
The holiday season is here, and I’m on the hunt for snacks that are both delicious and guilt-free. From vibrant fruit skewers to creamy avocado crostini and dark chocolate-dipped clementines, these treats are perfect for festive munching. Each bite offers a healthful choice without compromising on taste. Ready to impress your guests with quick and healthy Christmas snacks? Let’s explore these delightful recipes that make holiday celebrations even more special!
Festive Fruit Skewers
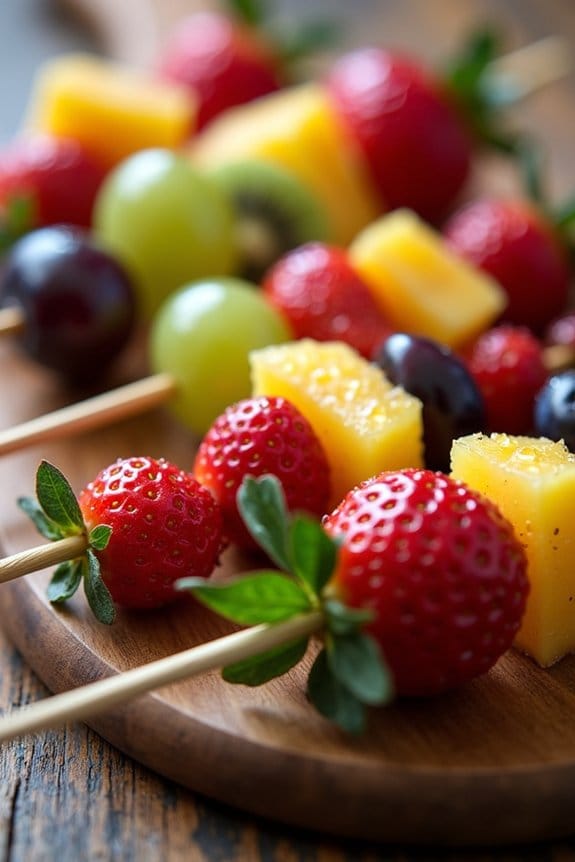
Festive Fruit Skewers make for a delightful and healthy addition to your Christmas snack lineup. These vibrant and colorful skewers aren’t only visually appealing but also packed with vitamins and nutrients. Perfect for a holiday party or a cozy family gathering, these skewers are easy to prepare and certain to impress guests of all ages.
The combination of fresh fruits offers a sweet and invigorating taste, making them a guilt-free indulgence during the festive season. This recipe is designed to serve 4-6 people, making it ideal for a small gathering.
The skewers can be customized with your favorite fruits, but the suggested fruits are chosen for their festive colors and complementary flavors. Whether you’re serving these as a snack, dessert, or part of a larger spread, Festive Fruit Skewers are a versatile and delicious option that everyone will enjoy.
Ingredients:
- 1 cup strawberries, hulled and halved
- 1 cup green grapes
- 1 cup red grapes
- 1 cup pineapple chunks
- 1 cup kiwi, peeled and sliced
- 1 cup blueberries
- 12 wooden skewers
Instructions:
1. Preparation of Fruits: Begin by washing all the fruits thoroughly under cold running water. Pat them dry with a clean kitchen towel or paper towels to remove excess moisture. This step is essential to guarantee that the fruit pieces stay fresh and don’t slip off the skewers.
2. Cutting the Fruits: Hull and halve the strawberries, slice the kiwi into thick rounds, and cut the pineapple into bite-sized chunks. Verify that all the fruit pieces are roughly the same size to guarantee even distribution and an appealing presentation on the skewers.
3. Assembling the Skewers: Take a wooden skewer and start threading the fruits onto it. Begin with a strawberry half, followed by a green grape, a chunk of pineapple, a slice of kiwi, a red grape, and finally a couple of blueberries.
Repeat this pattern until the skewer is filled, leaving some space at the top for easy handling.
4. Repeat and Serve: Continue assembling the skewers with the remaining fruits until all the ingredients are used. Arrange the skewers on a serving platter or in a festive container for an attractive presentation. Serve immediately for the freshest taste.
Extra Tips:
For an extra festive touch, consider adding a drizzle of melted dark chocolate or sprinkle some shredded coconut over the skewers before serving.
If preparing the skewers in advance, store them in the refrigerator and cover them with plastic wrap to prevent the fruits from drying out. You can also experiment with different fruits like mango or melon, depending on availability and personal preference.
Spiced Nuts and Seeds Mix

The holiday season is a time for indulgence, but that doesn’t mean you have to compromise on health. This Spiced Nuts and Seeds Mix is the perfect snack for those looking to enjoy a guilt-free treat during Christmas. Packed with a variety of nuts and seeds, this mix isn’t only delicious but also loaded with nutrients. The warm spices add a festive touch, making it an ideal snack for Christmas gatherings or a cozy night at home.
The Spiced Nuts and Seeds Mix is a versatile snack that can be enjoyed on its own or used as a topping for salads and yogurt. With a delightful combination of sweet and savory flavors, this recipe is sure to be a crowd-pleaser. Plus, it’s incredibly easy to make, requiring only a few basic ingredients and minimal preparation time. Whether you’re hosting a holiday party or simply craving a healthy snack, this recipe will become a favorite in your household.
Ingredients (Serves 4-6):
- 1 cup raw almonds
- 1 cup raw cashews
- 1 cup raw walnuts
- 1/2 cup raw pumpkin seeds
- 1/2 cup raw sunflower seeds
- 2 tablespoons olive oil
- 2 tablespoons maple syrup
- 1 teaspoon ground cinnamon
- 1/2 teaspoon ground nutmeg
- 1/2 teaspoon ground cayenne pepper (optional for heat)
- 1 teaspoon sea salt
- 1/2 teaspoon black pepper
Instructions:
- Preheat the Oven: Start by preheating your oven to 350°F (175°C). This will guarantee that the nuts and seeds roast evenly and achieve a perfect crunch.
- Prepare the Spiced Mixture: In a large mixing bowl, combine olive oil, maple syrup, ground cinnamon, nutmeg, cayenne pepper (if using), sea salt, and black pepper. Stir well to create a uniform mixture. This spiced mixture will coat the nuts and seeds, providing them with flavor and a slight caramelization.
- Add Nuts and Seeds: Add the almonds, cashews, walnuts, pumpkin seeds, and sunflower seeds to the bowl with the spiced mixture. Toss everything together until all the nuts and seeds are thoroughly coated with the spice blend.
- Spread and Roast: Line a baking sheet with parchment paper. Spread the coated nuts and seeds evenly on the prepared baking sheet. Make sure they’re in a single layer to roast properly. Place the baking sheet in the preheated oven.
- Roasting: Roast the nuts and seeds in the oven for about 15-20 minutes, stirring once halfway through to guarantee even roasting. Watch closely in the last few minutes to prevent burning.
- Cool and Serve: Once roasted, remove the baking sheet from the oven and allow the nuts and seeds to cool completely. They’ll become crispier as they cool. Once cooled, transfer them to a serving bowl or store in an airtight container for later enjoyment.
Extra Tips:
For a more personalized touch, feel free to experiment with different types of nuts and spices based on your preference. If you prefer a sweeter mix, add a touch more maple syrup or a sprinkle of brown sugar before roasting. For those who like it spicy, increase the cayenne pepper.
This recipe can also be doubled for larger gatherings. To guarantee the freshest taste, store the Spiced Nuts and Seeds Mix in an airtight container at room temperature for up to two weeks. Enjoy this healthy snack with family and friends throughout the holiday season!
Cucumber and Hummus Trees

Looking for a festive and healthy snack to serve at your Christmas party? These Cucumber and Hummus Trees are the perfect choice! Not only are they visually appealing with their vibrant green and red colors, but they’re also packed with nutrients. The cool, crisp cucumber pairs beautifully with the creamy hummus, creating a delightful flavor combination.
This dish isn’t only a great appetizer but also a fun activity to make with kids, allowing them to get involved in the holiday preparations. This recipe is designed to serve 4-6 people and can be easily scaled up or down depending on your needs. The ingredients are simple and easily accessible, making it an ideal last-minute addition to your holiday table.
Whether you’re hosting a party or just looking for a healthy snack to enjoy at home, these Cucumber and Hummus Trees will surely impress your guests with their taste and presentation.
Ingredients:
- 3 large cucumbers
- 1 cup of hummus (store-bought or homemade)
- 1/4 cup cherry tomatoes, halved
- 1/4 cup red bell pepper, diced
- Toothpicks
- Fresh parsley or cilantro for garnish (optional)
Instructions:
- Prepare the Cucumbers: Wash the cucumbers thoroughly and pat them dry. Cut the cucumbers into 1/4-inch thick slices. Each slice will serve as the base of the “tree.”
- Shape the Trees: Using a small knife, cut each cucumber slice into a tree shape by trimming the edges to form a triangular shape, resembling a Christmas tree.
- Prepare the Decorations: Halve the cherry tomatoes and dice the red bell pepper into small pieces. These will serve as the ornaments for your cucumber trees.
- Assemble the Trees: Spread a generous amount of hummus on each cucumber slice, using a spoon or small spatula. Place the hummus-covered cucumber slices flat on a serving platter.
- Decorate the Trees: Use toothpicks to carefully place cherry tomato halves and diced red bell pepper pieces on the hummus, arranging them in a way that resembles ornaments on a Christmas tree.
- Garnish and Serve: If desired, garnish the platter with fresh parsley or cilantro to add a splash of color. Serve immediately and enjoy!
Extra Tips:
For an added flavor boost, consider adding a sprinkle of your favorite spices to the hummus, such as paprika, cumin, or garlic powder. If you prefer a little heat, try using a spicy hummus or adding a pinch of crushed red pepper flakes.
Remember to keep the cucumber slices uniform in thickness to guarantee each “tree” can stand upright and hold the toppings securely. If making in advance, prepare all components and assemble just before serving to keep the cucumbers crisp and prevent the hummus from drying out.
Cranberry and Pistachio Energy Bites

Cranberry and Pistachio Energy Bites are the perfect festive treat to enjoy during the holiday season. They aren’t only delicious but also packed with nutrients, making them a guilt-free snack option.
These energy bites combine the tartness of cranberries with the rich, nutty flavor of pistachios, creating a delightful balance that will satisfy your sweet tooth while keeping you energized throughout the day.
This recipe is incredibly easy to prepare and requires no baking, making it a convenient option for busy holiday schedules. The combination of textures from the chewy cranberries, crunchy pistachios, and creamy almond butter creates a satisfying snack that’s sure to be a hit with family and friends.
With just a few simple ingredients, you can whip up a batch of these Cranberry and Pistachio Energy Bites to enjoy a healthy snack or to share as a thoughtful homemade gift.
Ingredients (serving size: 4-6 people):
- 1 cup rolled oats
- 1/2 cup dried cranberries
- 1/2 cup shelled pistachios
- 1/4 cup almond butter
- 1/4 cup honey
- 1/2 teaspoon vanilla extract
- 1/4 teaspoon salt
Instructions:
- Prepare the Ingredients: Begin by gathering all your ingredients. Verify that the dried cranberries are chopped into smaller pieces if they’re too large, and that the pistachios are shelled.
- Mix the Base: In a large mixing bowl, combine the rolled oats, chopped cranberries, and pistachios. Stir them together until they’re well mixed.
- Combine Wet Ingredients: In a separate small bowl, mix together the almond butter, honey, vanilla extract, and salt. Stir until smooth and well combined.
- Combine Wet and Dry Ingredients: Pour the almond butter mixture over the dry ingredients in the large bowl. Use a spatula to mix everything together until the dry ingredients are evenly coated and the mixture is sticky and holds together.
- Form the Bites: Take small portions of the mixture and roll them into balls, about 1-inch in diameter. If the mixture is too sticky, lightly wet your hands to make it easier to roll.
- Chill: Place the rolled energy bites onto a baking sheet or plate and refrigerate them for at least 30 minutes to allow them to firm up.
- Serve: Once chilled, the Cranberry and Pistachio Energy Bites are ready to be served. Enjoy them as a snack or pack them for on-the-go energy.
Extra Tips:
For variation, you can substitute almond butter with any other nut butter of your choice, such as peanut or cashew butter.
If you prefer a sweeter bite, consider adding a handful of dark chocolate chips to the mixture before rolling.
These energy bites can be stored in an airtight container in the refrigerator for up to one week, making them a convenient, make-ahead snack option.
If you find the mixture too crumbly, add a bit more honey or some extra nut butter to help it bind better.
Avocado and Pomegranate Crostini

Avocado and Pomegranate Crostini is a delightful and invigorating snack perfect for your holiday gatherings. This dish combines creamy avocado and juicy pomegranate seeds on a crispy crostini base, offering a burst of flavor and texture in every bite. The vibrant colors and fresh ingredients make it an attractive addition to your Christmas table, while the wholesome components guarantee a healthy treat that’s as nutritious as it’s delicious.
Ideal for serving 4-6 people, this recipe is easy to prepare and can be made in advance, allowing you to spend more time with your guests. The rich creaminess of the avocado pairs beautifully with the tart sweetness of the pomegranate seeds, all atop a crunchy crostini. Whether you’re hosting a holiday party or looking for a simple appetizer, these crostini will surely impress your family and friends.
Ingredients:
- 1 French baguette
- 2 ripe avocados
- 1 cup pomegranate seeds
- 1 tablespoon lemon juice
- Salt to taste
- Pepper to taste
- 2 tablespoons olive oil
- 1 clove garlic, halved
- Fresh cilantro leaves for garnish (optional)
Cooking Instructions:
- Prepare the Crostini Base: Preheat your oven to 375°F (190°C). Slice the French baguette into 1/2-inch thick slices and arrange them on a baking sheet. Brush each slice with olive oil and bake for 8-10 minutes or until golden brown and crisp. Remove from oven and rub each slice with the cut side of the garlic clove while still warm to infuse flavor.
- Prepare the Avocado Mixture: In a bowl, scoop out the flesh of the avocados and mash them with a fork until smooth. Stir in the lemon juice, salt, and pepper to taste. The lemon juice won’t only add flavor but also prevent the avocado from browning.
- Assemble the Crostini: Spread a generous spoonful of the avocado mixture onto each crostini. Top with a scattering of pomegranate seeds, pressing them lightly into the avocado to make sure they adhere.
- Garnish and Serve: For a touch of color and freshness, garnish each crostini with a few cilantro leaves if desired. Serve immediately so that the crostini remain crisp.
Extra Tips:
When making Avocado and Pomegranate Crostini, it’s crucial to choose ripe avocados for the best texture and flavor. If you need to prepare the crostini base ahead of time, keep them in an airtight container to maintain their crispness.
The avocado mixture can be made a short while before serving, but it’s best to assemble the crostini just before serving to guarantee they stay fresh and crunchy. If pomegranate seeds are unavailable, you can substitute them with dried cranberries for a similar burst of color and sweetness.
Greek Yogurt and Berry Parfaits
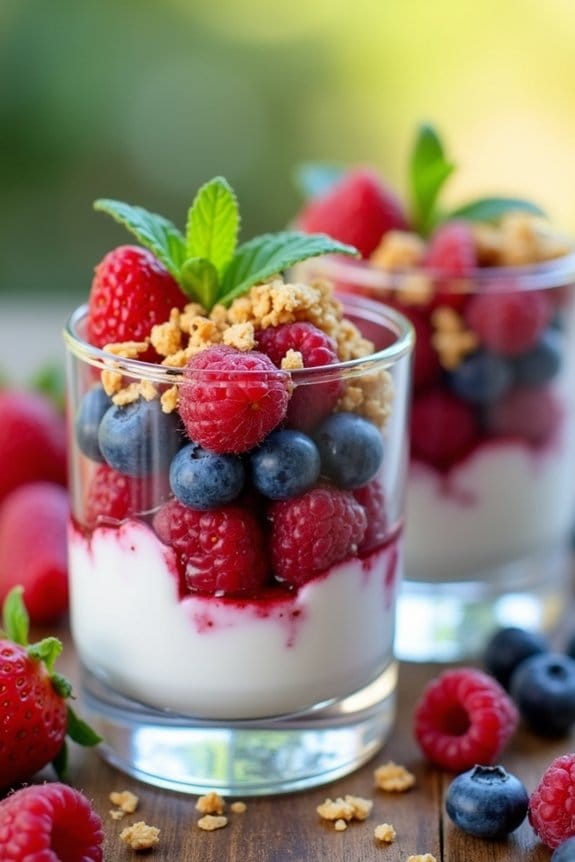
Indulge in a festive treat this holiday season with Greek Yogurt and Berry Parfaits. This delightful dessert combines the creaminess of Greek yogurt with the natural sweetness of fresh berries, making it a healthier alternative that doesn’t sacrifice flavor.
Perfect for a light snack or a guilt-free dessert, these parfaits aren’t only delicious but also packed with nutrients. They’re easy to assemble, require no cooking, and can be made in advance, saving you time during the busy holiday season.
Ideal for serving 4-6 people, Greek Yogurt and Berry Parfaits are layered to perfection, showcasing vibrant colors and textures. The combination of tangy yogurt, juicy berries, and a touch of honey provides a balanced taste that will surely be a hit with your guests.
Whether you’re hosting a Christmas party or looking for a nutritious snack for your family, these parfaits offer a revitalizing treat that can be enjoyed by all ages.
Ingredients (Serves 4-6):
- 4 cups Greek yogurt
- 2 cups mixed fresh berries (such as strawberries, blueberries, raspberries)
- 1/4 cup honey or maple syrup
- 1 cup granola
- 1 teaspoon vanilla extract
- Mint leaves for garnish (optional)
Cooking Instructions:
- Prepare the Berries: Wash the mixed berries thoroughly under cold water. Pat them dry with a paper towel. If using strawberries, hull and slice them into halves or quarters, depending on their size.
- Mix the Yogurt: In a large mixing bowl, combine the Greek yogurt with the vanilla extract and honey or maple syrup. Stir well until the mixture is smooth and well-blended.
- Assemble the Parfaits: In each serving glass or bowl, start by adding a layer of the yogurt mixture. Use about 1/2 cup of yogurt per layer.
- Add Berries and Granola: On top of the yogurt, add a layer of mixed berries, followed by a sprinkle of granola. Repeat the layers until the glasses are filled, finishing with a layer of berries and a little granola on top.
- Garnish and Serve: If desired, garnish each parfait with a sprig of fresh mint for added color and flavor. Serve immediately or refrigerate until ready to serve.
Extra Tips: For a more indulgent twist, consider adding a layer of chocolate chips or drizzle a small amount of melted dark chocolate between the layers.
If you’re preparing these parfaits in advance, keep the granola separate until just before serving to maintain its crunchiness. Additionally, feel free to customize the parfaits with other seasonal fruits such as pomegranate seeds or kiwi slices to enhance the festive appearance and flavor.
Roasted Chickpeas With Rosemary

Roasted Chickpeas With Rosemary is a delightful and nutritious snack perfect for the holiday season. This recipe elevates the humble chickpea into a crunchy, flavorful treat that’s both satisfying and healthy. With the aromatic essence of rosemary, this snack combines a savory taste with the natural nuttiness of chickpeas, making it an excellent choice for those looking to indulge without guilt during the festive period.
Ideal for gatherings or as a standalone snack, Roasted Chickpeas With Rosemary can be prepared in advance and stored, making it a convenient option for busy holiday schedules. The recipe is simple to follow, guaranteeing that even novice cooks can achieve a delicious and impressive result. Enjoy this delightful snack with friends and family or keep a stash ready for when you need a quick, energy-boosting bite.
Ingredients (Serving Size: 4-6 people)
- 2 cans (15 oz each) chickpeas, drained and rinsed
- 2 tablespoons olive oil
- 1 teaspoon sea salt
- 1 teaspoon freshly ground black pepper
- 2 tablespoons fresh rosemary, finely chopped
- 1 teaspoon garlic powder
- 1 teaspoon smoked paprika
Instructions
- Preheat the Oven: Start by preheating your oven to 400°F (200°C). This guarantees the chickpeas will roast evenly and become perfectly crispy.
- Prepare the Chickpeas: Drain and rinse the chickpeas thoroughly. Spread them out on a clean kitchen towel or paper towels and pat them dry. Removing excess moisture is vital for achieving a crispy texture.
- Season the Chickpeas: In a large mixing bowl, combine the dried chickpeas with olive oil, sea salt, black pepper, rosemary, garlic powder, and smoked paprika. Toss everything together until the chickpeas are well coated with the seasoning mix.
- Roast the Chickpeas: Spread the seasoned chickpeas in a single layer on a baking sheet lined with parchment paper. Place the baking sheet in the preheated oven and roast for 30-40 minutes, stirring halfway through to guarantee even cooking. The chickpeas are done when they’re golden brown and crispy.
- Cool and Serve: Once roasted, remove the chickpeas from the oven and let them cool slightly on the baking sheet. Serve warm or allow them to cool completely before storing in an airtight container for later enjoyment.
Extra Tips
For the best texture, make sure the chickpeas are completely dry before seasoning and roasting. If you have time, you can even let them air dry for an hour after rinsing.
Experiment with different spices such as cumin or cayenne pepper for an extra kick, or add a dash of lemon zest for an invigorating twist. Remember, the key to perfectly roasted chickpeas is patience—make sure they cook long enough to achieve that desired crunch!
Sweet Potato and Cinnamon Chips

Sweet Potato and Cinnamon Chips are a delightful and healthy snack option to enjoy during the festive Christmas season. These chips aren’t only easy to make but also pack a nutritious punch, providing a sweet and savory flavor that’s certain to satisfy your cravings.
Made with the natural sweetness of sweet potatoes and the warm, comforting aroma of cinnamon, these chips are a perfect addition to your holiday snack table or as a cozy treat during a quiet winter evening at home.
This recipe is designed to serve 4-6 people, making it ideal for family gatherings or small holiday parties. The combination of crispy, oven-baked sweet potatoes and the fragrant spice of cinnamon creates a snack that’s both delicious and guilt-free.
Whether you’re looking to impress your guests with a homemade snack or simply want to enjoy a healthy treat yourself, these Sweet Potato and Cinnamon Chips are certain to be a hit.
Ingredients:
- 2 large sweet potatoes
- 2 tablespoons olive oil
- 1 tablespoon ground cinnamon
- 1 teaspoon salt
- 1 tablespoon sugar (optional for a sweeter taste)
Instructions:
- Preheat the Oven: Begin by preheating your oven to 375°F (190°C). This guarantees that the oven is at the right temperature when you’re ready to bake the chips, allowing them to cook evenly and become crispy.
- Prepare the Sweet Potatoes: Wash and peel the sweet potatoes, then slice them into thin rounds, about 1/8 inch thick. Thinner slices will result in crispier chips, so try to be consistent with the thickness for even cooking.
- Season the Slices: In a large bowl, combine the sliced sweet potatoes with olive oil, ground cinnamon, salt, and sugar if using. Toss the slices well to confirm they’re evenly coated with the seasoning mixture.
- Arrange on Baking Sheet: Line a baking sheet with parchment paper to prevent sticking. Lay the seasoned sweet potato slices in a single layer on the sheet. Avoid overlapping the slices as this can lead to uneven cooking.
- Bake the Chips: Place the baking sheet in the preheated oven and bake for 20-25 minutes. Flip the slices halfway through the cooking time to guarantee even baking. Keep an eye on them during the last few minutes to prevent burning.
- Cool and Serve: Once the chips are golden and crispy, remove them from the oven and let them cool on the baking sheet for a few minutes. This will help them crisp up further. Transfer them to a serving platter and enjoy!
Extra Tips:
For best results, use a mandoline slicer to achieve uniformly thin slices, which will confirm even cooking. If you prefer a sweeter chip, feel free to increase the amount of sugar, or experiment with other sweet spices like nutmeg or allspice for added flavor.
Remember to store any leftovers in an airtight container to maintain their crispiness. These chips can also be made in advance and reheated for a quick snack option during holiday gatherings.
Zucchini and Red Pepper Roll-Ups
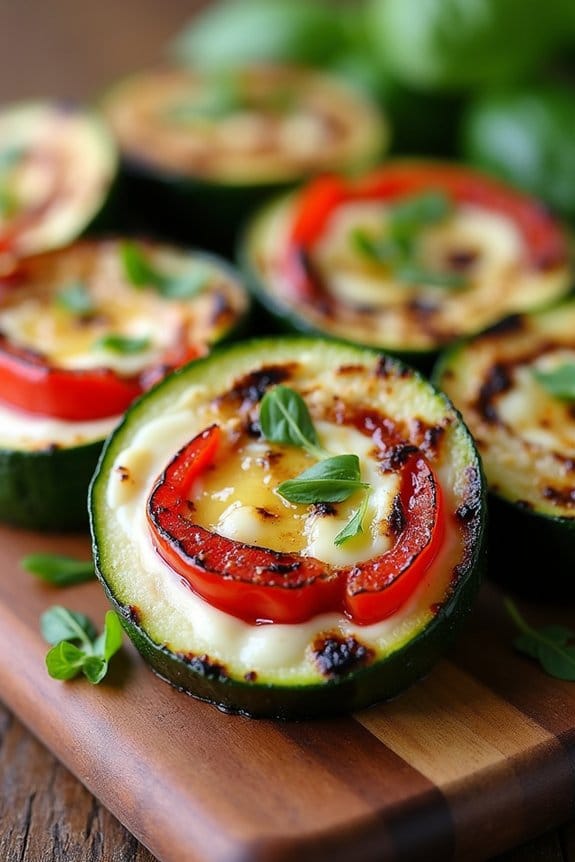
Zucchini and Red Pepper Roll-Ups are a festive and healthy snack perfect for your Christmas gathering. These vibrant roll-ups aren’t only visually appealing but also packed with nutrients and flavor. The earthy taste of zucchini combined with the sweet tang of roasted red peppers and creamy goat cheese makes this dish a crowd-pleaser.
Plus, it’s an excellent option for those looking to enjoy delicious holiday treats without straying from their healthy eating goals. These roll-ups are easy to prepare and can be made ahead of time, making them a convenient choice for busy holiday schedules.
The combination of fresh vegetables and creamy cheese provides a delightful contrast in flavors and textures. Whether you’re hosting a gathering or contributing to a potluck, Zucchini and Red Pepper Roll-Ups are sure to impress your guests with their taste and presentation.
Ingredients (Serves 4-6):
- 2 medium zucchinis
- 2 large red bell peppers
- 1 tablespoon olive oil
- Salt and pepper to taste
- 6 ounces goat cheese
- 2 tablespoons fresh basil, chopped
- Toothpicks (for securing the roll-ups)
Cooking Instructions:
1. Prepare the Vegetables: Start by washing the zucchinis and red bell peppers thoroughly. Cut the zucchinis lengthwise into thin slices, about 1/8 inch thick, using a mandoline or a sharp knife. For the red peppers, cut them into quarters and remove the seeds and membranes.
2. Roast the Red Peppers: Preheat your oven to 400°F (200°C). Place the red pepper quarters on a baking sheet lined with parchment paper, skin side up. Drizzle with olive oil and sprinkle a pinch of salt and pepper. Roast in the oven for about 15-20 minutes, or until the skins are blistered and slightly charred.
Once done, remove from the oven and let cool. Peel off the skins and slice the roasted peppers into strips.
3. Grill the Zucchini: While the peppers are roasting, heat a grill pan over medium-high heat. Lightly brush the zucchini slices with olive oil and grill for 2-3 minutes on each side, or until tender and grill marks appear. Season with salt and pepper to taste.
4. Assemble the Roll-Ups: Lay a grilled zucchini slice flat on a clean surface. Spread a thin layer of goat cheese over the zucchini. Place a strip of roasted red pepper on top, then sprinkle with chopped basil. Roll up the zucchini slice tightly and secure it with a toothpick.
Repeat this step with the remaining ingredients.
5. Serve: Arrange the roll-ups on a serving platter. They can be served warm or at room temperature.
Extra Tips:
For an even creamier texture, you can mix the goat cheese with a tablespoon of Greek yogurt before spreading it on the zucchini. If you’re preparing these roll-ups ahead of time, store them in an airtight container in the refrigerator until you’re ready to serve.
Just be sure to let them come to room temperature before serving for the best flavor. If you want to add a bit more variety, consider including a strip of roasted eggplant or a sliver of sun-dried tomato in the roll-ups.
Dark Chocolate-Dipped Clementines

Dark Chocolate-Dipped Clementines are a delightful and healthy Christmas snack that combines the natural sweetness of clementines with the rich, indulgent taste of dark chocolate. This simple yet elegant treat is perfect for holiday gatherings or for a cozy night at home. With just a few ingredients, you can whip up this delicious snack that will definitely impress your family and friends while keeping the holiday calories in check.
Clementines, known for their bright, citrusy flavor, are the perfect partner for dark chocolate, which provides a bittersweet contrast and a touch of sophistication. The preparation is straightforward, making it an excellent choice for busy holiday schedules. Plus, these little bites of goodness are full of vitamin C and antioxidants, making them a guilt-free indulgence. Whether you’re serving them as a dessert or a festive snack, these Dark Chocolate-Dipped Clementines are sure to be a hit.
Ingredients (Serving size: 4-6 people):
- 6 clementines
- 8 ounces of dark chocolate (70% cocoa or higher)
- Sea salt (optional)
- Crushed pistachios or almonds (optional)
Cooking Instructions:
- Prepare the Clementines: Begin by peeling the clementines. Try to remove as much of the white pith as possible, as it can be bitter. Separate the clementines into individual segments and set them aside on a clean, dry surface.
- Melt the Chocolate: Break the dark chocolate into small pieces and place them in a heatproof bowl. Set the bowl over a pot of simmering water, confirming that the bottom of the bowl doesn’t touch the water. Stir the chocolate occasionally until it’s completely melted and smooth. Alternatively, you can melt the chocolate in the microwave in 30-second increments, stirring in between to avoid burning.
- Dip the Clementines: Line a baking sheet with parchment paper. Dip each clementine segment halfway into the melted chocolate, allowing any excess chocolate to drip off. Place the dipped segments on the prepared baking sheet. If desired, sprinkle a pinch of sea salt or crushed nuts onto the chocolate before it sets.
- Set the Chocolate: Once all the clementines are dipped, place the baking sheet in the refrigerator for about 15-20 minutes or until the chocolate is fully set and firm.
- Serve and Enjoy: Once the chocolate has hardened, transfer the Dark Chocolate-Dipped Clementines to a serving platter. They can be enjoyed immediately or stored in an airtight container in the refrigerator for up to two days.
Extra Tips: For an added festive touch, consider drizzling white chocolate over the dark chocolate for a contrast in color and flavor. Make sure the clementines are thoroughly dried before dipping to guarantee the chocolate adheres properly. If you prefer a sweeter treat, opt for milk chocolate instead of dark chocolate, but keep in mind that this will increase the sugar content. When serving, allow the clementines to sit at room temperature for a few minutes to enhance the flavor and texture of the chocolate.
Spinach and Feta Stuffed Mushrooms

Spinach and Feta Stuffed Mushrooms are a delightful and healthy appetizer perfect for your Christmas festivities. These bite-sized treats aren’t only easy to prepare but also packed with flavor, making them a hit at any holiday gathering. The earthy taste of mushrooms combined with the creamy tanginess of feta cheese and the nutritious boost of spinach creates a mouthwatering combination that will leave your guests craving more.
Whether you’re hosting a party or simply looking for a festive snack, these stuffed mushrooms are bound to impress.
The recipe is designed to serve 4-6 people, making it an ideal choice for a small gathering or as part of a larger spread. With minimal ingredients and a straightforward cooking process, you’ll have these delicious appetizers ready in no time. This dish is also a great way to incorporate more vegetables into your holiday menu without sacrificing taste or appeal. Plus, the festive green of the spinach adds a seasonal touch to your table.
Ingredients (Serves 4-6):
- 20 large white mushrooms
- 2 tablespoons olive oil
- 1 small onion, finely chopped
- 2 cloves garlic, minced
- 4 cups fresh spinach, chopped
- 1/2 cup feta cheese, crumbled
- 1/4 cup breadcrumbs
- 1/4 teaspoon black pepper
- 1/4 teaspoon salt
- 1 teaspoon lemon juice
- 1 tablespoon fresh dill, chopped (optional)
Cooking Instructions:
- Prepare the Mushrooms: Preheat your oven to 375°F (190°C). Gently clean the mushrooms with a damp paper towel to remove any dirt. Carefully remove the stems and set the caps aside. Finely chop the stems as they’ll be used in the stuffing.
- Cook the Filling: In a skillet over medium heat, add the olive oil. Once hot, sauté the chopped onion and garlic until translucent, about 3-4 minutes. Add the chopped mushroom stems and cook for another 2 minutes.
- Add Spinach and Seasonings: Stir in the chopped spinach, cooking until wilted, around 2-3 minutes. Season the mixture with salt, black pepper, and lemon juice. Remove the skillet from the heat and allow the mixture to cool slightly.
- Combine with Cheese and Breadcrumbs: In a mixing bowl, combine the cooled spinach mixture with the crumbled feta cheese, breadcrumbs, and fresh dill if using. Mix well to ascertain all ingredients are evenly distributed.
- Stuff the Mushrooms: Place the mushroom caps on a baking sheet lined with parchment paper. Using a spoon, fill each mushroom cap generously with the spinach and feta mixture, pressing gently to compact the filling.
- Bake: Bake the stuffed mushrooms in the preheated oven for 20-25 minutes or until the mushrooms are tender and the tops are golden brown.
- Serve: Remove from the oven and let them cool slightly before serving. These stuffed mushrooms can be enjoyed warm or at room temperature.
Extra Tips: For an added layer of flavor, you can toast the breadcrumbs before mixing them into the filling. This will add a subtle nuttiness and a bit more crunch to the stuffed mushrooms.
If you prefer a spicier kick, consider adding a pinch of red pepper flakes to the sautéing vegetables. Finally, verify that the spinach mixture isn’t too wet before stuffing the mushrooms to prevent them from becoming soggy. Enjoy these delightful bites as part of your holiday celebrations!
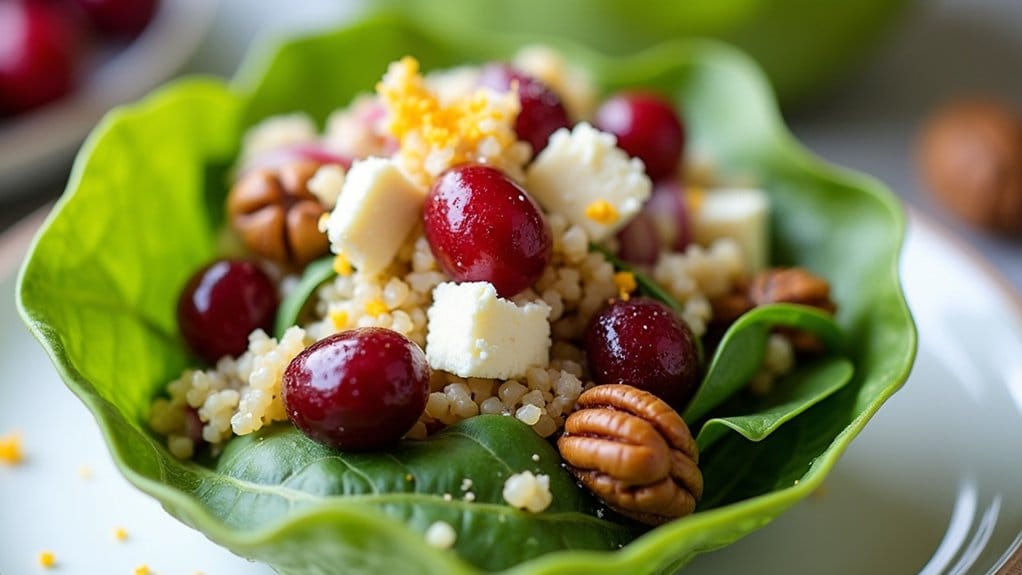
Quinoa and Cranberry Salad Cups
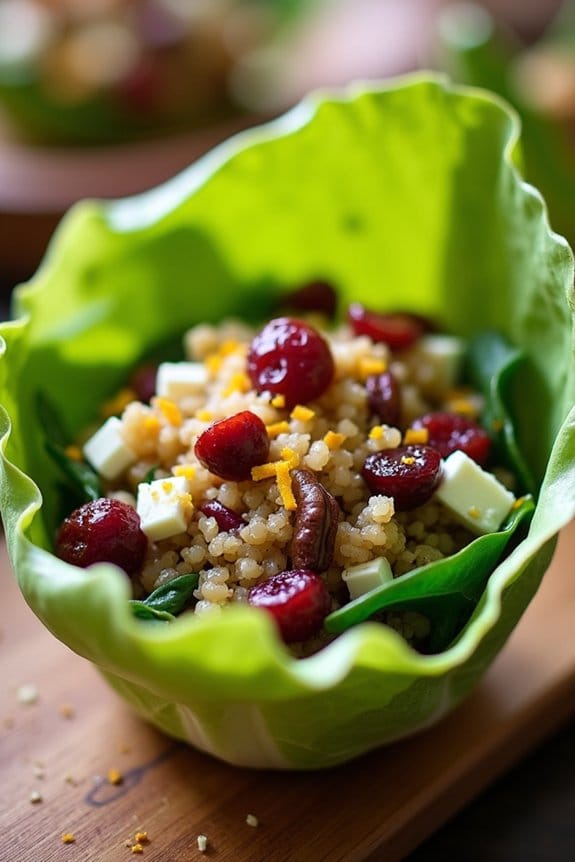
Quinoa and Cranberry Salad Cups are a delightful and nutritious addition to any holiday spread, offering a festive twist with their vibrant colors and flavors. This healthy Christmas snack is packed with protein from quinoa and the tart sweetness of cranberries, making it a perfect light appetizer or side dish.
The salad is served in individual cups, providing a convenient and elegant presentation that’s sure to impress your guests. This recipe isn’t only delicious but also simple to prepare, requiring minimal cooking and assembly time.
The combination of fresh ingredients, such as spinach and orange zest, adds a rejuvenating burst of flavor and color, making it a crowd-pleaser at any festive gathering. With a perfect balance of sweet, savory, and tangy elements, these Quinoa and Cranberry Salad Cups are a wholesome and tasty way to celebrate the season.
Ingredients for 4-6 servings:
- 1 cup quinoa
- 2 cups water
- 1/2 teaspoon salt
- 1 cup fresh spinach, chopped
- 1/2 cup dried cranberries
- 1/4 cup chopped pecans
- 1/4 cup crumbled feta cheese
- 1/4 cup red onion, finely chopped
- 1 tablespoon orange zest
- 2 tablespoons fresh orange juice
- 2 tablespoons olive oil
- 1 tablespoon balsamic vinegar
- Salt and pepper to taste
- 6-8 large lettuce leaves or small cups for serving
Instructions:
1. Cook the Quinoa: Rinse the quinoa thoroughly under cold water. In a medium saucepan, combine the quinoa, water, and 1/2 teaspoon of salt. Bring to a boil over medium-high heat. Once boiling, reduce the heat to low, cover, and simmer for 15 minutes or until the quinoa is cooked and the water is absorbed.
Remove from heat and let it sit covered for 5 minutes, then fluff with a fork.
2. Prepare the Dressing: In a small bowl, whisk together the olive oil, balsamic vinegar, fresh orange juice, orange zest, salt, and pepper. Adjust seasoning to taste.
3. Assemble the Salad: In a large mixing bowl, combine the cooked quinoa, chopped spinach, dried cranberries, chopped pecans, crumbled feta cheese, and red onion. Pour the dressing over the salad and toss gently to combine all ingredients thoroughly.
4. Serve the Salad: Place a large lettuce leaf or a small cup on each serving dish. Spoon the quinoa salad into each lettuce leaf or cup, ensuring an even distribution of ingredients. Garnish with additional cranberries or orange zest if desired.
Extra Tips: When cooking quinoa, make sure to rinse it well to remove its natural coating, called saponin, which can make it taste bitter. For added crunch, lightly toast the pecans before chopping and adding them to the salad.
If you prefer a vegan version, simply omit the feta cheese or substitute it with a plant-based alternative. This salad can be made ahead of time and stored in the refrigerator for up to two days, making it a convenient option for busy holiday schedules.
