
As the holiday season approaches, I’m on the lookout for healthy yet indulgent recipes that won’t leave me feeling guilty. Think bright quinoa salads with the sparkle of pomegranate seeds or the crispy goodness of herb-crusted salmon. I’ve found ten delightful dishes that balance flavor and nutrition perfectly. These recipes will transform your Christmas feast into a memorable culinary adventure. Curious to discover more? Let’s explore this festive journey together!
Festive Quinoa and Pomegranate Salad
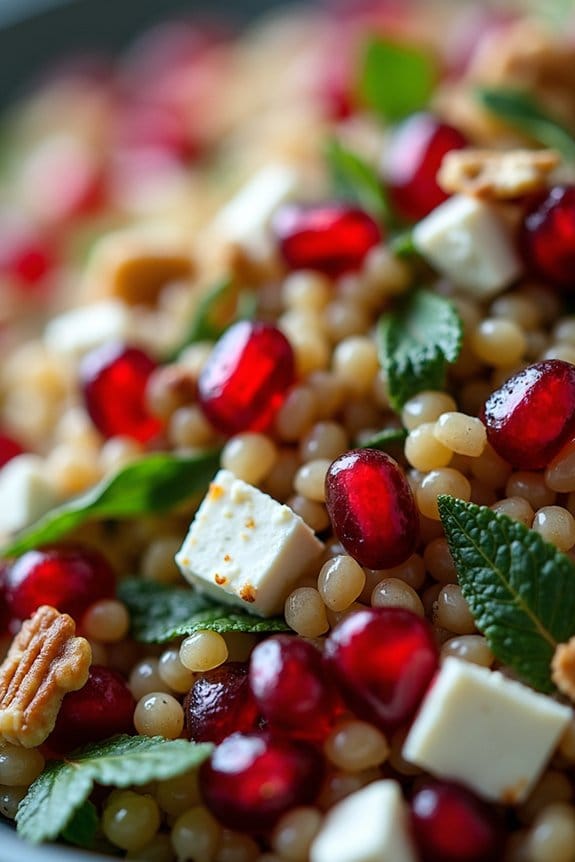
Festive Quinoa and Pomegranate Salad is a delightful and vibrant dish that not only adds a splash of color to your table but also offers a nutritious alternative during the holiday season. This salad combines the nutty flavor of quinoa with the sweet and tangy burst of pomegranate seeds, creating an invigorating balance of taste and texture. It’s perfect for those looking to enjoy a healthy and satisfying meal without compromising on festive cheer.
This salad is loaded with nutrients and is brimming with fresh ingredients that will leave you feeling energized and satisfied. Quinoa, a complete protein, is the star of this dish, making it a great option for vegetarians and those looking to include more plant-based meals in their diet. The addition of pomegranate seeds not only enhances the visual appeal but also adds a juicy sweetness that complements the other ingredients perfectly.
This salad is an excellent choice for a holiday meal, as it can be served as a main course or a side dish, and is sure to impress your family and friends.
Ingredients (Serves 4-6):
- 1 cup quinoa
- 2 cups water or vegetable broth
- 1 cup pomegranate seeds
- 1/2 cup chopped fresh parsley
- 1/2 cup chopped fresh mint
- 1/4 cup chopped green onions
- 1/2 cup crumbled feta cheese
- 1/4 cup chopped walnuts or pecans
- 3 tablespoons olive oil
- 2 tablespoons lemon juice
- 1 tablespoon honey
- Salt and pepper to taste
Instructions:
- Cook the Quinoa: Rinse the quinoa under cold water to remove any bitterness. In a medium saucepan, combine the quinoa and water or vegetable broth. Bring to a boil over medium-high heat, then reduce the heat to low, cover, and simmer for about 15 minutes or until the quinoa is tender and the liquid is absorbed. Remove from heat and let it sit, covered, for 5 minutes. Fluff with a fork and allow it to cool.
- Prepare the Dressing: In a small bowl, whisk together the olive oil, lemon juice, honey, salt, and pepper until well combined. Adjust the seasoning according to your taste preference.
- Assemble the Salad: In a large mixing bowl, combine the cooked and cooled quinoa, pomegranate seeds, parsley, mint, green onions, feta cheese, and chopped walnuts or pecans.
- Dress the Salad: Pour the prepared dressing over the salad ingredients. Gently toss everything together until the ingredients are evenly coated with the dressing.
- Chill and Serve: For the best flavor, let the salad chill in the refrigerator for at least 30 minutes before serving. This allows the flavors to meld together beautifully. Serve as an invigorating side dish or a light main course.
Extra Tips:
To enhance the flavor, you can toast the nuts in a dry skillet over medium heat for a few minutes before adding them to the salad. This will add a nice crunch and a deeper nutty flavor. If you prefer a vegan version, you can omit the feta cheese or substitute it with a plant-based cheese alternative.
Additionally, feel free to experiment with other seasonal fruits, such as diced apples or pears, for added sweetness and texture. This salad is versatile, so you can customize it to suit your palate and dietary preferences.
Roasted Brussels Sprouts With Balsamic Glaze
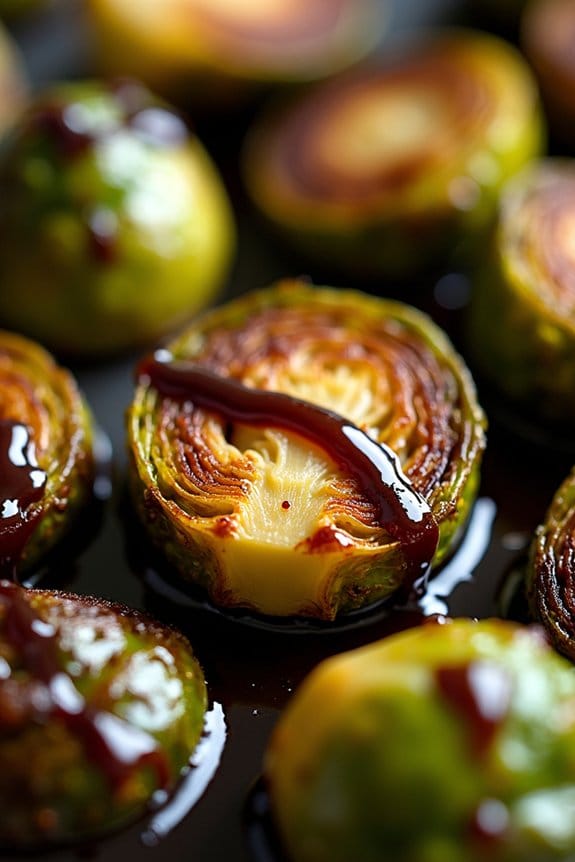
Roasted Brussels Sprouts With Balsamic Glaze is a delightful and healthy dish that can elevate your Christmas dinner to new heights. These vibrant green vegetables, when roasted to perfection, develop a wonderful caramelization that enhances their natural sweetness. The addition of a balsamic glaze adds a tangy and slightly sweet dimension, making this dish a festive favorite. Not only is this recipe delicious, but it’s also packed with nutrients, making it an excellent choice for those looking to maintain a healthy diet during the holiday season.
Preparing Roasted Brussels Sprouts With Balsamic Glaze is a simple process that requires minimal ingredients and effort. This recipe serves 4-6 people and can be easily scaled up or down depending on your holiday gathering size. The key is to verify the Brussels sprouts are evenly coated and spaced on the baking sheet to achieve that perfect roast. With just a few steps, you’ll have a dish that isn’t only visually appealing but also bursting with flavor, ready to impress your family and friends.
Ingredients for 4-6 servings:
- 1 1/2 pounds Brussels sprouts, trimmed and halved
- 3 tablespoons olive oil
- Salt and freshly ground black pepper, to taste
- 1/4 cup balsamic vinegar
- 2 tablespoons honey
Cooking Instructions:
- Preheat the Oven: Begin by preheating your oven to 400°F (200°C). This temperature is excellent for roasting the Brussels sprouts to achieve a crispy exterior while keeping the inside tender.
- Prepare the Brussels Sprouts: Wash the Brussels sprouts thoroughly, trim the ends, and cut them in half. This will verify they cook evenly. Pat them dry with a kitchen towel to remove any excess moisture, which can prevent them from roasting properly.
- Season the Brussels Sprouts: In a large mixing bowl, toss the halved Brussels sprouts with olive oil, verifying each piece is well-coated. Season generously with salt and freshly ground black pepper to enhance their flavor.
- Roast the Brussels Sprouts: Arrange the Brussels sprouts in a single layer on a baking sheet lined with parchment paper or a silicone baking mat. Place them in the preheated oven and roast for 20-25 minutes, or until they’re golden brown and crispy on the edges. Stir halfway through the roasting time for even cooking.
- Make the Balsamic Glaze: While the Brussels sprouts are roasting, prepare the balsamic glaze. In a small saucepan, combine the balsamic vinegar and honey. Bring the mixture to a boil over medium heat, then reduce the heat to low and simmer for about 5-7 minutes, or until the glaze has thickened slightly.
- Combine and Serve: Once the Brussels sprouts are roasted to perfection, remove them from the oven. Drizzle the balsamic glaze over the sprouts and toss gently to verify they’re well-coated. Transfer to a serving dish and serve immediately while warm.
Extra Tips:
To achieve maximum crispiness, make sure the Brussels sprouts are spread out in a single layer on the baking sheet. Overcrowding the pan can result in steaming rather than roasting.
Additionally, if you prefer a slightly sweeter glaze, adjust the honey to taste. For an extra burst of flavor, consider adding a sprinkle of freshly grated Parmesan cheese or toasted nuts like almonds or pecans just before serving. These additions can add a delightful texture and richness to the dish.
Herb-Crusted Salmon Fillet
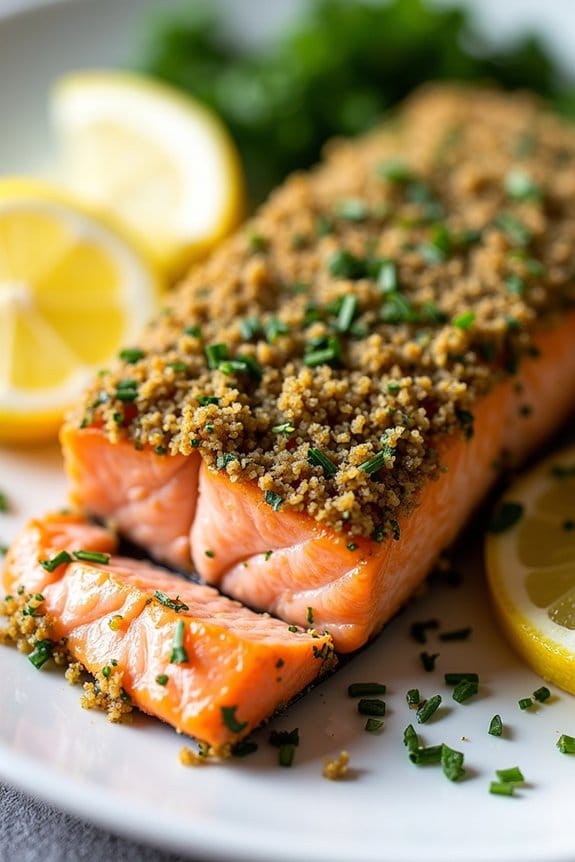
Herb-Crusted Salmon Fillet is a delicious and healthy option for your Christmas feast. This dish combines the rich flavors of fresh herbs with the natural taste of salmon, creating a mouth-watering main course that’s both nutritious and satisfying.
The crispy herb crust provides a wonderful texture contrast to the tender, flaky salmon inside, making it a perfect centerpiece for your holiday table. Not only is this dish full of flavor, but it also boasts a range of nutrients, including omega-3 fatty acids, vitamins, and minerals, contributing to a well-balanced Christmas meal.
The preparation of Herb-Crusted Salmon Fillet is straightforward, making it an excellent choice for home cooks who want to impress their guests without spending hours in the kitchen. The key to this dish is using fresh, high-quality ingredients and allowing the natural flavors to shine through.
Serve it alongside your favorite seasonal sides like roasted vegetables or a fresh salad for a complete and festive meal. This recipe serves 4-6 people, ideal for a family gathering or a small dinner party.
Ingredients:
- 4-6 salmon fillets (about 6 oz each)
- 2 tablespoons olive oil
- 1 cup fresh breadcrumbs
- 1/4 cup chopped fresh parsley
- 1/4 cup chopped fresh dill
- 1/4 cup chopped fresh chives
- 2 tablespoons Dijon mustard
- Salt and pepper to taste
- Lemon wedges for serving
Instructions:
- Preheat the Oven: Start by preheating your oven to 400°F (200°C). This guarantees that the oven is hot enough to cook the salmon evenly and helps the herb crust to crisp up nicely.
- Prepare the Salmon: Pat the salmon fillets dry with paper towels and season both sides with salt and pepper. Place the fillets skin-side down on a baking sheet lined with parchment paper or lightly greased with olive oil.
- Make the Herb Crust: In a medium bowl, combine the fresh breadcrumbs, parsley, dill, chives, and a pinch of salt and pepper. Drizzle in the olive oil and mix until the breadcrumbs are evenly coated.
- Coat the Salmon: Brush the top of each salmon fillet with a thin layer of Dijon mustard. This will help the herb mixture stick to the fish and add a nice tangy flavor. Press the breadcrumb mixture firmly onto the mustard-coated side of each fillet, guaranteeing an even layer.
- Bake the Salmon: Place the baking sheet in the preheated oven and bake for 12-15 minutes, or until the salmon is cooked through and the herb crust is golden brown. The salmon should flake easily with a fork when done.
- Serve: Remove the salmon from the oven and let it rest for a couple of minutes before serving. Arrange the fillets on a serving platter and garnish with lemon wedges. Serve immediately.
Extra Tips:
For the best results, opt for wild-caught salmon, which is often more flavorful and sustainable than farmed varieties. Additionally, you can prepare the herb crust mixture in advance and store it in the refrigerator for up to 24 hours, making it easier to assemble the dish on the day of your gathering.
To add a bit of a kick, consider incorporating a pinch of red pepper flakes into the herb mixture for a subtle heat. Finally, if you prefer a gluten-free option, substitute the breadcrumbs with crushed gluten-free crackers or almond meal.
Spiced Sweet Potato and Carrot Soup
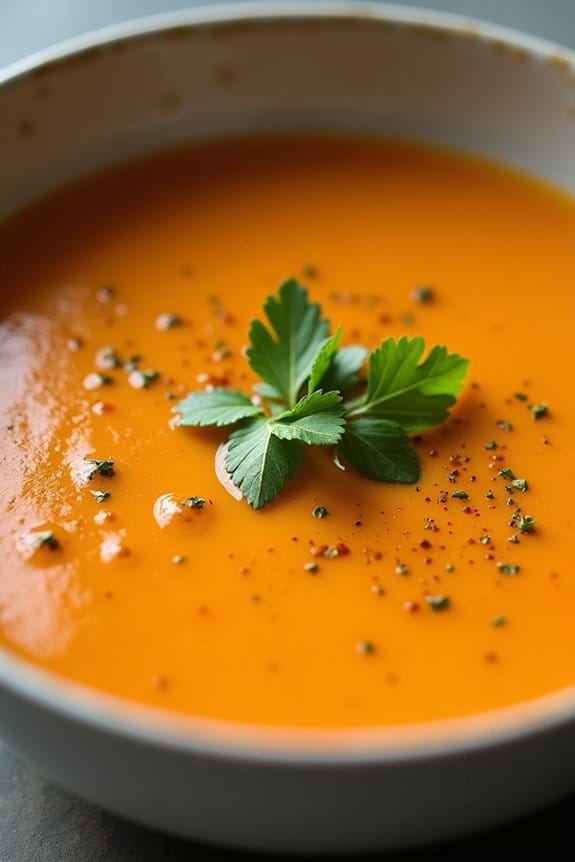
Spiced Sweet Potato and Carrot Soup is a warm and comforting dish perfect for the holiday season. This vibrant soup combines the natural sweetness of sweet potatoes and carrots with a medley of spices to create a rich and flavorful meal. Ideal for a festive starter or a cozy winter lunch, this soup not only satisfies the taste buds but also nourishes the body with its nutrient-rich ingredients.
The spices used in this recipe, such as cumin, coriander, and ginger, add an aromatic depth while providing additional health benefits. The creamy texture of the soup is achieved without the need for cream, making it a healthy choice for those looking to maintain a balanced diet during the Christmas festivities. This recipe makes enough soup to serve 4-6 people, making it perfect for a family gathering or a small holiday dinner party.
Ingredients for 4-6 servings:
- 2 large sweet potatoes, peeled and diced
- 3 large carrots, peeled and sliced
- 1 large onion, chopped
- 3 cloves garlic, minced
- 1 tablespoon olive oil
- 1 teaspoon ground cumin
- 1 teaspoon ground coriander
- 1/2 teaspoon ground ginger
- 1/4 teaspoon cayenne pepper (optional, for heat)
- 4 cups vegetable broth
- Salt and pepper to taste
- Fresh coriander or parsley for garnish
Cooking Instructions:
- Prepare the Vegetables: Begin by peeling and chopping the sweet potatoes, carrots, and onion. Verify that the pieces are relatively uniform to guarantee even cooking.
- Sauté the Aromatics: In a large pot, heat the olive oil over medium heat. Add the chopped onion and sauté for about 5 minutes until it becomes translucent. Stir in the minced garlic and cook for an additional minute, being careful not to let it burn.
- Add the Spices: Add the ground cumin, coriander, ginger, and cayenne pepper to the pot. Stir continuously for about 1-2 minutes, allowing the spices to release their aroma and flavor.
- Cook the Vegetables: Add the diced sweet potatoes and sliced carrots to the pot, stirring to coat them with the spice mixture. Cook for about 5 minutes, allowing the vegetables to slightly soften.
- Simmer the Soup: Pour in the vegetable broth, making sure that the vegetables are fully submerged. Bring the mixture to a boil, then reduce the heat to a simmer. Cover the pot and let the soup cook for 20-25 minutes or until the vegetables are tender.
- Blend the Soup: Once the vegetables are soft, use an immersion blender to puree the soup until smooth. Alternatively, you can transfer the soup in batches to a countertop blender, but be cautious of the hot liquid. Blend until silky smooth.
- Season and Serve: Taste the soup and adjust the seasoning with salt and pepper as needed. Ladle the soup into bowls, garnish with fresh coriander or parsley, and serve hot.
Extra Tips:
For an extra creamy texture, consider adding a splash of coconut milk after blending the soup. This will enhance the flavor and provide a hint of tropical sweetness.
If you prefer a chunkier soup, reserve some of the cooked vegetables before blending and stir them back into the pureed soup.
Additionally, you can prepare this soup a day in advance; the flavors will continue to develop and deepen, making it even more delicious when reheated.
Cranberry and Pistachio Quinoa Stuffing
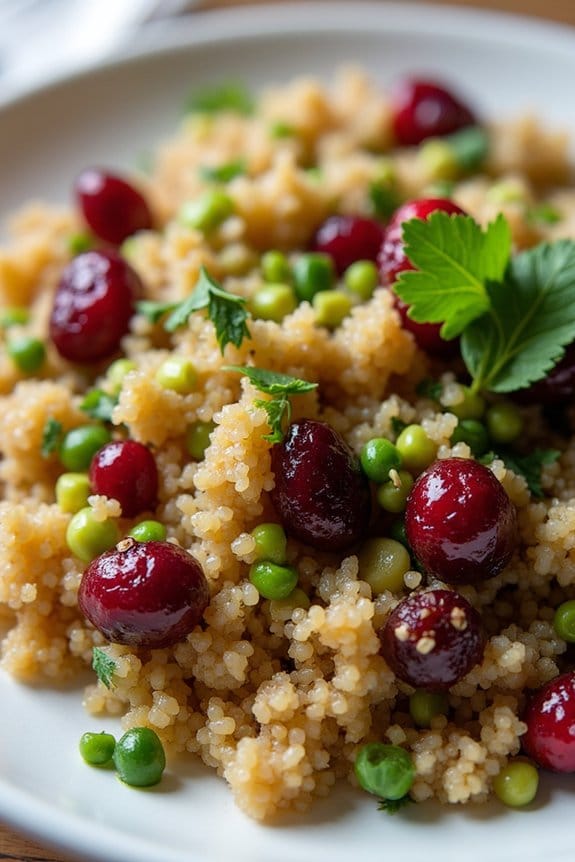
Cranberry and Pistachio Quinoa Stuffing is a delightful and nutritious twist on the traditional holiday stuffing. This dish combines the nutty flavor of quinoa with the tartness of cranberries and the rich, buttery taste of pistachios, creating a vibrant and festive side dish that can complement any holiday meal.
Perfect for those seeking a healthier alternative to bread stuffing, this recipe isn’t only gluten-free but also packed with protein, fiber, and essential nutrients.
Whether you’re catering to guests with dietary restrictions or simply looking to add a fresh twist to your Christmas dinner, Cranberry and Pistachio Quinoa Stuffing is an excellent addition to your holiday menu. The combination of herbs, dried fruits, and nuts provides a symphony of flavors and textures, making this dish both satisfying and memorable.
It’s a versatile recipe that can be adjusted to suit your taste preferences or dietary needs.
Ingredients for 4-6 people:
- 1 cup quinoa
- 2 cups vegetable broth
- 1 tablespoon olive oil
- 1 medium onion, finely chopped
- 2 celery stalks, diced
- 2 cloves garlic, minced
- 1 cup dried cranberries
- 1/2 cup shelled pistachios, roughly chopped
- 1 teaspoon dried thyme
- 1 teaspoon dried rosemary
- Salt and pepper to taste
- 1/4 cup fresh parsley, chopped
Instructions:
- Rinse and Cook Quinoa:
- Rinse the quinoa under cold water to remove its natural coating, which can cause bitterness. In a medium saucepan, bring the vegetable broth to a boil. Add the rinsed quinoa, reduce the heat to low, cover, and let it simmer for about 15 minutes or until the quinoa is cooked and all the broth is absorbed. Fluff the quinoa with a fork and set it aside.
- Sauté Vegetables:
- In a large skillet, heat the olive oil over medium heat. Add the chopped onion and diced celery, sautéing them until they become translucent, about 5 minutes. Stir in the minced garlic and cook for an additional 1-2 minutes, taking care not to burn the garlic.
- Combine Ingredients:
- Add the cooked quinoa to the skillet with the sautéed vegetables. Mix in the dried cranberries, chopped pistachios, dried thyme, and rosemary. Stir well to combine all the ingredients evenly.
- Season and Garnish:
- Season the mixture with salt and pepper to taste. Allow the stuffing to heat through, stirring occasionally. Just before serving, stir in the chopped fresh parsley for a burst of freshness.
- Serve:
- Transfer the stuffing to a serving dish and serve warm as a side dish.
Extra Tips:
To enhance the flavor of this stuffing, consider using toasted pistachios, as they’ll add an extra layer of flavor and crunch. If you prefer a sweeter stuffing, you can replace dried cranberries with dried cherries or apricots.
For a more substantial dish, you might add cooked mushrooms or butternut squash. Always taste and adjust the seasoning before serving to guarantee the perfect balance of flavors. Enjoy this colorful and healthy side dish with your holiday feast!
Grilled Turkey Breast With Citrus Marinade
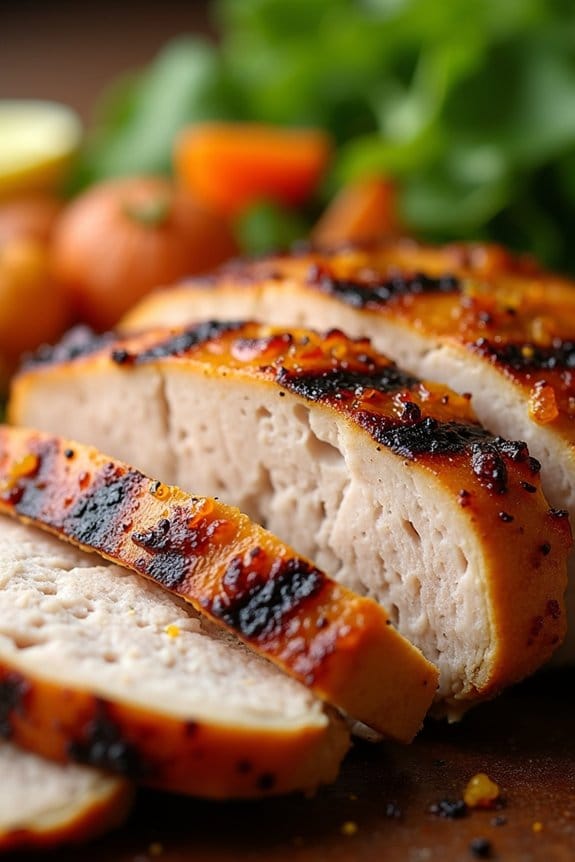
Grilled Turkey Breast With Citrus Marinade is a delightful way to enjoy a healthy and flavorful Christmas meal. The zesty citrus marinade infuses the turkey with a burst of invigorating flavors, guaranteeing that each bite is as succulent as it’s delicious. This dish is perfect for those who want a lighter option without sacrificing the festive spirit.
Grilling the turkey breast not only locks in the juices but also adds a subtle smokiness that complements the vibrant citrus notes. This recipe is ideal for a serving size of 4-6 people, making it a great choice for family gatherings or intimate holiday dinners.
The combination of fresh citrus, herbs, and spices creates a marinade that tenderizes the turkey, enhancing its natural flavors and guaranteeing it remains juicy and tender. Whether you’re hosting a Christmas feast or simply want a nutritious and tasty main course, this Grilled Turkey Breast With Citrus Marinade is sure to impress.
Ingredients:
- 2 lbs turkey breast, boneless and skinless
- 1/2 cup fresh orange juice
- 1/4 cup fresh lemon juice
- 1/4 cup fresh lime juice
- 4 cloves garlic, minced
- 1/4 cup olive oil
- 1 tablespoon honey
- 1 tablespoon Dijon mustard
- 1 tablespoon fresh thyme leaves
- 1 teaspoon salt
- 1/2 teaspoon black pepper
- Zest of 1 orange
- Zest of 1 lemon
- Zest of 1 lime
Cooking Instructions:
- Prepare the Marinade: In a medium-sized bowl, combine the orange juice, lemon juice, lime juice, minced garlic, olive oil, honey, Dijon mustard, fresh thyme leaves, salt, black pepper, and the zest of the orange, lemon, and lime. Mix well until all ingredients are fully incorporated.
- Marinate the Turkey: Place the turkey breast in a large, resealable plastic bag or a shallow dish. Pour the citrus marinade over the turkey, guaranteeing it’s evenly coated. Seal the bag or cover the dish with plastic wrap. Allow the turkey to marinate in the refrigerator for at least 2 hours, or overnight for maximum flavor infusion.
- Preheat the Grill: When ready to cook, preheat your grill to medium-high heat. If using a charcoal grill, prepare for indirect grilling by placing the coals on one side of the grill.
- Grill the Turkey: Remove the turkey from the marinade and allow any excess marinade to drip off. Place the turkey on the preheated grill. Grill for about 6-8 minutes per side, or until the internal temperature reaches 165°F (74°C) and the turkey is fully cooked through.
- Rest and Serve: Remove the turkey from the grill and let it rest for about 10 minutes. This allows the juices to redistribute throughout the meat. Slice the turkey breast into thin slices and serve immediately.
Extra Tips:
For best results, guarantee the turkey breast is evenly coated with the marinade and allow it to rest in the marinade for as long as possible to enhance the flavors.
If you prefer a spicier kick, consider adding a pinch of red pepper flakes to the marinade. Always use a meat thermometer to check the doneness of the turkey, as over-grilling can lead to dryness.
Pair this dish with a fresh green salad or roasted vegetables for a complete and balanced meal.
Zucchini Noodles With Avocado Pesto
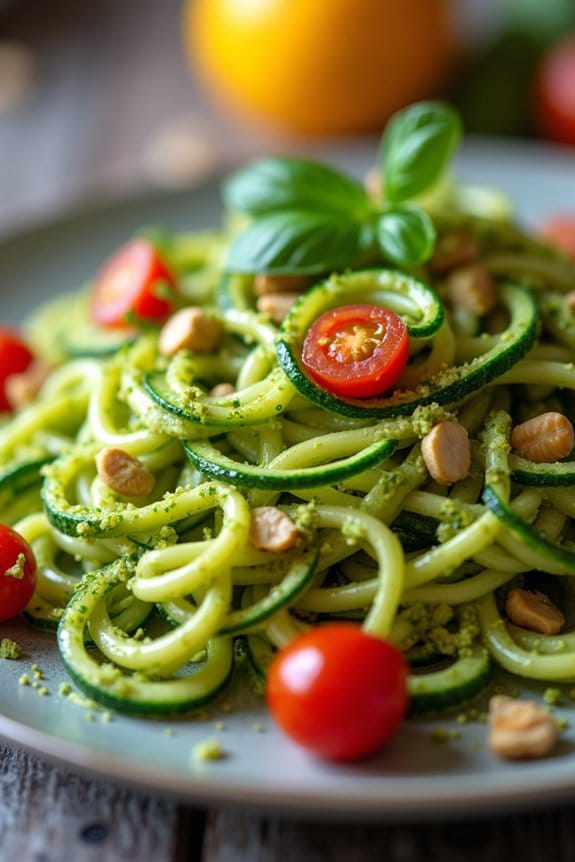
Zucchini Noodles with Avocado Pesto is a vibrant and nutritious twist on a classic pasta dish, perfect for a healthy Christmas dinner. By swapping out traditional pasta with zucchini noodles, this dish becomes both gluten-free and low-carb, while still being incredibly satisfying.
The avocado pesto adds a rich and creamy texture, with a burst of fresh flavors from basil and lemon, making it a delightful accompaniment to the zucchini noodles. This dish not only looks festive with its bright green hue, but it’s also packed with healthy fats, fiber, and essential nutrients.
Zucchini Noodles with Avocado Pesto can be served as a main course or a side dish, and it’s sure to impress your guests with its fresh and unique taste. Whether you’re catering to specific dietary needs or simply looking to add a healthy dish to your holiday spread, this recipe is a delicious option to evaluate.
Ingredients (Serves 4-6)
- 4 medium zucchinis
- 2 ripe avocados
- 1 cup fresh basil leaves
- 1/2 cup pine nuts
- 2 cloves garlic
- 1/4 cup freshly squeezed lemon juice
- 1/4 cup olive oil
- Salt and pepper to taste
- Cherry tomatoes for garnish (optional)
Cooking Instructions
- Prepare the Zucchini Noodles: Using a spiralizer, julienne peeler, or mandoline, create noodles from the zucchinis. Set them aside in a large bowl.
- Make the Avocado Pesto: In a food processor, combine the avocados, basil leaves, pine nuts, garlic, lemon juice, and olive oil. Blend until smooth. Add salt and pepper to taste, and blend again until well incorporated.
- Combine the Noodles and Pesto: Pour the avocado pesto over the zucchini noodles in the bowl. Gently toss the noodles with the pesto until they’re evenly coated.
- Serve: Transfer the coated zucchini noodles to a serving platter or individual plates. Garnish with cherry tomatoes, if desired, and serve immediately.
Extra Tips
When making zucchini noodles, it’s important not to overcook them. They should retain a bit of crunch to prevent becoming too soggy when mixed with the pesto.
If you prefer warm noodles, you can lightly sauté them in a pan for 1-2 minutes before adding the pesto. Additionally, if pine nuts are unavailable or if you have allergies, walnuts or almonds can be a good substitute in the pesto.
Finally, for an added touch of flavor, contemplate topping the dish with freshly grated Parmesan cheese or nutritional yeast for a vegan option.
Healthy Gingerbread Energy Balls

Healthy Gingerbread Energy Balls are a delightful treat that combines the festive flavors of gingerbread with the convenience of an energy ball. These bite-sized snacks are perfect for a healthy Christmas treat, offering a nutritious option amidst the holiday indulgence.
They’re an excellent choice for those who are looking to maintain their health goals even during the festive season, as they’re packed with wholesome ingredients that provide a natural energy boost.
These energy balls aren’t only delicious but also easy to make, requiring no baking and minimal preparation time. Ideal for a serving size of 4-6 people, they can be prepared in advance and stored, making them a convenient snack to have on hand.
The combination of spices, nuts, and natural sweeteners replicates the traditional gingerbread taste, guaranteeing that you can enjoy the essence of the holiday season without compromising your health.
Ingredients (for 4-6 people):
- 1 cup of rolled oats
- 1 cup of almond flour
- 1/2 cup of almond butter
- 1/3 cup of molasses
- 1/4 cup of honey or maple syrup
- 1 teaspoon of vanilla extract
- 1 teaspoon of ground cinnamon
- 1 teaspoon of ground ginger
- 1/2 teaspoon of ground nutmeg
- 1/4 teaspoon of ground cloves
- 1/4 teaspoon of salt
- 1/4 cup of mini dark chocolate chips (optional)
Instructions:
- Prepare the Dry Ingredients: In a large mixing bowl, combine the rolled oats, almond flour, cinnamon, ginger, nutmeg, cloves, and salt. Mix thoroughly to guarantee the spices are evenly distributed throughout the dry ingredients.
- Mix Wet Ingredients: In a separate bowl, combine the almond butter, molasses, honey (or maple syrup), and vanilla extract. Stir until the mixture is smooth and fully combined.
- Combine Ingredients: Pour the wet ingredients into the bowl of dry ingredients. Use a spatula or your hands to mix everything together until a sticky dough forms. If the mixture feels too dry, you can add more almond butter or a splash of water to help it bind.
- Add Chocolate Chips (optional): If desired, fold in the mini dark chocolate chips until they’re evenly distributed throughout the mixture.
- Shape the Energy Balls: Using your hands, scoop out approximately one tablespoon of the mixture and roll it between your palms to form a ball. Repeat this process until all the mixture is used up. You should end up with about 20-24 energy balls.
- Chill the Energy Balls: Place the energy balls on a baking sheet lined with parchment paper and refrigerate them for at least 30 minutes to allow them to firm up.
- Serve and Store: Once chilled, the energy balls are ready to be enjoyed. Store any leftovers in an airtight container in the refrigerator for up to one week.
Extra Tips:
For added texture and flavor, you can roll the energy balls in crushed nuts or shredded coconut before chilling them. If you prefer a sweeter treat, increase the amount of honey or maple syrup slightly.
These gingerbread energy balls can also be frozen for up to three months, making them a great make-ahead option for busy holiday schedules. Adjust the spices according to your taste preference to achieve the perfect gingerbread flavor.
Dark Chocolate and Almond Bark

Dark Chocolate and Almond Bark is a delightful and healthy treat that’s perfect for the holiday season. This recipe combines the rich flavors of dark chocolate with the nutty crunch of almonds, creating a satisfying dessert that’s both indulgent and nutritious.
Perfect for sharing with family and friends, this Dark Chocolate and Almond Bark isn’t only easy to make but also a healthier alternative to many traditional holiday sweets, thanks to the antioxidants found in dark chocolate and the heart-healthy fats in almonds.
Ideal for a serving size of 4-6 people, this recipe can be prepared in just a few simple steps. Whether you’re hosting a festive gathering or preparing gifts for loved ones, this almond bark will surely impress. The combination of ingredients guarantees a delicious taste and texture that will have everyone reaching for seconds.
Let’s plunge into how you can make this delectable treat at home.
Ingredients:
- 12 ounces dark chocolate (at least 70% cocoa)
- 1 cup whole almonds
- 1/4 cup unsweetened shredded coconut (optional)
- 1/4 teaspoon sea salt
- 1 teaspoon vanilla extract
Instructions:
- Prepare the Baking Sheet: Line a baking sheet with parchment paper. This will prevent the chocolate from sticking and make it easier to remove once set.
- Toast the Almonds: Preheat your oven to 350°F (175°C). Spread the almonds in a single layer on a baking sheet. Toast them in the oven for about 8-10 minutes, or until they become fragrant. Allow them to cool slightly before using.
- Melt the Chocolate: While the almonds are cooling, chop the dark chocolate into small pieces for even melting. In a microwave-safe bowl or a double boiler, melt the chocolate slowly, stirring frequently to avoid burning. If using a microwave, heat in 20-second intervals, stirring in between.
- Combine Ingredients: Once the chocolate is melted and smooth, stir in the vanilla extract. Add the toasted almonds to the chocolate and mix until they’re well coated. If you’re using shredded coconut, add it to the mixture as well.
- Spread the Mixture: Pour the chocolate-almond mixture onto the prepared baking sheet. Use a spatula to spread it evenly, ensuring the almonds are distributed throughout. Sprinkle sea salt over the top for added flavor.
- Chill the Bark: Place the baking sheet in the refrigerator for at least 1 hour, or until the chocolate is completely set and firm.
- Break into Pieces: Once set, remove the bark from the refrigerator. Break it into pieces of your desired size by hand.
Extra Tips:
For a more customized bark, consider adding other ingredients like dried fruits or different types of nuts for variety.
Always verify the chocolate is fully melted and smooth before adding other ingredients to achieve a glossy finish. If you prefer a sweeter bark, you may adjust the chocolate to a lower cocoa percentage, but keep in mind this will alter the health benefits.
Finally, store any leftover bark in an airtight container in a cool place to maintain its freshness and crisp texture.
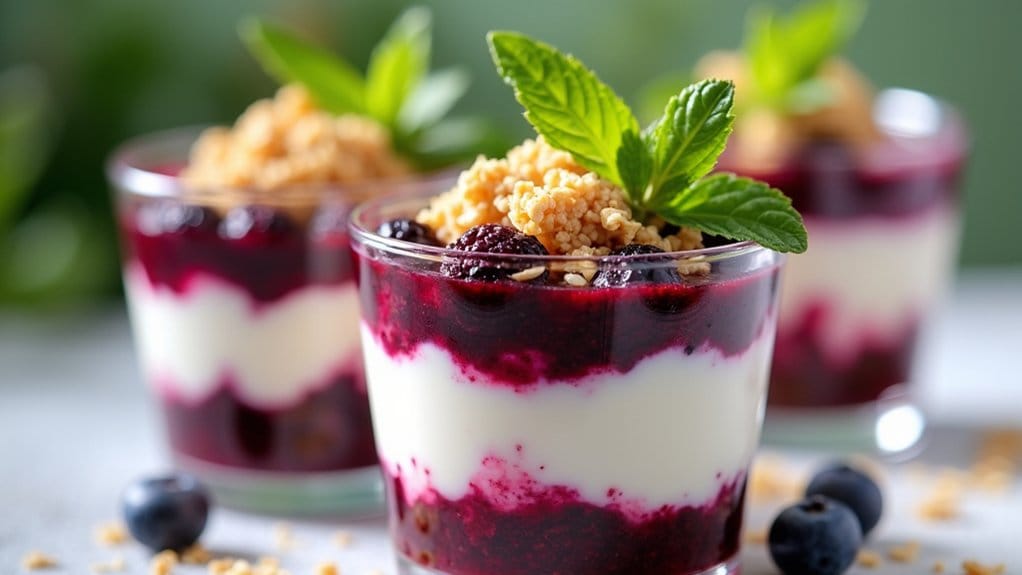
Greek Yogurt Parfait With Berry Compote
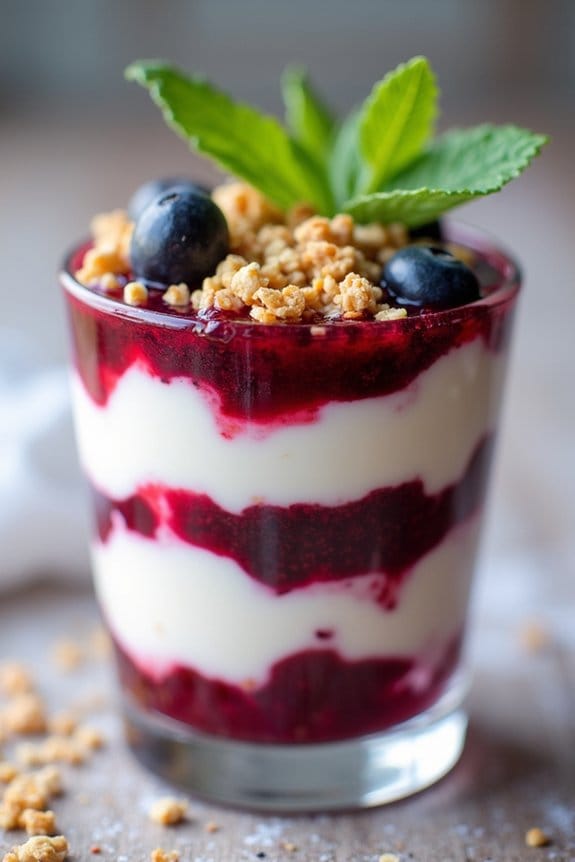
Indulge in a delightful and healthy treat this Christmas with a Greek Yogurt Parfait with Berry Compote. This dish isn’t only bursting with flavor, but it’s also packed with nutrients, making it a perfect addition to your festive menu.
The creamy texture of Greek yogurt pairs beautifully with the sweet and slightly tart berry compote, creating a dessert that’s both satisfying and invigorating. Whether served as a breakfast option or a dessert, this parfait is sure to impress your guests and add a touch of elegance to your holiday table.
The combination of rich Greek yogurt and vibrant berries creates a visually stunning dish that’s as pleasing to the eyes as it’s to the palate. With a few simple ingredients and minimal preparation time, you can whip up this parfait with ease, allowing you to focus on enjoying the festive season.
Not only is this recipe easy to make, but it’s also a healthier alternative to traditional holiday desserts, making it an excellent choice for those seeking a nutritious yet indulgent treat.
Ingredients for 4-6 servings:
- 3 cups Greek yogurt
- 2 cups mixed fresh or frozen berries (such as strawberries, blueberries, raspberries)
- 1/4 cup honey or maple syrup
- 1 teaspoon vanilla extract
- 1 tablespoon lemon juice
- 1 cup granola or crushed nuts
- Fresh mint leaves for garnish (optional)
Instructions:
- Prepare the Berry Compote: In a medium saucepan over medium heat, combine the mixed berries, honey or maple syrup, and lemon juice. Stir occasionally and let the mixture simmer for about 10-12 minutes until the berries have softened and the sauce thickens slightly. Remove from heat and let it cool to room temperature.
- Mix the Greek Yogurt: In a mixing bowl, combine the Greek yogurt and vanilla extract. Stir well until the vanilla is evenly distributed throughout the yogurt.
- Assemble the Parfaits: In serving glasses or bowls, layer the ingredients starting with a generous spoonful of the Greek yogurt mixture at the bottom. Follow with a layer of the berry compote. Repeat the layers until the glasses are filled, leaving some space at the top for granola.
- Top with Granola: Just before serving, sprinkle the granola or crushed nuts on top of each parfait to add a satisfying crunch.
- Garnish and Serve: If desired, garnish with fresh mint leaves for an extra burst of color and flavor. Serve immediately and enjoy!
Extra Tips:
For a smoother berry compote, you can mash the berries slightly with a fork while they’re cooking. This dish can be prepared ahead of time by making the compote and storing it in the refrigerator for up to three days.
Just assemble the parfaits right before serving to keep the granola crunchy. Feel free to experiment with different types of berries or even add a layer of fruit puree for added variety. Adjust the sweetness to your preference by adding more or less honey or syrup.
