
With the holiday season just around the corner, I’m already feeling the urge to get creative in the kitchen. There’s just something special about making rich and creamy fudge with little effort. Whether it’s classic chocolate or a unique twist like white chocolate cranberry, these 12 easy Christmas fudge recipes are sure to impress. They’re perfect for a festive gathering or a cozy night in. Ready to see how simple and delicious these treats can be?
Classic Chocolate Fudge
Indulge in the timeless delight of Classic Chocolate Fudge, a decadent treat that’s perfect for the holiday season. This rich and creamy confection is a must-have on any Christmas dessert table. It’s a simple yet satisfying recipe that brings together the deep, luscious flavor of chocolate with the smoothness of sweetened condensed milk.
Whether you’re making it for a festive gathering or as a special homemade gift, this classic fudge is guaranteed to impress with its delightful melt-in-your-mouth texture.
The beauty of this Classic Chocolate Fudge recipe lies in its simplicity and the minimal ingredients required. With just a few steps, you can create a batch of delicious fudge that will have everyone reaching for seconds.
This recipe yields enough fudge to serve 4-6 people, making it perfect for small gatherings or family celebrations. Enjoy the process of making this classic holiday treat, and get ready to savor every bite of its chocolatey goodness.
Ingredients (Serves 4-6):
- 2 cups semi-sweet chocolate chips
- 1 can (14 ounces) sweetened condensed milk
- ¼ cup unsalted butter
- 1 teaspoon vanilla extract
- ¼ teaspoon salt
- Optional toppings: chopped nuts, crushed candy canes, or sprinkles
Cooking Instructions:
- Prepare the Pan: Line an 8-inch square baking dish with aluminum foil or parchment paper, making sure the edges of the foil or paper hang over the sides. This will make it easier to lift the fudge out of the pan once it has set.
- Melt Ingredients: In a medium saucepan, combine the semi-sweet chocolate chips, sweetened condensed milk, and unsalted butter. Place the saucepan over low heat and stir continuously until the chocolate chips and butter have completely melted and the mixture is smooth.
- Add Flavorings: Remove the saucepan from heat and stir in the vanilla extract and salt. Continue stirring until the ingredients are fully incorporated and the mixture is glossy.
- Pour and Set: Pour the chocolate mixture into the prepared baking dish, spreading it evenly with a spatula. If desired, sprinkle chopped nuts, crushed candy canes, or sprinkles on top for added texture and flavor.
- Chill: Refrigerate the fudge for at least 2 hours, or until it’s firm to the touch. Once set, use the overhanging foil or parchment paper to lift the fudge out of the dish.
- Slice and Serve: Cut the fudge into squares and serve. For clean cuts, wipe the knife with a warm, damp cloth between slices.
Extra Tips:
To guarantee the best texture for your Classic Chocolate Fudge, be sure to melt the chocolate mixture over low heat to prevent burning or seizing. Stir constantly to maintain a smooth consistency.
If you want a firmer fudge, you can refrigerate it overnight. Feel free to experiment with different toppings or mix-ins like dried fruit or marshmallows to customize your fudge to your personal taste.
Enjoy this festive treat and share it with loved ones for a truly delightful holiday experience!
Peanut Butter Swirl Fudge
Indulge in the creamy richness of Peanut Butter Swirl Fudge, a delightful treat perfect for the holiday season. This classic Christmas fudge combines the smoothness of peanut butter with the rich decadence of chocolate, creating a harmonious blend that melts in your mouth.
Ideal for sharing with family and friends or as a homemade gift, this fudge is sure to bring warmth and joy to your festive celebrations.
With its simple preparation and impressive results, Peanut Butter Swirl Fudge is a must-have on your holiday dessert menu. Whether you’re a seasoned baker or a beginner, this recipe is easy to follow and yields a deliciously sweet treat that everyone will love.
The swirling technique not only adds visual appeal but also guarantees a delightful mix of flavors in every bite. Serve this luscious fudge at your Christmas gatherings, and watch it disappear in no time!
Ingredients for 4-6 People:
- 1 cup creamy peanut butter
- 1 cup semi-sweet chocolate chips
- 1 (14 oz) can sweetened condensed milk
- 1 teaspoon vanilla extract
- Pinch of salt
Cooking Instructions:
- Prepare the Baking Dish: Line an 8×8 inch baking dish with parchment paper, leaving some overhang on the sides to easily lift the fudge out once it’s set.
- Melt Chocolate Base: In a medium saucepan over low heat, combine the semi-sweet chocolate chips and half of the sweetened condensed milk. Stir continuously until the chocolate is completely melted and smooth. Remove from heat and stir in the vanilla extract and a pinch of salt.
- Make Peanut Butter Mixture: In a separate bowl, combine the remaining sweetened condensed milk with the creamy peanut butter. Mix until smooth and well combined.
- Layer and Swirl: Pour the chocolate mixture into the prepared baking dish and spread it evenly. Drop spoonfuls of the peanut butter mixture on top of the chocolate layer. Using a knife or a toothpick, gently swirl the peanut butter into the chocolate to create a marbled effect.
- Set the Fudge: Refrigerate the fudge for at least 2 hours, or until it’s firm and set. Once set, use the parchment paper overhang to lift the fudge out of the dish.
- Cut and Serve: Cut the fudge into small squares, approximately 1 inch in size. Serve immediately or store in an airtight container in the refrigerator for up to two weeks.
Extra Tips:
To guarantee your Peanut Butter Swirl Fudge is perfectly smooth and creamy, use high-quality chocolate chips and fresh peanut butter. Avoid overheating the chocolate mixture to prevent it from becoming grainy.
If you prefer a different flavor profile, try adding a handful of chopped nuts or a sprinkle of sea salt on top of the fudge before it sets. For a festive twist, consider adding a few drops of peppermint extract to the chocolate mixture.
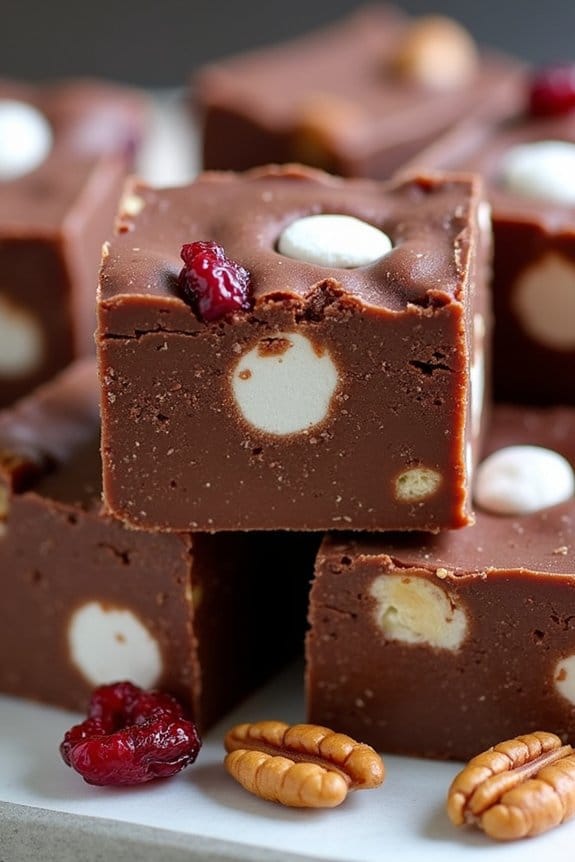
White Chocolate Cranberry Fudge
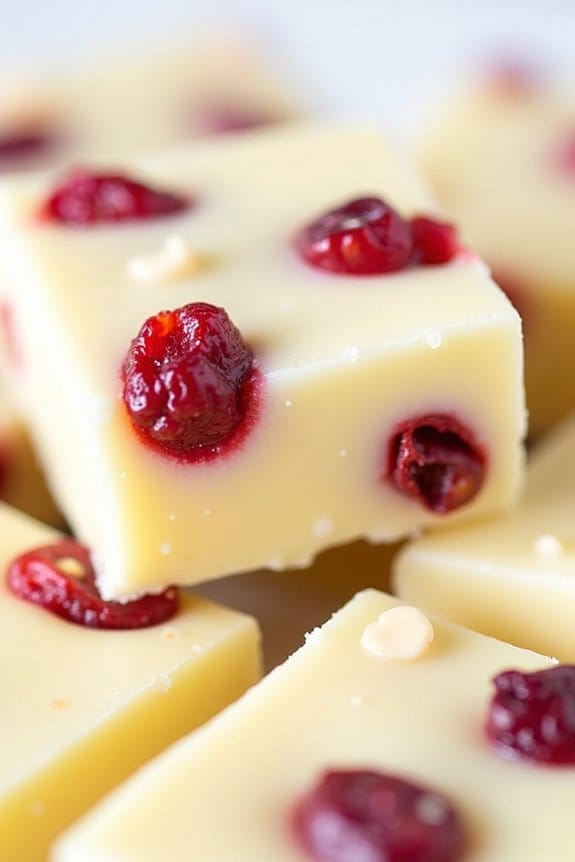
White Chocolate Cranberry Fudge is a delightful treat that combines the creaminess of white chocolate with the tartness of dried cranberries, creating a perfect balance of flavors for the holiday season. This fudge isn’t only delicious but also incredibly easy to make, making it a wonderful addition to your Christmas dessert table or a thoughtful homemade gift for friends and family.
The bright red cranberries against the creamy white fudge also add a festive touch to any holiday spread. This recipe yields a serving size of 4-6 people and requires minimal ingredients and effort, allowing you to focus on enjoying the festive season with your loved ones.
The rich, sweet flavor of the white chocolate is complemented by the slight tang of the cranberries, making each bite a burst of holiday cheer. Whether you’re a seasoned baker or a novice in the kitchen, this White Chocolate Cranberry Fudge is sure to impress with its simplicity and taste.
Ingredients:
- 2 cups white chocolate chips
- 1 can (14 oz) sweetened condensed milk
- 1 teaspoon vanilla extract
- 1 cup dried cranberries
- 1/4 cup chopped nuts (optional, such as almonds or walnuts)
- Pinch of salt
Instructions:
- Prepare Your Pan: Line an 8×8 inch square baking pan with parchment paper or aluminum foil, leaving some overhang on the sides to easily lift out the fudge later.
- Melt the Chocolate: In a medium saucepan, combine the white chocolate chips and sweetened condensed milk. Place the saucepan over low heat, stirring constantly until the chocolate is completely melted and the mixture is smooth.
- Add Flavorings: Remove the saucepan from heat and stir in the vanilla extract and a pinch of salt. Mix well to combine all the ingredients.
- Incorporate the Cranberries and Nuts: Gently fold in the dried cranberries and chopped nuts (if using) into the chocolate mixture, making certain they’re evenly distributed.
- Transfer to Pan: Pour the mixture into the prepared baking pan, spreading it evenly with a spatula. Make sure the top is as smooth as possible.
- Chill the Fudge: Place the pan in the refrigerator for at least 2 hours, or until the fudge is completely set.
- Cut and Serve: Once set, use the overhang to lift the fudge out of the pan and place it on a cutting board. Cut into small squares and serve.
Extra Tips: For the best results, verify that you’re using good quality white chocolate chips, as they’ll melt more smoothly and provide better flavor.
If you prefer a softer fudge, you can add a tablespoon of butter when melting the chocolate and condensed milk together. Remember to keep stirring while melting the chocolate to avoid burning. If you’re planning to gift this fudge, consider wrapping the pieces individually in wax paper for a charming presentation.
Salted Caramel Fudge
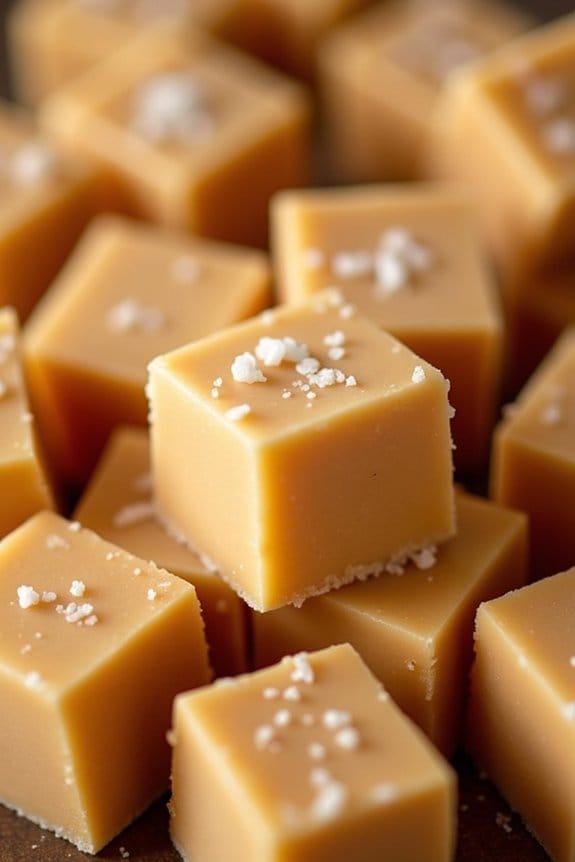
Salted Caramel Fudge is a delightful treat that combines the rich, buttery taste of caramel with a hint of salt, perfectly balancing sweetness and savory notes. This fudge is an excellent choice for holiday gatherings, as its decadent flavor is sure to impress your family and friends. Not only is it delicious, but it also makes for a beautiful homemade gift when packaged in decorative tins or boxes.
Whether you’re an experienced candy maker or a beginner, this recipe is straightforward and rewarding. The process of making Salted Caramel Fudge involves carefully cooking a mixture of sugar, butter, and cream to create a smooth, creamy texture that melts in your mouth. The addition of sea salt enhances the flavor profile, creating a sophisticated treat that’s perfect for any occasion.
This recipe yields enough fudge to serve 4-6 people, making it ideal for sharing at holiday parties or enjoying cozy nights by the fireplace.
Ingredients (Serves 4-6):
- 2 cups granulated sugar
- 1/2 cup unsalted butter
- 1/2 cup heavy cream
- 1/4 cup light corn syrup
- 1 teaspoon vanilla extract
- 1 teaspoon sea salt, plus extra for garnish
- 1 cup white chocolate chips
Cooking Instructions:
- Prepare the Baking Dish: Line an 8×8 inch baking dish with parchment paper, leaving some overhang on the sides for easy removal of the fudge later.
- Combine Ingredients: In a medium saucepan, combine the granulated sugar, unsalted butter, heavy cream, and light corn syrup. Place the saucepan over medium heat and stir until the butter is melted and the sugar is dissolved.
- Bring to a Boil: Increase the heat to medium-high and bring the mixture to a boil. Allow it to boil, without stirring, until it reaches 234°F (soft ball stage) on a candy thermometer. This should take about 5-7 minutes.
- Remove from Heat: Once the mixture reaches the desired temperature, remove the saucepan from the heat and immediately stir in the vanilla extract and sea salt. Then, add the white chocolate chips, stirring continuously until they’re completely melted and the mixture is smooth.
- Pour and Set: Quickly pour the fudge mixture into the prepared baking dish, spreading it evenly with a spatula. Sprinkle a pinch of sea salt over the top for added flavor and a decorative touch.
- Cool and Cut: Allow the fudge to cool at room temperature for about 2 hours, or until fully set. Once set, use the parchment paper overhang to lift the fudge from the pan. Cut into squares and serve.
Extra Tips:
When making Salted Caramel Fudge, it’s essential to monitor the temperature closely using a candy thermometer to guarantee the fudge reaches the correct stage; this ensures the perfect texture.
Be patient and avoid stirring the mixture once it begins to boil, as stirring can cause the sugar to crystallize, resulting in grainy fudge. If you want to add a personal touch, consider mixing in some chopped nuts or drizzling with melted chocolate before cutting the fudge into squares.
Store any leftovers in an airtight container at room temperature for up to a week, or refrigerate for longer storage.
Mint Chocolate Chip Fudge
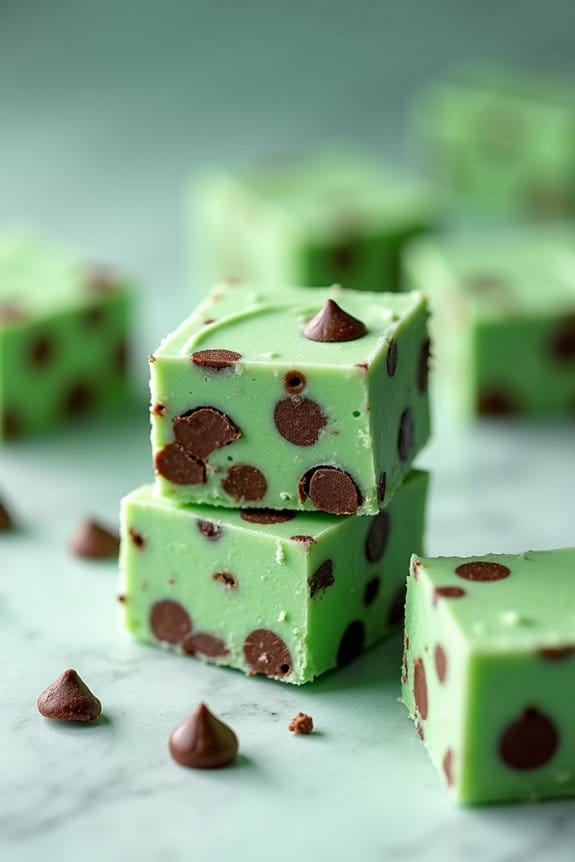
Mint Chocolate Chip Fudge is a delightful holiday treat that combines the invigorating taste of mint with the rich, creamy texture of chocolate fudge. This recipe is perfect for those who want to add a festive twist to their traditional fudge, making it an ideal addition to your Christmas dessert table.
The minty flavor pairs perfectly with the sweetness of the chocolate, while the chocolate chips add a delightful crunch to each bite. This fudge isn’t only delicious but also visually appealing, with its green hue and chocolate speckles, making it an eye-catching treat for all ages.
When preparing Mint Chocolate Chip Fudge, make certain you have enough time for the fudge to set properly, as patience is key to achieving the perfect texture. This recipe yields a serving size suitable for 4-6 people, making it perfect for small gatherings or as a delightful gift for friends and family.
The following ingredients and instructions will guide you through the process of creating this delectable holiday treat at home.
Ingredients for 4-6 servings:
- 2 cups white chocolate chips
- 1 can (14 oz) sweetened condensed milk
- 1 teaspoon mint extract
- Green food coloring (optional)
- 1 cup mini semi-sweet chocolate chips
- Cooking spray or butter (for greasing the pan)
Instructions:
- Prepare the Pan: Start by lightly greasing an 8×8 inch square baking pan with cooking spray or butter. This will prevent the fudge from sticking and make it easier to remove once it has set.
- Melt the Chocolate: In a medium saucepan over low heat, combine the white chocolate chips and sweetened condensed milk. Stir continuously until the chocolate is completely melted and the mixture is smooth. Be cautious not to overheat, as the chocolate can burn easily.
- Add Flavor and Color: Once the chocolate is melted, remove the saucepan from the heat. Stir in the mint extract, mixing well to make certain the flavor is evenly distributed. If you desire a festive green color, add a few drops of green food coloring, stirring until the color is uniform.
- Mix in Chocolate Chips: Allow the mixture to cool slightly before gently folding in the mini semi-sweet chocolate chips. This will help prevent them from melting and maintain their shape within the fudge.
- Pour and Set: Pour the fudge mixture into the prepared baking pan, spreading it evenly with a spatula. Let it sit at room temperature until it cools completely, then transfer it to the refrigerator for at least 2 hours to firm up.
- Cut and Serve: Once the fudge is set, remove it from the pan and cut it into small squares. Serve immediately or store in an airtight container in the refrigerator.
Extra Tips:
For best results, use high-quality white chocolate chips, as they tend to melt more smoothly and have a richer flavor. If you prefer a stronger mint taste, you can adjust the amount of mint extract to your liking.
Additionally, consider adding crushed candy canes on top of the fudge before it sets for an extra festive touch. Remember, patience is key—allow adequate time for the fudge to set properly to achieve the ideal texture. Enjoy your homemade Mint Chocolate Chip Fudge as a sweet holiday indulgence!
Eggnog Fudge
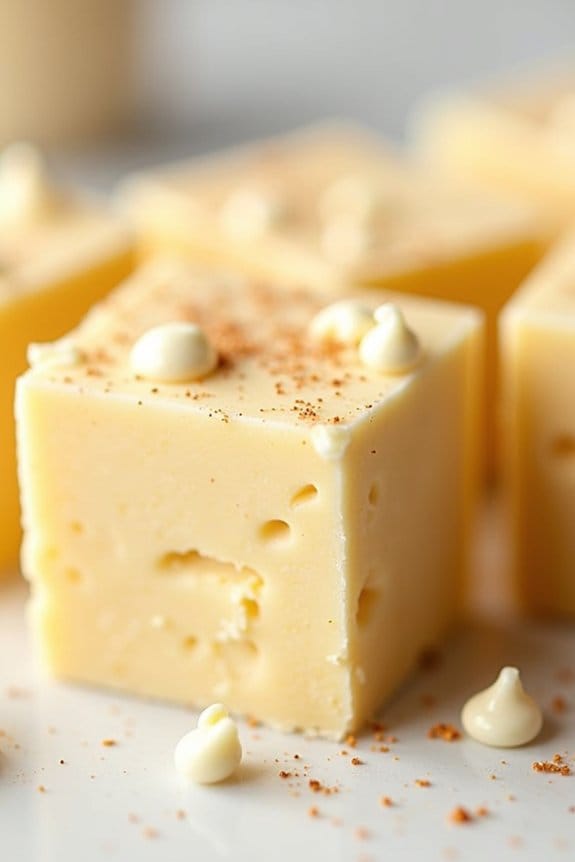
Eggnog Fudge is a delightful treat that perfectly captures the festive flavors of the holiday season. This creamy, rich fudge combines the classic taste of eggnog with a hint of nutmeg and white chocolate, making it a perfect addition to your Christmas dessert spread.
Simple to prepare and even easier to enjoy, this fudge is sure to become a holiday favorite for you and your loved ones. This recipe serves 4-6 people, making it ideal for intimate gatherings or as a special treat to share with friends and family.
With just a few ingredients and a little bit of time, you can create a sweet, melt-in-your-mouth fudge that embodies the warmth and joy of Christmas. Whether you’re a seasoned baker or a novice in the kitchen, this Eggnog Fudge recipe is straightforward and rewarding.
Ingredients:
- 2 cups granulated sugar
- 1/2 cup unsalted butter
- 3/4 cup eggnog
- 10 ounces white chocolate chips
- 1/2 teaspoon ground nutmeg
- 1 (7-ounce) jar marshmallow creme
- 1 teaspoon vanilla extract
Instructions:
- Prepare the Pan: Begin by lining an 8-inch square baking pan with aluminum foil or parchment paper, leaving some overhang on the sides. This will make it easier to lift the fudge out once it sets.
- Mix and Heat: In a medium saucepan, combine the granulated sugar, unsalted butter, and eggnog. Cook over medium heat, stirring constantly until the mixture comes to a boil.
- Boil to Soft Ball Stage: Once boiling, continue cooking the mixture without stirring until it reaches the soft ball stage (234-240°F or 112-115°C) on a candy thermometer. This should take about 8-10 minutes.
- Add Chocolate and Nutmeg: Remove the saucepan from heat and quickly stir in the white chocolate chips and ground nutmeg. Stir until the chocolate is completely melted and the mixture is smooth.
- Incorporate Marshmallow and Vanilla: Add the marshmallow creme and vanilla extract, stirring vigorously until the mixture is well combined and creamy.
- Transfer to Pan: Pour the fudge mixture into the prepared baking pan, spreading it evenly with a spatula. If desired, sprinkle a little extra nutmeg on top for garnish.
- Chill and Set: Allow the fudge to cool at room temperature for about 30 minutes, then transfer it to the refrigerator to set completely, at least 2 hours.
- Cut and Serve: Once the fudge is firm, use the overhanging foil or parchment to lift it out of the pan. Cut into small squares and serve.
Extra Tips:
When making Eggnog Fudge, make sure you reach the correct temperature during the boiling stage, as this is vital for achieving the right texture.
If you don’t have a candy thermometer, you can test the soft ball stage by dropping a small amount of the mixture into a glass of cold water; it should form a soft, pliable ball.
Additionally, for a more nuanced flavor, consider adding a pinch of ground cinnamon or a splash of rum extract.
Remember to store any leftover fudge in an airtight container in the refrigerator to maintain its freshness and creamy texture.
Rocky Road Fudge
Rocky Road Fudge is a delicious and indulgent treat that combines the rich flavors of chocolate with the delightful textures of nuts and marshmallows. This decadent fudge is perfect for adding a sweet touch to your Christmas celebrations.
It’s not only easy to make but also a wonderful homemade gift that your friends and family will adore. With just a few ingredients and simple steps, you can create a batch of Rocky Road Fudge that will melt in your mouth and bring festive joy to anyone who tastes it.
This recipe serves 4-6 people, making it ideal for a small gathering or for sharing with loved ones. The combination of smooth chocolate, crunchy nuts, and soft marshmallows creates a symphony of flavors and textures that’s hard to resist.
Whether you’re a seasoned cook or a beginner looking for an easy Christmas fudge recipe, this Rocky Road Fudge will be a hit at any holiday celebration.
Ingredients:
- 2 cups semi-sweet chocolate chips
- 1 can (14 ounces) sweetened condensed milk
- 2 tablespoons butter
- 1 teaspoon vanilla extract
- 1 cup mini marshmallows
- 1 cup chopped nuts (such as walnuts or pecans)
- 1/2 cup dried cranberries (optional)
Instructions:
- Prepare the Pan: Line an 8×8-inch baking dish with parchment paper or aluminum foil, allowing the edges to hang over the sides for easy removal later. Lightly grease the lining with a bit of butter or non-stick spray.
- Melt the Chocolate: In a medium saucepan over low heat, combine the semi-sweet chocolate chips, sweetened condensed milk, and butter. Stir continuously until the chocolate is completely melted and the mixture is smooth. Be sure to keep the heat low to prevent the chocolate from burning.
- Add Flavor: Remove the saucepan from the heat and stir in the vanilla extract. Mix well to incorporate the flavor throughout the chocolate mixture.
- Combine Ingredients: Gently fold in the mini marshmallows, chopped nuts, and dried cranberries (if using) into the chocolate mixture. Confirm that they’re evenly distributed throughout the fudge.
- Pour into Pan: Pour the fudge mixture into the prepared baking dish. Use a spatula to spread it evenly and smooth the top.
- Chill: Place the fudge in the refrigerator for at least 2 hours, or until it’s firm enough to cut. You can also leave it overnight for best results.
- Serve: Once set, lift the fudge out of the pan using the parchment paper or foil edges. Cut the fudge into small squares and serve. Enjoy the delightful combination of flavors and textures in each bite.
Extra Tips:
When making Rocky Road Fudge, you can customize it to suit your taste preferences. Feel free to substitute the nuts with your favorite variety or add other dried fruits like raisins or apricots for a different twist.
If you’re making this fudge as a gift, consider wrapping individual pieces in decorative cellophane or placing them in a festive tin. Remember to store any leftover fudge in an airtight container in the refrigerator to maintain freshness. Enjoy this simple yet satisfying treat throughout the holiday season!
Gingerbread Fudge
Gingerbread Fudge is a delightful holiday treat that combines the warm, spicy flavors of classic gingerbread with the creamy, rich texture of fudge. Perfect for festive gatherings or as a homemade gift, this fudge is sure to impress both friends and family.
The combination of molasses, spices, and white chocolate creates a harmonious blend of flavors that capture the essence of the holiday season. Whether you’re a seasoned baker or a beginner, this recipe is straightforward and rewarding, making it a great addition to your Christmas dessert table.
Ideal for serving 4-6 people, this Gingerbread Fudge recipe requires minimal ingredients and effort, yet delivers on taste and presentation. The key to achieving the perfect fudge texture lies in careful attention to the cooking process, guaranteeing the mixture reaches the right temperature.
Once set, this fudge can be cut into bite-sized pieces, making it easy to serve and enjoy. Get ready to indulge in a sweet, spicy, and creamy treat that’s sure to become a holiday favorite.
Ingredients:
- 2 cups white chocolate chips
- 1 can (14 oz) sweetened condensed milk
- 1/4 cup unsalted butter
- 1/4 cup molasses
- 1 teaspoon ground cinnamon
- 1 teaspoon ground ginger
- 1/2 teaspoon ground nutmeg
- 1/4 teaspoon ground cloves
- 1 teaspoon vanilla extract
- A pinch of salt
Cooking Instructions:
- Prepare the pan: Line an 8×8 inch square baking dish with parchment paper, leaving some overhang on the sides for easy removal later.
- Melt the ingredients: In a medium saucepan, combine the white chocolate chips, sweetened condensed milk, and unsalted butter. Place the saucepan over low heat and stir continuously until the chocolate and butter are completely melted and the mixture is smooth.
- Add the flavors: Once the mixture is smooth, remove it from the heat. Stir in the molasses, ground cinnamon, ground ginger, ground nutmeg, ground cloves, vanilla extract, and a pinch of salt until fully combined.
- Pour and spread: Pour the fudge mixture into the prepared baking dish. Use a spatula to spread it evenly across the pan, guaranteeing a smooth surface.
- Chill the fudge: Place the baking dish in the refrigerator for at least 2 hours, or until the fudge is firm and set.
- Cut and serve: Once set, remove the fudge from the pan using the parchment paper overhang. Place it on a cutting board and cut it into small squares. Serve immediately or store in an airtight container.
Extra Tips:
When making Gingerbread Fudge, it’s essential to maintain a low heat while melting the ingredients to prevent the chocolate from burning. Stirring constantly will help achieve a smooth texture.
If you prefer a more intense gingerbread flavor, consider adding a bit more of the spices to suit your taste. Additionally, make sure the fudge is completely set before cutting to achieve clean, neat squares.
For an extra festive touch, you can sprinkle the top with crushed gingerbread cookies before chilling. Enjoy your homemade holiday treat!
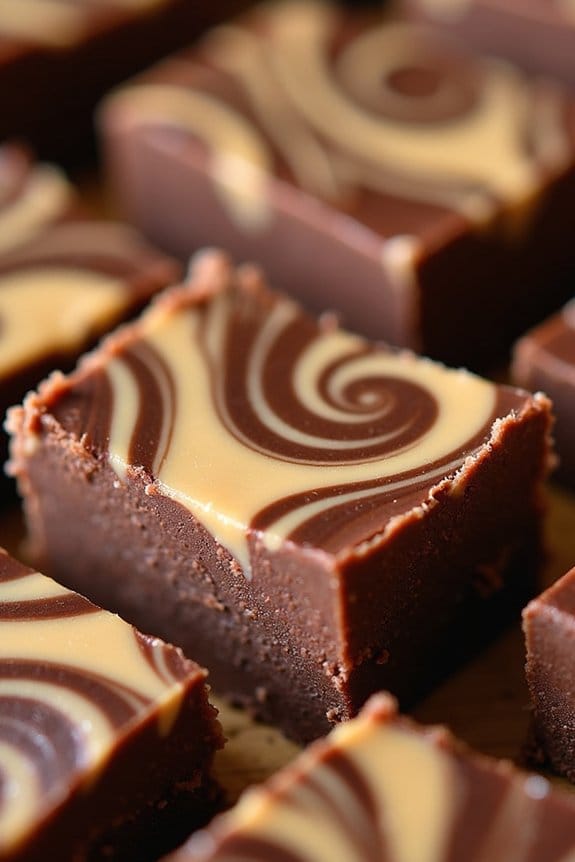
Cookies and Cream Fudge
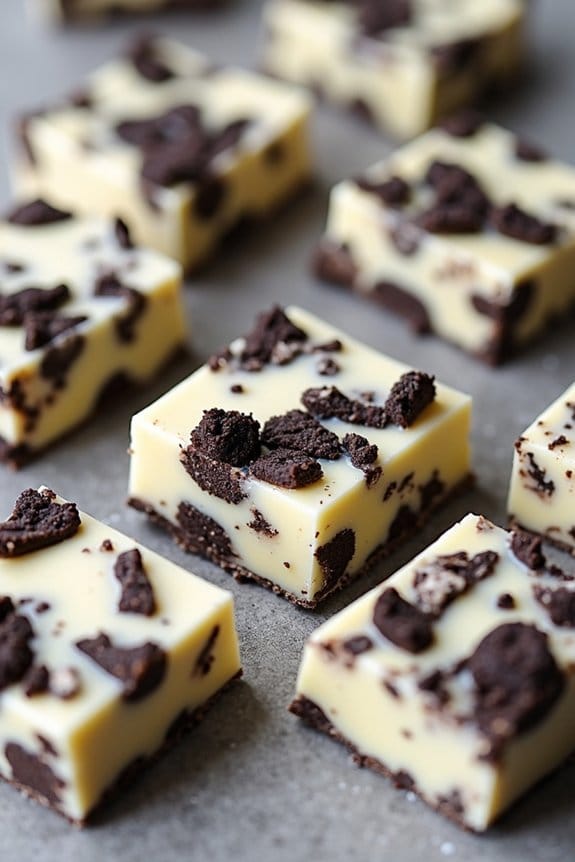
Cookies and Cream Fudge is a delightful twist on traditional fudge, combining the rich, creamy texture of classic fudge with the beloved flavor of cookies and cream. This festive treat is perfect for the holiday season, offering a sweet indulgence that’s guaranteed to please both kids and adults alike.
Its visually appealing swirls of black and white make it not only tasty but also a striking addition to your holiday dessert table.
This recipe is straightforward and quick to prepare, making it an ideal choice for busy holiday schedules. The melt-in-your-mouth texture and irresistible flavor come from premium white chocolate and crushed chocolate sandwich cookies. With just a handful of ingredients and a few simple steps, you can create a batch of Cookies and Cream Fudge that serves 4-6 people, perfect for a family gathering or a small holiday party.
Ingredients (Serves 4-6):
- 2 cups white chocolate chips
- 1 can (14 oz) sweetened condensed milk
- 10 chocolate sandwich cookies, crushed
- 1 teaspoon vanilla extract
- Pinch of salt
Cooking Instructions:
- Prepare the Pan: Line an 8-inch square baking pan with parchment paper, leaving some overhang on the sides for easy removal of the fudge later.
- Melt the Chocolate: In a medium saucepan over low heat, combine the white chocolate chips and sweetened condensed milk. Stir continuously until the chocolate is fully melted and the mixture is smooth.
- Add Flavoring: Remove the saucepan from heat and stir in the vanilla extract and a pinch of salt. Mix well to evenly distribute the flavors.
- Incorporate Cookies: Gently fold in the crushed chocolate sandwich cookies, making sure they’re evenly distributed throughout the fudge mixture.
- Spread the Mixture: Pour the fudge mixture into the prepared baking pan, spreading it evenly with a spatula. Gently press down any large cookie chunks to create a smooth top surface.
- Chill the Fudge: Place the pan in the refrigerator and allow the fudge to set for at least 2 hours, or until firm to the touch.
- Cut and Serve: Once set, lift the fudge out of the pan using the parchment paper overhang. Cut into squares and serve immediately, or store in an airtight container.
Extra Tips:
For an extra festive touch, consider adding a sprinkle of crushed peppermint candies on top before the fudge sets for a hint of minty freshness.
You can also experiment with different types of cookies if you prefer a unique twist on the classic recipe. Confirm all ingredients are at room temperature before starting to facilitate smoother melting and mixing.
This fudge can be stored in the refrigerator for up to two weeks, making it a convenient make-ahead holiday treat.
Pumpkin Spice Fudge
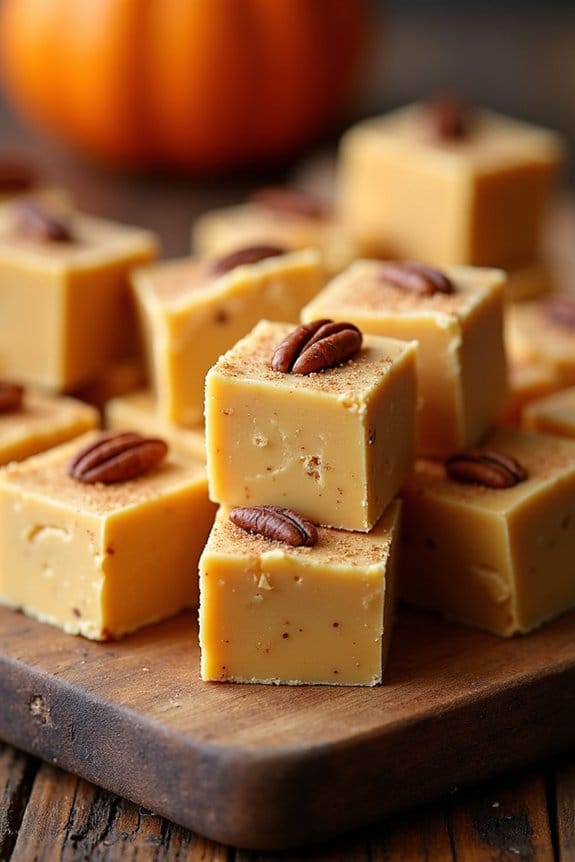
Pumpkin Spice Fudge is a delightful twist on traditional fudge that combines the warm and inviting flavors of pumpkin spice with the creamy richness of fudge. Perfect for the holiday season, this treat is both comforting and indulgent, making it an ideal dessert for Christmas gatherings.
The blend of pumpkin, spices, and creamy chocolate creates a unique and irresistible flavor profile that will have your friends and family asking for more.
Creating Pumpkin Spice Fudge is a relatively simple process that doesn’t require advanced culinary skills, making it accessible to both novice and experienced bakers alike. This recipe yields a batch that serves 4-6 people, perfect for a small holiday party or as a cozy treat to enjoy with loved ones.
With the right ingredients and a few easy steps, you can whip up a batch of this festive fudge in no time.
Ingredients (Serves 4-6):
- 2 cups white chocolate chips
- 1/2 cup canned pumpkin puree
- 1/2 cup sweetened condensed milk
- 1/4 cup unsalted butter
- 1 teaspoon vanilla extract
- 1 teaspoon pumpkin pie spice
- 1/2 teaspoon cinnamon
- 1/4 teaspoon salt
- 1/2 cup chopped pecans (optional)
Instructions:
- Prepare the Pan: Line an 8×8-inch baking dish with parchment paper, leaving some overhang on the sides for easy removal of the fudge later. Set aside.
- Melt the Base Ingredients: In a medium saucepan over low heat, add the white chocolate chips, sweetened condensed milk, and butter. Stir continuously until the mixture is completely melted and smooth. Be certain to keep the heat low to prevent scorching.
- Add Pumpkin and Spices: Once the base is smooth, add the pumpkin puree, vanilla extract, pumpkin pie spice, cinnamon, and salt. Stir well until all ingredients are completely combined and the mixture is smooth. If you’re using pecans, stir them in at this point.
- Pour and Set: Pour the mixture into the prepared baking dish, spreading it evenly with a spatula. Gently tap the dish on the counter to eliminate any air bubbles and guarantee even distribution.
- Chill the Fudge: Place the dish in the refrigerator for at least 2-3 hours, or until the fudge is firm to the touch. For best results, let it chill overnight.
- Cut and Serve: Once set, lift the fudge out of the pan using the parchment paper overhang. Cut into small squares and serve. Enjoy your creamy, spiced fudge!
Extra Tips:
For a smoother texture, make sure not to overheat the chocolate mixture, as it can cause the fudge to become grainy. If you prefer a more pronounced pumpkin flavor, adjust the pumpkin pie spice to your liking.
Additionally, you can experiment with different nuts or even add a drizzle of caramel on top for an extra layer of flavor. Remember to store any leftover fudge in an airtight container in the refrigerator to maintain its freshness and texture.
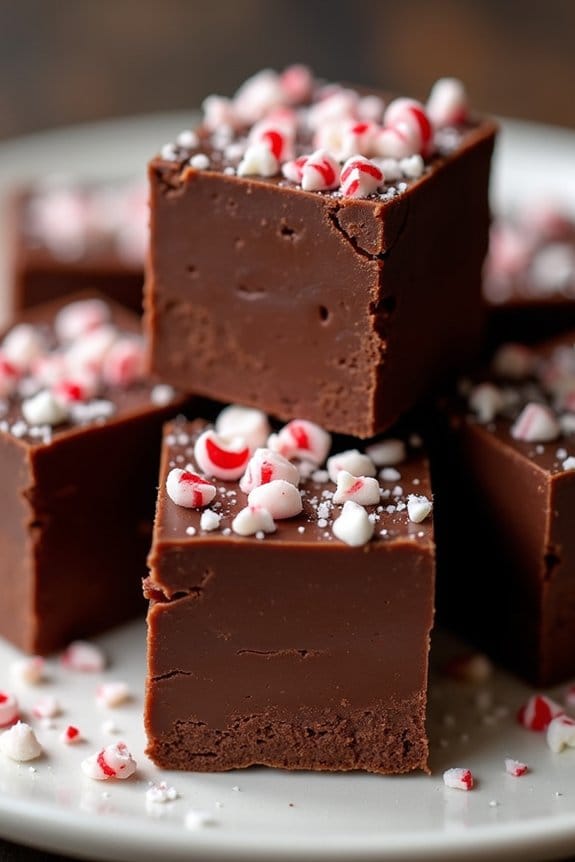
Candy Cane Fudge
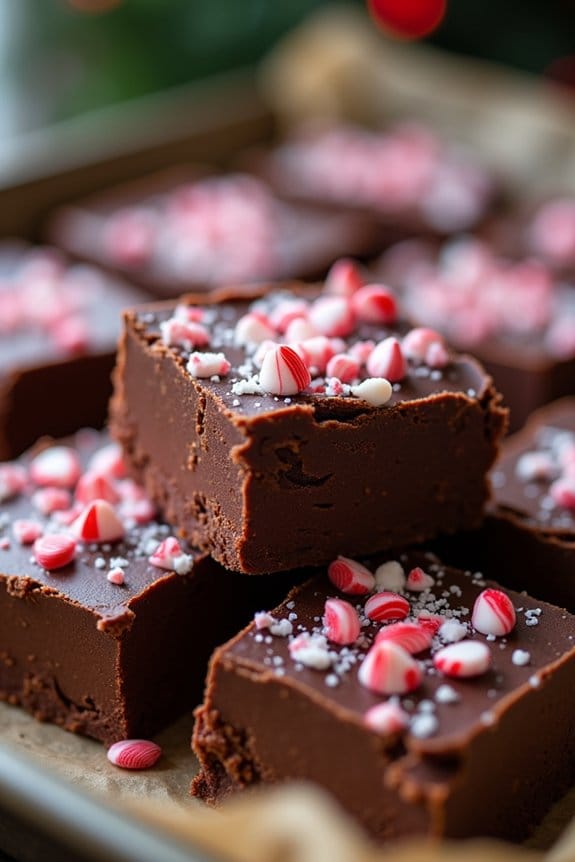
Candy Cane Fudge is a delightful seasonal treat that combines the rich creaminess of traditional fudge with the invigorating minty crunch of candy canes. This festive dessert is perfect for holiday gatherings or as a homemade gift for friends and family. The combination of chocolate and peppermint evokes the flavors of the season, making it a must-try recipe during the Christmas festivities.
This recipe is designed to serve 4-6 people, guaranteeing there’s plenty to share. The fudge is easy to prepare and requires just a few ingredients, but the result is a decadently smooth and flavorful confection that will impress everyone. The candy canes not only add a festive touch but also give the fudge a delightful texture and a burst of peppermint flavor that perfectly complements the rich chocolate.
Ingredients (Serves 4-6):
- 2 cups semi-sweet chocolate chips
- 1 can (14 ounces) sweetened condensed milk
- 1/4 cup unsalted butter
- 1/2 teaspoon peppermint extract
- 1 cup crushed candy canes
- 1/2 teaspoon vanilla extract
- Pinch of salt
Cooking Instructions:
- Prepare the Pan: Line an 8×8-inch baking dish with aluminum foil or parchment paper, leaving some overhang on the sides to easily lift the fudge out later. Lightly grease the lining to prevent sticking.
- Melt the Base Ingredients: In a medium saucepan over low heat, combine the semi-sweet chocolate chips, sweetened condensed milk, and butter. Stir continuously until the mixture is completely melted and smooth. Maintain the heat low to prevent the chocolate from burning.
- Add Flavorings: Remove the saucepan from the heat and stir in the peppermint extract, vanilla extract, and a pinch of salt. Mix well until the extracts are fully incorporated into the chocolate mixture.
- Incorporate Candy Canes: Gently fold in 3/4 cup of the crushed candy canes, reserving the remaining 1/4 cup for topping. Mix until the candy pieces are evenly distributed throughout the fudge mixture.
- Transfer and Set: Pour the fudge mixture into the prepared baking dish, spreading it evenly with a spatula. Sprinkle the reserved crushed candy canes on top, pressing them slightly into the surface. Refrigerate for at least 2 hours or until the fudge is firm.
- Cut and Serve: Once set, lift the fudge out of the pan using the foil or parchment overhang. Cut into small squares using a sharp knife. Serve immediately or store in an airtight container for later.
Extra Tips: For best results, use high-quality chocolate chips as this will greatly affect the flavor and texture of your fudge. If you prefer a subtler mint flavor, reduce the peppermint extract slightly. When crushing the candy canes, aim for a mix of small chunks and fine dust to guarantee an even distribution of flavor and texture. Finally, make sure to let the fudge set completely before cutting to achieve clean, sharp edges.
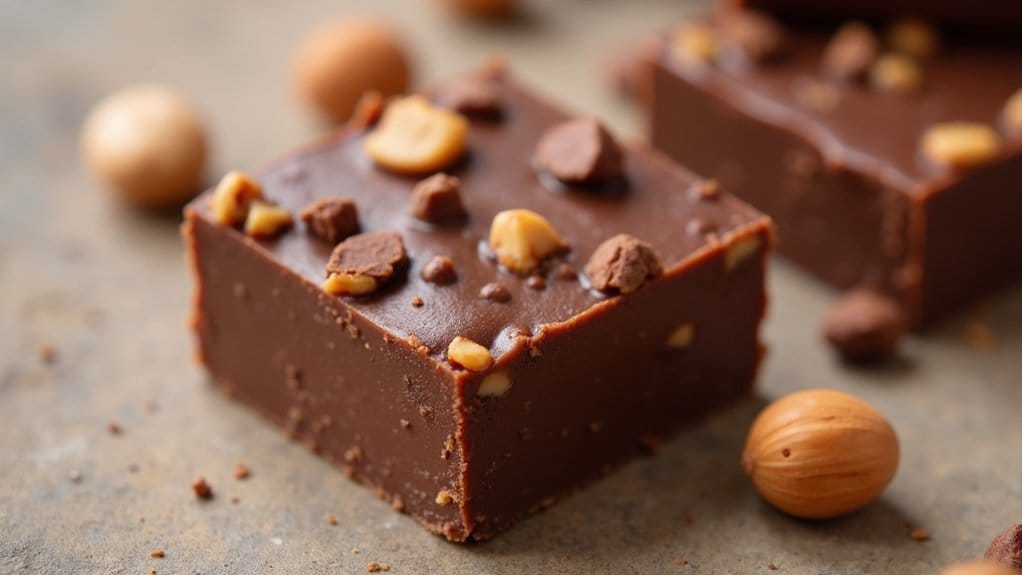
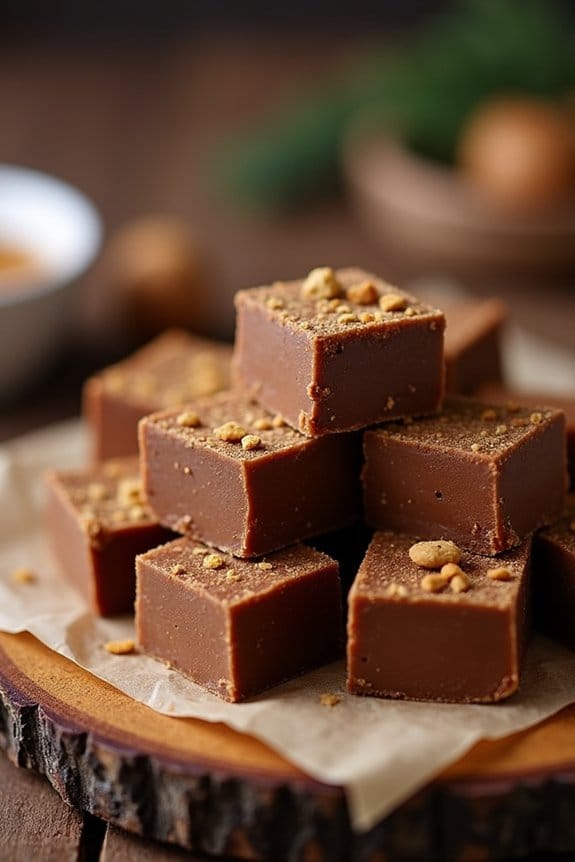
Nutella Hazelnut Fudge

Nutella Hazelnut Fudge is a delightful and creamy treat that combines the rich, velvety flavors of Nutella with the crunchy texture of hazelnuts. Perfect for the holiday season, this fudge isn’t only delicious but also incredibly easy to make, requiring just a handful of ingredients and minimal preparation time.
Whether you’re making it for a festive gathering or as a homemade gift, this recipe is bound to impress your friends and family with its luxurious taste and beautiful presentation.
This Nutella Hazelnut Fudge recipe yields enough to serve 4-6 people, making it an ideal dessert for small gatherings or as a sweet indulgence for your family. The combination of chocolate and hazelnuts is a classic pairing, and when combined with the smooth texture of fudge, it creates a treat that’s both satisfying and irresistible.
Follow these simple steps to make your own batch of Nutella Hazelnut Fudge and enjoy the taste of Christmas in every bite.
Ingredients (Serves 4-6):
- 1 cup Nutella
- 1 cup sweetened condensed milk
- 1 cup semi-sweet chocolate chips
- 1 teaspoon vanilla extract
- 1/2 cup chopped hazelnuts, toasted
- A pinch of salt
- Non-stick cooking spray or parchment paper
Cooking Instructions:
- Prepare the Pan: Line an 8×8 inch baking dish with parchment paper or lightly spray it with non-stick cooking spray. This will guarantee that the fudge can be removed easily once it has set.
- Melt the Ingredients: In a medium saucepan over low heat, combine the Nutella, sweetened condensed milk, and semi-sweet chocolate chips. Stir continuously until the mixture is completely melted and smooth. Be careful not to let the mixture boil to prevent it from burning.
- Add Flavorings: Once the mixture is smooth, remove the saucepan from the heat. Stir in the vanilla extract and a pinch of salt, mixing well to incorporate the flavors evenly.
- Add Hazelnuts: Gently fold in the toasted hazelnuts, ensuring they’re evenly distributed throughout the fudge mixture.
- Pour and Set: Pour the mixture into the prepared baking dish, spreading it evenly with a spatula. Allow the fudge to cool at room temperature for about 1 hour, then transfer it to the refrigerator to set completely for at least 2 hours.
- Cut and Serve: Once the fudge has set, lift it out of the baking dish using the parchment paper. Cut it into small squares using a sharp knife. Serve immediately or store in an airtight container.
Extra Tips:
When making Nutella Hazelnut Fudge, be sure to toast the hazelnuts before adding them to the fudge mixture. This enhances their flavor and adds an extra layer of depth to the fudge.
To toast the hazelnuts, spread them on a baking sheet and bake at 350°F (175°C) for about 10 minutes, or until they’re golden brown and fragrant.
Additionally, if you prefer a smoother texture, you can use a food processor to finely chop the hazelnuts before folding them into the fudge. This recipe can also be easily doubled if you’re planning to serve a larger crowd or want extra fudge to keep on hand for later.
