

As we cozy up for the holiday season, there’s something truly wonderful about sharing a romantic Christmas lunch with someone special. Picture a table set for two, the aroma of creamy mushroom risotto filling the room, and delightful flavors like cranberry and brie-stuffed chicken. Each dish is designed to make our time together feel intimate and memorable. Ready to explore these delightful recipes? Let’s create some cherished holiday memories.
Creamy Mushroom Risotto for Two
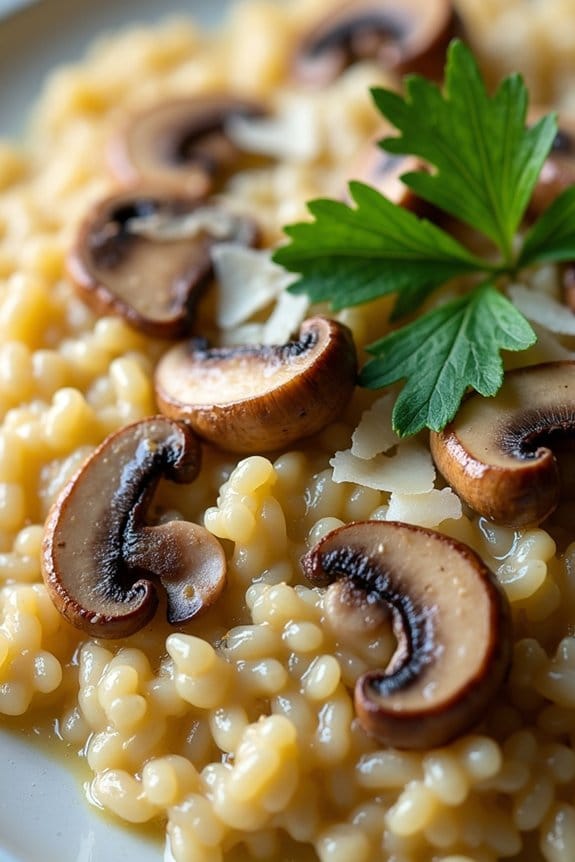
Indulge in a romantic Christmas lunch with a comforting bowl of Creamy Mushroom Risotto for Two. This dish brings together the earthy flavors of mushrooms and the rich creaminess of Arborio rice, creating an elegant meal perfect for celebrating the season. The dish isn’t only delicious but also provides you the opportunity to spend quality time together as you lovingly prepare this meal in your kitchen.
Planning for a larger gathering? No worries, this recipe can easily be scaled up to serve 4-6 people, making it a versatile option whether you’re having an intimate lunch or a small festive gathering. The key to a perfect risotto is patience and attention, guaranteeing each grain of rice absorbs the flavorful broth, resulting in a luscious and creamy finish.
Ingredients (Serves 4-6):
- 2 cups Arborio rice
- 6 cups chicken or vegetable broth
- 1 cup white wine
- 2 tablespoons olive oil
- 1 medium onion, finely chopped
- 3 cloves garlic, minced
- 1 pound mixed mushrooms (such as cremini, shiitake, or button), sliced
- 1/2 cup grated Parmesan cheese
- 1/4 cup heavy cream
- 2 tablespoons butter
- Salt and pepper to taste
- 2 tablespoons fresh parsley, chopped
Cooking Instructions:
- Prepare the Broth: In a medium saucepan, warm the chicken or vegetable broth over low heat. Keep it warm throughout the cooking process to guarantee it integrates well with the rice.
- Sauté the Aromatics: In a large pan, heat the olive oil over medium heat. Add the chopped onion and garlic, cooking until they’re soft and fragrant, about 3-4 minutes.
- Cook the Mushrooms: Add the sliced mushrooms to the pan and cook until they’re browned and have released their moisture, about 5-7 minutes. Season with a pinch of salt and pepper.
- Toast the Rice: Stir in the Arborio rice, ensuring each grain is coated in the oil and flavors. Cook for about 2 minutes until the rice is lightly toasted.
- Deglaze with Wine: Pour in the white wine, stirring continuously until the liquid is mostly absorbed by the rice.
- Add the Broth Gradually: Begin adding the warm broth, one ladle at a time, to the rice. Stir frequently and wait for the liquid to be absorbed before adding more. Repeat this process until the rice is creamy and tender, which should take about 18-20 minutes.
- Incorporate Cream and Cheese: Once the rice is cooked, stir in the grated Parmesan cheese and heavy cream. Mix well to combine and achieve a creamy consistency.
- Finish with Butter and Herbs: Remove the pan from the heat and stir in the butter and chopped parsley for added richness and freshness. Adjust seasoning with salt and pepper to taste.
Extra Tips:
To guarantee a perfectly creamy risotto, consistently stir the rice to release its starches, which contribute to the dish’s signature texture. It’s important to use warm broth to maintain a steady cooking temperature.
For an extra flavor boost, consider adding a splash of truffle oil when serving. If you prefer a vegetarian version, simply use vegetable broth instead of chicken broth. Enjoy your Creamy Mushroom Risotto with a glass of your favorite wine for an unforgettable Christmas lunch experience.
Stuffed Chicken Breasts With Cranberry and Brie
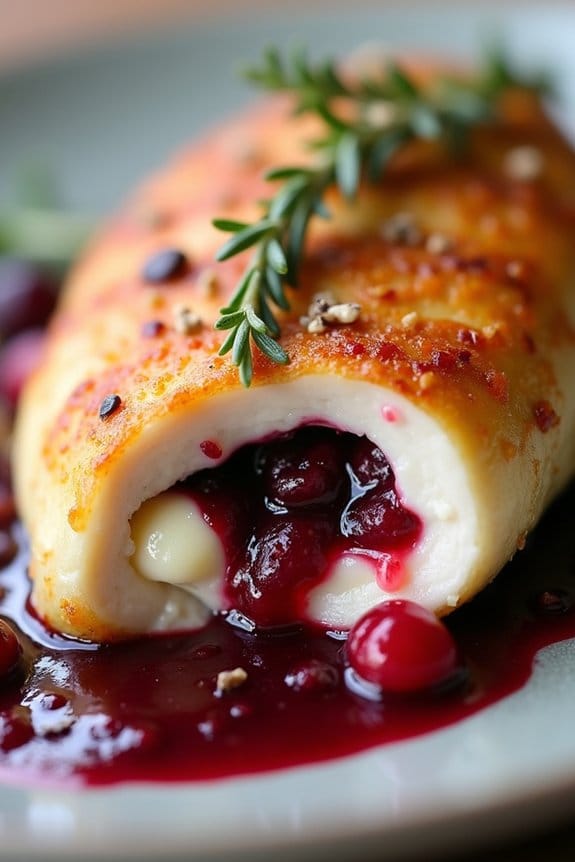
Impress your loved one this Christmas with a dish that combines the festive flavors of cranberry and the creamy richness of brie. This dish, Stuffed Chicken Breasts With Cranberry and Brie, is perfect for a romantic Christmas lunch for two, offering a delightful burst of flavor in every bite. The combination of tender chicken, sweet cranberry sauce, and gooey brie cheese creates a harmonious blend of tastes that will make your holiday meal truly memorable.
Not only is this dish delicious, but it’s also visually appealing, with the cranberries adding a pop of color that enhances the overall presentation.
While this recipe is designed with romance in mind, it can also be easily adjusted to serve a larger group. Below, you’ll find a list of ingredients for a serving size of 4-6 people, along with detailed instructions to guarantee your dish comes out perfectly. Whether you’re a seasoned cook or trying your hand at something new, this recipe is straightforward and guaranteed to impress.
Ingredients for 4-6 servings:
- 6 boneless, skinless chicken breasts
- 1 cup cranberry sauce (homemade or store-bought)
- 1 cup brie cheese, rind removed and sliced
- 1/2 cup chopped pecans
- 2 tablespoons olive oil
- Salt and pepper to taste
- 1 teaspoon dried thyme
- 1 teaspoon garlic powder
- 1/2 cup chicken broth
- 2 tablespoons butter
Cooking Instructions:
- Preheat Oven: Begin by preheating your oven to 375°F (190°C). This will guarantee that your oven is hot and ready for the chicken once it’s prepared.
- Prepare Chicken Breasts: Use a sharp knife to carefully cut a pocket into each chicken breast. Be sure not to cut all the way through; you just want to create a space to hold the stuffing.
- Stuff the Chicken: In a small bowl, mix the cranberry sauce, brie cheese slices, and chopped pecans. Stuff each chicken breast with the mixture, using toothpicks to secure the openings if necessary.
- Season and Sear: Rub each stuffed chicken breast with olive oil, then sprinkle with salt, pepper, dried thyme, and garlic powder. Heat a large oven-safe skillet over medium heat and add the butter. Sear the chicken breasts for about 3-4 minutes on each side, until they’re golden brown.
- Bake the Chicken: Pour the chicken broth into the skillet around the chicken breasts. Transfer the skillet to the preheated oven and bake for 20-25 minutes, or until the chicken is cooked through and no longer pink inside.
- Serve: Once the chicken is cooked, remove it from the oven and let it rest for a few minutes. This allows the juices to redistribute, making the chicken more tender. Serve warm, garnished with additional cranberry sauce if desired.
Extra Tips:
When making Stuffed Chicken Breasts With Cranberry and Brie, be sure to use chicken breasts that are similar in size for even cooking. If you’re using thick chicken breasts, you may need to bake them a little longer.
Always check for doneness with a meat thermometer; the internal temperature should reach 165°F (75°C). For a more intense flavor, consider marinating the chicken in a mixture of olive oil, garlic, and herbs for a few hours before cooking.
Additionally, you can substitute the pecans with walnuts or almonds if preferred, and experiment with adding fresh herbs like rosemary or sage to the stuffing for extra flavor.
Garlic Butter Shrimp Pasta
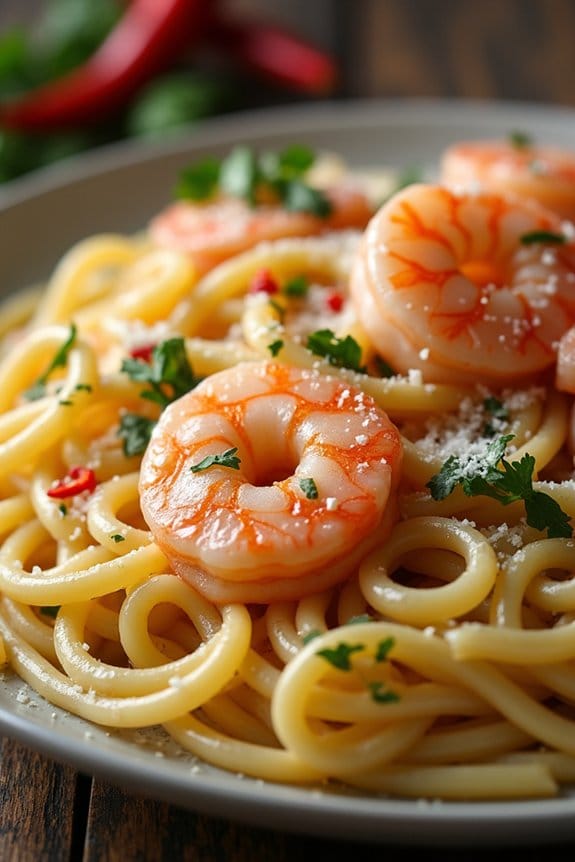
Indulge in a romantic Christmas lunch with the delightful flavors of Garlic Butter Shrimp Pasta. This dish is perfect for those who appreciate the harmonious blend of succulent shrimp, creamy butter, and aromatic garlic, all tossed together with tender pasta.
It’s a dish that speaks to the heart, offering a medley of flavors that are both satisfying and elegant. Perfect for a cozy holiday meal, this recipe promises not only to tantalize the taste buds but also to bring warmth to your festive celebration.
The beauty of Garlic Butter Shrimp Pasta lies in its simplicity and speed, allowing you to spend more time enjoying the company of your loved one. With ingredients that are easy to find and a preparation process that’s straightforward, this dish isn’t only ideal for an intimate Christmas lunch but also a versatile recipe that can be scaled up for a larger gathering.
Let’s explore the ingredients and steps needed to create this culinary delight for 4-6 people.
Ingredients for 4-6 servings:
- 1 pound (450 grams) of shrimp, peeled and deveined
- 12 ounces (340 grams) of linguine or spaghetti
- 1/2 cup (1 stick) of unsalted butter
- 5 cloves of garlic, minced
- 1/2 teaspoon red pepper flakes
- 1/4 cup dry white wine
- Juice of one lemon
- 1/4 cup chopped fresh parsley
- Salt and pepper to taste
- Optional: grated Parmesan cheese for serving
Cooking Instructions:
- Cook the Pasta: Fill a large pot with water, add a generous amount of salt, and bring it to a boil. Add the pasta, and cook according to package instructions until al dente. Reserve 1 cup of pasta water, then drain the pasta and set aside.
- Prepare the Shrimp: In a large skillet over medium heat, melt 2 tablespoons of the butter. Add the shrimp to the skillet and season with salt and pepper. Cook the shrimp for 2-3 minutes on each side, or until they turn pink and are cooked through. Remove the shrimp from the skillet and set aside.
- Make the Garlic Butter Sauce: In the same skillet, add the remaining butter. Once melted, add minced garlic and red pepper flakes. Sauté for about 1 minute, or until the garlic is fragrant and lightly golden. Be careful not to burn the garlic.
- Deglaze with Wine: Pour in the dry white wine and lemon juice, scraping up any browned bits from the bottom of the skillet. Let the mixture simmer for about 2 minutes, allowing the alcohol to evaporate and the flavors to meld.
- Combine Ingredients: Return the cooked shrimp to the skillet, along with the drained pasta and chopped parsley. Toss everything together to coat the pasta in the garlic butter sauce. If the sauce seems too thick, gradually add the reserved pasta water until the desired consistency is reached.
- Season and Serve: Taste and adjust the seasoning with more salt and pepper if needed. Transfer the pasta to serving plates and, if desired, sprinkle with grated Parmesan cheese. Serve immediately while hot.
Extra Tips:
When preparing Garlic Butter Shrimp Pasta, using fresh shrimp will elevate the dish’s flavor, but frozen shrimp can be a convenient alternative; just make sure they’re thoroughly thawed and patted dry before cooking.
If you prefer a hint of heat, adjust the red pepper flakes to your taste. Additionally, the type of pasta can be varied based on preference, such as using fettuccine for a heartier bite.
To enhance the dish further, consider adding a handful of cherry tomatoes or a splash of cream for a richer sauce. Remember, the key to a perfect garlic butter sauce isn’t to rush the garlic sautéing process – let it infuse gently for maximum flavor.
Beef Wellington With Red Wine Sauce
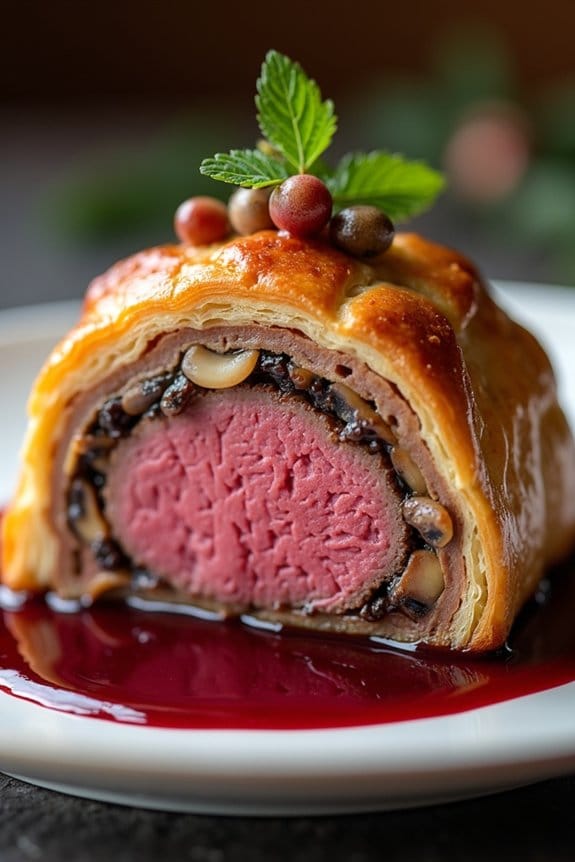
Celebrate the festive season with a romantic Christmas lunch by indulging in a classic Beef Wellington with Red Wine Sauce. This luxurious dish promises to impress with its tender beef encased in a flaky puff pastry, complemented by a rich and savory red wine sauce. Perfect for creating an intimate dining experience, Beef Wellington is renowned for its exquisite flavors and elegant presentation, making it an ideal centerpiece for your holiday table.
A harmonious blend of textures and tastes, the Beef Wellington is crafted from the finest beef tenderloin, enveloped in a layer of mushroom duxelles and prosciutto before being wrapped in golden-brown pastry. The accompanying red wine sauce elevates the dish with its depth and complexity, perfectly balancing the richness of the beef. While this recipe is designed to serve 4-6 people, it can be easily adapted to fit a more intimate setting for two.
Ingredients (Serves 4-6):
- 2 lbs beef tenderloin
- Salt and freshly ground black pepper
- 2 tbsp olive oil
- 1 lb mushrooms, finely chopped
- 2 tbsp unsalted butter
- 1 shallot, finely chopped
- 2 cloves garlic, minced
- 2 tbsp fresh thyme leaves
- 12 thin slices of prosciutto
- 2 tbsp Dijon mustard
- Flour, for dusting
- 14 oz puff pastry
- 2 egg yolks, beaten
- 1 tbsp milk
- 1 cup red wine
- 1 cup beef stock
- 1 tbsp cornstarch mixed with 1 tbsp cold water
- 1 tbsp unsalted butter
Cooking Instructions:
- Prepare the Beef Tenderloin: Season the beef tenderloin with salt and pepper. Heat olive oil in a skillet over medium-high heat and sear the beef on all sides until browned, about 2-3 minutes per side. Remove from the skillet and let cool. Brush the beef with Dijon mustard.
- Make Mushroom Duxelles: In the same skillet, melt butter over medium heat. Add shallots and garlic, sauté until softened. Add mushrooms and thyme, cook until all moisture evaporates and mushrooms are golden brown. Season with salt and pepper. Let cool.
- Wrap the Beef: Lay out a large piece of plastic wrap. Place prosciutto slices overlapping on the wrap. Spread mushroom duxelles evenly over prosciutto. Place beef on top, then roll it tightly using the plastic wrap. Chill in the fridge for 15 minutes.
- Prepare the Puff Pastry: Roll out puff pastry on a floured surface. Remove beef from plastic wrap and place it on the pastry. Wrap the beef in the pastry, sealing the edges with a little water. Trim any excess pastry.
- Bake the Beef Wellington: Preheat oven to 400°F (200°C). Place wrapped beef seam-side down on a baking tray. Mix egg yolks with milk and brush over the pastry. Make small cuts on the top for steam to escape. Bake for 25-30 minutes or until pastry is golden brown. Let it rest for 10 minutes before slicing.
- Make the Red Wine Sauce: In a saucepan over medium heat, add red wine and beef stock. Bring to a simmer and reduce by half. Add cornstarch mixture, whisking continuously until the sauce thickens. Stir in butter for a glossy finish.
Extra Tips:
When cooking Beef Wellington, ascertain the beef is chilled after wrapping in prosciutto and mushrooms; this helps maintain its shape and prevents the pastry from becoming soggy.
Don’t forget to let the Wellington rest after baking; this allows the juices to redistribute, ensuring a moist and tender slice.
Finally, make sure the red wine sauce is well-reduced to concentrate its flavors, adding a luxurious touch to your holiday meal.
Baked Lobster Tails With Herb Butter
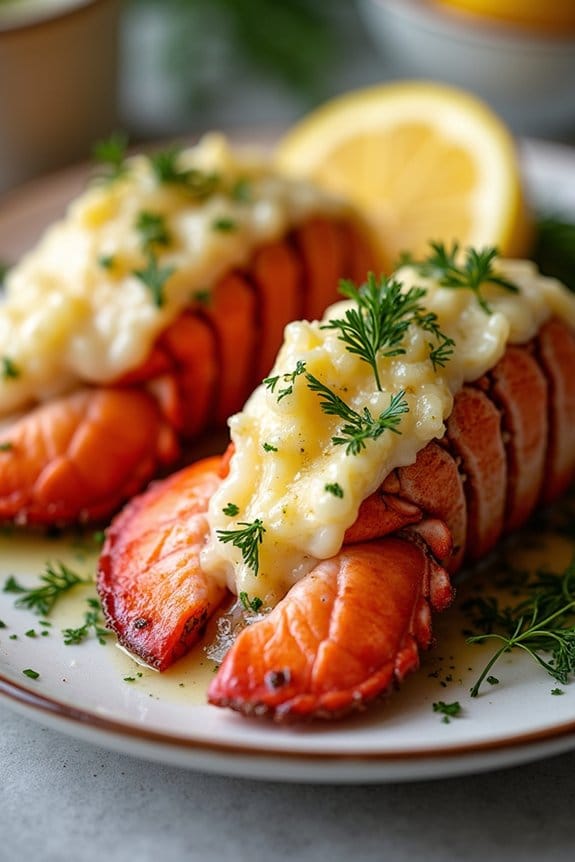
Baked Lobster Tails With Herb Butter is an exquisite dish that’s perfect for a romantic Christmas lunch for two. The succulent lobster meat, paired with a rich and flavorful herb butter, creates a luxurious dining experience that’s guaranteed to impress. This dish isn’t only delicious but also surprisingly simple to prepare, making it an ideal choice for a special occasion.
The key to this recipe is using high-quality, fresh lobster tails and a blend of aromatic herbs that enhance the natural sweetness of the lobster. The herb butter, made with fresh herbs, garlic, and lemon juice, adds a burst of flavor to the baked lobster tails. When baked to perfection, the lobster meat becomes tender and juicy, while the herb butter melts into every crevice of the lobster, creating a mouthwatering dish.
This recipe can be easily scaled to serve 4-6 people, so you can share this delightful meal with family or friends if desired.
Ingredients for 4-6 servings:
- 4-6 lobster tails
- 1/2 cup unsalted butter, softened
- 2 tablespoons fresh parsley, finely chopped
- 1 tablespoon fresh dill, finely chopped
- 2 cloves garlic, minced
- 1 tablespoon lemon juice
- 1/2 teaspoon salt
- 1/4 teaspoon black pepper
- Lemon wedges, for serving
Cooking Instructions:
- Preheat the Oven: Preheat your oven to 425°F (220°C). This high heat will help cook the lobster tails quickly and evenly.
- Prepare the Lobster Tails: Using kitchen shears, carefully cut through the top shell of each lobster tail, from the base to the tip of the tail. Gently pull the shell apart slightly and lift the lobster meat to rest on top of the shell, keeping it attached at the tail end.
- Make the Herb Butter: In a bowl, combine the softened butter, parsley, dill, garlic, lemon juice, salt, and pepper. Mix until well combined.
- Butter the Lobster Tails: Spread the herb butter generously over the exposed lobster meat. Confirm each tail is well coated to maximize flavor.
- Bake the Lobster Tails: Place the prepared lobster tails on a baking sheet and bake in the preheated oven for 12-15 minutes, or until the lobster meat is opaque and cooked through. The internal temperature should reach 140°F (60°C).
- Serve: Remove the lobster tails from the oven and serve immediately with lemon wedges on the side for an added burst of freshness.
Extra Tips:
For the best results, select lobster tails that are similar in size to guarantee even cooking. If using frozen lobster tails, be sure to fully thaw them in the refrigerator before preparing.
When cutting the shell, take care not to cut through the meat. Additionally, you can customize the herb butter by adding other herbs such as thyme or tarragon for different flavor profiles.
Finally, always use a meat thermometer to confirm the lobster is perfectly cooked, as overcooking can result in tough meat.
Spinach and Ricotta Stuffed Shells
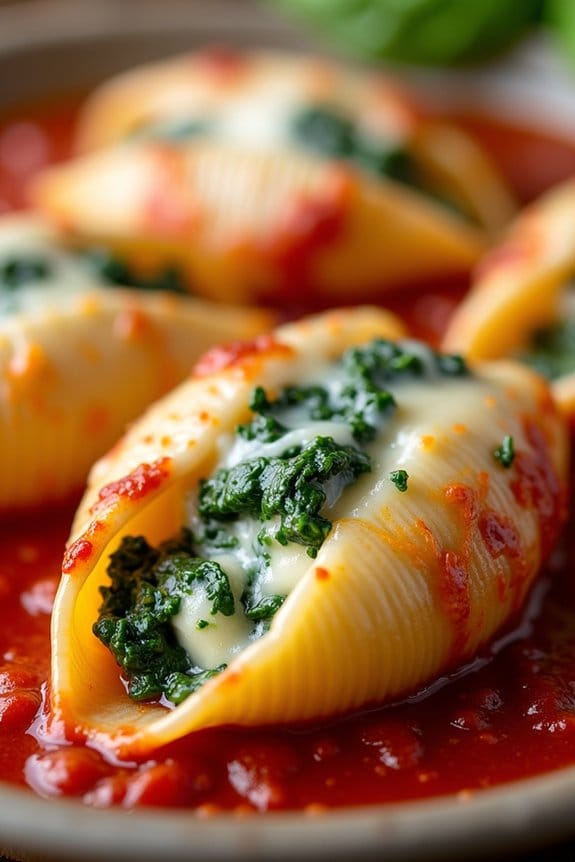
Spinach and Ricotta Stuffed Shells is a delightful and comforting dish, perfect for a romantic Christmas lunch. This dish combines creamy ricotta cheese with fresh spinach, nestled inside tender pasta shells, and topped with a rich tomato sauce and melted mozzarella cheese. The combination of flavors and textures creates a satisfying meal that’s both elegant and comforting.
Whether you’re a seasoned cook or trying your hand at something new, this recipe is bound to impress your loved one.
Preparing Spinach and Ricotta Stuffed Shells is a rewarding experience, as it allows you to create a beautiful and delicious dish from scratch. The process involves making a flavorful filling, stuffing the pasta shells, and baking them to perfection. While it may seem like a lot of steps, each stage is straightforward and contributes to the final dish’s rich flavors and appealing presentation.
This recipe is designed to serve 4-6 people, making it perfect for a small gathering or for enjoying as leftovers the next day.
Ingredients (serves 4-6):
- 12 ounces jumbo pasta shells
- 15 ounces ricotta cheese
- 1 cup freshly grated Parmesan cheese
- 1 egg
- 2 cups fresh spinach, chopped
- 2 cups marinara sauce
- 1 teaspoon dried Italian herbs
- 2 cups shredded mozzarella cheese
- Salt and pepper to taste
- 2 tablespoons olive oil
Cooking Instructions:
- Preheat the Oven: Preheat your oven to 375°F (190°C). This will guarantee your oven is ready to bake the shells once they’re assembled.
- Cook the Pasta Shells: In a large pot, bring salted water to a boil. Add the jumbo pasta shells and cook until al dente, following the package instructions. Drain the shells and drizzle with olive oil to prevent sticking. Set aside.
- Prepare the Filling: In a large mixing bowl, combine the ricotta cheese, Parmesan cheese, egg, chopped spinach, Italian herbs, salt, and pepper. Mix until all ingredients are well-blended.
- Stuff the Shells: Using a spoon, fill each cooked pasta shell with the ricotta and spinach mixture. Be generous with the filling, ensuring each shell is nicely packed.
- Assemble the Dish: Spread a layer of marinara sauce over the bottom of a large baking dish. Arrange the stuffed shells over the sauce in a single layer. Pour the remaining marinara sauce over the top of the shells, ensuring they’re fully covered.
- Top with Cheese: Sprinkle the shredded mozzarella cheese evenly over the top of the shells. This will create a golden, bubbly crust when baked.
- Bake: Cover the baking dish with aluminum foil and bake in the preheated oven for 25 minutes. Then, remove the foil and bake for an additional 10-15 minutes, or until the cheese is melted and slightly browned.
- Serve: Let the dish cool for a few minutes before serving. This allows the cheese to set slightly and makes serving easier.
Extra Tips: When cooking the pasta shells, guarantee they’re slightly undercooked, as they’ll continue to cook in the oven. If you prefer a more robust flavor, consider adding a pinch of nutmeg to the filling. For a variation, you can substitute spinach with kale or Swiss chard.
To save time, the shells can be assembled a day ahead and stored in the refrigerator until you’re ready to bake them. Just remember to bring the dish to room temperature before baking to ensure even cooking.
Pan-Seared Duck Breast With Orange Glaze
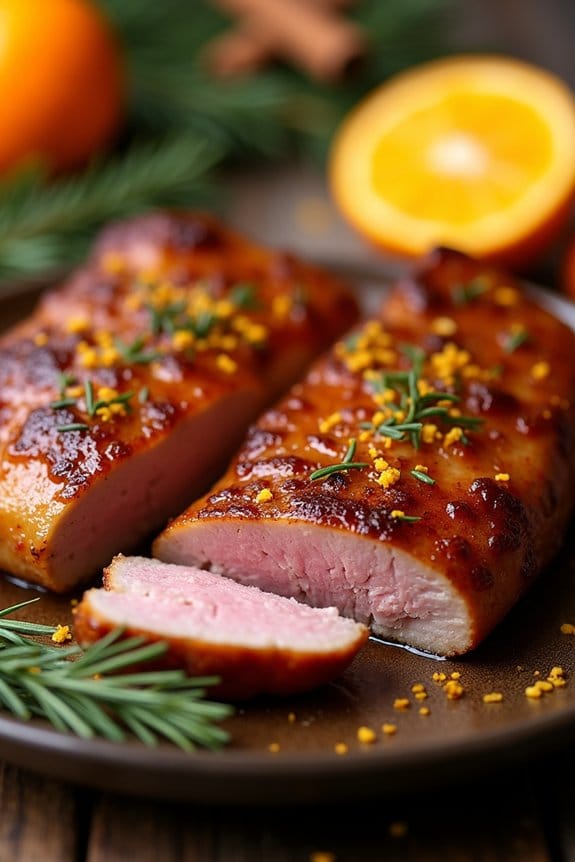
Indulge in a romantic Christmas lunch for two with this exquisite Pan-Seared Duck Breast with Orange Glaze. This dish combines the rich, succulent flavor of duck with a sweet and tangy orange glaze, creating a perfect balance of taste. The crispy skin of the duck breast, achieved through expert pan-searing, pairs beautifully with the vibrant and aromatic glaze, making it an ideal centerpiece for a holiday meal.
This dish not only satisfies the palate but also adds a touch of elegance to your Christmas table. The orange glaze is crafted from freshly squeezed orange juice, zest, and a hint of honey, which enhances the natural flavors of the duck. The addition of aromatic spices adds depth to the glaze, while a splash of balsamic vinegar contributes a slight acidity, cutting through the richness of the duck.
The result is a beautifully caramelized duck breast with a glossy, flavorful glaze that will impress your loved one and make your Christmas lunch truly memorable.
Ingredients for 4-6 servings:
- 4-6 duck breasts
- Salt and pepper to taste
- 2 tablespoons olive oil
- 1 cup fresh orange juice
- Zest of 1 orange
- 2 tablespoons honey
- 1 tablespoon balsamic vinegar
- 1 teaspoon ground cinnamon
- 1/2 teaspoon ground ginger
- 2 cloves garlic, minced
Cooking Instructions:
- Prepare the Duck Breasts: Take the duck breasts out of the refrigerator about 30 minutes before cooking to allow them to reach room temperature. Pat them dry with paper towels and score the skin in a crosshatch pattern, being careful not to cut into the meat. Season generously with salt and pepper.
- Sear the Duck Breasts: Heat olive oil in a large skillet over medium-high heat. Place the duck breasts skin-side down in the skillet. Cook for about 6-8 minutes, or until the skin is crispy and golden brown. Flip the breasts and cook for another 3-4 minutes for medium-rare, or longer for desired doneness. Remove the duck from the skillet and let it rest on a cutting board.
- Prepare the Orange Glaze: In the same skillet, add minced garlic and sauté for about 1 minute until fragrant. Pour in the orange juice, orange zest, honey, balsamic vinegar, cinnamon, and ginger. Stir the mixture and bring it to a simmer. Cook for about 10 minutes, or until the glaze has thickened slightly and coats the back of a spoon.
- Finish the Duck Breasts: Return the duck breasts to the skillet, skin-side up. Spoon the orange glaze over the duck, making sure they’re well-coated. Simmer for another 1-2 minutes to warm the duck through and allow the flavors to meld.
- Serve: Slice the duck breasts and arrange them on a platter. Drizzle any remaining glaze over the top. Serve immediately with your choice of sides.
Extra Tips:
When cooking duck breast, it’s crucial to start with a cold pan to guarantee the fat renders out properly, resulting in a crispy skin. Be patient and avoid moving the duck around in the pan to achieve an even sear.
For the glaze, fresh orange juice is recommended for a more vibrant flavor, but you can use bottled juice if necessary. Adjust the amount of honey to suit your taste, especially if you desire a sweeter glaze.
Finally, always let the duck rest after cooking to allow the juices to redistribute, ensuring a tender and juicy bite.
Honey Mustard Glazed Salmon
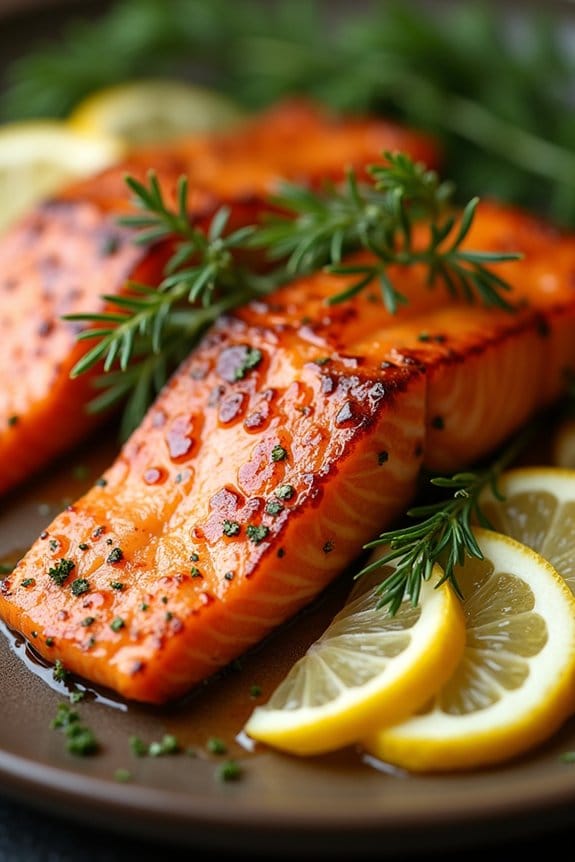
For a delightful and romantic Christmas lunch, the Honey Mustard Glazed Salmon is a perfect choice. This dish combines the rich, savory flavor of salmon with a sweet and tangy glaze, creating a harmonious blend that tantalizes the taste buds. The glaze, made with honey and mustard, caramelizes beautifully on the salmon during cooking, giving it a glossy and appetizing finish. The dish isn’t only delicious but also visually appealing, making it an ideal centerpiece for a special meal shared with a loved one.
The Honey Mustard Glazed Salmon is both simple and elegant, allowing you to focus on enjoying each other’s company rather than being tied up in the kitchen. This recipe is designed to serve 4-6 people, making it perfect for a double-date Christmas lunch or to have a little leftover for another meal. The preparation is straightforward, and the cooking time is efficient, guaranteeing that you can create a gourmet experience without any hassle. Pair it with a light salad or some roasted vegetables for a complete and satisfying meal.
Ingredients for 4-6 servings:
- 4-6 salmon fillets, skin-on
- 1/2 cup honey
- 1/4 cup Dijon mustard
- 2 tablespoons whole grain mustard
- 2 tablespoons soy sauce
- 1 tablespoon olive oil
- 2 cloves garlic, minced
- Salt and pepper, to taste
- Lemon wedges, for serving
- Fresh dill, for garnish
Cooking Instructions:
- Prepare the Glaze: In a small bowl, combine the honey, Dijon mustard, whole grain mustard, soy sauce, olive oil, and minced garlic. Mix well until all ingredients are thoroughly combined to form a smooth glaze.
- Season the Salmon: Pat the salmon fillets dry with a paper towel. Season both sides with salt and pepper to taste, guaranteeing an even coating.
- Apply the Glaze: Place the salmon fillets skin-side down on a lined baking sheet. Generously brush the glaze over the top and sides of each fillet, guaranteeing they’re well-coated.
- Preheat the Oven: Preheat your oven to 375°F (190°C). Allow it to reach the desired temperature before placing the salmon inside.
- Bake the Salmon: Place the baking sheet in the preheated oven and bake for 15-20 minutes, or until the salmon is cooked through and flakes easily with a fork. The glaze should be bubbling and slightly caramelized.
- Finish and Serve: Remove the salmon from the oven and let it rest for a couple of minutes. Garnish with fresh dill and serve with lemon wedges on the side for an added burst of flavor.
Extra Tips:
When preparing the Honey Mustard Glazed Salmon, confirm that the salmon fillets are of even thickness to promote even cooking.
If you prefer a crispier skin, you can sear the salmon skin-side down in a hot skillet for a couple of minutes before applying the glaze and baking.
Additionally, consider marinating the salmon in the glaze for about 30 minutes prior to cooking to enhance the flavor.
Roasted Vegetable Tart With Goat Cheese
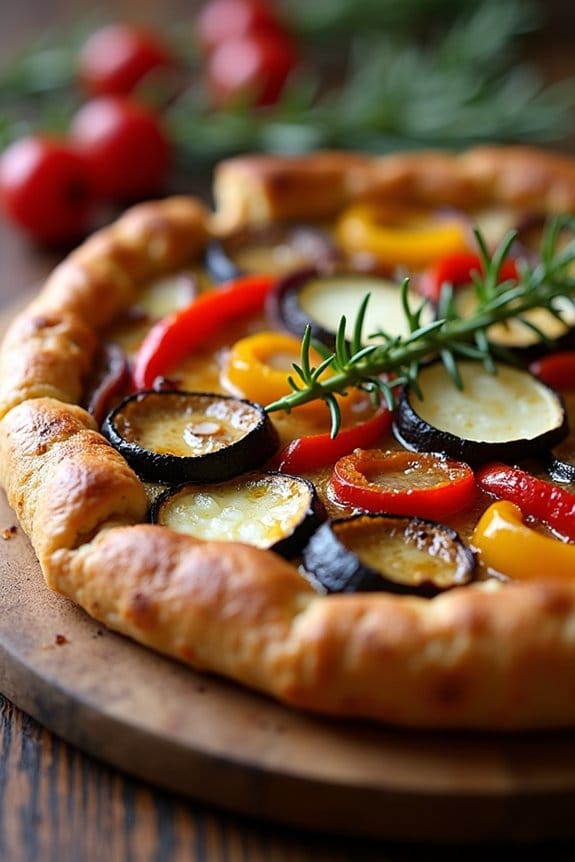
Roasted Vegetable Tart With Goat Cheese is a delightful dish that brings together the earthy flavors of roasted vegetables with the creamy tanginess of goat cheese, all nestled within a buttery, flaky tart crust.
It’s an ideal choice for a romantic Christmas lunch for two, as it offers a sophisticated blend of flavors that are both comforting and elegant. The warm, golden tart is sure to be a centerpiece at your lunch table, inviting you to relish in the festive season’s spirit with every bite.
This dish is as visually appealing as it’s delicious, with vibrant colors from the roasted vegetables creating a beautiful contrast against the creamy goat cheese. The aroma of rosemary and thyme infuses the tart, enhancing its flavor profile and making it a true treat for the senses.
Whether you’re a seasoned cook or experimenting with new recipes, this roasted vegetable tart is a satisfying and impressive dish to prepare and enjoy together.
Ingredients (Serving Size: 4-6 people):
- 1 sheet of puff pastry, thawed
- 1 small eggplant, diced
- 1 small zucchini, sliced
- 1 red bell pepper, diced
- 1 yellow bell pepper, diced
- 1 small red onion, sliced
- 2 tablespoons olive oil
- Salt and pepper to taste
- 1 teaspoon dried thyme
- 1 teaspoon dried rosemary
- 150g (5 oz) goat cheese, crumbled
- 1 egg, beaten (for egg wash)
Instructions:
- Preheat the Oven: Start by preheating your oven to 200°C (400°F). This will guarantee that the oven is at the right temperature for roasting the vegetables and baking the tart.
- Prepare the Vegetables: In a large bowl, toss the diced eggplant, zucchini, red and yellow bell peppers, and red onion with olive oil, salt, pepper, thyme, and rosemary. Make sure all the vegetables are evenly coated with the oil and seasoning.
- Roast the Vegetables: Spread the seasoned vegetables in a single layer on a baking sheet. Roast them in the preheated oven for about 20-25 minutes, or until they’re tender and slightly caramelized. Stir the vegetables halfway through the cooking time to guarantee even roasting.
- Prepare the Tart Base: While the vegetables are roasting, roll out the puff pastry on a lightly floured surface to smooth out any creases. Place the pastry on a baking sheet lined with parchment paper.
- Assemble the Tart: Once the vegetables are roasted, spread them evenly over the puff pastry, leaving a border of about 1 inch around the edges. Crumble the goat cheese over the top of the vegetables.
- Fold and Brush: Fold the edges of the pastry over the filling to create a border. Brush the edges with beaten egg to give the tart a golden, glossy finish as it bakes.
- Bake the Tart: Place the assembled tart in the oven and bake for 20-25 minutes, or until the pastry is golden brown and puffed up. The goat cheese should be slightly melted and the edges crispy.
- Serve the Tart: Remove the tart from the oven and let it cool slightly before slicing. Serve warm, and enjoy the harmonious blend of roasted vegetables and goat cheese.
Extra Tips:
When preparing the vegetables, make sure they’re cut into similar sizes to promote even roasting.
Feel free to experiment with different vegetables based on your preference or seasonal availability. If you prefer a stronger flavor, you can add a sprinkle of balsamic glaze over the tart before serving.
Additionally, if you have any leftover tart, it can be reheated in the oven to restore its crispiness. This dish pairs wonderfully with a light, crisp white wine or a revitalizing salad.
Lamb Chops With Rosemary and Garlic
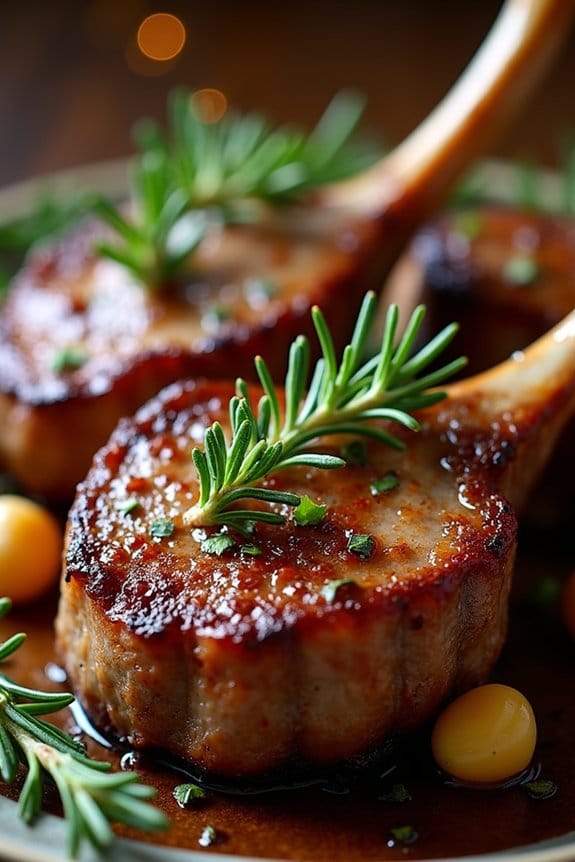
Few dishes can match the elegance and flavor of perfectly cooked lamb chops, making them an ideal choice for a romantic Christmas lunch for two. The combination of tender lamb, fresh rosemary, and pungent garlic creates a savory symphony that’s both impressive and easy to prepare. This dish captures the essence of traditional holiday flavors, with the rosemary providing a fragrant herbal note that complements the richness of the lamb.
When cooked to a succulent medium-rare, these lamb chops are sure to delight the palate and set the tone for a memorable meal. The key to this dish is allowing the lamb to marinate, which infuses the meat with the aromatic flavors of rosemary and garlic. This marinade not only tenderizes the lamb but also enhances its natural taste.
When paired with a simple side of roasted vegetables or a fresh salad, Lamb Chops With Rosemary and Garlic become the centerpiece of a festive meal that’s both sophisticated and satisfying. Though this recipe is designed for a romantic meal for two, we’ve provided ingredient quantities to serve 4-6 people, so you can easily adjust as needed for a larger gathering.
Ingredients for 4-6 servings:
- 8-12 lamb chops (about 1-inch thick)
- 4 tablespoons fresh rosemary, chopped
- 4 cloves garlic, minced
- 1/4 cup olive oil
- Salt and freshly ground black pepper, to taste
- 2 tablespoons lemon juice
- Optional: 1 tablespoon Dijon mustard
Cooking Instructions:
1. Prepare the Marinade:
In a small bowl, combine the chopped rosemary, minced garlic, olive oil, lemon juice, and Dijon mustard (if using). Season with salt and freshly ground black pepper to taste. Mix well to create a thick marinade.
2. Marinate the Lamb Chops:
Place the lamb chops in a large shallow dish or a resealable plastic bag. Pour the marinade over the chops, ensuring they’re well coated. Cover the dish or seal the bag, and refrigerate for at least 1-2 hours, or overnight for a more intense flavor.
3. Preheat the Grill or Pan:
Remove the lamb chops from the refrigerator about 30 minutes before cooking to bring them to room temperature. Preheat your grill to medium-high heat, or heat a large skillet over medium-high heat if cooking indoors.
4. Cook the Lamb Chops:
Remove the lamb chops from the marinade, allowing any excess to drip off. Place them on the grill or in the hot pan, cooking for about 3-4 minutes on each side for medium-rare, or until they reach your desired level of doneness. Use a meat thermometer to check that the internal temperature reaches at least 145°F for medium-rare.
5. Rest and Serve:
Once cooked, transfer the lamb chops to a plate and let them rest for about 5 minutes. This allows the juices to redistribute, ensuring tender and juicy chops. Serve immediately with your choice of sides.
Extra Tips:
For the best results, choose lamb chops that are evenly cut and have a good amount of marbling, which contributes to the flavor and tenderness of the meat. If you prefer a stronger garlic flavor, consider using garlic paste instead of minced garlic in the marinade.
When grilling, it’s important to avoid overcooking the lamb, as it can become tough; keeping a close eye on the cooking time and using a thermometer will help achieve the perfect level of doneness. If you have leftovers, lamb chops can be gently reheated in the oven, but they’re most delightful when served fresh off the grill or pan.
Butternut Squash and Sage Risotto
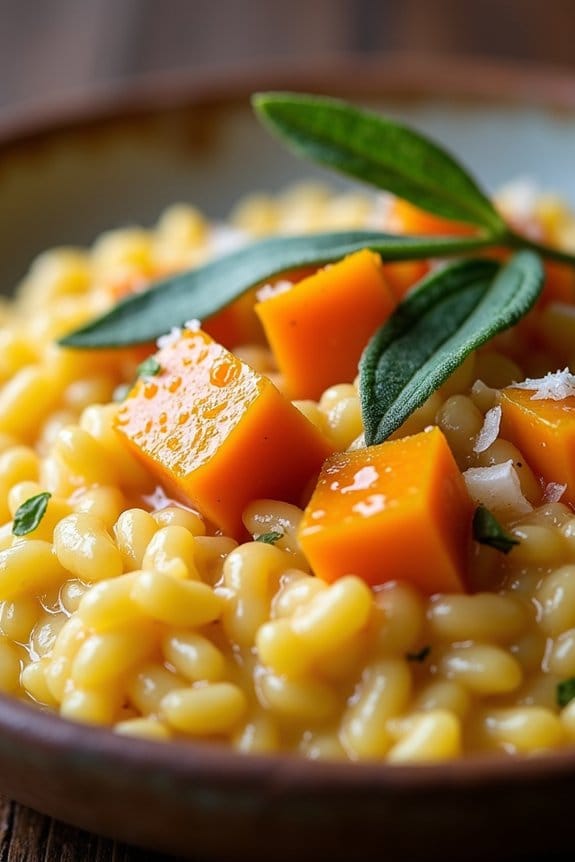
Indulge in a romantic Christmas lunch with a delightful Butternut Squash and Sage Risotto. This creamy, flavorful dish is perfect for a cozy holiday meal, bringing together the rich sweetness of butternut squash and the earthy aroma of fresh sage. As the risotto slowly cooks, it absorbs the savory broth and melds with the squash, resulting in a luscious, velvety texture that will surely impress your loved one.
This dish not only highlights the festive flavors of the season but also offers a warm and comforting dining experience. Cooking for two is often intimate and special, and preparing a dish like Butternut Squash and Sage Risotto allows you to share that experience with someone you care about. The process of making risotto is a labor of love, requiring patience and attention to detail, but the end result is a dish that speaks volumes.
Whether you’re celebrating Christmas or simply enjoying a quiet afternoon together, this risotto is sure to make the occasion memorable with its vibrant colors and hearty taste.
Ingredients (Serving Size: 4-6 people)
- 2 cups Arborio rice
- 1 small butternut squash, peeled and diced
- 1 small onion, finely chopped
- 2 cloves garlic, minced
- 6 cups vegetable broth
- 1/2 cup dry white wine
- 1/2 cup grated Parmesan cheese
- 2 tablespoons olive oil
- 2 tablespoons unsalted butter
- 10 fresh sage leaves, thinly sliced
- Salt and pepper to taste
Instructions
- Prepare the Ingredients: Begin by heating the vegetable broth in a saucepan over low heat. Keep it warm but not boiling as it will be added gradually to the risotto.
- Cook the Butternut Squash: In a large pan, heat one tablespoon of olive oil over medium heat. Add the diced butternut squash, season with a pinch of salt and pepper, and sauté for about 10 minutes until it becomes tender and slightly caramelized. Remove the squash from the pan and set aside.
- Sauté the Aromatics: In the same pan, add another tablespoon of olive oil and the unsalted butter. Once melted, add the chopped onion and garlic. Sauté for about 2-3 minutes, or until the onion becomes translucent and fragrant.
- Toast the Rice: Add the Arborio rice to the pan with the onions and garlic. Stir continuously for 1-2 minutes until the rice grains are well coated and start to toast slightly, which enhances the overall flavor.
- Deglaze with Wine: Pour in the white wine and stir until it has mostly evaporated. This will add a depth of flavor to the risotto.
- Cook the Risotto: Begin adding the warm vegetable broth to the rice, one ladle at a time. Stir frequently and allow the rice to absorb most of the liquid before adding the next ladle. Continue this process for about 18-20 minutes until the rice is creamy and al dente.
- Incorporate Squash and Seasonings: Gently fold in the cooked butternut squash and sliced sage leaves. Stir in the grated Parmesan cheese until it melts into the risotto. Taste and adjust seasoning with salt and pepper as needed.
- Serve: Remove from heat and let the risotto rest for a minute before serving. Garnish with additional Parmesan and sage if desired.
Extra Tips
When making risotto, it’s important to use a good quality Arborio rice, as its high starch content is essential for achieving the creamy texture.
Always keep the broth warm to promote even cooking and avoid shocking the rice with cold liquid. Stirring frequently helps release the starches in the rice, creating a smooth consistency.
If you prefer a richer flavor, you can substitute chicken broth for vegetable broth. Finally, remember that risotto continues to thicken as it cools, so serve immediately for the best texture.
Prosciutto-Wrapped Asparagus With Parmesan
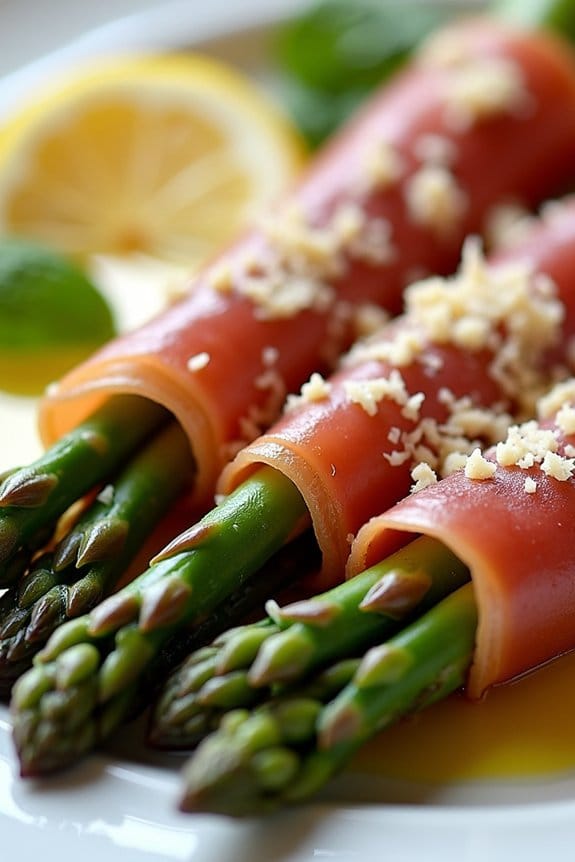
Celebrate the festive season with a delightful combination of flavors that come together to create a memorable dish: Prosciutto-Wrapped Asparagus With Parmesan. This dish is perfect for a romantic Christmas lunch, offering an elegant balance of salty prosciutto, fresh asparagus, and the rich, nutty taste of Parmesan cheese. Each bite delivers a harmonious mix of textures and flavors that will elevate your dining experience, making it a culinary delight to share with your loved ones.
The simplicity of the ingredients is matched by the ease of preparation, allowing you to focus on enjoying the moment rather than spending hours in the kitchen. Whether you’re a seasoned cook or a novice in the kitchen, this recipe is both approachable and impressive. Designed for a serving size of 4-6 people, this dish is perfect for a small gathering or an intimate meal. The following recipe will guide you through the process of creating this exquisite dish, guaranteeing your holiday lunch is both delicious and stress-free.
Ingredients (serving size: 4-6 people):
- 24 asparagus spears, trimmed
- 12 slices of prosciutto
- 1 cup grated Parmesan cheese
- 2 tablespoons olive oil
- Salt and pepper to taste
- Lemon wedges, for serving
Cooking Instructions:
- Preheat the Oven: Start by preheating your oven to 400°F (200°C). Preparing the oven in advance guarantees it reaches the right temperature for cooking the asparagus evenly.
- Prepare the Asparagus: Wash the asparagus spears thoroughly and trim the woody ends to guarantee they’re tender after cooking. Pat them dry with a paper towel to remove excess moisture.
- Wrap with Prosciutto: Take a slice of prosciutto and wrap it around each asparagus spear, starting from the bottom and working your way up, leaving the tips exposed. The prosciutto will add a savory flavor to the asparagus while keeping it moist during baking.
- Arrange on Baking Sheet: Place the prosciutto-wrapped asparagus spears on a baking sheet lined with parchment paper. Make sure they’re evenly spaced to guarantee even cooking.
- Drizzle with Olive Oil: Drizzle the olive oil over the asparagus spears, coating them lightly. Sprinkle with salt and pepper to taste, keeping in mind that prosciutto is quite salty, so use salt sparingly.
- Sprinkle with Parmesan: Generously sprinkle grated Parmesan cheese over the asparagus spears, guaranteeing each piece has a good amount of cheese to create a deliciously crisp topping.
- Bake the Asparagus: Place the baking sheet in the preheated oven and bake for 12-15 minutes. The asparagus should be tender, and the prosciutto should be crispy, with the Parmesan melted and golden.
- Serve: Remove from the oven and transfer the asparagus to a serving platter. Serve immediately with lemon wedges on the side, allowing guests to squeeze fresh lemon juice over the asparagus for added brightness.
Extra Tips:
When selecting asparagus, opt for medium-sized spears that are firm and bright green for the best flavor and texture. If the Parmesan cheese starts to brown too quickly during baking, you can cover the top with a piece of aluminum foil to prevent burning.
For an extra touch of indulgence, consider adding a sprinkle of crushed red pepper flakes or a drizzle of balsamic glaze before serving. This dish pairs beautifully with a light white wine, enhancing the meal’s overall dining experience.
