
As I started planning for Halloween party snacks, the excitement of balancing those sweet treats with savory ones took over. Picture serving spooky stuffed peppers that look like mini jack-o’-lanterns or crispy mummy jalapeño poppers. Each bite adds a delicious twist to classic recipes. The vibrant colors and playful presentations make these snacks irresistible. Ready to add some eerie charm to your festive spread? Let’s explore these creative savory delights that are sure to captivate your guests’ taste buds.
Spooky Stuffed Peppers
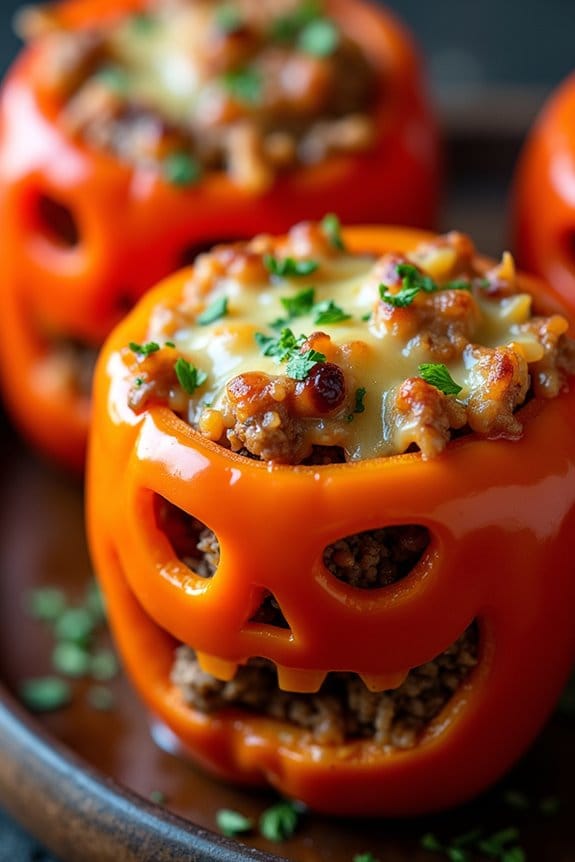
Get ready to delight your guests this Halloween with a dish that’s as delicious as it’s eerie. Spooky Stuffed Peppers aren’t only a visual treat but also pack a flavorful punch that will leave everyone craving more. These peppers are carved to resemble jack-o’-lanterns, filled with a savory mixture, and then roasted to perfection. They’re a perfect combination of festive fun and delectable taste, making them an ideal addition to your Halloween spread.
The concept of Spooky Stuffed Peppers is simple yet innovative. By carving out the peppers to mimic the classic Halloween pumpkin face, you’re adding a playful twist to a classic stuffed pepper recipe. The filling, which includes ground meat, rice, and a blend of spices, creates a hearty and satisfying meal. This recipe serves 4-6 people, making it a great option for a small gathering or family dinner. Not only will this dish charm your taste buds, but it will also add a touch of spookiness to your Halloween festivities.
Ingredients for 4-6 Servings:
- 6 medium-sized bell peppers (preferably orange or red)
- 1 pound ground beef or turkey
- 1 cup cooked rice
- 1 can (15 ounces) diced tomatoes
- 1 small onion, finely chopped
- 2 cloves garlic, minced
- 1 teaspoon chili powder
- 1 teaspoon cumin
- Salt and pepper to taste
- 1 cup shredded cheese (cheddar or mozzarella)
- Olive oil
- Fresh parsley for garnish (optional)
Cooking Instructions:
- Prepare the Peppers: Preheat your oven to 375°F (190°C). Cut the tops off the bell peppers and remove the seeds and membranes. Using a small paring knife, carefully carve out jack-o’-lantern faces on one side of each pepper.
- Cook the Filling: In a large skillet, heat a tablespoon of olive oil over medium heat. Add the chopped onion and garlic, sautéing until they become translucent. Add the ground beef or turkey, cooking until browned. Drain any excess fat.
- Mix the Ingredients: Stir in the cooked rice, diced tomatoes (with juice), chili powder, cumin, salt, and pepper. Let this mixture simmer for about 5 minutes, allowing the flavors to meld together.
- Stuff the Peppers: Carefully spoon the meat and rice mixture into each carved pepper, pressing down slightly to pack the filling. Place the stuffed peppers upright in a baking dish.
- Bake the Peppers: Cover the baking dish with aluminum foil and bake in the preheated oven for 25 minutes. Remove the foil, sprinkle shredded cheese on top of each pepper, and bake for an additional 10-15 minutes, or until the peppers are tender and the cheese is bubbly and golden.
- Serve: Remove the peppers from the oven and let them cool slightly. Garnish with fresh parsley if desired before serving.
Extra Tips:
When preparing the Spooky Stuffed Peppers, try to select peppers that can stand upright easily, as this will help prevent any spillage of the filling.
If you prefer a vegetarian version, substitute the ground meat with a mixture of black beans and corn or your favorite plant-based protein.
Adjust the spices according to your preference for heat, and feel free to add extra vegetables like mushrooms or zucchini to the filling for added nutrition.
Enjoy crafting these spooky yet scrumptious treats!
Mummy Jalapeño Poppers
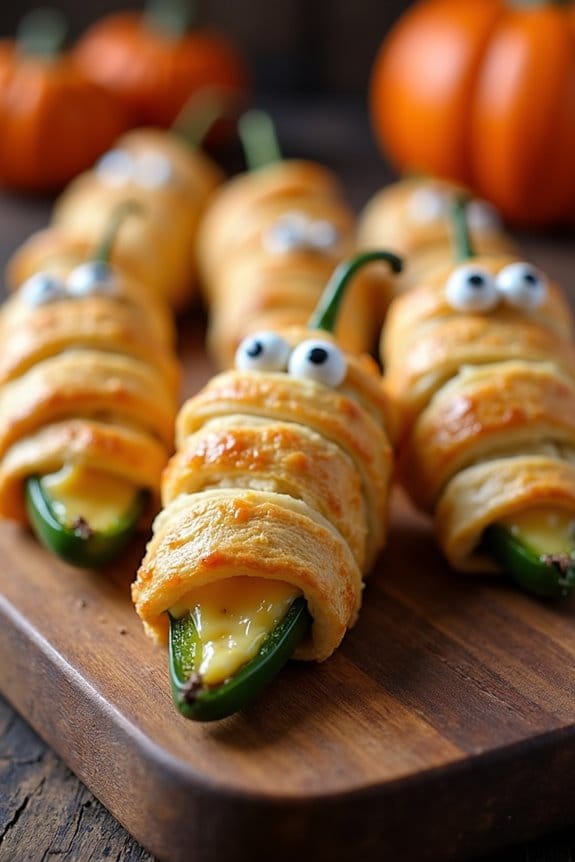
Mummy Jalapeño Poppers are a frightfully fun and delicious snack perfect for Halloween festivities. These spooky treats combine the bold flavors of jalapeño peppers with creamy cheese filling, all wrapped up in a flaky, golden crescent dough. The result is a delightful combination of spicy, creamy, and crunchy that will have your guests screaming for more.
A spooky, scrumptious snack with jalapeño, creamy cheese, and golden crescent dough—perfect for Halloween.
Whether you’re hosting a Halloween party or preparing a themed dinner, these Mummy Jalapeño Poppers are sure to be a hit. The recipe is simple enough to involve the whole family in the preparation, making it a perfect activity to get everyone into the Halloween spirit. Not only do these poppers look the part, but they’re also incredibly tasty and satisfying.
The combination of flavors and textures, with a hint of heat from the jalapeños, makes this dish a standout among savory Halloween snacks. Plus, the use of crescent dough to create the “mummy” effect is both fun and easy to execute.
Ingredients (Serves 4-6)
- 12 large jalapeño peppers
- 8 ounces cream cheese, softened
- 1 cup shredded cheddar cheese
- 1 teaspoon garlic powder
- 1 teaspoon onion powder
- 1 package crescent roll dough (8 oz)
- 1 egg, beaten
- Optional: candy eyes for decoration
Cooking Instructions
- Prepare the Jalapeños: Begin by preheating your oven to 375°F (190°C). Slice each jalapeño pepper in half lengthwise and remove the seeds and membranes to reduce the heat. This step is essential for ensuring the poppers aren’t overly spicy.
- Make the Cheese Filling: In a medium bowl, combine the softened cream cheese, shredded cheddar cheese, garlic powder, and onion powder. Mix until the ingredients are well combined and smooth.
- Stuff the Jalapeños: Using a spoon, fill each jalapeño half with the cheese mixture. Be generous with the filling, ensuring each pepper is adequately stuffed.
- Wrap with Dough: Unroll the crescent roll dough and cut it into thin strips. Wrap each stuffed jalapeño half with a strip of dough, leaving a small gap at the top to resemble a mummy’s bandages. Be creative with your wrapping for a more authentic look.
- Egg Wash and Bake: Place the wrapped jalapeños on a baking sheet. Brush each with the beaten egg to give them a golden, shiny finish when baked. Bake in the preheated oven for 12-15 minutes or until the dough is golden brown and cooked through.
- Decorate: If desired, place candy eyes on the poppers while they’re still warm to complete the mummy appearance. Allow the poppers to cool slightly before serving.
Extra Tips
When preparing the jalapeños, wearing gloves is advisable to prevent any irritation from the peppers’ oils. If you prefer a milder version, consider soaking the jalapeños in cold water for about an hour after cleaning them.
Additionally, feel free to experiment with different types of cheese or seasonings to suit your taste preferences. For a vegetarian option, you can substitute the cheese filling with a plant-based alternative. Enjoy your Mummy Jalapeño Poppers warm for the best flavor and texture.
Witch’s Finger Breadsticks

Witch’s Finger Breadsticks are the perfect savory snack to add a spooky touch to your Halloween festivities. These eerie breadsticks aren’t only fun to make, but they’re also deliciously seasoned and crispy. Shaped like gnarly witch fingers, they’re sure to be a hit at any Halloween party or gathering.
With their easy-to-follow recipe, you can whip up these creative snacks in no time and impress your guests with your culinary creativity. The dough is flavored with Italian herbs and garlic, giving the breadsticks a scrumptious taste that complements their creepy appearance. Almonds serve as the “fingernails,” adding a crunchy texture to each bite.
Whether you’re hosting a Halloween party or simply want to enjoy a themed snack with your family, these Witch’s Finger Breadsticks are the perfect choice. To make these, you’ll need the following ingredients for a serving size of 4-6 people:
Ingredients:
- 1 package (13.8 oz) refrigerated pizza dough
- 1/4 cup all-purpose flour (for dusting)
- 2 tablespoons unsalted butter, melted
- 1 teaspoon garlic powder
- 1 teaspoon dried Italian seasoning
- 1/2 teaspoon salt
- 1/4 cup grated Parmesan cheese
- 10-12 whole almonds
- Marinara sauce (optional, for dipping)
Cooking Instructions:
- Preheat the Oven: Begin by preheating your oven to 375°F (190°C). Line a baking sheet with parchment paper to prevent the breadsticks from sticking.
- Prepare the Dough: Remove the pizza dough from its packaging and place it on a lightly floured surface. Roll out the dough to about 1/2-inch thickness.
- Shape the Breadsticks: Using a sharp knife or a pizza cutter, cut the dough into strips approximately 4-5 inches long and 1/2 inch wide. Shape each strip into a finger-like form, pinching it in the middle to create knuckle-like indentations.
- Add the Fingernails: Press an almond firmly into one end of each dough strip to resemble a fingernail. You may need to adjust the shaping to guarantee the almond stays in place.
- Season the Breadsticks: In a small bowl, mix together the melted butter, garlic powder, Italian seasoning, and salt. Brush this mixture generously over each breadstick. Finally, sprinkle the grated Parmesan cheese over the top for an added layer of flavor.
- Bake the Breadsticks: Place the prepared breadsticks on the lined baking sheet, ensuring they aren’t touching. Bake them in the preheated oven for 12-15 minutes or until they turn golden brown and crispy.
- Serve and Enjoy: Once baked, remove the breadsticks from the oven and let them cool slightly. Serve them warm, with a side of marinara sauce for dipping if desired.
Extra Tips:
To make your Witch’s Finger Breadsticks even more realistic, try using a small knife to score additional lines and creases on the dough to mimic the texture of a real finger.
If you want to enhance the eerie appearance, consider using food coloring to tint the almonds a darker shade before placing them as fingernails. Additionally, if you prefer a spicier kick, you can add a pinch of crushed red pepper flakes to the seasoning mix.
These breadsticks are best served fresh out of the oven but can be reheated in a toaster oven if needed.
Deviled Egg Eyeballs
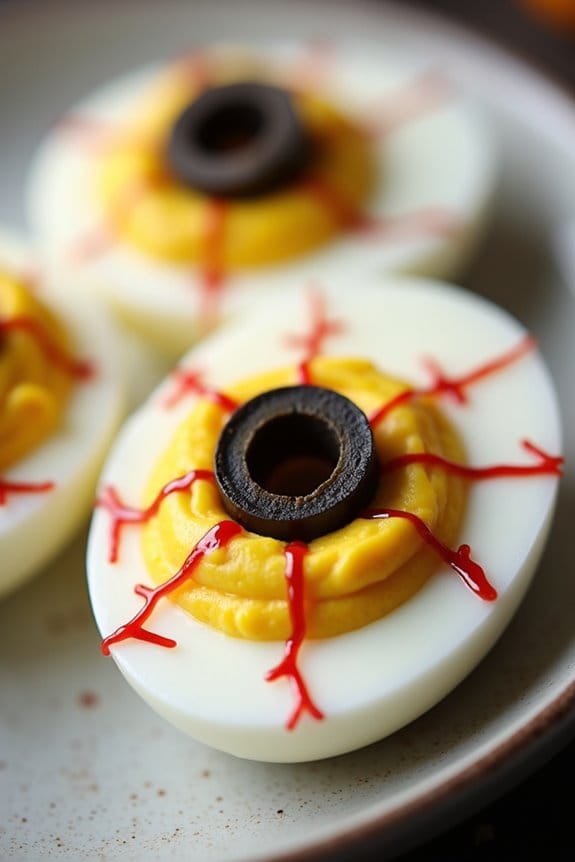
Deviled Egg Eyeballs are a spooky and savory treat perfect for any Halloween gathering. These eerie snacks aren’t only visually appealing but also deliciously creamy, with a hint of spice that will tantalize your taste buds. Ideal for a serving size of 4-6 people, these Deviled Egg Eyeballs are bound to be a hit at your Halloween party or family gathering.
Perfect for Halloween, Deviled Egg Eyeballs are spooky, savory, and sure to delight your guests.
These deviled eggs are transformed into creepy eyeballs with the use of black olives and red food coloring, giving them a realistic yet frightful appearance. They’re easy to make and require minimal ingredients, making them a quick and fun addition to your Halloween snack table. With the right balance of flavors and a spooky presentation, Deviled Egg Eyeballs are a must-try for your Halloween festivities.
Ingredients:
- 6 large eggs
- 1/4 cup mayonnaise
- 1 teaspoon mustard
- 1/4 teaspoon salt
- 1/4 teaspoon black pepper
- 1/4 teaspoon paprika
- Black olives
- Red food coloring
Instructions:
- Boil the Eggs: Place the eggs in a saucepan and cover them with water. Bring the water to a boil, then cover the pot, remove it from the heat, and let the eggs sit for 10 minutes. This will guarantee perfectly hard-boiled eggs.
- Peel and Halve: After the eggs are cooked, drain the hot water and run cold water over the eggs to cool them down. Once cooled, peel the eggs and slice them in half lengthwise.
- Prepare the Filling: Remove the yolks and place them in a mixing bowl. Mash the yolks with a fork, then add mayonnaise, mustard, salt, pepper, and paprika. Mix until smooth and creamy.
- Fill the Egg Whites: Spoon or pipe the yolk mixture back into the egg white halves. Make sure each egg half is generously filled.
- Create the Eyeballs: Slice the black olives into thin rings and place one ring on top of each filled egg to resemble an iris. Add a small dot of red food coloring in the center of the olive for the pupil.
- Add Bloodshot Effects: Use a toothpick dipped in red food coloring to draw squiggly lines from the olive outward to mimic bloodshot veins on the egg whites.
- Serve and Enjoy: Arrange the Deviled Egg Eyeballs on a platter, and they’re ready to serve.
Extra Tips:
For a more intense flavor, consider adding a dash of hot sauce or a pinch of cayenne pepper to the yolk mixture. If you want to make the eggs ahead of time, you can prepare the yolk mixture and store it separately in the refrigerator. Fill the egg whites and add the final touches just before serving to keep them fresh and vibrant.
Be careful with the red food coloring, as it can stain surfaces and clothes easily.
Ghostly Guacamole Dip
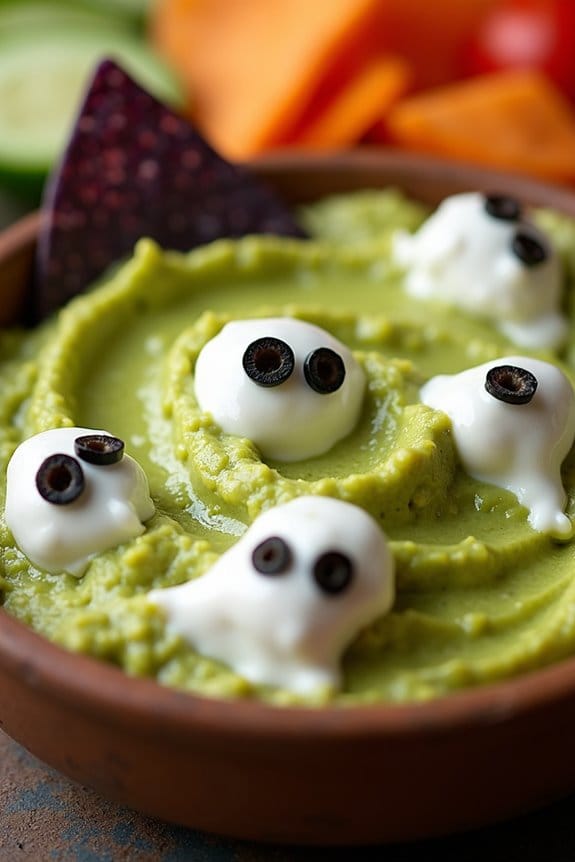
Embrace the spooky spirit of Halloween with this eerily delicious Ghostly Guacamole Dip. Perfect for parties or a fun family snack, this recipe combines the creamy goodness of ripe avocados with a zesty blend of spices and a playful presentation. The dip isn’t only a tasty treat but also visually striking, with ghostly white sour cream and olive eyes haunting the vibrant green guacamole below.
This ghostly dip is sure to be a hit with both kids and adults alike. Serve it alongside a platter of crunchy tortilla chips or fresh veggies to balance the creamy texture of the guacamole. The recipe is simple to prepare and takes advantage of fresh ingredients, ensuring that it’s as healthy as it’s fun. Suitable for 4-6 people, this dish will be the star of your Halloween party spread.
Ingredients:
- 4 ripe avocados
- 1 small red onion, finely chopped
- 2 tomatoes, diced
- 1 lime, juiced
- 1/2 teaspoon salt
- 1/4 teaspoon black pepper
- 1/4 teaspoon garlic powder
- 1/4 teaspoon cumin
- 1/4 cup fresh cilantro, chopped
- 1/2 cup sour cream
- Black olives, sliced (for eyes)
- Tortilla chips or fresh veggies for serving
Cooking Instructions:
- Prepare the Avocados: Start by slicing the avocados in half, removing the pits, and scooping the flesh into a mixing bowl. Use a fork or a potato masher to gently mash the avocados until they’re mostly smooth with a few small chunks remaining for texture.
- Mix the Guacamole: Add the finely chopped red onion, diced tomatoes, lime juice, salt, black pepper, garlic powder, cumin, and chopped cilantro to the mashed avocados. Stir everything together until the ingredients are well combined, ensuring the flavors are evenly distributed.
- Assemble the Ghosts: Spoon the guacamole into a serving bowl, smoothing the top with the back of a spoon. Fill a piping bag or a plastic sandwich bag with the sour cream, snip off a small corner, and pipe ghost shapes onto the surface of the guacamole.
- Add the Eyes: Place two slices of black olives onto each ghost shape to create eyes, giving them a spooky, animated look.
- Serve: Present the Ghostly Guacamole Dip with a side of tortilla chips or fresh veggies for dipping. Enjoy the mix of creamy, zesty flavors with a touch of Halloween fun.
Extra Tips:
For the best flavor, use ripe avocados that give slightly to the touch. If you prepare the guacamole ahead of time, press a piece of plastic wrap directly onto the surface of the guacamole to prevent browning.
Feel free to adjust the spices to suit your taste preferences, adding more lime juice or cilantro as desired. To make the ghosts stand out even more, you can add a sprinkle of paprika or chili powder around the edges of the bowl for a fiery effect.
Spider Web Hummus
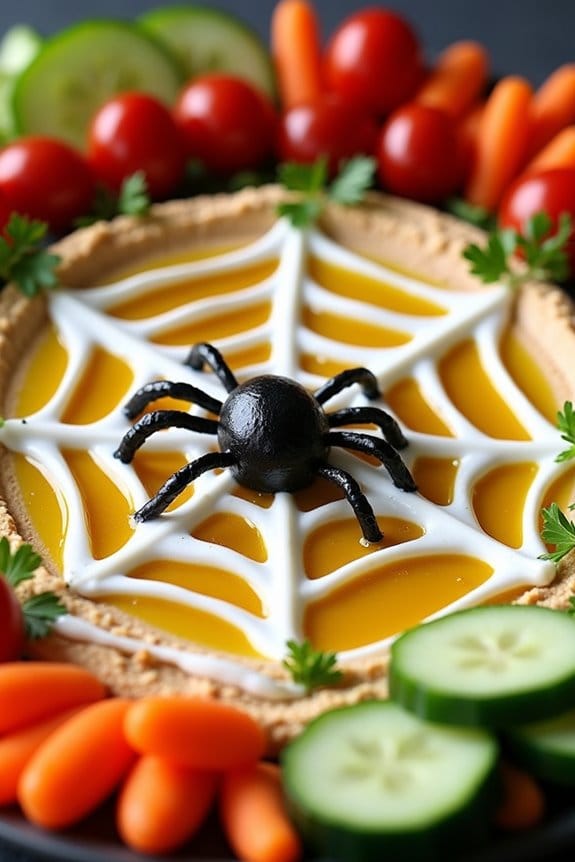
Embrace the spooky spirit of Halloween with this deliciously eerie Spider Web Hummus. This creative twist on a classic snack is perfect for any Halloween gathering, offering a blend of rich flavors and a visually enchanting presentation. The creamy hummus base is topped with a decorative spider web made from tangy Greek yogurt, creating a striking contrast that will impress your guests.
Serve it with a variety of fresh veggies, pita chips, or crackers for a fun and nutritious treat that both kids and adults will enjoy.
A delightful snack for all ages, perfect with fresh veggies, pita chips, or crackers.
The beauty of this dish lies not only in its presentation but also in its simplicity. With just a few basic ingredients, you can craft a crowd-pleasing appetizer that can be prepared in advance, freeing you up to enjoy the festivities. The Spider Web Hummus isn’t only frightfully fun but also healthy, making it an ideal choice for those looking to offer lighter fare amidst the typically sugary Halloween treats.
Let’s get started by gathering the ingredients needed to serve 4-6 people.
Ingredients:
- 2 cans (15 oz each) of chickpeas, drained and rinsed
- 1/3 cup tahini
- 1/4 cup fresh lemon juice
- 2 tablespoons olive oil, plus more for drizzling
- 2 garlic cloves, minced
- 1 teaspoon ground cumin
- Salt to taste
- 1/3 cup Greek yogurt
- Black olives (optional, for decoration)
- Fresh parsley, chopped (optional, for garnish)
- Veggies, pita chips, or crackers for serving
Cooking Instructions:
- Prepare the Hummus Base:
- In a food processor, combine the drained chickpeas, tahini, lemon juice, olive oil, minced garlic, ground cumin, and a pinch of salt. Blend until smooth and creamy, scraping down the sides as needed to guarantee everything is well incorporated.
- Adjust the Consistency:
- If the hummus is too thick, add a tablespoon of water at a time, blending after each addition, until the desired consistency is reached. Taste and adjust seasoning, adding more salt or lemon juice if needed.
- Create the Spider Web:
- Transfer the hummus to a serving dish, smoothing the top with a spatula. Fill a small piping bag or a resealable plastic bag with Greek yogurt. Cut a tiny corner off the bag and pipe a spiral pattern from the center outward over the hummus.
- Design the Web:
- Using a toothpick or skewer, draw straight lines from the center of the spiral to the edges to create a web pattern. Wipe the toothpick clean between lines for a neat design.
- Add Finishing Touches:
- Optionally, slice black olives to create “spiders” and place them strategically on the web. Sprinkle chopped parsley around the edges for added color and freshness.
- Serve:
- Drizzle a little extra olive oil over the hummus for added richness and serve with your choice of veggies, pita chips, or crackers.
Extra Tips:
For a stronger garlic flavor, consider roasting the garlic before adding it to the hummus. This will add a deeper, sweeter flavor that complements the earthiness of the chickpeas.
If you don’t have a piping bag, simply use a resealable plastic bag with a small corner snipped off to create the web. Don’t be afraid to get creative with the decorations – using assorted colorful vegetables as “bugs” or “creepy crawlies” can add an extra layer of fun.
To make the hummus ahead of time, prepare the base and store it in the fridge, then add the yogurt web and decorations just before serving for best results.
Bat Wing Chicken Drumsticks

If you’re looking to add a spooky and savory touch to your Halloween party menu, Bat Wing Chicken Drumsticks are the perfect choice. These delicious drumsticks are coated in a dark, flavorful marinade that not only gives them a rich taste but also an eerie appearance reminiscent of bat wings. Perfect for serving at gatherings, these drumsticks are a crowd favorite and are sure to be a hit among both kids and adults.
The secret to their irresistible taste lies in the marinade, which combines a mix of soy sauce, balsamic vinegar, and a blend of spices to create a deep, dark glaze. When baked, the drumsticks develop a crispy skin and tender, juicy meat inside. This recipe is designed to serve 4-6 people, making it ideal for small to medium-sized gatherings.
Ingredients (Serves 4-6)
- 12 chicken drumsticks
- 1/2 cup soy sauce
- 1/4 cup balsamic vinegar
- 2 tablespoons olive oil
- 2 tablespoons honey
- 4 cloves garlic, minced
- 1 teaspoon smoked paprika
- 1 teaspoon ground black pepper
- 1 teaspoon onion powder
- 1/2 teaspoon cayenne pepper
- Fresh parsley for garnish (optional)
Cooking Instructions
- Prepare the Marinade: In a large bowl, combine the soy sauce, balsamic vinegar, olive oil, honey, minced garlic, smoked paprika, black pepper, onion powder, and cayenne pepper. Mix well to guarantee all ingredients are properly combined.
- Marinate the Chicken: Add the chicken drumsticks to the bowl with the marinade. Confirm that each drumstick is thoroughly coated. Cover the bowl with plastic wrap and refrigerate for at least 2 hours, preferably overnight, to allow the flavors to penetrate the meat.
- Preheat the Oven: When ready to cook, preheat your oven to 400°F (200°C). Line a baking sheet with aluminum foil for easy cleanup and place a wire rack on top.
- Arrange and Bake the Drumsticks: Remove the drumsticks from the marinade, letting any excess drip off, and place them on the wire rack. This allows the heat to circulate around the chicken for even cooking. Bake in the preheated oven for 35-40 minutes, or until the chicken is cooked through and the skin is crispy. You can check the doneness by confirming the internal temperature of the chicken reaches 165°F (75°C).
- Garnish and Serve: Once cooked, remove the drumsticks from the oven and let them rest for a few minutes before serving. Garnish with fresh parsley for a touch of color if desired.
Extra Tips
For the best results, allow the chicken to marinate overnight. This enhances the depth of flavor and tenderizes the meat.
If you prefer a smokier taste, consider grilling the drumsticks instead of baking them. Keep an eye on the drumsticks while they cook to prevent the glaze from burning due to the honey.
Finally, these drumsticks pair wonderfully with a side of roasted vegetables or a simple green salad, balancing the flavors and making for a more complete meal.
Creepy Cheese Ball Bites

Creepy Cheese Ball Bites are the perfect savory snack to add a spine-chilling yet delicious twist to your Halloween celebrations. These bite-sized delights are a hit with both kids and adults, offering a flavorful experience wrapped in a spooky presentation. The rich, creamy cheese combination paired with assorted coatings makes them not only tasty but also visually intriguing, guaranteeing they stand out on your Halloween snack table.
Bite-sized delights that add a spooky twist to Halloween, perfect for kids and adults alike.
These Creepy Cheese Ball Bites are simple to prepare and can be made ahead of time, allowing you to focus on your Halloween festivities. The recipe cleverly combines a mixture of cheeses with a hint of spice and herbs, then rolls them in a variety of coatings for added texture and flavor. With just a little creativity in shaping and decorating, you can transform these cheese balls into eerie eyeballs or ghostly forms that will delight and frighten your guests.
Ingredients for Creepy Cheese Ball Bites (Serves 4-6):
- 8 oz cream cheese, softened
- 1 cup shredded sharp cheddar cheese
- 1 tablespoon Worcestershire sauce
- 1 teaspoon garlic powder
- 1/2 teaspoon onion powder
- 1/2 teaspoon smoked paprika
- Salt and pepper to taste
- 1/4 cup chopped fresh parsley
- 1/4 cup crushed pecans
- 1/4 cup crushed pretzels
- 1/4 cup crushed tortilla chips
- Black olives, sliced (for decoration)
- Red bell pepper, cut into small pieces (for decoration)
- Crackers or vegetable sticks for serving
Cooking Instructions:
1. Prepare the Cheese Mixture:
In a large mixing bowl, combine the softened cream cheese, shredded cheddar cheese, Worcestershire sauce, garlic powder, onion powder, smoked paprika, salt, and pepper. Use a spatula or electric mixer to blend the ingredients until smooth and well combined.
2. Chill the Mixture:
Cover the bowl with plastic wrap and refrigerate the cheese mixture for at least 30 minutes. This will firm it up and make it easier to shape into balls.
3. Shape the Cheese Balls:
Once the mixture is chilled, use a tablespoon to scoop out portions of the cheese mix. Roll each portion into a ball using your hands. You should get about 12-15 cheese balls from the mixture.
4. Coat the Cheese Balls:
Set up small bowls with the chopped parsley, crushed pecans, crushed pretzels, and crushed tortilla chips. Roll each cheese ball in one of the coatings until completely covered. This not only adds flavor but also gives a variety of textures and colors.
5. Decorate the Cheese Balls:
For a creepy effect, use slices of black olives to create eyes on the cheese balls. Add small pieces of red bell pepper to resemble bloodshot veins or eerie marks. Get creative with your designs to enhance the spooky theme.
6. Serve:
Arrange the decorated cheese ball bites on a platter alongside crackers or vegetable sticks for a complete appetizer spread.
Extra Tips:
When making Creepy Cheese Ball Bites, it’s important to let your creativity flow. You can experiment with different coatings such as crushed nuts, seeds, or herbs to suit your taste preferences.
Additionally, if you’re preparing these in advance, store them in an airtight container in the refrigerator and add the decorative touches just before serving to guarantee the decorations remain fresh and vibrant.
Finally, for a more pronounced flavor, you can adjust the seasonings to your liking or add a dash of hot sauce for a fiery kick.
Monster Meatball Skewers

Halloween is the perfect time to get creative in the kitchen, and Monster Meatball Skewers are a fun and savory treat that’s certain to delight both kids and adults. These skewers combine juicy meatballs with a variety of colorful vegetables, all skewered together to resemble little monsters on a stick.
Whether you’re hosting a Halloween party or just looking for a spooky dinner option, these skewers are a delicious way to celebrate the season. Packed with flavor and easy to make, Monster Meatball Skewers are also customizable to suit your taste. You can use your favorite ground meat for the meatballs, or even go vegetarian with plant-based alternatives.
The vegetables can be switched up as well, allowing you to use whatever is fresh and in season. This recipe makes enough for 4-6 people, making it perfect for a small gathering or family meal.
Ingredients (Serving Size: 4-6 people)
- 1 pound ground beef or turkey
- 1/2 cup breadcrumbs
- 1/4 cup grated Parmesan cheese
- 1 egg
- 2 cloves garlic, minced
- 1 teaspoon Italian seasoning
- Salt and pepper to taste
- 1 red bell pepper, cut into chunks
- 1 green bell pepper, cut into chunks
- 1 red onion, cut into chunks
- 1 zucchini, sliced
- 1 cup cherry tomatoes
- Wooden or metal skewers
Cooking Instructions
- Preheat the Oven: Preheat your oven to 400°F (200°C). If using wooden skewers, soak them in water for at least 30 minutes to prevent burning.
- Prepare the Meatballs: In a large bowl, combine the ground meat, breadcrumbs, Parmesan cheese, egg, garlic, Italian seasoning, salt, and pepper. Mix well until all ingredients are well incorporated.
- Form the Meatballs: Using your hands, shape the mixture into small meatballs, about 1 inch in diameter. You should have approximately 16-20 meatballs.
- Assemble the Skewers: Thread the meatballs and vegetables onto the skewers, alternating between meatballs, bell pepper chunks, onion chunks, zucchini slices, and cherry tomatoes. Leave a little space between each item to guarantee even cooking.
- Bake the Skewers: Place the assembled skewers on a baking sheet lined with parchment paper. Bake in the preheated oven for 20-25 minutes, or until the meatballs are cooked through and the vegetables are tender.
- Serve: Remove from the oven and let cool slightly before serving. Arrange the skewers on a platter and serve hot.
Extra Tips
To add an extra layer of flavor, consider brushing the skewers with your favorite barbecue sauce or glaze during the last 5 minutes of baking. This will give the skewers a nice caramelized finish.
If you prefer a spicier option, add some crushed red pepper flakes to the meatball mixture or use spicy sausage in place of ground beef or turkey. For a more festive presentation, try using black olives or cheese slices with small holes as “eyes” for your monster skewers.
Just remember to have fun and enjoy the process of creating these delightful Halloween treats!
Bloody Beet Soup Shooters
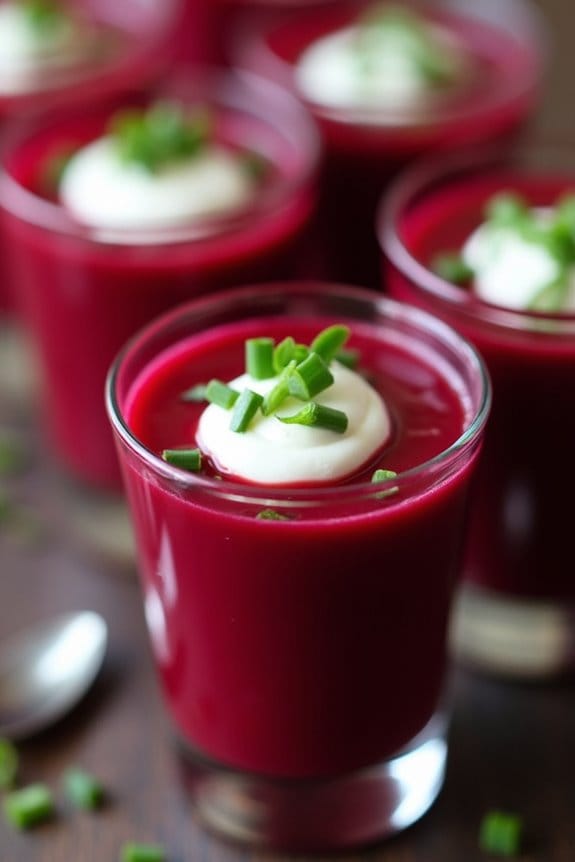
Bloody Beet Soup Shooters are a perfect savory treat to serve at your Halloween gathering. Not only do they embody the eerie essence of the holiday with their deep red color, but they also offer a healthy and delicious option for your guests. The rich and earthy flavors of beets, complemented by a hint of spice and tang, make these shooters a unique appetizer that’s sure to impress.
A spooky yet nutritious Halloween treat with rich beet flavors and a delightful tang.
Serve them in small shot glasses for a fun and festive presentation that will have your guests talking. This recipe is designed to serve 4-6 people and can be easily scaled up for larger gatherings. The key to achieving the perfect Bloody Beet Soup Shooters lies in the balance of flavors. The natural sweetness of the beets pairs beautifully with the acidity of the vinegar and the warmth of the spices. A dollop of sour cream adds creaminess, while a sprinkle of chives provides a crisp finish.
Whether you’re throwing a full-blown bash or a small get-together, these shooters are a must-have on your Halloween menu.
Ingredients:
- 1 pound beets, peeled and diced
- 1 medium onion, chopped
- 2 cloves garlic, minced
- 4 cups vegetable broth
- 1 tablespoon olive oil
- 2 tablespoons red wine vinegar
- 1 teaspoon ground cumin
- Salt and pepper to taste
- Sour cream, for garnish
- Chopped chives, for garnish
Cooking Instructions:
- Prepare the Beets: Begin by peeling and dicing the beets into small, uniform pieces. This will guarantee they cook evenly and quickly.
- Sauté the Aromatics: In a large pot, heat the olive oil over medium heat. Add the chopped onion and minced garlic, sautéing until the onion becomes translucent and the garlic is fragrant, about 3-4 minutes.
- Cook the Beets: Add the diced beets to the pot, stirring to combine with the onion and garlic. Pour in the vegetable broth, making sure the beets are fully submerged. Increase the heat to high and bring the mixture to a boil.
- Simmer the Soup: Once boiling, reduce the heat to low and cover the pot. Let the soup simmer for about 30 minutes, or until the beets are tender when pierced with a fork.
- Blend the Soup: Remove the pot from heat. Using an immersion blender, puree the soup until smooth. Alternatively, transfer the soup to a blender in batches and blend until smooth.
- Season the Soup: Stir in the red wine vinegar and ground cumin. Taste and adjust seasoning with salt and pepper as needed.
- Serve the Shooters: Pour the soup into shot glasses or small bowls. Garnish each shooter with a dollop of sour cream and a sprinkle of chopped chives.
Extra Tips:
For the best flavor, choose fresh, firm beets with no signs of spoilage. If you prefer a spicier soup, consider adding a pinch of cayenne pepper or a dash of hot sauce.
To save time, you can roast the beets in advance and store them in the refrigerator until you’re ready to make the soup. When blending hot liquids, always be cautious to avoid splatters; use a blender with a vented lid or an immersion blender to prevent accidents.
These Bloody Beet Soup Shooters can also be served chilled for a revitalizing twist.
Pumpkin-Shaped Cheese Platter
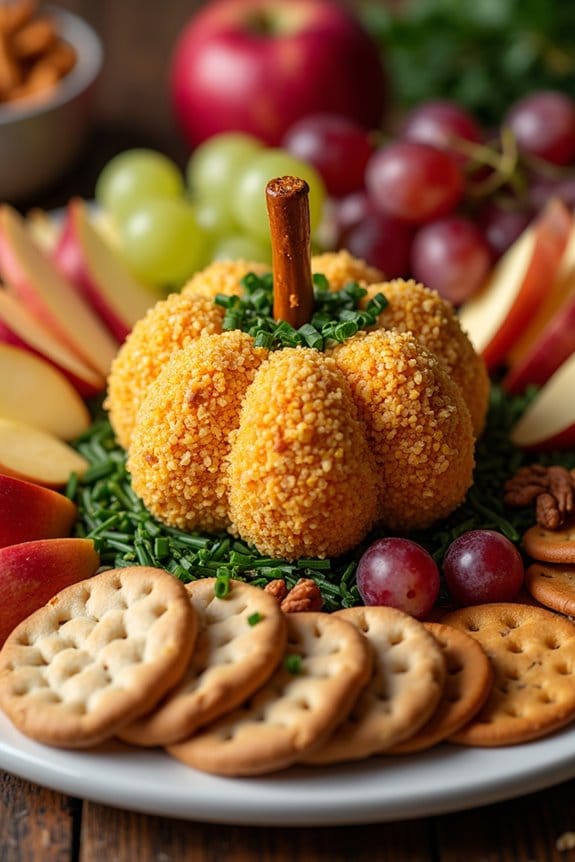
Transform your Halloween party with this delightful Pumpkin-Shaped Cheese Platter. This festive and savory dish is perfect for entertaining guests with its artistic presentation and delicious flavors. The centerpiece of this platter is a large cheese ball shaped like a pumpkin, surrounded by an assortment of crackers, nuts, and fruits, creating a visually appealing and tasty snack that everyone will enjoy.
To create the perfect pumpkin shape, you’ll mix cream cheese with savory spices and shredded cheddar, then mold it into a ball and add a decorative touch using pretzel sticks as the stem. The cheese ball can be prepared in advance, giving you more time to focus on other Halloween festivities. This recipe serves 4-6 people, making it ideal for a small gathering or an appetizer before a larger meal.
Ingredients (serving size: 4-6 people):
- 16 oz cream cheese, softened
- 2 cups shredded sharp cheddar cheese
- 1 teaspoon garlic powder
- 1 teaspoon onion powder
- 1 teaspoon smoked paprika
- 1/2 teaspoon salt
- 1/2 teaspoon black pepper
- 1 cup crushed pretzels
- 1 pretzel rod (for the stem)
- 1/2 cup chopped chives (for garnish)
- Assorted crackers
- Sliced apples
- Grapes
- Mixed nuts
Cooking Instructions:
- Mix the Cheese Base: In a large mixing bowl, combine the softened cream cheese, shredded cheddar cheese, garlic powder, onion powder, smoked paprika, salt, and black pepper. Use an electric mixer to blend until smooth and evenly mixed.
- Shape into a Pumpkin: Transfer the cheese mixture onto a sheet of plastic wrap. Gather the edges of the plastic wrap and form the cheese into a ball. Twist the plastic wrap at the top to secure the shape, ensuring the cheese ball is as round as possible.
- Chill the Cheese Ball: Place the cheese ball in the refrigerator to chill for at least 1 hour. This will help it firm up and hold its shape.
- Coat with Crushed Pretzels: Remove the cheese ball from the refrigerator and carefully unwrap it. Roll the cheese ball in the crushed pretzels until it’s entirely coated. This will give the cheese ball a textured, pumpkin-like appearance.
- Add the Stem and Garnish: Insert a pretzel rod into the top of the cheese ball to mimic the pumpkin stem. Sprinkle chopped chives around the base for a touch of greenery.
- Assemble the Platter: Place the cheese ball in the center of a large platter. Arrange assorted crackers, sliced apples, grapes, and mixed nuts around the cheese ball for a complete and balanced presentation.
Extra Tips:
For an even more pumpkin-like appearance, you can use a toothpick to gently score lines around the cheese ball, mimicking the ridges of a pumpkin.
Feel free to get creative with the accompaniments on the platter by adding other autumn-inspired items like dried cranberries or roasted pumpkin seeds.
To save time, you can prepare the cheese ball a day in advance and store it in the refrigerator until ready to serve.
Remember to let it sit at room temperature for about 15 minutes before serving to make it easier to spread on crackers.
Zombie Spinach Dip Bread Bowl
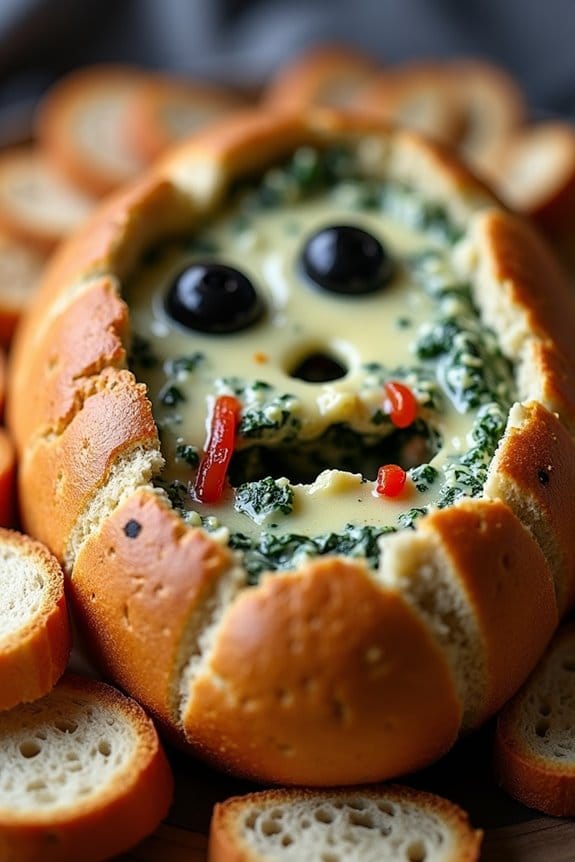
Zombie Spinach Dip Bread Bowl is a spooky and delicious appetizer perfect for your Halloween festivities. This dish combines a creamy spinach dip with a fun and eerie presentation that will have your guests both impressed and slightly spooked. The rich, cheesy dip is served in a hollowed-out round bread loaf, which not only adds to the ghoulish look but also provides a tasty and edible vessel for serving.
Whether you’re hosting a Halloween party or simply looking for a themed snack to enjoy with family and friends, this Zombie Spinach Dip Bread Bowl is bound to be a hit.
The dip itself is a delightful blend of spinach, cream cheese, sour cream, and a mix of melted cheeses, all seasoned with garlic and onion for extra flavor. The bread bowl is transformed into a “zombie” with the help of some creative decoration, making it a fun activity to prepare with kids or friends. This recipe serves 4-6 people, making it ideal for a small gathering or as part of a larger spread of Halloween treats.
Ingredients:
- 1 large round loaf of bread (sourdough or similar)
- 1 (10 oz) package frozen chopped spinach, thawed and drained
- 8 oz cream cheese, softened
- 1 cup sour cream
- 1 cup shredded mozzarella cheese
- 1/2 cup grated Parmesan cheese
- 2 cloves garlic, minced
- 1/2 cup chopped green onions
- 1/2 teaspoon salt
- 1/4 teaspoon black pepper
- 1 tablespoon olive oil
- Black olives and red bell pepper for decoration
Cooking Instructions:
- Prepare the Bread Bowl: Preheat your oven to 350°F (175°C). Slice the top off the loaf of bread and hollow out the inside, leaving about a 1-inch wall to create a bowl. Reserve the bread pieces for serving later.
- Mix the Dip: In a large mixing bowl, combine the cream cheese, sour cream, mozzarella cheese, Parmesan cheese, minced garlic, and chopped green onions. Stir in the drained spinach, salt, and black pepper until well combined.
- Fill the Bread Bowl: Spoon the spinach dip mixture into the hollowed-out bread bowl, pressing it down slightly to fill the space evenly.
- Bake: Place the filled bread bowl on a baking sheet and brush the outside with olive oil. Bake in the preheated oven for 25-30 minutes, or until the dip is hot and the bread is golden brown.
- Decorate: While the dip is baking, cut black olives and red bell pepper into shapes to create “zombie eyes” and other facial features. Once the bread bowl is done baking, remove it from the oven and let it cool slightly before adding the decorations to give it a spooky appearance.
- Serve: Arrange the reserved bread pieces around the bread bowl for dipping, and serve warm.
Extra Tips:
To make the dip extra creamy, make certain the cream cheese is fully softened before mixing. You can microwave it for a few seconds if necessary.
For a spicier version, consider adding a pinch of red pepper flakes or a dash of hot sauce to the dip mixture. If you want to prepare the dip ahead of time, you can mix it and store it in the refrigerator until ready to bake. Just be sure to let it come to room temperature before baking to guarantee even cooking.
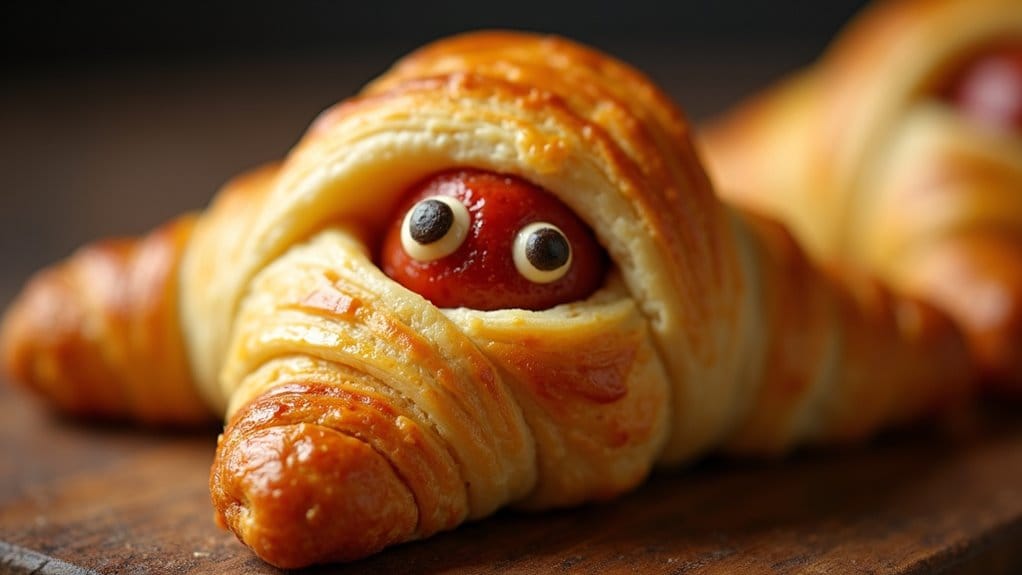
Scary Sausage Mummies

Scary Sausage Mummies are a fun and frightful treat that are perfect for any Halloween gathering. These delicious and savory snacks combine the classic flavors of sausage and pastry, wrapped together in a way that resembles mummified figures. Not only are they easy to make, but they also add a touch of spooky charm to your Halloween spread.
Whether you’re hosting a party or just wanting to enjoy a themed snack with family and friends, these sausage mummies are sure to be a hit.
To make these Scary Sausage Mummies, you’ll need a few simple ingredients and about 30 minutes of your time. The key is in the presentation, as the sausages are wrapped in strips of crescent dough to create the appearance of a mummy. Once baked to a golden brown, these mummies can be served with a side of mustard or ketchup for dipping. They’re a delightful way to get into the Halloween spirit, and they’re sure to be enjoyed by both kids and adults alike.
Ingredients (Serves 4-6):
- 1 package of crescent roll dough
- 12 cocktail sausages or mini hot dogs
- 1 egg
- 1 tablespoon of water
- Mustard or ketchup for dipping
Cooking Instructions:
- Prepare the Dough: Preheat your oven to 375°F (190°C). Unroll the crescent roll dough and separate into triangles. Use a knife or pizza cutter to slice each triangle into thin strips about 1/4 inch wide.
- Wrap the Mummies: Take a cocktail sausage and wrap it with the dough strips, leaving a small gap at the top for the “face”. Crisscross the strips to give the appearance of mummy bandages. Repeat with all sausages.
- Egg Wash: In a small bowl, beat the egg with 1 tablespoon of water to create an egg wash. This will give the mummies a nice golden finish. Use a pastry brush to lightly coat each wrapped sausage with the egg wash.
- Bake: Place the wrapped sausages on a baking sheet lined with parchment paper. Bake in the preheated oven for 12-15 minutes, or until the dough is golden brown and the sausages are heated through.
- Final Touches: Remove from oven and let cool for a few minutes. Use a small amount of mustard or ketchup to dot eyes onto each mummy, completing their spooky look.
Extra Tips:
When wrapping the sausages, try to leave small gaps in the dough to mimic the appearance of a mummy’s bandages. If you prefer a spicier version, you can use spicy cocktail sausages or add a dash of cayenne pepper to the egg wash for an extra kick.
Additionally, these mummies are best served warm, so consider baking them right before your guests arrive. If you’re serving them later, you can reheat them in the oven for a few minutes to regain their crispy texture.
