

Are you planning to add a spooky flair to your Halloween gathering? Picture serving dishes that enchant the senses and give a delightful fright. From the sinister allure of Blood-Red Sangria with eerie eyeball ice cubes to the creamy decadence of Ghostly White Chocolate Cheesecake, these recipes promise to thrill. Your guests will be enchanted by the hauntingly delicious spread. Let’s explore these ghoulishly enchanting treats that are sure to cast a spell on everyone.
Blood-Red Sangria With Eyeball Ice Cubes

Blood-Red Sangria with Eyeball Ice Cubes is a perfect spooky cocktail to serve at your adult Halloween party. This eerie drink combines the fruity and rich flavors of sangria with a gory twist, featuring eyeball ice cubes that will surely capture the attention of your guests.
The deep red color of the sangria mimics the look of blood, making it an ideal addition to your Halloween-themed menu. Not only is it visually enchanting, but it also offers a deliciously invigorating taste that balances the spookiness of its presentation.
Visually enchanting, this blood-red sangria balances spooky presentation with a deliciously invigorating taste.
The key to this Halloween treat lies in its details. The sangria is infused with a variety of fruits to enhance its flavor, while the eyeball ice cubes add a chilling effect both in temperature and appearance. The ice cubes are made using lychees and blueberries to create a realistic eye look.
As the ice melts, the fruits gradually infuse the sangria, adding sweetness and a touch of mystery to each sip. This recipe serves 4-6 people, making it perfect for an intimate gathering or a small party.
Ingredients:
- 1 bottle (750ml) of red wine
- 1/4 cup brandy
- 1/4 cup triple sec
- 2 cups cranberry juice
- 1/2 cup orange juice
- 1/4 cup simple syrup
- 1 orange, sliced
- 1 lemon, sliced
- 1 lime, sliced
- 1/2 cup fresh or frozen raspberries
- 1/2 cup fresh or frozen blackberries
- 1 can (20 oz) lychees, drained
- 1/2 cup fresh blueberries
- Ice cubes
Instructions:
- Prepare the Eyeball Ice Cubes:
- Take each lychee and gently insert a blueberry into its hollow center to create an “eyeball.”
- Place the prepared lychees in an ice cube tray and fill each section with water.
- Freeze until solid, ideally overnight, to guarantee the eyeballs hold their shape.
- Mix the Sangria:
- In a large pitcher, combine the red wine, brandy, triple sec, cranberry juice, orange juice, and simple syrup.
- Stir well to verify all liquids are thoroughly mixed.
- Add the Fruits:
- Slice the orange, lemon, and lime, and add them to the pitcher along with the raspberries and blackberries.
- Stir again to incorporate the fruits into the sangria.
- Chill the Sangria:
- Place the pitcher in the refrigerator for at least 2 hours before serving. This allows the flavors to meld together and the sangria to become nicely chilled.
- Serve:
- Before serving, add the prepared eyeball ice cubes to individual glasses.
- Pour the chilled sangria over the eyeball ice cubes and serve immediately.
Extra Tips:
For an extra spooky effect, consider using a punch bowl instead of a pitcher to serve the sangria, allowing guests to see the floating eyeball ice cubes more clearly.
If you prefer a non-alcoholic version, substitute the red wine with grape juice and omit the brandy and triple sec. Adjust the sweetness by adding more or less simple syrup according to your taste preference.
Finally, make sure to prepare enough eyeball ice cubes ahead of time, as they’re sure to be a hit and may melt quickly during the party.
Creepy Crawly Deviled Eggs

Creepy Crawly Deviled Eggs are a deliciously eerie addition to any Halloween party spread. These deviled eggs aren’t just a treat for the taste buds but also a visual feast. Perfectly crafted to resemble tiny spider nests, they bring a touch of creepy elegance to your table. The combination of classic deviled egg flavors with an unexpected twist makes these an unforgettable appetizer for adults looking to indulge in some festive fun.
The base of this dish is the traditional deviled egg, but with a ghoulish makeover using black olives to create spider-like decorations on top. This recipe is designed to serve 4-6 people, making it an ideal choice for small gatherings or a spooky dinner party. Whether you’re hosting a Halloween bash or just want to enjoy a themed meal with friends or family, these Creepy Crawly Deviled Eggs will undoubtedly be a hit.
Ingredients (Serves 4-6):
- 6 large eggs
- 3 tablespoons mayonnaise
- 1 teaspoon Dijon mustard
- 1 teaspoon white vinegar
- Salt to taste
- Freshly ground black pepper to taste
- Paprika for garnish
- 12 black olives
Cooking Instructions:
- Boil the Eggs: Place the eggs in a saucepan and cover them with water. Bring to a boil over medium-high heat. Once boiling, turn off the heat, cover the pan with a lid, and let the eggs sit for 10-12 minutes.
- Cool and Peel: After the eggs are cooked, transfer them to a bowl of ice water to cool for about 5 minutes. Once cooled, gently peel the shells off the eggs.
- Prepare Egg Halves: Carefully slice each egg in half lengthwise. Remove the yolks and place them in a medium bowl, setting the whites aside on a serving platter.
- Make the Filling: Mash the yolks with a fork until you achieve a crumbly texture. Add mayonnaise, Dijon mustard, vinegar, salt, and pepper. Stir until the mixture is smooth and creamy.
- Fill the Eggs: Using a spoon or a piping bag, fill each egg white half with the yolk mixture, mounding it slightly over the top.
- Create the Spiders: Cut the black olives in half lengthwise. Use one half for the spider’s body and slice the other half into thin strips for the legs. Place one olive half on top of each deviled egg and arrange 8 olive strips around it to resemble spider legs.
- Garnish and Serve: Lightly sprinkle paprika over the eggs for added color and flavor. Serve immediately or refrigerate until ready to serve.
Extra Tips:
For the best presentation, verify the eggs are fresh and the yolks are centered by gently rotating the eggs during the boiling process.
If you’re preparing these ahead of time, store the filled eggs in an airtight container in the refrigerator. Add the olive spiders just before serving to maintain their shape and texture.
Additionally, you can experiment with different flavors by adding ingredients like hot sauce or a dash of curry powder to the yolk mixture for a unique taste.
Spooky Black Pasta With Squid Ink Sauce
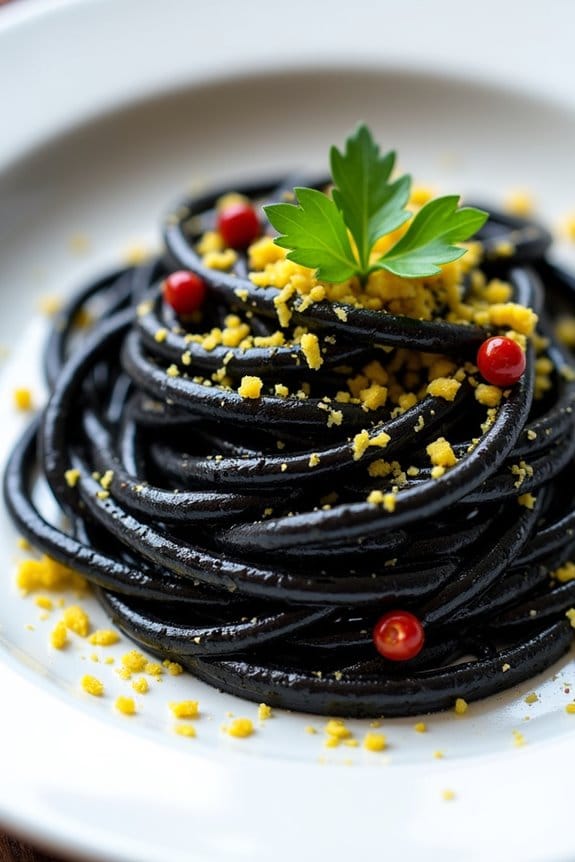
Embrace the eerie spirit of Halloween with a dish that’s as hauntingly delicious as it’s visually striking—Spooky Black Pasta with Squid Ink Sauce. This dish is perfect for adults looking to indulge in a sophisticated yet festive meal. The dark, inky pasta paired with a rich and slightly briny sauce will captivate your guests’ senses, making it a memorable centerpiece for any Halloween gathering.
Hauntingly delicious and visually striking, this spooky black pasta will captivate your guests’ senses this Halloween.
The squid ink not only provides a deep black color but also imparts a unique seafood flavor that pairs beautifully with garlic, lemon, and a hint of chili. While this dish might look complex, it’s surprisingly simple to prepare. The key is to use high-quality ingredients to guarantee the best flavor and texture.
The squid ink sauce is made with a base of sautéed garlic and shallots, which are then infused with the ink, creating a smooth and luscious consistency. Fresh lemon zest and parsley add a touch of brightness to balance the dish, while a pinch of chili flakes gives it a subtle kick. Serve this pasta with a glass of crisp white wine, and you have a Halloween dinner that will leave your guests spellbound.
Ingredients (Serves 4-6):
- 500g black pasta (preferably tagliatelle or spaghetti)
- 4 tablespoons extra-virgin olive oil
- 2 shallots, finely chopped
- 4 garlic cloves, minced
- 1/2 teaspoon red chili flakes
- 200ml seafood or fish stock
- 4 tablespoons squid ink
- Zest of 1 lemon
- Juice of 1 lemon
- Salt and freshly ground black pepper, to taste
- Fresh parsley, chopped, for garnish
- Grated Parmesan cheese, for serving
Cooking Instructions:
- Cook the Pasta: Bring a large pot of salted water to a boil. Add the black pasta and cook according to the package instructions until al dente. Reserve 1 cup of pasta water, then drain the pasta and set aside.
- Sauté Aromatics: In a large skillet, heat the olive oil over medium heat. Add the chopped shallots and minced garlic, sautéing until soft and fragrant, about 3-4 minutes. Stir in the red chili flakes and cook for an additional minute.
- Prepare the Sauce: Add the seafood or fish stock to the skillet and bring to a simmer. Stir in the squid ink until fully dissolved and the sauce is a uniform black color. Let the sauce simmer gently for 5 minutes, allowing it to thicken slightly.
- Combine Pasta and Sauce: Add the cooked pasta to the skillet, tossing to coat it thoroughly with the squid ink sauce. If the sauce is too thick, add a little reserved pasta water to achieve the desired consistency.
- Season and Serve: Stir in the lemon zest and juice, and season with salt and freshly ground black pepper. Remove from heat and garnish with chopped fresh parsley. Serve immediately with grated Parmesan cheese on the side.
Extra Tips:
When making this dish, it’s important to use fresh squid ink, which can be found at specialty seafood markets or ordered online. If you can’t find black pasta, you can use regular pasta and rely on the squid ink sauce for color.
Always taste and adjust the seasoning before serving, as the flavor can vary depending on the type of stock used. For an added touch of luxury, consider adding seared scallops or shrimp to the dish. This will enhance the seafood flavor and provide a delightful texture contrast.
Finally, remember that squid ink can stain, so handle it carefully and wear an apron to protect your clothing.
Witch’s Brew Cauldron Soup

Immerse yourself in the mystique of Halloween with a bewitching dish that tantalizes both taste buds and imagination. The Witch’s Brew Cauldron Soup is a hearty and flavorful concoction that’s perfect for adult gatherings. With its rich blend of ingredients and an enchanting presentation, this soup is sure to be a hit at your spooky soirée.
This dish combines the earthy flavors of root vegetables with the robust taste of smoked sausage and beans, creating a soul-warming experience that’s both comforting and delightfully eerie. The Witch’s Brew Cauldron Soup isn’t only delicious but also visually enthralling. Served in a large cauldron-like pot and garnished with whimsical touches, it sets the perfect stage for a fun and festive Halloween night.
The combination of spices and ingredients creates a complex and satisfying flavor profile, while the presentation adds an element of fun and fantasy to the meal. Whether you’re hosting a Halloween party or simply enjoying a themed dinner with friends, this soup will surely bring some magic to your table.
Ingredients (Serves 4-6 people)
- 2 tablespoons olive oil
- 1 large onion, chopped
- 3 cloves garlic, minced
- 2 medium carrots, sliced
- 2 celery stalks, chopped
- 1 medium sweet potato, peeled and diced
- 1 red bell pepper, chopped
- 1 teaspoon smoked paprika
- 1 teaspoon dried thyme
- 1/2 teaspoon cayenne pepper
- 4 cups chicken or vegetable broth
- 1 can (14 oz) diced tomatoes
- 1 can (14 oz) black beans, drained and rinsed
- 1 pound smoked sausage, sliced
- Salt and pepper to taste
- Fresh parsley for garnish
Instructions
- Prepare the Ingredients: Begin by chopping the onion, garlic, carrots, celery, sweet potato, and red bell pepper. Slice the smoked sausage into rounds.
- Sauté Vegetables: In a large pot or Dutch oven, heat the olive oil over medium heat. Add the chopped onion and garlic, and sauté until the onion is translucent, about 3-4 minutes.
- Add Vegetables and Spices: Stir in the carrots, celery, sweet potato, and red bell pepper. Cook for an additional 5 minutes, stirring occasionally. Add the smoked paprika, dried thyme, and cayenne pepper, mixing well to coat the vegetables with the spices.
- Combine with Liquids: Pour in the chicken or vegetable broth and the can of diced tomatoes, and bring the mixture to a boil.
- Simmer the Soup: Reduce the heat to low, cover, and let the soup simmer for about 15 minutes, or until the vegetables are tender.
- Add Beans and Sausage: Stir in the black beans and sliced smoked sausage. Continue to simmer for another 10 minutes to allow the flavors to meld together.
- Season to Taste: Taste the soup and season with salt and pepper according to your preference.
- Serve and Garnish: Serve the soup hot, garnished with freshly chopped parsley for an added touch of color and freshness.
Extra Tips
To enhance the spooky theme, consider serving the Witch’s Brew Cauldron Soup in a black or dark-colored pot that resembles a cauldron. You can also add a swirl of sour cream or yogurt on top to mimic the look of a mystical potion.
For a vegetarian version, simply omit the sausage and use vegetable broth. If you prefer a thicker soup, mash some of the sweet potatoes against the side of the pot before serving. Enjoy the enchantment of Halloween with this delicious and visually striking soup!
Severed Finger Hot Dogs

If you’re looking to add a touch of macabre fun to your Halloween party, Severed Finger Hot Dogs are the perfect addition to your menu. This spooky dish isn’t only easy to make but also adds a gory yet delightful element to your table spread.
These hot dogs are cleverly transformed into eerie finger replicas, complete with nail beds and knuckle lines, creating a dish that’s certain to be the talk of the event. With just a few simple ingredients, you can whip up a batch of these creepy treats that both look gruesome and taste delicious.
Perfect for adult Halloween parties, these Severed Finger Hot Dogs can serve between 4 to 6 people, making them an ideal appetizer or party snack. The key is in the details—using a knife to create the appearance of knuckles and nails on the hot dogs guarantees they’re as realistic as possible.
This recipe isn’t only fun to make but also provides a unique way to enjoy a timeless classic with a hair-raising twist.
Ingredients (serving size: 4-6 people):
- 8 hot dogs
- 8 hot dog buns
- 1/4 cup ketchup
- 1/4 cup mustard
- 1 small onion (optional, for added texture)
- Toothpicks (optional, for presentation)
- Black food coloring (optional, for extra effect)
Cooking Instructions:
- Prepare the Hot Dogs: Begin by taking each hot dog and using a small, sharp knife to carve out a shallow nail bed at one end. Make it about the size of a fingernail. Also, create small, shallow lines about a third and two-thirds down the hot dog to mimic knuckle creases.
- Boil the Hot Dogs: Bring a pot of water to a boil. Once boiling, add the hot dogs and cook them for about 5 minutes or until heated through. This will help to slightly plump them, enhancing the finger-like appearance.
- Prepare the Buns: While the hot dogs are cooking, lightly toast the hot dog buns. This can be done in a toaster oven or on a grill. Toasting the buns will add a nice texture and warmth to the dish.
- Assemble the Severed Fingers: Once the hot dogs are cooked, place each one inside a toasted bun. Make sure the carved nail bed is visible at the end of the bun to maintain the illusion of severed fingers.
- Add the “Blood”: Drizzle ketchup generously at the base of the hot dog where it meets the bun for a gory “severed” effect. If you want to add an extra layer of detail, you can use a small brush to paint some black food coloring into the nail bed for a more dramatic look.
- Serve: Arrange the Severed Finger Hot Dogs on a platter. For added decoration, you can use toothpicks to create the illusion of bones sticking out from the severed end, and scatter some diced onions around the platter for texture.
Extra Tips:
For an added touch of realism, consider using larger sausages instead of traditional hot dogs, as they provide more surface area for detailing.
If you want your severed fingers to stand out even more, you can mix a small amount of mustard with black food coloring to add depth to the knuckle lines.
Additionally, if you want to prepare these ahead of time, simply carve and boil the hot dogs in advance, then assemble with buns and toppings just before serving. This will guarantee they’re fresh and warm when your guests arrive.
Mummified Brie With Raspberry Preserves

Mummified Brie with Raspberry Preserves is a delightful and spooky treat that combines creamy, melted Brie cheese with sweet and tangy raspberry preserves, all wrapped in a flaky pastry crust. This dish is perfect for adult Halloween parties, offering a sophisticated twist to the festive season. The presentation, resembling a mummy, adds a playful element to your Halloween table.
The warm, gooey Brie pairs beautifully with the vibrant raspberry preserves, while the pastry provides a satisfying crunch. This dish isn’t only delicious but also easy to make, requiring minimal ingredients and effort. Serve it as an appetizer or a part of a larger spread, and you’ll have a crowd-pleasing dish that’s sure to be a hit among your guests.
Ingredients (Serves 4-6):
- 1 wheel of Brie cheese (approximately 8 ounces)
- 1 sheet of puff pastry, thawed
- 1/4 cup raspberry preserves
- 1 egg, beaten
- 2 tablespoons all-purpose flour (for dusting)
- 1 tablespoon sliced almonds (optional for decoration)
- 2 candy eyeballs (optional for decoration)
Cooking Instructions:
- Preheat the Oven: Start by preheating your oven to 375°F (190°C) to guarantee it’s hot enough to bake the pastry evenly.
- Prepare the Puff Pastry: Lightly dust your work surface with flour to prevent sticking. Roll out the thawed puff pastry sheet into a larger square, about 1/8 inch thick. This will allow you to comfortably wrap the Brie.
- Place the Brie: Set the Brie wheel in the center of the pastry. Spread the raspberry preserves evenly over the top of the Brie, making sure you cover the entire surface for a burst of flavor in every bite.
- Wrap the Cheese: With a sharp knife or pastry cutter, cut the pastry into strips of varying widths. Carefully wrap the strips around the Brie, leaving a small gap at the top to allow the cheese to breathe and the preserves to bubble.
- Add Decorations: If desired, press sliced almonds onto the pastry for additional texture and flavor. Place the candy eyeballs on top for a fun, spooky effect.
- Brush with Egg Wash: Using a pastry brush, lightly coat the wrapped Brie with the beaten egg. This will give the pastry a golden, shiny finish as it bakes.
- Bake: Place the wrapped Brie on a baking sheet lined with parchment paper. Bake in the preheated oven for 20-25 minutes, or until the pastry is golden brown and puffed.
- Cool and Serve: Allow the mummified Brie to cool for a few minutes before serving. This helps the cheese set slightly, making it easier to slice and serve.
Extra Tips:
For best results, verify your puff pastry is well-thawed but still cold to the touch, as this will make it easier to handle and wrap around the Brie.
If you want to add a savory twist, consider incorporating herbs like rosemary or thyme within the pastry strips. Additionally, feel free to experiment with different preserves, such as fig or apricot, to customize the flavor to your liking.
Poison Apple Martini
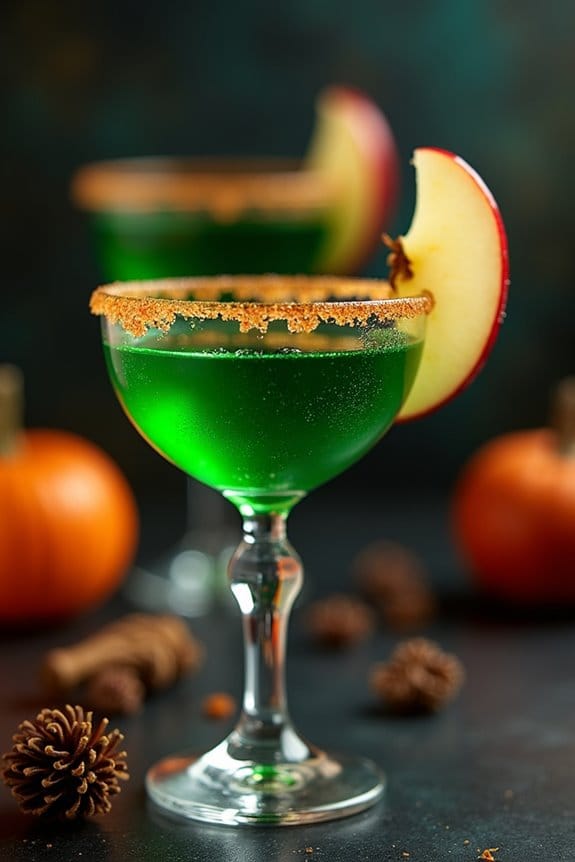
Creating the perfect Halloween cocktail can add a touch of eerie elegance to your adult-themed gathering. The Poison Apple Martini is a bewitching concoction that combines bold flavors with an enchanting color, making it an ideal addition to your spooky celebration. This drink not only tantalizes the taste buds but also fascinates the eyes with its deep, mysterious hue reminiscent of a forbidden fruit.
A bewitching cocktail, the Poison Apple Martini adds eerie elegance with bold flavors and an enchanting hue.
Its unique blend of ingredients makes it an unforgettable experience for your guests, guaranteeing your Halloween party is a frightful success.
The Poison Apple Martini is surprisingly easy to craft, yet it leaves a lasting impression. With the perfect balance of tart apple, sweet caramel, and a hint of citrus, this cocktail strikes the ideal harmony between sweet and sour, appealing to a wide range of palates.
Whether you’re a seasoned mixologist or a novice bartender, you’ll find this recipe simple to follow, allowing you to enjoy the festivities with ease. Gather your ingredients, set the mood, and prepare to enchant your guests with a cocktail that’s as delicious as it’s dangerous.
Ingredients (Serves 4-6):
- 2 cups apple cider
- 1 cup vodka
- 1/2 cup sour apple schnapps
- 1/4 cup triple sec
- 2 tablespoons fresh lemon juice
- Ice cubes
- Green food coloring (optional)
- Caramel sauce (for rimming the glasses)
- Granulated sugar (for rimming the glasses)
- Apple slices (for garnish)
Instructions:
- Prepare the Glasses: Begin by preparing your martini glasses. Pour a little caramel sauce onto a small plate and sugar onto another plate. Dip the rim of each glass into the caramel sauce, then into the sugar, providing an even coating. This creates a sweet, crunchy border that complements the tartness of the cocktail.
- Mix the Ingredients: In a cocktail shaker, combine the apple cider, vodka, sour apple schnapps, triple sec, and lemon juice. Fill the shaker with ice cubes to chill the mixture thoroughly. If you desire a more vibrant green color for a spooky effect, add a few drops of green food coloring.
- Shake and Strain: Secure the lid on the shaker and shake vigorously for about 20 seconds. This guarantees the ingredients are well-mixed and properly chilled. Strain the mixture into the prepared martini glasses, dividing it evenly among them.
- Garnish and Serve: For a final touch, garnish each glass with a thin apple slice. This not only enhances the presentation but also adds a fresh, crisp aroma to the drink. Serve immediately to enjoy the full spectrum of flavors.
Extra Tips:
To enhance the visual appeal of your Poison Apple Martini, consider using different colored sugars for rimming the glasses, such as black or orange, to match the Halloween theme.
Additionally, chilling your glasses in the freezer before rimming them can help maintain the cocktail’s temperature once poured. If you’re serving a large crowd, you can prepare the cocktail mix in advance and store it in the refrigerator; just remember to give it a quick stir or shake before serving.
Finally, for a non-alcoholic version, replace the vodka and schnapps with additional apple cider and a splash of club soda for a festive mocktail.
Monster Meatball Eyeballs

Creating a spooky yet delicious dish for your Halloween gathering is a breeze with these Monster Meatball Eyeballs. This fun and eerie dish combines the savory flavors of homemade meatballs with a creepy twist that will delight and frighten your guests in equal measure.
Perfect for an adult Halloween party, these meatball eyeballs aren’t only visually striking but also packed with flavor, sure to be a conversation starter at your event.
The Monster Meatball Eyeballs are crafted using a blend of ground beef, spices, and cheese, all topped with a hauntingly realistic “eyeball” made from mozzarella and olives. This dish serves 4-6 people, making it an ideal appetizer or main course for your Halloween spread. Pair them with a spooky-themed cocktail, and you’re set for a night of frightful fun!
Ingredients (Serves 4-6)
- 1 pound ground beef
- 1/2 cup breadcrumbs
- 1/4 cup grated Parmesan cheese
- 1 large egg
- 2 cloves garlic, minced
- 1 teaspoon Italian seasoning
- Salt and pepper to taste
- 1 cup marinara sauce
- 6 slices mozzarella cheese
- 12 pitted green olives
- 12 pimento-stuffed olives
Cooking Instructions
- Prepare the Meatball Mixture: In a large mixing bowl, combine ground beef, breadcrumbs, Parmesan cheese, egg, minced garlic, Italian seasoning, salt, and pepper. Mix thoroughly until all ingredients are well incorporated.
- Form the Meatballs: Roll the mixture into 12 evenly sized balls, approximately 1 1/2 inches in diameter. Place them on a baking sheet lined with parchment paper or lightly greased with cooking spray.
- Bake the Meatballs: Preheat your oven to 375°F (190°C). Bake the meatballs for about 20 minutes or until they’re cooked through and slightly browned on the outside.
- Prepare the Eyeballs: While the meatballs are baking, cut the mozzarella slices into small circles, about the size of the top of each meatball. Slice the green olives in half.
- Assemble the Monster Eyeballs: Once the meatballs are baked, remove them from the oven and spoon a small amount of marinara sauce over each one. Place a mozzarella circle on top, then press a halved green olive into the center. Finally, place a slice of pimento-stuffed olive on top of the green olive to complete the “eyeball” look.
- Melt the Cheese: Return the assembled meatballs to the oven for an additional 5 minutes, just until the cheese is melted and the “eyeballs” are set in place.
Extra Tips
To enhance the spooky effect, consider serving these Monster Meatball Eyeballs on a bed of spaghetti “worms” or a dark leafy green salad.
You can also experiment with different cheeses and olive combinations to customize the look of your eyeballs. For a spicier kick, add a bit of crushed red pepper to the meatball mixture.
If you’re short on time, you can use pre-made meatballs, but homemade ones tend to have a richer flavor and are more fun to prepare for Halloween.
Gory Bloody Mary Shrimp Shooters

Gory Bloody Mary Shrimp Shooters are a sinister yet sophisticated addition to your adult Halloween party menu. These shooters take the classic Bloody Mary cocktail to a whole new level by incorporating spicy and tangy flavors with succulent shrimp.
Each shot glass is a mini masterpiece, layered with vibrant red hues reminiscent of blood, making it a fitting and festive choice for a Halloween gathering. Not only do they look devilishly delightful, but they also pack a punch with a combination of vodka, hot sauce, and other zesty ingredients that are sure to captivate your guests’ taste buds.
These shooters are perfect for setting the mood and thrilling your guests with their gory presentation. They’re also a great make-ahead appetizer, allowing you to enjoy the party without spending all your time in the kitchen. The blend of fresh seafood with a spicy cocktail kick will certainly be a crowd-pleaser.
Whether you’re hosting a large gathering or a more intimate get-together, these Gory Bloody Mary Shrimp Shooters will be a memorable addition to your Halloween celebration.
Ingredients (serving size: 4-6 people):
- 1 pound large shrimp, peeled and deveined
- 1 tablespoon olive oil
- Salt and pepper to taste
- 2 cups tomato juice
- 1/2 cup vodka
- 1/4 cup fresh lemon juice
- 1 tablespoon Worcestershire sauce
- 1 teaspoon hot sauce (adjust to taste)
- 1 teaspoon prepared horseradish
- 1 teaspoon celery salt
- 1/2 teaspoon black pepper
- 1 teaspoon smoked paprika
- Celery sticks for garnish
- Lemon wedges for garnish
- Fresh dill for garnish
Cooking Instructions:
- Prepare the Shrimp: Preheat your grill or stovetop grill pan over medium-high heat. Toss the shrimp with olive oil, salt, and pepper. Grill the shrimp for about 2-3 minutes on each side until they’re pink and opaque. Remove from heat and set aside to cool.
- Make the Bloody Mary Mixture: In a large bowl, combine the tomato juice, vodka, lemon juice, Worcestershire sauce, hot sauce, horseradish, celery salt, black pepper, and smoked paprika. Stir well to combine all the flavors. Adjust the seasoning if necessary, adding more hot sauce or lemon juice to taste.
- Assemble the Shooters: Pour the Bloody Mary mixture into shot glasses, filling each one about three-quarters full. Place a grilled shrimp on the rim of each glass. Garnish with a celery stick, a lemon wedge, and a sprig of fresh dill.
- Serve: Arrange the shooters on a tray and serve immediately, or refrigerate them until guests arrive.
Extra Tips:
To enhance the presentation, consider rimming the shot glasses with a mixture of celery salt and smoked paprika before filling them with the Bloody Mary mixture. This adds a little extra flavor with each sip.
Make sure to taste the Bloody Mary mixture before assembling the shooters to verify it’s seasoned to your liking. If you want to make these shooters alcohol-free, simply omit the vodka and add a bit more tomato juice or a splash of pickle brine for an extra tangy flavor.
Dracula’s Beetroot Risotto

Dracula’s Beetroot Risotto is a perfect Halloween dish for adults, combining the earthy sweetness of beetroots with the creamy texture of risotto. The deep red color of the beetroot gives the dish a spooky, blood-like appearance that’s sure to impress your guests at any Halloween gathering.
Not only does it look the part, but it also delivers on taste with the subtle flavors of garlic, shallots, and a hint of parmesan cheese. This risotto isn’t only delicious but also a visually striking centerpiece for your Halloween table. The slight tang from the balsamic vinegar balances the sweetness of the beetroot, while the creamy arborio rice provides a comforting texture.
Whether you’re hosting a themed dinner party or simply want to surprise your friends with a unique dish, Dracula’s Beetroot Risotto will be a memorable addition to your menu.
Ingredients for 4-6 servings:
- 2 medium beetroots, peeled and grated
- 2 tablespoons olive oil
- 1 small onion, finely chopped
- 2 garlic cloves, minced
- 1 cup arborio rice
- 1/2 cup dry white wine
- 4 cups vegetable stock
- 1 tablespoon balsamic vinegar
- 1/2 cup grated parmesan cheese
- Salt and pepper to taste
- Fresh thyme leaves for garnish (optional)
Cooking Instructions:
- Prepare the Beets: Begin by peeling and grating the beetroots. Set them aside. If you prefer, you can also blend the beets in a food processor for a smoother texture.
- Sauté the Aromatics: In a large saucepan, heat the olive oil over medium heat. Add the chopped onion and sauté until translucent, about 5 minutes. Stir in the minced garlic and cook for an additional minute.
- Cook the Rice: Add the arborio rice to the saucepan and stir well to coat the grains in the oil. Cook for 2-3 minutes until the rice becomes slightly translucent around the edges.
- Deglaze with Wine: Pour in the white wine and stir until it has been absorbed by the rice.
- Add the Beetroots: Stir in the grated beetroots and mix well with the rice.
- Gradually Add Stock: Begin adding the vegetable stock, one cup at a time, stirring frequently. Allow each cup of stock to be absorbed before adding the next. This process should take about 15-20 minutes until the rice is creamy and tender.
- Finish with Cheese and Vinegar: Once the rice is cooked, stir in the balsamic vinegar and grated parmesan cheese. Season with salt and pepper to taste.
- Serve and Garnish: Remove from heat and let the risotto rest for a minute before serving. Garnish with fresh thyme leaves if desired.
Extra Tips:
When preparing Dracula’s Beetroot Risotto, make certain that you stir the rice frequently as this helps release the starches, resulting in a creamy texture.
Use a good quality dry white wine for deglazing, as it will enhance the flavor of the dish. If you want an even more intense beetroot flavor, you can roast the beets beforehand and then grate them.
Remember to taste the risotto towards the end of cooking and adjust the seasoning accordingly, as the flavor of the beets can vary in sweetness.
Ghostly White Chocolate Cheesecake
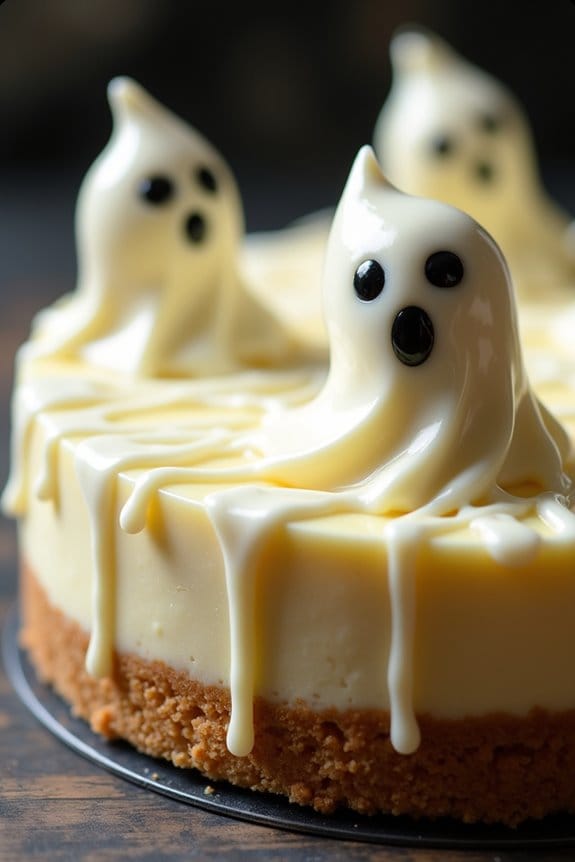
Ghostly White Chocolate Cheesecake is a perfect Halloween treat that combines the rich creaminess of cheesecake with a spooky twist. This dessert isn’t only delicious but also visually appealing, making it a great centerpiece for any adult Halloween gathering. The cheesecake is infused with white chocolate, giving it a luxurious taste, and is topped with a ghostly design that’s sure to impress your guests.
The base of this cheesecake is made from a buttery graham cracker crust, providing the perfect contrast to the creamy, sweet filling. The ghostly decorations are made using melted white chocolate and black food coloring to create haunting faces. This cheesecake serves 4-6 people, guaranteeing everyone at your party gets a generous slice of this delectable Halloween-themed dessert.
Ingredients for Ghostly White Chocolate Cheesecake (Serves 4-6):
- 1 1/2 cups graham cracker crumbs
- 1/4 cup unsalted butter, melted
- 1/4 cup granulated sugar
- 16 oz cream cheese, softened
- 1/2 cup granulated sugar
- 1 tsp vanilla extract
- 3 large eggs
- 8 oz white chocolate, melted and cooled
- 1/4 cup heavy cream
- Black food coloring or black icing gel
Instructions:
- Prepare the crust: Preheat your oven to 325°F (163°C). In a medium bowl, combine the graham cracker crumbs, melted butter, and 1/4 cup of sugar. Mix until the crumbs are evenly coated with butter and press the mixture into the bottom of a 9-inch springform pan to form an even layer. Bake the crust for 10 minutes, then remove from the oven and let it cool.
- Make the filling: In a large mixing bowl, beat the softened cream cheese and 1/2 cup of sugar with an electric mixer until smooth and creamy. Mix in the vanilla extract. Add the eggs one at a time, beating well after each addition. Gently fold in the melted white chocolate and heavy cream until the filling is fully combined.
- Bake the cheesecake: Pour the cheesecake filling over the cooled crust in the springform pan. Smooth the top with a spatula. Place the pan on a baking sheet and bake in the preheated oven for 50-60 minutes, or until the center is set and the edges are lightly golden. Let the cheesecake cool in the oven with the door slightly ajar for about an hour to prevent cracking.
- Create ghostly decorations: Once the cheesecake is completely cooled, melt additional white chocolate for the ghost designs. Use a teaspoon to drizzle ghost shapes onto the surface of the cheesecake. Use black food coloring or icing gel to add eyes and mouths to the ghosts.
- Chill and serve: Refrigerate the cheesecake for at least 4 hours, or overnight, to allow it to fully set. When ready to serve, remove the cheesecake from the springform pan and slice into servings.
Extra Tips:
For the best results, make sure all your ingredients are at room temperature before beginning, as this guarantees a smoother filling. It’s important to cool the cheesecake gradually in the oven to prevent cracks from forming on the surface. If you don’t have black food coloring, melted dark chocolate can be used for the ghost faces. Remember to chill the cheesecake thoroughly before serving for the best texture and flavor.
Zombie Brain Guacamole

Release your inner mad scientist this Halloween with a chilling appetizer that’s sure to be the center of attention at your adult gathering—Zombie Brain Guacamole. This frightfully delicious dip isn’t only visually engaging with its eerie presentation, but it also packs a flavorful punch that will have your guests coming back for more. Crafted from creamy avocados, zesty lime, and a blend of spices, this dish is perfect for those who want to add a little bit of spooky fun to their Halloween menu without sacrificing taste.
The presentation of Zombie Brain Guacamole is what sets it apart from a typical guacamole dish. By creatively shaping the guacamole into a brain-like form, you can create an eye-catching centerpiece that doubles as a conversation starter. When served with a selection of chips or vegetable sticks, this dish becomes a delightful combination of creepy and delicious. Whether you’re hosting a Halloween party or just looking to enjoy a festive snack, this recipe is perfect for any adult gathering.
Ingredients for 4-6 people:
- 4 ripe avocados
- 1 small red onion
- 2 Roma tomatoes
- 2 cloves of garlic
- 1 jalapeño pepper
- 1 lime
- Salt to taste
- Black pepper to taste
- 1 tablespoon of fresh cilantro
- Blue corn tortilla chips (for serving)
- Optional: 1 small Halloween brain mold
Instructions:
- Prepare the Ingredients: Begin by halving the avocados, removing the pits, and scooping the flesh into a large mixing bowl. Finely chop the red onion, Roma tomatoes, garlic, and jalapeño pepper, and add them to the bowl.
- Mix the Guacamole: Use a fork or potato masher to mash the avocado and mix it with the other ingredients until you reach your desired consistency. For a smoother texture, continue mashing until there are minimal chunks.
- Add Flavor: Squeeze the juice of one lime into the mixture, and then season with salt and black pepper to taste. Stir in the chopped cilantro to enhance the freshness of the guacamole.
- Shape the Brain: If using a Halloween brain mold, spoon the guacamole into the mold, pressing it down firmly to fill in all the crevices. If not using a mold, shape the guacamole into a brain-like form on a serving platter using a spatula or your hands.
- Chill and Serve: Place the molded guacamole in the refrigerator for at least 30 minutes to allow it to set. Once chilled, unmold the guacamole onto a serving plate and surround it with blue corn tortilla chips for a spooky effect.
Extra Tips:
To make your Zombie Brain Guacamole even more visually striking, consider adding a few drops of green food coloring to intensify the eerie hue. If you’re short on time, you can skip the brain mold and simply serve the guacamole in a bowl with a brain-shaped top.
For an extra kick, leave some jalapeño seeds in the mix or add a dash of cayenne pepper. Remember to taste the guacamole as you go, adjusting the lime, salt, and spices to your personal preference. Enjoy the delightful blend of flavors while keeping your Halloween party theme alive!
Eerie Eyeball Caprese Salad

Eerie Eyeball Caprese Salad is a spooky twist on the classic Italian appetizer that’s sure to add a hauntingly delicious touch to your Halloween gathering. This dish combines the fresh flavors of mozzarella, tomatoes, and basil with a creepy yet fun presentation. Perfect for adults looking to add a touch of eerie elegance to their Halloween menu, this dish is as delightful to look at as it’s to eat.
The “eyeballs” are made from mozzarella balls, adorned with olives for pupils, and served on a bed of fresh basil leaves with a drizzle of balsamic glaze for that extra layer of flavor.
This recipe serves 4-6 people, making it ideal for a small party or a family gathering. Not only is it visually striking, but it also offers a rejuvenating and savory taste that balances the heavier, richer flavors often found in Halloween treats. The combination of creamy mozzarella, juicy tomatoes, and aromatic basil is a crowd-pleaser, and the addition of “eyeball” details adds a playful yet sophisticated touch.
This dish is simple to prepare, allowing you to focus on enjoying the festivities.
Ingredients:
- 12 small mozzarella balls (bocconcini or ciliegine)
- 6 cherry tomatoes, halved
- 12 black olives, pitted and sliced
- Fresh basil leaves
- 2 tablespoons olive oil
- 2 tablespoons balsamic glaze
- Salt and pepper to taste
Cooking Instructions:
- Prepare the Mozzarella Eyeballs: Begin by slicing the black olives into thin rings. Place one olive ring onto each mozzarella ball. These will serve as the “pupils” of your eyeballs.
- Assemble the Salad Base: On a large serving platter, arrange the fresh basil leaves to create a lush green bed. This will serve as the backdrop for your eerie eyeballs.
- Add the Tomato Halves: Place a cherry tomato half on top of each mozzarella ball. The flat side of the tomato should face down, resting on the mozzarella. This will give the look of a bloodshot eye.
- Season the Salad: Drizzle the olive oil evenly over the mozzarella and tomatoes. Season with salt and pepper to taste, ensuring each eyeball is adequately flavored.
- Finish with Balsamic Glaze: Carefully drizzle the balsamic glaze over the entire salad, focusing on the mozzarella eyeballs. The dark balsamic glaze will enhance the spooky appearance while adding a sweet and tangy note to the dish.
Extra Tips:
When selecting mozzarella balls, opt for the smaller sizes like bocconcini or ciliegine for a more realistic eyeball appearance.
If you’re preparing the salad ahead of time, keep the mozzarella, tomatoes, and basil separate until just before serving to prevent the basil from wilting.
For an added touch of horror, consider using a toothpick to create red “veins” on the mozzarella by lightly scoring the cheese and rubbing it with a bit of tomato juice. This simple yet effective technique can make your Eerie Eyeball Caprese Salad even more striking and memorable for your Halloween guests.
Sinister Dark Chocolate Truffles

Sinister Dark Chocolate Truffles are a decadent treat perfect for any Halloween gathering or adult-themed party. These rich, velvety truffles aren’t only delicious but also surprisingly simple to make, offering a delightful balance of dark chocolate’s bittersweet notes and the subtle hint of spookiness that comes with their sinister appearance.
The truffles can be customized with various coatings and flavors, making them versatile enough to suit any palate while maintaining their haunting allure. Ideal for a serving size of 4-6 people, these truffles are crafted to delight and surprise your guests. Their dark and ominous exterior hides a smooth, creamy center that melts in the mouth, leaving a lingering taste of indulgence.
Whether you’re hosting a sophisticated soirée or a casual get-together, these Sinister Dark Chocolate Truffles are sure to be a hit, as they not only taste divine but also add a touch of elegance and mystery to your Halloween festivities.
Ingredients:
- 300g dark chocolate (at least 70% cocoa), finely chopped
- 200ml heavy cream
- 50g unsalted butter, cut into small pieces
- 2 tbsp brandy or coffee liqueur (optional)
- 1/2 cup unsweetened cocoa powder
- 1/4 cup crushed pistachios (optional, for coating)
- 1/4 cup shredded coconut (optional, for coating)
Instructions:
- Prepare the Chocolate: Place the finely chopped dark chocolate in a medium-sized heatproof bowl. Confirm the bowl is large enough to hold all the ingredients and allow for easy stirring.
- Heat the Cream: In a small saucepan, heat the heavy cream over medium heat until it just begins to simmer. Don’t let it boil, as this can affect the texture of your truffles.
- Combine Cream and Chocolate: Pour the hot cream over the chopped chocolate. Allow it to sit for 2-3 minutes without stirring, letting the heat of the cream melt the chocolate.
- Stir Until Smooth: Add the small pieces of butter and brandy or coffee liqueur (if using) to the chocolate-cream mixture. Stir gently with a spatula until the mixture is completely smooth and glossy.
- Chill the Mixture: Cover the bowl with plastic wrap or a lid, and place it in the refrigerator for about 2 hours, or until the mixture is firm enough to handle.
- Shape the Truffles: Once the chocolate mixture is firm, use a small spoon or melon baller to scoop out even portions, about the size of a walnut. Roll each portion into a ball using your hands.
- Coat the Truffles: Place the cocoa powder, crushed pistachios, and shredded coconut in separate shallow dishes. Roll the shaped truffles in your choice of coating until fully covered, then place them on a baking sheet lined with parchment paper.
- Chill Before Serving: Return the coated truffles to the refrigerator for about 30 minutes to set before serving.
Extra Tips: For the best results, use high-quality dark chocolate with at least 70% cocoa content, as it provides the richest flavor and the best texture. If you find the mixture too firm to shape, let it sit at room temperature for a few minutes before handling.
Customize your truffles by experimenting with different coatings or infusing the cream with spices like cinnamon or chili for an extra kick. Remember, a little goes a long way, so enjoy these truffles in moderation!
