

When it comes to Christmas lunch, there’s a special kind of joy in sharing dishes that blend tradition and flavor.
Think about the comforting aroma of honey-glazed ham paired with the bright taste of pineapple.
Or the savory goodness of herb-crusted prime rib.
These aren’t just meals; they’re moments to cherish.
Ready to explore some festive recipes that could become new family favorites?
Honey-Glazed Ham With Pineapple
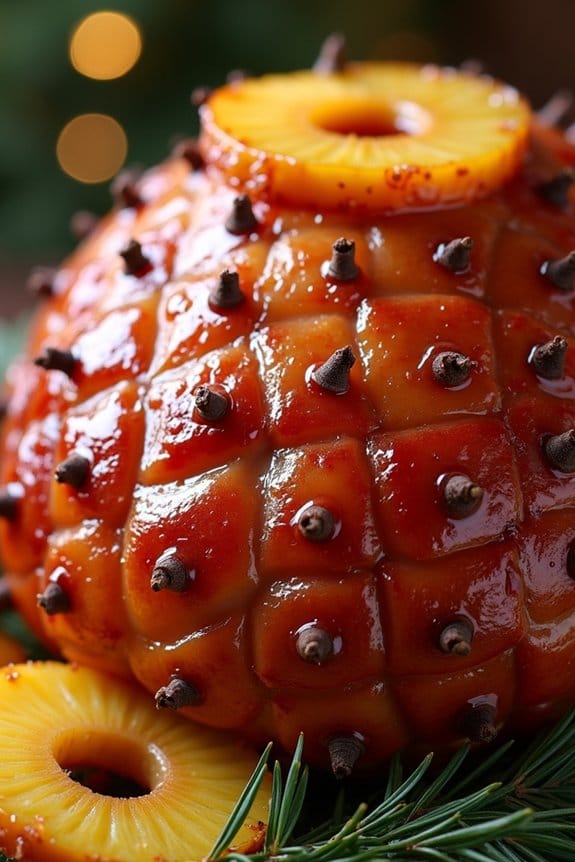
Nothing says festive like a sweet and savory Honey-Glazed Ham With Pineapple, a classic centerpiece for Christmas lunch. This delightful dish combines the rich, smoky flavors of ham with a luscious glaze made from honey and tangy pineapple, resulting in a succulent meal that will impress your guests and leave them asking for seconds.
The natural sweetness of the pineapple complements the salty ham, creating a beautifully balanced flavor profile that’s both nostalgic and sophisticated. The dish isn’t only delicious but also visually stunning, with the golden-brown glaze caramelizing on the surface of the ham and the vibrant pineapple rings adding a pop of color to your holiday table.
This recipe is perfect for serving 4-6 people and can be easily adjusted to accommodate larger gatherings. The preparation process is straightforward, making it an ideal choice for those looking to serve a show-stopping meal without spending all day in the kitchen.
Ingredients (Serves 4-6):
- 1 fully cooked bone-in half ham (about 5-6 pounds)
- 1 cup honey
- 1/2 cup brown sugar
- 1/4 cup Dijon mustard
- 1/4 cup apple cider vinegar
- 1 can (20 ounces) pineapple slices, drained
- Whole cloves
Cooking Instructions:
- Preheat the Oven: Start by preheating your oven to 325°F (165°C). This temperature will guarantee that the ham cooks evenly and the glaze caramelizes perfectly.
- Prepare the Ham: Place the ham in a large roasting pan, fat side up. Score the surface of the ham in a diamond pattern using a sharp knife, being careful not to cut too deep. Stud the intersection of each diamond with a whole clove.
- Make the Glaze: In a medium saucepan, combine the honey, brown sugar, Dijon mustard, and apple cider vinegar. Heat the mixture over medium heat, stirring occasionally, until the sugar has dissolved and the glaze is smooth.
- Apply the Glaze: Brush half of the glaze over the surface of the ham, making sure to cover all areas evenly. Reserve the remaining glaze for later use.
- Bake the Ham: Place the ham in the preheated oven and bake for approximately 1.5 to 2 hours, or until the internal temperature reaches 140°F (60°C). Baste the ham with the reserved glaze every 30 minutes to guarantee a rich, flavorful crust.
- Add Pineapple Slices: About 30 minutes before the ham is done, arrange the pineapple slices over the top of the ham, securing each slice with a toothpick. Continue baking until the ham is fully heated and the pineapples are lightly caramelized.
- Rest and Serve: Once cooked, remove the ham from the oven and let it rest for 10-15 minutes before slicing. This resting period allows the juices to redistribute, guaranteeing each slice is moist and tender. Serve with additional glaze on the side, if desired.
Extra Tips:
When selecting a ham, opt for a fully cooked bone-in variety, as it often yields better flavor and texture. If you prefer a less sweet glaze, you can adjust the amount of honey and brown sugar to suit your taste.
Additionally, if you want to add more depth to the glaze, consider incorporating a splash of bourbon or a pinch of ground ginger. For a beautiful presentation, garnish the serving platter with fresh herbs or additional pineapple slices.
Herb-Crusted Prime Rib
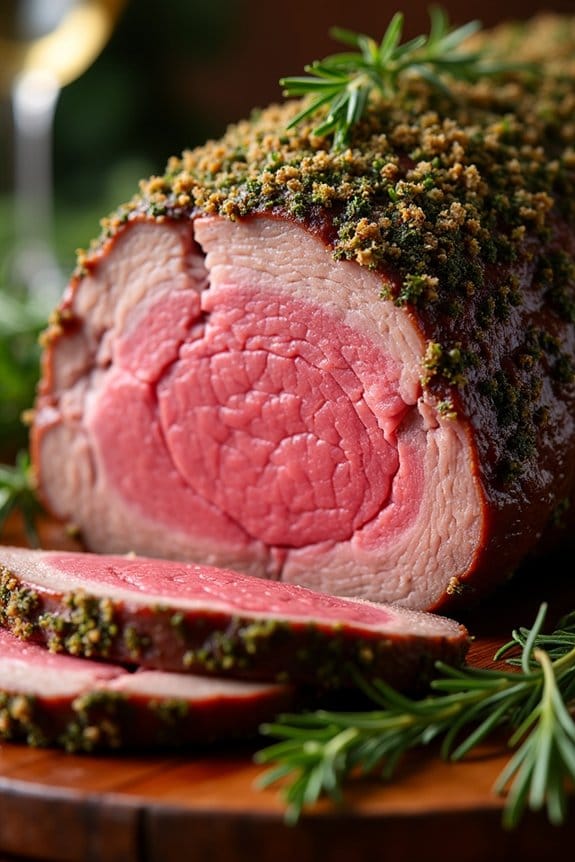
Herb-Crusted Prime Rib is a delicious and impressive centerpiece for your Christmas lunch. This dish combines the natural richness of a prime rib roast with a flavorful herb crust, creating a meal that’s both visually stunning and delectably satisfying. The crust adds a fragrant, savory layer that enhances the juicy, tender meat, making it a perfect choice for a festive occasion.
With a few simple ingredients and careful attention, you can create this classic holiday staple that will surely delight your guests.
Prime rib is known for its mouthwatering marbling and succulent taste, and when paired with a blend of fresh herbs, garlic, and seasonings, it becomes an unforgettable entrée. Whether you’re hosting family or friends, this dish is sure to make your Christmas lunch memorable.
Follow these guidelines to achieve a perfectly cooked herb-crusted prime rib that showcases the best of this exquisite cut of meat.
Ingredients (Serves 4-6):
- 1 (5-6 pound) prime rib roast
- 3 tablespoons olive oil
- 4 cloves garlic, minced
- 2 tablespoons fresh rosemary, chopped
- 2 tablespoons fresh thyme, chopped
- 2 tablespoons fresh parsley, chopped
- 1 tablespoon kosher salt
- 2 teaspoons black pepper
Cooking Instructions:
- Prepare the Roast: Remove the prime rib from the refrigerator and let it sit at room temperature for about an hour. This allows for even cooking.
- Preheat the Oven: Preheat your oven to 450°F (232°C). This initial high heat will help develop a beautiful crust on the roast.
- Make the Herb Mixture: In a small bowl, mix together the olive oil, minced garlic, chopped rosemary, thyme, parsley, kosher salt, and black pepper to form a paste.
- Season the Roast: Pat the roast dry with paper towels. Rub the herb mixture all over the surface of the meat, pressing it in so it adheres well.
- Roast the Prime Rib: Place the seasoned roast on a rack in a roasting pan, fatty side up. Insert a meat thermometer into the thickest part of the roast, avoiding the bone. Roast in the preheated oven for 20 minutes.
- Adjust the Temperature: After 20 minutes, reduce the oven temperature to 325°F (163°C). Continue roasting until the thermometer reads 130°F (54°C) for medium-rare, about 1.5 to 2 hours.
- Rest the Meat: Remove the roast from the oven and tent it with aluminum foil. Let it rest for 20-30 minutes. This step is vital as it allows the juices to redistribute throughout the meat.
- Carve and Serve: Once rested, carve the prime rib into slices and serve immediately with your choice of sides.
Extra Tips:
When preparing Herb-Crusted Prime Rib, remember that the quality of the meat is paramount; choose a well-marbled roast for the best results. If possible, get a roast that has been dry-aged for added flavor.
Also, use a meat thermometer for accuracy, as cooking times can vary based on the size and shape of the roast. Finally, resist the urge to carve the meat immediately after it comes out of the oven; allowing it to rest guarantees that it remains juicy and tender.
Roast Turkey With Cranberry Sauce
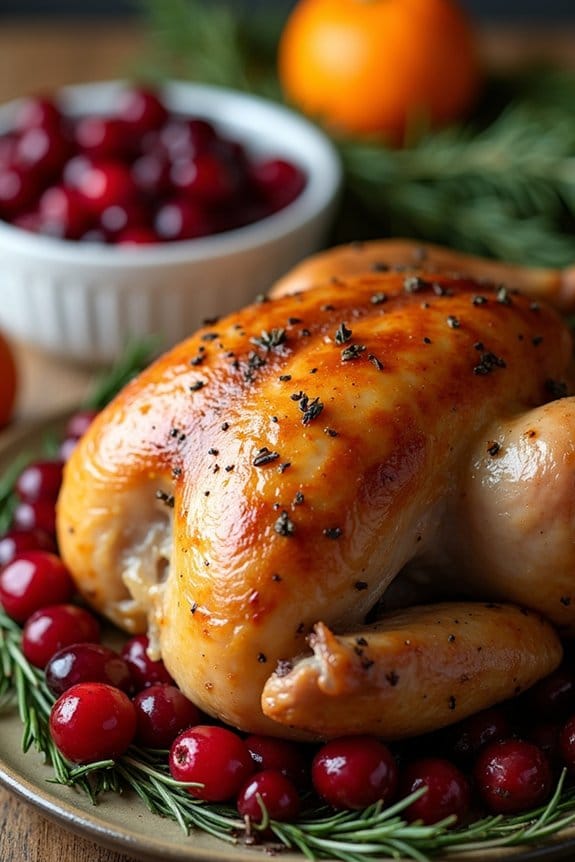
Roast Turkey with Cranberry Sauce is a quintessential holiday dish that brings a festive touch to any Christmas lunch. This classic recipe combines the succulent flavors of roasted turkey with the tangy sweetness of cranberry sauce, creating a delightful and traditional centerpiece for your holiday meal.
Whether you’re hosting a large family gathering or a cozy meal with friends, this dish is sure to impress with its aromatic herbs and vibrant presentation.
Preparing a Roast Turkey with Cranberry Sauce requires a bit of planning and attention to detail, but the results are more than worth the effort. The turkey is seasoned with a blend of herbs and spices, then roasted to perfection, guaranteeing a moist, flavorful bite in every piece.
Paired with a freshly made cranberry sauce, this dish offers a balance of savory and sweet that’s both comforting and celebratory. Follow this recipe for a serving size of 4-6 people and create a memorable Christmas lunch that everyone will enjoy.
Ingredients:
- 1 whole turkey (8-10 pounds)
- 1/2 cup unsalted butter, melted
- 1 tablespoon salt
- 1 tablespoon black pepper
- 2 tablespoons fresh rosemary, chopped
- 2 tablespoons fresh thyme, chopped
- 1 onion, quartered
- 1 lemon, halved
- 4 cups chicken broth
- 12 ounces fresh cranberries
- 1 cup granulated sugar
- 1 cup orange juice
Cooking Instructions:
- Prepare the Turkey: Preheat your oven to 325°F (165°C). Remove the giblets and rinse the turkey thoroughly under cold water, then pat dry with paper towels. Place the turkey breast-side up on a roasting rack inside a large roasting pan.
- Season the Turkey: In a small bowl, mix the melted butter with salt, pepper, rosemary, and thyme. Rub this mixture all over the turkey, making sure it’s evenly coated. Place the onion quarters and lemon halves inside the turkey cavity for added flavor.
- Roast the Turkey: Pour the chicken broth into the bottom of the roasting pan to keep the turkey moist during cooking. Cover the turkey loosely with aluminum foil and roast in the preheated oven. Baste the turkey every 45 minutes with the pan juices. Roast for approximately 3-4 hours, or until the internal temperature reaches 165°F (74°C) when measured at the thickest part of the thigh.
- Make the Cranberry Sauce: While the turkey is roasting, prepare the cranberry sauce. In a medium saucepan, combine the cranberries, sugar, and orange juice. Cook over medium heat, stirring occasionally, until the cranberries burst and the sauce thickens, about 10-15 minutes. Remove from heat and let it cool.
- Rest and Serve: Once the turkey is done, remove it from the oven and let it rest for at least 30 minutes before carving. This allows the juices to redistribute, making the meat more tender. Serve the turkey alongside the cranberry sauce for a perfect holiday meal.
Extra Tips:
For an even more flavorful turkey, consider preparing a herb butter and placing it under the skin before roasting. This not only infuses the meat with additional flavor but also helps keep it moist.
If you prefer a more citrusy note, add an orange or two to the cavity along with the lemon. For the cranberry sauce, feel free to add a pinch of cinnamon or nutmeg for a warming spice profile.
Finally, verify you have a good meat thermometer on hand to check the turkey’s internal temperature accurately, making sure it’s perfectly cooked and safe to eat.
Baked Salmon With Dill and Lemon
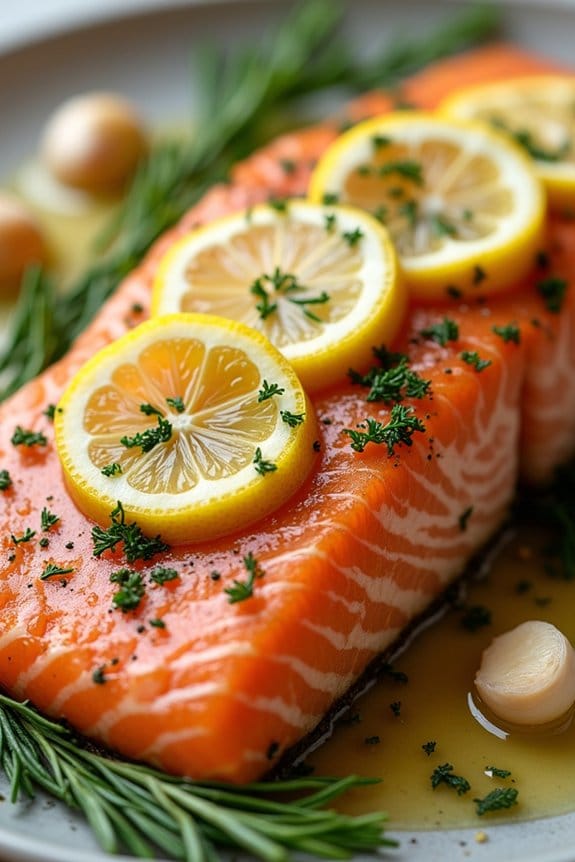
Baked Salmon With Dill and Lemon is a delightful and healthy choice for your Christmas lunch. The combination of fresh dill and zesty lemon complements the rich, buttery flavor of the salmon, creating a dish that’s both invigorating and satisfying. This recipe is perfect for those who want to serve a festive meal without spending hours in the kitchen. Not only is it simple to prepare, but it also looks stunning on the table, making it an excellent centerpiece for your holiday gathering.
This dish is baked to perfection, guaranteeing that the salmon remains tender and moist while absorbing the bright flavors of the dill and lemon. It’s a versatile recipe that pairs well with an assortment of side dishes, such as roasted potatoes, steamed asparagus, or a fresh green salad. Whether you’re hosting a large family event or a more intimate gathering, Baked Salmon With Dill and Lemon is sure to impress your guests with its elegant simplicity and delicious taste.
Ingredients for 4-6 servings:
- 2 pounds of salmon fillet
- 1 tablespoon olive oil
- Salt to taste
- Black pepper to taste
- 2 lemons, sliced
- 1/4 cup fresh dill, chopped
- 4 cloves garlic, minced
- 1/2 cup white wine (optional)
- 1 tablespoon butter
Cooking Instructions:
- Preheat the Oven: Begin by preheating your oven to 375°F (190°C). This guarantees that the salmon cooks evenly and retains its moisture.
- Prepare the Baking Dish: Lightly grease a large baking dish with olive oil. This will prevent the salmon from sticking and make cleanup easier.
- Season the Salmon: Place the salmon fillet in the prepared baking dish. Drizzle olive oil over the fish and season generously with salt and black pepper.
- Add Aromatics: Scatter the minced garlic evenly over the salmon. Arrange the lemon slices on top and around the fillet, then sprinkle the chopped dill over the entire dish.
- Add Liquid for Moisture: Pour the white wine into the baking dish around the salmon. This step is optional, but it helps to keep the fish moist and enhances the flavor. Dot the top of the fish with small pieces of butter for added richness.
- Bake the Salmon: Place the baking dish in the preheated oven and bake for 20-25 minutes or until the salmon is opaque and flakes easily with a fork. The cooking time may vary slightly depending on the thickness of your fillet.
- Rest and Serve: Once done, remove the dish from the oven and let it rest for a few minutes before serving. This allows the juices to redistribute, guaranteeing each bite is tender and flavorful.
Extra Tips:
When selecting salmon, look for a fillet with a vibrant color and a fresh, clean smell. If possible, use wild-caught salmon for the best flavor and texture.
To enhance the dish further, consider adding a sprinkle of capers or a drizzle of honey before serving. If you’re looking to save time, prep the ingredients ahead of time and store them in the fridge until you’re ready to bake.
Stuffed Bell Peppers With Quinoa
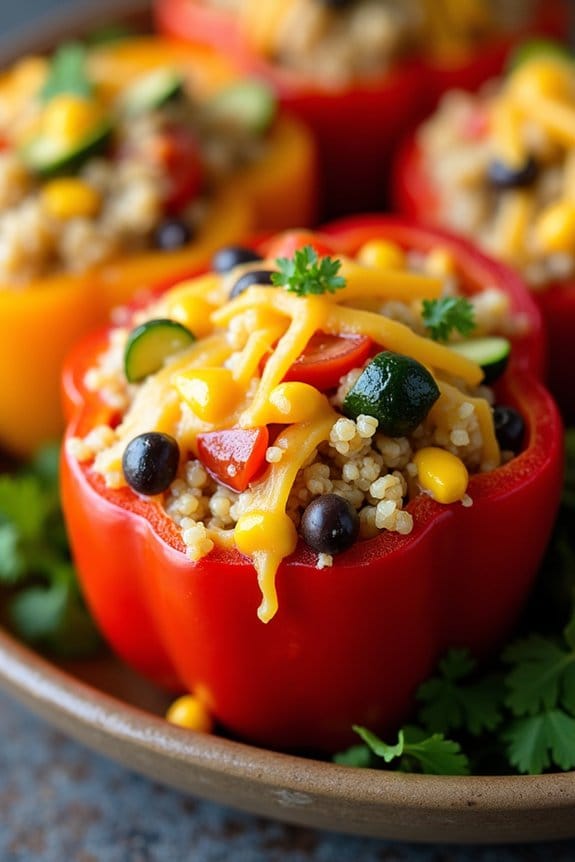
Stuffed Bell Peppers with Quinoa is a delightful and nutritious dish perfect for a festive Christmas lunch. This recipe combines vibrant bell peppers with a delicious quinoa filling, enhanced with a blend of aromatic spices and a medley of fresh vegetables. The quinoa provides a nutty flavor and a satisfying texture, while the bell peppers serve as a colorful and edible vessel that bakes beautifully in the oven.
This dish isn’t only visually appealing but also packed with vitamins and nutrients, making it a wholesome choice for a holiday meal. Easy to prepare and customizable to your taste, Stuffed Bell Peppers with Quinoa is an excellent option for both vegetarians and meat lovers. You can add your favorite protein or keep it plant-based for a lighter meal.
The dish can be prepared ahead of time, making it a convenient choice for busy holiday gatherings. Whether served as a main course or a hearty side dish, these stuffed peppers are sure to impress your guests with their savory flavors and festive presentation.
Ingredients (Serves 4-6):
- 6 large bell peppers (any color)
- 1 cup quinoa
- 2 cups vegetable broth
- 1 tablespoon olive oil
- 1 medium onion, chopped
- 2 cloves garlic, minced
- 1 zucchini, diced
- 1 cup cherry tomatoes, halved
- 1 teaspoon ground cumin
- 1 teaspoon smoked paprika
- Salt and pepper to taste
- 1 cup canned black beans, drained and rinsed
- 1 cup corn kernels (fresh, frozen, or canned)
- 1 cup shredded cheddar cheese (optional)
- Fresh parsley or cilantro for garnish
Cooking Instructions:
- Preheat the Oven: Start by preheating your oven to 375°F (190°C) to prepare it for baking the stuffed peppers.
- Prepare the Quinoa: Rinse the quinoa under cold water. Then, in a medium saucepan, combine the quinoa with the vegetable broth. Bring to a boil over medium-high heat, then reduce the heat to low, cover, and let it simmer for about 15 minutes, or until the quinoa is cooked and the liquid is absorbed. Fluff with a fork and set aside.
- Prep the Bell Peppers: While the quinoa is cooking, prepare the bell peppers. Cut the tops off and remove the seeds and membranes. Lightly brush the outside with olive oil and set aside.
- Sauté Vegetables: In a large skillet, heat the olive oil over medium heat. Add the chopped onion and sauté for about 3 minutes until translucent. Stir in the garlic, zucchini, and cherry tomatoes, and cook for another 5 minutes until the vegetables are tender.
- Season and Combine: Add the cooked quinoa to the skillet with the sautéed vegetables. Stir in the cumin, smoked paprika, salt, and pepper. Mix well, then fold in the black beans and corn. Cook for another 2 minutes to heat through.
- Stuff the Peppers: Place the prepared bell peppers in a baking dish. Fill each pepper with the quinoa mixture, pressing down gently to pack them tightly. If desired, sprinkle the tops with shredded cheddar cheese.
- Bake: Cover the baking dish with aluminum foil and bake in the preheated oven for 25 minutes. Remove the foil and bake for an additional 10-15 minutes, or until the peppers are tender and the cheese is melted and bubbly.
- Garnish and Serve: Remove the stuffed peppers from the oven and let them cool slightly. Garnish with fresh parsley or cilantro before serving.
Extra Tips:
When selecting bell peppers, opt for those that are uniform in size and have a flat bottom for stability in the baking dish. Feel free to experiment with different types of cheese or even add a sprinkle of feta for a tangy twist.
For a protein boost, consider adding cooked ground turkey or crumbled tofu to the quinoa mixture. If you wish to prepare this dish ahead of time, stuff the peppers in advance and store them in the refrigerator, then bake them just before serving. This way, you can enjoy a stress-free holiday gathering with more time spent with your loved ones.
Spinach and Ricotta Cannelloni
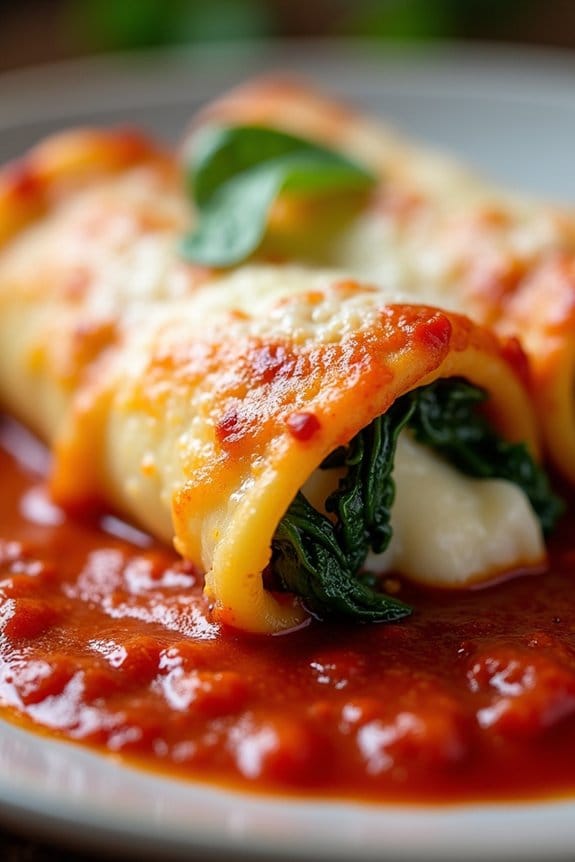
Spinach and Ricotta Cannelloni is a classic Italian dish perfect for Christmas lunch. This creamy, savory dish is ideal for those who want to indulge in a rich and comforting meal. The cannelloni tubes are stuffed with a delicious mixture of fresh spinach and creamy ricotta cheese, flavored with a hint of nutmeg, and then baked to perfection in a bath of tangy tomato sauce and topped with melted cheese. The result is a heartwarming dish that brings vibrant colors and flavors to your holiday table.
This recipe is designed to serve 4-6 people, making it perfect for a small family gathering or an intimate holiday meal. With its combination of nutritious spinach and protein-rich ricotta, this dish not only satisfies your taste buds but also provides a balanced meal. The preparation is straightforward, and the ingredients can be easily found at your local grocery store, allowing you to create an authentic Italian dining experience at home.
Ingredients:
- 12 cannelloni tubes
- 500g fresh spinach leaves
- 250g ricotta cheese
- 1 cup grated Parmesan cheese
- 1/2 teaspoon ground nutmeg
- Salt and pepper to taste
- 2 cups tomato passata
- 1 clove garlic, minced
- 1 teaspoon dried oregano
- 1 tablespoon olive oil
- 1 cup mozzarella cheese, grated
Cooking Instructions:
- Prepare the Spinach: Begin by washing the spinach leaves thoroughly. Heat a large pan over medium heat and add the spinach. Cook until the spinach wilts, then transfer it to a colander to drain any excess water. Once cooled, chop the spinach finely.
- Make the Filling: In a mixing bowl, combine the chopped spinach, ricotta cheese, 1/2 cup of Parmesan cheese, ground nutmeg, salt, and pepper. Mix until the ingredients are fully blended and set aside.
- Prepare the Tomato Sauce: In a separate saucepan, heat the olive oil over medium heat. Add the minced garlic and cook until fragrant. Pour in the tomato passata and stir in the oregano. Season with salt and pepper, then let simmer for about 10 minutes to allow the flavors to meld.
- Stuff the Cannelloni Tubes: Using a small spoon or piping bag, carefully fill each cannelloni tube with the spinach and ricotta mixture. Confirm each tube is generously filled.
- Assemble the Dish: Preheat your oven to 180°C (350°F). Spread a thin layer of tomato sauce on the bottom of a baking dish. Place the filled cannelloni tubes on top of the sauce in a single layer. Pour the remaining tomato sauce over the cannelloni, confirming they’re well-covered.
- Add Cheese and Bake: Sprinkle the remaining Parmesan cheese and the mozzarella cheese evenly over the top. Cover the baking dish with aluminum foil and bake in the preheated oven for 25 minutes. Remove the foil and bake for an additional 15 minutes, or until the cheese is golden and bubbly.
Extra Tips:
For a creamier texture, you can add a bechamel sauce layer over the cannelloni before adding the tomato sauce. To prevent the cannelloni from drying out, confirm they’re adequately covered with sauce.
If you prefer a spicier version, add a pinch of chili flakes to the tomato sauce. Additionally, using fresh nutmeg and grating it directly into the filling can enhance the dish’s overall flavor.
Finally, let the cannelloni rest for a few minutes after baking before serving to allow the flavors to settle.
Slow-Cooked Lamb Shanks
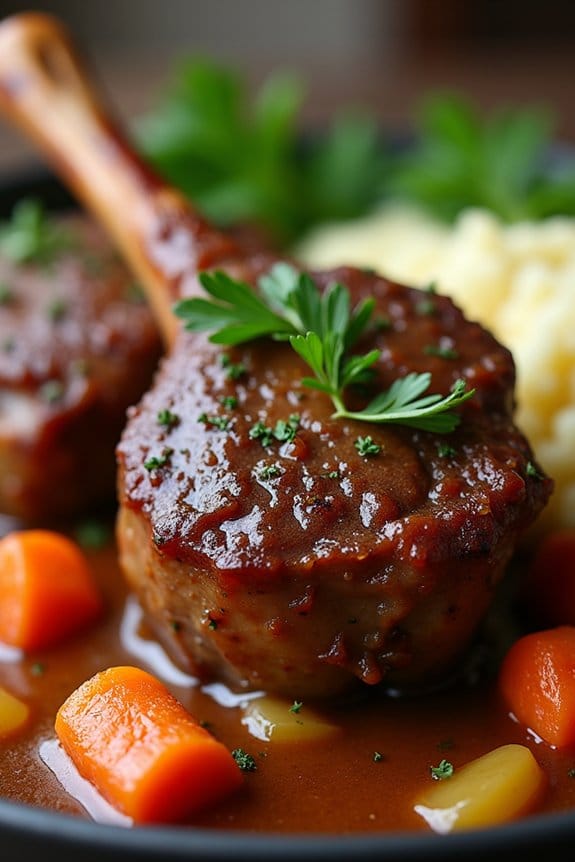
Celebrate Christmas with a sumptuous and heartwarming dish of slow-cooked lamb shanks. Infused with aromatic herbs and spices, this recipe promises a melt-in-your-mouth experience that brings together the rich flavors of tender lamb meat and a luscious sauce.
Perfect for a festive gathering, this dish will be the star of your Christmas lunch, offering a comforting and indulgent meal that will have your guests asking for seconds.
The key to this dish is the slow-cooking process, which allows the meat to become incredibly tender while absorbing the flavors of the herbs and spices. Served with creamy mashed potatoes or your favorite seasonal vegetables, these lamb shanks are sure to create a memorable holiday feast.
Whether you’re hosting a big gathering or a small family dinner, this recipe caters to 4-6 people, guaranteeing everyone enjoys the delightful taste of Christmas.
Ingredients (Serves 4-6):
- 4 lamb shanks
- Salt and freshly ground black pepper
- 2 tablespoons olive oil
- 2 large onions, chopped
- 4 cloves garlic, minced
- 3 carrots, peeled and chopped
- 2 celery stalks, chopped
- 1 cup red wine
- 2 cups beef stock
- 2 tablespoons tomato paste
- 1 tablespoon fresh rosemary, chopped
- 1 tablespoon fresh thyme, chopped
- 2 bay leaves
- Zest of 1 lemon
- Fresh parsley, chopped (for garnish)
Cooking Instructions:
- Preparation: Begin by seasoning the lamb shanks generously with salt and freshly ground black pepper. This will enhance the flavor of the meat when cooked.
- Browning the Meat: In a large, heavy-based pot or Dutch oven, heat the olive oil over medium-high heat. Add the lamb shanks and brown them on all sides until they develop a deep, caramelized color. This should take about 8-10 minutes. Remove the shanks and set them aside.
- Sautéing Vegetables: In the same pot, add the chopped onions, garlic, carrots, and celery. Sauté the vegetables for about 5-7 minutes until they’re softened and aromatic.
- Deglazing: Pour the red wine into the pot to deglaze, scraping the bottom of the pot to release any browned bits. This adds depth and richness to the sauce. Allow the wine to simmer for about 2 minutes.
- Adding Liquids and Herbs: Stir in the beef stock, tomato paste, rosemary, thyme, bay leaves, and lemon zest. Mix everything thoroughly to combine the flavors.
- Slow Cooking: Return the lamb shanks to the pot, ensuring they’re submerged in the liquid. Bring the mixture to a gentle simmer, then cover the pot with a lid. Allow the lamb to cook slowly on low heat for 2.5 to 3 hours, or until the meat is tender and easily falls off the bone.
- Finishing Touches: Once cooked, remove the lamb shanks from the pot and keep them warm. If the sauce is too thin, increase the heat and let it reduce to your desired consistency. Taste and adjust seasoning if needed.
- Serving: Serve the lamb shanks with the reduced sauce, garnishing with freshly chopped parsley. Pair with mashed potatoes or seasonal vegetables for a complete meal.
Extra Tips:
For ideal flavor, consider marinating the lamb shanks overnight with a mixture of olive oil, garlic, rosemary, and thyme. This will further infuse the meat with aromatic flavors.
If preparing in advance, the dish can be made a day ahead, as the flavors deepen overnight. Simply reheat slowly before serving to guarantee the meat remains tender.
Additionally, using a good quality red wine will greatly enhance the taste of the sauce, making this dish truly unforgettable.
Chicken and Mushroom Puff Pastry
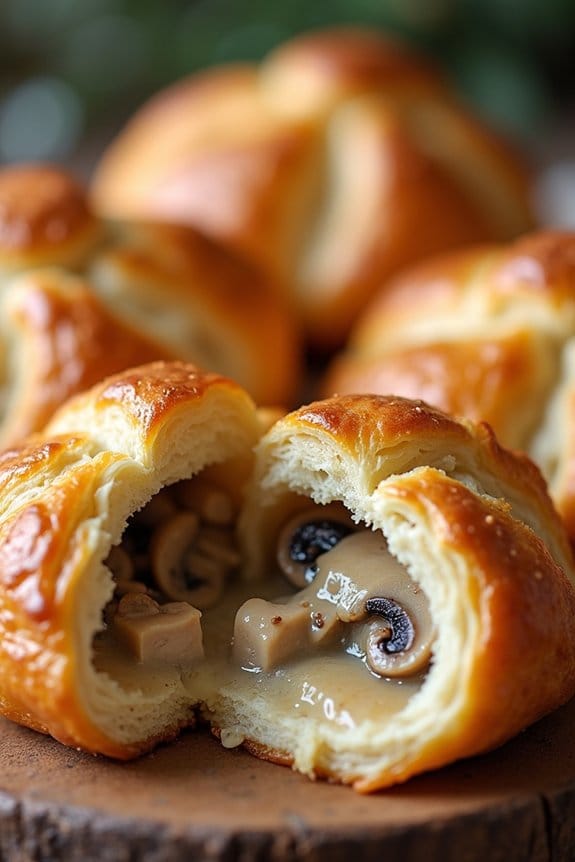
Chicken and Mushroom Puff Pastry is a delightful dish that’s perfect for a Christmas lunch, combining the savory flavors of tender chicken and earthy mushrooms encased in a flaky puff pastry. This dish not only looks impressive but also offers a deliciously satisfying experience that will surely impress your guests.
With its golden, buttery crust, and a rich, creamy filling, this dish is a great way to bring warmth and joy to your holiday table.
The key to a successful Chicken and Mushroom Puff Pastry lies in the quality of the ingredients and the delicate balance of flavors. The chicken should be juicy and flavorful, while the mushrooms add depth to the dish with their umami-rich taste. The creamy sauce binds everything together, guaranteeing that each bite is a perfect blend of textures and tastes.
Serve this dish alongside a fresh green salad or roasted vegetables for a complete meal that will leave everyone at the table satisfied and merry.
Ingredients (serving size: 4-6 people):
- 2 sheets of puff pastry
- 2 tablespoons olive oil
- 1 pound chicken breast, cubed
- 8 ounces mushrooms, sliced
- 1 onion, finely chopped
- 2 cloves garlic, minced
- 1 teaspoon dried thyme
- 1 teaspoon salt
- 1/2 teaspoon black pepper
- 1/4 cup white wine
- 1 cup heavy cream
- 1 cup chicken broth
- 1 egg, beaten (for egg wash)
- Flour, for dusting
Cooking Instructions:
- Prepare the Ingredients: Begin by preheating your oven to 400°F (200°C). Lightly dust a clean surface with flour and roll out the puff pastry sheets until they’re slightly larger than your baking dish. Set aside to chill while you prepare the filling.
- Cook the Chicken and Vegetables: In a large skillet, heat the olive oil over medium heat. Add the cubed chicken and cook until browned on all sides, about 5-7 minutes. Remove the chicken from the pan and set aside.
- Sauté the Aromatics: In the same skillet, add the chopped onion and minced garlic. Sauté for 2-3 minutes until the onion becomes translucent and the garlic is fragrant.
- Add Mushrooms and Seasoning: Add the sliced mushrooms to the skillet along with the dried thyme, salt, and black pepper. Cook for another 5 minutes until the mushrooms have released their moisture and are golden brown.
- Deglaze and Make the Sauce: Pour the white wine into the skillet to deglaze, scraping up any browned bits from the bottom. Allow the wine to reduce by half, then add the heavy cream and chicken broth. Stir well to combine and bring the mixture to a simmer. Let it cook for about 5 minutes until the sauce thickens slightly.
- Combine and Cool the Filling: Return the browned chicken to the skillet, stirring to coat it in the creamy mushroom sauce. Remove from heat and allow the filling to cool slightly.
- Assemble the Puff Pastry: Place one sheet of puff pastry into a baking dish, pressing it into the corners. Spoon the chicken and mushroom filling over the pastry, spreading it evenly. Cover with the second sheet of puff pastry, pressing the edges to seal. Brush the top with beaten egg for a glossy finish.
- Bake: Transfer the baking dish to the preheated oven and bake for 25-30 minutes, or until the pastry is golden brown and puffed.
- Serve: Allow the Chicken and Mushroom Puff Pastry to cool for a few minutes before slicing and serving.
Extra Tips:
For an extra layer of flavor, consider adding a tablespoon of Dijon mustard to the creamy sauce. If you prefer a vegetarian version, substitute the chicken with additional mushrooms or a mix of roasted vegetables. Ascertain the filling isn’t overly wet to prevent the puff pastry from becoming soggy.
This dish can be made ahead of time and baked just before serving to save time on the day of your Christmas lunch.
Sweet Potato and Black Bean Tacos
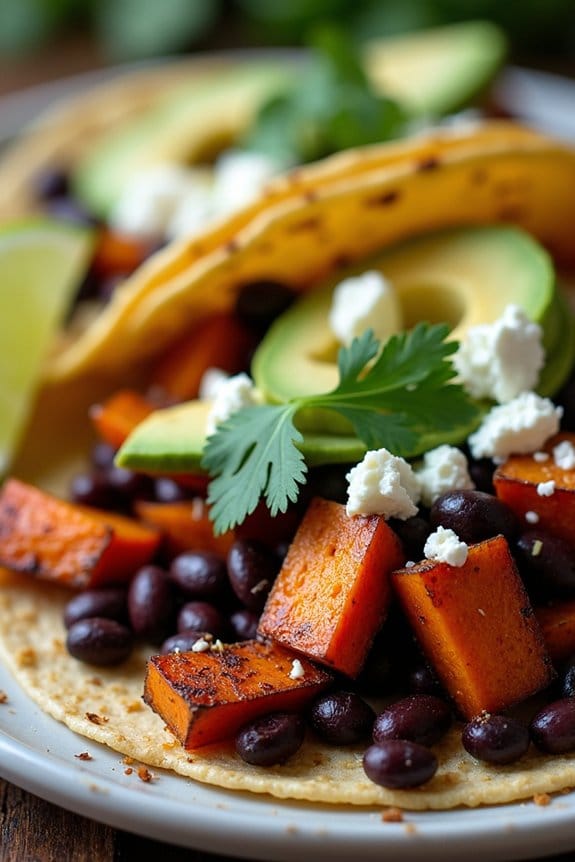
Sweet Potato and Black Bean Tacos are a perfect addition to your Christmas lunch menu. This dish combines the earthy sweetness of roasted sweet potatoes with the hearty texture of black beans, all wrapped up in a warm tortilla. The combination isn’t only delicious but also nutritious, making it a great option for both vegetarians and those looking to incorporate more plant-based meals into their holiday festivities.
The tacos can be topped with a variety of fresh ingredients like avocado, cilantro, and a squeeze of lime, adding bright and invigorating flavors that balance the richness of the sweet potatoes.
This recipe serves 4-6 people and is relatively easy to prepare. It’s a great make-ahead option, as the components can be prepared in advance and assembled quickly when it’s time to eat. The sweet potatoes can be roasted to perfection while you prepare the black bean mixture, guaranteeing that the meal comes together efficiently.
These tacos aren’t only delightful to eat but also visually appealing, with their vibrant colors and inviting aroma, making them a showstopper on your holiday table.
Ingredients:
- 4 medium sweet potatoes, peeled and cubed
- 2 tablespoons olive oil
- 1 teaspoon ground cumin
- 1 teaspoon smoked paprika
- Salt and pepper to taste
- 1 (15-ounce) can black beans, drained and rinsed
- 1 teaspoon ground coriander
- 1 tablespoon lime juice
- 1 tablespoon chopped fresh cilantro
- 8-12 small corn or flour tortillas
- 1 avocado, sliced
- 1/4 cup crumbled feta or cotija cheese
- Lime wedges for serving
Instructions:
1. Preheat the Oven: Begin by preheating your oven to 425°F (220°C). This temperature will allow the sweet potatoes to roast nicely, developing a crispy exterior and a soft, tender interior.
2. Prepare the Sweet Potatoes: Place the cubed sweet potatoes in a large bowl. Drizzle with olive oil and sprinkle with ground cumin, smoked paprika, salt, and pepper. Toss to guarantee even coating of the spices on the sweet potatoes.
Spread the sweet potatoes on a baking sheet in a single layer to guarantee even roasting.
3. Roast the Sweet Potatoes: Place the baking sheet in the preheated oven and roast for about 25-30 minutes, or until the sweet potatoes are tender and slightly caramelized, stirring halfway through the cooking time to guarantee even browning.
4. Prepare the Black Beans: While the sweet potatoes are roasting, heat a small pan over medium heat. Add the black beans, ground coriander, and a pinch of salt. Cook, stirring occasionally, for about 5 minutes until the beans are warmed through.
Add the lime juice and chopped cilantro, then remove from heat.
5. Warm the Tortillas: Wrap the tortillas in aluminum foil and warm them in the oven for about 5 minutes, or until they’re pliable and heated through.
6. Assemble the Tacos: To assemble, place a generous scoop of roasted sweet potatoes and black beans on each tortilla. Top with slices of avocado, crumbled feta or cotija cheese, and any additional toppings you desire.
Serve immediately with lime wedges on the side for squeezing over the tacos.
Extra Tips:
For added flavor, consider making a quick avocado crema by blending avocado with a bit of yogurt, lime juice, and salt to drizzle over the tacos.
You can also add a touch of heat by including sliced jalapeños or a dash of hot sauce. If you prefer a bit more crunch, add some shredded cabbage or radish slices as toppings.
Remember that the key to a great taco is balancing flavors and textures, so feel free to experiment with different combinations of toppings to suit your taste.
Finally, these tacos are best enjoyed fresh, but the components can be stored separately in the refrigerator for up to two days and assembled just before serving.
Classic Beef Wellington
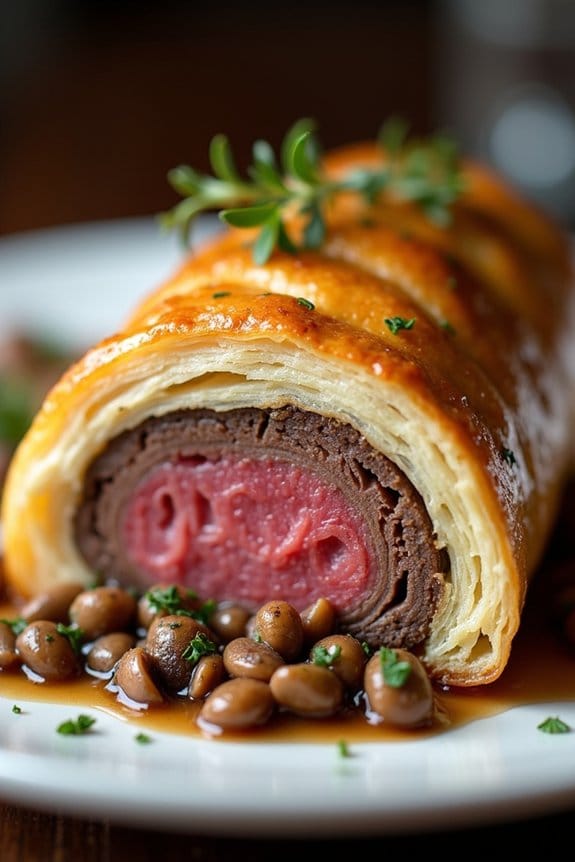
Classic Beef Wellington is an elegant and mouthwatering dish that’s perfect for a special Christmas lunch. This traditional English dish consists of a tender beef filet, coated with a savory mushroom duxelles, wrapped in a layer of prosciutto, all encased in a flaky puff pastry. The combination of flavors and textures creates a truly luxurious dining experience that’s certain to impress your family and guests.
The key to a perfect Beef Wellington lies in its preparation and timing. It takes some effort to execute, but the end result is well worth it. This recipe serves 4-6 people, making it ideal for a festive gathering. Whether you’re a seasoned cook or trying this dish for the first time, with careful attention to each step, your Beef Wellington will be the star of your Christmas meal.
Ingredients (Serves 4-6):
- 2 pounds center-cut beef tenderloin
- Salt and freshly ground black pepper
- 2 tablespoons olive oil
- 1 pound mushrooms, finely chopped
- 2 tablespoons unsalted butter
- 2 cloves garlic, minced
- 2 tablespoons Dijon mustard
- 12 slices prosciutto
- 1 sheet puff pastry, thawed
- 1 egg, beaten
- 2 tablespoons flour, for dusting
- 1 tablespoon fresh thyme leaves, chopped
Cooking Instructions:
- Prepare the Beef Tenderloin: Preheat your oven to 400°F (200°C). Season the beef tenderloin generously with salt and pepper. Heat olive oil in a large skillet over high heat and sear the beef on all sides until browned, about 2-3 minutes per side. Remove from skillet and allow it to cool. Brush the beef with Dijon mustard and set aside.
- Make the Mushroom Duxelles: In the same skillet, melt butter over medium heat. Add the chopped mushrooms and garlic, cooking until the mushrooms release their moisture and begin to brown, about 10 minutes. Stir in the fresh thyme, salt, and pepper, then allow the mixture to cool.
- Wrap the Beef: Lay out a large piece of plastic wrap on a flat surface. Arrange the prosciutto slices on the plastic wrap, slightly overlapping. Spread the mushroom duxelles evenly over the prosciutto. Place the beef tenderloin on top of the mushroom layer. Using the plastic wrap, carefully roll the prosciutto around the beef, forming a tight log. Twist the ends of the plastic wrap to secure the shape and refrigerate for 30 minutes.
- Prepare the Puff Pastry: Roll out the puff pastry on a lightly floured surface to a size large enough to enclose the beef. Remove the beef from the refrigerator and plastic wrap. Place it in the center of the pastry. Brush the edges of the pastry with beaten egg, then fold over the beef, sealing the edges. Trim any excess pastry and place the seam side down on a baking sheet. Brush the pastry with more beaten egg.
- Bake the Wellington: Score the top of the pastry lightly with a sharp knife and sprinkle with a little more salt. Bake in the preheated oven for 25-30 minutes, or until the pastry is golden brown and the beef registers 125°F (51°C) for medium-rare. Remove from the oven and let it rest for 10 minutes before slicing.
Extra Tips:
To guarantee your Beef Wellington turns out perfectly, it’s crucial to let the beef rest after searing to allow the juices to redistribute. This will keep the meat moist and tender.
Also, make sure the mushroom duxelles is well-cooked and moisture-free to prevent the pastry from becoming soggy. If you’re short on time, prepare the Wellington up to the point of wrapping in pastry a day in advance and bake just before serving.
Vegetable and Cheese Frittata
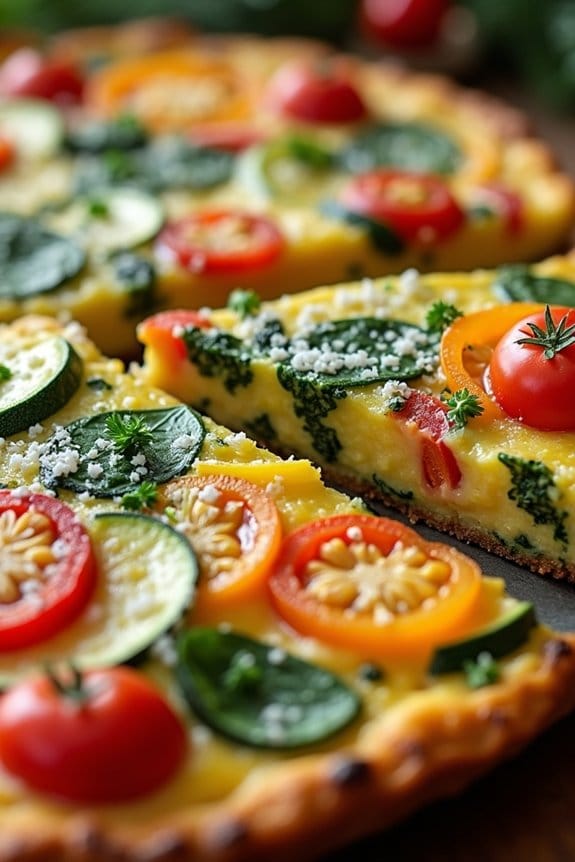
A vegetable and cheese frittata is a versatile and delightful addition to any Christmas lunch menu. This dish isn’t only easy to prepare but also allows for creativity in the kitchen, as you can incorporate a variety of vegetables based on your preference or what you have available. The combination of fresh vegetables and rich cheese creates a satisfying and flavorful meal that can be enjoyed by both vegetarians and meat-eaters alike.
A frittata is similar to an omelet but is cooked more slowly, allowing the flavors to meld together beautifully. Ideal for serving 4-6 people, this frittata is a wonderful way to add a healthy, colorful, and nutritious dish to your festive table. The key to a perfect frittata lies in balancing the ingredients and guaranteeing the eggs are cooked to perfection without becoming dry.
The following recipe will guide you through creating a delicious vegetable and cheese frittata that will impress your family and guests this Christmas.
Ingredients (Serves 4-6):
- 8 large eggs
- 1/4 cup milk
- Salt and pepper to taste
- 1 tablespoon olive oil
- 1 small onion, finely chopped
- 1 bell pepper (any color), diced
- 1 zucchini, sliced
- 1 cup spinach leaves
- 1/2 cup cherry tomatoes, halved
- 1 cup shredded cheese (cheddar, mozzarella, or your choice)
- 1/4 cup grated Parmesan cheese
- 2 tablespoons fresh parsley, chopped
Cooking Instructions:
1. Preheat the Oven: Preheat your oven to 350°F (175°C). This guarantees the frittata cooks evenly and develops a nice golden top.
2. Prepare the Egg Mixture: In a medium-sized bowl, whisk together the eggs, milk, salt, and pepper until well combined. Set this mixture aside as you prepare the vegetables.
3. Cook the Vegetables: Heat the olive oil in a large ovenproof skillet over medium heat. Add the chopped onion and bell pepper, and sauté for about 3-4 minutes until they’re softened.
Stir in the zucchini slices and cook for an additional 2 minutes. Then, add the spinach and cherry tomatoes, cooking until the spinach is wilted.
4. Combine and Cook: Pour the egg mixture over the sautéed vegetables in the skillet. Gently stir to evenly distribute the vegetables. Sprinkle the shredded cheese evenly over the top of the eggs.
5. Bake the Frittata: Transfer the skillet to the preheated oven and bake for about 20-25 minutes, or until the frittata is set in the middle and the top is lightly golden.
If you prefer a browner top, you can broil the frittata for an additional 2-3 minutes, watching closely to prevent burning.
6. Finish and Serve: Once cooked, remove the frittata from the oven and let it cool slightly. Sprinkle with grated Parmesan cheese and chopped fresh parsley before slicing into wedges. Serve warm or at room temperature.
Extra Tips:
When making a frittata, it’s important to use a non-stick or well-seasoned skillet that can shift from stovetop to oven. Additionally, don’t be afraid to experiment with different vegetables and cheeses based on your taste preferences or dietary needs.
If you want to add a little protein, consider incorporating cooked bacon or sausage into the mix. Finally, be mindful not to overcook the eggs, as they can become rubbery. The frittata should be firm but still slightly soft in the center when you remove it from the oven.
Garlic Butter Shrimp Skewers
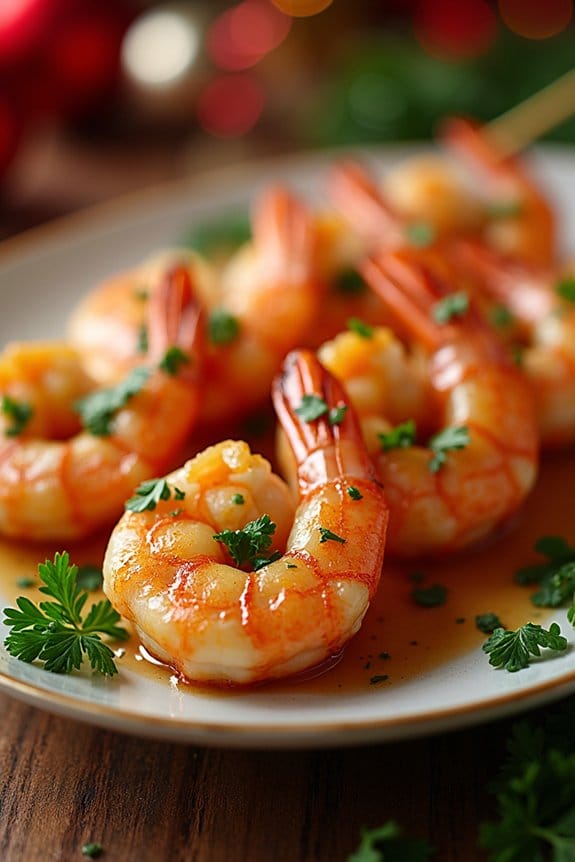
Garlic Butter Shrimp Skewers are a delightful addition to any Christmas lunch spread, offering a burst of flavors that complement the festive spirit. These skewers aren’t only delicious but also quick and easy to prepare, making them an ideal choice for a holiday meal. The combination of succulent shrimp with a savory garlic butter marinade creates a mouthwatering dish that’s sure to impress your guests.
Whether you’re serving them as an appetizer or as part of the main course, these skewers will add a touch of elegance and taste to your Christmas celebration. Perfect for serving 4-6 people, this recipe is designed to be a crowd-pleaser. The shrimp are marinated in a rich blend of garlic, butter, and herbs, then skewered and grilled to perfection.
The high heat of the grill imparts a beautiful char to the shrimp, enhancing their natural sweetness and infusing them with the flavors of the marinade. This dish is versatile and can be paired with a variety of sides, such as a fresh salad or grilled vegetables, to create a well-rounded holiday meal.
Ingredients:
- 1 1/2 pounds large shrimp, peeled and deveined
- 1/4 cup unsalted butter, melted
- 4 cloves garlic, minced
- 1 tablespoon fresh lemon juice
- 1 teaspoon salt
- 1/2 teaspoon black pepper
- 1 tablespoon chopped fresh parsley
- Skewers (if using wooden skewers, soak them in water for 30 minutes before use)
Instructions:
- Prepare the Marinade: In a medium-sized bowl, combine the melted butter, minced garlic, lemon juice, salt, black pepper, and chopped parsley. Mix well to confirm that all the ingredients are thoroughly blended.
- Marinate the Shrimp: Add the peeled and deveined shrimp to the marinade, assuring that each shrimp is well-coated. Cover the bowl with plastic wrap and refrigerate for at least 30 minutes to let the flavors develop. If time allows, marinate for up to 2 hours for an even more intense flavor.
- Preheat the Grill: While the shrimp are marinating, preheat your grill to medium-high heat. If using an indoor grill pan, heat it over medium-high heat as well.
- Skewer the Shrimp: Once marinated, thread the shrimp onto skewers, making sure they’re secure and evenly spaced to allow even cooking.
- Grill the Shrimp: Place the skewers on the preheated grill. Cook for 2-3 minutes on each side, or until the shrimp are opaque and have a nice char. Be cautious not to overcook, as shrimp can become tough if cooked too long.
- Serve: Remove the skewers from the grill and transfer them to a serving platter. Garnish with additional chopped parsley and serve immediately for the best flavor.
Extra Tips: When selecting shrimp, opt for larger sizes as they’re easier to skewer and grill without drying out. To confirm even cooking, make sure all shrimp are similar in size. If you’re preparing the dish ahead of time, you can marinate the shrimp overnight to deepen the flavors.
Pair the skewers with a light white wine or a revitalizing sparkling water with a splash of lemon for a perfect complement to this tasty dish.
