

As the holiday season approaches, there’s nothing quite like the joy of planning Christmas gatherings with loved ones. A table full of delightful appetizers is the perfect way to kick off the celebrations. From a stunning Caprese Christmas Wreath to irresistible Cranberry Brie Bites, these recipes are simple yet impressive. They will surely become the stars of your holiday spread. Get ready to wow your guests with these festive treats!
Caprese Christmas Wreath
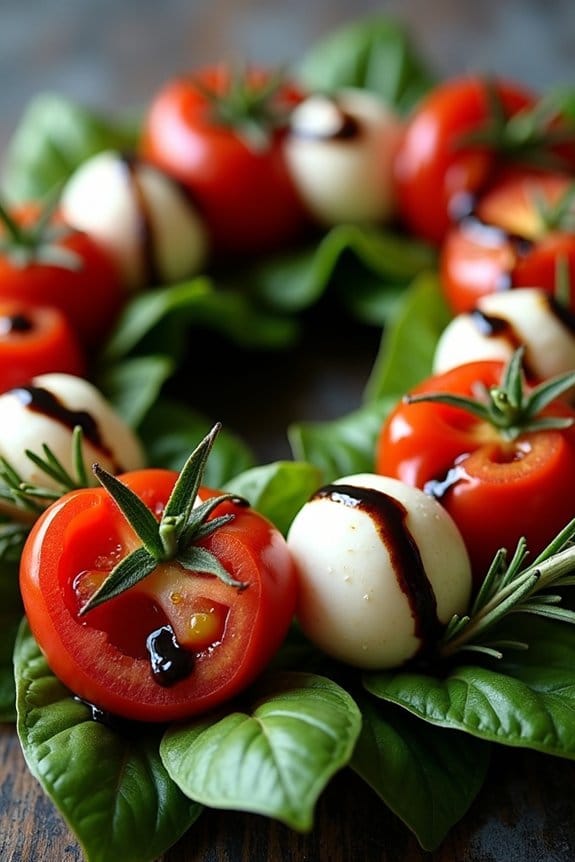
Transform your holiday appetizer spread with a visually stunning and delicious Caprese Christmas Wreath. This dish isn’t only festive but also incredibly easy to put together, making it a perfect choice for busy holiday gatherings.
The vibrant colors of fresh basil, juicy cherry tomatoes, and creamy mozzarella come together to represent the classic red, green, and white hues of Christmas, creating a dish that’s both aesthetically pleasing and a crowd-pleaser.
This appetizer isn’t only about the presentation but also about the flavors that are sure to delight the taste buds. The Caprese Christmas Wreath is a fresh and healthy option among the often-heavy holiday eats. Drizzled with a balsamic glaze, it adds a touch of sweetness and tang, elevating the simple ingredients to a gourmet level.
Whether you’re serving it as a starter or a delightful side, it will certainly enhance your holiday table.
Ingredients (Serving Size: 4-6 people):
- 2 cups cherry tomatoes
- 8 ounces fresh mozzarella balls
- 1 bunch fresh basil leaves
- 2 tablespoons extra-virgin olive oil
- Salt to taste
- Black pepper to taste
- 1/4 cup balsamic glaze
- Optional: sprigs of fresh rosemary for garnish
Cooking Instructions:
- Prepare Ingredients: Begin by rinsing the cherry tomatoes and basil leaves under cold running water to remove any dirt or pesticides. Pat them dry with a clean kitchen towel. Drain the mozzarella balls if they’re packed in water and set aside.
- Assemble the Wreath Base: On a large round platter, arrange the basil leaves in a circular fashion to create the base of your wreath. Confirm that the leaves overlap slightly to give a full, lush appearance.
- Add Tomatoes and Mozzarella: Alternate placing cherry tomatoes and mozzarella balls on top of the basil leaves. Continue layering them in a circular pattern until you cover the entire base, creating a visually appealing wreath shape.
- Season the Wreath: Drizzle extra-virgin olive oil evenly over the tomatoes and mozzarella. Sprinkle a pinch of salt and black pepper to taste. This will enhance the natural flavors of the ingredients.
- Finish with Balsamic Glaze: Carefully drizzle balsamic glaze over the top of the wreath. You can either create a zigzag pattern or a circular motion for aesthetic appeal.
- Garnish and Serve: If desired, tuck fresh rosemary sprigs into the wreath for additional greenery and aroma. Serve immediately, allowing guests to help themselves.
Extra Tips:
To guarantee the best flavor for your Caprese Christmas Wreath, use high-quality ingredients, especially the olive oil and balsamic glaze, as their flavors are central to the dish.
If you have the time, consider making your own balsamic reduction by simmering balsamic vinegar until it thickens, which can provide a more intense flavor.
Also, if preparing in advance, assemble the wreath without the balsamic glaze and cover it with plastic wrap, storing it in the refrigerator. Add the glaze just before serving to maintain the dish’s visual appeal.
Cranberry Brie Bites
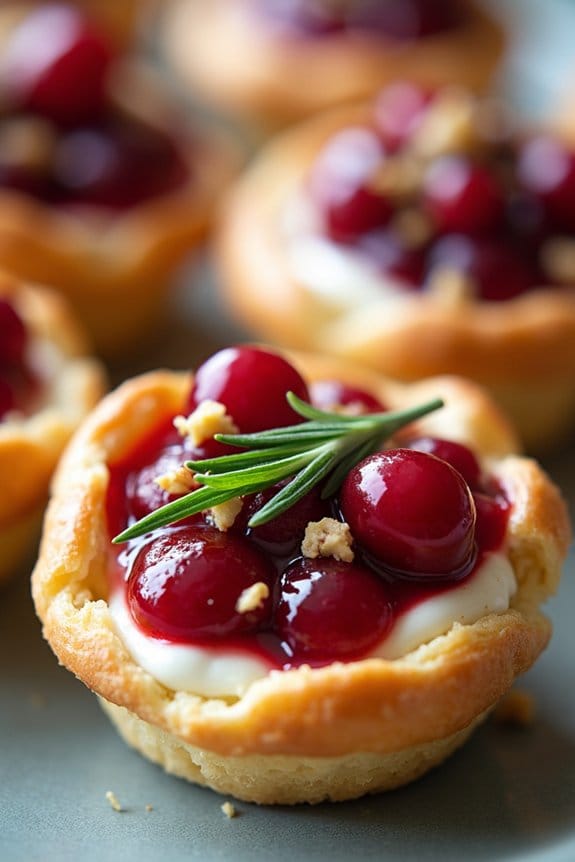
Cranberry Brie Bites are a delightful appetizer perfect for the holiday season. These bite-sized treats combine the creamy, rich flavor of Brie cheese with the tartness of cranberry sauce, all nestled in a flaky puff pastry shell. They make for a visually appealing and delicious addition to any Christmas gathering, certain to impress guests with both their taste and presentation.
The combination of flavors and textures in these bites is wonderfully balanced, making them a crowd-pleaser that’s also simple to prepare. What makes Cranberry Brie Bites so special is their simplicity and elegance. With just a few ingredients, you can create a dish that looks and tastes like it took hours to prepare.
This recipe is ideal for those looking to serve something festive and sophisticated without spending too much time in the kitchen. The bites are easy to assemble and bake quickly, making them a convenient choice for holiday entertaining. Plus, they can be made in advance and baked just before serving, freeing up your time to enjoy the celebrations.
Ingredients for Cranberry Brie Bites (serving size: 4-6 people):
- 1 sheet of puff pastry, thawed
- 1/2 cup cranberry sauce (homemade or store-bought)
- 1 small wheel of Brie cheese
- 1/4 cup chopped pecans (optional)
- 1 tablespoon fresh rosemary, finely chopped (optional)
- 1 egg (for egg wash)
- Flour, for dusting
Cooking Instructions:
- Preheat and Prepare: Preheat your oven to 375°F (190°C). Lightly dust your work surface with flour and roll out the puff pastry to smooth out any creases.
- Cut the Pastry: Using a sharp knife or a pizza cutter, cut the puff pastry into 2-inch squares. You should get around 24 squares from one sheet.
- Prepare the Brie: Cut the Brie into small cubes, roughly 1/2 inch in size. You’ll need one cube per pastry square.
- Assemble the Bites: Place each pastry square into a mini muffin tin, gently pressing down to create a small cup. Add a cube of Brie cheese into each pastry cup.
- Add Cranberry Sauce: Spoon about 1 teaspoon of cranberry sauce over each piece of Brie.
- Optional Toppings: If desired, sprinkle chopped pecans and rosemary over the cranberry sauce for added flavor and texture.
- Egg Wash: In a small bowl, beat the egg and lightly brush the edges of the pastry with the egg wash to promote a golden color while baking.
- Bake: Place the muffin tin in the preheated oven and bake for 12-15 minutes, or until the pastry is puffed and golden brown.
- Cool and Serve: Allow the bites to cool slightly before removing them from the tin. Serve warm or at room temperature.
Extra Tips: For best results, make sure your puff pastry is well-thawed but still cold when you start working with it, as this helps in achieving a flaky texture. You can prepare the bites up to the baking step a few hours in advance and keep them refrigerated; bake them just before serving to ensure they’re warm and fresh.
If you’re short on time, using store-bought cranberry sauce is perfectly fine, but homemade will add a personal touch. Finally, feel free to experiment with other toppings like caramelized onions or nuts to suit your taste preferences.
Puff Pastry Christmas Tree
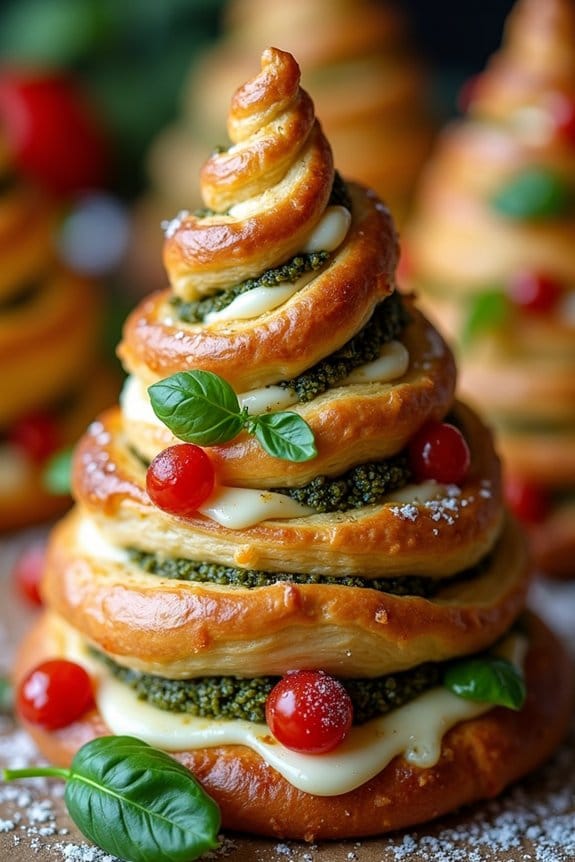
Puff Pastry Christmas Tree is a delightful and visually stunning appetizer that’s sure to impress your guests during the holiday season. This festive dish isn’t only easy to make but also offers a delightful combination of flaky pastry and your choice of savory fillings.
The tree-shaped presentation makes it a centerpiece-worthy addition to your Christmas table, adding a touch of whimsy and holiday cheer. Perfect for serving 4-6 people, this Puff Pastry Christmas Tree can be customized with various fillings to suit your taste preferences.
Whether you opt for a classic pesto and cheese combination or explore other combinations like spinach and feta, the result will be a deliciously crispy and flavorful appetizer. This recipe is ideal for those who wish to prepare something quick yet impressive for holiday gatherings.
Ingredients for Puff Pastry Christmas Tree (serving size: 4-6 people):
- 2 sheets of puff pastry, thawed
- 1/2 cup of pesto sauce
- 1 cup shredded mozzarella cheese
- 1/4 cup grated Parmesan cheese
- 1 egg, beaten (for egg wash)
- Cherry tomatoes and fresh basil leaves for garnish (optional)
Cooking Instructions:
- Preheat the Oven: Start by preheating your oven to 375°F (190°C). Line a baking sheet with parchment paper to prevent sticking and make cleanup easier.
- Prepare the Puff Pastry: Roll out the first sheet of puff pastry on a lightly floured surface. Spread the pesto sauce evenly over the entire sheet, leaving a small border around the edges.
- Add Cheese: Sprinkle the shredded mozzarella cheese evenly over the pesto layer, followed by a sprinkle of grated Parmesan cheese for added flavor.
- Layer the Pastry: Carefully place the second sheet of puff pastry over the first one, aligning the edges. Gently press down to secure the layers together.
- Shape the Tree: Using a sharp knife or pizza cutter, cut the pastry into a large triangle resembling a Christmas tree. Trim off the excess pastry from the sides. Make horizontal cuts along the sides of the triangle, about 1 inch apart, to create branches. Be sure not to cut all the way through the center.
- Twist the Branches: Gently twist each branch a few times to create a spiral effect, giving it a tree-like appearance. Be careful not to tear the pastry.
- Apply Egg Wash: Brush the entire pastry tree with the beaten egg. This will give the pastry a golden, shiny finish once baked.
- Bake: Transfer the pastry tree to the prepared baking sheet and bake in the preheated oven for 20-25 minutes, or until the pastry is golden brown and puffed.
- Garnish and Serve: Once baked, remove from the oven and let it cool slightly. Optionally, garnish with cherry tomatoes and fresh basil leaves to enhance the festive look. Serve warm.
Extra Tips:
To guarantee your Puff Pastry Christmas Tree turns out perfectly, make sure the puff pastry is well-thawed before you start assembling. This will make it easier to handle and shape.
Experiment with different fillings to cater to your guests’ preferences; sun-dried tomato pesto or a combination of ricotta and spinach are excellent alternatives. If you’re short on time before serving, prepare the tree in advance and refrigerate it until you’re ready to bake. Just remember to apply the egg wash right before baking for the best results.
Stuffed Mushrooms With Garlic and Herbs

Stuffed mushrooms with garlic and herbs make the perfect appetizer for your Christmas gathering. These delightful bites aren’t only delicious but also easy to prepare, making them an ideal addition to your holiday menu. The combination of earthy mushrooms, aromatic garlic, and fresh herbs creates a mouthwatering flavor that will leave your guests asking for more.
Whether you’re hosting a festive dinner or attending a potluck, these stuffed mushrooms are sure to impress. This recipe is designed for a serving size of 4-6 people, guaranteeing that everyone at your table gets a taste of these savory morsels. By using simple ingredients such as mushrooms, garlic, and herbs, you can create a dish that’s both elegant and satisfying.
The key to success is selecting fresh, high-quality ingredients to bring out the best flavors. Let’s plunge into the ingredients and steps needed to make these delectable stuffed mushrooms.
Ingredients:
- 16 large button mushrooms
- 4 tablespoons olive oil
- 3 cloves garlic, minced
- 1/2 cup breadcrumbs
- 1/4 cup grated Parmesan cheese
- 2 tablespoons chopped fresh parsley
- 2 tablespoons chopped fresh thyme
- Salt and pepper to taste
- 2 tablespoons butter, melted
Cooking Instructions:
- Preheat the Oven: Start by preheating your oven to 375°F (190°C). This guarantees that the mushrooms cook evenly and develop a nice golden-brown crust.
- Prepare the Mushrooms: Gently clean the mushrooms with a damp cloth to remove any dirt. Remove the stems and, using a small spoon, hollow out the center of each mushroom cap slightly to make room for the filling.
- Make the Filling: In a medium-sized bowl, combine the minced garlic, breadcrumbs, Parmesan cheese, parsley, thyme, salt, and pepper. Mix well to guarantee all ingredients are evenly distributed.
- Stuff the Mushrooms: Using a small spoon, fill each mushroom cap with the prepared filling, pressing gently to pack it in. Be sure to mound the filling slightly over the top of the mushroom cap.
- Arrange and Drizzle: Place the stuffed mushrooms on a baking sheet lined with parchment paper. Drizzle the tops of the mushrooms with olive oil and brush them lightly with melted butter for added richness.
- Bake the Mushrooms: Transfer the baking sheet to the preheated oven and bake for 20-25 minutes, or until the mushrooms are tender and the tops are golden brown.
- Serve: Remove the mushrooms from the oven and let them cool slightly before serving. Arrange them on a platter and garnish with additional fresh herbs if desired.
Extra Tips:
When selecting mushrooms, opt for those that are firm and free from blemishes for the best texture and flavor. If you prefer a creamier filling, you can add a tablespoon of cream cheese to the breadcrumb mixture.
Additionally, feel free to experiment with other herbs like basil or rosemary to personalize the flavor profile. For a bit of heat, a pinch of red pepper flakes can be added to the filling. Remember to taste the filling before stuffing the mushrooms to adjust the seasoning as needed.
Enjoy your festive stuffed mushrooms with a glass of your favorite holiday beverage!
Festive Cheese Balls
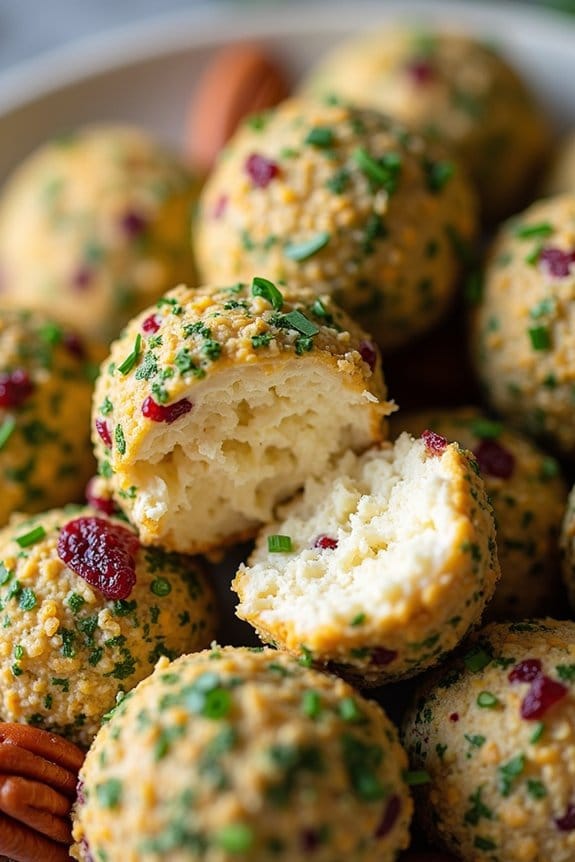
Festive Cheese Balls are a delightful addition to any holiday gathering, combining creamy cheese with a variety of savory and sweet flavors that are sure to please every palate.
These cheese balls aren’t only easy to make but also visually appealing, making them a perfect centerpiece for your Christmas appetizer spread. Whether served with crackers, breadsticks, or fresh vegetables, these cheese balls will surely become a favorite tradition at your holiday table.
The beauty of Festive Cheese Balls lies in their versatility; you can customize them to suit your preferences or dietary needs. This particular recipe serves 4-6 people and incorporates a blend of cheeses, nuts, and cranberries to create a flavor profile that’s both rich and invigorating.
The addition of fresh herbs and spices adds an extra layer of taste, making every bite a burst of festive cheer.
Ingredients:
- 16 oz cream cheese, softened
- 1 cup shredded sharp cheddar cheese
- 1/2 cup crumbled blue cheese
- 1/4 cup finely chopped fresh chives
- 1/4 cup dried cranberries, chopped
- 1/4 cup chopped pecans
- 1/4 teaspoon garlic powder
- 1/4 teaspoon onion powder
- Salt and pepper to taste
- 1/2 cup finely chopped parsley (for coating)
Cooking Instructions:
- Prepare the Cheese Mixture: In a large mixing bowl, combine the softened cream cheese, shredded cheddar cheese, and crumbled blue cheese. Mix until well combined and smooth.
- Add Flavorings: Fold in the chopped chives, dried cranberries, chopped pecans, garlic powder, onion powder, salt, and pepper. Mix until all ingredients are evenly distributed throughout the cheese mixture.
- Shape the Cheese Balls: Divide the cheese mixture into two or three portions, depending on your desired size of cheese balls. Using your hands, shape each portion into a smooth, round ball.
- Coat the Cheese Balls: Spread the chopped parsley on a flat surface. Roll each cheese ball in the parsley to coat evenly on all sides. The parsley won’t only add flavor but also give the cheese balls a festive green appearance.
- Chill the Cheese Balls: Place the cheese balls on a plate, cover with plastic wrap, and refrigerate for at least 1 hour. This will allow the flavors to meld together and the cheese balls to firm up, making them easier to serve.
- Serve: Once chilled, remove the cheese balls from the refrigerator and let them sit at room temperature for about 15 minutes before serving. This will enhance the texture and flavor. Serve with your choice of crackers, breadsticks, or fresh vegetable sticks.
Extra Tips:
For an added touch of sweetness, consider adding a tablespoon of honey to the cheese mixture. If you prefer a spicier kick, a pinch of cayenne pepper or a few dashes of hot sauce can be incorporated.
When shaping the cheese balls, lightly oil your hands to prevent sticking. If you’re preparing these cheese balls ahead of time, store them in the refrigerator for up to two days, ensuring they’re well-covered to maintain freshness.
Smoked Salmon and Cream Cheese Blinis
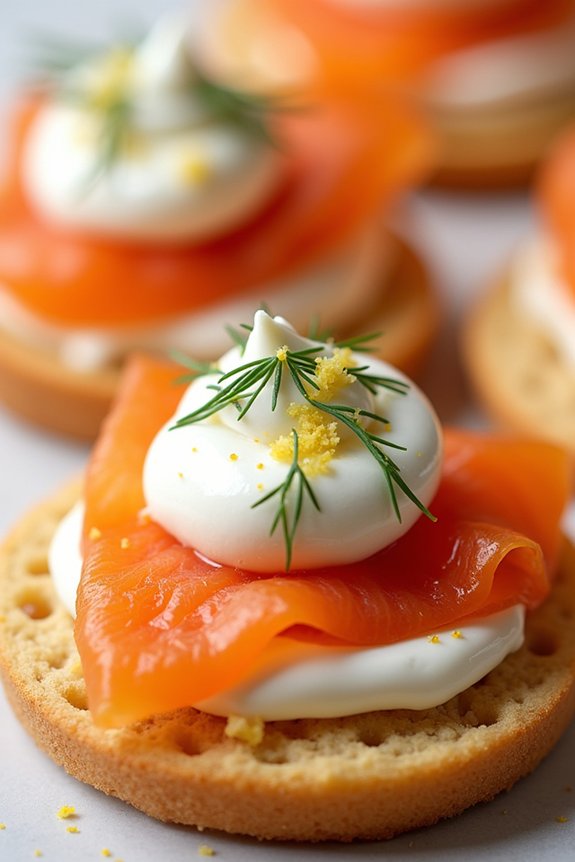
Smoked Salmon and Cream Cheese Blinis are a delightful appetizer perfect for your Christmas gatherings. These elegant little pancakes topped with savory smoked salmon and creamy cheese are sure to impress your guests.
Blinis, which are small Russian pancakes, serve as the ideal base for this sophisticated dish. Their soft, fluffy texture complements the rich, smoky flavors of the salmon, while the cream cheese adds a smooth, tangy contrast. The garnishing of fresh dill and a hint of lemon zest elevates the flavor profile, making these bite-sized treats a festive favorite.
Whether you’re hosting a formal dinner or a casual get-together, Smoked Salmon and Cream Cheese Blinis are a versatile addition to your appetizer menu. They aren’t only visually appealing but also easy to prepare, allowing you to spend more time enjoying the festivities and less time in the kitchen.
This recipe serves 4-6 people, making it perfect for intimate holiday gatherings or as part of a larger spread of appetizers.
Ingredients:
- 1 cup all-purpose flour
- 1 teaspoon baking powder
- 1/2 teaspoon salt
- 1 large egg
- 1 cup milk
- 2 tablespoons unsalted butter, melted
- 200g smoked salmon, thinly sliced
- 150g cream cheese, softened
- 1 tablespoon lemon juice
- 1 tablespoon fresh dill, chopped
- Lemon zest, for garnish
- Fresh dill sprigs, for garnish
- Black pepper, to taste
Instructions:
1. Prepare the Blini Batter: In a medium bowl, whisk together the flour, baking powder, and salt. In a separate bowl, beat the egg and add the milk. Gradually stir the wet ingredients into the dry ingredients until combined.
Mix in the melted butter and let the batter rest for 15 minutes.
2. Cook the Blinis: Heat a non-stick skillet over medium heat. Lightly grease the skillet with a bit of butter. Pour a tablespoon of batter for each blini onto the skillet, leaving enough space between them.
Cook for about 1-2 minutes on each side, or until bubbles form on the surface and the edges are set. Flip and cook the other side until golden. Repeat with the remaining batter.
3. Prepare the Cream Cheese Mixture: In a small bowl, mix the softened cream cheese with lemon juice and chopped dill until smooth. Season with black pepper to taste.
4. Assemble the Blinis: Once the blinis are cooked and slightly cooled, spread a small dollop of the cream cheese mixture over each one. Top with a slice of smoked salmon.
5. Garnish and Serve: Garnish each blini with a sprig of fresh dill and a sprinkle of lemon zest. Arrange on a serving platter and serve immediately.
Extra Tips:
To guarantee your blinis are light and fluffy, be careful not to overmix the batter. Letting the batter rest allows the flour to fully absorb the liquid ingredients, resulting in a tender texture.
For an added burst of flavor, consider adding a touch of horseradish to the cream cheese mixture. If preparing in advance, you can cook the blinis ahead of time and assemble them just before serving to maintain their freshness.
Enjoy the festive flavors of this delightful appetizer!
Holiday Meatball Skewers
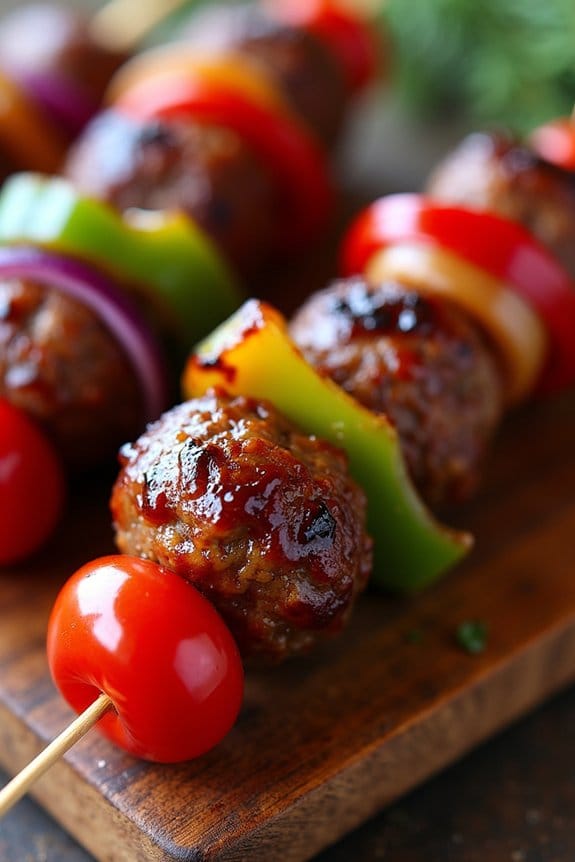
The holiday season is a time for joy, gathering, and of course, delicious food. One dish that perfectly captures the festive spirit is Holiday Meatball Skewers. This appetizer is a delightful combination of savory meatballs, fresh vegetables, and a sweet glaze, offering a burst of flavors in every bite. The skewers aren’t only a treat for the taste buds, but they also add a colorful and festive touch to any holiday table, making them a surefire hit at your holiday gathering.
These skewers are incredibly versatile and can be customized to cater to different dietary preferences. Whether you’re hosting a Christmas party or simply enjoying a cozy family dinner, these Holiday Meatball Skewers will make a standout addition to your menu. With tender meatballs paired with vibrant vegetables and a sticky, luscious glaze, these skewers are as easy to make as they’re satisfying.
Follow the simple recipe below to create a delicious appetizer that serves 4-6 people.
Ingredients:
- 1 pound ground beef or turkey
- 1/2 cup breadcrumbs
- 1/4 cup grated Parmesan cheese
- 1 egg
- 2 cloves garlic, minced
- Salt and pepper to taste
- 1 tablespoon Italian seasoning
- 1 cup cherry tomatoes
- 1 green bell pepper, cut into pieces
- 1 red onion, cut into chunks
- 1/2 cup barbecue sauce
- 2 tablespoons honey
- Wooden skewers
Cooking Instructions:
- Prepare the Meatballs: In a large bowl, combine the ground beef or turkey, breadcrumbs, Parmesan cheese, egg, minced garlic, salt, pepper, and Italian seasoning. Mix well until all ingredients are evenly incorporated.
- Form the Meatballs: Shape the mixture into small meatballs, approximately 1 inch in diameter. You should have around 20-24 meatballs.
- Preheat the Oven: Preheat your oven to 375°F (190°C) and line a baking sheet with parchment paper.
- Bake the Meatballs: Place the meatballs on the prepared baking sheet and bake for 15-20 minutes, or until they’re cooked through and browned.
- Prepare the Vegetables: While the meatballs are baking, wash the cherry tomatoes, and cut the green bell pepper and red onion into skewer-sized pieces.
- Make the Glaze: In a small saucepan, combine the barbecue sauce and honey. Heat on low until the mixture is smooth and slightly thickened.
- Assemble the Skewers: Once the meatballs are done, start assembling the skewers by alternating meatballs, cherry tomatoes, bell pepper pieces, and red onion chunks onto the wooden skewers.
- Glaze the Skewers: Brush the prepared glaze over the skewers, guaranteeing each component is well coated.
- Final Bake or Grill: Place the assembled skewers on the baking sheet and bake for an additional 5-7 minutes, or grill them for a few minutes until the glaze becomes sticky and caramelized.
Extra Tips:
To ascertain the skewers stay intact and the meatballs don’t fall apart, make sure the meatball mixture is firm. If it feels too wet, add a bit more breadcrumbs.
Soak the wooden skewers in water for about 30 minutes before assembling to prevent them from burning in the oven or on the grill. You can also experiment with different vegetables or add a sprinkle of sesame seeds as a finishing touch for extra flavor and presentation.
Prosciutto-Wrapped Asparagus
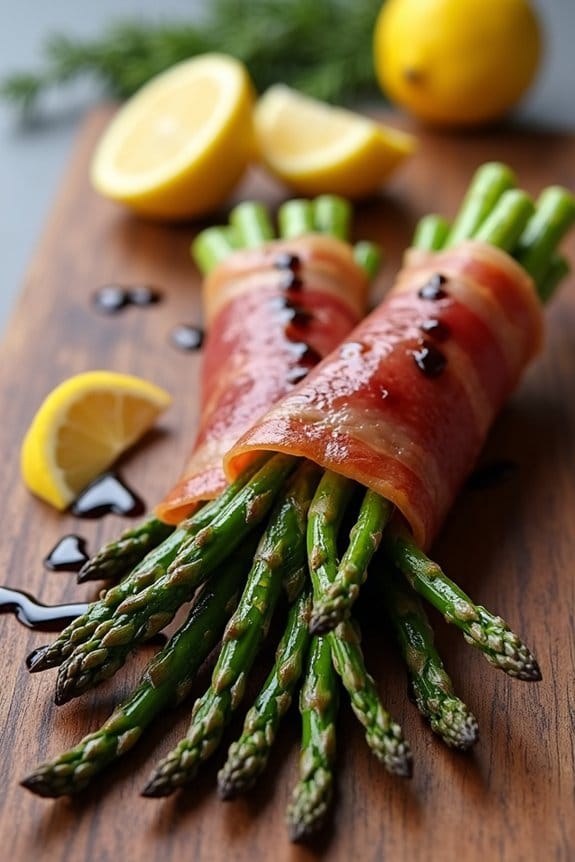
Prosciutto-wrapped asparagus is a delightful appetizer that combines the earthy flavors of fresh asparagus with the savory, salty notes of prosciutto. Perfect for Christmas gatherings, this dish isn’t only visually appealing with its vibrant green and delicate pink hues but also incredibly easy to prepare. The crispness of the roasted asparagus complements the tender prosciutto, making it a crowd-pleaser that’s bound to impress your guests.
Whether you’re hosting a formal dinner or a casual get-together, prosciutto-wrapped asparagus offers a touch of elegance and taste that will enhance any holiday menu. The versatility of this appetizer lies in its simplicity. With just a handful of ingredients, you can create a dish that looks sophisticated yet requires minimal effort.
The key to achieving the perfect balance is to guarantee the asparagus is just tender enough to bite through, while the prosciutto becomes slightly crispy during baking. This recipe is designed to serve 4-6 people, making it an ideal choice for a small to medium-sized gathering. Whether you’re a seasoned cook or a novice in the kitchen, this recipe is straightforward and easy to follow, providing delicious results every time.
Ingredients for 4-6 servings:
- 1 pound fresh asparagus, trimmed
- 8-12 slices of prosciutto
- 2 tablespoons olive oil
- Salt and freshly ground black pepper to taste
- Optional: 1 tablespoon balsamic glaze for drizzling
- Optional: Fresh lemon wedges for serving
Cooking Instructions:
- Prepare the Asparagus:
- Preheat your oven to 400°F (200°C).
- Trim the woody ends of the asparagus by bending each stalk until it naturally snaps, or trim about 1-2 inches from the bottom.
- Place the asparagus in a large bowl and drizzle with olive oil. Season with a pinch of salt and freshly ground black pepper, then toss to coat evenly.
- Wrap the Asparagus:
- Take a slice of prosciutto and wrap it around each asparagus stalk, starting from the bottom and spiraling up towards the tip. Ensure the prosciutto is secure but not too tight to allow for even cooking.
- Arrange and Bake:
- Arrange the wrapped asparagus in a single layer on a baking sheet lined with parchment paper or a silicone baking mat.
- Bake in the preheated oven for 10-15 minutes, or until the asparagus is tender and the prosciutto is slightly crisp.
- Serve:
- Remove from the oven and let cool slightly. Transfer to a serving platter.
- If desired, drizzle with balsamic glaze and serve with fresh lemon wedges for an extra burst of flavor.
Extra Tips:
For best results, choose medium-thick asparagus stalks, as they hold up better during baking and provide a satisfying bite. If you prefer a softer texture, you can blanch the asparagus in boiling water for 2-3 minutes before wrapping them in prosciutto. Make sure to pat them dry thoroughly to prevent excess moisture.
You can also experiment by adding a sprinkle of grated Parmesan cheese over the asparagus before baking for an additional layer of flavor. Finally, remember that prosciutto is quite salty, so be cautious with the amount of salt you add to the asparagus before baking. Enjoy your festive appetizer!
Mini Quiche Lorraine

Mini Quiche Lorraine is a delightful and savory appetizer that’s perfect for Christmas gatherings. Originating from the Lorraine region in France, this classic dish combines a rich, creamy filling with a flaky pastry crust. The traditional ingredients include eggs, cream, bacon, and cheese, making it a delectable treat for any festive occasion.
These mini versions are ideal for serving at parties, allowing guests to enjoy a taste of France in a small, convenient package. These Mini Quiche Lorraine make a wonderful addition to any holiday appetizer spread. They aren’t only delicious but also versatile, allowing you to prepare them ahead of time and reheat them just before serving.
Whether you’re hosting a small family gathering or a large party, these mini quiches are sure to impress your guests with their rich flavor and charming presentation. With this recipe, you can provide 4-6 servings, guaranteeing everyone gets a taste of this delightful dish.
Ingredients:
- 1 package of refrigerated pie crusts (enough for 2 crusts)
- 1/2 cup of cooked and crumbled bacon
- 1/2 cup of shredded Swiss cheese
- 1/4 cup of finely chopped onion
- 3 large eggs
- 1 cup of heavy cream
- 1/4 teaspoon of salt
- 1/4 teaspoon of black pepper
- 1/8 teaspoon of ground nutmeg
Cooking Instructions:
- Preheat the Oven: Begin by preheating your oven to 375°F (190°C). This guarantees that the oven is at the right temperature for the quiches to bake evenly.
- Prepare the Crust: Roll out the refrigerated pie crusts on a lightly floured surface. Using a round cookie cutter (about 3 inches in diameter), cut circles out of the dough. Press each circle into the cups of a mini muffin tin, ensuring they fit snugly.
- Cook the Bacon: In a skillet over medium heat, cook the bacon until crisp. Remove and allow it to cool, then crumble into small pieces.
- Assemble the Filling: In a mixing bowl, combine the crumbled bacon, shredded Swiss cheese, and finely chopped onion. Divide this mixture evenly among the prepared crusts in the muffin tin.
- Make the Egg Mixture: In a separate bowl, whisk together the eggs, heavy cream, salt, black pepper, and ground nutmeg until smooth. Carefully pour this egg mixture over the bacon and cheese filling in each mini quiche.
- Bake the Quiches: Place the muffin tin in the preheated oven and bake for about 20-25 minutes, or until the filling is set and the tops are lightly golden brown. Remove from the oven and allow to cool slightly before serving.
Extra Tips:
For an even flakier crust, you can blind bake the pie crusts for about 5 minutes before adding the filling. If you’re preparing these mini quiches ahead of time, simply store them in an airtight container in the refrigerator and reheat them in the oven at 350°F (175°C) for about 10 minutes before serving.
Additionally, feel free to experiment with different types of cheeses or add some chopped fresh herbs like chives or parsley for added flavor and color.
Spinach and Artichoke Dip
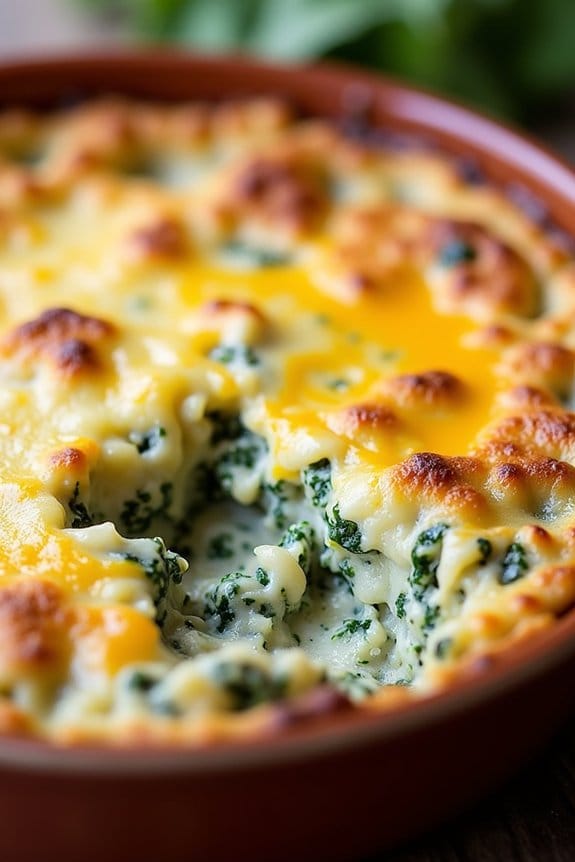
Spinach and Artichoke Dip is a quintessential Christmas appetizer that combines the creamy richness of cheese with the savory goodness of spinach and artichokes. This classic dip is perfect for holiday gatherings, offering a warm and inviting flavor that’s bound to be a hit with family and friends. The blend of cheeses creates a velvety texture, while the spinach and artichokes add a delightful balance of flavors.
Whether you’re hosting a festive dinner or attending a potluck, this dish is a crowd-pleaser that can be enjoyed with a variety of dippers, from crusty bread to crunchy vegetables.
The origins of Spinach and Artichoke Dip are rooted in the desire to create a delicious, easy-to-make dish that can be prepared in advance and served warm. The recipe has evolved over time to include a variety of ingredients that enhance its flavor and texture.
Today, it’s a staple at many holiday gatherings, loved for its comforting and satisfying taste. This recipe serves 4-6 people and is ideal for those looking to enjoy a delectable appetizer that’s both flavorful and easy to prepare.
Ingredients:
- 1 cup fresh spinach, chopped
- 1 can (14 oz) artichoke hearts, drained and chopped
- 1 cup cream cheese, softened
- 1/2 cup sour cream
- 1/2 cup mayonnaise
- 1 cup mozzarella cheese, shredded
- 1/2 cup Parmesan cheese, grated
- 2 cloves garlic, minced
- 1/4 teaspoon salt
- 1/4 teaspoon black pepper
- 1/4 teaspoon red pepper flakes (optional)
Instructions:
- Preheat the Oven: Start by preheating your oven to 350°F (175°C). This guarantees that the dip bakes evenly and achieves the perfect creamy texture.
- Prepare the Spinach and Artichokes: In a medium-sized bowl, combine the chopped fresh spinach and drained, chopped artichoke hearts. These ingredients form the flavorful base of the dip.
- Mix the Cheeses: In a separate large mixing bowl, blend together the softened cream cheese, sour cream, and mayonnaise until smooth. Add the shredded mozzarella cheese and grated Parmesan cheese, stirring to combine.
- Combine Ingredients: Add the spinach and artichoke mixture to the cheese blend. Stir in the minced garlic, salt, black pepper, and red pepper flakes if using. Mix until all ingredients are well incorporated.
- Transfer to Baking Dish: Pour the mixture into a baking dish, spreading it evenly. A 9-inch round or square dish works well for this quantity.
- Bake the Dip: Place the baking dish in the preheated oven and bake for 25-30 minutes, or until the top is bubbly and golden brown.
- Serve: Remove from the oven and allow to cool for a few minutes before serving. Pair with your choice of dippers like crusty bread, pita chips, or vegetable sticks.
Extra Tips:
For a more robust flavor, consider adding a pinch of nutmeg to the cheese mixture. If you prefer a slightly tangier dip, you can substitute the mozzarella with sharp cheddar cheese.
To save time, the dip can be prepared ahead of time and stored in the refrigerator until you’re ready to bake it. Just remember to let it come to room temperature before baking to guarantee even cooking.
Roasted Red Pepper Hummus
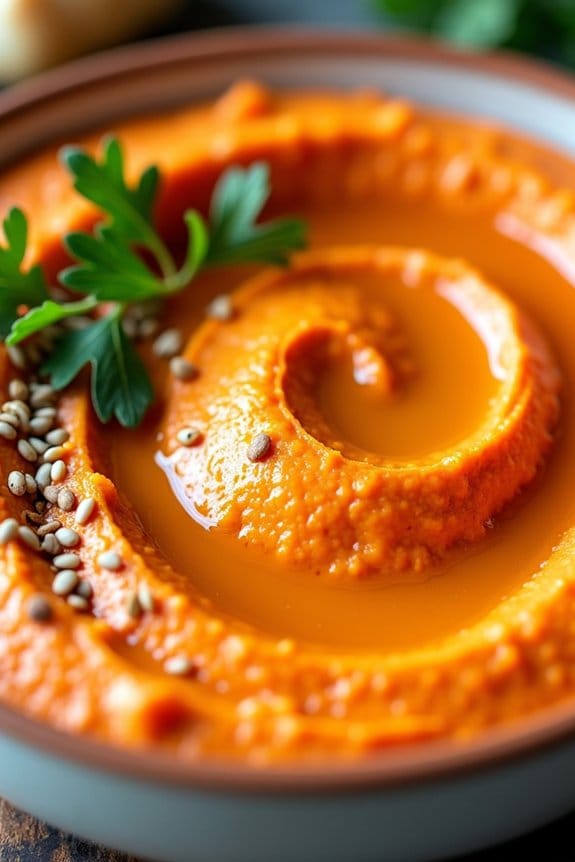
Roasted Red Pepper Hummus is a delightful, flavorful twist on traditional hummus that will surely be a hit at any Christmas gathering. This creamy dip combines the rich, smoky flavor of roasted red peppers with the classic smoothness of chickpeas, tahini, and fresh lemon juice. It’s perfect for serving with pita bread, vegetable sticks, or crackers, making it an ideal appetizer for your holiday spread.
Not only is it delicious, but it’s also easy to prepare, requiring minimal ingredients and effort. This recipe yields enough Roasted Red Pepper Hummus to serve 4-6 people, so it’s perfect for a small holiday party or as an addition to a larger appetizer platter. The vibrant color and robust flavor make it a visually appealing and tasty choice. Plus, it’s a healthy option that’s packed with protein and fiber, ensuring that your guests have a nutritious snack to enjoy alongside their festive treats.
Ingredients:
- 1 can (15 oz) chickpeas, drained and rinsed
- 2 medium red bell peppers
- 3 tablespoons tahini
- 2 tablespoons fresh lemon juice
- 2 cloves garlic, minced
- 2 tablespoons olive oil, plus more for drizzling
- 1 teaspoon ground cumin
- 1/2 teaspoon smoked paprika
- Salt to taste
- Black pepper to taste
- Optional garnishes: chopped fresh parsley, sesame seeds
Instructions:
- Roast the Red Peppers: Preheat your oven to 450°F (230°C). Place the red bell peppers on a baking sheet and roast them in the oven for about 20-25 minutes, turning occasionally, until the skin is charred and blistered. Remove from the oven and transfer the peppers to a bowl. Cover with plastic wrap and let them steam for about 10 minutes. This will make it easier to peel off the skin.
- Prepare the Peppers: Once the peppers are cool enough to handle, peel off the charred skin, remove the seeds, and cut the peppers into strips.
- Blend the Ingredients: In a food processor, combine the roasted red peppers, chickpeas, tahini, lemon juice, garlic, olive oil, cumin, and smoked paprika. Blend until smooth. If the hummus is too thick, you can add a tablespoon or two of water to reach your desired consistency.
- Season the Hummus: Taste the hummus and season with salt and black pepper to your preference. Blend again to incorporate the seasoning.
- Serve: Transfer the hummus to a serving bowl. Drizzle with a little olive oil, and if desired, garnish with chopped fresh parsley and sesame seeds for extra flavor and presentation.
Extra Tips:
For an even smokier flavor, consider adding a small pinch of cayenne pepper or a dash of hot sauce when blending the ingredients. If you prefer your hummus to be extra smooth, peel the chickpeas before blending. You can do this by gently squeezing each chickpea between your fingers.
Additionally, if you’re short on time, you can use jarred roasted red peppers, but roasting them fresh will give the best flavor. Remember that hummus can be stored in an airtight container in the refrigerator for up to a week, so feel free to make it ahead of your holiday festivities.
Deviled Eggs With a Twist

Deviled eggs are a timeless classic when it comes to appetizers, but why not spice things up this Christmas with a unique twist? This delightful recipe combines the traditional creamy filling with a hint of unexpected flavors that will leave your guests impressed and craving more.
The beauty of deviled eggs lies in their simplicity, yet they can easily be elevated into something extraordinary with just a few additional ingredients. Whether you’re hosting a holiday party or a cozy family gathering, these deviled eggs with a twist are sure to be a hit.
The twist in this recipe comes from the incorporation of fresh herbs and a touch of heat to create an exciting flavor profile that balances perfectly with the richness of the eggs. The addition of crispy bacon bits adds a delightful crunch, while a hint of Dijon mustard and smoked paprika provides depth and warmth.
This combination of flavors not only enhances the classic deviled egg but also adds a festive flair that’s perfect for the Christmas season. Serve these eggs chilled as a rejuvenating starter that will set the tone for a delicious meal.
Ingredients for 4-6 people:
- 12 large eggs
- 1/3 cup mayonnaise
- 1 tablespoon Dijon mustard
- 1 tablespoon apple cider vinegar
- 1/4 teaspoon smoked paprika
- 1/4 teaspoon cayenne pepper
- Salt and black pepper to taste
- 3 tablespoons finely chopped chives
- 4 strips of crispy bacon, crumbled
- Fresh dill sprigs for garnish
Cooking Instructions:
- Boil the Eggs: Place the eggs in a large saucepan and cover them with water. Bring the water to a boil over medium-high heat. Once boiling, cover the saucepan and remove it from the heat. Let the eggs sit in the hot water for 10-12 minutes to confirm they’re fully cooked.
- Cool and Peel: Carefully transfer the eggs to a bowl of ice water to cool them quickly. Once cooled, gently peel the eggs and pat them dry with a paper towel.
- Prepare the Filling: Slice the eggs in half lengthwise and remove the yolks, placing them in a medium-sized mixing bowl. Arrange the egg whites on a serving platter.
- Mix the Filling: Mash the yolks with a fork until smooth. Add the mayonnaise, Dijon mustard, apple cider vinegar, smoked paprika, cayenne pepper, salt, and black pepper. Stir until the mixture is creamy and well combined.
- Add the Twist: Fold in the chopped chives and crumbled bacon. Mix until evenly distributed throughout the yolk mixture.
- Fill the Egg Whites: Using a spoon or a piping bag with a star tip, fill the egg whites with the yolk mixture. Be generous, allowing the filling to mound slightly over the top of the egg whites.
- Garnish: Top each deviled egg with a sprig of fresh dill for a festive touch and an extra layer of flavor.
Extra Tips:
For perfectly boiled eggs, it’s important to use eggs that are a few days old, as they’re easier to peel. If you want to save time, you can prepare the filling a day in advance and store it in the refrigerator.
When ready to serve, simply fill the egg whites and garnish. Feel free to adjust the amount of cayenne pepper to suit your taste preference for heat. For an added twist, consider experimenting with other herbs like parsley or tarragon for a unique flavor profile.
Enjoy your deviled eggs with a twist as a delightful addition to your Christmas table.
Chocolate-Dipped Pretzel Rods

Chocolate-Dipped Pretzel Rods are a delightful and festive treat that make for a perfect Christmas appetizer. These sweet and salty snacks aren’t only easy to make but also offer a beautiful display of holiday cheer with their colorful decorations. With just a few ingredients and minimal prep time, you can create a batch of these tasty treats to impress your guests or to enjoy yourself during the festive season.
The combination of crunchy pretzel rods and smooth, rich chocolate is a classic pairing that never fails to please. Once dipped in chocolate, the pretzel rods are adorned with a variety of toppings, such as sprinkles, crushed candy canes, or nuts, adding both flavor and visual appeal. These treats can be made in advance, making them a convenient choice for holiday gatherings. Whether you serve them as an appetizer or a dessert, Chocolate-Dipped Pretzel Rods are sure to be a hit.
Ingredients for 4-6 servings:
- 12 large pretzel rods
- 1 cup semi-sweet chocolate chips
- 1 cup white chocolate chips
- 2 tablespoons vegetable oil (optional)
- Assorted sprinkles
- Crushed candy canes
- Chopped nuts (such as almonds or peanuts)
- Parchment paper
Instructions:
- Prepare the Work Area: Begin by lining a baking sheet with parchment paper. This will serve as the area for cooling the chocolate-dipped pretzel rods.
- Melt the Chocolate: In two separate microwave-safe bowls, place the semi-sweet chocolate chips in one and the white chocolate chips in the other. Add 1 tablespoon of vegetable oil to each bowl to create a smoother consistency, if desired. Microwave each bowl separately in 30-second intervals, stirring after each interval, until the chocolate is fully melted and smooth.
- Dip the Pretzel Rods: Holding a pretzel rod at the unbroken end, dip it into the melted chocolate, covering about two-thirds of its length. Allow any excess chocolate to drip off back into the bowl. For a mix of colors, you can dip some rods in semi-sweet chocolate and others in white chocolate.
- Decorate the Pretzels: Immediately after dipping each pretzel rod, sprinkle your choice of toppings—such as sprinkles, crushed candy canes, or chopped nuts—over the chocolate before it sets. Place the decorated pretzel rods on the prepared parchment paper.
- Let the Chocolate Set: Allow the chocolate on the pretzel rods to set completely. This can be done by leaving them at room temperature for about an hour or placing them in the refrigerator for about 15 minutes.
- Serve and Enjoy: Once the chocolate is firm, the pretzel rods are ready to be served. Arrange them on a festive platter and enjoy the sweet and salty combination.
Extra Tips:
For the best results, ascertain your work area is cool and dry, as humidity can affect the chocolate’s ability to set properly. If you’re making these treats in a humid environment, consider setting them in an air-conditioned room.
Additionally, you can experiment with different types of chocolate, such as milk or dark chocolate, to suit your taste preferences. For a more personalized touch, consider using colored candy melts in place of or alongside traditional chocolate. This not only adds a pop of color but also allows you to customize the treats to match your holiday theme.
