

Halloween is almost here, and it’s time to turn your gathering into a spooktacular soirée of flavors. Think Sinister Stuffed Mushrooms paired with a Creepy Charcuterie Board that will delight every palate. Guests will be thrilled to sip on Dracula’s Bloody Marys while savoring Coffin-Shaped Brownies. Curious for more? Get ready for an evening filled with ghoulishly delicious treats and a touch of eerie elegance.
Sinister Stuffed Mushrooms

Sinister Stuffed Mushrooms are a devilishly delightful addition to your Halloween party spread. These savory bites pack a flavorful punch, combining earthy mushrooms with a rich and creamy filling that’s certain to impress your adult guests. The dark, moody presentation is perfect for the spooky season, making them an ideal hors d’oeuvre for your eerie evening feast. Not only do they taste incredible, but they also bring a touch of elegance to your haunted gathering.
Devilishly delightful, Sinister Stuffed Mushrooms enchant with their rich, creamy filling and moody, spooky allure.
Crafting these sinister snacks involves a blend of ingredients that balance creamy, cheesy textures with a hint of garlic and herbs, all stuffed into hearty mushroom caps. The mushrooms serve as edible vessels, filled with a luscious mixture that will leave your guests craving more. This recipe is designed to serve 4-6 people, making it a perfect choice for intimate gatherings or as part of a larger spread of ghoulish goodies.
Ingredients (Serves 4-6):
- 24 large white button mushrooms
- 4 tablespoons olive oil
- 1 small onion, finely chopped
- 3 garlic cloves, minced
- 1/2 cup cream cheese, softened
- 1/4 cup grated Parmesan cheese
- 1/4 cup breadcrumbs
- 2 tablespoons fresh parsley, chopped
- 1 tablespoon fresh thyme leaves
- Salt and pepper to taste
Cooking Instructions:
- Prepare the Mushrooms: Begin by preheating your oven to 375°F (190°C). Gently clean the mushrooms with a damp paper towel to remove any dirt. Carefully remove the stems from the mushroom caps and set them aside. Place the mushroom caps on a baking sheet, rounded side down.
- Chop and Sauté: Finely chop the mushroom stems. In a skillet over medium heat, heat 2 tablespoons of olive oil. Add the chopped onion, garlic, and mushroom stems. Sauté until the onions are translucent and the mushroom stems are tender, about 5-7 minutes.
- Make the Filling: In a mixing bowl, combine the sautéed mixture with the cream cheese, Parmesan cheese, breadcrumbs, parsley, and thyme. Season with salt and pepper. Mix until the ingredients are well combined and the mixture is smooth and creamy.
- Stuff the Mushrooms: Using a spoon or a small scoop, fill each mushroom cap with the cream cheese mixture, packing it slightly to confirm it holds together. Drizzle the remaining 2 tablespoons of olive oil over the stuffed mushrooms to help them brown and crisp in the oven.
- Bake: Place the baking sheet in the preheated oven and bake for 20-25 minutes, or until the mushrooms are tender and the tops are golden brown. Remove from the oven and let them cool slightly before serving.
- Serve: Arrange the Sinister Stuffed Mushrooms on a platter and garnish with additional chopped parsley for a touch of color. Serve warm and enjoy the hauntingly delicious flavors.
Extra Tips:
For an extra layer of flavor, consider adding a splash of white wine to the sautéed mushroom stem mixture, letting it reduce slightly before combining with the other filling ingredients.
If you prefer a spicier version, incorporate a pinch of red pepper flakes into the filling. Additionally, you can prepare these mushrooms a day in advance; simply store them covered in the refrigerator and bake them fresh before serving. This won’t only save you time on the day of your party but also allow the flavors to meld beautifully.
Blood-Red Beet Hummus
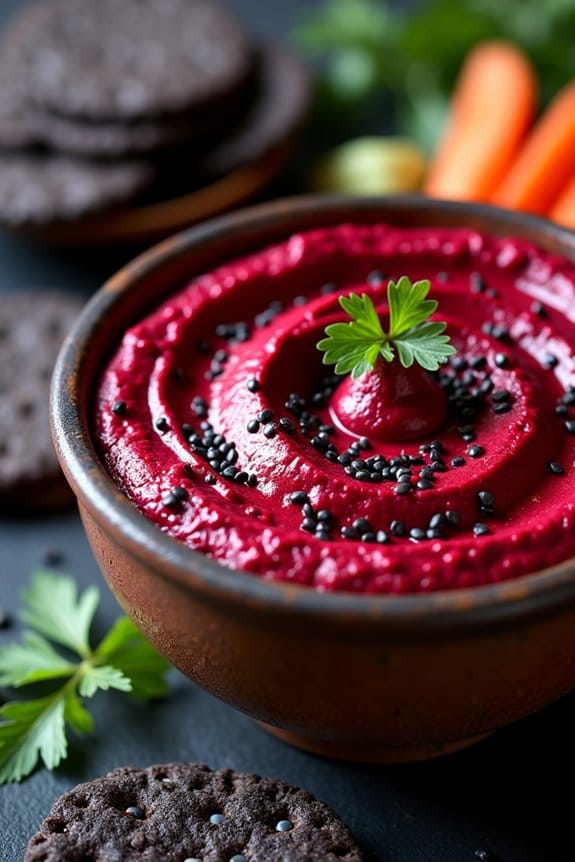
Immerse yourself in the Halloween spirit with a spooky and vibrant Blood-Red Beet Hummus that will captivate your guests and tantalize their taste buds. This eerie dip combines the earthy sweetness of roasted beets with the creamy texture of classic hummus, resulting in a strikingly colored appetizer perfect for your adult Halloween party.
Not only does it look the part, but it also offers a nutritious punch, making it a guilt-free indulgence for your festive gathering. The deep red hue of this hummus comes from the beets, which are known for their rich color and numerous health benefits. This dish isn’t only visually appealing but also packed with flavors and nutrients.
Serve this dip with black crackers or vegetable sticks for an extra touch of Halloween fun. Perfect for a serving size of 4-6 people, this recipe will guarantee there’s enough for everyone to enjoy.
Ingredients:
- 2 medium-sized beets
- 2 cups canned chickpeas, drained and rinsed
- 3 tablespoons tahini
- 2 cloves garlic, minced
- Juice of 1 lemon
- 3 tablespoons olive oil
- 1 teaspoon ground cumin
- Salt and pepper to taste
- 1 tablespoon water (optional, for consistency)
- Black sesame seeds (optional, for garnish)
- Fresh parsley (optional, for garnish)
Cooking Instructions:
- Prepare the Beets: Preheat your oven to 400°F (200°C). Wash the beets thoroughly and wrap them individually in aluminum foil. Place them on a baking sheet and roast in the oven for 45-60 minutes or until they’re tender when pierced with a fork. Allow them to cool before handling.
- Peel and Chop: Once the beets are cool enough to handle, peel off the skins using your fingers or a knife. Chop the beets into large chunks and set them aside.
- Blend the Ingredients: In a food processor, combine the roasted beets, chickpeas, tahini, minced garlic, lemon juice, olive oil, and ground cumin. Blend the mixture until smooth. If the hummus is too thick, add a tablespoon of water to reach the desired consistency.
- Season to Taste: Add salt and pepper to the mixture according to your taste preferences. Blend again to confirm the seasoning is evenly distributed.
- Serve: Transfer the beet hummus to a serving bowl. Garnish with a sprinkle of black sesame seeds and a few sprigs of fresh parsley for an added visual appeal.
Extra Tips:
For an even deeper flavor, consider roasting the garlic cloves along with the beets. This will add a subtle sweetness and a rich aroma to the hummus.
If you’re short on time, pre-cooked beets can be used instead of roasting them yourself. Remember to adjust the seasoning gradually, as the flavors will intensify after the hummus sits for a while.
Serve the beet hummus with an assortment of dips like black crackers, sliced cucumbers, or carrot sticks for a festive touch that complements the Halloween theme.
Creepy Charcuterie Board
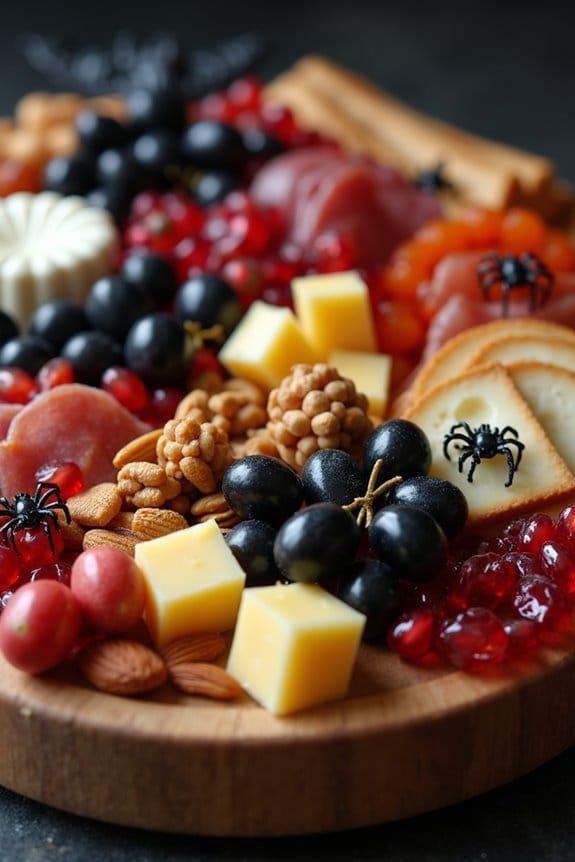
A Creepy Charcuterie Board is a perfect centerpiece for an adult Halloween party, combining delicious flavors with a spooky presentation. This board is adorned with an assortment of meats, cheeses, fruits, and nuts, all with a haunting twist to delight your guests. Using simple ingredients, you can transform a traditional charcuterie board into a chilling display that will both impress and satisfy.
To create the perfect Creepy Charcuterie Board, start by choosing a variety of meats and cheeses, then add in some seasonal fruits, nuts, and unique decorations to give it an eerie vibe. The key is in the presentation: think about adding elements like fake spiders, miniature skeletons, or even black plastic bats to enhance the Halloween theme. Your guests will enjoy the combination of flavors and the creative display, making your party an unforgettable experience.
Start with meats and cheeses, then add fruits and decorations for an eerie, unforgettable party display.
Ingredients for 4-6 people:
- 150g prosciutto
- 150g salami
- 150g spicy chorizo
- 200g aged cheddar cheese
- 200g brie cheese
- 200g blue cheese
- 1 bunch of black grapes
- 1 pomegranate (seeds only)
- 1 handful of dried apricots
- 1 handful of roasted almonds
- 1 handful of walnuts
- 1 jar of black olives
- 1 small pack of breadsticks
- Assorted crackers
- Decorative Halloween elements (e.g., fake spiders, plastic bats)
Cooking Instructions:
- Prepare the Base: Start by choosing a large wooden board or platter as your base. This will serve as the canvas for your Creepy Charcuterie Board.
- Place the Cheeses: Cut the aged cheddar into cubes, slice the brie, and break the blue cheese into chunks. Arrange these cheeses in different sections of the board to create variety and visual interest.
- Add the Meats: Roll or fold the prosciutto, salami, and chorizo, and place them in clusters around the cheeses. Confirm they’re spread out evenly across the board to make them accessible from all sides.
- Incorporate Fruits and Nuts: Scatter the black grapes, pomegranate seeds, dried apricots, roasted almonds, and walnuts around the meats and cheeses. This adds color and texture to your board.
- Include Olives and Crackers: Fill any gaps with black olives, breadsticks, and assorted crackers. These provide additional flavors and pair well with the meats and cheeses.
- Decorate for the Theme: Finally, place decorative Halloween elements like fake spiders and plastic bats strategically around the board. This gives your charcuterie board a spooky, festive touch.
Extra Tips:
When assembling your Creepy Charcuterie Board, consider the colors and textures you’re using to enhance the Halloween theme. Darker hues like black grapes and olives, and blood-red pomegranate seeds, contribute to the eerie aesthetic.
Feel free to experiment with different types of cheeses and meats according to your taste preferences. Make sure to leave some space between different items to allow easy access for your guests. And remember, presentation is key, so take your time to arrange everything thoughtfully for the best visual impact.
Ghostly Goat Cheese Balls
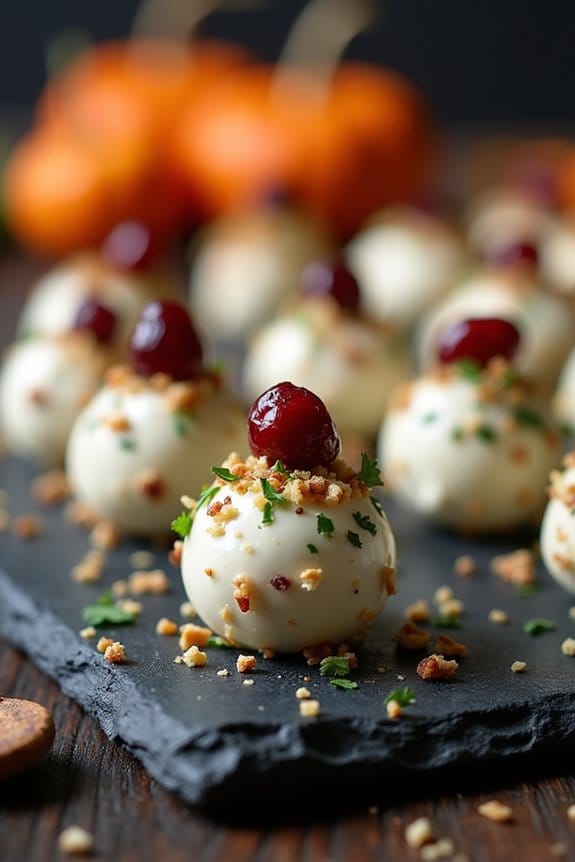
As Halloween approaches, it’s time to get creative in the kitchen with spooky-themed treats that are perfect for adult gatherings. Ghostly Goat Cheese Balls are an elegant yet eerie appetizer that combines the tangy creaminess of goat cheese with the subtle sweetness of dried fruits and nuts.
These bite-sized delights not only look the part with their ghostly white appearance but also deliver a delightful burst of flavor, making them a sophisticated addition to your Halloween party menu. This dish is perfect for those who appreciate a blend of savory and sweet, wrapped in a visually appealing presentation.
The soft texture of the goat cheese is complemented by the crunchy coating of nuts and herbs, while the hint of fruit adds a surprising twist. Whether you’re hosting a cocktail party or a sit-down dinner, these Ghostly Goat Cheese Balls will certainly leave your guests enchanted and craving more.
Ingredients for 4-6 servings:
- 8 ounces of goat cheese
- 4 ounces of cream cheese, softened
- 1/2 cup dried cranberries, finely chopped
- 1/2 cup chopped fresh parsley
- 1/2 cup chopped walnuts or pecans
- Salt and pepper to taste
- Crackers or sliced baguette, for serving
Cooking Instructions:
- Prepare the Cheese Mixture: In a medium-sized bowl, combine the goat cheese and cream cheese. Use a fork or electric mixer to blend them until smooth and creamy. Season the mixture with a pinch of salt and pepper to enhance the flavors.
- Shape the Balls: Using your hands, form the cheese mixture into small balls, roughly the size of a walnut. This should yield about 12-16 balls, depending on the size you prefer. Place them on a parchment-lined baking sheet to prevent sticking.
- Prepare the Coating: In a separate bowl, mix the chopped dried cranberries, parsley, and nuts until evenly combined. This will form the coating for the cheese balls, adding both texture and color.
- Coat the Cheese Balls: Roll each cheese ball in the cranberry-nut mixture, pressing gently to ascertain the coating adheres well. Make sure each ball is evenly covered for a uniform appearance.
- Chill the Balls: Once all the cheese balls are coated, place them in the refrigerator for at least 30 minutes. This will allow the flavors to meld together and the cheese to firm up, making them easier to handle.
- Serve: Arrange the Ghostly Goat Cheese Balls on a platter, accompanied by crackers or sliced baguette. Serve chilled or at room temperature.
Extra Tips:
For an extra spooky touch, you can use edible eyes or small black olives to create ghostly faces on your cheese balls. Feel free to experiment with different herbs or nuts for coating, such as chives or pistachios, to suit your taste preferences.
If you’re short on time, the cheese balls can be made a day in advance and stored in an airtight container in the refrigerator. Just remember to let them sit at room temperature for a few minutes before serving to soften slightly.
Deviled Eye Eggs
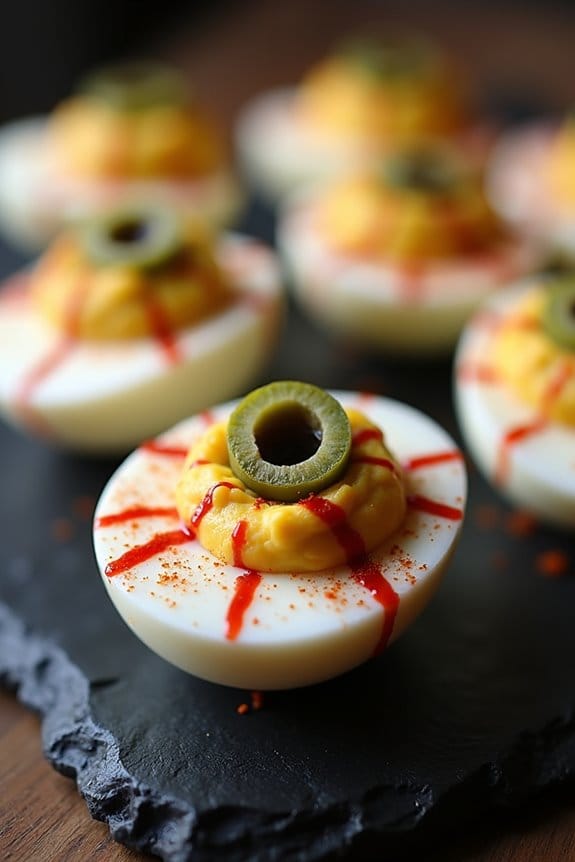
Deviled Eye Eggs are a spooky twist on the classic deviled eggs, perfect for adding a touch of eerie elegance to your Halloween party spread. These creepy yet delicious bites resemble eerie eyeballs, sure to give your guests a fright before they delight in the savory flavor. The creamy, tangy filling is complemented by the visual appeal of “bloodshot” veins and an olive “pupil,” making them a must-have addition to any adult Halloween gathering.
Whether you’re hosting a frightful Halloween bash or just want to surprise your friends with some ghoulishly good eats, these Deviled Eye Eggs are bound to be a hit. They’re not only simple to prepare but also a fun way to get creative in the kitchen. With a few basic ingredients and a little bit of artistic flair, you can transform ordinary eggs into an extraordinary centerpiece that captures the spirit of Halloween.
Ingredients (serving size: 4-6 people):
- 6 large eggs
- 1/4 cup mayonnaise
- 1 teaspoon Dijon mustard
- 1 teaspoon white vinegar
- Salt and pepper to taste
- Red food coloring
- 6 pimento-stuffed green olives
- Paprika for garnish
Cooking Instructions:
- Boil the Eggs: Place the eggs in a saucepan and cover with cold water. Bring to a boil over medium-high heat. Once boiling, remove from heat, cover, and let sit for 9 minutes. Drain the hot water, then transfer the eggs to a bowl of ice water to cool completely.
- Prepare the Eggs: Once cooled, peel the eggs and slice them in half lengthwise. Carefully remove the yolks and place them in a separate bowl. Arrange the egg white halves on a serving platter.
- Make the Filling: Mash the yolks with a fork until smooth. Add mayonnaise, Dijon mustard, white vinegar, salt, and pepper. Mix until creamy and well combined.
- Create the Eyeball Effect: Use a toothpick dipped in red food coloring to draw thin, bloodshot lines on the surface of each egg white, mimicking veins.
- Stuff the Eggs: Spoon or pipe the yolk mixture back into the egg white halves.
- Add the Pupil: Slice the olives crosswise into thin rounds. Place one olive slice in the center of each filled egg to create the appearance of an eyeball.
- Garnish and Serve: Lightly sprinkle paprika over the filled eggs for added flavor and color. Serve immediately or refrigerate until ready to serve.
Extra Tips:
When creating the bloodshot effect, be gentle with the toothpick to avoid tearing the egg white. If you prefer a spicier flavor, consider adding a dash of hot sauce to the yolk mixture. For a more vibrant presentation, use gel food coloring instead of liquid to draw the veins.
Confirm that the eggs are fully chilled before peeling to make the shells easier to remove. Finally, these Deviled Eye Eggs can be made a day ahead and stored in the refrigerator for convenience, just be sure to add the olive slices and paprika just before serving to maintain freshness.
Mummified Jalapeño Poppers

If you’re looking to spice up your Halloween party with a spooky yet delicious appetizer, Mummified Jalapeño Poppers are the perfect choice. These little bites are a creative twist on the traditional jalapeño poppers, wrapped in crescent roll dough to give them a “mummified” appearance. Not only are they visually appealing, but they also pack a flavorful punch with a creamy, cheesy filling that perfectly complements the heat of the jalapeños. Ideal for adult gatherings, these poppers will add a festive touch to your Halloween spread and are sure to be a hit among your guests.
Creating Mummified Jalapeño Poppers is a fun and engaging process that can easily be done ahead of time to minimize party prep stress. The combination of spicy jalapeños, smooth cream cheese, and savory bacon wrapped in golden crescent dough makes for an irresistible snack. Perfect for serving 4 to 6 people, this recipe isn’t only simple to prepare but also allows room for customization, such as adding different cheeses or adjusting the heat level to suit your guests’ preferences.
Let’s plunge into the ingredients and steps to create these deliciously spooky poppers.
Ingredients for 4-6 People:
- 12 large jalapeño peppers
- 8 ounces cream cheese, softened
- 1 cup shredded cheddar cheese
- ½ teaspoon garlic powder
- ½ teaspoon onion powder
- 12 slices of bacon, cooked and crumbled
- 1 can (8 ounces) refrigerated crescent roll dough
- 24 candy eyeballs (optional, for decoration)
Cooking Instructions:
- Preheat the Oven: Begin by preheating your oven to 375°F (190°C). Line a baking sheet with parchment paper to prevent sticking and guarantee easy cleanup.
- Prepare the Jalapeños: Wash the jalapeños thoroughly. Cut each pepper in half lengthwise and remove the seeds and membranes using a small spoon or a jalapeño corer, being cautious of the spicy oils.
- Mix the Filling: In a mixing bowl, combine the softened cream cheese, shredded cheddar cheese, garlic powder, onion powder, and crumbled bacon. Mix until thoroughly combined and creamy.
- Stuff the Jalapeños: Spoon the cheese mixture into each jalapeño half, ensuring they’re filled generously but not overflowing.
- Wrap with Crescent Dough: Open the can of crescent roll dough and unroll it on a flat surface. Cut the dough into thin strips, about ¼ inch wide. Wrap each stuffed jalapeño with a strip of dough, leaving a small gap for the “eyes” if using them later, to achieve a mummy effect.
- Bake the Poppers: Place the wrapped jalapeños onto the prepared baking sheet. Bake in the preheated oven for 12-15 minutes, or until the dough is golden brown and cooked through.
- Add Decorative Eyes: If desired, once the poppers are slightly cooled, place two candy eyeballs onto each popper to complete the mummified look.
Extra Tips:
When handling jalapeños, it’s advisable to wear gloves to avoid irritation from the chili oils. You can adjust the spiciness by removing more or less of the seeds and membranes.
For a more indulgent filling, try adding a bit of mozzarella cheese or even a few dashes of hot sauce to the mix. If you don’t have candy eyeballs, you can use small dots of cream cheese or edible markers to create eyes.
Finally, these poppers can be made in advance and reheated in the oven just before serving, making them a convenient option for entertaining.
Witch’s Brew Pumpkin Soup

Witch’s Brew Pumpkin Soup is the perfect concoction to warm your bones on a chilly Halloween night. This savory soup combines the rich, earthy flavors of pumpkin with a hint of spice that will enchant your taste buds. It’s an ideal starter for your Halloween party, setting the tone for a night filled with thrilling festivities. The vibrant orange hue and velvety texture make it not only a treat for the palate but also a feast for the eyes.
The key to this spellbinding soup lies in its simplicity and the use of fresh, wholesome ingredients. Carefully selected spices such as nutmeg and ginger lend a bewitching aroma, while the creamy base provides the perfect canvas for these flavors to shine. Served with crusty bread or topped with roasted pumpkin seeds, Witch’s Brew Pumpkin Soup is sure to cast a delicious spell on all your guests.
Ingredients for 4-6 servings:
- 2 tablespoons olive oil
- 1 medium onion, chopped
- 3 cloves garlic, minced
- 4 cups pumpkin puree (fresh or canned)
- 4 cups vegetable broth
- 1 teaspoon ground nutmeg
- 1 teaspoon ground ginger
- 1/2 teaspoon cinnamon
- Salt and pepper to taste
- 1 cup heavy cream
- Optional toppings: roasted pumpkin seeds, croutons, or a drizzle of cream
Cooking Instructions:
- Prepare the Aromatics: In a large pot, heat the olive oil over medium heat. Add the chopped onion and sauté for about 5 minutes until it becomes translucent. Stir in the minced garlic and cook for another minute, making sure the garlic doesn’t burn.
- Combine the Base Ingredients: Add the pumpkin puree to the pot and stir well to combine with the onion and garlic mixture. Pour in the vegetable broth and bring to a gentle boil.
- Season the Soup: Reduce the heat to a simmer and add the ground nutmeg, ginger, and cinnamon. Stir well to incorporate the spices evenly throughout the soup. Season with salt and pepper to taste.
- Simmer and Infuse Flavors: Allow the soup to simmer for 20 minutes, stirring occasionally. This allows the flavors to meld together beautifully.
- Blend for a Smooth Texture: Using an immersion blender, blend the soup until it reaches a smooth, creamy consistency. If you don’t have an immersion blender, carefully transfer the soup to a blender in batches and blend until smooth.
- Add Cream: Stir in the heavy cream and let the soup heat through for an additional 5 minutes. Taste and adjust seasoning if necessary.
- Serve: Ladle the soup into bowls and garnish with optional toppings like roasted pumpkin seeds or a drizzle of cream. Serve hot with crusty bread on the side.
Extra Tips: For an added layer of flavor, consider roasting fresh pumpkin pieces before pureeing them for the soup. This will enhance the natural sweetness and add a depth of flavor. If you prefer a spicier kick, add a pinch of cayenne pepper. To save time, canned pumpkin puree works well, but make sure it’s pure pumpkin and not pie filling. Finally, if you have leftovers, this soup freezes well and can be easily reheated for a quick meal on a busy day.
Dracula’s Bloody Marys

Dracula’s Bloody Marys are a wickedly delightful twist on the classic cocktail, perfect for spooking up your Halloween party for adults. This eerie concoction combines the robust flavors of tomato juice with the sharpness of vodka, creating a drink that’s both invigorating and hauntingly satisfying.
A devilishly delicious cocktail that adds a spine-chilling thrill to any Halloween gathering.
The addition of unique garnishes like spicy pickled vegetables, olives, and even a splash of red hot sauce gives the cocktail a terrifyingly tasty edge that will make it a standout amidst your other Halloween treats.
This recipe for Dracula’s Bloody Marys is crafted to serve 4-6 people, making it ideal for a small gathering or a cozy get-together. The drink’s vibrant red hue and bold flavors will surely add a touch of mystery and excitement to your Halloween festivities.
Whether you’re serving them alongside other creative Halloween-themed dishes or as a standalone star, these Bloody Marys are sure to leave your guests spellbound.
Ingredients for 4-6 Servings:
- 3 cups tomato juice
- 1 1/2 cups vodka
- 1/4 cup fresh lemon juice
- 1 tablespoon Worcestershire sauce
- 1 teaspoon hot sauce (adjust to taste)
- 1/2 teaspoon celery salt
- 1/2 teaspoon ground black pepper
- 1 teaspoon horseradish
- 1 cup ice cubes
- Garnishes: celery stalks, pickled green beans, olives, lime wedges, and cherry tomatoes
Cooking Instructions:
- Prepare the Base: In a large pitcher, combine the tomato juice, vodka, lemon juice, Worcestershire sauce, hot sauce, celery salt, black pepper, and horseradish. Stir thoroughly to verify all the ingredients are well mixed and the flavors are evenly distributed.
- Chill the Mixture: Add the ice cubes to the pitcher and stir again to cool the mixture. Alternatively, you can refrigerate the mixture for about an hour if you prefer a colder drink.
- Prepare the Glasses: Take your serving glasses and rim them with a slice of lime. Dip the rims into a small plate of salt or a mixture of salt and paprika for an extra kick.
- Serve the Bloody Marys: Pour the chilled Bloody Mary mixture into the prepared glasses, filling each about three-quarters full. Add additional ice cubes to each glass if desired.
- Garnish Creatively: Garnish each glass with a celery stalk, a pickled green bean, a couple of olives, a lime wedge, and a cherry tomato. Feel free to get creative with your garnishes to add to the Halloween theme.
Extra Tips: When making Dracula’s Bloody Marys, feel free to adjust the level of spice to suit your taste or your guests’ preferences. You can add more hot sauce or horseradish for an extra fiery kick.
For a smoky flavor, try incorporating a dash of smoked paprika. For a more intense presentation, consider using black vodka for a darker, more mysterious appearance. Always remember to taste as you go to verify the balance of flavors is just right for your spooky soirée.
Spooky Squid Ink Pasta
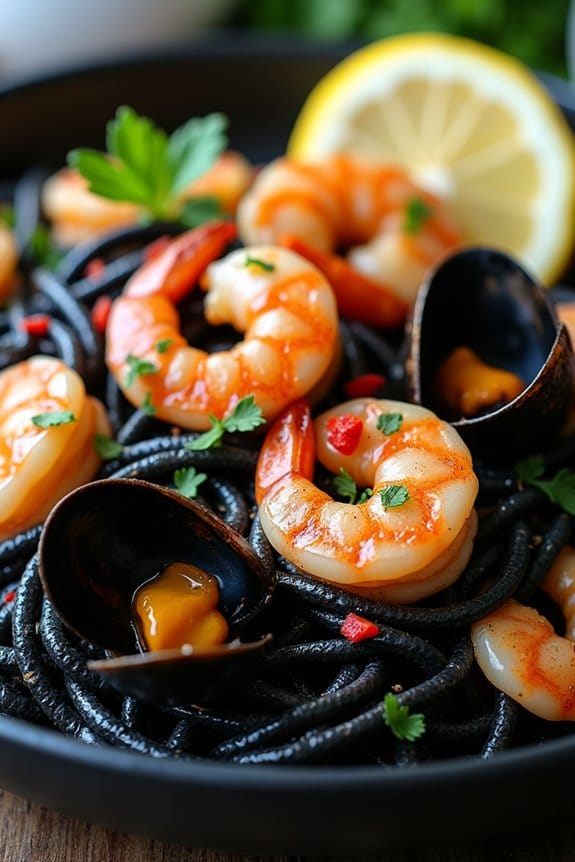
Spooky Squid Ink Pasta is an ideal dish to serve at your Halloween party if you want to impress your adult guests with something both eerie and delicious. This inky black pasta dish isn’t only visually striking but also offers a rich, briny taste thanks to the squid ink. The pasta is complemented by a luxurious garlic and white wine sauce, and topped with succulent seafood for a dish that’s as flavorful as it’s spooky.
This dish is perfect for a sophisticated Halloween gathering, providing a unique culinary experience that goes beyond the usual party fare. It’s easy to prepare, allowing you to focus on the rest of your party planning. The following recipe serves 4-6 people, ensuring that everyone at your gathering will get a chance to enjoy this distinctive and memorable dish.
Ingredients (Serves 4-6):
- 500g squid ink pasta
- 3 tablespoons olive oil
- 4 cloves garlic, minced
- 1 teaspoon red pepper flakes
- 1 cup dry white wine
- 1 pound mixed seafood (shrimp, mussels, and squid)
- Salt and pepper to taste
- 2 tablespoons fresh parsley, chopped
- Lemon wedges for serving
Cooking Instructions:
- Cook the Pasta: Begin by bringing a large pot of salted water to a boil. Add the squid ink pasta and cook according to the package instructions until al dente. Reserve 1 cup of pasta water, then drain the pasta and set aside.
- Prepare the Sauce: In a large skillet, heat the olive oil over medium heat. Add the minced garlic and red pepper flakes, sautéing for about 1-2 minutes until the garlic is fragrant but not browned.
- Deglaze with Wine: Pour the white wine into the skillet, stirring to combine with the garlic and red pepper flakes. Allow the mixture to simmer for 2-3 minutes, reducing slightly.
- Cook the Seafood: Add the mixed seafood to the skillet, stirring to coat with the sauce. Cook until the seafood is just cooked through, about 4-5 minutes. Season with salt and pepper to taste.
- Combine Pasta and Sauce: Add the cooked pasta to the skillet, tossing to coat the noodles in the sauce. If the pasta appears dry, gradually add the reserved pasta water until the desired consistency is reached.
- Finish the Dish: Remove the skillet from heat and sprinkle with fresh parsley. Toss once more to combine. Serve immediately with lemon wedges on the side for squeezing over the pasta.
Extra Tips:
When cooking the seafood, make sure not to overcook it, as it can become rubbery. Keep an eye on the mussels, ensuring they open fully, indicating they’re done. Discard any that don’t open.
If you can’t find squid ink pasta, you can make your own by mixing a small amount of squid ink with regular pasta dough. Finally, adjust the red pepper flakes according to your desired level of heat, and consider serving with a chilled glass of the same white wine used in the sauce for a complete and complementary dining experience.
Black Magic Risotto
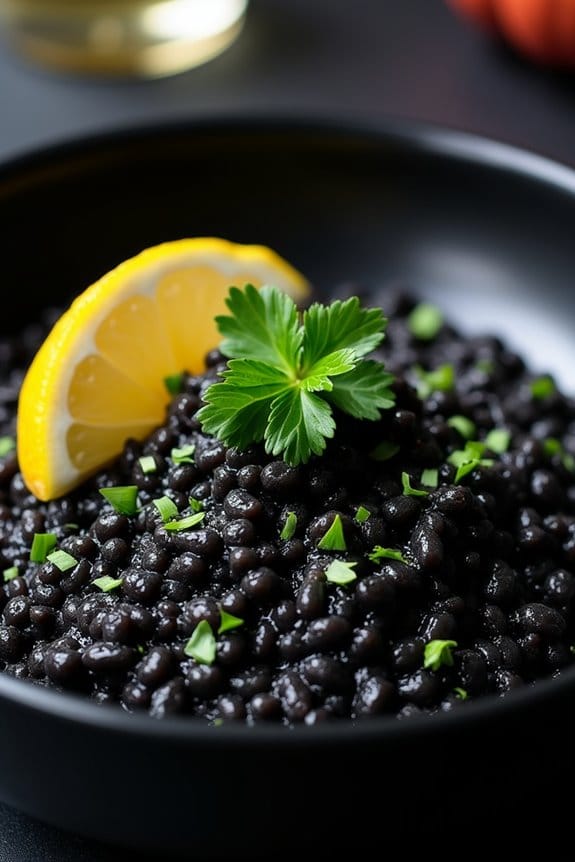
Indulge in a hauntingly delicious experience this Halloween with Black Magic Risotto, a spine-chilling twist on the classic Italian dish that’s perfect for your adult Halloween party. This risotto captures the eerie essence of the season with its dark, rich color and mysterious flavors. The secret to its inky appearance is squid ink, which not only gives the dish a dramatic look but also infuses it with a subtle briny taste that pairs beautifully with the creamy texture of the rice.
As your guests savor each bite, they’ll be entranced by the bewitching combination of flavors, making it an unforgettable addition to your spooky soirée. Ideal for serving 4-6 people, this Black Magic Risotto is both a feast for the eyes and the taste buds.
While it may appear complex, this dish is surprisingly straightforward to prepare, allowing you to focus on creating an enchanting atmosphere for your guests. The recipe incorporates a variety of complementary ingredients, each contributing to the overall depth of flavor and aesthetic appeal. Whether you’re a seasoned cook or a culinary novice, this recipe will guide you through the process of creating a dish that’s as impressive as it’s delicious.
Ingredients:
- 1 tablespoon olive oil
- 1 tablespoon unsalted butter
- 1 medium onion, finely chopped
- 2 cloves garlic, minced
- 1 1/2 cups Arborio rice
- 1/2 cup dry white wine
- 4 cups chicken or vegetable broth, warmed
- 2 tablespoons squid ink
- 1 cup grated Parmesan cheese
- Salt and pepper to taste
- Fresh parsley, chopped, for garnish
- Lemon wedges, for serving
Instructions:
- Prepare the Base: In a large saucepan, heat the olive oil and butter over medium heat. Add the finely chopped onion and sauté until it becomes translucent, about 5 minutes. Stir in the minced garlic and cook for an additional minute, making sure not to brown it.
- Cook the Rice: Add the Arborio rice to the saucepan, stirring continuously to coat the grains in the oil and butter. Cook for about 2-3 minutes until the edges of the rice become translucent.
- Deglaze with Wine: Pour in the dry white wine and stir until it’s fully absorbed by the rice. This step will add depth to the flavor and prepare the rice to absorb the broth.
- Gradually Add Broth: Begin adding the warmed broth, one ladleful at a time, stirring continually and allowing each addition to be absorbed before adding the next. Continue this process for about 18-20 minutes, or until the rice is al dente and creamy.
- Incorporate Squid Ink: Stir in the squid ink, mixing thoroughly until the entire risotto takes on a dark, mysterious hue. Adjust the seasoning with salt and pepper to taste.
- Finish with Cheese: Remove the saucepan from the heat and gently fold in the grated Parmesan cheese, stirring until it melts completely and the risotto becomes creamy.
- Serve: Spoon the risotto onto plates, garnishing each serving with a sprinkle of chopped fresh parsley. Accompany with lemon wedges to add a bright, contrasting flavor.
Extra Tips:
When preparing Black Magic Risotto, it’s vital to keep the broth warm throughout the cooking process, as this helps the rice absorb the liquid more efficiently, resulting in a creamy texture.
Stirring constantly is important to prevent sticking and to guarantee even cooking. Feel free to adjust the amount of squid ink to achieve your desired level of color intensity; however, start with smaller amounts to avoid overpowering the dish with its distinct flavor.
Finally, for an added touch of Halloween flair, consider serving the risotto in mini pumpkins or black bowls to enhance the spooky presentation.
Poison Apple Cocktails

Elevate your Halloween party with these spine-chilling yet delicious Poison Apple Cocktails. A perfect blend of flavors, these cocktails encapsulate the essence of the witching season with their deep, enchanting colors and tantalizing taste. The combination of apple cider, pomegranate juice, and a touch of vodka gives these drinks a sweet yet slightly tart profile, making them irresistible to your adult guests.
With a splash of lime and a hint of cinnamon, these cocktails also offer a warming kick that’s perfect for a crisp October evening.
These Poison Apple Cocktails aren’t just about the taste—they also mesmerize with their presentation. The dark hue of the drink, combined with a cinnamon sugar rim and an apple slice garnish, mimics the allure of a forbidden fruit. As you sip, the aroma of spices and the taste of autumnal fruits will transport you to a world of fantasy and mystery.
The allure of a forbidden fruit, capturing autumn’s essence in every sip.
Ideal for a spooky soirée, these cocktails promise to be a hit among your guests, adding an unforgettable twist to your Halloween celebration.
Ingredients for Poison Apple Cocktails (Serves 4-6):
- 2 cups apple cider
- 1 cup pomegranate juice
- 1 cup vodka
- 1/4 cup lime juice
- 1 teaspoon ground cinnamon
- Ice cubes
- Cinnamon sticks (for garnish)
- Apple slices (for garnish)
- 1/4 cup granulated sugar
- 1 tablespoon ground cinnamon (for rim)
Cooking Instructions:
- Prepare the Glasses:
- Mix the granulated sugar and 1 tablespoon of ground cinnamon in a shallow dish. Rim your cocktail glasses with a slice of lime, then dip them into the cinnamon sugar mixture to coat the rims evenly. Set aside.
- Mix the Cocktail:
- In a large pitcher, combine the apple cider, pomegranate juice, vodka, lime juice, and 1 teaspoon of ground cinnamon. Stir the mixture well until the cinnamon is fully incorporated and the liquids are blended.
- Chill the Drink:
- Add a generous amount of ice cubes to the pitcher to chill the cocktail. Allow it to sit for a few minutes, stirring occasionally to keep the mixture cold.
- Serve the Cocktails:
- Fill each prepared glass with the chilled cocktail mixture, ensuring an even distribution of the drink among the glasses.
- Garnish and Enjoy:
- Finish each cocktail with a cinnamon stick and a slice of apple for garnish. Serve immediately and enjoy the enchanting flavors of your Poison Apple Cocktails.
Extra Tips:
For an added dramatic effect, consider adding a drop of black food coloring to the cocktail mixture to deepen the color, enhancing the “poison” appearance.
If you prefer a non-alcoholic version, simply replace the vodka with sparkling water or ginger ale for a revitalizing twist.
Additionally, to make the cocktail even more festive, consider using apple slices cut into fun Halloween shapes, such as bats or pumpkins, for the garnish.
Haunted Hot Chocolate

Transform your Halloween gathering into a spooky soirée with this decadent Haunted Hot Chocolate. Perfect for adult parties, this beverage combines the rich flavors of dark chocolate and the warming notes of assorted spices, creating a drink that’s both bewitching and delicious. The addition of a splash of Irish cream liqueur elevates the drink, giving it an extra layer of indulgence that will delight your guests.
Whether served as a welcome drink or a cozy nightcap, this hot chocolate is sure to cast a spell on all who taste it. This recipe serves 4-6 people, making it ideal for sharing among friends or family. The use of quality ingredients such as premium cocoa and dark chocolate guarantees that every sip is a luxurious experience.
The Haunted Hot Chocolate can be garnished with whipped cream and eerie edible decorations to give it a festive touch that fits perfectly with the Halloween theme. Let’s explore the ingredients and steps needed to brew this magical concoction.
Ingredients:
- 4 cups whole milk
- 1 cup heavy cream
- 1/2 cup granulated sugar
- 1/3 cup unsweetened cocoa powder
- 8 oz dark chocolate, chopped
- 1 tsp vanilla extract
- 1/2 tsp ground cinnamon
- 1/4 tsp ground nutmeg
- 1/4 tsp ground clove
- 1/2 cup Irish cream liqueur
- Whipped cream, for topping
- Halloween-themed sprinkles or edible decorations
Instructions:
- Prepare the Base: In a medium-sized saucepan, combine the whole milk and heavy cream. Place the pan over medium heat and allow the mixture to warm up, stirring occasionally to prevent the milk from scalding.
- Incorporate Cocoa and Sugar: Once the milk mixture is warm, whisk in the granulated sugar and unsweetened cocoa powder until fully dissolved. This will form the rich base of your hot chocolate.
- Melt the Chocolate: Add the chopped dark chocolate to the pan. Stir continuously until the chocolate melts completely and the mixture is smooth and velvety.
- Add Spices and Flavoring: Stir in the vanilla extract, ground cinnamon, nutmeg, and clove. These spices will infuse your hot chocolate with a warm, autumnal flavor that complements the chocolate beautifully.
- Spike the Chocolate: Pour in the Irish cream liqueur, stirring well to combine. Allow the mixture to heat through, but don’t bring it to a boil to preserve the alcohol content.
- Serve with a Scare: Once everything is heated and well-mixed, remove the pan from the heat. Ladle the hot chocolate into mugs, leaving room at the top for garnishes.
- Add the Finishing Touches: Top each mug with a generous dollop of whipped cream. Sprinkle with Halloween-themed sprinkles or place a spooky edible decoration on top to complete the haunted theme.
Extra Tips:
For an even richer experience, you can substitute half of the whole milk with half-and-half. If you prefer a non-alcoholic version, simply omit the Irish cream liqueur.
To keep the hot chocolate warm during your party, consider using a slow cooker on the “keep warm” setting. Additionally, you can prepare the hot chocolate in advance and reheat it gently, guaranteeing the chocolate remains smooth by stirring frequently.
Customize the decorative toppings to suit your Halloween theme, using items like candy eyes, marshmallow ghosts, or colored sugar for an extra festive touch.
Ghastly Gourmet Popcorn

Get ready to thrill your Halloween guests with a batch of Ghastly Gourmet Popcorn. This spooky snack is a perfect combination of sweet and savory, ideal for an adult Halloween party. By incorporating some ghoulish ingredients and a hint of spice, this popcorn will surely be the highlight of your eerie evening.
The rich flavors and delightful crunch offer a tantalizing treat that pairs perfectly with a creepy cocktail or a glass of red wine. This recipe is designed to serve 4-6 people, making it perfect for a small gathering. The popcorn is tossed in a devilishly delicious mix of spices, herbs, and a touch of sweetness, creating a snack that’s both addicting and visually appealing.
With a few simple steps, you can transform ordinary popcorn into a Halloween masterpiece, adding just the right amount of frightful fun to your celebration.
Ingredients (Serves 4-6):
- 1/2 cup popcorn kernels
- 1/4 cup unsalted butter
- 2 tablespoons olive oil
- 1/4 cup dark brown sugar
- 1 teaspoon smoked paprika
- 1 teaspoon garlic powder
- 1/2 teaspoon cayenne pepper
- 1 teaspoon salt
- 1/2 teaspoon black pepper
- 1/4 cup roasted pumpkin seeds
- 1/4 cup dried cranberries
- 1/4 cup chopped dark chocolate
Cooking Instructions:
- Pop the Corn: Start by popping the popcorn kernels. In a large pot, heat 2 tablespoons of olive oil over medium heat. Add the popcorn kernels and cover the pot with a lid. Shake occasionally until the popping slows down to about 2-3 seconds between pops. Remove from heat and set aside.
- Prepare the Seasoning: In a small saucepan over low heat, melt the unsalted butter. Once melted, stir in the dark brown sugar, smoked paprika, garlic powder, cayenne pepper, salt, and black pepper. Stir continuously until the sugar dissolves and the mixture is smooth, about 3-4 minutes.
- Mix the Popcorn: In a large mixing bowl, combine the popped popcorn with the melted butter mixture. Toss until the popcorn is evenly coated.
- Add the Extras: Gently fold in the roasted pumpkin seeds, dried cranberries, and chopped dark chocolate. Confirm all ingredients are well distributed throughout the popcorn.
- Cool and Serve: Allow the popcorn to cool for about 10 minutes, letting the flavors meld together. Serve in a large bowl, and enjoy the Halloween festivities!
Extra Tips:
For an extra spooky touch, consider using black or orange popcorn buckets to serve your Ghastly Gourmet Popcorn. You can also experiment with different spices to adjust the heat level according to your preference.
If you want to add more texture, try incorporating other nuts or seeds. Remember, the key to this recipe is balance; the sweetness of the sugar and cranberries should complement the heat from the spices for a truly haunting treat!
Coffin-Shaped Brownies
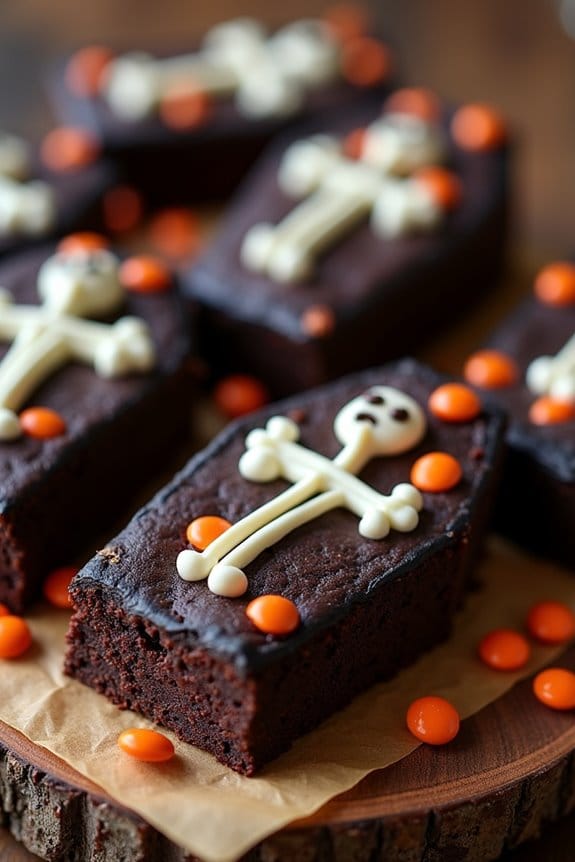
Halloween is a time for creativity and fun, and what better way to celebrate than with some spooky treats? Coffin-Shaped Brownies are perfect for adult Halloween parties, combining rich chocolate flavor with a playful presentation. These brownies are shaped like tiny coffins and can be decorated to add an eerie touch to your dessert spread.
Whether you’re hosting a get-together or attending a potluck, these brownies are sure to impress and delight.
These Coffin-Shaped Brownies aren’t only fun to look at, but they also deliver a decadent, moist, and fudgy texture that chocolate lovers will adore. The recipe is simple enough to whip up in your kitchen, and you can even get creative with the decorations, using icing or candy to add features like crosses or RIP signs.
Decadent and fudgy, these Coffin-Shaped Brownies make for a spooky yet delicious Halloween treat.
Perfect for a serving size of 4-6 people, these brownies will be a hit at your Halloween party.
Ingredients (Serves 4-6):
- 1 cup unsalted butter
- 1 cup granulated sugar
- 1 cup brown sugar, packed
- 4 large eggs
- 1 teaspoon vanilla extract
- 1 cup all-purpose flour
- 1 cup unsweetened cocoa powder
- 1/2 teaspoon salt
- 1/2 teaspoon baking powder
- 1 cup semi-sweet chocolate chips
- Black or dark chocolate icing
- White icing or edible markers for decoration
- Optional: Halloween-themed candies for decoration
Cooking Instructions:
- Preheat and Prepare: Begin by preheating your oven to 350°F (175°C). Line a 9×13 inch baking pan with parchment paper, leaving some overhang on the sides for easy removal later.
- Melt Butter and Mix Sugars: In a large microwave-safe bowl, melt the butter in the microwave. Once melted, add the granulated sugar and brown sugar, stirring until well combined.
- Add Wet Ingredients: Allow the butter mixture to cool slightly before adding the eggs one at a time, mixing well after each addition. Stir in the vanilla extract.
- Combine Dry Ingredients: In a separate bowl, sift together the flour, cocoa powder, salt, and baking powder. Gradually add this dry mixture to the wet ingredients, stirring until just combined. Be careful not to overmix.
- Fold in Chocolate Chips: Gently fold in the chocolate chips, ensuring they’re evenly distributed throughout the batter.
- Bake the Brownies: Pour the batter into the prepared baking pan and spread it evenly. Bake in the preheated oven for 25-30 minutes or until a toothpick inserted into the center comes out with a few moist crumbs.
- Cool and Cut Shapes: Once baked, allow the brownies to cool completely in the pan. Using the parchment paper, lift the brownies out and place them on a flat surface. Using a sharp knife or coffin-shaped cookie cutter, carefully cut out coffin shapes from the cooled brownies.
- Decorate: Use black or dark chocolate icing to outline the coffin shapes. Use white icing or edible markers to add spooky details like crosses, RIP signs, or spider webs. Optionally, add Halloween-themed candies for extra decoration.
Extra Tips:
When cutting the brownies into coffin shapes, it helps to chill them in the refrigerator for about 20 minutes first. This makes them firmer and easier to cut without crumbling.
If you don’t have a coffin-shaped cookie cutter, use a template made from cardboard for consistent shapes. For an extra touch, you can add a teaspoon of espresso powder to the batter to enhance the chocolate flavor.
Enjoy your spooky and delicious Coffin-Shaped Brownies!
Eerie Espresso Martini

Eerie Espresso Martini is a spooky twist on the classic cocktail, perfect for your Halloween party. This drink combines the rich, bold flavors of espresso with the smoothness of vodka and coffee liqueur, all enhanced by a touch of vanilla and a hint of sweetness. The result is a bewitching concoction that will delight your adult guests and elevate your party to a new level of sophistication.
The deep, dark color of this cocktail, reminiscent of a witch’s brew, fits right in with the Halloween theme, making it both delicious and visually appealing.
To create the perfect Eerie Espresso Martini, you’ll need to focus on achieving the right balance of flavors. The espresso should be freshly brewed and chilled, guaranteeing that your drink is both aromatic and invigorating. A quality coffee liqueur will add depth and complexity, while the vodka provides a smooth base that ties everything together.
For a touch of sweetness, a simple syrup or vanilla syrup can be used, adding a subtle layer of flavor without overpowering the drink. Finally, a garnish of coffee beans or a sprinkle of cocoa powder gives the cocktail a polished, sophisticated finish, making it the ideal choice for your Halloween celebration.
Ingredients for Serving Size of 4-6 People:
- 240 ml of vodka
- 120 ml of coffee liqueur
- 240 ml of freshly brewed espresso, chilled
- 60 ml of vanilla syrup (or simple syrup)
- Ice cubes
- Coffee beans or cocoa powder for garnish
Cooking Instructions:
- Prepare the Espresso: Brew a fresh cup of espresso and allow it to chill. You can place it in the refrigerator or an ice bath to speed up the cooling process.
- Prepare the Shaker: Fill a cocktail shaker halfway with ice cubes. This will guarantee that your martini is well-chilled and invigorating.
- Mix the Ingredients: Add the vodka, coffee liqueur, chilled espresso, and vanilla syrup into the shaker. Confirm all ingredients are measured accurately for the best flavor balance.
- Shake It Up: Secure the lid on the shaker and shake vigorously for about 15-20 seconds. This will mix the ingredients thoroughly and chill the drink.
- Strain and Serve: Strain the mixture into martini glasses. This will remove the ice and leave you with a smooth, frothy cocktail.
- Garnish: Add a few coffee beans or a light dusting of cocoa powder on top of each drink for an elegant finishing touch.
Extra Tips:
When making the Eerie Espresso Martini, use high-quality ingredients for the best results. Freshly brewed espresso will provide a more robust flavor compared to pre-made or instant coffee.
If you prefer a sweeter drink, adjust the amount of vanilla syrup to taste. Additionally, serving the martini in chilled glasses can enhance the overall experience by keeping the drink colder for longer.
Finally, if you’re preparing these cocktails in advance, you can keep the liquid mixture refrigerated and pour it over ice just before serving to maintain freshness and flavor.
