

As Halloween approaches, I’ve been on the lookout for delightful snacks that also serve as fun family activities. Picture the smiles as little hands assemble Monster Apple Bites or decorate Witch Hat Cookies. These treats are not just about satisfying sweet cravings but also about creating cherished memories together. From crafting Mummy Hot Dogs to stirring up a bubbling Witch’s Brew Punch, the kitchen will become a lively playground of spooky joy. Ready to see how these snacks can enchant your Halloween celebrations?
Monster Apple Bites
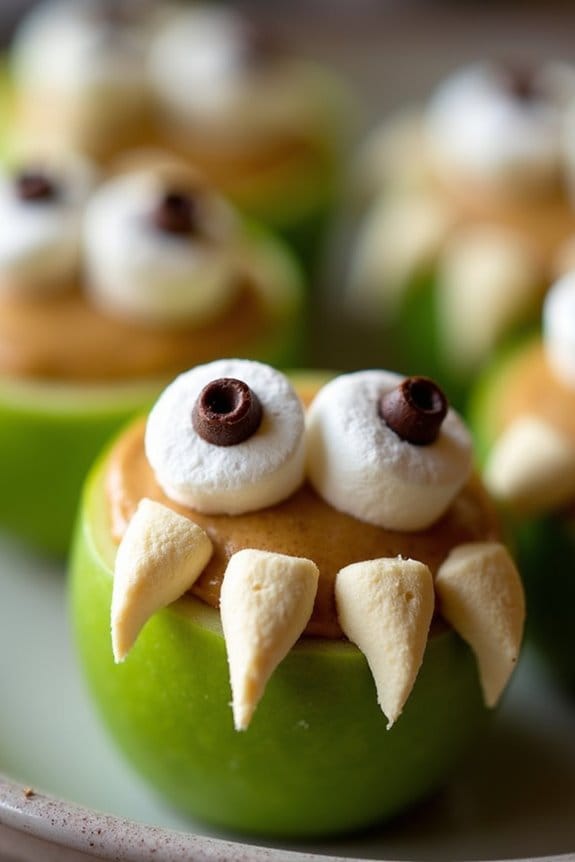
Monster Apple Bites are a spooktacular and healthy Halloween snack that will delight kids and adults alike. These little monsters aren’t only fun to make, but they’re also a nutritious alternative to sugary treats, using fresh apples, nut butter, and a few other simple ingredients.
A spooktacular, healthy Halloween treat that combines fun and nutrition for both kids and adults.
Perfect for a Halloween party or a festive snack, Monster Apple Bites are sure to be a hit with their playful appearance and delicious taste.
These creative snacks are easy to assemble and allow for a bit of artistic flair, making them an ideal activity for kids to join in on the fun. The combination of crisp apples, creamy nut butter, and a hint of sweetness from the optional chocolate or candy eyes makes for a balanced and tasty treat.
Let’s plunge into the ingredients and steps needed to create these monstrous bites for 4-6 servings.
Ingredients:
- 3 medium-sized green apples
- 1/2 cup of peanut butter or almond butter
- 1/4 cup of mini marshmallows
- 1/4 cup of slivered almonds
- 1/4 cup of chocolate chips or candy eyes
Instructions:
1. Prepare the Apples: Begin by washing and drying the apples thoroughly. Cut each apple into quarters and remove the core and seeds.
Then, slice each quarter into two or three wedges, depending on the size of the apple, to create the base of the monster mouths.
2. Spread the Nut Butter: Use a butter knife to spread a thin layer of peanut butter or almond butter on one side of each apple wedge. This will help the other ingredients stick and create a delicious base flavor.
3. Create the Monster Mouths: Place two or three mini marshmallows along the edge of the peanut butter on each apple wedge to resemble teeth. For extra effect, you can cut the marshmallows in half for smaller teeth.
4. Add the Almond Slivers: Insert a few slivered almonds into the peanut butter above the marshmallows to create monster fangs. Feel free to get creative with the placement and number of fangs.
5. Finish with the Eyes: Place two chocolate chips or candy eyes on top of each apple bite, pressing gently into the nut butter to secure them. Arrange them to give each monster a unique expression.
Extra Tips: When selecting apples, opt for green varieties like Granny Smith for a tart contrast to the sweet elements, and their color adds to the monster theme.
If you’re preparing these snacks in advance, consider brushing the apple slices with a bit of lemon juice to prevent browning. Encourage kids to get creative with the monster faces – adding a bit of personality to each one can make snack time even more entertaining!
Witch Hat Cookies

Witch Hat Cookies are a whimsical and delightful treat that adds a touch of magic to any Halloween celebration. These cookies aren’t only fun to make, but they also offer a delicious combination of chocolatey goodness and sweet confections. Perfect for kids and adults alike, these treats are bound to be a hit at your Halloween party or simply as a festive snack to enjoy at home.
The recipe for Witch Hat Cookies is simple and involves just a few ingredients to create a visually appealing and tasty snack. With a serving size that accommodates 4-6 people, these cookies are perfect for sharing with family and friends. The process involves crafting a chocolate base and decorating with colorful candies to mimic a witch’s hat, making it a fun activity to engage in with kids.
Ingredients (Serving Size: 4-6 people):
- 1 package of chocolate wafer cookies
- 1 cup of semi-sweet chocolate chips
- 1 tablespoon of vegetable oil
- 1 package of Hershey’s Kisses
- Assorted colored icing or decorating gel
- Assorted small round candies or sprinkles for decoration
Cooking Instructions:
- Prepare the Chocolate Base: Begin by lining a baking sheet with parchment paper. This will prevent the cookies from sticking and make cleanup easier.
- Melt the Chocolate: In a small microwave-safe bowl, combine the semi-sweet chocolate chips and vegetable oil. Microwave in 30-second intervals, stirring in between, until the chocolate is completely melted and smooth.
- Attach the Hershey’s Kisses: Take one chocolate wafer cookie and place it on the prepared baking sheet. Dip the bottom of a Hershey’s Kiss into the melted chocolate and place it in the center of the cookie. This will form the top of the witch’s hat. Repeat this process for all cookies.
- Decorate the Witch Hats: Use the colored icing or decorating gel to pipe a ring around the base of each Hershey’s Kiss, where it meets the cookie. This acts as the band of the witch hat. You can also add small candies or sprinkles to the icing for additional decoration.
- Set the Cookies: Allow the decorated cookies to sit at room temperature or in the refrigerator until the chocolate has set and the decorations are firm, about 20-30 minutes.
Extra Tips:
When making Witch Hat Cookies, feel free to get creative with the decorations! You could use different colored icings to match your Halloween theme or add edible glitter for extra sparkle.
If you don’t have chocolate wafer cookies, any flat, round cookie can serve as a substitute. Additionally, keeping the chocolate warm while working will guarantee that the Hershey’s Kisses adhere properly to the cookies.
Enjoy crafting these enchanting treats with your little ones!
Mummy Hot Dogs

Mummy Hot Dogs are a fun and festive snack perfect for Halloween celebrations with the kids. These spooky treats aren’t only delightful to look at but are also incredibly easy to make, making them an ideal cooking activity to do with children. The concept is simple: wrap hot dogs in strips of dough to resemble mummies, bake them to golden perfection, and voila—an edible Halloween surprise that everyone will enjoy!
Perfect for a party or just a family gathering, these Mummy Hot Dogs can be prepared quickly and require minimal ingredients. They provide a creative twist on the classic hot dog, adding a playful element to your Halloween festivities. Whether served as a main dish or a snack, these mummies are sure to be a hit with both kids and adults alike.
Ingredients for 4-6 Servings:
- 8 hot dogs
- 1 package of refrigerated crescent roll dough
- 1 egg, beaten (for egg wash)
- 1 tablespoon water
- Mustard or ketchup (for decorating)
Cooking Instructions:
1. Preheat the Oven:
Preheat your oven to 375°F (190°C) to guarantee it’s hot enough to bake the mummies evenly.
2. Prepare the Dough:
Unroll the crescent roll dough and separate it into four rectangles. Press the perforations to seal them. Using a knife or pizza cutter, slice each rectangle into thin strips, about 1/4 inch wide.
3. Wrap the Hot Dogs:
Take one hot dog and start wrapping it with the dough strips, leaving a small gap for the face. Overlap the strips to create a bandaged mummy look. Repeat with all hot dogs.
4. Apply Egg Wash:
In a small bowl, mix the beaten egg with 1 tablespoon of water. Use a pastry brush to lightly coat the dough-wrapped hot dogs with the egg wash. This will give them a nice golden color when baked.
5. Bake:
Place the wrapped hot dogs on a baking sheet lined with parchment paper. Bake in the preheated oven for 12-15 minutes, or until the dough is golden brown.
6. Decorate:
Once baked, allow the mummies to cool slightly. Use mustard or ketchup to dot small eyes on each mummy to give them character.
Extra Tips:
For an extra spooky effect, you can use edible googly eyes instead of just mustard or ketchup for the eyes. If you’re making these for a larger crowd, simply double or triple the ingredients as needed.
Remember to leave space between each mummy on the baking sheet to guarantee they bake evenly. Also, consider serving with a variety of dips such as honey mustard or cheese sauce for added flavor.
Spider Web Nachos

Spider Web Nachos are a thrilling and tasty treat that’s certain to be a hit at any Halloween gathering. These nachos aren’t only delicious, but they also bring a spooky twist to your snack table with their cleverly designed spider web pattern. Perfect for kids and adults alike, this dish combines the classic flavors of nachos with a fun and festive presentation.
Whether you’re hosting a Halloween party or enjoying a night of trick-or-treating with your family, Spider Web Nachos are a great addition to your celebration.
To make Spider Web Nachos, you’ll need a variety of ingredients to create a layered masterpiece that’s both visually appealing and scrumptious. The key to this dish is in the presentation, where sour cream is used to create the spider web design over a bed of crispy tortilla chips, melted cheese, and favorite toppings.
This recipe serves 4-6 people, making it ideal for a small gathering or family night in. Follow the steps below to bring this spooky snack to life in your own kitchen.
Ingredients:
- 1 bag (about 12 oz) of tortilla chips
- 2 cups shredded cheddar cheese
- 1 can (15 oz) black beans, drained and rinsed
- 1 cup salsa
- 1/2 cup sour cream
- 1/4 cup sliced black olives
- 1/4 cup sliced green onions
- 1 jalapeño, sliced (optional)
- 1 cup guacamole (for serving)
- 1 plastic or toy spider (for decoration, optional)
Cooking Instructions:
- Preheat the Oven: Start by preheating your oven to 350°F (175°C). This will guarantee that your nachos cook evenly and the cheese melts perfectly.
- Layer the Chips: Spread the tortilla chips evenly on a large baking sheet or oven-safe platter. Make sure the chips aren’t too piled up to facilitate even coverage of toppings.
- Add Toppings: Sprinkle the shredded cheddar cheese evenly over the tortilla chips. Next, distribute the black beans and salsa over the top, making sure to cover the chips thoroughly.
- Bake: Place the baking sheet in the preheated oven and bake for about 10-12 minutes or until the cheese is fully melted and bubbly. Keep an eye on them to avoid burning the chips.
- Create the Spider Web: While the nachos are baking, prepare the sour cream spider web. Spoon the sour cream into a small plastic sandwich bag, pushing it to one corner. Snip off a tiny tip of the corner to create a makeshift piping bag.
- Decorate: Remove the nachos from the oven. Using the sour cream piping bag, carefully draw a large spiral over the nachos. Then, use a toothpick or knife to draw lines from the center of the spiral outward, creating a spider web effect.
- Garnish: Top the nachos with sliced black olives, green onions, and jalapeños (if using). For an extra festive touch, place a plastic or toy spider in the center of the web.
- Serve: Serve the nachos warm with a side of guacamole for dipping.
Extra Tips:
For an added flavor boost, you can customize your Spider Web Nachos with additional toppings such as diced tomatoes, cooked seasoned ground beef, or chopped cilantro.
If you’re serving guests who are sensitive to spice, consider offering the jalapeños on the side. Additionally, to keep the sour cream spider web looking crisp, pipe it onto the nachos just before serving.
Ghostly Marshmallow Pops

Ghostly Marshmallow Pops are a delightful and easy treat that will bring a spooky twist to your Halloween festivities. Perfectly suited for kids, these pops are both fun to make and delicious to eat. The combination of marshmallows, white chocolate, and dark chocolate creates an irresistible sweet treat.
These pops aren’t only a joy to create but also serve as the perfect snack for Halloween parties or trick-or-treating events. These Ghostly Marshmallow Pops are designed to be engaging for children, allowing them to get hands-on experience in the kitchen. By following this simple recipe, kids can actively participate in the Halloween fun, decorating their own marshmallow ghosts.
The recipe yields enough pops for 4-6 people, making it ideal for small gatherings or as a special treat for your family. So gather your little ghouls and goblins, and let’s create some ghostly fun!
Ingredients (Serving Size: 4-6 people):
- 12 large marshmallows
- 12 lollipop sticks
- 1 cup white chocolate chips
- 1 tablespoon coconut oil (or vegetable oil)
- 1/4 cup dark chocolate chips
- 1 small tube of black gel icing (optional)
Cooking Instructions:
- Prepare the Marshmallows: Begin by inserting a lollipop stick into each marshmallow. Make sure the stick is firmly in place, but take care not to push it all the way through the marshmallow.
- Melt the White Chocolate: In a microwave-safe bowl, combine the white chocolate chips with the coconut oil. Microwave on medium power in 30-second intervals, stirring in between, until the chocolate is completely melted and smooth.
- Dip the Marshmallows: Carefully dip each marshmallow into the melted white chocolate, ensuring it’s fully coated. Gently tap off any excess chocolate, then place the pops on a baking sheet lined with parchment paper. Allow the coated marshmallows to set for about 10-15 minutes, either at room temperature or in the refrigerator.
- Melt the Dark Chocolate: While the white chocolate sets, melt the dark chocolate chips in a similar manner to the white chocolate, using a microwave-safe bowl and 30-second intervals.
- Decorate the Ghosts: Once the white chocolate has set, use a small spoon or piping bag to apply dark chocolate dots for eyes and a mouth on each marshmallow pop. Alternatively, you can use black gel icing for the facial features if you prefer.
- Set the Pops: Allow the decorated marshmallow pops to rest until the dark chocolate has fully set. This can be done at room temperature or in the refrigerator for quicker results.
Extra Tips:
For an added layer of fun and variation, allow the kids to add different expressions to their ghost faces with the black gel icing; this can give each pop its unique personality.
If you want to add a bit of crunch, consider sprinkling some crushed cookies or nuts onto the white chocolate before it sets. Additionally, if you’re making these in advance, store the marshmallow pops in an airtight container to keep them fresh until serving.
Pumpkin Patch Dirt Cups

Not only are Pumpkin Patch Dirt Cups a hit with children for their taste and appearance, but they also serve as an engaging way to involve kids in the kitchen. The recipe is straightforward and requires no baking, allowing children to contribute to each step, from layering the ingredients to placing the candy pumpkins. This fun and interactive treat is perfect for Halloween parties, school events, or just a spook-tacular afternoon snack.
Ingredients (Serves 4-6):
- 2 cups cold milk
- 1 package (3.9 ounces) instant chocolate pudding mix
- 1 package (14.3 ounces) chocolate sandwich cookies
- 1 cup whipped topping
- 1 package (5 ounces) candy pumpkins
Cooking Instructions:
- Prepare the Pudding: In a mixing bowl, combine the cold milk and the instant chocolate pudding mix. Whisk them together for about two minutes until the mixture thickens. Set the pudding aside to allow it to set further as you prepare the other components.
- Crush the Cookies: Place the chocolate sandwich cookies in a plastic zip-top bag. Seal the bag, ensuring there’s no air inside, and use a rolling pin to crush the cookies until they resemble fine crumbs. These crumbs will serve as the “dirt” in your cups.
- Layer the Cups: Take clear plastic cups and start by adding a layer of the crushed cookie crumbs at the bottom. Follow with a layer of the prepared chocolate pudding, spreading it evenly. Add another layer of cookie crumbs on top of the pudding. Continue to layer until you reach near the top of the cup, ensuring the final layer is cookie crumbs.
- Add the Whipped Topping: Spoon a dollop of whipped topping over the top layer of cookie crumbs in each cup. This will give a nice contrast to the dark layers beneath.
- Decorate with Candy Pumpkins: Finally, place a few candy pumpkins on top of the whipped topping, gently pressing them into the “dirt” so they appear to be growing out of the soil.
Extra Tips:
For a more immersive experience, consider using clear cups to allow the layers to be visible from the side, enhancing the visual appeal of the treat.
If you want to add a bit more fun, you can use gummy worms in addition to the candy pumpkins to create a more varied “garden” in your dirt cups.
For those with dietary restrictions, gluten-free cookies can be used, and dairy-free pudding and whipped topping alternatives are available to accommodate various needs.
Batty Brownies

Looking for a spooktacular treat to serve at your Halloween party? Search no further than Batty Brownies! These fun and festive brownies are the perfect blend of chocolatey goodness and Halloween flair, making them an irresistible snack for both kids and adults.
With their whimsical bat shapes and rich, fudgy texture, Batty Brownies are sure to be a hit at your holiday gathering. Crafting these delightful treats is easier than you might think. Using simple ingredients and a bit of creativity, you can whip up a batch of Batty Brownies that will have your little ghouls and goblins coming back for more.
Whip up whimsical Batty Brownies; a festive treat that delights ghouls and goblins with rich, fudgy texture.
Whether you’re hosting a Halloween party or just looking for a fun activity to do with the kids, this recipe is a great way to get into the spirit of the season.
Ingredients (Serves 4-6):
- 1 cup unsalted butter
- 2 cups granulated sugar
- 4 large eggs
- 1 teaspoon vanilla extract
- 1 cup all-purpose flour
- 1 cup unsweetened cocoa powder
- 1/2 teaspoon baking powder
- 1/4 teaspoon salt
- 1/2 cup chocolate chips (optional)
- Black food coloring (optional)
- Edible candy eyes
- Black licorice strings or pretzel sticks (for wings)
Instructions:
- Preheat the Oven: Start by preheating your oven to 350°F (175°C). Grease a 9×13 inch baking pan or line it with parchment paper for easy removal.
- Melt the Butter: In a medium saucepan, melt the butter over low heat. Once melted, remove from heat and allow it to cool slightly.
- Mix Sugar and Eggs: In a large mixing bowl, combine the granulated sugar and eggs. Beat them together until the mixture is light and fluffy. This should take about 3-4 minutes.
- Add Vanilla and Butter: Stir in the vanilla extract, then gradually add the melted butter to the sugar-egg mixture, mixing continuously until well combined.
- Combine Dry Ingredients: In another bowl, sift together the flour, cocoa powder, baking powder, and salt. Gradually add these dry ingredients to the wet ingredients, stirring until just combined.
- Add Chocolate Chips: If desired, fold in the chocolate chips for an extra chocolatey kick.
- Color the Batter: If you want to give your brownies an extra spooky touch, add a few drops of black food coloring to the batter and mix until evenly colored.
- Bake the Brownies: Pour the batter into the prepared pan, spreading it evenly. Bake in the preheated oven for 25-30 minutes, or until a toothpick inserted into the center comes out with a few moist crumbs.
- Cool and Cut: Allow the brownies to cool completely in the pan on a wire rack. Once cooled, use a bat-shaped cookie cutter to cut out bat shapes.
- Decorate the Bats: Attach edible candy eyes to the bat-shaped brownies using a small dab of frosting or melted chocolate. Use black licorice strings or pretzel sticks to create wings by gently pressing them into the sides of the brownies.
Extra Tips:
For best results, make sure the brownies are completely cool before cutting them into bat shapes to prevent crumbling.
If you don’t have a bat-shaped cookie cutter, you can use a knife to carefully cut out the shapes freehand. To keep the licorice wings in place, you can also use a small amount of frosting as glue.
Enjoy your Batty Brownies with a cold glass of milk or a scoop of your favorite ice cream for a frightfully delicious treat!
Creepy Crawly Pretzel Rods
Halloween is the perfect time to get creative in the kitchen, and these Creepy Crawly Pretzel Rods are sure to be a hit with kids and adults alike. These spooky snacks combine the crunch of pretzel rods with the sweetness of chocolate, all while being transformed into eerie edible insects. They’re not only delicious but also a fun and easy project that you can enjoy making with your little ones.
Whether you’re hosting a Halloween party or just want to whip up a festive treat, these pretzel rods are a great addition to your spooky spread.
The key to these Creepy Crawly Pretzel Rods is in the decoration. By using candy melts and assorted candies, you can easily turn ordinary pretzel sticks into a creepy yet adorable treat that resembles spiders or centipedes. The best part is that there’s no limit to how you can customize them – feel free to get wild with colors and designs!
This recipe makes enough for 4-6 people, perfect for a small gathering or as a contribution to a Halloween potluck.
Ingredients (serving size: 4-6 people)
- 12 large pretzel rods
- 1 cup semi-sweet chocolate chips or candy melts
- 1 cup white candy melts
- Assorted mini candy eyes
- Assorted colored sprinkles
- Licorice strings or gummy worms
- Wax paper or parchment paper
Cooking Instructions
- Prepare the Workspace: Begin by laying a sheet of wax paper or parchment paper on a flat surface to allow the pretzel rods to cool and set without sticking.
- Melt the Chocolate: In a microwave-safe bowl, melt the semi-sweet chocolate chips or candy melts in 30-second increments, stirring in between until completely smooth. Alternatively, use a double boiler to melt the chocolate.
- Coat the Pretzel Rods: Dip each pretzel rod into the melted chocolate, using a spoon to help cover about two-thirds of the rod. Gently tap off any excess chocolate to prevent dripping.
- Add Decorations: Before the chocolate sets, place candy eyes onto the coated pretzels to form the “face” of your creepy crawly creature. Use sprinkles to add texture or color to the chocolate coating.
- Create Legs: Cut licorice strings or gummy worms into small pieces and press them onto the chocolate near the top of the pretzel to resemble legs. Confirm these are added before the chocolate hardens.
- Cool and Set: Place each decorated pretzel rod onto the prepared wax paper. Allow them to cool at room temperature until the chocolate has fully set, or speed up the process by placing the pretzels in the refrigerator for about 15 minutes.
- Serve and Enjoy: Once the chocolate is firm, your Creepy Crawly Pretzel Rods are ready to serve. Arrange them on a festive platter for an eye-catching Halloween snack.
Extra Tips
For an even spookier effect, consider using colored candy melts in shades of green, purple, or orange to create a variety of creepy creatures. If you’re working with young children, verify that the chocolate isn’t too hot to handle.
Additionally, if you’re planning to make these in advance, store the completed pretzel rods in an airtight container to keep them fresh and crunchy. These treats not only make for a fun activity but are also an excellent way to get kids involved in the kitchen during the Halloween season.
Frankenstein Rice Krispie Treats

Frankenstein Rice Krispie Treats are the perfect spooky snacks for a Halloween party, especially designed to delight kids. These fun, green-colored treats resemble the iconic monster and are a creative twist on the classic Rice Krispie Treats. Not only are they easy to make, but they also add a festive touch to any Halloween celebration, making them a hit with both children and adults alike.
The secret to these delightful snacks is in the decoration. With a few simple ingredients and some imaginative flair, you can transform ordinary cereal bars into creepy, yet adorable little monsters. Whether you serve them as a party snack or a take-home treat, these Frankenstein Rice Krispie Treats are sure to be a spooky success.
Ingredients (serves 4-6 people):
- 6 cups Rice Krispies cereal
- 3 tablespoons butter
- 1 package (10 oz) marshmallows
- Green food coloring
- 1 cup black candy melts
- Candy eyes
- Mini marshmallows
- Pretzel sticks
Instructions:
- Prepare the Base: In a large saucepan, melt the butter over low heat. Once melted, add the marshmallows and stir until completely melted and smooth. Remove from heat.
- Color the Mixture: Add a few drops of green food coloring to the melted marshmallow mixture and stir until the color is evenly distributed. Adjust the amount of coloring until you achieve the desired shade of green, reminiscent of Frankenstein’s iconic hue.
- Combine with Cereal: Gradually add the Rice Krispies cereal to the green marshmallow mixture, stirring until the cereal is thoroughly coated.
- Shape the Treats: Press the mixture into a greased 9×13-inch baking dish, using a buttered spatula or waxed paper to pack it down evenly. Allow it to cool and set for about 30 minutes.
- Cut and Decorate: Once set, cut the treats into rectangles. Melt the black candy melts according to package instructions and dip the top of each rectangle to create Frankenstein’s hair. While the candy melt is still wet, attach two candy eyes to each treat.
- Add Finishing Touches: Push half of a mini marshmallow onto each end of a pretzel stick to create bolts and insert them into the sides of the treats. Allow the candy melts to harden before serving.
Extra Tips:
For a more detailed Frankenstein face, you can use a toothpick dipped in black candy melts or edible marker to draw stitches or a mouth on your treats.
If you want to save time, pre-made candy eyes and decorating gel can be found in most baking aisles during the Halloween season.
Remember to work quickly when shaping and decorating, as the marshmallow mixture sets rapidly. Enjoy creating these fun and festive treats with your kids, making it a memorable part of your Halloween celebrations!
Eyeball Donut Holes

Halloween is the perfect time to get creative with spooky-themed treats that delight both the eyes and taste buds of kids. One such treat is Eyeball Donut Holes, a fun and festive snack that’s as easy to make as it’s delicious. These delightful eyeballs are made from donut holes and simple decorations, perfect for a Halloween party or a fun family activity.
With minimal ingredients and a simple preparation process, this recipe is sure to be a hit among young ones and add a touch of eerie excitement to your spooky celebrations.
Eyeball Donut Holes aren’t only visually fun but also tasty, making them an excellent choice for a Halloween snack. The recipe requires no baking, just a bit of creativity to transform ordinary donut holes into creepy eyeballs. The following recipe serves 4-6 people, guaranteeing there are enough to go around for everyone to enjoy.
Gather your little helpers, and let’s plunge into making these spooky, sweet treats!
Ingredients (Serves 4-6)
- 24 pre-made donut holes
- 1 cup powdered sugar
- 2-3 tablespoons milk
- 1/2 teaspoon vanilla extract
- Red food coloring
- Blue or green food coloring
- 12 chocolate chips or small candy pieces
- Black decorating gel or icing
Instructions
- Prepare the Icing: In a small bowl, mix the powdered sugar with milk and vanilla extract to create a smooth, thick glaze. Adjust the thickness by adding more milk if necessary, but make sure it’s not too runny.
- Color the Glaze: Divide the glaze into two separate bowls. In one bowl, add a few drops of red food coloring to create a bright red glaze. In the other bowl, add a few drops of blue or green food coloring to make the iris color for the eyeballs.
- Coat the Donut Holes: Dip each donut hole in the white glaze, guaranteeing they’re fully coated. Place them on a wire rack or parchment-lined tray to let the excess glaze drip off and set. Allow them to dry for about 10-15 minutes.
- Create the Bloodshot Effect: Using a small brush or a toothpick, draw thin lines of red glaze from the center to the edges of each donut hole to create a bloodshot effect. This adds to the spooky appearance of the eyeballs.
- Add the Iris and Pupil: Once the white glaze has set, use a small spoon or piping bag to add a circle of blue or green glaze to the center of each donut hole to form the iris. Press a chocolate chip or candy piece into the center of the iris to create the pupil.
- Finish with Details: Use black decorating gel or icing to add details around the iris or to define the pupil further, if desired. Allow the donut holes to set completely before serving.
Extra Tips
For best results, guarantee the glaze is thick enough to coat the donut holes without dripping excessively. If you’re short on time, use store-bought colored icing to skip the coloring step.
To make the process more engaging for kids, let them help with the decorating part, turning the kitchen into a little Halloween workshop. Remember, the more imperfect and irregular the lines, the spookier the eyeballs will look!
Spooky Spider Pizzas
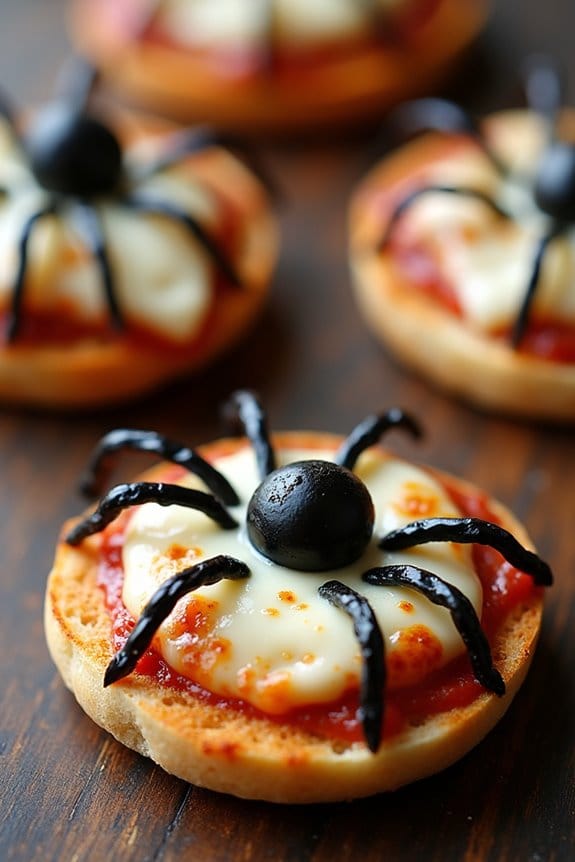
Spooky Spider Pizzas are the perfect Halloween-themed snack for kids and can be a fun way to get them involved in the kitchen. With their creepy-crawly design, these mini pizzas are both delicious and visually appealing, making them a hit at any Halloween party. Your little ghouls and goblins will love creating and devouring these fun treats, all while getting a good dose of creativity and culinary practice.
These pizzas aren’t only a treat for the taste buds but also an opportunity for kids to explore different textures and flavors. The use of olives for creating spider shapes is a fantastic way to encourage children to appreciate and try new ingredients. Plus, these pizzas are easy to make and require minimal ingredients, making them a quick and convenient option for busy parents who want to add a touch of Halloween spirit to their snacks.
Ingredients (serves 4-6 people):
- 6 English muffins, split in half
- 1 cup pizza sauce
- 2 cups shredded mozzarella cheese
- 1 can (6 oz) black olives, pitted
- Cooking spray or olive oil
- Optional: pepperoni slices, bell peppers, and other toppings of choice
Instructions:
- Preheat the Oven: Start by preheating your oven to 375°F (190°C) to guarantee it’s hot enough to bake the pizzas evenly.
- Prepare the Muffins: Arrange the split English muffins on a baking sheet, cut side up. Lightly spray or brush each muffin half with cooking spray or olive oil to help them crisp up during baking.
- Sauce the Muffins: Spread about a tablespoon of pizza sauce on each muffin half, guaranteeing that the surface is evenly covered.
- Add the Cheese: Sprinkle a generous amount of shredded mozzarella cheese over the sauce on each muffin half. Make sure the cheese covers the sauce completely.
- Create the Spiders: Cut the black olives in half lengthwise to form the spider bodies. Use additional olive halves or slices to create legs around the spider body. Arrange these olive spiders on top of the cheese.
- Bake the Pizzas: Place the baking sheet in the preheated oven and bake for about 10-12 minutes, or until the cheese is melted and bubbly, and the muffin edges are golden brown.
- Cool and Serve: Once baked, remove the pizzas from the oven and allow them to cool slightly before serving. This prevents the cheese from burning little mouths.
Extra Tips:
When crafting the spider designs, encourage kids to use their imagination with the placement of the olives and any additional toppings they might want to add. If your kids are hesitant about olives, consider using small pepperoni slices or cut-up bell peppers as alternatives for the spider bodies.
For a gluten-free version, swap out English muffins for gluten-free bread or pizza bases. And most importantly, supervise younger children during the cutting of olives and when using the oven to guarantee safety at all times.
Witch’s Brew Punch
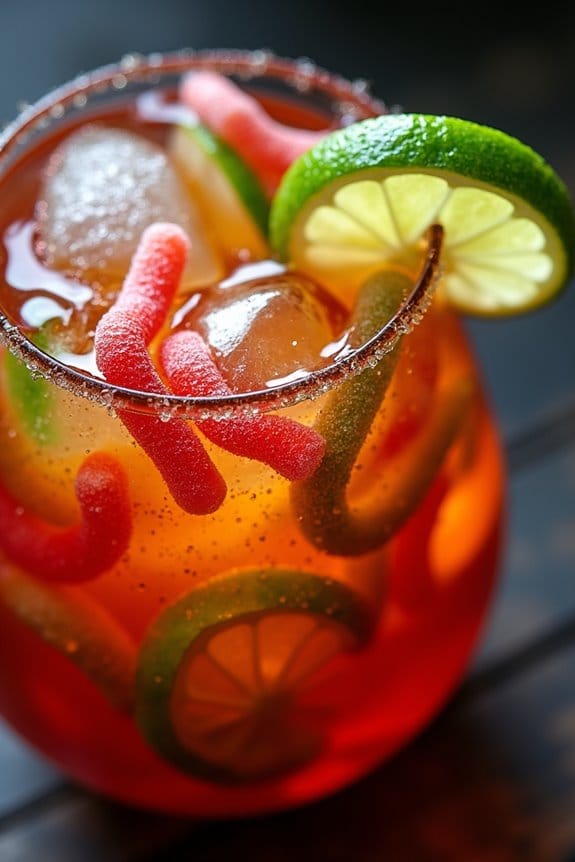
As Halloween approaches, it’s the perfect time to brew up some spooky fun with a festive drink that will delight kids and adults alike. Witch’s Brew Punch is a vibrant, fizzy concoction that not only looks magical but tastes delicious too. This punch combines a mix of fruity flavors and bubbles, making it an exciting addition to any Halloween gathering.
It’s easy to prepare, and with a few simple ingredients, you’ll have a cauldron full of goodies that will have everyone coming back for more. The beauty of Witch’s Brew Punch is its adaptability; you can tweak flavors to suit your little witches and wizards. With a serving size of 4-6 people, this recipe is perfect for a small party or family gathering.
Craft a cauldron of fun with this adaptable Witch’s Brew Punch, perfect for enchanting small gatherings.
The fun part is in the presentation, where you can use creative garnishes or serve it from a cauldron to enhance the Halloween theme. Whether you’re hosting a party or looking for a fun activity with the kids, this punch is sure to cast a spell of delight.
Ingredients (Serves 4-6):
- 4 cups of lemon-lime soda
- 2 cups of pineapple juice
- 2 cups of orange juice
- 1 cup of grape juice
- 1/2 cup of grenadine syrup
- 2 cups of ice cubes
- 1 cup of gummy worms or other Halloween-themed candies
- 1 lime, sliced for garnish
- Optional: 1-2 drops of green food coloring for an extra spooky effect
Instructions:
- Prepare the Base: Begin by placing the ice cubes in a large punch bowl or cauldron. This will keep the punch chilled and invigorating as you add the other ingredients.
- Mix the Juices: Pour the pineapple juice, orange juice, and grape juice over the ice. Stir gently to combine the juices, creating a fruity base for your punch.
- Add Fizz: Slowly add the lemon-lime soda to the mixture. Stir gently to maintain the carbonation, giving your punch a delightful fizz that kids will love.
- Sweeten It Up: Pour in the grenadine syrup, which will add a sweet, rich flavor and create a beautiful layered effect as it sinks to the bottom.
- Add Spooky Elements: Stir in the gummy worms or other Halloween-themed candies. They’ll float on top and add a fun, quirky touch to your punch.
- Garnish: Add lime slices to the punch for a zesty flavor and a pop of color. If desired, add a few drops of green food coloring for an extra spooky, witch-like appearance.
- Serve: Ladle the punch into cups, ensuring each serving has a few gummy worms for an exciting, thematic treat.
Extra Tips:
For an added touch of Halloween magic, consider freezing gummy worms in ice cube trays with water or juice, then add them to the punch. This won’t only keep the punch cool but also add a ghoulish surprise as the ice melts.
If you want a non-alcoholic option that adults can enjoy as well, consider substituting regular soda with a ginger ale for a slightly different taste. Remember to taste the punch before serving, and adjust the sweetness or tartness by adding more grenadine or lime slices as needed.
Enjoy your Witch’s Brew Punch and have a spooktacular Halloween!
Haunted House Gingerbread

Transform your Halloween celebration into a spooktacular event with this Haunted House Gingerbread. This festive treat not only serves as a delicious snack for kids but also doubles as a fun and creative activity. Let the little ones bring their imagination to life by decorating their own gingerbread haunted house, complete with eerie embellishments and frightful details.
With this recipe, you’ll have everything you need to create a memorable Halloween snack that both delights and entertains. The Haunted House Gingerbread is a perfect way to involve kids in the kitchen, allowing them to explore their creativity while learning basic baking skills.
This recipe yields enough to construct a haunted gingerbread house for 4-6 people, making it ideal for a small Halloween gathering. Gather your ingredients, preheat the oven, and prepare for a delightful culinary adventure that will surely become a cherished Halloween tradition.
Ingredients (Serves 4-6 people):
- 3 1/4 cups all-purpose flour
- 1/2 teaspoon baking soda
- 2 teaspoons ground ginger
- 1 teaspoon ground cinnamon
- 1/2 teaspoon ground cloves
- 1/2 teaspoon ground nutmeg
- 1/4 teaspoon salt
- 3/4 cup unsalted butter, room temperature
- 3/4 cup firmly packed dark brown sugar
- 1 large egg
- 1/2 cup molasses
- 2 teaspoons vanilla extract
- Assorted candies and icing for decoration
Instructions:
- Preheat the Oven: Begin by preheating your oven to 350°F (175°C). This will guarantee it’s ready for baking once your gingerbread dough is prepared.
- Mix Dry Ingredients: In a medium bowl, whisk together the flour, baking soda, ginger, cinnamon, cloves, nutmeg, and salt. Set aside for later use.
- Cream Butter and Sugar: In a large bowl using an electric mixer, cream the butter and brown sugar together on medium speed until the mixture is light and fluffy, about 2 minutes.
- Add Wet Ingredients: Add the egg, molasses, and vanilla extract to the butter mixture. Beat until combined, scraping down the sides as needed.
- Combine Mixtures: Gradually add the dry ingredients to the wet ingredients, mixing on low speed until a dough forms. Don’t overmix.
- Chill the Dough: Divide the dough in half, flatten into disks, and wrap in plastic wrap. Refrigerate for at least 1 hour or until firm.
- Roll and Cut Dough: Once chilled, roll out the dough on a lightly floured surface to about 1/4-inch thickness. Use a gingerbread house stencil or freehand to cut out the necessary pieces for your haunted house (walls, roof, etc.).
- Bake the Pieces: Place the cut-out pieces on a parchment-lined baking sheet, leaving space between each piece. Bake for 10-12 minutes or until the edges are golden brown. Allow to cool completely on wire racks.
- Assemble the Haunted House: Use icing as glue to assemble your gingerbread house. Be patient and allow each section to set before adding the next.
- Decorate: Once the house is assembled, let the kids decorate with assorted candies and icing to add spooky details like ghosts, bats, and pumpkins.
Extra Tips:
When constructing your haunted house, make sure that your icing is thick enough to hold the pieces together; you might’ve to adjust the consistency by adding more powdered sugar.
Allow each section of the house to dry completely before moving on to the next for added stability. Encourage creativity by providing a variety of candies and colors for decoration, and consider using food coloring to make the icing more festive.
Remember to have fun and enjoy the process—imperfections add character to your haunted creation!
Skeleton Veggie Platter

Get ready to delight your little goblins and witches with a fun and healthy Halloween treat – the Skeleton Veggie Platter! This spooky yet nutritious dish is perfect for any Halloween gathering. The platter is designed to resemble a skeleton, with fresh vegetables forming the body parts. Not only is it visually appealing, but it also promotes kids to munch on their veggies, making it a perfect balance of fright and fun.
The Skeleton Veggie Platter is simple to assemble and requires no cooking, making it an ideal project for kids to help with. You can use a variety of colorful vegetables to create different parts of the skeleton, and even customize it with your child’s favorite veggies. Pair it with a delicious dip, and you’ve got a platter that’s both festive and healthy.
Ingredients for 4-6 Servings:
- 1 large head of cauliflower
- 1 bunch of celery
- 1 cucumber
- 1 red bell pepper
- 1 yellow bell pepper
- 1 pint cherry tomatoes
- 1 bunch of baby carrots
- 1 broccoli head
- 1 small radish
- 1 cup ranch dressing (or dip of choice)
Instructions:
- Prepare the Vegetables:
- Wash all the vegetables thoroughly under cool, running water. Pat them dry with paper towels to guarantee they’re free from excess moisture.
- Assemble the Skeleton Head:
- Break the cauliflower into small florets and arrange them at the top of a large platter to form the skeleton’s skull. Use a couple of black olives for the eyes, and slice a radish thinly to form the mouth.
- Create the Ribcage:
- Slice the cucumber and create a line of overlapping circles below the cauliflower to represent the ribcage. This will also add a nice crunch to your platter.
- Form the Arms and Legs:
- Use the celery sticks as the skeleton’s arms and legs, placing them on either side of the ribcage and below it. Trim the ends if necessary to fit your platter.
- Add the Hands and Feet:
- For the hands and feet, use the broccoli florets. Position them at the ends of the celery sticks to complete the limbs.
- Make the Spine:
- Cut the bell peppers into strips and use them to form the spine. Lay them vertically down the center of the platter.
- Add Details with Cherry Tomatoes and Carrots:
- Scatter cherry tomatoes and baby carrots around the skeleton to add color and additional snacking options.
- Serve with Dip:
- Place the ranch dressing or your dip of choice in a small bowl, and position it next to the skeleton for easy dipping.
Extra Tips:
To make your Skeleton Veggie Platter even more appealing, consider using a large, black serving tray to enhance the Halloween theme. You can also experiment with different vegetables based on seasonal availability or personal preferences.
Spinach leaves can be used as a backdrop to make the skeleton stand out. Don’t hesitate to encourage the kids to get creative with the arrangement – after all, the spooky fun is in the details!
Vampire Fang Cookies

Vampire Fang Cookies are a spooktacular Halloween treat that will delight kids and adults alike. These cookies not only taste delicious but also add a fun, creepy element to any Halloween gathering.
Imagine the excitement on children’s faces as they sink their teeth into these cleverly crafted confections, which mimic the appearance of vampire fangs with their sharp, pointed shapes and bright red accents.
Perfect for a Halloween party or a spooky night in, Vampire Fang Cookies are both fun to make and enjoy. The process involves simple ingredients and a few creative touches to transform ordinary sugar cookies into something frightfully festive.
With a serving size suitable for 4-6 people, this recipe guarantees there will be plenty of fangs to go around, making it an ideal project for a group baking activity or a family cooking session.
Ingredients (Serves 4-6):
- 1 cup unsalted butter, softened
- 1 cup granulated sugar
- 1 large egg
- 1 teaspoon vanilla extract
- 2 ½ cups all-purpose flour
- ½ teaspoon baking powder
- ¼ teaspoon salt
- Red food coloring gel
- Mini marshmallows
- Slivered almonds
Instructions:
- Prepare the Cookie Dough: In a large mixing bowl, cream together the softened butter and granulated sugar until light and fluffy. Add the egg and vanilla extract, mixing until well combined.
- Mix the Dry Ingredients: In a separate bowl, whisk together the all-purpose flour, baking powder, and salt. Gradually add the dry ingredients to the wet mixture, stirring until a soft dough forms.
- Shape the Cookies: Divide the dough into two equal parts. Add a few drops of red food coloring gel to one part and knead until the color is evenly distributed. Wrap both dough portions in plastic wrap and refrigerate for at least 1 hour.
- Preheat and Prep: Preheat your oven to 350°F (175°C). Line a baking sheet with parchment paper.
- Roll and Cut Dough: Roll out the uncolored dough on a lightly floured surface to a thickness of ¼ inch. Use a fang-shaped cookie cutter or create your own template to cut out the shapes. Place the shapes on the prepared baking sheet.
- Create Vampire Fangs: Cut small pieces of the red dough and press gently onto one end of each cookie to create a gum effect. Place two mini marshmallows at the top of the red portion to mimic teeth, and insert slivered almonds into the marshmallows for the fangs.
- Bake the Cookies: Bake in the preheated oven for 10-12 minutes, or until the cookies are lightly golden. Allow them to cool on the baking sheet for a few minutes before transferring to a wire rack to cool completely.
- Decorate: Once cooled, you can add additional red food coloring with a brush for a blood effect if desired.
Extra Tips: For best results, confirm that the butter is softened to room temperature before starting, as this will help achieve the perfect cookie texture.
If you don’t have a fang-shaped cutter, you can use a knife to carefully shape each cookie. Be sure to keep an eye on the cookies while baking, as they can quickly go from perfectly golden to overbaked.
Store any leftovers in an airtight container to keep them fresh and crisp for several days.
