
Planning family dinners for Halloween does not have to be complicated. These ideas focus on meals that kids and adults can enjoy together. Many use ingredients you might already have at home. They are straightforward to prepare on a weeknight or weekend. You will find options that range from quick to a bit more involved.
Helpful Tips Before You Start
These tips will help you create Halloween dinners that feel special without adding extra stress.
Get Kids Involved Early
Assign simple tasks like mixing sauces or arranging toppings on plates. Kids stay engaged and feel proud of the final meal.
Prep What You Can Ahead
Make sauces or chop vegetables the day before. This keeps the actual cooking time short on Halloween.
Add Small Festive Touches
Use cookie cutters on sandwiches or add a few candy eyes to casseroles. These details turn regular dinners into themed ones without much effort.
Keep Sides Simple and Flexible
Serve a plain pasta or rice option alongside the main dish. This gives picky eaters an easy choice while the rest of the family enjoys bolder flavors.
Set Up a Quick Cleanup Plan
Use disposable plates for the main meal and keep wipes nearby. Everyone can finish faster and move on to other activities.
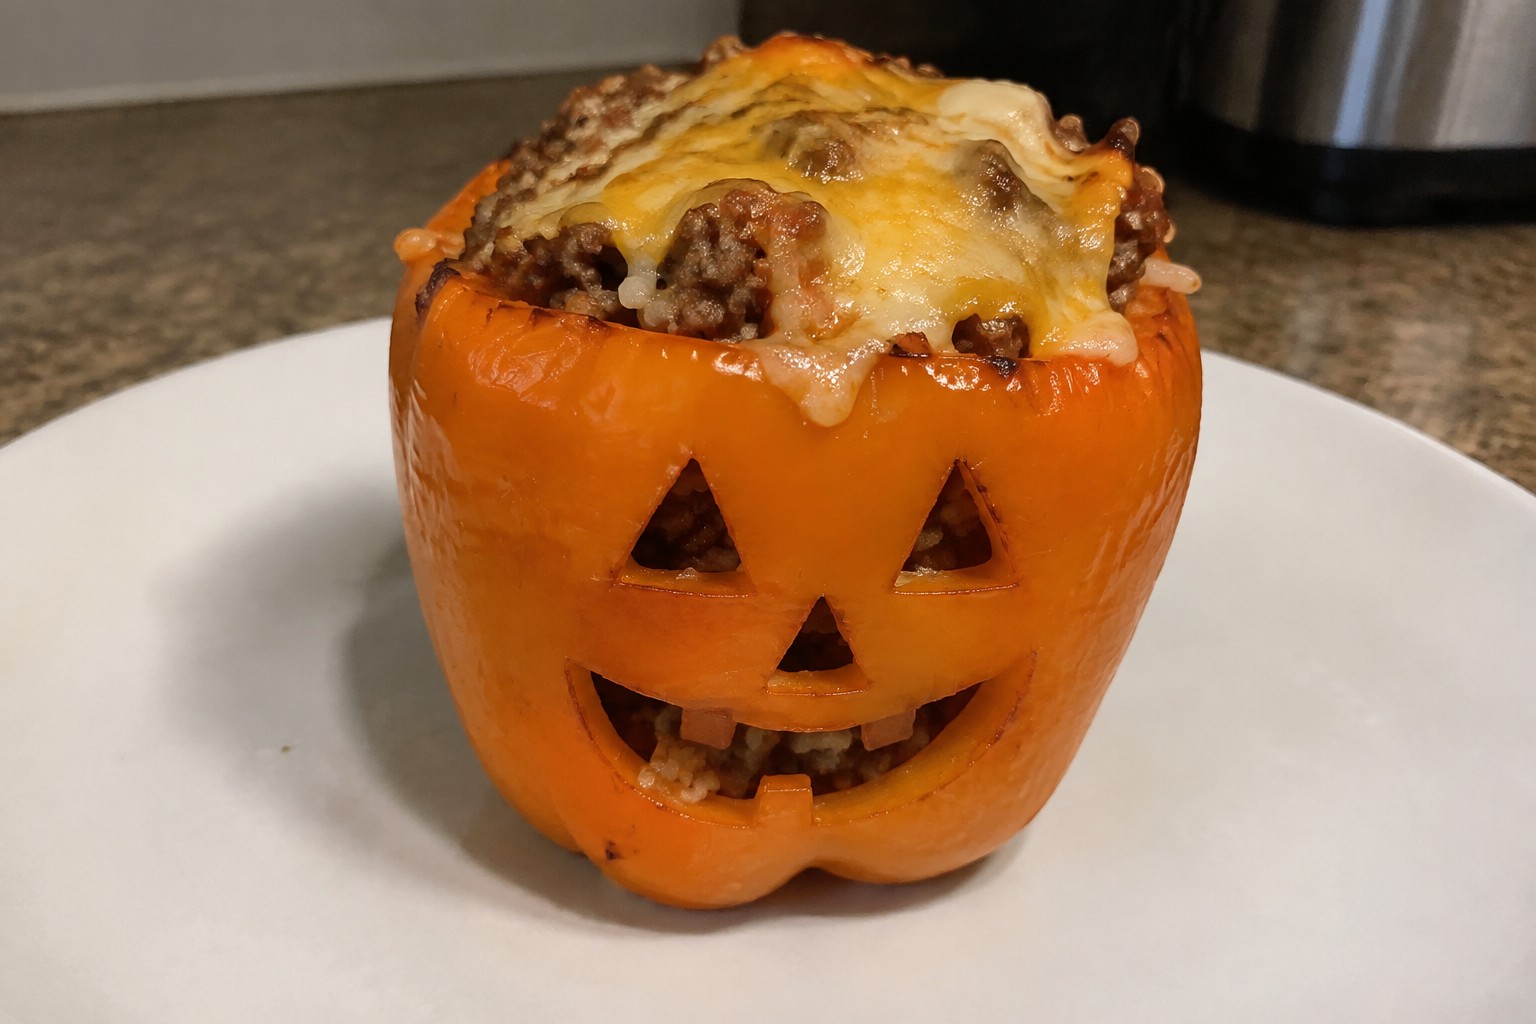
Jack-o’-Lantern Stuffed Peppers with Ground Turkey and Quinoa
These stuffed peppers turn dinner into a fun family project. Kids can help carve the faces while the filling simmers on the stove. The finished dish gives a savory, hearty meal with tender peppers, seasoned turkey, and fluffy quinoa that holds together well.
The orange peppers stay firm after baking and the cheese melts into a light golden layer on top. It works nicely for a weeknight meal or a casual Halloween gathering when you want something themed but still balanced.

Serves 4 people.
Ingredients
- 4 large orange bell peppers
- 1 pound ground turkey
- 1 cup quinoa
- 1 small yellow onion, diced
- 2 garlic cloves, minced
- 1 cup tomato sauce
- 1 teaspoon dried oregano
- 1/2 teaspoon salt
- 1/4 teaspoon black pepper
- 1 cup shredded mozzarella cheese
- Chopped fresh basil for garnish
Instructions
- Rinse the quinoa, then cook it in a small pot with 2 cups of water until the liquid is absorbed. Set it aside.
- Preheat the oven to 375 degrees. Lightly oil a baking dish.
- Slice the tops off the bell peppers and scoop out the seeds. Use a small knife to carve simple jack-o’-lantern faces on the front of each pepper.
- In a large skillet over medium heat, cook the ground turkey with the diced onion and minced garlic until the meat is no longer pink.
- Stir the cooked quinoa, tomato sauce, oregano, salt, and black pepper into the turkey mixture. Cook for 2 minutes until everything is heated through.
- Stand the carved peppers in the baking dish. Spoon the filling evenly into each pepper.
- Sprinkle the shredded mozzarella cheese over the top of the filling. Bake for 25 minutes until the peppers are soft and the cheese is melted.
- Remove from the oven and sprinkle with chopped fresh basil before serving.
Extra Tips
Carve the pepper faces after removing the tops so the peppers stay sturdy during baking. The filling can be made a day ahead and stored in the fridge, then stuffed and baked when ready to eat. Leftovers reheat well in the microwave with a splash of water to keep the quinoa moist.Course: Main Course Cuisine: American Equipment: Baking dish, Large skillet, Small pot, Knife
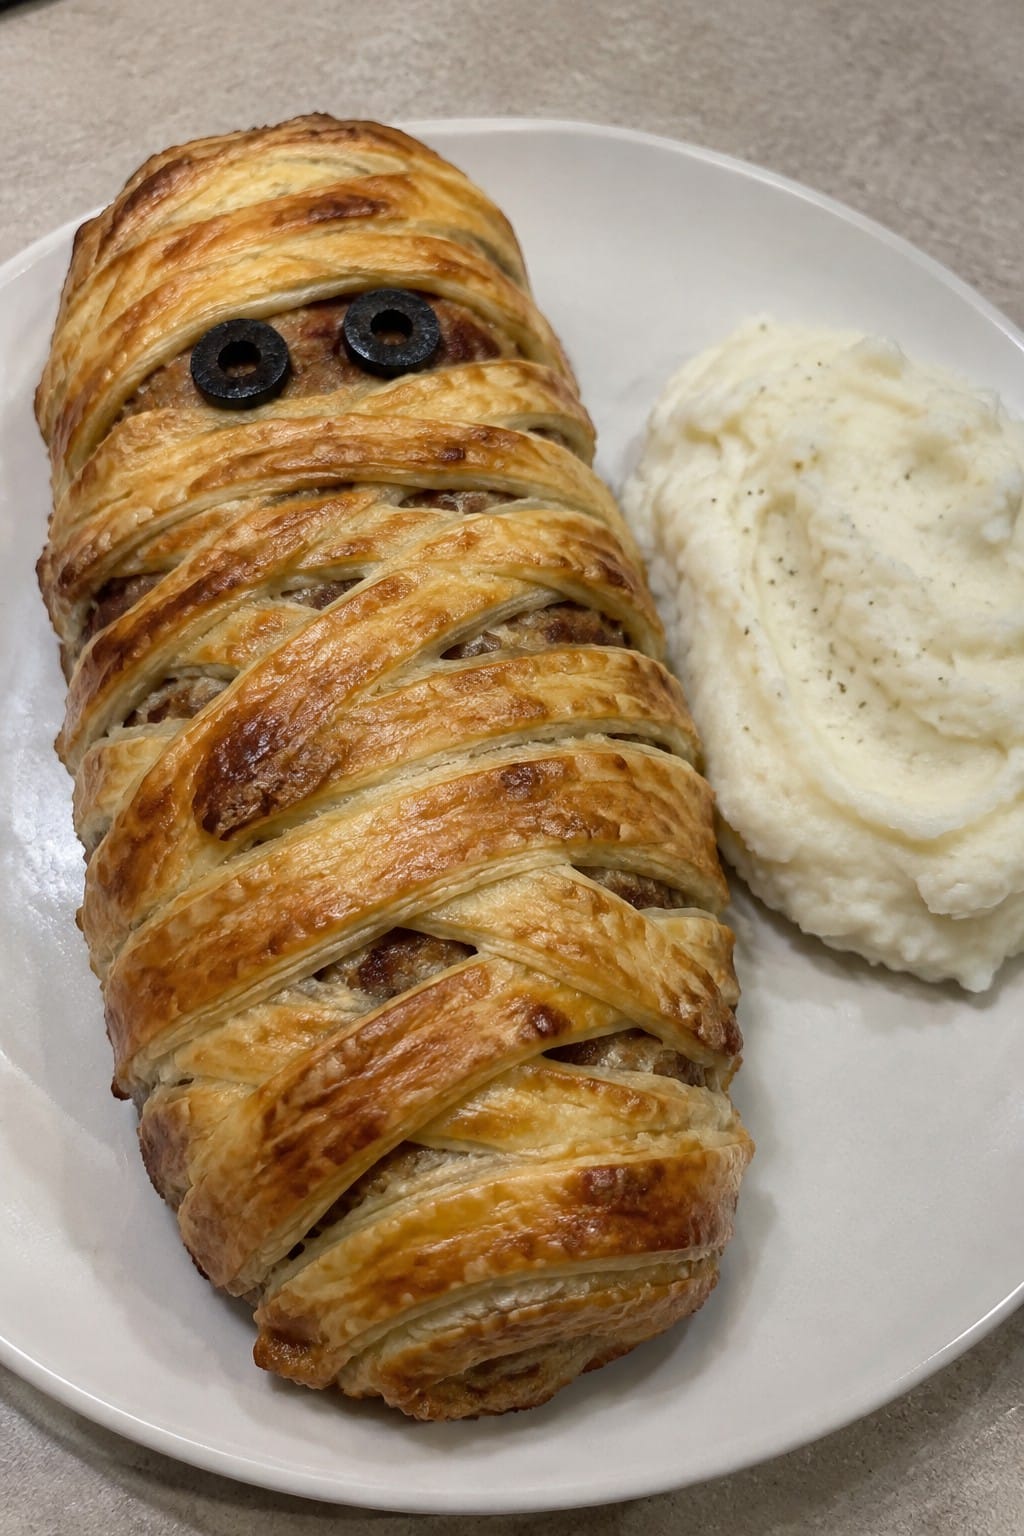
Mummy-Wrapped Meatloaf with Garlic Mashed Potatoes
This meatloaf gets shaped into a loaf and wrapped with thin strips of puff pastry before baking. The pastry bakes into a golden, bandage-like crust that gives the dish a playful Halloween look while keeping the meat moist inside. It pairs with simple garlic mashed potatoes for a meal that feels both festive and familiar.
The result is a savory main with a crisp outer layer and tender beef center. The mashed potatoes stay creamy and carry a mild garlic flavor that balances the richer meatloaf. Families can enjoy it as a themed dinner without extra fuss.
Serves 4 people.
Ingredients
- 1 lb ground beef
- 1/2 cup breadcrumbs
- 1 egg
- 1 small onion, finely chopped
- 3 cloves garlic, minced
- 1/4 cup ketchup
- 1 tsp Worcestershire sauce
- 1/2 tsp salt
- 1/4 tsp black pepper
- 1 sheet puff pastry, cut into 1/2-inch strips
- 4 large russet potatoes, peeled and cubed
- 4 cloves garlic, peeled
- 1/4 cup butter
- 1/2 cup milk
- 1/2 tsp salt
- 2 black olives, sliced
Instructions
- Preheat the oven to 375°F and line a baking sheet with parchment paper.
- In a large bowl, combine the ground beef, breadcrumbs, egg, onion, 3 minced garlic cloves, ketchup, Worcestershire sauce, 1/2 tsp salt, and black pepper. Mix until evenly blended, then shape into a compact loaf and place on the baking sheet.
- Lay the puff pastry strips across the meatloaf in overlapping bands to create a wrapped effect, leaving small gaps for steam to escape. Tuck the ends under the loaf.
- Bake the meatloaf for 45 minutes until the pastry is golden and the internal temperature reaches 160°F.
- While the meatloaf bakes, place the potatoes and 4 whole garlic cloves in a pot of salted water. Bring to a boil and cook until the potatoes are fork-tender, about 15 minutes.
- Drain the potatoes and garlic. Return them to the pot, add the butter and milk, then mash until smooth. Stir in the remaining 1/2 tsp salt.
- Remove the meatloaf from the oven and let it rest for 5 minutes. Place olive slices on top as eyes before slicing and serving with the mashed potatoes.
Extra Tips
Cut the pastry strips slightly uneven so the baked surface looks more like loose bandages. If the pastry browns too quickly, loosely cover the loaf with foil for the last 10 minutes. Leftovers reheat well in a 350°F oven to keep the pastry crisp. The olives add a simple finishing touch without overpowering the flavors.Course: Main Course Cuisine: American Equipment: Baking sheet, Large mixing bowl, Large pot, Potato masher
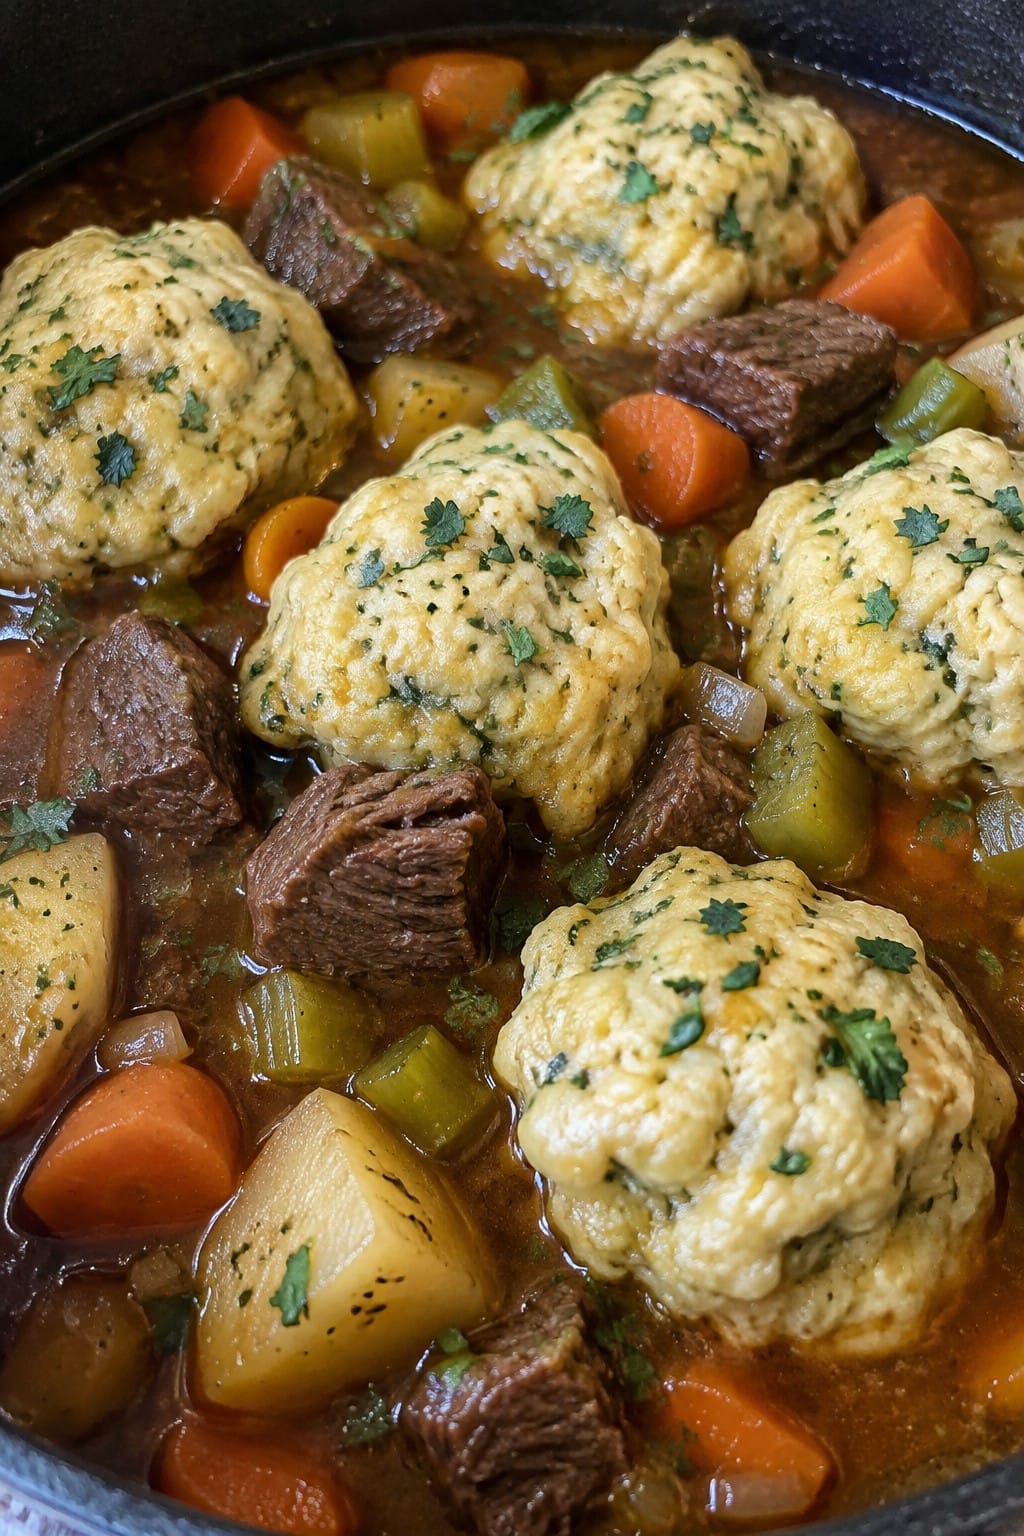
Witch’s Cauldron Beef Stew with Herb Dumplings
This beef stew makes a filling Halloween dinner that comes together in one pot. Families can sit down to bowls of tender beef and vegetables with soft dumplings on top. The broth tastes savory from slow simmering, while the dumplings add a light, herby finish that pairs well with the rich sauce.
It works well for cool fall evenings when you want something warm and hands-on. Kids can help drop the dumpling dough once the stew is ready. The result is a complete meal with balanced textures from the chunky vegetables and fluffy topping.
Serves 4 people.
Ingredients
- 1.5 pounds beef chuck, cut into cubes
- 2 tablespoons vegetable oil
- 1 large onion, diced
- 3 carrots, peeled and sliced
- 2 celery stalks, sliced
- 3 medium potatoes, cubed
- 4 cups beef broth
- 2 tablespoons tomato paste
- 3 garlic cloves, minced
- 1 teaspoon dried thyme
- 2 bay leaves
- Salt and black pepper to taste
- 1 cup all-purpose flour
- 2 teaspoons baking powder
- 1/2 teaspoon salt
- 2 tablespoons cold butter
- 1/2 cup milk
- 2 tablespoons chopped fresh parsley
- 1 tablespoon chopped fresh chives
Instructions
- Heat the vegetable oil in a Dutch oven over medium heat. Add the beef cubes and brown them on all sides for even color and flavor.
- Stir in the onion, carrots, and celery. Cook for 5 minutes until the onion softens.
- Add the garlic, thyme, tomato paste, bay leaves, salt, and black pepper. Stir for 1 minute to release the aromas.
- Pour in the beef broth and add the potatoes. Bring the mixture to a boil, then reduce to a simmer. Cover and cook for 1 hour until the beef is tender.
- While the stew simmers, mix the flour, baking powder, and 1/2 teaspoon salt in a bowl. Cut in the cold butter until the mixture looks like coarse crumbs. Stir in the milk, parsley, and chives to form a soft dough.
- Drop spoonfuls of the dough onto the simmering stew. Cover the pot and cook for 15 minutes without lifting the lid so the dumplings steam through.
Extra Tips
Serve the stew right away in wide bowls so the dumplings stay on top. If the dough feels too sticky, add a little more flour before dropping it in. Leftovers keep in the fridge for two days and reheat gently on the stove with a splash of broth to loosen the sauce.Course: Main Course Cuisine: American Equipment: Dutch oven, mixing bowl, wooden spoon
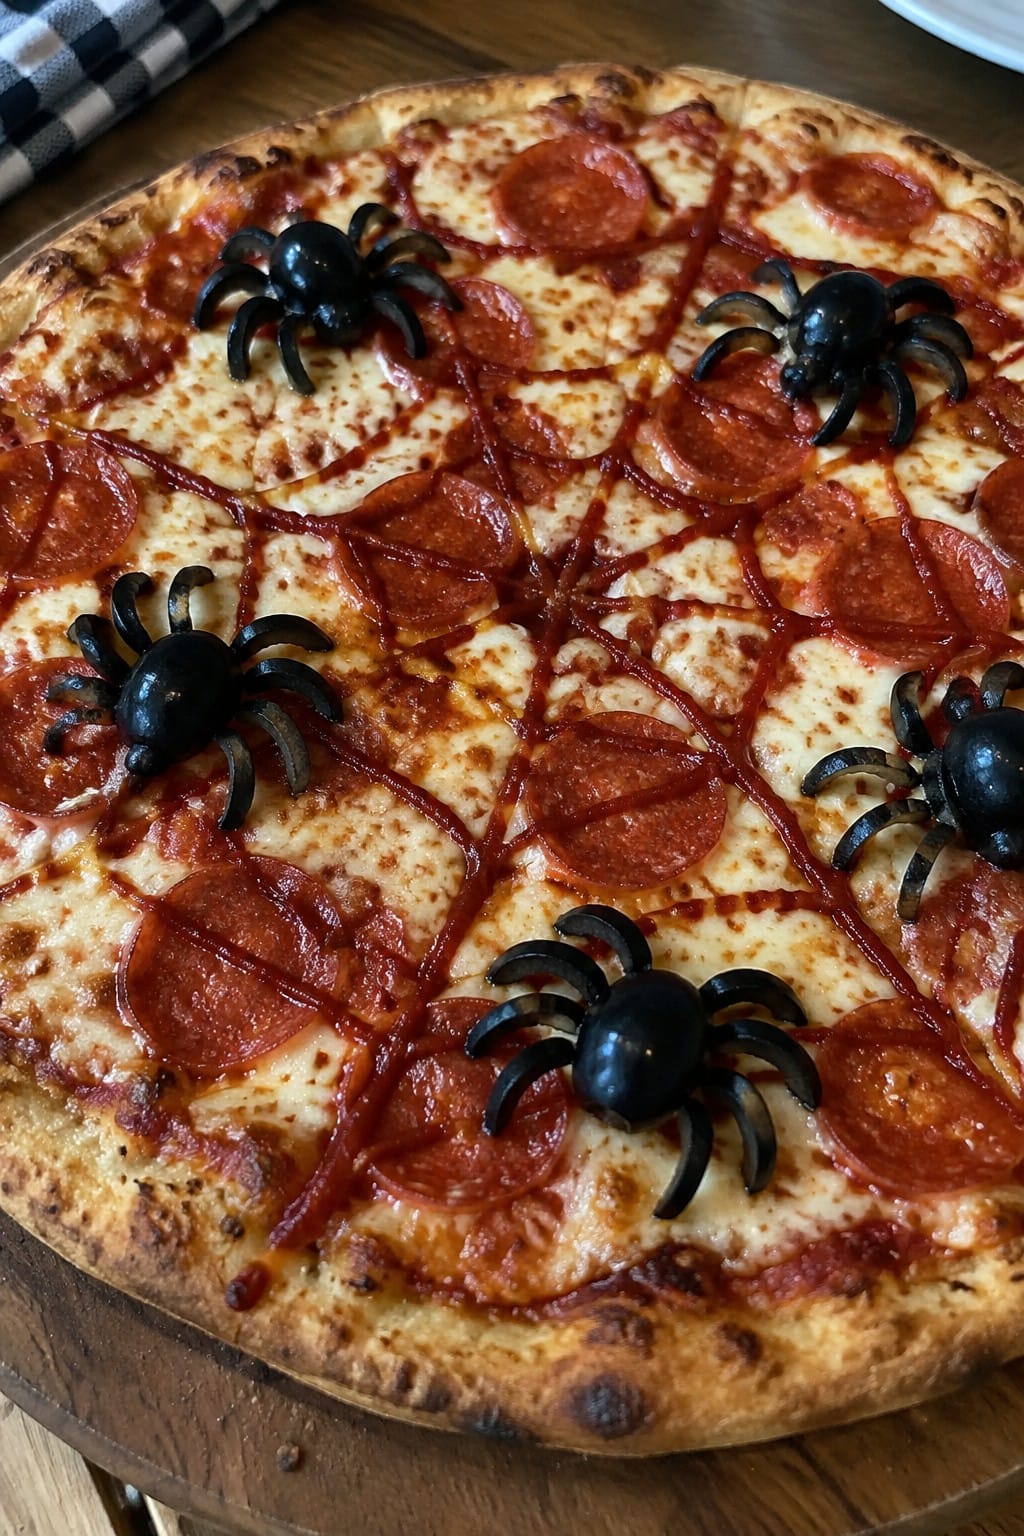
Spiderweb Pepperoni Pizza with Black Olive Spiders
This pizza turns a regular family dinner into a light Halloween activity. Kids can help arrange the olive spiders and watch the web take shape while the adults handle the oven. It keeps the familiar taste of pepperoni pizza but adds a simple visual detail that feels festive without extra work.
The finished pizza has a crisp crust, melted cheese, and savory pepperoni under a thin sauce web. The black olive spiders sit on top as the final touch.
Serves 4 people.
Ingredients
- 1 pound pizza dough
- 1 cup pizza sauce, divided
- 2 cups shredded mozzarella cheese
- 30 slices pepperoni
- 8 large black olives
Instructions
- Heat the oven to 475°F and place a baking sheet or pizza stone inside to warm.
- Roll the dough into a 12-inch circle on a lightly floured surface.
- Spread ¾ cup of the sauce evenly over the dough, leaving a small border around the edge.
- Sprinkle the mozzarella cheese over the sauce, then layer the pepperoni slices on top.
- Spoon the remaining ¼ cup sauce into a small zip-top bag, snip a tiny corner, and pipe four concentric circles on the pizza. Drag a toothpick from the center outward in eight lines to form a web.
- Slide the pizza onto the hot baking sheet or stone and bake for 12 to 14 minutes until the crust is golden and the cheese is bubbly.
- While the pizza bakes, cut four olives in half lengthwise for bodies. Slice the remaining olives into thin strips for legs. Place one body and eight leg pieces on each slice of pepperoni after the pizza comes out of the oven.
Extra Tips
Pipe the sauce web right before baking so the lines stay distinct. If the dough feels too stretchy, let it rest five minutes before rolling. Leftovers reheat best in a 350°F oven for six minutes to keep the crust crisp.Course: Main Course Cuisine: American Equipment: Baking sheet, Rolling pin, Toothpick
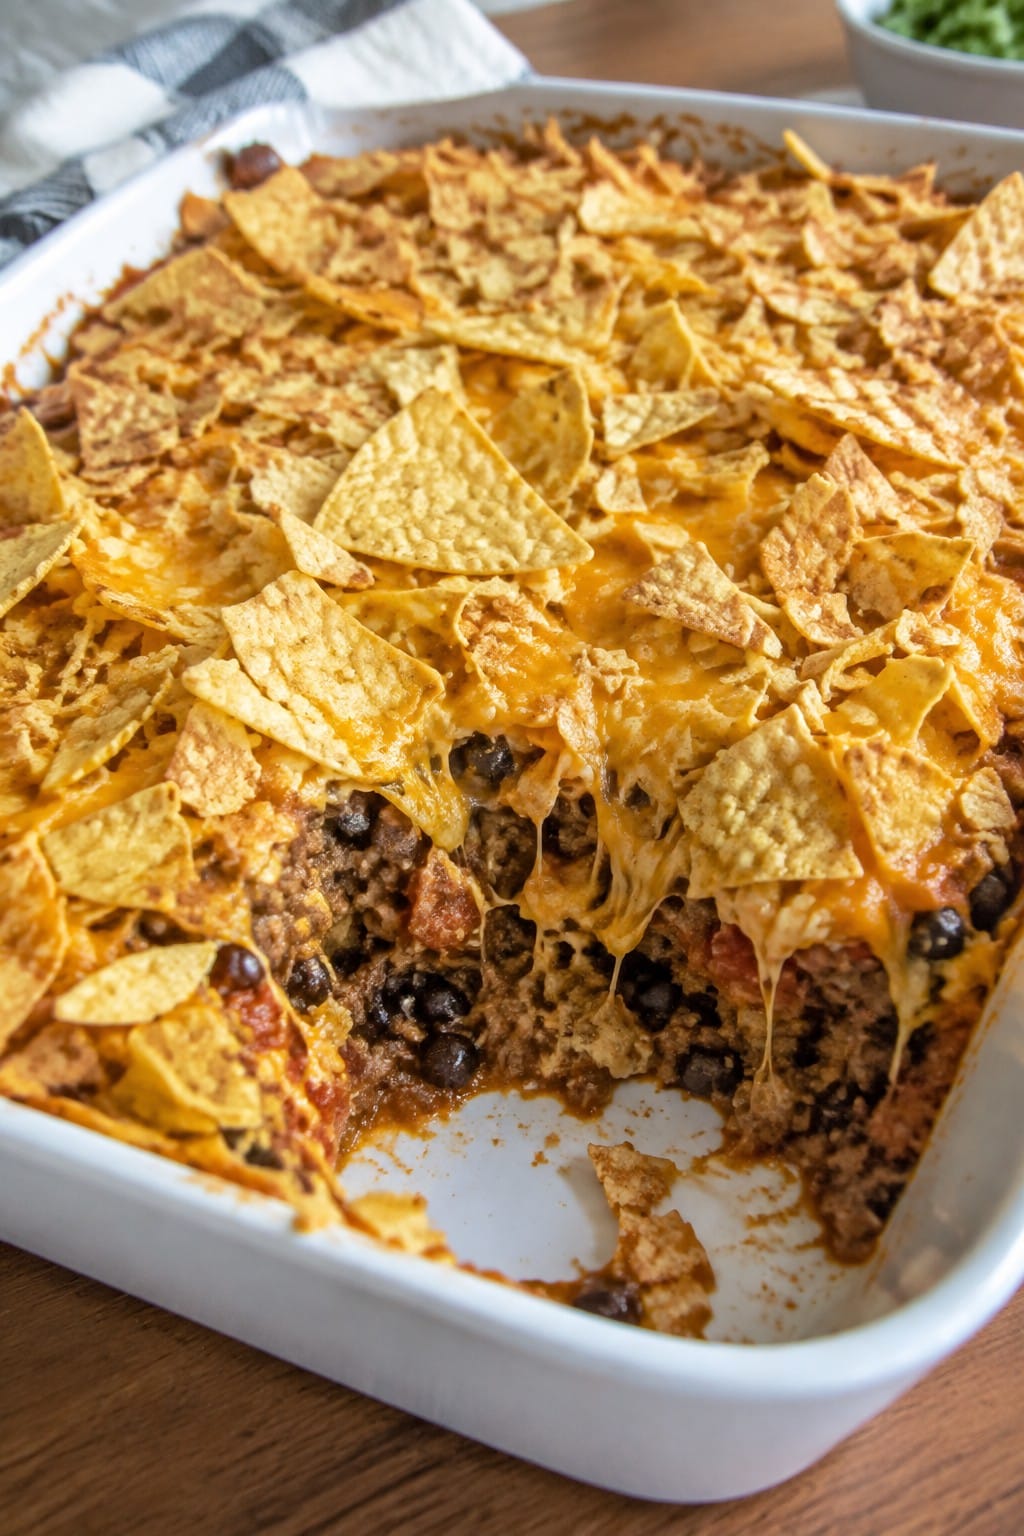
Graveyard Taco Casserole with Tortilla Chip Topping
This graveyard taco casserole turns a simple taco night into a family Halloween meal. Kids enjoy the idea of a crunchy chip topping that looks like a graveyard while adults appreciate the hearty layers underneath. The dish combines seasoned beef, beans, and melted cheese with a crisp tortilla chip finish that adds texture.
It works well for weeknight dinners in October or small Halloween parties. The flavors stay familiar and kid friendly with a slight kick from the taco seasoning.
Serves 4 people.
Ingredients
- 1 pound ground beef
- 1 packet taco seasoning
- 1 can (15 oz) black beans, drained and rinsed
- 1 cup salsa
- 2 cups shredded cheddar cheese, divided
- 3 cups tortilla chips, crushed
Instructions
- Preheat the oven to 350 degrees F and lightly grease a 9 by 13 inch baking dish.
- Brown the ground beef in a large skillet over medium heat until no pink remains. Drain excess fat.
- Stir the taco seasoning, black beans, and salsa into the skillet. Cook for 3 minutes until heated through.
- Spread half the beef mixture into the prepared baking dish. Sprinkle with 1 cup of the shredded cheddar cheese.
- Add the remaining beef mixture on top and finish with the rest of the cheese.
- Scatter the crushed tortilla chips evenly over the cheese layer.
- Bake for 15 to 20 minutes until the cheese is melted and the chips are lightly golden.
Extra Tips
Crush the tortilla chips by hand right before baking so they stay crisp instead of turning soggy. If you want a stronger graveyard look, press a few whole chips upright into the topping before it goes in the oven. Leftovers reheat well in a 300 degree F oven for 10 minutes to restore some crunch.Course: Main Course Cuisine: Mexican Equipment: Large skillet, 9×13 baking dish, Oven
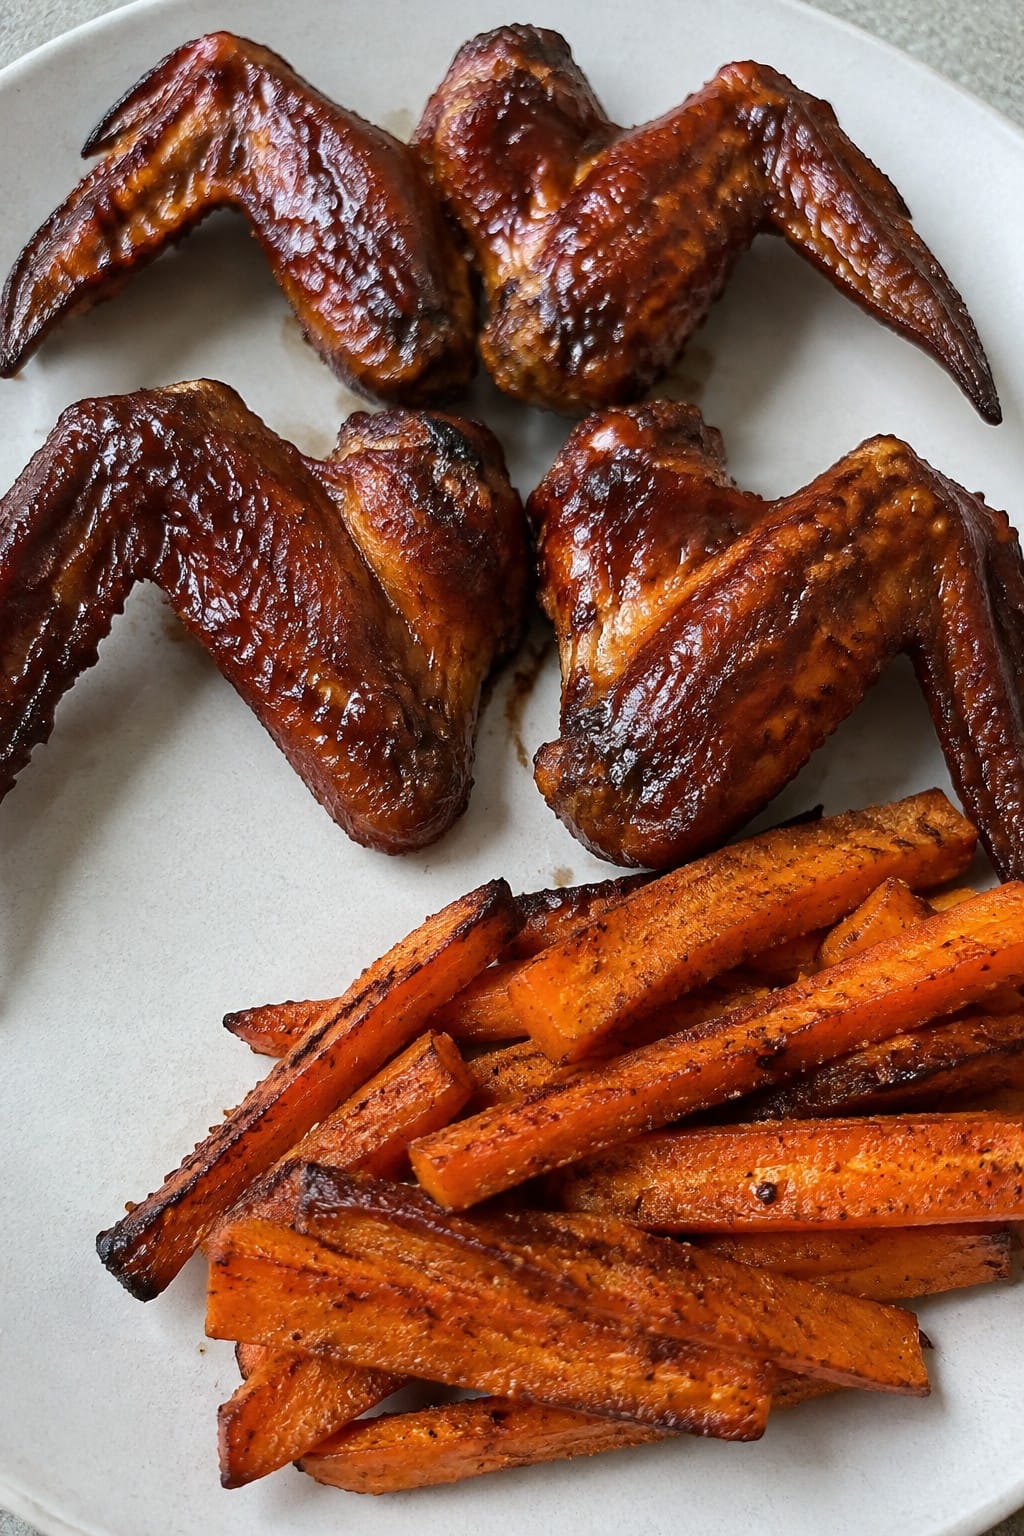
Bat-Wing Barbecue Chicken Wings with Roasted Carrot Sticks
This recipe gives chicken wings a bat-like look with a simple barbecue coating that appeals to kids and adults alike. It works well for a relaxed Halloween dinner because everything cooks on one pan and comes together without much hands-on time. The wings turn out sticky and savory while the carrots stay slightly sweet and tender.
The flavor leans smoky with a light garlic note and just enough seasoning to keep things interesting for the whole family. Roasted carrot sticks add color and balance without extra sides.
Serves 4 people.
Ingredients
- 2 pounds chicken wings
- ¾ cup barbecue sauce
- 1 pound carrots, peeled and cut into sticks
- 3 tablespoons olive oil, divided
- 1 teaspoon garlic powder
- 1 teaspoon paprika
- ½ teaspoon salt
- ¼ teaspoon black pepper
Instructions
- Preheat the oven to 400 degrees F and line a large baking sheet with parchment paper.
- Place the carrot sticks in a bowl and toss with 1 tablespoon olive oil, half the garlic powder, half the paprika, half the salt, and half the black pepper.
- Spread the carrots in a single layer on one half of the baking sheet.
- In the same bowl, toss the chicken wings with the remaining olive oil, garlic powder, paprika, salt, and black pepper.
- Arrange the wings on the other half of the baking sheet.
- Bake for 25 minutes, then remove the pan and brush the wings generously with barbecue sauce.
- Return the pan to the oven and bake for 10 more minutes until the wings are glazed and the carrots are tender.
Extra Tips
Brush the barbecue sauce on only after the first bake so it thickens without burning. If your family prefers milder flavors, use a sweet-style sauce instead of a spicy one. Leftovers reheat well in a 350-degree oven for 10 minutes to restore crisp edges on both the wings and carrots.Course: Main Course Cuisine: American Equipment: Baking sheet, Mixing bowl, Pastry brush, Oven
Frankenstein Zucchini Boats Filled with Italian Sausage
These zucchini boats turn a simple weeknight dinner into a fun Halloween activity the whole family can help with. Kids enjoy adding the olive faces while the adults handle the stovetop work. The result is tender zucchini filled with a savory sausage mixture that tastes like a cozy Italian meal.
The green skin of the zucchini stays bright after baking, which makes the black olive details stand out. Each bite gives you juicy sausage, a little tomato sauce, and melted cheese on top.

Serves 4 people.
Ingredients
- 4 medium zucchinis
- 1 pound ground Italian sausage
- 1 small onion, finely chopped
- 2 cloves garlic, minced
- 1 cup marinara sauce
- 1 cup shredded mozzarella cheese
- 8 black olives
- 1 tablespoon olive oil
- Salt and pepper
Instructions
- Heat the oven to 400°F. Cut each zucchini in half lengthwise and use a spoon to scoop out the center, leaving a sturdy shell.
- Place the zucchini halves on a baking sheet. Brush the cut sides lightly with olive oil and sprinkle with salt and pepper.
- Warm a large skillet over medium heat. Add the Italian sausage, onion, and garlic. Cook until the sausage is browned and the onion is soft, breaking up the meat as it cooks.
- Stir the marinara sauce into the skillet and let the mixture simmer for two minutes so the flavors combine.
- Spoon the sausage filling evenly into the prepared zucchini boats.
- Sprinkle mozzarella cheese over the top of each boat. Slice the black olives in half and press two halves onto each boat to form eyes.
- Bake for 20 to 25 minutes until the zucchini is tender and the cheese is melted and lightly golden.
Extra Tips
If you want to get the kids involved, let them place the olive eyes right before the boats go into the oven. The filling can be made a day ahead and kept in the fridge, then simply reheated and spooned into fresh zucchini halves at dinnertime. Leftovers reheat well in a 350°F oven for about 10 minutes.Course: Main Course Cuisine: Italian Equipment: Large Skillet, Baking Sheet, Spoon
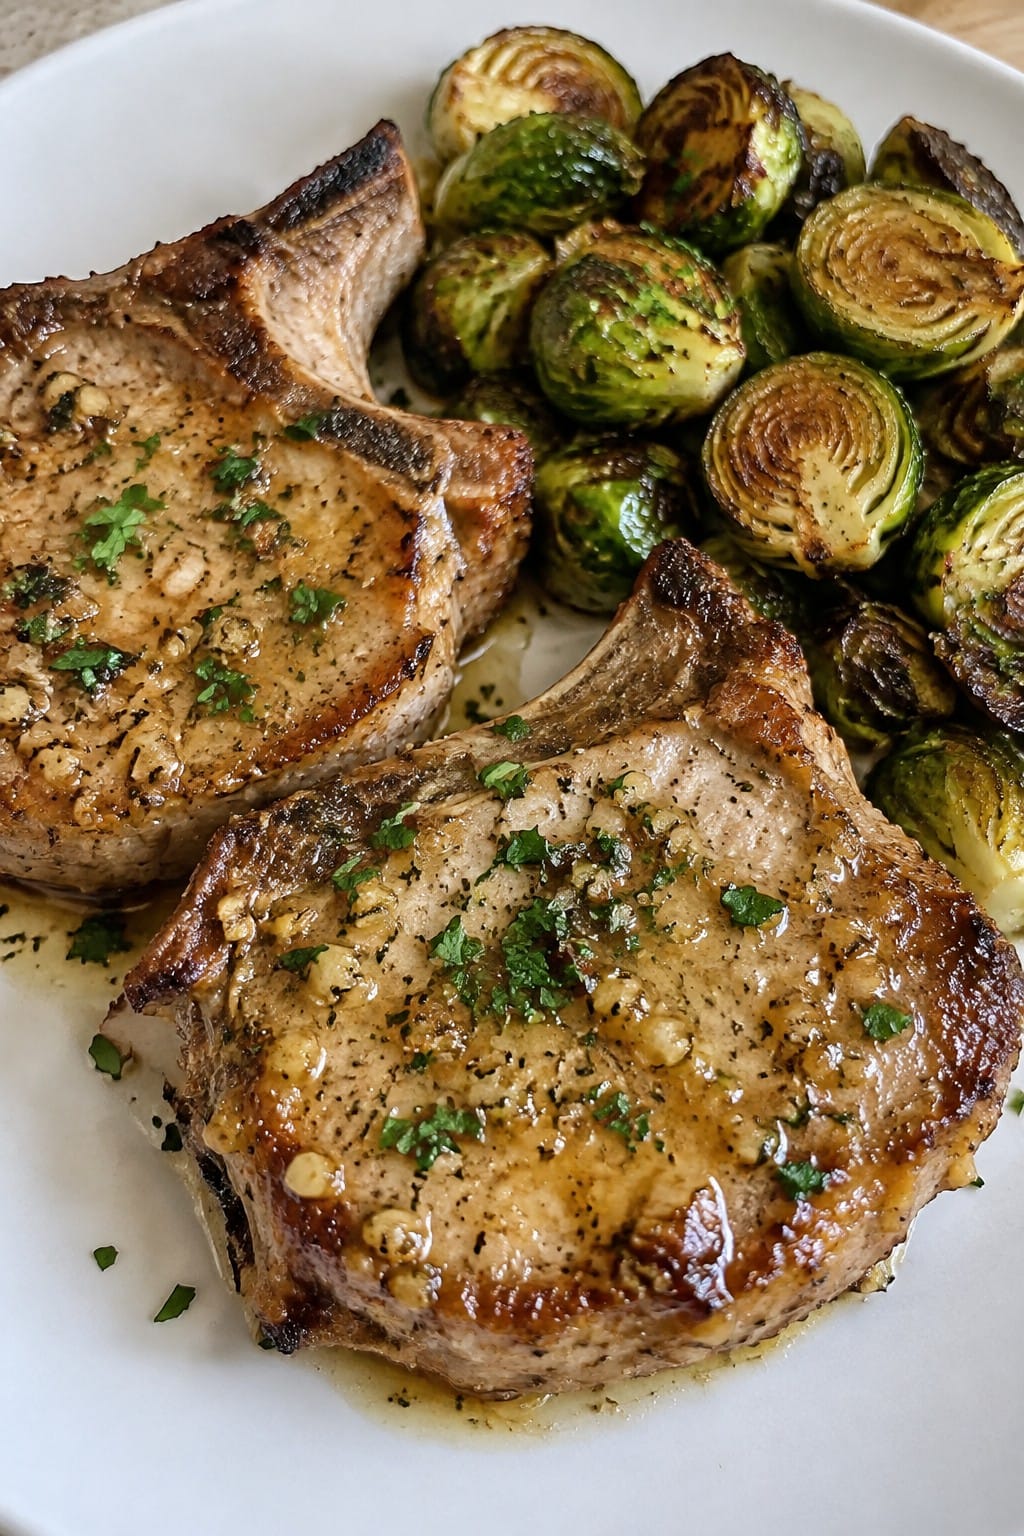
Vampire Garlic Butter Pork Chops with Roasted Brussels Sprouts
This dish gives families a fun Halloween dinner with bold garlic flavor that pairs well with tender pork. The butter sauce coats the chops while the Brussels sprouts roast until the edges turn crisp and the centers stay tender.
It suits busy weeknights or a themed meal before trick-or-treating. The simple ingredients keep prep straightforward and the results consistent for home cooks.
Serves 4 people.
Ingredients
- 4 bone-in pork chops (about 1 inch thick)
- 4 tablespoons unsalted butter
- 6 garlic cloves, minced
- 1 pound Brussels sprouts, trimmed and halved
- 2 tablespoons olive oil
- 1 teaspoon salt
- 1/2 teaspoon black pepper
- 1 teaspoon paprika
- 2 tablespoons fresh parsley, chopped
Instructions
- Heat the oven to 400 degrees. Toss the Brussels sprouts with olive oil, half the salt, and half the black pepper on a baking sheet. Spread them in a single layer and roast for 20 minutes until the edges brown.
- While the sprouts roast, season both sides of the pork chops with the remaining salt, black pepper, and paprika. Set them aside.
- Melt the butter in a large oven-safe skillet over medium heat. Add the minced garlic and cook for 1 minute until fragrant. Place the pork chops in the skillet and sear for 3 minutes per side until golden.
- Transfer the skillet to the oven and cook the chops for 8 to 10 minutes until they reach 145 degrees inside. Remove the skillet and let the chops rest for 5 minutes.
- Serve the pork chops with the roasted Brussels sprouts on the side and sprinkle the chopped parsley over both.
Extra Tips
Use bone-in chops for better flavor and moisture during the sear. If the garlic starts to brown too fast in the butter, lower the heat slightly before adding the pork. Leftovers reheat well in a covered skillet over low heat to keep the chops from drying out.Course: Main Course Cuisine: American Equipment: Large oven-safe skillet, Baking sheet, Oven
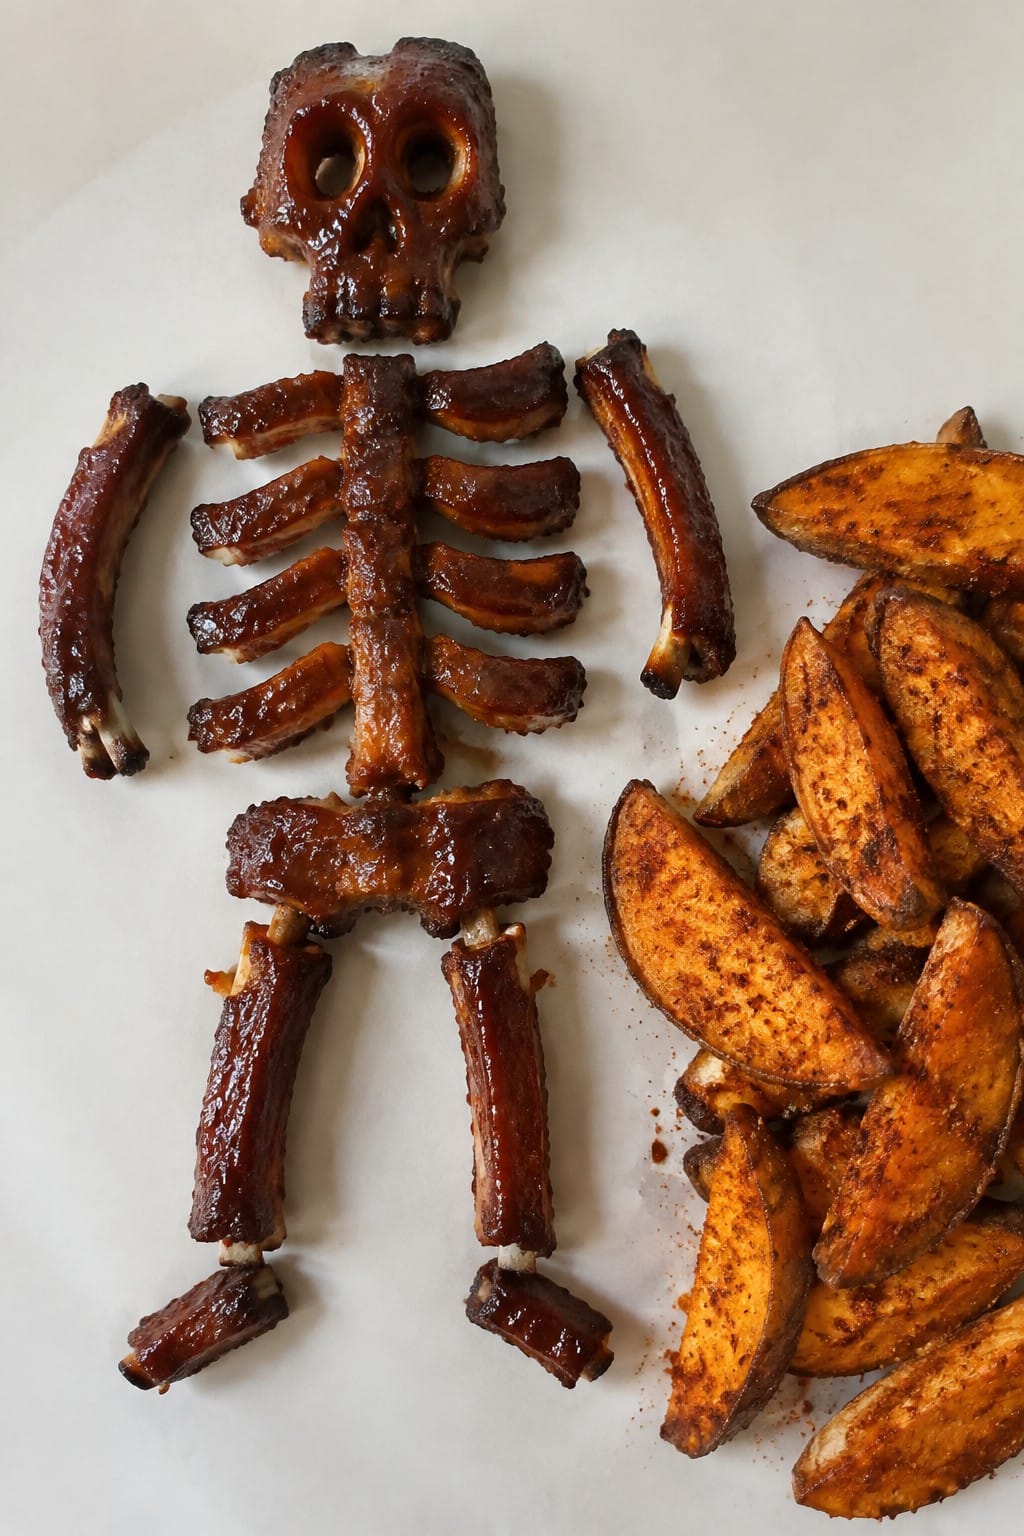
Skeleton BBQ Ribs with Sweet Potato Wedges
This recipe turns tender BBQ ribs into a fun skeleton display that fits right into a family Halloween dinner. Kids enjoy the playful presentation while everyone shares a meal with smoky, saucy ribs and crisp sweet potato wedges.
It works well for a casual evening at home when you want something hands-on but straightforward. The ribs stay juicy under a sticky glaze, and the wedges bring a natural sweetness that balances the bold barbecue flavor.
Serves 4 people.
Ingredients
- 2 racks pork baby back ribs (about 3-4 lbs total)
- 1 1/2 cups BBQ sauce
- 4 medium sweet potatoes
- 3 tablespoons olive oil
- 1 teaspoon salt
- 1/2 teaspoon black pepper
- 1 teaspoon smoked paprika
- 1/2 teaspoon garlic powder
Instructions
- Preheat the oven to 300°F. Line two baking sheets with foil or parchment paper.
- Remove the membrane from the back of each rack of ribs. Mix the salt, black pepper, smoked paprika, and garlic powder in a small bowl.
- Rub the seasoning mix evenly over both sides of the ribs. Place the ribs on one baking sheet and cover tightly with foil.
- Bake the ribs for 2 hours until tender. Remove the foil cover for the last 30 minutes.
- While the ribs bake, cut each sweet potato into 8 wedges. Toss the wedges with olive oil and the remaining seasoning mix.
- Spread the wedges on the second baking sheet. Add them to the oven for the final 30 minutes of rib cooking time, flipping once halfway through.
- Brush the ribs with BBQ sauce and return them to the oven for 10 more minutes until the sauce sets. Arrange the ribs on a platter in a skeleton shape before serving with the wedges.
Extra Tips
Cut the ribs into individual bones after baking so they are easy to pull apart and arrange like a skeleton on the serving platter. The sweet potato wedges crisp best when spread in a single layer, so use two sheets if needed. Leftovers keep in the fridge for two days and reheat well in a 350°F oven to restore crisp edges on the wedges.Course: Main Course Cuisine: American Equipment: Oven, Baking Sheet, Mixing Bowl, Tongs, Knife
Haunted Forest Chicken Stroganoff over Egg Noodles
This creamy chicken stroganoff turns a classic family favorite into a Halloween dinner with earthy mushrooms and wilted greens that give it a forest look. It comes together in one skillet and pairs the tender chicken with wide egg noodles for a meal that feels both cozy and themed.
Serve it on Halloween night when kids want something hearty before heading out. The sauce stays thick and clings well to the noodles without becoming heavy.
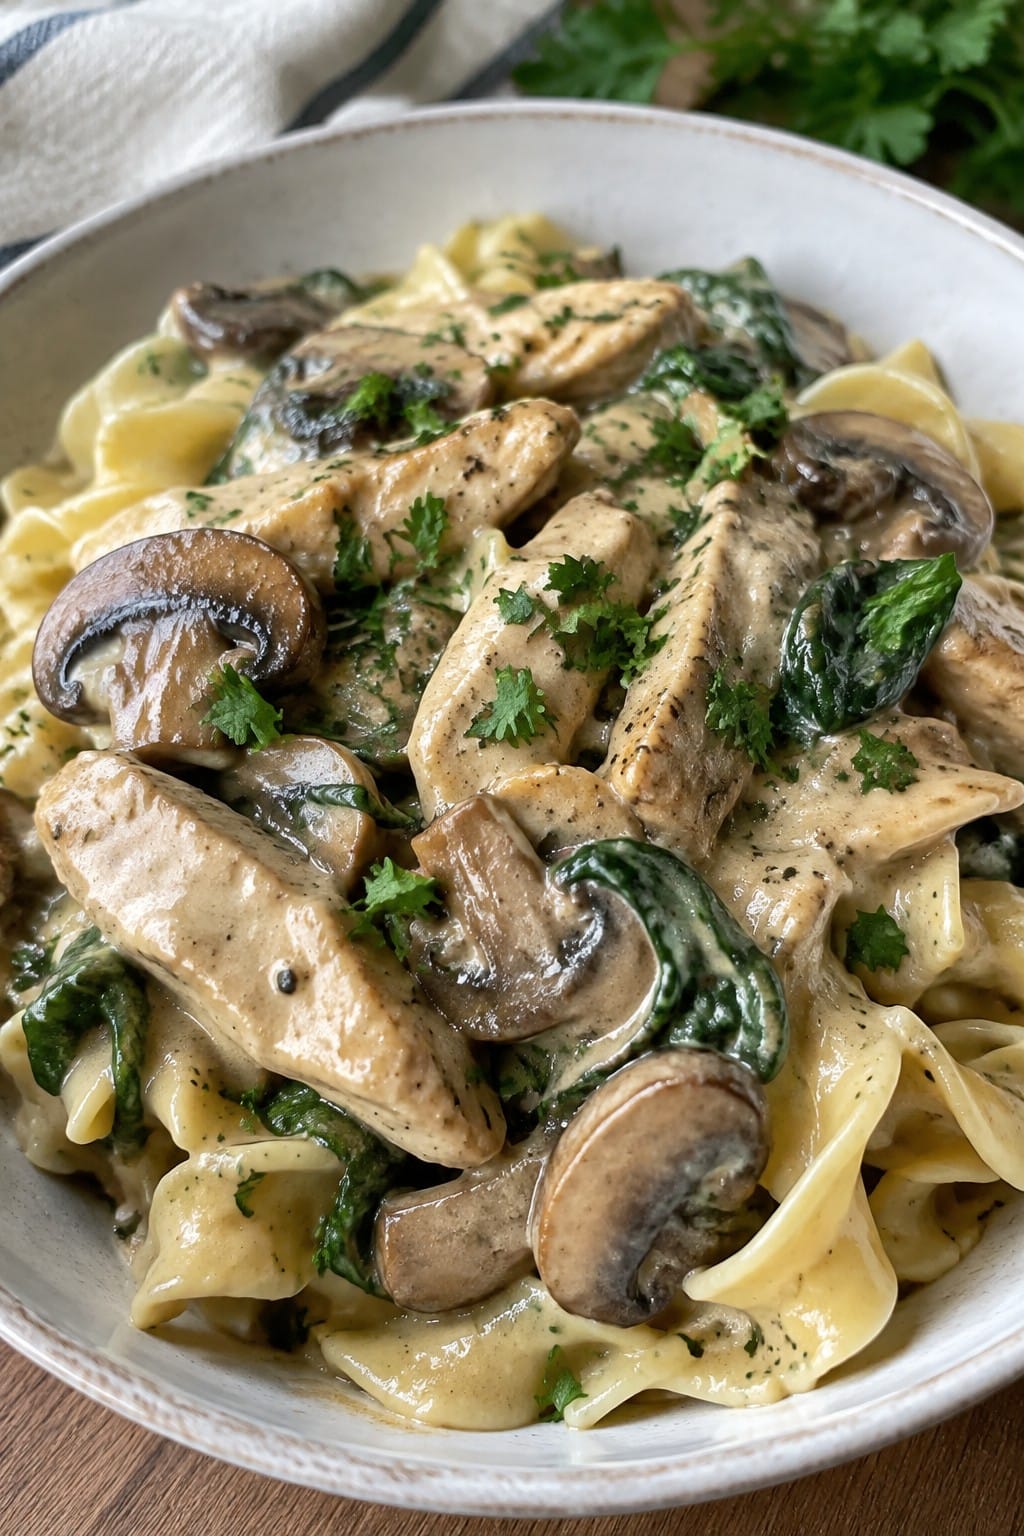
Serves 4 people.
Ingredients
- 1 lb boneless skinless chicken thighs, cut into strips
- 8 oz egg noodles
- 8 oz cremini mushrooms, sliced
- 1 medium onion, diced
- 2 garlic cloves, minced
- 1 1/2 cups chicken broth
- 1/2 cup sour cream
- 2 tbsp all-purpose flour
- 2 tbsp butter
- 2 cups baby spinach
- Salt and black pepper
- Chopped parsley for garnish
Instructions
- Bring a large pot of salted water to a boil and cook the egg noodles according to package directions. Drain and set aside.
- Melt 1 tablespoon of butter in a large skillet over medium heat. Add the chicken strips, season with salt and pepper, and cook until browned and cooked through. Remove the chicken to a plate.
- Add the remaining tablespoon of butter to the same skillet. Stir in the mushrooms, onion, and garlic. Cook until the mushrooms release their liquid and the onion softens.
- Sprinkle the flour over the mushroom mixture and stir for one minute. Slowly pour in the chicken broth while stirring to avoid lumps.
- Return the chicken to the skillet and simmer for 3 to 4 minutes until the sauce thickens. Reduce the heat to low and stir in the sour cream until smooth.
- Add the baby spinach and stir just until it wilts. Season with additional salt and pepper if needed.
- Divide the cooked egg noodles among four plates and spoon the chicken stroganoff over the top. Sprinkle with chopped parsley before serving.
Extra Tips
Stir the spinach in at the very end so it stays bright green instead of turning dull. If the sauce thickens too much while sitting, add a splash of broth to loosen it before serving. Leftovers reheat well in a skillet over low heat with a little extra broth to restore the creamy texture.Course: Main Course Cuisine: American Equipment: Large Skillet, Large Pot, Colander
Pumpkin Patch Shepherd’s Pie with Ground Beef
This version of shepherd’s pie brings pumpkin into the mashed potato topping for a fall twist that fits right into a family Halloween meal. The ground beef filling stays hearty and savory while the pumpkin adds a soft orange color and gentle sweetness on top. It works well on busy weeknights when you want something warm and filling that still feels a little festive.
The dish gives you tender beef and vegetables under a creamy layer that browns nicely in the oven. Kids often enjoy the mild pumpkin flavor mixed into the potatoes, and the whole meal comes together in one baking dish for easy cleanup.
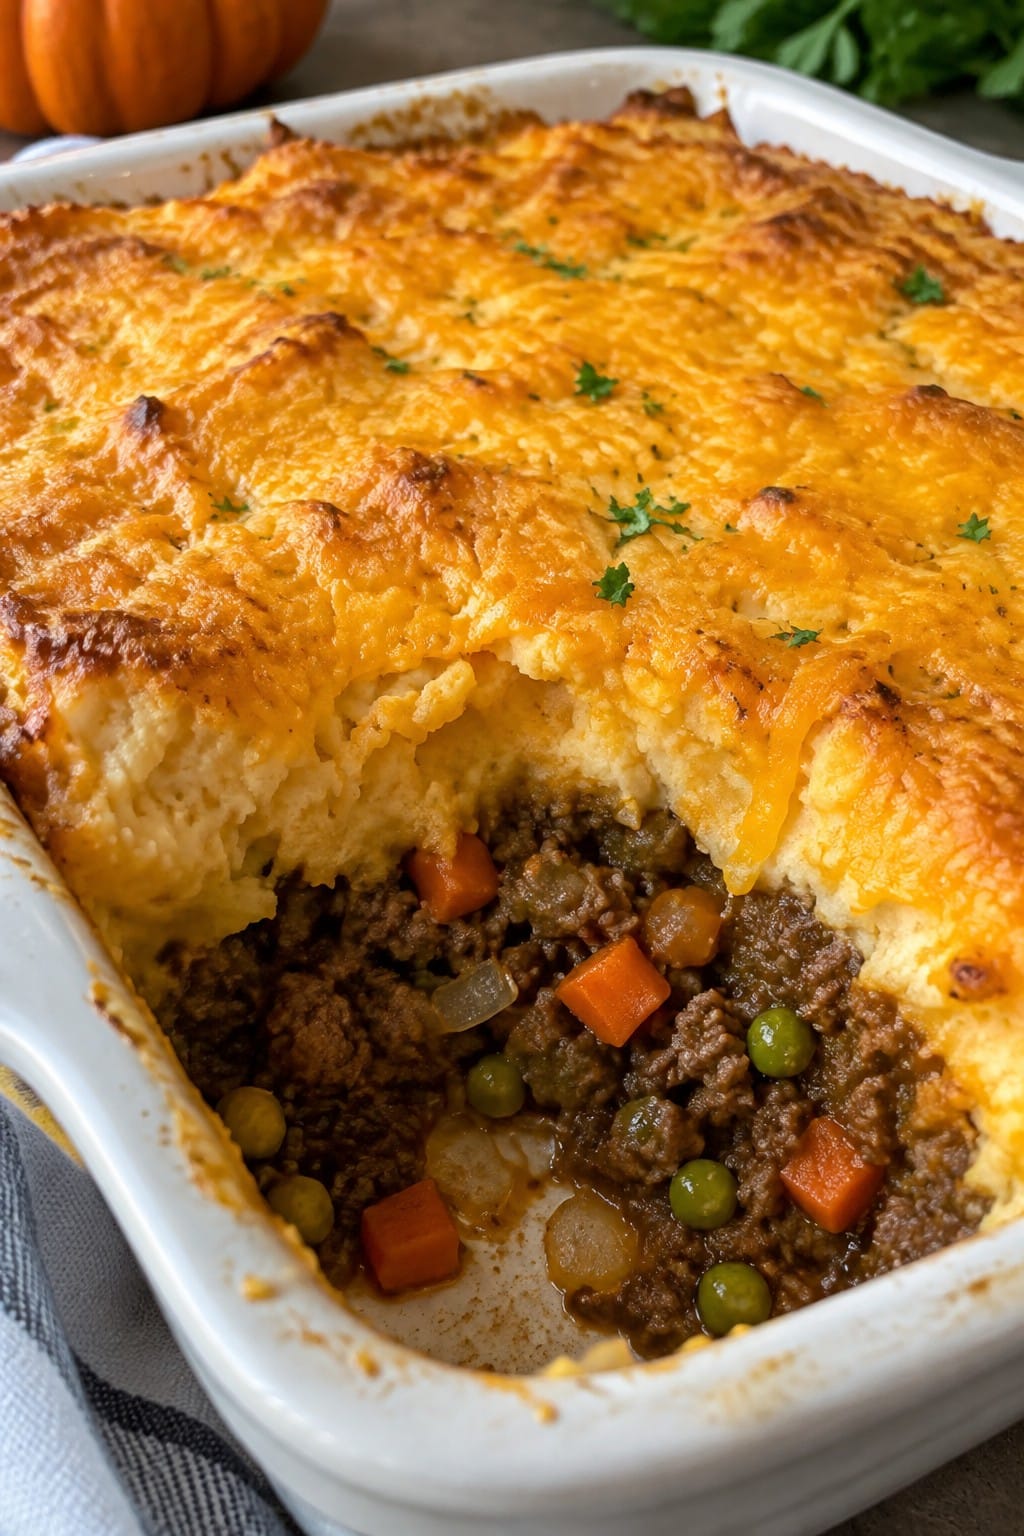
Serves 4 people.
Ingredients
- 1 pound ground beef
- 1 medium onion, diced
- 2 carrots, peeled and diced
- 2 cloves garlic, minced
- 1 tablespoon Worcestershire sauce
- 1 cup beef broth
- 1 cup frozen peas
- 4 large russet potatoes, peeled and cubed
- 1 cup pumpkin puree
- 1/4 cup milk
- 2 tablespoons butter
- 1/2 teaspoon dried thyme
- Salt and pepper to taste
- 1/2 cup shredded cheddar cheese
Instructions
- Heat a large skillet over medium heat. Add the ground beef and cook until browned, breaking it up with a spoon as it cooks. Drain excess fat if needed.
- Add the diced onion, carrots, and minced garlic to the skillet. Cook for 5 minutes until the vegetables start to soften.
- Stir in the Worcestershire sauce, beef broth, frozen peas, and dried thyme. Season with salt and pepper. Simmer for 8 minutes until the liquid reduces slightly. Remove from heat.
- While the filling simmers, place the cubed potatoes in a large pot and cover with water. Bring to a boil and cook for 12 minutes until tender. Drain well.
- Return the potatoes to the pot. Add the pumpkin puree, milk, and butter. Mash until smooth. Season with salt and pepper.
- Preheat the oven to 400 degrees. Spread the beef mixture evenly in a baking dish. Spoon the pumpkin mashed potatoes over the top and spread to cover. Sprinkle with shredded cheddar cheese.
- Bake for 20 minutes until the topping is lightly golden and the filling bubbles at the edges. Let it rest for 5 minutes before serving.
Extra Tips
Mash the potatoes while they are still hot so the pumpkin mixes in smoothly without lumps. If the filling seems dry after simmering, add a splash more broth before transferring it to the dish. Leftovers reheat well in the oven at 350 degrees with a cover to keep the topping from drying out.Course: Main Course Cuisine: American Equipment: Large skillet, Large pot, Baking dish, Potato masher
Monster Mash Turkey Chili with Cornbread Muffins
This turkey chili brings a hearty, spiced base that pairs with sweet cornbread muffins for a balanced family meal. It works well on cooler evenings when you want something filling that everyone can eat together without much fuss. The chili has a thick texture from beans and tomatoes, while the muffins add a soft, crumbly contrast.
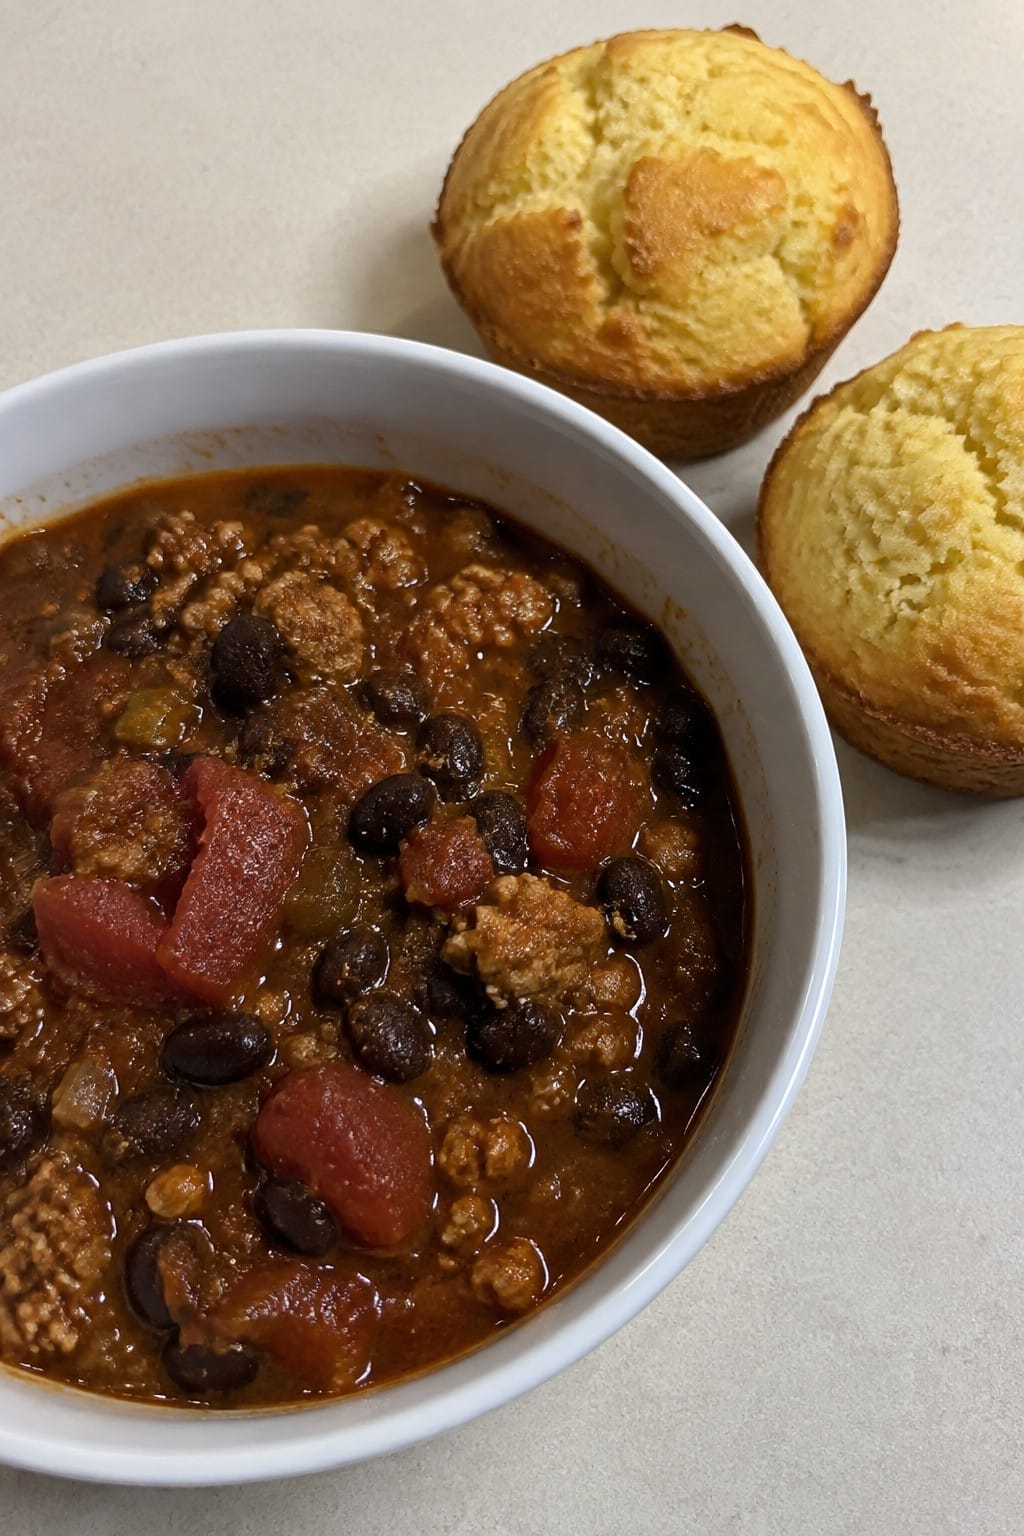
Serves 4 people.
Ingredients
- 1 pound ground turkey
- 1 medium onion, diced
- 3 cloves garlic, minced
- 2 tablespoons chili powder
- 1 teaspoon ground cumin
- 1 can (15 ounces) black beans, drained and rinsed
- 1 can (14.5 ounces) diced tomatoes
- 1 cup cornmeal
- 1 cup all-purpose flour
- 1 tablespoon baking powder
- 1 cup milk
- 1 large egg
- 1/4 cup unsalted butter, melted
- Salt to taste
Instructions
- Heat a large pot over medium heat and add the ground turkey. Cook until browned, breaking it up with a spoon as it cooks.
- Add the diced onion and minced garlic to the pot. Stir and cook for 3 to 4 minutes until the onion softens.
- Stir in the chili powder, cumin, and a pinch of salt. Cook for 1 minute to toast the spices.
- Pour in the black beans and diced tomatoes. Bring the mixture to a simmer and cook for 15 minutes, stirring occasionally, until the chili thickens.
- While the chili simmers, preheat the oven to 400 degrees and line a muffin tin with paper liners.
- In a mixing bowl, combine the cornmeal, flour, baking powder, and a pinch of salt. In a separate bowl, whisk together the milk, egg, and melted butter.
- Pour the wet ingredients into the dry ingredients and stir just until combined. Spoon the batter evenly into the muffin tin.
- Bake the muffins for 15 to 18 minutes until a toothpick inserted in the center comes out clean. Serve the muffins warm with the chili.
Extra Tips
Make the chili a day ahead and reheat it gently on the stove to let the flavors settle. If the chili thickens too much during storage, add a splash of water when warming. The muffins taste best fresh but can be wrapped and stored at room temperature for one day.Course: Main Course Cuisine: American Equipment: Large pot, Muffin tin, Mixing bowls
Ghostly Baked Chicken Parmesan with Spaghetti
This baked chicken parmesan turns a family favorite into a Halloween dinner with simple ghost shapes made from mozzarella. It keeps the meal comforting while adding a light seasonal touch that kids can help create.
The chicken stays crisp under a layer of sauce and melted cheese. Spaghetti underneath catches all the flavors so every bite feels complete.
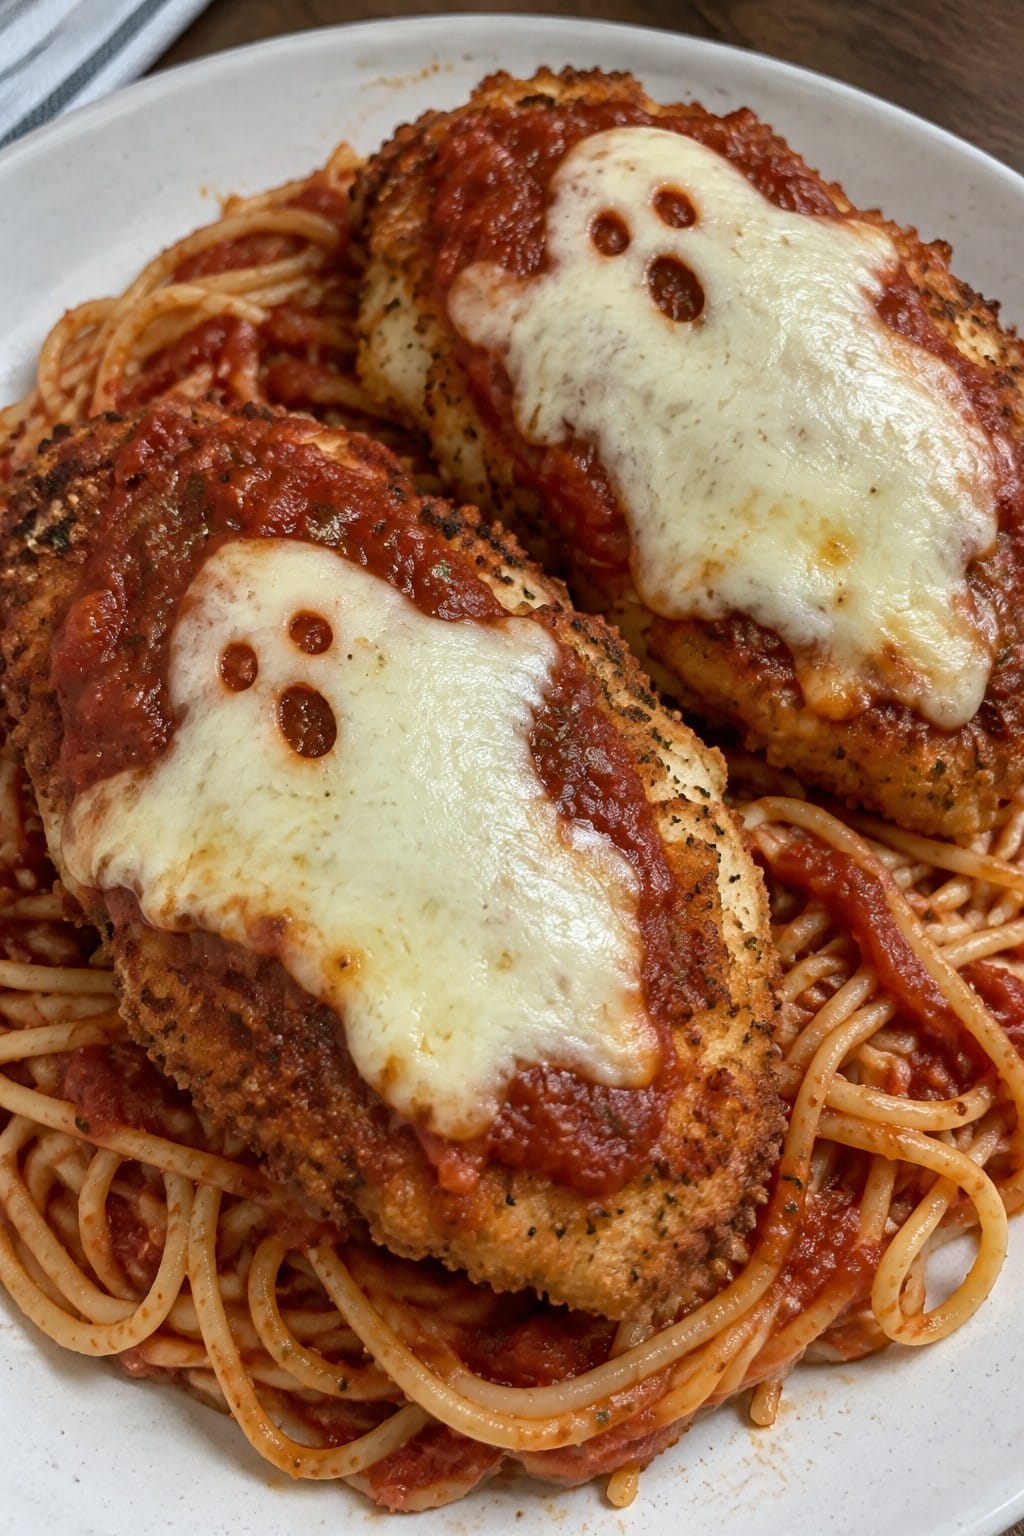
Serves 4 people.
Ingredients
- 4 boneless skinless chicken breasts
- 1 cup Italian breadcrumbs
- 1/2 cup grated Parmesan cheese
- 2 large eggs
- 2 cups marinara sauce
- 8 ounces fresh mozzarella cheese
- 12 ounces spaghetti
- 1 tablespoon olive oil
- Salt and pepper to taste
Instructions
- Preheat the oven to 400 degrees and line a baking sheet with parchment paper.
- Pound the chicken breasts to even thickness and season both sides with salt and pepper.
- Beat the eggs in a shallow bowl. Mix the breadcrumbs and Parmesan cheese in a second shallow bowl.
- Dip each chicken breast in the egg, then coat it in the breadcrumb mixture. Place the coated pieces on the baking sheet.
- Drizzle the olive oil over the chicken. Bake for 20 minutes.
- Remove the pan from the oven and spoon marinara sauce over each piece. Cut the mozzarella into ghost shapes and lay one on top of each chicken breast.
- Return the pan to the oven and bake for 10 more minutes until the cheese melts and the chicken reaches 165 degrees.
- While the chicken finishes, cook the spaghetti in salted water according to package directions and drain.
- Serve the chicken over the spaghetti with extra marinara on the side.
Extra Tips
Slice the mozzarella while it is still cold so the ghost shapes hold their edges. If the cheese browns too quickly in the last minutes, loosely cover the pan with foil. Leftovers reheat well in a 350 degree oven for 10 minutes to keep the coating crisp.Course: Main Course Cuisine: Italian Equipment: Baking sheet, Large pot, Shallow bowls
Cauldron Vegetable Curry with Coconut Rice
This curry turns a simple pot of vegetables into a fun centerpiece for Halloween dinner. Families can gather around a bubbling dish filled with colorful produce and gentle spices that appeal to both kids and adults.
The coconut rice brings a mild creaminess that softens the curry’s warmth. Together they create a filling meal with soft vegetables and a lightly sweet rice base.

Serves 4 people.
Ingredients
- 1 tablespoon olive oil
- 1 onion, diced
- 3 cloves garlic, minced
- 1 tablespoon fresh ginger, grated
- 2 carrots, peeled and sliced
- 2 medium potatoes, cubed
- 1 red bell pepper, chopped
- 1 can (15 oz) chickpeas, drained and rinsed
- 2 tablespoons curry powder
- 1 teaspoon turmeric
- 1 can (14 oz) coconut milk
- 2 cups fresh spinach
- 1.5 cups jasmine rice
- 1 can (14 oz) coconut milk
- 1 cup water
- Salt to taste
- Fresh cilantro, chopped
Instructions
- Heat the olive oil in a large pot over medium heat. Add the onion and cook until it softens.
- Stir in the garlic and ginger. Cook for one minute until fragrant.
- Add the carrots, potatoes, and red bell pepper. Stir to coat the vegetables with the oil and spices.
- Sprinkle in the curry powder and turmeric. Cook for another minute to toast the spices.
- Pour in one can of coconut milk and add the chickpeas. Bring the mixture to a gentle simmer. Cover and cook for 20 minutes until the potatoes are tender.
- Stir in the spinach and cook just until it wilts. Add salt to taste and remove the pot from the heat.
- While the curry simmers, rinse the jasmine rice under cold water. Place it in a medium saucepan with the second can of coconut milk, water, and a pinch of salt.
- Bring the rice to a boil, then reduce to low heat. Cover and cook for 15 minutes until the liquid is absorbed. Fluff with a fork and let it rest for 5 minutes.
- Spoon the rice into bowls and top with the curry. Finish with chopped cilantro.
Extra Tips
Make the curry a day ahead so the flavors can deepen overnight. Reheat it gently on the stove with a splash of water if it thickens too much. If your family prefers milder food, reduce the curry powder by half and let everyone add extra at the table. The spinach wilts quickly, so add it only at the end to keep its color bright.Course: Main Course Cuisine: Indian Equipment: Large pot, Medium saucepan, Cutting board, Knife
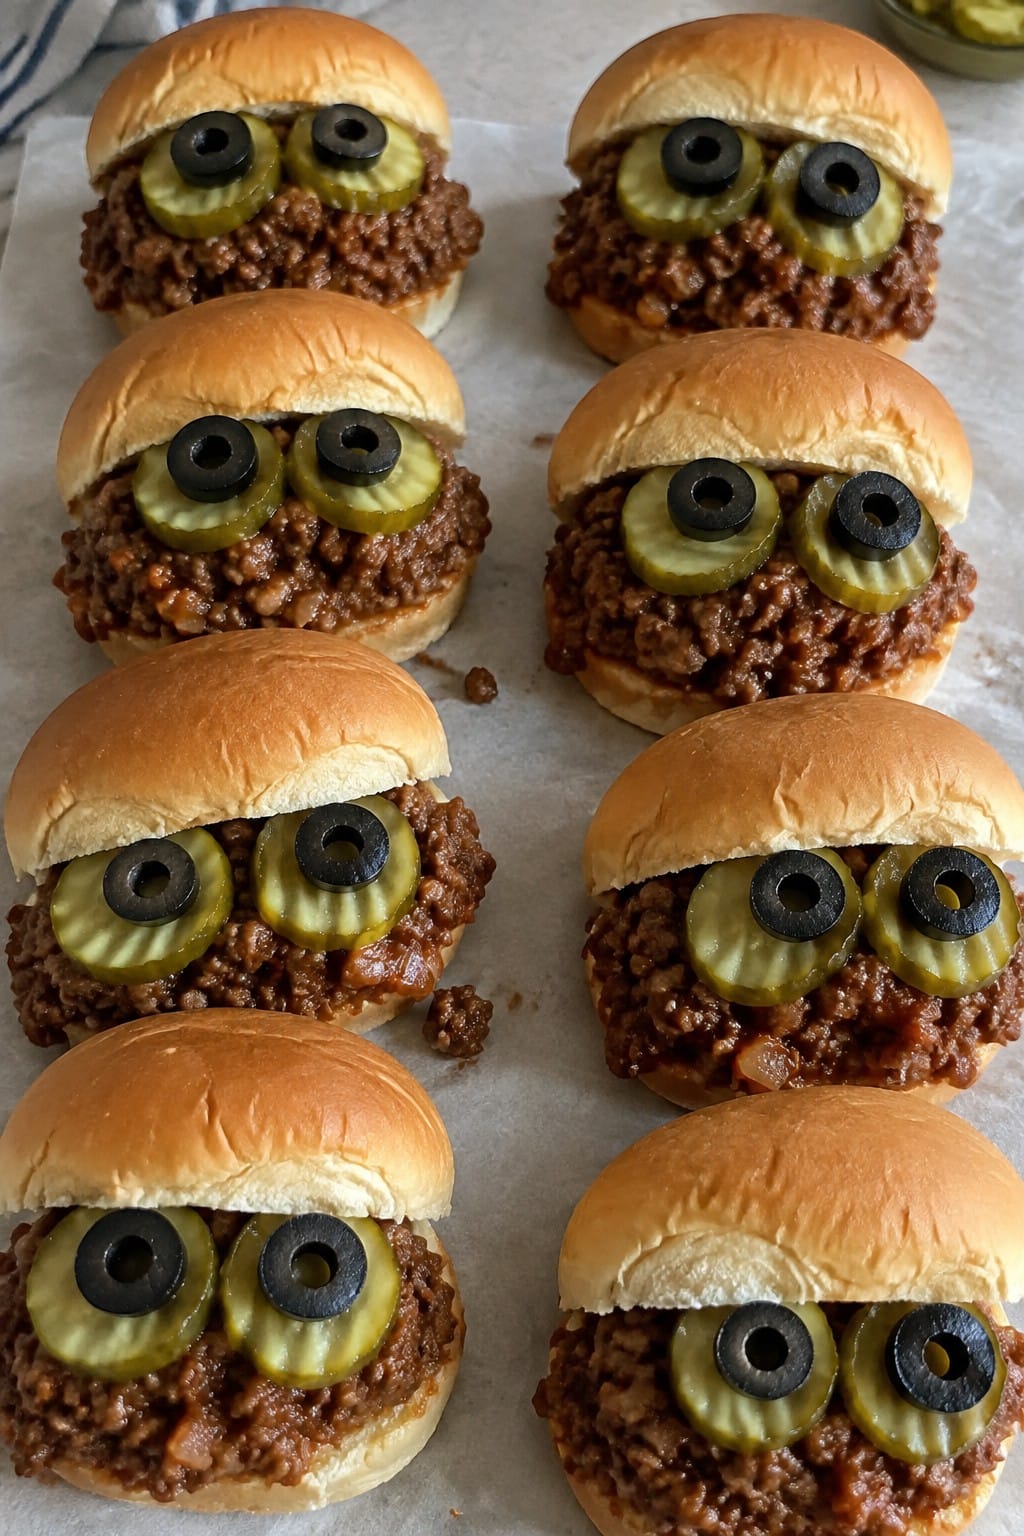
Creepy Crawly Sloppy Joe Sliders with Pickle Eyes
These sliders turn a weeknight favorite into a simple Halloween dinner that kids can help assemble. The hearty beef mixture stays mild and familiar while the pickle eyes add a playful touch that fits right into a family meal.
The soft buns hold up well to the thick filling, and the cool pickles give a nice contrast to the warm, tangy meat. Serve them when you want something quick that still feels themed for the holiday.
Serves 4 people.
Ingredients
- 1 pound ground beef
- 1 small onion, diced
- 2 cloves garlic, minced
- 1 cup tomato sauce
- 1/4 cup ketchup
- 2 tablespoons brown sugar
- 1 tablespoon yellow mustard
- 1 tablespoon Worcestershire sauce
- 8 slider buns
- 16 dill pickle slices
- 16 black olives, sliced
Instructions
- Brown the ground beef in a large skillet over medium heat, breaking it up as it cooks. Add the diced onion and minced garlic, stirring until the onion softens.
- Stir in the tomato sauce, ketchup, brown sugar, yellow mustard, and Worcestershire sauce. Lower the heat and let the mixture simmer for 8 to 10 minutes until it thickens.
- Split the slider buns and place the bottoms on a serving tray. Spoon the beef mixture evenly onto each bun.
- Top each slider with two dill pickle slices. Place one black olive slice in the center of each pickle slice to create the eyes.
- Add the top buns and serve right away while the filling is warm.
Extra Tips
Simmer the beef mixture a few extra minutes if it seems loose so it stays on the buns. The olive slices can be swapped for whole pitted olives cut in half if you want larger pupils. Leftovers keep in the fridge for two days and reheat well in a covered skillet with a splash of water to loosen the sauce.Course: Main Course Cuisine: American Equipment: Large skillet, Wooden spoon, Measuring cups
