

Halloween is just around the corner, and I’ve crafted a delightful lineup of 14 finger foods that will make your kids’ taste buds dance with excitement. From Monster Eyeball Tacos to Witch’s Broomstick Snacks, these treats are not only fun but delicious too. Picture the joy on their faces as they munch on Spider Web Pizza or savor Dracula’s Donut Holes. These spook-tacular bites are sure to be a hit at your Halloween gathering. Let’s explore this tasty adventure together!
Monster Eyeball Tacos

Monster Eyeball Tacos are a spooky yet delightful treat perfect for Halloween festivities with kids. These tacos aren’t only eerie in appearance, but also scrumptious and packed with flavor. Easy to assemble and full of fun ingredients, Monster Eyeball Tacos are sure to be a hit at any Halloween gathering. The children will especially enjoy the creativity involved in making these ghoulish goodies, which can be customized with their favorite toppings.
The key to making these Monster Eyeball Tacos is using a variety of colorful ingredients that mimic the look of monster eyes. By using a combination of ground beef, taco shells, and vibrant toppings, you can create an engaging culinary experience for your little ones. Whether you’re hosting a Halloween party or simply looking for a fun dinner idea, these tacos are a fantastic way to celebrate the spooky season.
Below, you’ll find a complete list of ingredients and detailed instructions to help you make this unique dish for a serving size of 4-6 people.
Ingredients:
- 1 pound ground beef
- 1 packet taco seasoning mix
- 1 cup water
- 8-10 taco shells
- 1 cup shredded lettuce
- 1 cup diced tomatoes
- 1 cup shredded cheddar cheese
- 1/2 cup sour cream
- 1/2 cup sliced black olives
- 1/2 cup guacamole
- 12-18 grape tomatoes
- 12-18 mozzarella balls (bocconcini)
- 1 small jar of salsa
Instructions:
- Prepare the Ground Beef: In a large skillet, brown the ground beef over medium heat until fully cooked. Drain any excess fat. Add the taco seasoning mix and water to the skillet, stirring to combine. Let the mixture simmer for about 5 minutes until thickened.
- Prepare Taco Shells: While the beef is cooking, preheat the oven to 350°F (175°C). Arrange the taco shells on a baking sheet and warm them in the oven for about 5 minutes until crisp.
- Assemble the Tacos: Once the taco shells are ready, evenly divide the seasoned beef among them. Add shredded lettuce, diced tomatoes, and shredded cheddar cheese to each taco.
- Create Monster Eyes: For each taco, place a dollop of sour cream in the center. Press a mozzarella ball into the sour cream to create the eyeball effect. Top each mozzarella ball with a sliced black olive to form the pupil. For added effect, use grape tomatoes as additional eyeballs alongside mozzarella balls.
- Add Guacamole and Salsa: Add a spoonful of guacamole and a touch of salsa around the monster eyes to enhance the flavor and create a colorful presentation.
- Serve and Enjoy: Serve the Monster Eyeball Tacos immediately while they’re warm. Allow the kids to enjoy assembling their own tacos with any additional toppings they prefer.
Extra Tips:
When making Monster Eyeball Tacos, consider using brightly colored plates or serving platters to enhance the Halloween theme. If you’re serving these at a party, set up a ‘taco bar’ with all the toppings and let kids customize their own tacos.
To save time, you can prepare the beef mixture in advance and simply reheat before serving. Feel free to experiment with different toppings and ingredients to suit the preferences of your little monsters!
Mummy Dogs

Mummy Dogs are a fun and spooky finger food perfect for a Halloween party. They’re easy to make and a surefire hit with kids and adults alike. These delightful treats are fundamentally hot dogs wrapped in pastry to resemble mummies, complete with mustard or ketchup eyes. They aren’t only tasty but also visually appealing, adding a playful element to your Halloween festivities.
These Mummy Dogs require minimal ingredients and are quick to prepare, making them an ideal choice for busy parents looking to whip up a festive snack. Whether you’re hosting a Halloween bash or just want to surprise your little ones with a themed snack, these Mummy Dogs are sure to bring smiles and satisfy everyone’s taste buds. The combination of the savory hot dog and the flaky pastry is irresistible, making it a popular choice at any gathering.
Ingredients (Serves 4-6)
- 1 pack of refrigerated crescent roll dough
- 8 hot dogs
- Ketchup or mustard (for decoration)
Cooking Instructions
- Preheat the Oven: Start by preheating your oven to 375°F (190°C). This will guarantee your Mummy Dogs cook evenly and have a nice, golden-brown color.
- Prepare the Dough: Unroll the crescent roll dough and separate it into individual triangles. Using a knife or a pizza cutter, slice each triangle into long, thin strips. These strips will be used to wrap the hot dogs, creating the mummy effect.
- Wrap the Hot Dogs: Take a hot dog and begin wrapping it with the dough strips. Start at one end and work your way to the other, leaving small gaps to resemble the bandages of a mummy. Be sure to leave a small space uncovered at one end of the hot dog to create a face for the mummy.
- Bake the Mummy Dogs: Place the wrapped hot dogs on a baking sheet lined with parchment paper. Bake in the preheated oven for about 12-15 minutes, or until the dough is golden brown and fully cooked.
- Add the Eyes: Once the Mummy Dogs are baked and slightly cooled, use ketchup or mustard to dot on eyes in the exposed area of the hot dog. A toothpick or small piping bag can help in applying the condiments precisely.
- Serve and Enjoy: Serve the Mummy Dogs warm with additional ketchup or mustard for dipping. They’re perfect as a snack or part of a Halloween-themed meal.
Extra Tips
For added flavor, consider using cheese-filled hot dogs or adding a slice of cheese beneath the dough before wrapping. If you’re catering to children who might prefer milder flavors, opt for turkey or chicken hot dogs.
You can also get creative by using food coloring to tint the dough or add edible googly eyes for an extra spooky touch. Preparing the dough strips in advance can save time, especially if you’re making a large batch for a party.
Witch’s Broomstick Snacks
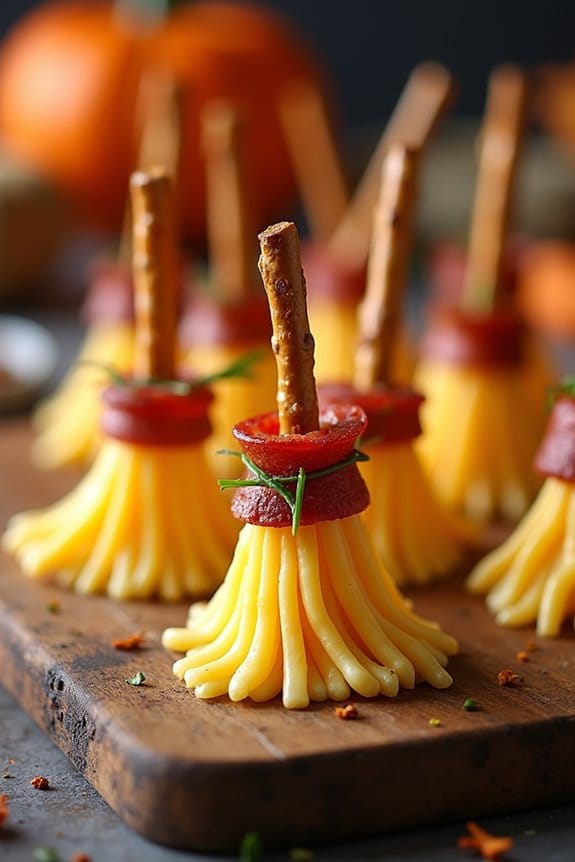
Halloween is a time filled with creativity and fun, and what better way to delight your little ones than with a spooky and delicious treat like Witch’s Broomstick Snacks? These charming snacks aren’t only easy to make but also a hit with kids, offering a perfect combination of savory flavors and playful presentation. They add a touch of magic to any Halloween gathering, making them a must-have on your party menu.
Plus, with minimal ingredients and effort, you can whip up a batch of these broomsticks in no time, keeping both kids and adults enchanted.
The beauty of Witch’s Broomstick Snacks lies in their simplicity and versatility. You can customize the ingredients to suit your taste preferences or dietary needs, making them an inclusive treat. Whether you’re hosting a Halloween party or simply looking for a fun activity to do with your kids, these broomsticks are sure to cast a delightful spell.
Here’s how to make Witch’s Broomstick Snacks for 4-6 people.
Ingredients:
- 12 pretzel sticks
- 6 string cheese sticks
- 12 fresh chives
- Optional: 12 slices of pepperoni or turkey slices
Cooking Instructions:
- Prepare the Cheese: Unwrap the string cheese and cut each stick in half to create two shorter sticks. These will serve as the base of your broomstick.
- Create the Broom Bristles: Take each half of the string cheese and carefully peel one end into thin strips about two-thirds of the way up the stick to mimic broom bristles.
- Assemble the Broom: Insert a pretzel stick into the unpeeled end of the string cheese. Make sure it’s secure but gentle to avoid breaking the pretzel.
- Tie the Broom Handle: Take a chive and wrap it around the top of the cheese bristles where it meets the pretzel stick. Tie it securely in a knot. If the chives are too short or delicate, consider moistening them slightly to make them more pliable.
- Add a Savory Twist (Optional): For an added savory flavor, wrap a slice of pepperoni or turkey around the top of the cheese, just beneath the chive. Secure it gently to create a more visually appealing broom.
- Serve and Enjoy: Arrange the broomstick snacks on a platter and serve them immediately for the freshest experience. They can be enjoyed as is or with a dip of your choice.
Extra Tips:
When making Witch’s Broomstick Snacks, make certain you use fresh and pliable chives, as older ones can be brittle and difficult to tie without breaking.
If you don’t have chives, thin strips of green onion can serve as a substitute. For a fun activity with kids, let them help peel the cheese into bristles and tie the chives, turning the preparation into part of the Halloween festivities.
Finally, if you need to make these in advance, store them in the refrigerator and cover them lightly to maintain their freshness, but aim to assemble them as close to serving time as possible for ideal texture.
Spider Web Pizza
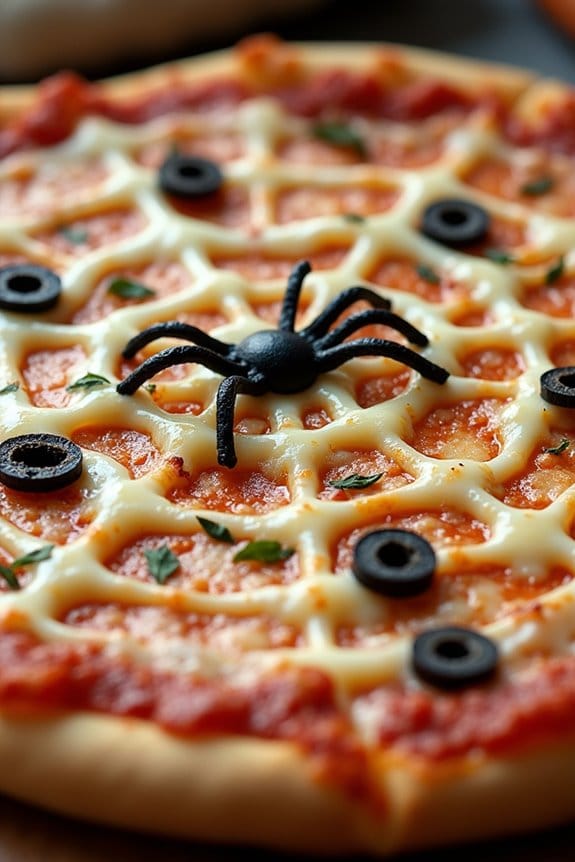
Spider Web Pizza is a delightful and spooky treat that’s perfect for a Halloween party, especially when entertaining kids. This fun finger food combines the classic flavors of pizza with a creative twist that captivates young imaginations. By arranging cheese and toppings in a way that resembles a spider web, you can transform a simple pizza into a festive and eerie centerpiece for any Halloween gathering. Kids will love the novelty of the design, while adults can appreciate the simplicity and deliciousness of this dish.
To create Spider Web Pizza, you’ll begin with a basic pizza dough and top it with your favorite sauce and cheese. The key to achieving the spider web effect lies in the careful arrangement of mozzarella cheese strings and olives, which create the web and spider look. This recipe is designed to serve 4-6 people, making it an ideal choice for small parties or family gatherings. The preparation is straightforward and perfect for getting kids involved in the kitchen, allowing them to express their creativity as they help craft this spooky snack.
Ingredients for 4-6 servings:
- 1 pre-made pizza dough
- 1 cup pizza sauce
- 2 cups shredded mozzarella cheese
- 8 mozzarella cheese sticks
- 1/2 cup sliced black olives
- 1/4 cup sliced green bell pepper (optional)
- 1/4 cup sliced mushrooms (optional)
- 1/4 cup pepperoni slices (optional)
- Cooking spray or olive oil for greasing
Cooking Instructions:
- Preheat the Oven: Start by preheating your oven to 425°F (220°C). Grease a pizza pan or baking sheet lightly with cooking spray or olive oil to prevent the dough from sticking.
- Prepare the Dough: Roll out the pizza dough on a lightly floured surface to fit your prepared pizza pan or baking sheet. Stretch it to the desired thickness, keeping the edges slightly thicker to form a crust.
- Add the Sauce and Base Cheese: Spread the pizza sauce evenly over the dough, leaving a small border around the edges for the crust. Sprinkle the shredded mozzarella cheese evenly over the sauce.
- Create the Spider Web: Break the mozzarella cheese sticks into thin strands. Arrange the strands on top of the pizza in a circular pattern, starting from the center and working outward, to resemble a spider web.
- Add Toppings: Place the sliced black olives strategically to mimic spiders on the web. Add any additional toppings like green bell peppers, mushrooms, or pepperoni, as desired.
- Bake the Pizza: Place the pizza in the preheated oven and bake for 12-15 minutes, or until the crust is golden brown and the cheese is melted and bubbly.
- Cool and Serve: Once baked, remove the pizza from the oven and let it cool for a few minutes. Slice into wedges and serve warm.
Extra Tips:
To guarantee the spider web design stands out, use fresh mozzarella cheese sticks, which are easier to pull apart and arrange. If you want to make the pizza even spookier, consider using cookie cutters to shape pepperoni slices into bat or pumpkin shapes.
Additionally, you can experiment with different cheese varieties, such as cheddar or provolone, to add more flavor and color to the pizza. Encourage kids to get involved by letting them arrange the “spiders” and “webs,” making the cooking process a fun and interactive experience.
Ghostly Cheese Pops
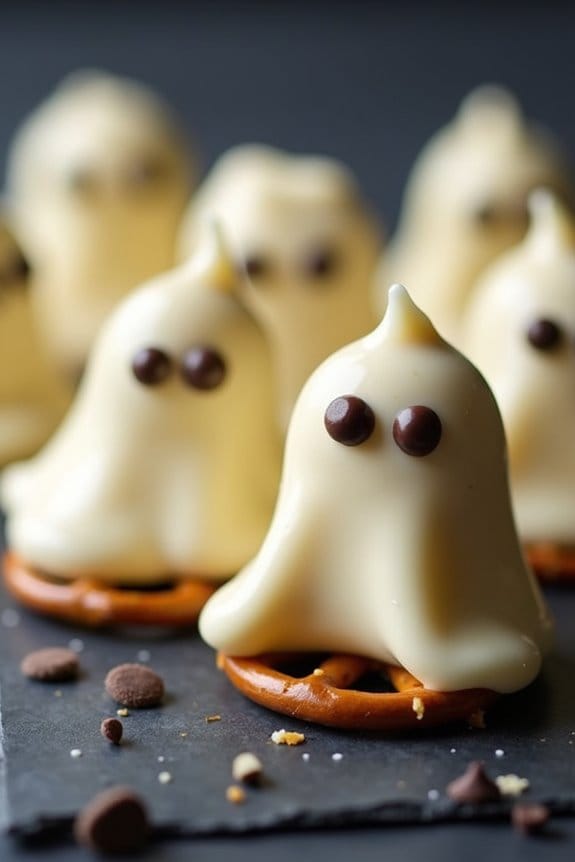
Create a spook-tacular treat this Halloween with Ghostly Cheese Pops! These delightful snacks are perfect for kids, combining the creamy taste of cheese with the whimsy of Halloween fun. Shaped like adorable little ghosts, these cheese pops aren’t only easy to make but also incredibly delicious. They’re perfect for serving at Halloween parties or simply as a festive snack to bring some ghostly fun to your family meals.
Ghostly Cheese Pops are a great way to get kids involved in the kitchen. With minimal ingredients and easy steps, they can help shape the cheese ghosts and have fun decorating them with spooky faces. Plus, they make for a nutritious snack option that’s certain to please both kids and adults alike. Here’s how you can make these delightful Halloween treats.
Ingredients (Serves 4-6):
- 12 cheese sticks
- 12 pretzel sticks
- 1 cup of cream cheese
- 24 mini chocolate chips
- 1 tablespoon of olive oil
- Black edible marker (optional)
Cooking Instructions:
- Prepare the Cheese Sticks: Begin by unwrapping the cheese sticks. Cut each cheese stick in half to create 24 small cheese portions. These will serve as the body of your ghostly pops.
- Insert the Pretzel Sticks: Gently insert a pretzel stick into one end of each cheese portion. Be careful not to push too hard as this might cause the cheese to crack.
- Shape the Ghosts: Use your fingers to gently mold the top of each cheese portion into a ghost shape. Slightly taper the top to create a rounded ghost head, while keeping the bottom wider.
- Create the Ghost Faces: Take two mini chocolate chips and gently press them into the cheese to create eyes for each ghost. If you have a black edible marker, you can also draw small mouths to add more character to the ghostly faces.
- Coat with Cream Cheese: In a small bowl, mix the cream cheese with a tablespoon of olive oil to soften it. Use a small spoon or knife to spread a thin layer of this mixture over each ghost. This will give them a smooth and slightly shiny appearance, enhancing their ghostly look.
- Chill and Serve: Place the completed Ghostly Cheese Pops on a tray and refrigerate for about 15 minutes. This helps the cream cheese set and keeps the ghost shapes intact. Serve chilled and enjoy the eerie yet delicious creation!
Extra Tips:
To make the Ghostly Cheese Pops even more festive, consider adding a dash of food coloring to the cream cheese for a spooky tint. You can also experiment with different types of cheese to suit your taste preferences.
If you’re serving these at a party, display them on a platter with some Halloween-themed decorations for an extra festive touch. Additionally, always supervise children while they use the edible marker to guarantee proper use. Enjoy making these ghoulishly good snacks with your little ones!
Jack-o’-Lantern Veggie Cups
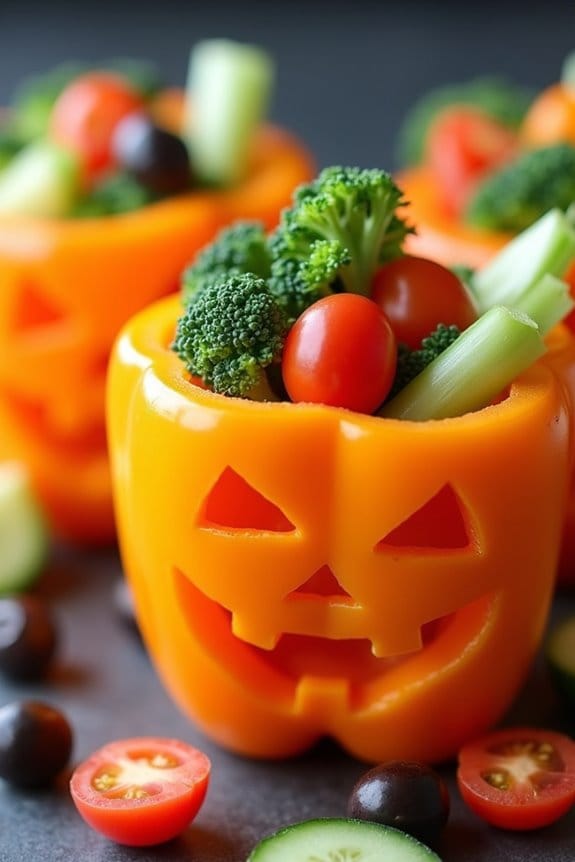
Add a spooky twist to your Halloween party with Jack-o’-Lantern Veggie Cups! These delightful and healthy snacks are perfect for little ghouls and goblins. They aren’t only visually appealing but also packed with nutrients, making them a hit among kids and parents alike. This creative dish involves carving out bell peppers to resemble mini jack-o’-lanterns and filling them with a medley of fresh, crisp vegetables. It’s a fun and interactive way to get kids excited about eating their veggies.
The Jack-o’-Lantern Veggie Cups are straightforward to prepare and provide a festive touch to your Halloween spread. They’re ideal for parties, school events, or as a healthy snack option at home. The bright colors of the bell peppers and the assortment of vegetables make this dish both appetizing and nutritious. Plus, preparing these veggie cups can be a fun family activity, allowing kids to get involved in the kitchen and express their creativity.
Ingredients for 4-6 servings:
- 4 medium-sized orange bell peppers
- 1 cup cherry tomatoes, halved
- 1 cup cucumber slices
- 1 cup baby carrots
- 1 cup broccoli florets
- 1 cup celery sticks
- 1 cup ranch dressing or hummus (for dipping)
- Optional: black olives for decoration
Instructions:
- Prepare the Bell Peppers: Begin by washing the bell peppers thoroughly. Cut off the tops of the peppers and remove the seeds and membranes inside. Use a small paring knife to carve out jack-o’-lantern faces on the side of each bell pepper, being careful not to cut through too extensively.
- Prepare the Vegetables: Wash all the vegetables. Halve the cherry tomatoes, slice the cucumber, and cut the celery into sticks. Trim the broccoli into small florets and leave the baby carrots whole. If desired, slice black olives to use as additional decorations for the pepper faces.
- Assemble the Cups: Fill each carved bell pepper with an assortment of the prepared vegetables. You can arrange them creatively, allowing some to peek out of the top like crazy hair.
- Serve with Dipping Sauce: Arrange the filled bell peppers on a platter. Serve them with a side of ranch dressing or hummus for dipping. This adds extra flavor and makes the veggies even more appealing to kids.
- Decorate and Enjoy: If using black olives, place them strategically on the jack-o’-lantern faces to enhance their spooky appearance. Enjoy these delicious and healthful snacks!
Extra Tips:
When creating the jack-o’-lantern faces, keep the designs simple to prevent the bell peppers from becoming too fragile. Encourage kids to be part of the decoration process, letting them choose which veggies to include and how to arrange them.
It’s a good idea to prepare the veggies ahead of time and store them in the refrigerator, especially if you’re planning to make a large batch for a party. To save on time, you can use pre-cut veggies available at most grocery stores.
Finally, remember that you can easily customize the fillings to suit your child’s taste preferences, making these veggie cups a versatile option for any occasion.
Bloody Finger Breadsticks

Halloween is a time for spooky fun, and what better way to get into the spirit than with some creepy yet delicious treats? Bloody Finger Breadsticks are the perfect addition to your Halloween party menu, offering a frightful twist on a classic snack that kids will love.
These breadsticks are shaped like fingers, complete with a bloody tomato sauce dip to add to the ghastly effect. Despite their eerie appearance, they’re easy to make and certain to be a hit with children, providing both a visual and tasty delight.
Getting the kids involved in making Bloody Finger Breadsticks can add to the fun and excitement of Halloween. They’ll enjoy shaping the dough into fingers and adding almond “nails” to complete the look.
The best part is that these breadsticks aren’t only entertaining but also deliciously crispy on the outside and soft on the inside. Served with a side of tomato sauce for dipping, they make for a perfectly spooky snack that’s both satisfying and fun to eat.
Ingredients (Serving Size: 4-6 people):
- 1 can of refrigerated breadstick dough
- 1/4 cup all-purpose flour (for dusting)
- 24 whole blanched almonds
- 1/4 cup tomato sauce
- 2 tablespoons butter, melted
- 1 teaspoon garlic powder
- 1 teaspoon dried oregano
- Red food coloring (optional)
Cooking Instructions:
- Preheat the Oven: Start by preheating your oven to 375°F (190°C). This guarantees that your breadsticks will bake evenly and achieve the right texture.
- Prepare the Work Surface: Lightly dust your work surface with all-purpose flour. This will prevent the dough from sticking as you shape it into fingers.
- Shape the Dough: Open the can of refrigerated breadstick dough and separate the pieces. Take each piece and roll it into a finger-like shape, about 5-6 inches long. Slightly taper one end to resemble a fingertip.
- Add the Nails: Press a blanched almond into the tapered end of each breadstick to create a “fingernail.” Make sure it’s secure but not too deep into the dough.
- Create Knuckles and Wrinkles: Using a small knife, make three shallow cuts across the middle of each breadstick to form knuckles. Add a few more cuts near the almond to create a realistic finger appearance.
- Flavor the Fingers: In a small bowl, mix the melted butter, garlic powder, and dried oregano. Brush this mixture over each breadstick for added flavor.
- Bake the Breadsticks: Place the breadsticks on a baking sheet lined with parchment paper and bake in the preheated oven for 10-12 minutes, or until they’re golden brown.
- Prepare the Dipping Sauce: While the breadsticks are baking, heat the tomato sauce in a small saucepan over medium heat. If desired, add a few drops of red food coloring to intensify the “bloody” appearance.
- Serve: Once the breadsticks are done, remove them from the oven and allow them to cool slightly. Serve them with the tomato sauce in a small bowl for dipping.
Extra Tips:
To make the Bloody Finger Breadsticks even spookier, you can add a few drops of red food coloring directly onto the breadsticks before baking, giving them a more gruesome look.
Be sure to supervise children when using knives to create the finger details. These breadsticks are best enjoyed fresh but can be prepared a few hours in advance and reheated in the oven for a few minutes before serving.
Enjoy watching your kids’ faces light up with both fear and delight as they munch on these terrifying treats!
Creepy Crawly Deviled Eggs
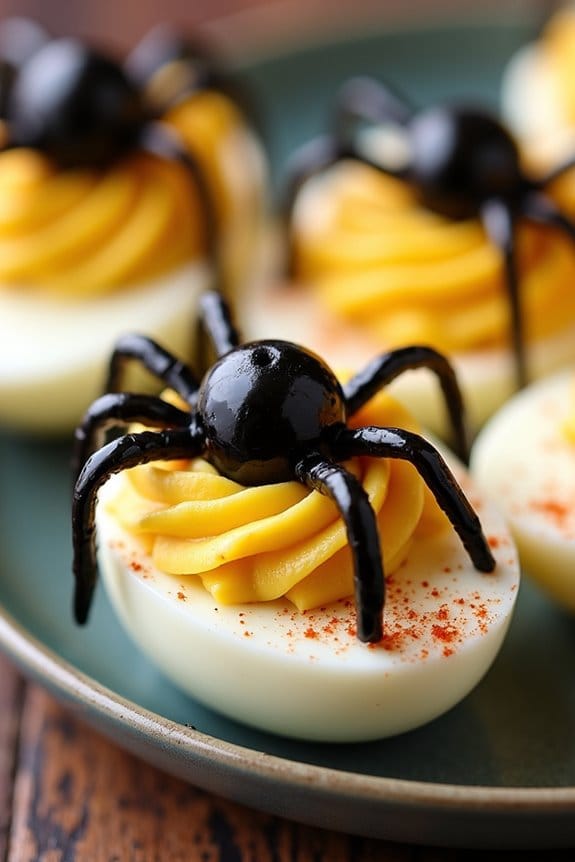
Creepy Crawly Deviled Eggs are a perfect addition to your Halloween finger foods lineup, providing a spooky yet delicious treat for kids. These deviled eggs aren’t only visually appealing with their eerie spider-like appearance but also pack a tasty punch. The classic deviled egg recipe is given a Halloween twist, making it a fun activity for both kids and parents to prepare together.
With a creamy, tangy filling and a touch of creativity, you’ll have a platter of creepy crawly eggs that are sure to delight the little ones and add a festive touch to your Halloween spread. Perfect for serving 4-6 people, Creepy Crawly Deviled Eggs are easy to make and require only a handful of ingredients.
This recipe combines the traditional flavors of deviled eggs with a playful presentation that will capture the Halloween spirit. Whether you’re hosting a Halloween party or just want to surprise your kids with a fun after-school snack, these deviled eggs are sure to be a hit. Let’s plunge into the recipe and get started on making these spooky treats!
Ingredients
- 6 large eggs
- 1/4 cup mayonnaise
- 1 teaspoon mustard
- 1 teaspoon white vinegar
- Salt and pepper to taste
- Black olives (for decoration)
- Paprika (optional, for garnish)
Instructions
- Boil the Eggs: Place the eggs in a single layer in a saucepan and cover with water. Bring to a boil over medium-high heat. Once boiling, cover, remove from heat, and let sit for 12 minutes. Drain and cool the eggs under cold running water.
- Prepare the Eggs: Once cooled, gently tap each egg on a hard surface and peel off the shells. Rinse the eggs under water to remove any shell fragments.
- Cut and Scoop: Slice each egg in half lengthwise. Carefully remove the yolks and place them in a small mixing bowl. Arrange the egg whites on a platter.
- Make the Filling: Mash the egg yolks with a fork until smooth. Add mayonnaise, mustard, vinegar, salt, and pepper. Mix until well combined and creamy.
- Fill the Egg Whites: Spoon or pipe the yolk mixture back into the egg white halves. Be generous with the filling for a satisfying bite.
- Create the Creepy Crawlies: Slice black olives in half for the spider bodies. For the spider legs, cut the remaining olive halves into thin strips. Place one olive half on top of each deviled egg for the body, then arrange the sliced strips around it to mimic spider legs.
- Garnish and Serve: Lightly sprinkle paprika over the eggs for added color and flavor, if desired. Serve immediately or refrigerate until ready to enjoy.
Extra Tips
To guarantee your eggs peel easily, use eggs that are at least a week old, as fresher eggs tend to stick to the shell more. When cutting and placing the olive spiders, a small paring knife and tweezers can help with precision.
If you’re short on time, consider using pre-sliced olives available in cans, which can simplify the process. Finally, if you want to add an extra layer of flavor, consider incorporating a dash of hot sauce or a bit of minced garlic into the yolk mixture.
These Creepy Crawly Deviled Eggs can be made a few hours ahead and stored in the refrigerator, making them a convenient option for your Halloween festivities.
Goblin Fruit Kabobs
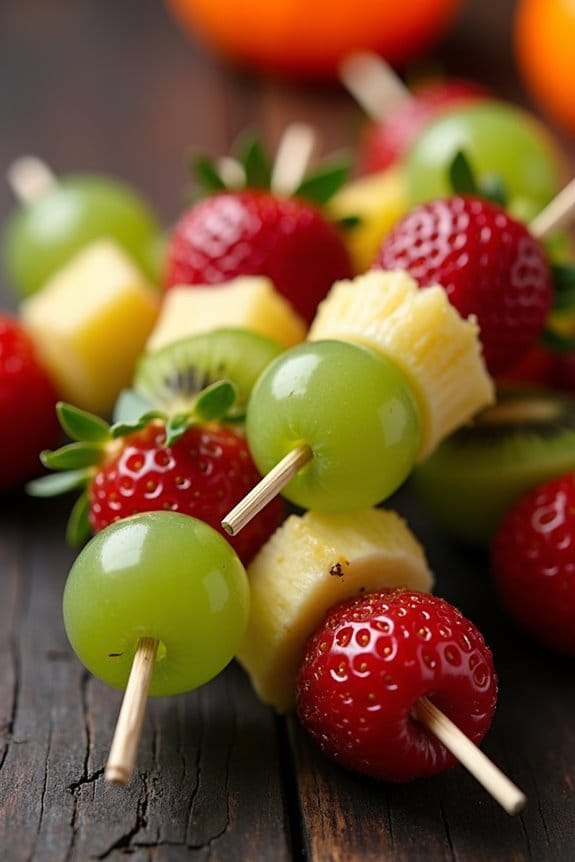
Delight your little monsters this Halloween with these colorful and spooky Goblin Fruit Kabobs. Perfect for a festive party or a creepy night in, these kabobs are both fun to make and delicious to eat.
The combination of fresh fruits, with their vibrant colors and natural sweetness, makes them a healthy treat that kids will love to snack on. Arranged on skewers, these kabobs resemble the playful nature of Halloween while providing a nutritious alternative to the usual sugary treats.
The Goblin Fruit Kabobs are an ideal finger food for children, as they’re easy to hold and eat, and require minimal cleanup. You can let your creativity run wild by choosing a variety of fruits, arranging them in your desired pattern, and even adding some fun decorations to make them extra spooky.
This recipe serves 4-6 people, making it perfect for a small gathering or a family treat.
Ingredients:
- 1 cup green grapes
- 1 cup red grapes
- 2 kiwis, peeled and cut into thick slices
- 1 banana, sliced into thick rounds
- 1 cup pineapple chunks
- 1 cup strawberries, hulled
- 12-18 wooden skewers
Instructions:
- Prepare the fruits: Start by washing all the fruits thoroughly. Peel the kiwis and cut them into thick slices. Slice the banana into thick rounds. Hull the strawberries and cut them into halves if they’re large.
- Assemble the kabobs: Take a wooden skewer and begin threading the fruits onto it. You can start with a green grape as the base, then add a slice of kiwi, followed by a strawberry, a pineapple chunk, a banana slice, and a red grape. Repeat this pattern until the skewer is filled, leaving enough space at the bottom for holding.
- Repeat the process: Continue assembling the skewers with the remaining fruits until all the ingredients are used up. Aim for each skewer to have a colorful and varied combination of fruits.
- Presentation: Once all the skewers are assembled, arrange them on a platter in a fun and festive way. You can even serve them standing upright by placing them in a carved pumpkin or a decorative base.
Extra Tips:
For an extra spooky touch, you can add mini marshmallows or edible googly eyes to the kabobs to create little monster faces.
If you’re preparing these in advance, spritz the banana slices with a bit of lemon juice to prevent browning. Feel free to customize the fruit selection based on what’s in season or your kids’ preferences.
Goblin Fruit Kabobs are versatile and can be adjusted to accommodate any allergies or dietary restrictions.
Frankenstein Guacamole Cups
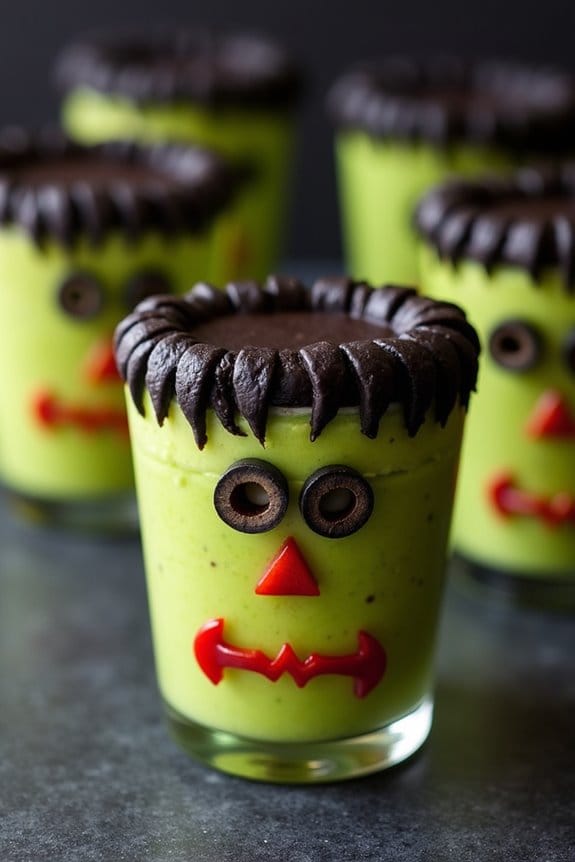
Frankenstein Guacamole Cups are a spooktacular treat perfect for adding a ghoulish flair to your Halloween finger foods lineup. These delightful cups combine creamy guacamole with a creative presentation that resembles the infamous Frankenstein monster.
They aren’t only fun to make with kids but also deliciously healthy, providing an excellent opportunity to sneak in some nutritious ingredients amidst the Halloween candy overload. Perfect for a party or a playful family snack, these cups will surely bring smiles and perhaps a few playful screams to the table.
To create these monstrous treats, you start by crafting a vibrant green guacamole, which will serve as the base for your Frankenstein cups. The guacamole is then spooned into clear cups, with the face details artfully crafted using black olives and red bell peppers. A few additional touches bring the monster to life, making these cups as fun to look at as they’re to eat.
Prepare to indulge in a frightfully good time with this easy-to-follow recipe that’s suitable for a serving size of 4-6 people.
Ingredients:
- 4 ripe avocados
- 1 lime, juiced
- 1/4 cup red onion, finely chopped
- 1 small jalapeño, finely chopped (optional)
- 1/2 cup cherry tomatoes, diced
- Salt to taste
- 1/4 cup black olives, sliced
- 1/4 cup red bell pepper, sliced into small triangles
- 6 small clear cups
Instructions:
- Prepare the Guacamole:
- Cut the avocados in half, remove the pit, and scoop the flesh into a mixing bowl.
- Add the lime juice immediately to prevent the avocados from browning.
- Mash the avocados using a fork or potato masher until you reach a creamy consistency, leaving some chunks for texture.
- Stir in the red onion, jalapeño (if using), and cherry tomatoes. Season with salt to taste.
- Assemble the Cups:
- Divide the guacamole evenly among the six clear cups, filling each about three-quarters full.
- Create Frankenstein’s Face:
- Use the black olive slices to create Frankenstein’s hair along the top edge of the guacamole.
- Arrange the red bell pepper slices to form a mouth and use additional olive slices for the eyes.
- For added detail, you can use a small piece of red bell pepper to create a scar or stitches on the face.
- Serve and Enjoy:
- Arrange the Frankenstein Guacamole Cups on a spooky-themed platter and serve immediately.
Extra Tips:
When making the guacamole, adjust the amount of lime juice and salt based on your taste preference. For a spicier kick, leave the seeds in the jalapeño or add a dash of cayenne pepper.
When crafting Frankenstein’s face, get creative and involve the kids; they might come up with some unique designs of their own! If you plan to make this ahead of time, store the guacamole cups in the refrigerator and add the face details just before serving to maintain freshness and prevent browning.
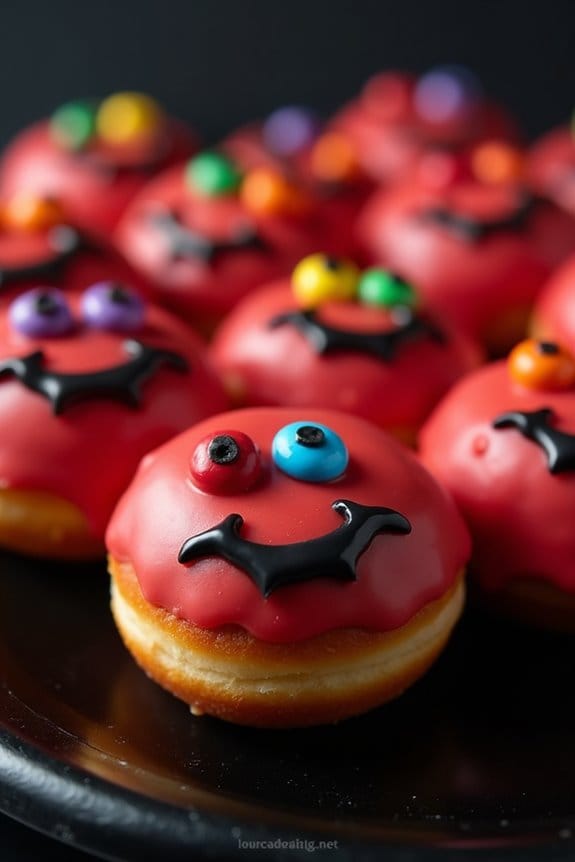
Dracula’s Donut Holes
As the spooky season approaches, it’s time to get creative in the kitchen with some Halloween-themed treats that are sure to delight the little ghouls and goblins in your home.
Dracula’s Donut Holes are the perfect finger food for kids, combining the classic sweetness of donut holes with a fun and eerie twist. These treats not only look the part but are also incredibly easy to make, ensuring that you’ll have more time to enjoy the festivities with your little ones.
Dracula’s Donut Holes are a great addition to any Halloween party spread, and they’re ideal for serving a group of 4-6 people. This recipe uses simple ingredients that you may already have in your pantry, making it a convenient choice for busy parents.
With a few easy steps, you can transform ordinary donut holes into a spooky snack that’s both delicious and visually appealing.
Ingredients (Serves 4-6):
- 24 plain donut holes
- 1 cup white chocolate chips
- 1 tablespoon coconut oil (or vegetable oil)
- Red food coloring
- Black decorating gel
- Small candy eyes
Instructions:
- Prepare the Chocolate Coating: In a microwave-safe bowl, combine the white chocolate chips and coconut oil. Microwave in 20-second intervals, stirring in between, until the mixture is fully melted and smooth.
- Add Color: Once the chocolate is melted, add a few drops of red food coloring and stir until you achieve the desired shade of blood-red. This will be used to coat the donut holes.
- Coat the Donut Holes: Using a fork or skewer, dip each donut hole into the red chocolate mixture, ensuring it’s fully covered. Allow any excess chocolate to drip off before placing the donut holes onto a parchment-lined baking sheet.
- Decorate: While the chocolate is still wet, press two candy eyes onto each donut hole. Use the black decorating gel to draw a small “vampire mouth” underneath the eyes, completing the Dracula look.
- Set the Coating: Place the decorated donut holes in the refrigerator for about 20 minutes, or until the chocolate has fully set and hardened.
For an extra spooky touch, you can use a mix of different colored candy eyes to give each Dracula donut hole a unique personality.
If you’re hosting a party, consider setting up a decorating station where kids can create their own vampire designs. Be sure to store any leftover donut holes in an airtight container in the refrigerator to keep them fresh.
These fun and festive treats are sure to be a hit with kids of all ages!
Zombie Popcorn Hands
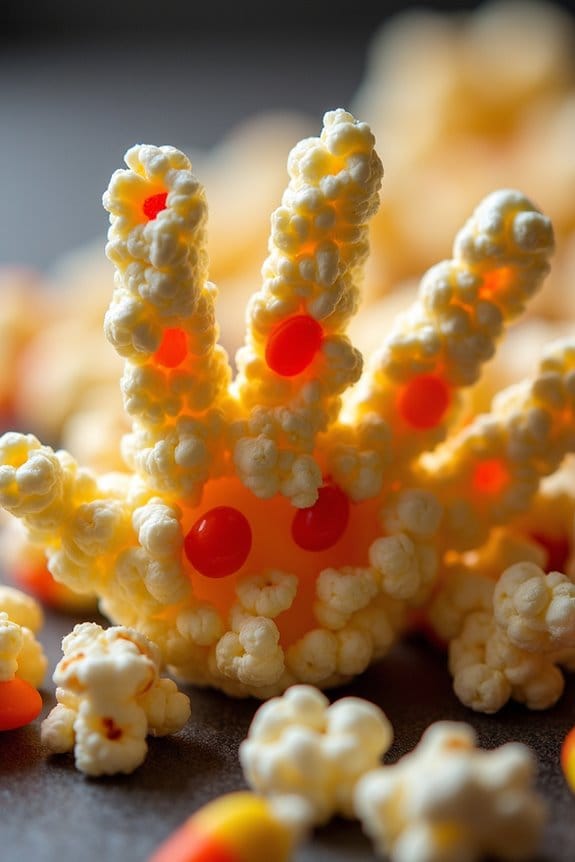
Zombie Popcorn Hands are a spooky and fun treat perfect for Halloween parties and gatherings, especially for kids. These creepy creations aren’t only delicious but also serve as a fantastic decorative centerpiece for your Halloween table. The combination of popcorn and candy creates a sweet and salty treat that will have little ghouls and goblins coming back for more.
To make Zombie Popcorn Hands, you’ll use disposable plastic gloves as molds to shape the popcorn mixture into eerie hand shapes. This recipe is simple to prepare and doesn’t require any cooking, making it a great activity for kids to help with. Once the gloves are filled, candy corn is used to mimic fingernails, adding an extra touch of spookiness to each hand.
Ingredients (Serves 4-6 people):
- 6 disposable plastic gloves
- 8 cups of popped popcorn
- 1/2 cup of melted butter
- 1/2 cup of sugar
- 1/4 cup of corn syrup
- 1 teaspoon of vanilla extract
- 1 cup of candy corn
- 1 cup of assorted Halloween candies (such as M&Ms, Skittles, or gummy worms)
- Twine or ribbon
Instructions:
- Prepare the Gloves: Begin by ensuring that the disposable plastic gloves are clean and dry. These will act as molds for your popcorn hands.
- Melt the Butter: In a medium saucepan over low heat, melt the butter completely. Once melted, add the sugar and corn syrup, stirring constantly until the sugar is fully dissolved. Remove from heat and stir in the vanilla extract.
- Coat the Popcorn: In a large bowl, combine the popped popcorn with the butter mixture. Stir until all the popcorn is well-coated. Allow it to cool slightly so it can be handled without burning your hands.
- Assemble the Hands: Place one candy corn at the tip of each finger in the glove to create fingernails. Carefully fill the gloves with the popcorn mixture, pressing it firmly into the fingers to create a hand shape. Add a few assorted Halloween candies to each glove for extra flavor and fun.
- Seal the Gloves: Once the gloves are filled, tie the open end securely with twine or ribbon to keep the popcorn mixture in place.
- Set and Serve: Allow the Zombie Popcorn Hands to set for about 30 minutes. Once set, carefully cut away the plastic glove, ensuring the hand shape remains intact. Arrange the hands on a platter for serving.
Extra Tips:
For best results, make sure the popcorn is completely cooled before beginning the mixing process, as warm popcorn will make the butter mixture soggier.
Consider using non-buttered or lightly salted popcorn to balance the sweetness of the candy. If you want to add an extra element of fright, try mixing in a few drops of green food coloring into the butter mixture before coating the popcorn. This will give your Zombie Popcorn Hands a ghoulish glow that will delight and surprise your guests.
Vampire Bat Wings
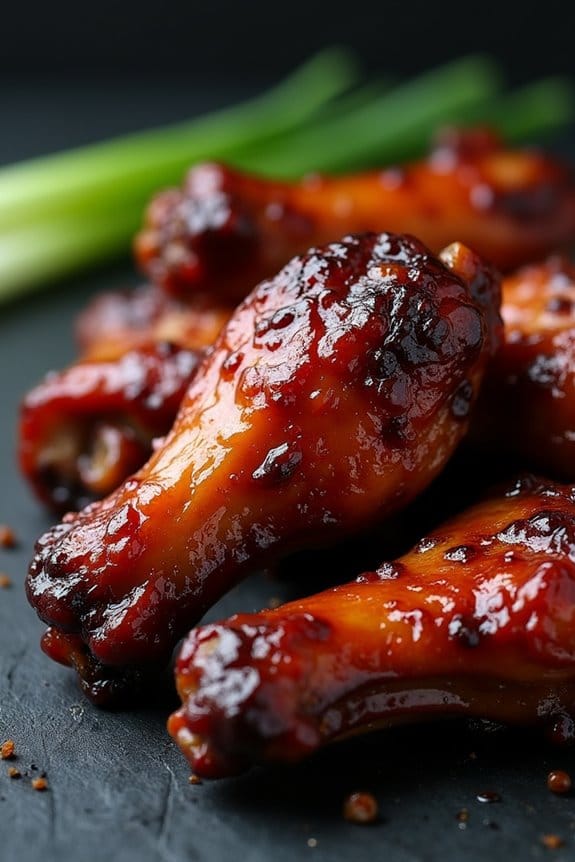
Vampire Bat Wings are a spooktacular addition to any Halloween party, especially for kids who love a good fright with their bite! These delightfully ghoulish wings are marinated in a tangy, sweet, and slightly spicy sauce that gives them a rich dark color, perfect for mimicking the look of eerie bat wings. Not only are they delicious, but they also add a touch of Halloween magic to your table, making them an irresistible treat for both young and old.
A frightfully fun treat, Vampire Bat Wings bring spooky delight and Halloween magic to your table.
Cooking up a batch of Vampire Bat Wings is both simple and fun, providing a hands-on activity that kids can help with. The key to achieving the perfect flavor is in the marinade, which should be prepared a day in advance to allow the wings to soak up all the spooky goodness. Ideal for a serving size of 4-6 people, this recipe guarantees enough for everyone to have a fang-tastic time at your Halloween bash.
Ingredients (Serving Size: 4-6 people):
- 2 pounds of chicken wings
- 1/2 cup soy sauce
- 1/4 cup balsamic vinegar
- 1/4 cup honey
- 2 tablespoons ketchup
- 1 tablespoon minced garlic
- 1 teaspoon smoked paprika
- 1/2 teaspoon cayenne pepper
- 1/4 teaspoon black food coloring (optional)
- Salt and pepper to taste
- Green onions for garnish (optional)
Cooking Instructions:
- Prepare the Marinade: In a large mixing bowl, combine the soy sauce, balsamic vinegar, honey, ketchup, minced garlic, smoked paprika, cayenne pepper, and black food coloring. Whisk the ingredients together until they’re well blended. The food coloring is optional but gives the wings a more Halloween-appropriate appearance.
- Marinate the Wings: Place the chicken wings into a large resealable plastic bag or shallow dish. Pour the marinade over the wings, ensuring they’re fully coated. Seal the bag or cover the dish with plastic wrap, then refrigerate for at least 4 hours, preferably overnight, to let the flavors develop.
- Preheat the Oven: When ready to cook, preheat your oven to 400°F (200°C). Line a baking sheet with aluminum foil and place a wire rack on top. This allows the wings to cook evenly and get crispy all over.
- Arrange the Wings: Remove the wings from the marinade, letting any excess drip off, and arrange them in a single layer on the prepared wire rack. Discard any leftover marinade.
- Bake the Wings: Place the baking sheet on the middle rack of the preheated oven. Bake the wings for 35-40 minutes, turning them halfway through, until they’re cooked through and the skin is crispy.
- Serve and Garnish: Once the wings are done, remove them from the oven. Let them cool slightly before serving. Garnish with chopped green onions if desired for a touch of color.
Extra Tips:
For an even spookier presentation, serve the Vampire Bat Wings on a platter lined with decorative spider webs or alongside a cauldron of dipping sauce like a creamy ranch or spicy sriracha mayo.
If you’re using food coloring, remember that a little goes a long way; start with a small amount and adjust as needed to achieve the desired shade.
Finally, if you prefer your wings spicy, feel free to add more cayenne pepper or a dash of hot sauce to the marinade. Enjoy the hauntingly delicious flavors and watch as these wings disappear faster than a vampire at sunrise!
Haunted Graveyard Pudding Cups
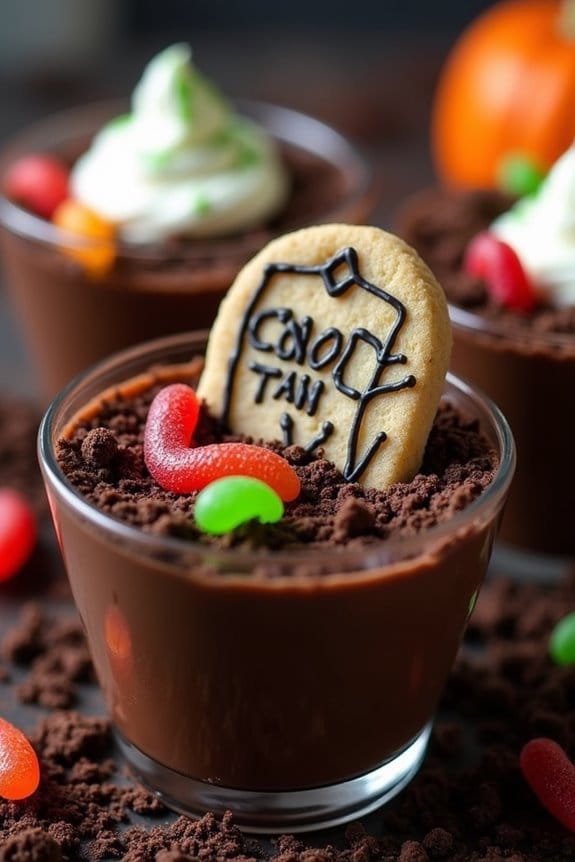
Halloween is the perfect time to let your creativity run wild, especially in the kitchen. The Haunted Graveyard Pudding Cups are a spooky yet delightful treat that kids will love. These cups combine creamy chocolate pudding with a crunchy cookie topping that resembles dirt, making it both delicious and fun. The decorative elements, like cookie tombstones and gummy worms, add a playful touch that’s sure to excite little ghouls and goblins.
These pudding cups aren’t only a hit at Halloween parties but also a fun activity for kids to help with in the kitchen. They’re simple enough for small hands to assist with layering and decorating, encouraging creativity and imagination. Plus, since they require no baking, they’re a quick and easy option for busy parents. This recipe serves 4-6 people, making it perfect for a small gathering or family treat.
Ingredients:
- 2 cups cold milk
- 1 package (3.9 ounces) instant chocolate pudding mix
- 1 package (14.3 ounces) chocolate sandwich cookies
- 1 cup whipped topping
- Gummy worms
- Oval-shaped cookies (e.g., Milano cookies) for tombstones
- Black decorating gel or icing
Instructions:
- Prepare the Pudding: In a large mixing bowl, whisk together the cold milk and instant chocolate pudding mix for about 2 minutes until the mixture begins to thicken. Let it stand for 5 minutes to achieve the desired consistency.
- Crush the Cookies: Place the chocolate sandwich cookies in a resealable plastic bag and crush them using a rolling pin until they resemble coarse dirt. Set aside.
- Assemble the Cups: Divide the prepared chocolate pudding evenly among 4-6 small cups or jars. Leave some room at the top for the “dirt” layer and decorations.
- Create the Dirt Layer: Sprinkle a generous layer of crushed cookies on top of each pudding cup. This will serve as the graveyard “dirt.”
- Decorate with Tombstones: Use the black decorating gel to write spooky phrases or draw designs on the oval-shaped cookies to resemble tombstones. Insert one decorated cookie into the back of each pudding cup.
- Add Gummy Worms: Place a few gummy worms on top of the crushed cookies, arranging them so they appear to be crawling out of the dirt.
- Finish with Whipped Topping: Add a small dollop of whipped topping next to the tombstone for a ghostly effect.
Extra Tips:
For an extra spooky effect, you can use green food coloring to tint the whipped topping, simulating moss or grass around the tombstones. If you want to make the tombstones more elaborate, consider using edible ink markers for finer details.
Additionally, you can experiment with different gummy creatures like spiders or bats for variety. Remember to involve the kids in decorating, as this is where they can truly personalize their Haunted Graveyard Pudding Cups.
