
Halloween parties for kids often call for snacks that are simple to serve and eat. These finger food ideas focus on recipes that use everyday ingredients and take little time to prepare. You will find options that kids tend to like without being too messy. Each one comes with clear steps so you can make them ahead if needed. They work well for school events or a small get together at home.
Helpful Tips Before You Start
These ideas will help the snacks turn out fun to eat and simple to prepare.
Cut Everything Small
Finger foods work best when pieces fit easily in a child’s hand. Slice or shape items into bite sized portions before serving.
Set Up a Mess Station
Keep napkins and wipes close by since many of these treats involve sticky or crumbly ingredients.
Prep Components Ahead
Assemble bases or chop ingredients the day before so you can finish the snacks quickly on Halloween.
Let Kids Help
Children enjoy adding toppings or arranging items on plates. Simple tasks keep them involved without extra stress.
Crescent Roll Mummy Hot Dogs
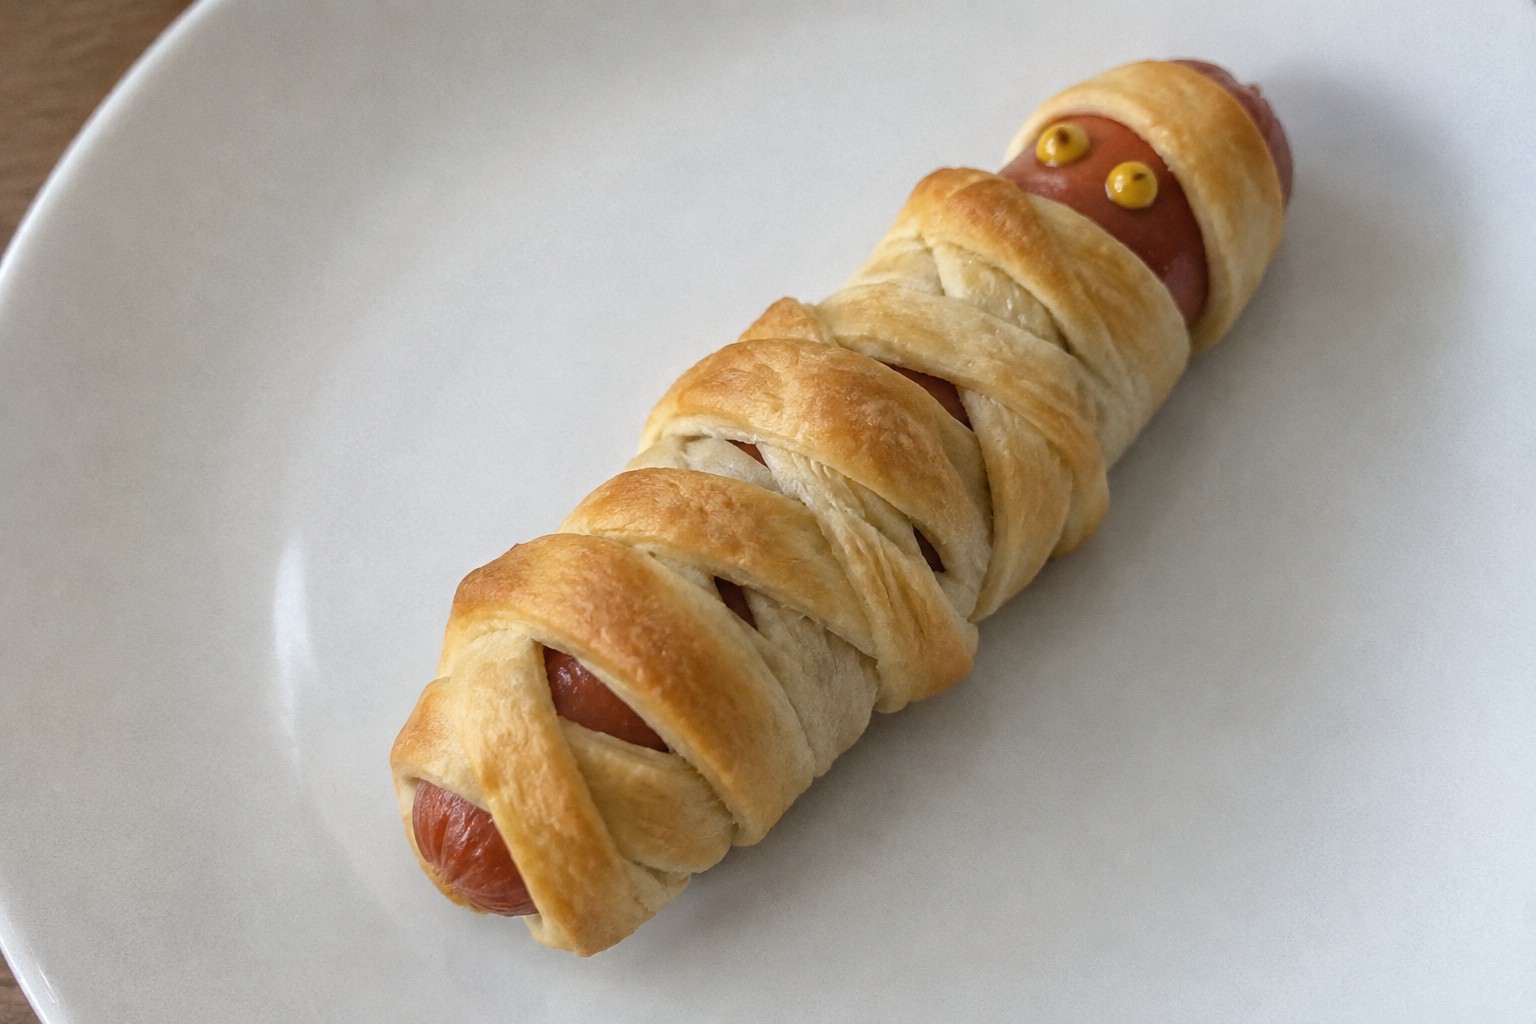
These crescent roll mummy hot dogs turn a simple package of dough and a pack of hot dogs into a quick Halloween snack that kids can help assemble. They work well for an after-school treat, a party platter, or a light dinner before trick-or-treating. The finished bites have a flaky golden crust wrapped around juicy hot dogs, with small mustard dots that double as eyes.

Serves 4 people.
Ingredients
- 8 hot dogs
- 1 can (8 ounces) refrigerated crescent roll dough
- 2 tablespoons yellow mustard
Instructions
- Heat the oven to 375 degrees and line a baking sheet with parchment paper.
- Unroll the crescent dough on a cutting board and press the seams together to form one sheet. Cut the sheet into thin strips about half an inch wide.
- Wrap the dough strips around each hot dog, leaving a small gap near one end for the face. Place the wrapped hot dogs on the prepared baking sheet.
- Bake for 12 to 15 minutes until the dough is golden brown and the hot dogs are heated through.
- Let the mummies cool for two minutes, then use a small dab of mustard to make two eyes on the uncovered end of each hot dog.
Extra Tips
If the dough strips break while wrapping, just press the ends together; the baked result still looks like bandages. Serve the mummies with a side of ketchup for dipping so kids can add their own "blood" details. Leftovers reheat well in a 350-degree oven for five minutes to restore crispness.Course: Appetizer Cuisine: American Equipment: Baking sheet, Oven, Cutting board
Black Olive Spider Deviled Eggs
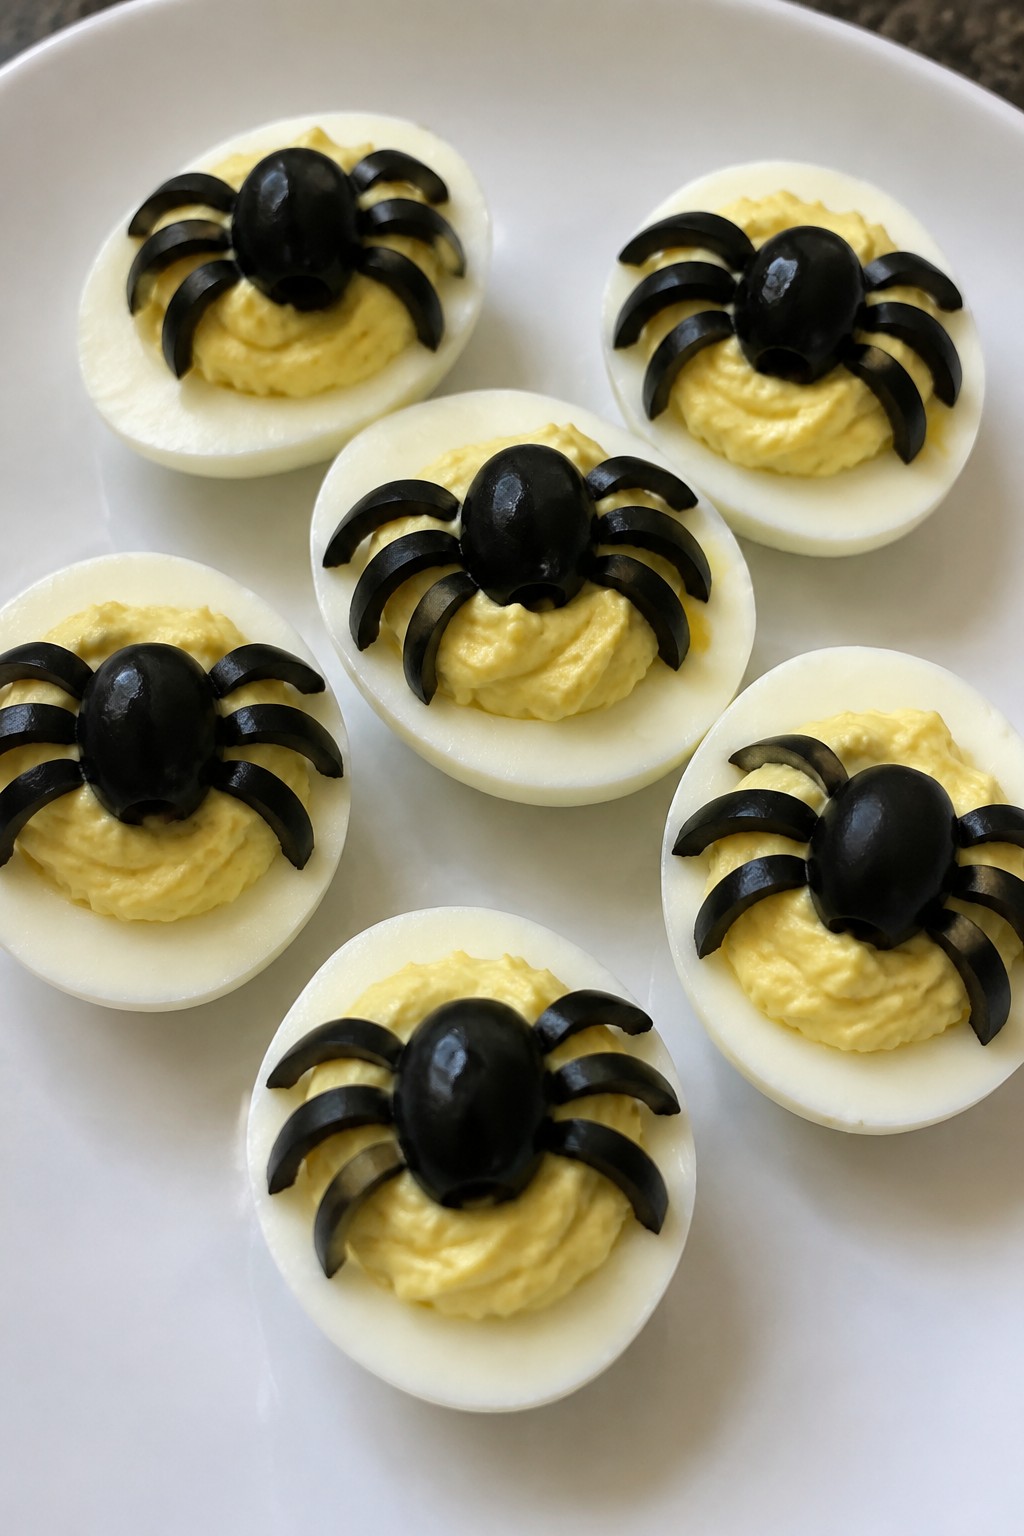
These Black Olive Spider Deviled Eggs add a playful Halloween element to any kids table. The olive spiders sit right on top of the filled eggs, making them easy for little hands to grab and eat.
The eggs stay creamy and tangy with a light mustard note. They work well for after-school snacks, party platters, or quick finger food before an evening of costumes.
Serves 4 people.
Ingredients
- 6 large eggs
- 3 tablespoons mayonnaise
- 1 teaspoon Dijon mustard
- 1 teaspoon apple cider vinegar
- 1/4 teaspoon salt
- 1/8 teaspoon black pepper
- 18 pitted black olives
Instructions
- Place the eggs in a pot and cover them with cold water. Bring the water to a boil over medium heat, then turn off the heat, cover the pot, and let the eggs sit for 12 minutes.
- Drain the hot water and run cold water over the eggs until they feel cool enough to handle. Peel the eggs and slice each one in half lengthwise.
- Scoop the yolks into a mixing bowl. Add the mayonnaise, Dijon mustard, apple cider vinegar, salt, and black pepper. Mash everything together until the mixture is smooth.
- Spoon or pipe the yolk mixture back into the egg white halves.
- Cut 6 olives in half lengthwise to form the spider bodies. Slice the remaining olives into thin strips to create the legs. Place one olive half on each filled egg and arrange 8 thin strips around it to look like legs.
Extra Tips
Slice the olive legs very thin so they stay in place on the creamy filling. Assemble the spiders right before serving if you want the olives to look sharpest. Leftovers keep in an airtight container in the fridge for one day.Course: Appetizer Cuisine: American Equipment: Pot, Mixing Bowl, Knife
Cream Cheese Pumpkin Bites with Pretzel Stems
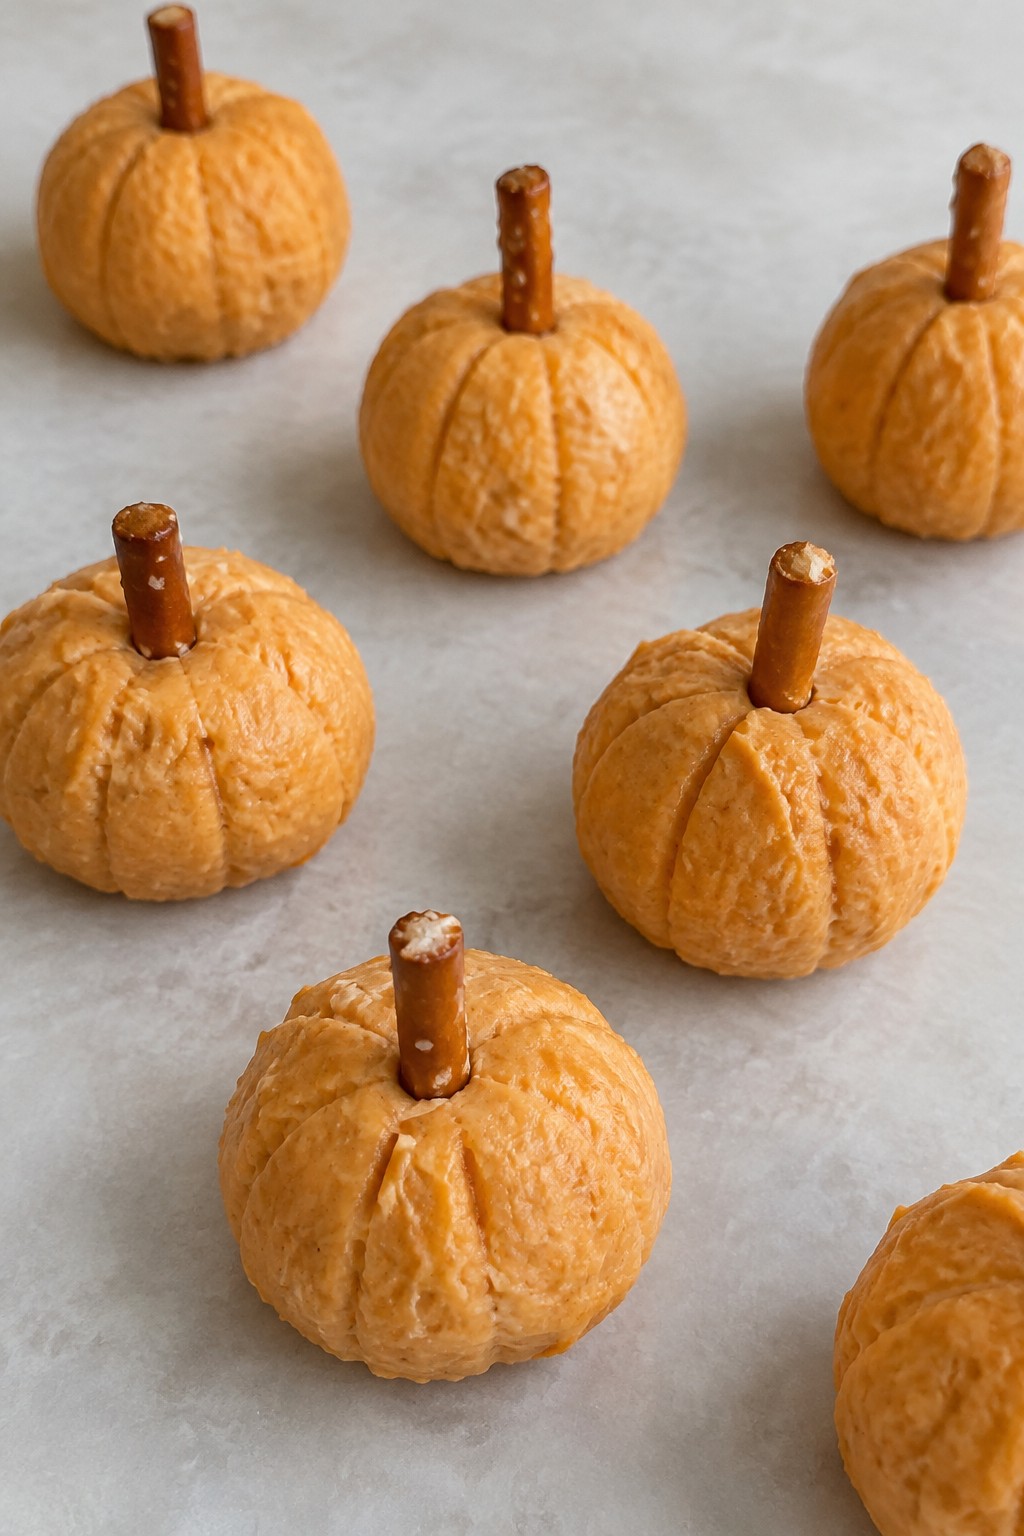
These Cream Cheese Pumpkin Bites with Pretzel Stems bring a playful touch to any Halloween gathering. Kids enjoy the small size and the way the pretzel sticks turn each bite into a mini pumpkin shape. They fit well as a quick snack before trick-or-treating or as part of a party spread.
The bites have a creamy center with a light pumpkin flavor and gentle spice. No oven is needed, so they stay simple to prepare with young helpers nearby.
Serves 4 people.
Ingredients
- 8 ounces cream cheese, softened
- 1/2 cup pumpkin puree
- 1/4 cup powdered sugar
- 1 teaspoon pumpkin pie spice
- 1/2 teaspoon vanilla extract
- 12 pretzel sticks
Instructions
- Place the softened cream cheese in a mixing bowl and beat it until smooth.
- Add the pumpkin puree, powdered sugar, pumpkin pie spice, and vanilla extract to the bowl. Stir until the mixture is fully combined and uniform in color.
- Scoop out level tablespoons of the mixture and roll them between your palms to form small balls.
- Push one pretzel stick into the top of each ball to act as the stem.
- Set the finished bites on a baking sheet and place them in the refrigerator for at least 30 minutes to firm up.
Extra Tips
Chill the mixture for 10 minutes before rolling if it feels too soft to handle. These bites taste best served straight from the fridge, and any leftovers can be stored in an airtight container for up to two days.Course: Appetizer Cuisine: American Equipment: Mixing Bowl, Baking Sheet
Chocolate-Dipped Banana Ghost Pops
These banana ghost pops turn a simple fruit into a playful Halloween snack. Kids enjoy the process of turning the bananas into little white ghosts, and the treat feels light enough to serve before a party or as an afternoon bite.
The soft banana center contrasts with the thin chocolate shell, and the mini chip faces give each pop its own personality. They hold up well on a platter without needing utensils.

Serves 4 people.
Ingredients
- 4 medium bananas
- 8 ounces white chocolate chips
- 1 tablespoon coconut oil
- 4 popsicle sticks
- 2 tablespoons mini chocolate chips
Instructions
- Peel the bananas and trim a small slice from the bottom of each so they stand upright if needed. Insert one popsicle stick into the cut end of each banana.
- Place the white chocolate chips and coconut oil in a microwave-safe bowl. Heat in 20-second bursts, stirring between each, until the mixture is smooth and fully melted.
- Dip each banana into the melted white chocolate, turning to coat all sides and leaving a small section near the stick uncovered. Let excess chocolate drip back into the bowl.
- Set the coated bananas on a parchment-lined tray. Immediately press two mini chocolate chips into the upper half for eyes and one or two more below for a mouth on each pop.
- Place the tray in the refrigerator until the chocolate hardens, about 20 minutes.
Extra Tips
Make the pops the same day you plan to serve them, since the banana softens once coated. If the white chocolate thickens while you work, warm it for a few seconds and stir in a drop more coconut oil to loosen it again.Course: Snack Cuisine: American Equipment: Microwave-safe bowl, Parchment-lined tray, Popsicle sticks
Almond-Topped Witch Finger Breadsticks
These breadsticks turn regular dough into playful witch fingers that kids enjoy at Halloween parties. They work well as a quick snack before trick-or-treating or as part of a spooky buffet spread. The breadsticks bake up with a lightly crisp surface and soft, chewy centers, carrying a mild garlic and herb taste.

Serves 4 people.
Ingredients
- 1 pound pizza dough
- 12 whole blanched almonds
- 1 large egg
- 1 tablespoon olive oil
- 1 teaspoon dried oregano
- 1/2 teaspoon sea salt
Instructions
- Preheat the oven to 400 degrees and line a baking sheet with parchment paper.
- Divide the pizza dough into 12 equal pieces and roll each piece into a thin log about 5 inches long. Taper one end slightly to form a fingertip shape and gently press two or three indentations along the log to suggest knuckles.
- Press one blanched almond firmly into the tapered end of each log to create a fingernail.
- Place the shaped dough pieces on the prepared baking sheet. Beat the egg in a small bowl and brush it lightly over each breadstick.
- Stir together the olive oil, oregano, and sea salt. Drizzle or brush the mixture over the breadsticks.
- Bake for 12 to 15 minutes until the breadsticks turn golden. Remove from the oven and let them cool for a few minutes before serving.
Extra Tips
Shape the knuckles right before baking so the dough holds the ridges. If the almonds loosen during baking, press them back in gently while the breadsticks are still warm. Serve them plain or alongside a simple marinara dip for extra flavor without changing the savory profile. Course: Appetizer Cuisine: American Equipment: Baking sheet, Parchment paper, Mixing bowl
Peanut Butter Apple Monster Mouths
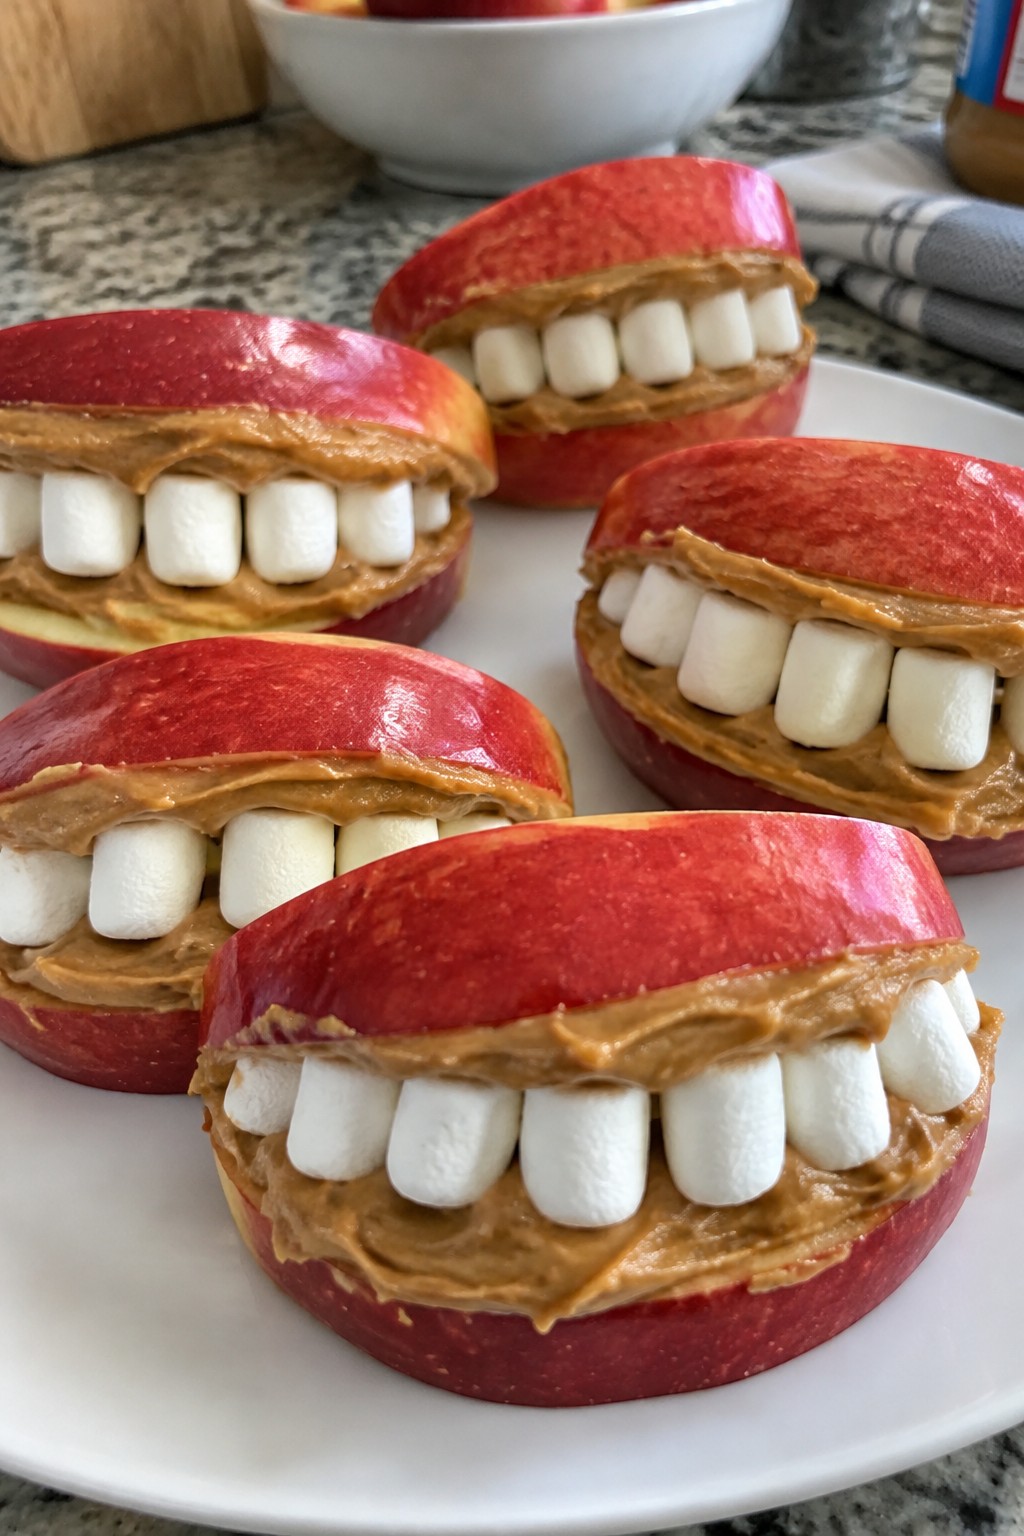
These apple monster mouths give kids a fun way to enjoy fresh fruit during Halloween gatherings. They come together quickly and work well as a party snack or an after-school bite. Crisp apple slices hold a layer of peanut butter that sticks the marshmallow teeth in place, creating a simple mix of crunchy, creamy, and chewy textures.
Serves 4 people.
Ingredients
- 2 large apples
- ½ cup creamy peanut butter
- ½ cup mini marshmallows
Instructions
- Core the apples and cut each one into 8 wedges for a total of 16 pieces.
- Spread a thin layer of peanut butter on one cut side of 8 apple wedges.
- Press 4 to 6 mini marshmallows into the peanut butter on each wedge to form teeth.
- Top each prepared wedge with a plain apple wedge, pressing gently so the peanut butter holds the pieces together like a mouth.
Extra Tips
Assemble the mouths right before serving so the apples stay crisp. Creamy peanut butter spreads evenly without tearing the fruit. If you need a nut-free version, swap the peanut butter for sunflower seed butter while keeping the same steps.Course: Snack Cuisine: American Equipment: Knife, Cutting board, Measuring cups
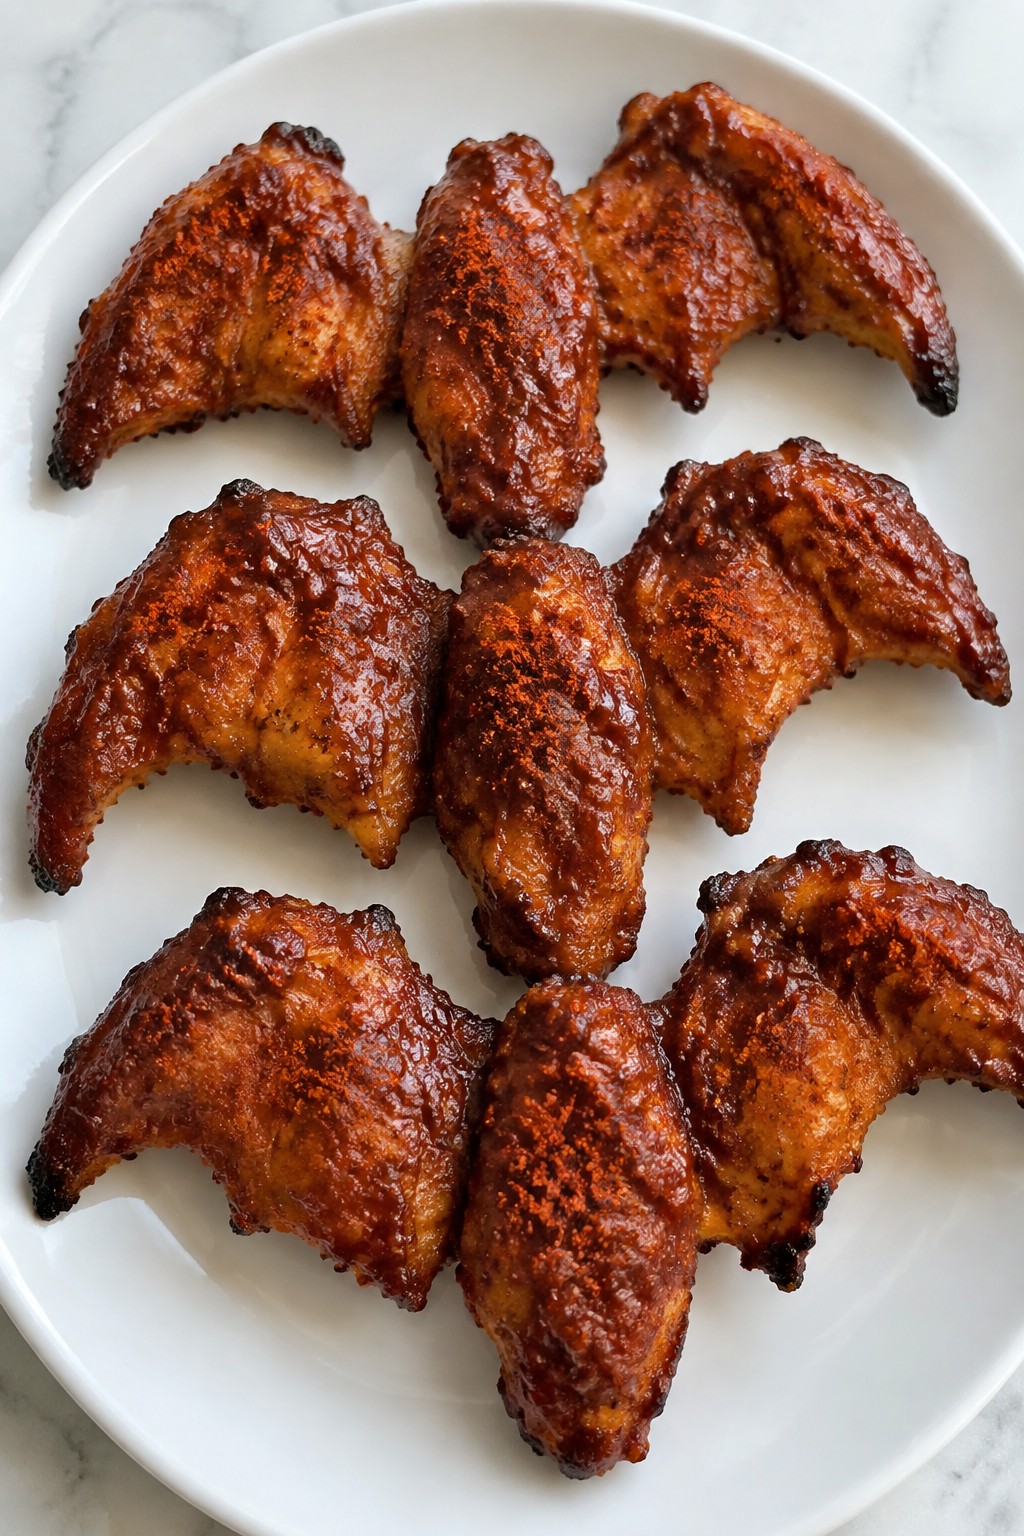
BBQ Chicken Bat Wing Tenders
These BBQ Chicken Bat Wing Tenders give chicken strips a spooky twist that fits right into a kids Halloween spread. The tenders cook up crispy on the edges and soak up smoky BBQ flavor for a sweet and savory bite that little hands can grab easily.
They work well for parties or after-school snacks when you want something quick that still feels festive. Arrange them on a platter to look like spread wings and watch the kids reach for seconds.
Serves 4 people.
Ingredients
- 1 pound chicken tenders
- ¾ cup BBQ sauce
- 1 tablespoon olive oil
- 1 teaspoon paprika
- ½ teaspoon salt
- ¼ teaspoon black pepper
Instructions
- Place the chicken tenders in a bowl and sprinkle them with paprika, salt, and black pepper. Toss to coat evenly on all sides.
- Heat the olive oil in a large skillet over medium heat until it shimmers.
- Add the seasoned tenders to the skillet in a single layer. Cook for 5 to 6 minutes on the first side until golden.
- Flip each tender and cook for another 5 minutes until the inside is no longer pink and the edges are crisp.
- Pour the BBQ sauce over the tenders in the skillet. Stir gently to coat every piece and let it bubble for 1 minute so the sauce thickens slightly on the chicken.
- Remove the skillet from the heat and transfer the tenders to a serving plate.
Extra Tips
Let the tenders rest for two minutes after cooking so the BBQ sauce sets and stays on each piece instead of sliding off. If the sauce feels too thick, stir in a teaspoon of water while it warms in the skillet. Leftovers reheat well in a 350°F oven for five minutes to bring back the crisp edges without drying out the chicken.Course: Appetizer Cuisine: American Equipment: Large skillet, Mixing bowl, Tongs
Mozzarella-Stuffed Meatball Eyeballs
These mozzarella-stuffed meatball eyeballs add a playful touch to any Halloween spread. Kids enjoy biting into the warm meatballs and finding the melted cheese inside, while the olive accents give each one an eye-like appearance. They hold up well on a platter and pair easily with other finger foods.
The meatballs turn out tender with a light herb flavor and a satisfying cheese pull. They work nicely for parties, movie nights, or quick after-school snacks when you want something that feels festive without extra fuss.

Serves 4 people.
Ingredients
- 1 pound ground beef
- 1/2 cup plain breadcrumbs
- 1 large egg
- 2 cloves garlic, minced
- 1 teaspoon Italian seasoning
- 1/2 teaspoon salt
- 1/4 teaspoon black pepper
- 4 ounces mozzarella cheese, cut into 12 small cubes
- 12 black olives, sliced into rings
- 1 cup marinara sauce
Instructions
- Preheat the oven to 400 degrees and line a baking sheet with parchment paper.
- In a mixing bowl, combine the ground beef, breadcrumbs, egg, minced garlic, Italian seasoning, salt, and black pepper. Mix until evenly blended.
- Divide the mixture into 12 portions. Flatten each portion slightly, place one mozzarella cube in the center, and shape the meat around the cheese to seal it completely.
- Arrange the meatballs on the prepared baking sheet with space between them.
- Bake for 18 to 20 minutes until the meatballs are cooked through and lightly browned.
- Remove from the oven and immediately press one olive ring onto the top of each meatball to create the eyeball effect.
- Warm the marinara sauce and serve it on the side for dipping.
Extra Tips
Seal the meatballs tightly around the cheese cubes so none leaks out during baking. If you want a stronger olive flavor, press the slice in right after baking while the surface is still soft. Leftovers reheat well in a 350-degree oven for 8 minutes to keep the cheese gooey without drying the meat.Course: Appetizer Cuisine: Italian Equipment: Mixing Bowl, Baking Sheet, Oven
Candy Corn Fruit and Cheese Skewers
These skewers stack fruit and cheese in candy corn colors to create an easy Halloween snack. They work well for school parties, after-school treats, or a quick addition to a holiday spread. The result gives kids something colorful to pick up without extra fuss.
The flavor combines sweet pineapple with mild mozzarella and sharper cheddar. The textures stay juicy from the fruit and firm from the cheese cubes.

Serves 4 people.
Ingredients
- 12 small wooden skewers
- 2 cups fresh pineapple chunks
- 8 ounces cheddar cheese, cut into 1-inch cubes
- 8 ounces mozzarella cheese, cut into 1-inch cubes
Instructions
- Lay out the wooden skewers on a clean surface so you can assemble them in order.
- Thread one pineapple chunk onto each skewer to form the yellow base layer.
- Add one cheddar cheese cube next to the pineapple to create the orange middle layer.
- Finish each skewer with one mozzarella cheese cube at the top for the white layer.
- Repeat the process until all twelve skewers are complete and the colors show clearly.
Extra Tips
Cut the cheese into even cubes so the skewers hold together without sliding. Assemble them shortly before serving to keep the pineapple from releasing too much juice. If you need to prepare ahead, store the cut pieces separately in the fridge and thread them just before guests arrive.Course: Appetizer Cuisine: American Equipment: Cutting board, Knife, Wooden skewers
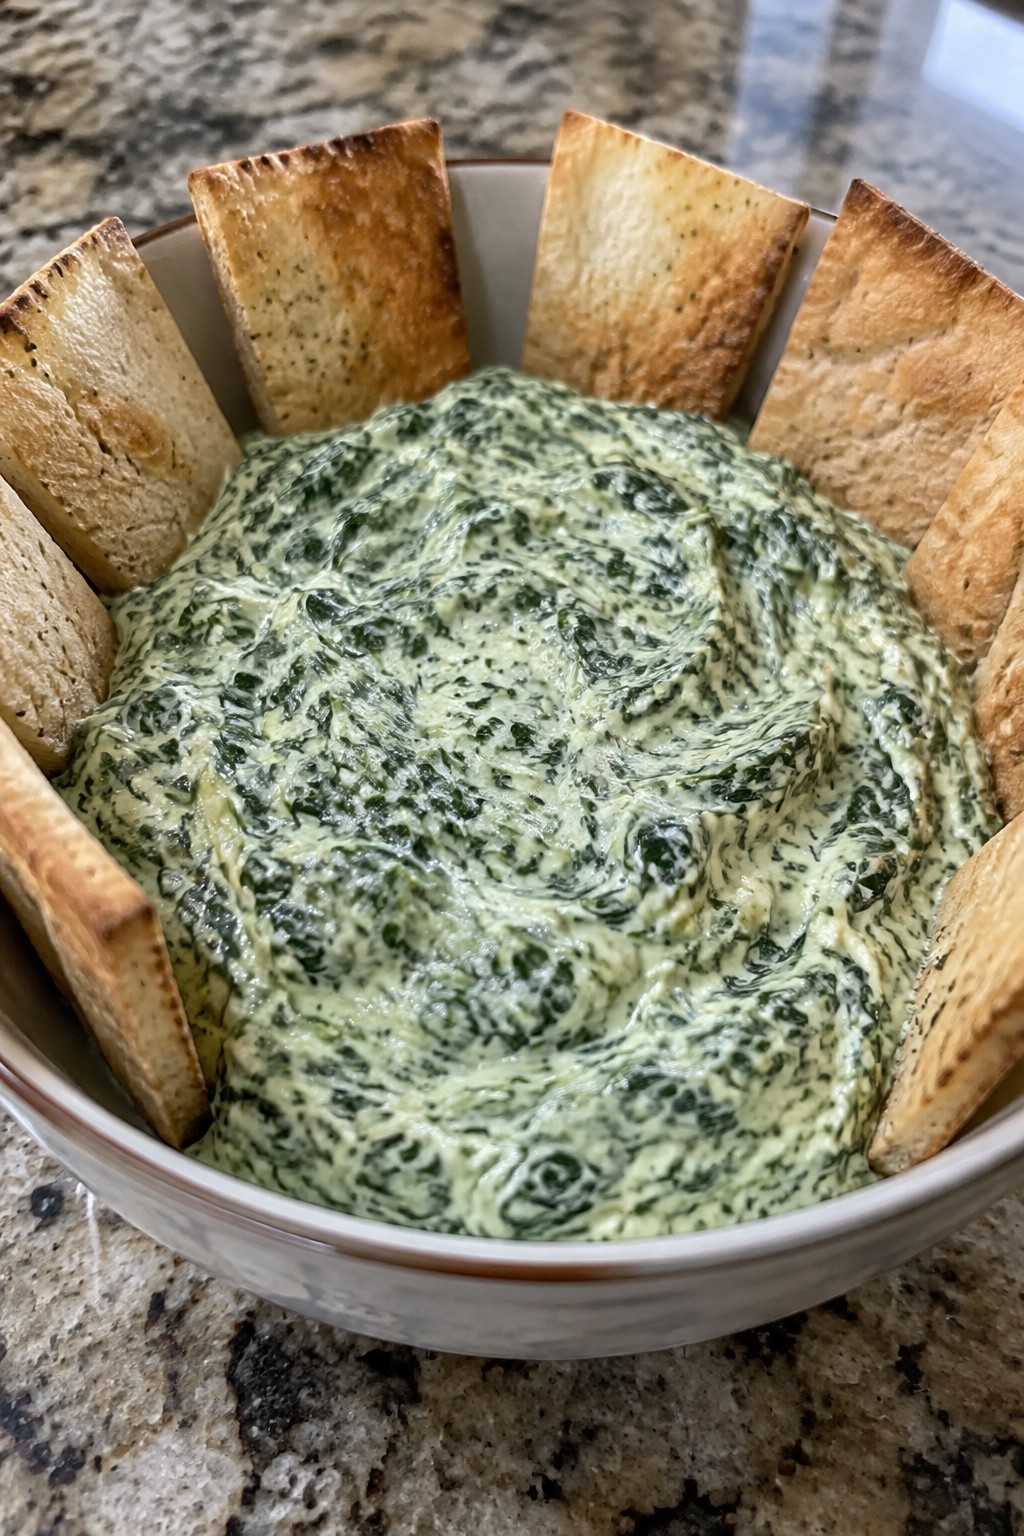
Graveyard Spinach Dip with Pita Chip Tombstones
This spinach dip becomes a simple Halloween centerpiece when pita chips stand upright like tombstones around the edge of the bowl. Kids enjoy the game of fishing out the chips and scooping up the creamy dip underneath.
The finished dish offers a mild garlic flavor with a smooth, thick texture from the spinach and cream cheese. It works well for small parties or after-school snacks because the components can be prepared ahead and assembled quickly.
Serves 4 people.
Ingredients
- 10 oz fresh spinach, chopped
- 8 oz cream cheese, softened
- 1/2 cup sour cream
- 2 garlic cloves, minced
- 1/4 tsp salt
- 4 whole pita breads
- 2 tbsp olive oil
Instructions
- Preheat the oven to 375°F. Cut each pita bread into 6-8 rectangles roughly 3 inches tall to resemble tombstones. Brush both sides lightly with olive oil and place on a baking sheet.
- Bake the pita pieces for 10-12 minutes until they turn golden and crisp. Remove from the oven and set aside to cool.
- While the pita bakes, heat a large skillet over medium heat. Add the chopped spinach and minced garlic. Cook for 3-4 minutes, stirring often, until the spinach wilts and most liquid evaporates.
- Transfer the spinach mixture to a mixing bowl. Add the softened cream cheese, sour cream, and salt. Stir until the ingredients are fully combined and the mixture is smooth.
- Spoon the spinach dip into a serving bowl. Stand several pita tombstones upright around the rim so they look like they are rising from the dip. Serve the remaining pita chips on the side.
Extra Tips
Cut the pita rectangles slightly different heights so the tombstones look more natural when arranged. The dip thickens as it cools, so stir it again right before serving if it sits out for more than 30 minutes. Leftovers keep in the refrigerator for two days in a covered container; the pita chips stay crisp longer if stored separately in a bag.
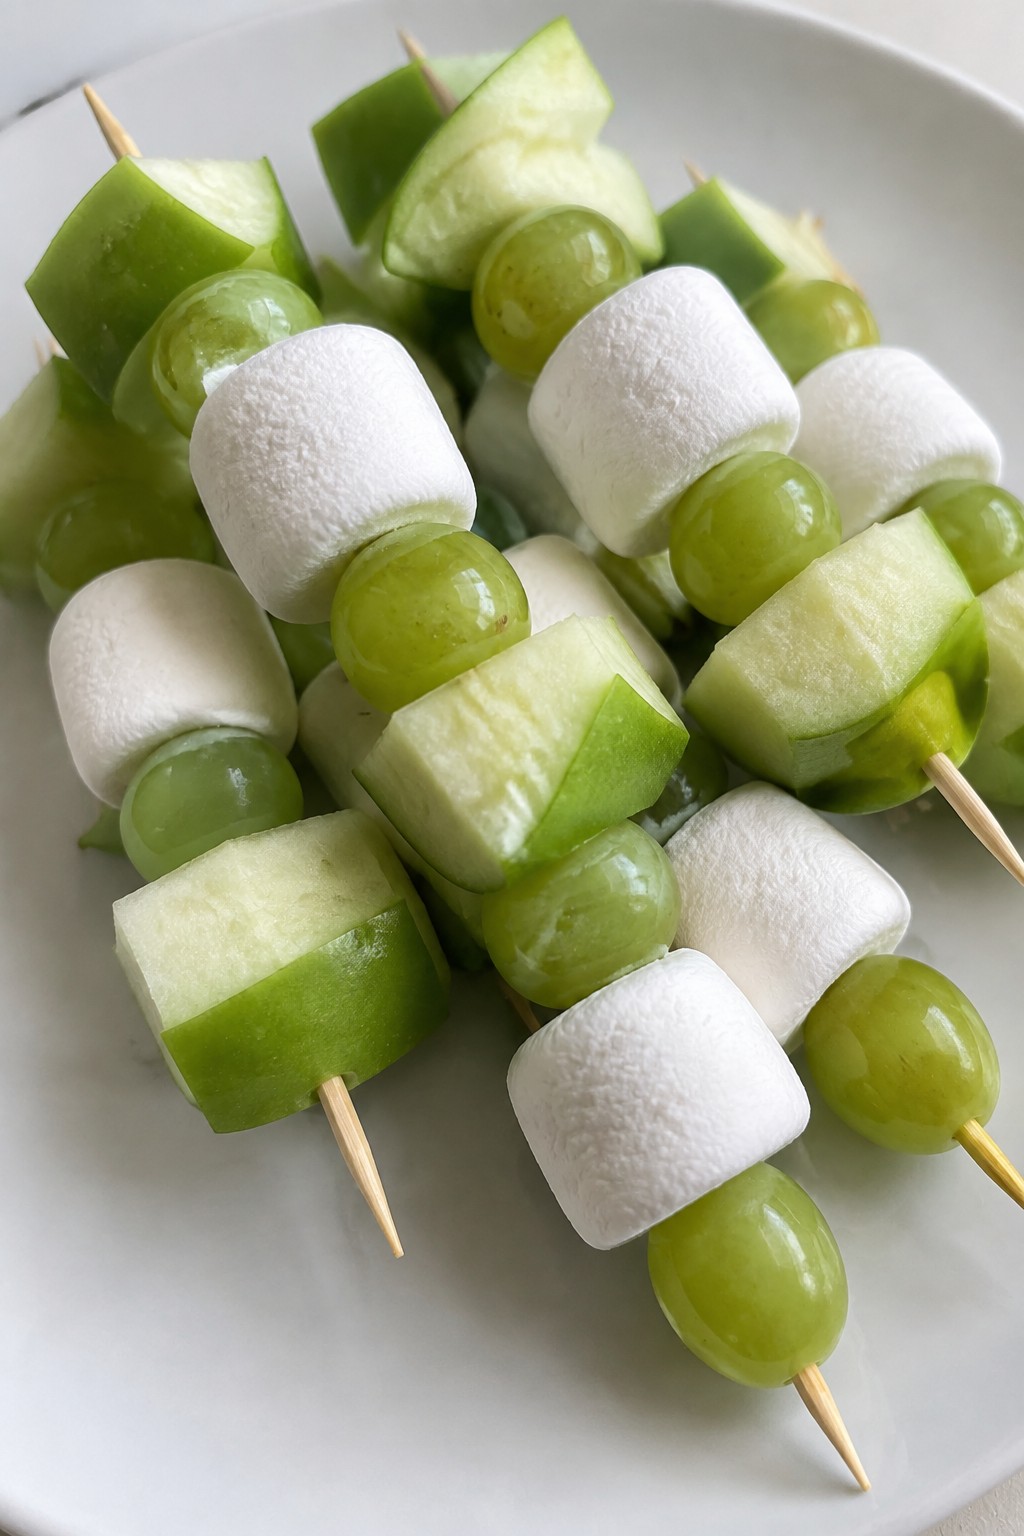
Course: Appetizer Cuisine: American Equipment: Baking sheet, Large skillet, Mixing bowlMarshmallow Bolt Frankenfruit Skewers
These Marshmallow Bolt Frankenfruit Skewers add a simple Frankenstein touch to basic fruit skewers. Kids can grab them easily at parties or snack time, and the mix of crisp apple, sweet grapes, and soft marshmallow gives a good balance of textures.
They come together quickly with minimal tools and hold up well on a platter. The green apples and grapes keep the color theme light while the marshmallows stand in as the bolts.
Serves 4 people.
Ingredients
- 2 large green apples, cored and cut into 1-inch chunks
- 1 cup green seedless grapes
- 16 large marshmallows
- 8 wooden skewers
Instructions
- Core the green apples and cut them into 1-inch chunks so they thread easily onto the skewers.
- Place one marshmallow on each wooden skewer first. This will act as one of the bolts.
- Add an apple chunk, then a grape, and repeat the pattern once more.
- Finish each skewer with a second marshmallow at the opposite end to complete the bolt look.
- Repeat the process with the remaining ingredients until all eight skewers are assembled.
Extra Tips
Use firm apples so the chunks do not break when the skewers are handled. You can prepare the skewers a few hours ahead and store them covered in the refrigerator to keep the fruit fresh.Course: Snack Cuisine: American Equipment: Knife, Cutting Board, Wooden Skewers
Mini Pumpkin Patch Pizza Bites
These Mini Pumpkin Patch Pizza Bites turn simple English muffins into a kid-friendly Halloween snack. The round bases get topped with sauce and two kinds of cheese that melt into a gooey layer, then finished with green basil and tomato pieces that give the look of a tiny garden patch.
They fit well on a party platter or as an after-school bite when you want something quick and hands-on. The crisp muffin base holds up under the melted cheese while the mild tomato flavor keeps everything balanced for young eaters.

Serves 4 people.
Ingredients
- 4 English muffins, halved
- ½ cup pizza sauce
- 1 cup shredded mozzarella cheese
- ½ cup shredded cheddar cheese
- 8 small basil leaves
- 4 cherry tomatoes, quartered
Instructions
- Heat the oven to 400 degrees F and line a baking sheet with parchment if you like.
- Arrange the English muffin halves cut side up on the baking sheet.
- Spread about 1 tablespoon of pizza sauce over each muffin half.
- Stir the mozzarella and cheddar together in a small bowl, then scatter the cheese mix evenly over the sauce on every piece.
- Bake for 8 to 10 minutes until the cheese is fully melted and starting to brown at the edges.
- Take the baking sheet out of the oven and let the bites cool for one minute.
- Place one basil leaf on each bite and add two or three tomato quarters near the basil to finish the pumpkin patch look.
Extra Tips
Mix a little extra cheddar into the cheese blend if you want a brighter orange color once it melts. These bites taste best right after baking, but you can warm leftovers in a toaster oven for two minutes to bring back the crisp base. Skip the tomatoes if your kids prefer plain cheese pizza.Course: Appetizer Cuisine: American Equipment: Baking sheet, Oven, Knife
Ghostly Popcorn Balls with Candy Eyes
These popcorn balls bring a simple spooky touch to Halloween gatherings. Kids enjoy shaping them and adding the candy eyes, which makes the snack feel interactive and fun. The result is a chewy, sweet treat that holds together well for little hands.
The marshmallow coating creates a pale, ghostly look while the popcorn adds a light crunch inside each ball. They work best as a make-ahead snack for parties or after-school treats during the holiday week.

Serves 4 people.
Ingredients
- 8 cups popped popcorn
- 3 tablespoons unsalted butter
- 4 cups mini marshmallows
- 1 teaspoon vanilla extract
- 24 candy eyes
Instructions
- Melt the butter in a large pot over medium heat.
- Add the mini marshmallows and stir until fully melted and smooth.
- Remove the pot from heat and stir in the vanilla extract.
- Pour the popped popcorn into the pot and stir quickly until every piece is coated.
- Lightly grease your hands, then scoop the mixture and press it into 8 compact balls.
- While the balls are still warm, press three candy eyes onto each one to form faces.
- Place the finished balls on a lined baking sheet and let them cool until firm.
Extra Tips
Form the balls while the mixture is warm but not hot to keep the shape neat. Store any leftovers in an airtight container at room temperature for up to two days. If the popcorn mixture stiffens too quickly, warm it gently over low heat for a minute before shaping the last few balls.Course: Snack Cuisine: American Equipment: Large Pot, Wooden Spoon, Baking Sheet
Monster Green Cookie Dough Bites
These green cookie dough bites bring a playful Halloween twist to snack time. Kids enjoy the bright color and the soft, chewy texture that comes from the simple no-bake dough. The sweet vanilla flavor pairs with scattered chocolate chips for a treat that feels both fun and familiar.
They work well for parties or after-school snacks when you need something quick that does not require baking. The bites stay soft and hold their shape once chilled.

Serves 4 people.
Ingredients
- 1 cup heat-treated all-purpose flour
- 1/2 cup unsalted butter, softened
- 1/2 cup granulated sugar
- 1 teaspoon vanilla extract
- 1/4 teaspoon salt
- 4-6 drops green food coloring
- 1/2 cup mini chocolate chips
- 16 candy eyes
Instructions
- Place the softened butter and sugar in a mixing bowl. Beat them together until the mixture looks light and creamy.
- Add the vanilla extract and salt. Stir until everything is evenly combined.
- Mix in the heat-treated flour a little at a time until a soft dough forms.
- Add the green food coloring one drop at a time, stirring after each addition, until the dough reaches a bright green shade.
- Fold in the mini chocolate chips until they are scattered throughout the dough.
- Scoop out small portions and roll them into bite-sized balls. Place each ball on a lined baking sheet.
- Gently press two candy eyes onto the top of each ball to create the monster faces.
- Chill the bites in the refrigerator for 20 minutes before serving.
Extra Tips
Chill the dough balls a little longer if the room feels warm, since the butter can soften quickly. Skip the candy eyes if you prefer a plain look, or press them on right before serving so they stay secure. Store leftovers in an airtight container in the fridge for up to three days.Course: Snack Cuisine: American Equipment: Mixing Bowl, Baking Sheet
