
Hey there, spooky food enthusiasts! 🎃
If you’re looking to whip up some boo-tiful treats with a pinch of creativity and a dash of fun, you’ve come to the right place. I’ve rounded up 15 easy Halloween finger foods that will not only bewitch your guests but also leave you with plenty of time to join in on the party fun. From creepy spider deviled eggs to playful monster finger hot dogs, there’s something for every ghost and goblin in your home. Let’s conjure up some tasty magic together!
Spooky Spider Deviled Eggs
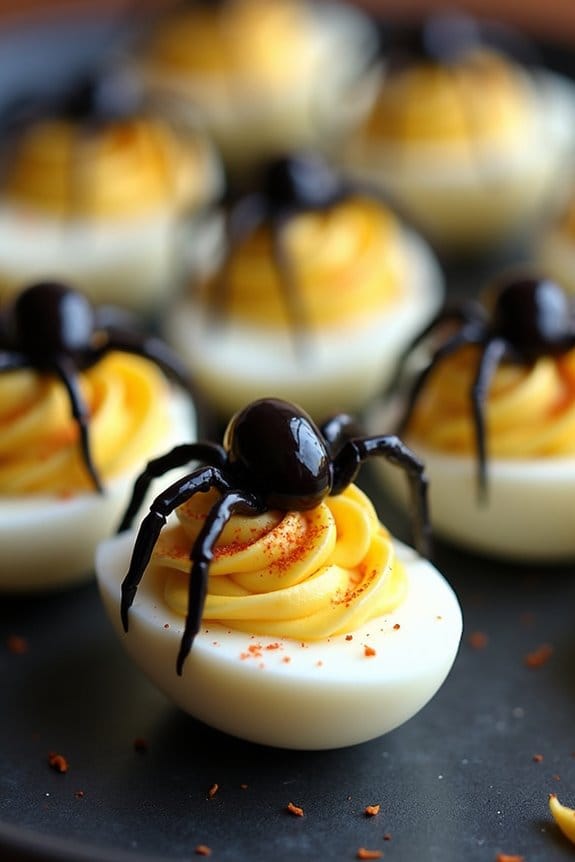
Halloween is the perfect time to get creative in the kitchen, and these Spooky Spider Deviled Eggs are an ideal addition to your festive spread. Not only are they delicious, but their eerie appearance is sure to delight both kids and adults alike.
The classic deviled egg filling is made extra creamy and flavorful with mayonnaise, mustard, and a hint of paprika, while black olives artfully mimic creepy crawly spiders. This recipe is simple to prepare and makes an excellent finger food for your Halloween party.
Each bite of these Spooky Spider Deviled Eggs offers a rich and tangy flavor with just the right amount of spice. The addition of black olives not only adds a dash of color but also provides a slight salty taste that complements the creamy filling perfectly.
Whether you’re hosting a spooky soiree or just want to surprise your family with a Halloween-themed snack, these deviled eggs will make a striking centerpiece on your buffet table. Designed to serve 4-6 people, this recipe guarantees there’s enough creepy goodness to go around.
Ingredients for 4-6 people:
- 6 large eggs
- 3 tablespoons mayonnaise
- 1 teaspoon Dijon mustard
- 1/4 teaspoon salt
- 1/4 teaspoon black pepper
- 1/4 teaspoon paprika
- 12 black olives
Cooking Instructions:
- Boil the Eggs: Place the eggs in a saucepan and cover them with water by about an inch. Bring the water to a boil over medium-high heat. Once boiling, remove the saucepan from the heat, cover, and let the eggs sit for 10 minutes.
- Prepare the Eggs: After 10 minutes, transfer the eggs to a bowl of ice water to cool for at least 5 minutes. This will make them easier to peel. Once cooled, gently peel the eggs and slice them in half lengthwise.
- Make the Filling: Carefully scoop out the yolks into a small mixing bowl, and mash them with a fork. Add mayonnaise, Dijon mustard, salt, pepper, and paprika to the bowl, mixing until smooth and creamy.
- Fill the Egg Whites: Spoon or pipe the yolk mixture back into the hollowed egg whites, dividing the filling evenly among the 12 halves.
- Create the Spiders: Cut the black olives in half. Use one half as the spider’s body and slice the other half into thin strips for legs. Arrange them on top of the deviled eggs to form spiders.
- Serve and Enjoy: Arrange the finished Spooky Spider Deviled Eggs on a platter and serve chilled.
Extra Tips:
For perfectly hard-boiled eggs, make sure not to overcrowd the saucepan, as this could lead to uneven cooking. If you want to add a bit more spice, consider incorporating a dash of hot sauce into the yolk mixture.
To make the deviled eggs look even more festive, you can sprinkle additional paprika or black pepper over them before serving. Finally, if you’re preparing these in advance, keep them covered in the refrigerator to maintain freshness until your guests arrive.
Monster Finger Hot Dogs

Halloween is a time for fun and creativity, and what better way to celebrate than with some spooky-themed snacks? Monster Finger Hot Dogs are a delicious and entertaining addition to any Halloween gathering. These creepy yet tasty finger foods aren’t only eye-catching but also simple to make. With a few basic ingredients and a touch of creativity, you can have a platter of Monster Finger Hot Dogs ready to delight your guests.
These ghoulish treats are perfect for a Halloween party or a family night in. The key to making Monster Finger Hot Dogs is in the presentation. By using hot dogs and a few cleverly placed condiments, you can create a dish that looks like a plate of severed monster fingers, complete with fingernails and knuckle details. It’s a fun project to do with kids, and they’re sure to enjoy both making and eating these eerie edibles.
Ingredients for Monster Finger Hot Dogs (serving size: 4-6 people):
- 10 hot dogs
- 10 hot dog buns
- Ketchup (for blood effect)
- Mustard (optional)
- 10 sliced almonds (for fingernails)
- 1 tablespoon olive oil or butter (for brushing)
Cooking Instructions:
- Prepare the Hot Dogs: Begin by heating a grill or stovetop pan over medium heat. Lightly brush the hot dogs with olive oil or butter to prevent sticking and to add a bit of flavor.
- Create the Finger Details: Using a small, sharp knife, score each hot dog to mimic the appearance of knuckles. Make one slice near the top, one near the middle, and one near the bottom of each hot dog, being careful not to cut too deep.
- Add the Fingernails: At one end of each hot dog, slice off a small, rounded piece to create a flat surface. Attach a sliced almond to this flat end using a small dab of mustard or ketchup to act as an adhesive.
- Cook the Hot Dogs: Place the prepared hot dogs on the grill or in the pan. Cook them for about 5-7 minutes, turning occasionally, until they’re heated through and have grill marks (if grilling).
- Prepare the Buns: While the hot dogs are cooking, open the hot dog buns and lightly toast them on the grill or in a toaster until they’re golden brown.
- Assemble the Monster Fingers: Place each hot dog into a bun, almond-side facing out to resemble a nail. Drizzle ketchup around the base of the hot dog to create a “bloody” effect.
- Serve and Enjoy: Arrange the Monster Finger Hot Dogs on a serving platter and garnish with additional ketchup or mustard as desired. Serve immediately while warm.
Extra Tips:
For an even more realistic look, you can use a small amount of red food coloring mixed with ketchup to enhance the bloody effect. If you want to add extra flavor, consider using different types of hot dogs like smoked or cheese-filled varieties.
For a vegetarian option, substitute traditional hot dogs with plant-based versions available in most supermarkets. Remember, the key to these spooky snacks is all in the presentation, so take your time with the details to make them as frightfully fun as possible!
Ghostly Mini Pizzas
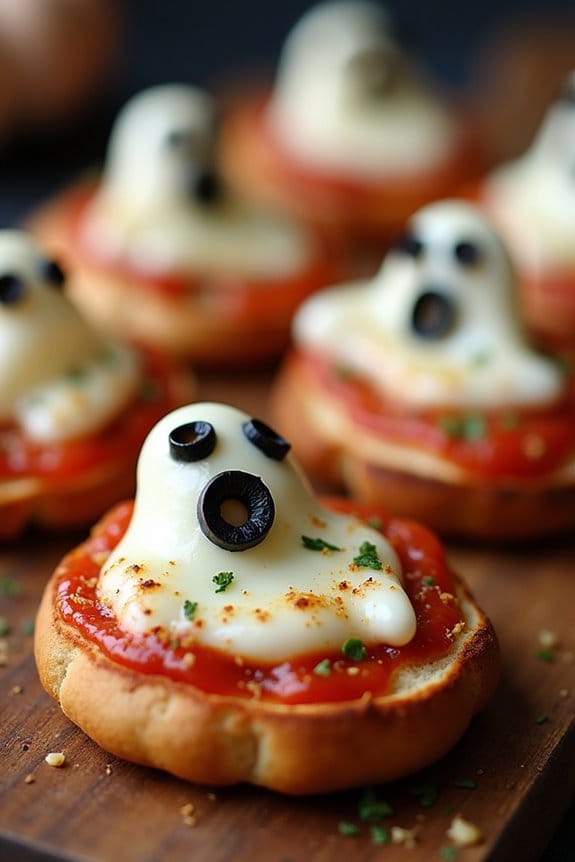
The beauty of Ghostly Mini Pizzas is that they can be made quickly and with minimal effort, allowing you to spend more time enjoying your Halloween festivities.
Quickly crafted Ghostly Mini Pizzas let you savor Halloween fun without the kitchen hassle.
The combination of savory pizza sauce, gooey cheese, and your choice of toppings on a crispy base makes for a perfect finger food. Whether you’re hosting a spooky soiree or just want to add some Halloween fun to your dinner table, these mini pizzas are sure to be a hit.
Ingredients (Serves 4-6 people):
- 6 English muffins or mini pizza bases
- 1 cup pizza sauce
- 12 slices mozzarella cheese
- 24 black olives
- 1 teaspoon dried oregano
- 1 teaspoon garlic powder
- Optional toppings: pepperoni, bell peppers, mushrooms
Cooking Instructions:
- Preheat the Oven: Preheat your oven to 375°F (190°C) to guarantee it’s hot enough to crisp up the pizza bases and melt the cheese perfectly.
- Prepare the Bases: Slice the English muffins in half and place them on a baking sheet lined with parchment paper. This will serve as the base for your mini pizzas.
- Add the Sauce: Spread a generous tablespoon of pizza sauce over each muffin half, making sure it’s evenly coated to offer a rich tomato flavor in every bite.
- Shape the Cheese: Using a ghost-shaped cookie cutter, cut each slice of mozzarella into ghost shapes. If you don’t have a cutter, a small knife can be used to cut out ghost shapes by hand.
- Assemble the Pizzas: Place the ghost-shaped mozzarella slices on top of the sauce-covered muffin halves. Add two slices of black olives to each piece to create ghost eyes.
- Season and Top: Sprinkle a pinch of dried oregano and garlic powder over each pizza for added flavor. Add optional toppings like pepperoni or vegetables if desired.
- Bake: Place the baking sheet in the preheated oven and bake for 10-12 minutes, or until the cheese is melted and slightly golden, and the muffin edges are crispy.
- Serve: Remove from the oven and let them cool slightly before serving. These mini pizzas are best enjoyed warm.
Extra Tips:
For an even spookier effect, try adding small pieces of red bell pepper for mouths or use a variety of cheeses to create different ghostly looks.
If you want a healthier version, opt for whole grain English muffins or gluten-free pizza bases. Additionally, these mini pizzas can be prepared ahead of time and stored in the refrigerator. Simply bake them when you’re ready to serve. Enjoy these fun and festive treats at your next Halloween event!
Witch’s Broomstick Pretzels

Witch’s Broomstick Pretzels are a spooky and delightful treat perfect for your Halloween festivities. These savory snacks are quick to prepare and add a whimsical touch to any Halloween party spread. Shaped like tiny broomsticks, they aren’t only delicious but also visually amusing, making them a hit among both kids and adults.
Their crunchy texture and salty taste make them a fantastic finger food that pairs well with a variety of dips or can be enjoyed on their own.
The magic behind Witch’s Broomstick Pretzels lies in their simple yet creative design. By using pretzel sticks as broom handles and string cheese as broom bristles, this recipe offers a fun and interactive way to get everyone into the Halloween spirit.
With minimal ingredients and effort, you can whip up a batch of these charming broomsticks in no time, making them an ideal last-minute addition to your Halloween menu.
Ingredients for Witch’s Broomstick Pretzels (Serves 4-6):
- 12 pretzel sticks
- 4 string cheese sticks
- 12 fresh chive strands
Cooking Instructions:
- Prepare the String Cheese:
- Take each string cheese stick and cut it into thirds. You should have three equal-sized pieces from each stick, totaling twelve pieces.
- Create the Broom Bristles:
- Using a sharp knife, carefully slice one end of each cheese piece into thin strips, creating a fringe effect that resembles broom bristles. Be cautious not to cut all the way through to avoid the cheese from falling apart.
- Assemble the Broomsticks:
- Gently insert one end of a pretzel stick into the uncut end of each string cheese piece. Push it just enough to secure the cheese without breaking the pretzel.
- Fasten with a Chive:
- Take a chive strand and tie it around the top of the cheese piece where it meets the pretzel stick. This will help hold the cheese in place and enhance the broomstick appearance.
- Serve and Enjoy:
- Arrange the Witch’s Broomstick Pretzels on a platter. Serve them as they are, or pair them with your favorite dips for added flavor.
Extra Tips:
To make the process smoother, make certain the string cheese is cold, as it will be easier to slice and manipulate without sticking or breaking apart.
If chives aren’t available, you can use thin green onion strips or parsley stems as a substitute. For a more flavored version, consider sprinkling some smoked paprika or garlic powder on the cheese before assembling the broomsticks.
This recipe is quite versatile, so feel free to experiment with different herbs and spices to suit your taste preferences.
Mummy Jalapeño Poppers
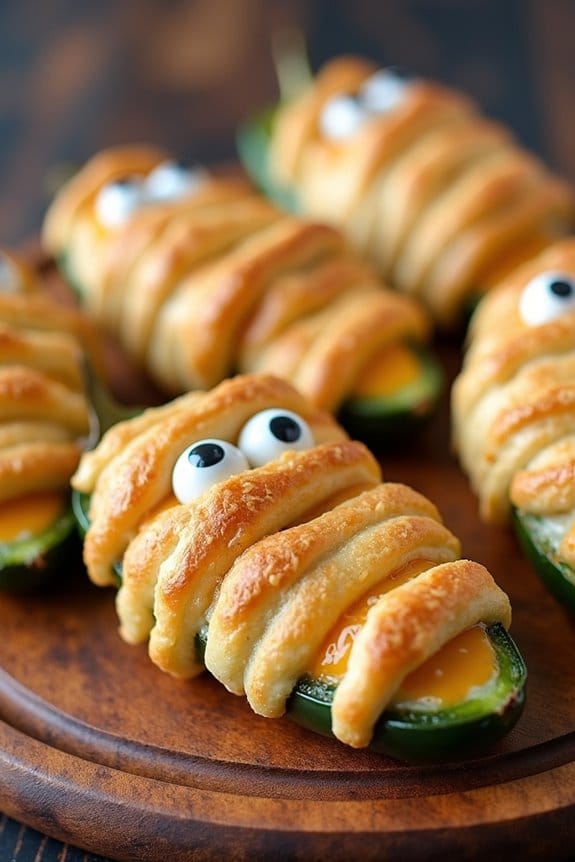
Mummy Jalapeño Poppers are a spooktacular addition to any Halloween gathering, combining spicy, creamy, and savory flavors wrapped in a delightful pastry “bandage.” These bite-sized treats are perfect for a Halloween party, offering a playful twist on classic jalapeño poppers. With their gory mummy appearance, they’re sure to be a hit with both kids and adults alike. The combination of spicy jalapeños, creamy cheese filling, and flaky crescent roll dough creates a scrumptious snack that will have everyone reaching for more.
Spooky, scrumptious, and sure to be a Halloween hit, Mummy Jalapeño Poppers delight with every bite.
Making Mummy Jalapeño Poppers isn’t only fun but also relatively simple, making it a great option for those who enjoy getting creative in the kitchen. The process involves filling halved jalapeños with a flavorful cheese mixture, wrapping them in strips of crescent roll dough to mimic mummy wrappings, and baking them to golden perfection. For an added spooky touch, edible eyes are placed on the mummies, bringing them to life with a fun and festive flair. Follow this recipe to prepare a serving size of 4-6 people, guaranteeing there are plenty of these delicious mummies to go around.
Ingredients:
- 10-12 medium-sized jalapeño peppers
- 8 oz cream cheese, softened
- 1 cup shredded cheddar cheese
- 1/2 teaspoon garlic powder
- 1/4 teaspoon onion powder
- 1/4 teaspoon smoked paprika
- 1/4 teaspoon salt
- 1 roll (8 oz) refrigerated crescent roll dough
- 1 tablespoon milk
- 1 egg yolk
- Edible candy eyes
Instructions:
- Preheat the Oven: Begin by preheating your oven to 375°F (190°C) to verify it’s ready for baking once the jalapeños are prepared.
- Prepare the Jalapeños: Slice each jalapeño in half lengthwise and carefully remove the seeds and membranes. For less heat, make sure to remove all the seeds, as they contain most of the pepper’s spiciness.
- Make the Cheese Filling: In a mixing bowl, combine the softened cream cheese, shredded cheddar cheese, garlic powder, onion powder, smoked paprika, and salt. Mix until all ingredients are well combined into a creamy filling.
- Fill the Jalapeños: Using a small spoon, generously fill each jalapeño half with the cheese mixture, smoothing the top to create a flat surface.
- Prepare the Crescent Dough: Unroll the crescent roll dough and cut it into thin strips, approximately 1/4 inch wide. These will serve as the mummy “bandages.”
- Wrap the Jalapeños: Wrap each filled jalapeño half with the dough strips, leaving a small gap for the eyes and ensuring they resemble mummies. Don’t cover the cheese filling entirely.
- Brush with Egg Wash: In a small bowl, whisk together the egg yolk and milk to create an egg wash. Lightly brush each wrapped jalapeño with the egg wash to promote a golden and shiny finish when baked.
- Bake the Poppers: Place the wrapped jalapeños on a baking sheet lined with parchment paper. Bake in the preheated oven for 20-25 minutes, or until the dough is golden brown and crispy.
- Add the Eyes: Once baked, remove the poppers from the oven and let them cool for a few minutes. Attach two candy eyes onto each popper using a small dab of the leftover cheese mixture as glue.
Extra Tips: When working with jalapeños, consider wearing gloves to protect your skin from the spicy oils, which can cause irritation. If the dough strips are too sticky, lightly dust them with flour to make handling easier. For an extra kick, you can add a pinch of cayenne pepper to the cheese mixture. These mummy poppers can be made ahead of time and warmed up before serving, making them a convenient party option. Enjoy the spooky and delicious experience of these Mummy Jalapeño Poppers!
Eyeball Caprese Bites
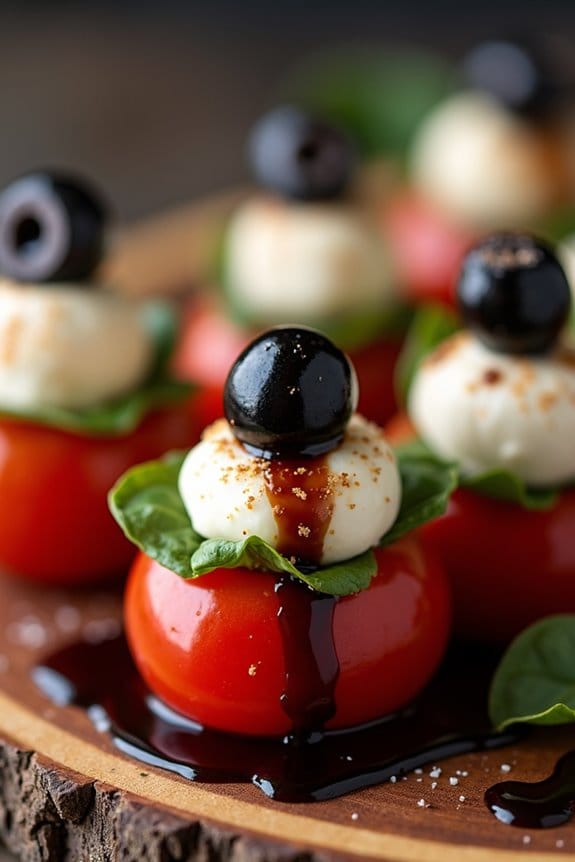
Eyeball Caprese Bites are a spooky and delicious twist on the traditional Italian caprese salad, perfect for your Halloween gathering. These bite-sized treats not only look festive but are also packed with flavors that your guests will love. The combination of juicy cherry tomatoes, fresh mozzarella, and fragrant basil topped with a creepy olive “eyeball” makes for a fun and tasty appetizer.
The best part is that they’re simple to assemble and require minimal cooking, making them an ideal choice for hosts who want to focus on other aspects of their Halloween party.
These eyeball caprese bites aren’t only visually appealing but also healthy, providing a revitalizing contrast to the more decadent treats often found at Halloween celebrations. With the addition of a drizzle of balsamic glaze, these appetizers offer a perfect balance of savory and sweet flavors.
Whether you’re hosting a large party or a small gathering, these eyeball caprese bites will surely be a hit, leaving your guests impressed and satisfied.
Ingredients for 4-6 servings:
- 12 cherry tomatoes
- 12 small fresh mozzarella balls (bocconcini)
- 6 large basil leaves
- 6 black olives
- 12 toothpicks
- 1 tablespoon balsamic glaze
- Salt and pepper to taste
Instructions:
- Prepare the Ingredients: Rinse the cherry tomatoes and pat them dry. Slice each tomato in half to create two equal parts. Drain the mozzarella balls and pat them dry as well.
- Create the Eyeballs: Slice the black olives crosswise into thin rings. Place one olive ring on top of each mozzarella ball. Press gently so it adheres securely, resembling an eyeball.
- Assemble the Bites: Take one toothpick and begin by skewering half of a cherry tomato, cut side facing up. Next, add a mozzarella ball with the olive on top. Finish by skewering the other half of the cherry tomato, cut side down, so that the mozzarella is sandwiched between the tomato halves.
- Add the Basil: Tear each basil leaf in half, if they’re large, and carefully tuck a piece of basil between the mozzarella ball and one of the tomato halves on each skewer.
- Season and Drizzle: Arrange the assembled eyeball caprese bites on a serving platter. Lightly season with salt and pepper. Drizzle the balsamic glaze over the top of each bite for added flavor.
Extra Tips: When preparing your Eyeball Caprese Bites, make sure the mozzarella balls are dry by patting them with paper towels. This guarantees that the olive rings adhere better.
You can prepare these bites ahead of time and refrigerate them until serving, but hold off on drizzling the balsamic glaze until just before serving to prevent them from becoming soggy. If you prefer a little more spice, consider adding a small piece of jalapeño or a dash of red pepper flakes to give your bites an extra kick.
Graveyard Taco Dip

Graveyard Taco Dip is a spooky and delicious addition to your Halloween finger foods spread. This layered dip combines classic taco ingredients with a creative presentation that resembles a haunted graveyard, complete with edible tombstones and creepy decorations.
It’s not just a treat for the eyes but also a delight for the taste buds, bringing together the flavors of seasoned beef, creamy cheese, and fresh veggies in every bite. Perfect for serving at a Halloween party or gathering, this recipe will cater to 4-6 people.
The Graveyard Taco Dip isn’t only fun to make but also easy to assemble, making it a great option for those looking to add a bit of festive flair to their food offerings without too much hassle. Whether you’re entertaining kids or adults, this dish is sure to be a hit.
Ingredients for 4-6 servings:
- 1 pound ground beef
- 1 packet taco seasoning
- 1 can (16 oz) refried beans
- 1 cup sour cream
- 1 cup guacamole
- 1 cup salsa
- 2 cups shredded cheese (cheddar or Mexican blend)
- 1 can (2.25 oz) sliced black olives, drained
- 1 tomato, diced
- 3 green onions, chopped
- 1 bag tortilla chips
- 6-8 rectangular-shaped tortilla chips (for tombstones)
- 1 small bunch fresh cilantro (optional, for garnish)
Cooking Instructions:
- Cook the Ground Beef: In a skillet over medium heat, brown the ground beef until fully cooked, breaking it up into crumbles as it cooks. Drain any excess fat and stir in the taco seasoning. Set aside to cool slightly.
- Prepare the Base Layer: Spread the refried beans evenly across the bottom of a 9×13 inch serving dish or a similar-sized platter to create the first layer of the dip.
- Create Layers: Layer the seasoned ground beef on top of the refried beans. Follow with a layer of sour cream, then a layer of guacamole, spreading each layer evenly.
- Add Cheese and Salsa: Sprinkle the shredded cheese over the guacamole layer, then add the salsa on top, spreading it evenly to cover the cheese.
- Decorate with Vegetables: Sprinkle the diced tomatoes, sliced black olives, and chopped green onions over the salsa layer for added flavor and color.
- Create the Graveyard Scene: Use the rectangular-shaped tortilla chips to create “tombstones” by standing them upright in the dip. You can use edible food markers to write spooky words or draw designs on the chips.
- Garnish and Serve: Garnish the dip with fresh cilantro if desired. Serve with tortilla chips for dipping.
Extra Tips: For an extra spooky effect, consider adding small plastic spiders or other Halloween-themed decorations around the edge of the serving dish (ensure they’re non-toxic and removed before eating).
You can also use sour cream in a piping bag to draw spider webs on top of the dip. This dip is best served fresh, but you can prepare the components in advance and assemble them just before serving to keep the ingredients vibrant and flavorful.
Pumpkin Cheese Ball
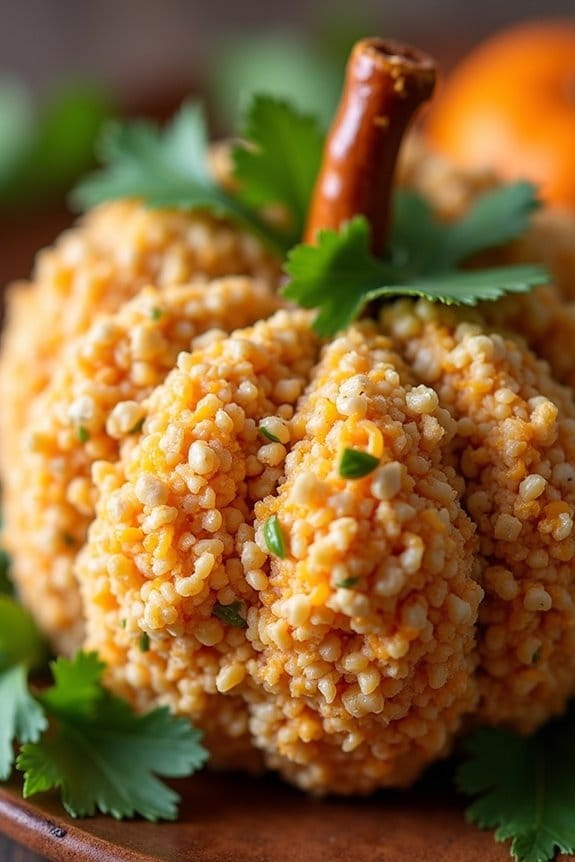
The Pumpkin Cheese Ball is a delightful and festive appetizer perfect for any Halloween gathering. Its playful presentation and rich, creamy taste make it a crowd-pleaser, adding a touch of seasonal charm to your spread. This cheese ball not only looks like a cute little pumpkin but also combines the savory flavors of cream cheese, cheddar, and an array of spices, making it a delectable treat.
Ideal for serving 4-6 people, the Pumpkin Cheese Ball is easy to prepare and can be made in advance, giving you more time to focus on other party preparations. Once assembled, it’s coated with crunchy crushed crackers or nuts to enhance its texture and flavor. Whether you’re hosting a spooky soiree or an autumnal dinner party, this finger food is a surefire hit.
Ingredients (serves 4-6 people):
- 16 oz cream cheese, softened
- 2 cups shredded sharp cheddar cheese
- 1 tablespoon Worcestershire sauce
- 1 teaspoon garlic powder
- 1/2 teaspoon onion powder
- 1/4 teaspoon smoked paprika
- Salt and pepper to taste
- 1 cup finely crushed crackers or nuts (such as pecans or walnuts)
- Pretzel rod or celery for the pumpkin stem
- Fresh parsley or cilantro for decoration
Instructions:
- Mix the Base: In a large mixing bowl, combine the softened cream cheese, shredded cheddar cheese, Worcestershire sauce, garlic powder, onion powder, smoked paprika, salt, and pepper. Mix thoroughly until all ingredients are well incorporated and the mixture is smooth.
- Shape the Ball: Transfer the cheese mixture onto a piece of plastic wrap. Gather the wrap around the cheese and form it into a round ball. Twist the top of the plastic wrap to secure it tightly.
- Chill: Refrigerate the cheese ball for at least 2 hours, or until it’s firm enough to hold its shape.
- Coat the Ball: Once chilled, remove the cheese ball from the refrigerator and carefully unwrap it. Roll the cheese ball in the crushed crackers or nuts, pressing gently to guarantee it adheres to the surface.
- Add the Stem: Insert a pretzel rod or a piece of celery into the top of the cheese ball to act as the pumpkin stem.
- Decorate: Use fresh parsley or cilantro around the stem to mimic pumpkin leaves. This adds a touch of greenery and enhances the presentation.
- Serve: Place the Pumpkin Cheese Ball on a serving platter with an assortment of crackers, sliced vegetables, or bread for dipping.
Extra Tips:
For a smoother texture, consider using an electric mixer when combining the ingredients. This will guarantee that the cream cheese and cheddar blend seamlessly.
You can also experiment with different types of cheese or spices to customize the flavor to your liking. If preparing in advance, the cheese ball can be stored in the refrigerator for up to 3 days. Just be sure to add the outer coating and decorations closer to serving time to maintain their freshness and crunch.
Bloody Finger Breadsticks

Searching for a spooky yet delicious addition to your Halloween party spread? Search no more than Bloody Finger Breadsticks.
These eerie breadsticks are shaped to resemble bloody fingers, complete with an almond “fingernail” and a smear of red sauce for that extra gruesome touch. They aren’t only a visual treat but also a savory delight, perfect for dipping into marinara sauce or your favorite dip.
Creating these breadsticks is a fun activity that can be enjoyed with family and friends. The process involves shaping the dough, attaching the “fingernails,” and adding a touch of red food coloring to give them a realistic, bloody appearance.
With a few simple ingredients and easy-to-follow steps, you can have a platter of these creepy breadsticks ready to impress your guests.
Ingredients for 4-6 servings:
- 1 package of refrigerated breadstick dough
- 12 whole almonds
- 1 egg, beaten
- Red food coloring
- 1/4 cup of marinara sauce (for dipping)
Cooking Instructions:
- Preheat the Oven: Start by preheating your oven to 350°F (175°C). This guarantees it’s hot enough to bake the breadsticks evenly.
- Prepare the Dough: Roll out the breadstick dough on a clean surface. Cut the dough into 12 strips, each about the length of a finger.
- Shape the Fingers: Take each strip and gently roll to form a finger-like shape. Pinch the dough slightly to create knuckles and bend the dough to give a more realistic finger appearance.
- Add the Fingernails: Press a whole almond into one end of each dough strip to represent the fingernail. Make sure it’s secure but not too deep to avoid it getting buried during baking.
- Apply Egg Wash: Brush the shaped dough fingers with a beaten egg. This will give them a nice golden color once baked.
- Bake: Place the dough fingers on a baking sheet lined with parchment paper. Bake in the preheated oven for 15-20 minutes or until they’re golden brown.
- Bloody Effect: Once baked and slightly cooled, use a small brush or a toothpick to apply red food coloring around the almond and in the creases to mimic blood.
- Serve: Arrange the breadsticks on a serving platter around a bowl of marinara sauce for dipping.
Extra Tips:
For an extra spooky effect, you can experiment with different shades of red food coloring to create a more realistic blood effect.
If you prefer a spicier flavor, consider adding a pinch of cayenne pepper to the marinara sauce.
To make the fingers more realistic, use a knife to score lines into the dough to mimic knuckle creases before baking.
Enjoy these finger foods with caution, as they might just be the scariest treat at your Halloween party!
Bat-Shaped Quesadillas

Preparing these quesadillas is simple and requires only a few ingredients, making them an ideal last-minute snack option. Using cookie cutters, you can easily transform ordinary tortillas into bat shapes, creating a visually appealing and thematic dish. The filling can be customized to your preferences, with options ranging from classic cheese to a mixture of vegetables or even shredded chicken for added protein. With a serving size that caters to 4-6 people, these quesadillas are an excellent choice for sharing.
Ingredients (Serves 4-6):
- 8 medium flour tortillas
- 2 cups shredded cheddar cheese
- 1 cup cooked shredded chicken (optional)
- 1/2 cup diced bell peppers
- 1/4 cup chopped green onions
- 1/4 cup salsa
- 1 tablespoon olive oil
- Salt and pepper to taste
Cooking Instructions:
- Prep the Ingredients: Begin by gathering all your ingredients and preheating your oven to 350°F (175°C). Use a bat-shaped cookie cutter to cut out bat shapes from the tortillas. If you don’t have a bat-shaped cutter, you can carefully cut the shapes using a sharp knife.
- Prepare the Filling: In a mixing bowl, combine the shredded cheddar cheese, diced bell peppers, chopped green onions, and cooked shredded chicken (if using). Add salsa, salt, and pepper, and mix until all ingredients are evenly distributed.
- Assemble the Quesadillas: Lay out half of the bat-shaped tortilla cutouts on a baking sheet lined with parchment paper. Spoon the cheese mixture onto each tortilla, spreading it evenly but leaving a small border around the edges. Place another bat-shaped tortilla on top to form a sandwich.
- Seal and Cook: Lightly brush the top tortilla with olive oil to help it crisp up in the oven. Gently press the edges of each quesadilla to seal them. Place the baking sheet in the preheated oven and bake for 10-12 minutes, or until the tortillas are golden brown and the cheese has melted.
- Serve: Remove the quesadillas from the oven and let them cool slightly before serving. Arrange them on a platter for a spooky presentation, perfect for your Halloween festivities.
Extra Tips:
When cutting the tortillas into bat shapes, save the leftover pieces to toast and use as croutons or snack pieces. You can also experiment with different fillings to suit your guests’ tastes, such as adding black beans, corn, or jalapeños for a spicy kick.
If you’re in a hurry, consider using store-bought rotisserie chicken for a quick and easy protein addition. Finally, serve the quesadillas with additional salsa, guacamole, or sour cream for dipping to enhance the flavor experience.
Creepy Crawly Cupcakes
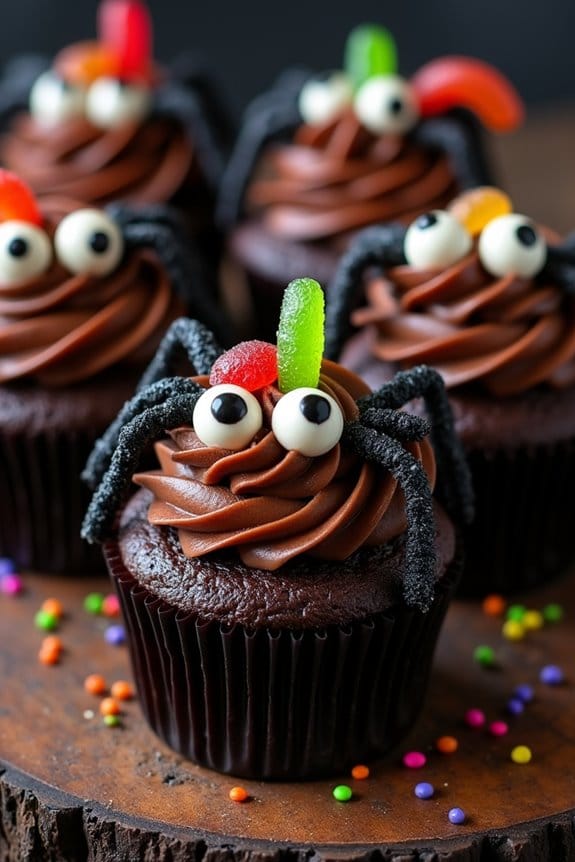
Creepy Crawly Cupcakes are the perfect addition to your Halloween party spread, combining delicious flavors with a spooky presentation. These cupcakes aren’t only fun to make but also delightfully eerie, featuring edible decorations that resemble creepy crawlies.
Delightfully eerie cupcakes with edible creepy crawlies that are a spooky and delicious Halloween treat.
Whether you’re hosting a haunted house party or simply want to surprise your family with a festive dessert, these cupcakes will certainly be a hit. Their moist texture and rich, chocolatey flavor make them irresistible, while the creative toppings add an element of surprise and fun.
These cupcakes are designed to serve 4-6 people, making them ideal for a small gathering or as a part of a larger dessert table. With a simple chocolate base and creative use of frosting and candy, you can transform ordinary cupcakes into a Halloween masterpiece. The recipe is straightforward, so even novice bakers can join in on the fun.
Gather your ingredients and get ready to create a spooky treat that will impress both kids and adults alike.
Ingredients:
- 1 cup all-purpose flour
- 1/2 cup unsweetened cocoa powder
- 1 cup granulated sugar
- 1 teaspoon baking powder
- 1/2 teaspoon baking soda
- 1/4 teaspoon salt
- 1/2 cup unsalted butter, softened
- 2 large eggs
- 1 teaspoon vanilla extract
- 1/2 cup buttermilk
- 1 cup chocolate frosting
- Black licorice strings
- Candy eyes
- Gummy worms
- Colored sprinkles
Instructions:
- Preheat and Prepare: Preheat your oven to 350°F (175°C). Line a muffin tin with cupcake liners to prevent sticking and guarantee easy removal.
- Mix Dry Ingredients: In a large bowl, whisk together the flour, cocoa powder, sugar, baking powder, baking soda, and salt until well combined.
- Combine Wet Ingredients: In a separate bowl, beat together the softened butter, eggs, and vanilla extract until smooth. Gradually add the buttermilk, mixing until fully incorporated.
- Combine Mixtures: Slowly add the dry ingredients to the wet mixture, stirring gently until you achieve a smooth batter without lumps.
- Fill and Bake: Spoon the batter evenly into the prepared cupcake liners, filling each about two-thirds full. Bake in the preheated oven for 18-20 minutes, or until a toothpick inserted into the center comes out clean.
- Cool: Allow the cupcakes to cool in the pan for about 5 minutes, then transfer them to a wire rack to cool completely before decorating.
- Decorate: Once cooled, spread a generous layer of chocolate frosting over each cupcake. Use black licorice strings to create spider legs, candy eyes for a spooky effect, and gummy worms crawling out of the top. Add colored sprinkles for extra flair.
Extra Tips: For a more intense chocolate flavor, consider using dark cocoa powder instead of regular. If you can’t find candy eyes, you can make them using small dots of white and dark chocolate.
When adding decorative elements like gummy worms or licorice, press them gently into the frosting to guarantee they stay in place. These cupcakes can be made a day in advance and stored in an airtight container, allowing the flavors to meld and the decorations to settle. Enjoy your spooky treats!
Frankenstein Rice Krispie Treats
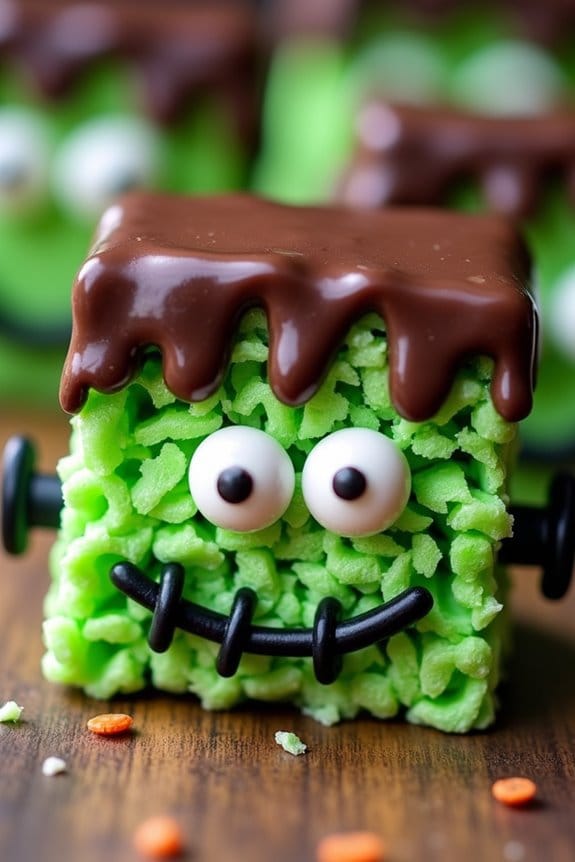
Frankenstein Rice Krispie Treats aren’t only a spooky addition to your Halloween finger foods spread, but they’re also incredibly fun to make and enjoyable for both kids and adults. These treats combine the classic, gooey delight of Rice Krispie Treats with a creative spin that transforms them into little green monsters, just like Frankenstein’s iconic creature. Their vibrant color and playful decoration make them a standout on any party table, and they’re perfect for making with the whole family.
Creating these Frankenstein Rice Krispie Treats is easy and doesn’t require any baking, making them a convenient option for a last-minute Halloween treat. The recipe involves crafting a simple Rice Krispie base, then adding green food coloring to give it that eerie Frankenstein hue. With a few additional decorations, such as chocolate chips and candy eyes, you can bring these little monsters to life in no time. This recipe is designed to serve 4-6 people, ensuring there’s enough for everyone to enjoy.
Ingredients:
- 6 cups Rice Krispies cereal
- 4 cups mini marshmallows
- 3 tablespoons unsalted butter
- Green food coloring
- 1 cup semisweet chocolate chips
- Candy eyes
- Black icing or edible marker
- Cooking spray or butter for greasing
Cooking Instructions:
- Prepare the Pan: Begin by greasing a 9×13 inch baking pan with cooking spray or butter. This will prevent the treats from sticking when they’re ready to be cut.
- Melt the Butter: In a large saucepan, melt the butter over low heat. Add the mini marshmallows and stir continuously until they’re completely melted and smooth.
- Add Food Coloring: Once the marshmallows are melted, remove the pan from heat and add a few drops of green food coloring. Stir well until the color is evenly distributed. You can adjust the amount of food coloring to achieve the desired shade of green.
- Mix in the Cereal: Add the Rice Krispies cereal to the saucepan and stir until they’re fully coated with the green marshmallow mixture.
- Transfer to Pan: Pour the mixture into the prepared baking pan, using a greased spatula or buttered hands to press down and spread it evenly.
- Melt Chocolate: In a microwave-safe bowl, melt the chocolate chips in 20-second intervals, stirring after each, until smooth.
- Decorate Faces: Cut the treats into rectangles. Dip one end of each rectangle into the melted chocolate to create Frankenstein’s hair, then press two candy eyes below the chocolate. Use black icing or an edible marker to draw a mouth and stitches on each treat.
- Let Set: Allow the treats to set at room temperature until the chocolate has hardened.
Extra Tips:
For a more detailed texture, you can use a fork to create lines in the chocolate while it’s still soft to resemble Frankenstein’s hair. If you’re making these treats in a warm or humid environment, consider refrigerating them briefly to help the chocolate set faster.
Additionally, if you have trouble finding candy eyes, you can substitute with small white chocolate chips and use a dab of black icing for the pupils. These treats are best enjoyed fresh but can be stored in an airtight container for up to two days.
Vampire Bat Wings

For a truly devilish delight this Halloween, try your hand at crafting Vampire Bat Wings. These sinister-looking wings aren’t only a visual treat but also a culinary delight that will have your guests craving more. With a deep, dark glaze reminiscent of the blood-sucking creatures they’re named after, these wings are perfect for adding that eerie touch to your Halloween finger foods spread.
The secret to these wings lies in the marinade, which imbues them with a depth of flavor that’s both sweet and savory with a hint of heat. To create these Vampire Bat Wings, you’ll need to allow ample time for marinating the chicken wings to guarantee they soak up all the delicious flavors.
Marinate for depth: sweet, savory, and a touch of heat for unforgettable Vampire Bat Wings.
Once marinated, the wings are baked until tender and perfectly glazed. This combination of preparation and cooking time delivers juicy, flavorful wings with a slightly crispy exterior that makes them irresistible. This recipe serves 4-6 people, making it ideal for a small gathering of ghouls and goblins.
Ingredients:
- 2 pounds chicken wings
- 1 cup soy sauce
- 1/2 cup balsamic vinegar
- 1/2 cup brown sugar
- 4 cloves garlic, minced
- 1 tablespoon freshly grated ginger
- 1 teaspoon smoked paprika
- 1 teaspoon cayenne pepper
- 1/2 teaspoon black pepper
- 1 tablespoon sesame oil
- 2 tablespoons honey
- Sesame seeds and chopped green onions for garnish
Cooking Instructions:
- Prepare the Marinade: In a large mixing bowl, combine the soy sauce, balsamic vinegar, brown sugar, minced garlic, grated ginger, smoked paprika, cayenne pepper, black pepper, sesame oil, and honey. Whisk until all ingredients are thoroughly mixed and the sugar is dissolved.
- Marinate the Wings: Place the chicken wings in a large resealable plastic bag or a shallow dish. Pour the marinade over the wings, guaranteeing they’re all well-coated. Seal the bag or cover the dish, and refrigerate for at least 2 hours, preferably overnight to maximize flavor absorption.
- Preheat the Oven: When ready to cook, preheat your oven to 400°F (200°C). Line a baking sheet with aluminum foil or parchment paper for easy cleanup, and place a wire rack on top.
- Bake the Wings: Arrange the marinated wings on the wire rack, ensuring there’s space between each wing for even cooking. Reserve any leftover marinade. Bake in the preheated oven for 30 minutes.
- Glaze the Wings: Remove the wings from the oven and brush them with the reserved marinade. Return to the oven and bake for an additional 15-20 minutes, or until the wings are fully cooked and have a glossy, sticky glaze.
- Garnish and Serve: Once the wings are cooked, remove them from the oven and let them rest for a few minutes. Sprinkle with sesame seeds and chopped green onions before serving.
Extra Tips:
For best results, guarantee the wings are as dry as possible before adding them to the marinade; this helps the marinade adhere better. If you desire extra crispy wings, you can broil them for an additional 2-3 minutes after baking.
Keep a close eye on them during broiling to prevent burning. This dish pairs beautifully with a side of cool, creamy dipping sauce such as ranch or bleu cheese to balance the flavors and add an invigorating contrast.
Skeleton Veggie Platter
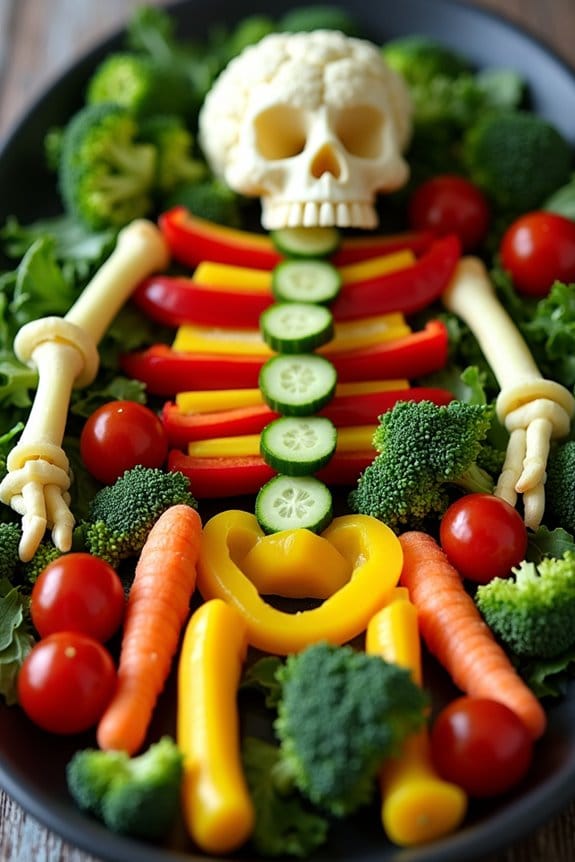
Creating a Skeleton Veggie Platter is a fun and spooky way to present healthy snacks at your Halloween gathering. This dish combines the nutritional benefits of fresh vegetables with the fun, artistic arrangement that mimics a skeleton.
Whether you’re entertaining kids or adults, this veggie platter will surely be a hit, offering a creative way to encourage healthy eating during the festivities.
The platter can be customized to your liking with a variety of vegetables, making it both versatile and adaptable to different tastes and dietary restrictions. Not only is the Skeleton Veggie Platter easy to assemble, but it also requires no cooking, allowing you to focus on other party preparations.
Follow the recipe below to create a delightful and visually appealing dish that serves 4-6 people.
Ingredients (serving size: 4-6 people):
- 1 head of cauliflower
- 1 red bell pepper
- 1 yellow bell pepper
- 1 cucumber
- 1 bunch of celery
- 1 pint of cherry tomatoes
- 1 small broccoli crown
- 1 cup of baby carrots
- 1 small jicama
- 1 cup of ranch dressing (or your preferred dip)
Instructions:
- Prepare the Vegetables:
- Wash all the vegetables thoroughly.
- Separate the cauliflower into small florets.
- Cut the red and yellow bell peppers into strips.
- Slice the cucumber into thin rounds.
- Cut the celery stalks into 3-4 inch sticks.
- Halve the cherry tomatoes.
- Cut the broccoli crown into small florets.
- Peel and slice the jicama into thin sticks.
- Assemble the Skeleton:
- Use a large serving platter or a cutting board as your base.
- Begin by placing the cauliflower florets in a circular shape at the top to represent the skull.
- Use the red bell pepper strips to form the ribcage below the cauliflower.
- Arrange the celery sticks on either side of the ribcage to mimic arms, using cherry tomatoes at the ends for hands.
- Create the spine using a row of cucumber slices down the center.
- Use the yellow bell pepper strips to construct the pelvis below the spine.
- For the legs, arrange the broccoli florets in a line extending from the pelvis, ending with baby carrots as feet.
- Position the jicama sticks around the platter to fill in gaps and add texture.
- Add the Dip:
- Place a small bowl of ranch dressing or your preferred dip near the head of the skeleton, or in a spot that’s easily accessible for dipping.
Extra Tips:
To add more visual interest, consider using purple cauliflower or rainbow cherry tomatoes for a pop of color.
If you prefer a different dip, hummus or guacamole can be great alternatives to ranch dressing. For a more detailed skeleton look, you can use a paring knife to carve facial features into the cauliflower “skull.”
Be sure to arrange the vegetables just before serving to keep them fresh and crisp. Enjoy your spooky, nutritious creation!
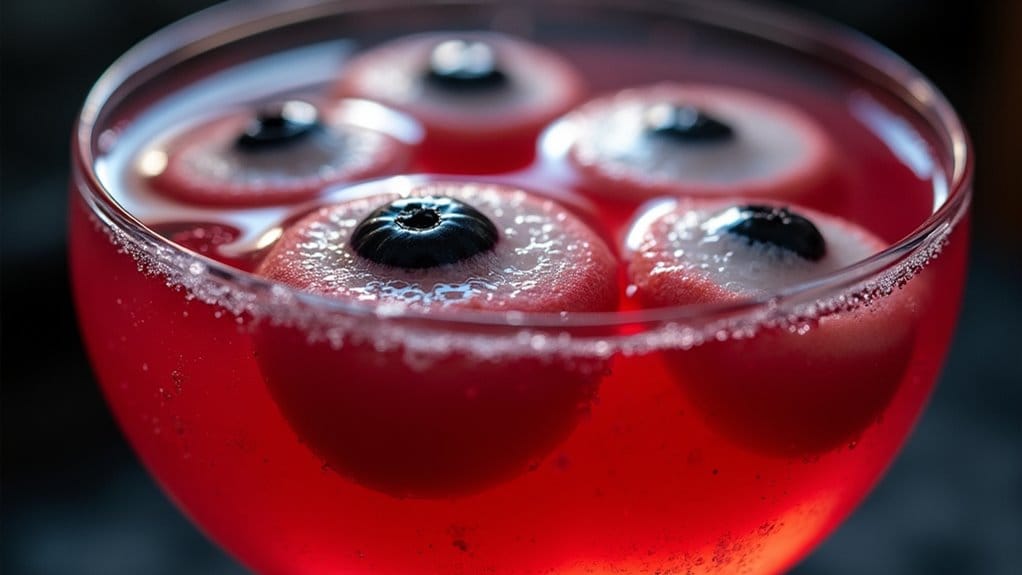
Eerie Eyeball Punch
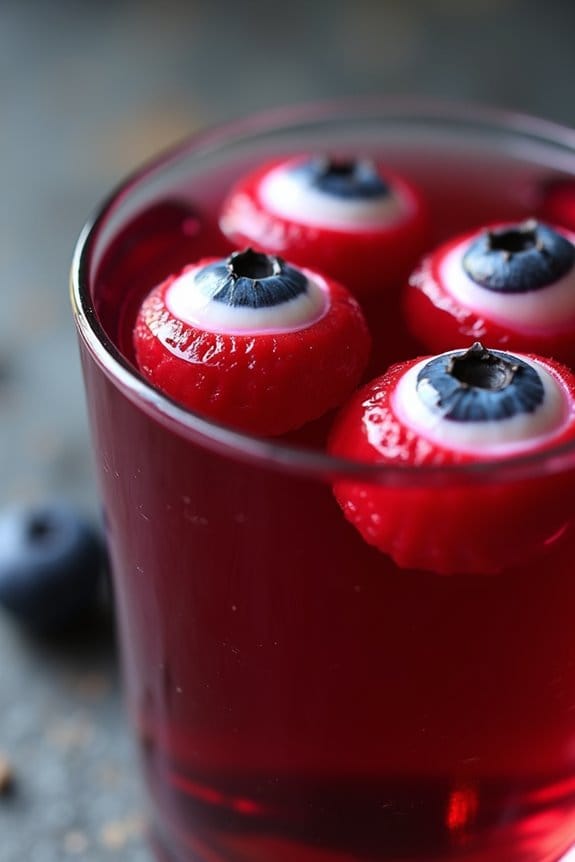
Halloween is the perfect time to get creative in the kitchen, and what better way to thrill your guests than with a spooky yet delicious Eerie Eyeball Punch? This festive beverage not only quenches thirst but also adds an extra touch of fun to your Halloween party.
The punch is a chilling concoction of fruity flavors, with floating “eyeballs” made from lychee and blueberries to give it an eerily realistic appearance. It’s a treat for both the eyes and the taste buds, perfect for both children and adults who enjoy a good frightful delight.
Crafting this ghoulish punch is easy and requires minimal effort, making it an ideal choice for those busy with party preparations. Designed to serve 4-6 people, this recipe makes use of a variety of ingredients that, when combined, create a vibrant and spooky beverage that guests will be excited to try.
The punch can be served in a large bowl for a communal experience or in individual cups for a more personal touch. Either way, your guests are sure to be impressed by your creativity and culinary flair.
Ingredients (serving size: 4-6 people):
- 1 can of lychees in syrup
- 1 pint of blueberries
- 3 cups cranberry juice
- 2 cups pineapple juice
- 1 cup ginger ale
- 1 cup lemon-lime soda
- 1/2 cup grenadine syrup
- Ice cubes
Instructions:
- Prepare the Eyeballs: Drain the lychees from their syrup and set aside. Place a single blueberry into the hollow center of each lychee. This will create the appearance of an eyeball. Repeat this process until all the lychees have been filled with blueberries.
- Mix the Punch: In a large punch bowl, combine the cranberry juice, pineapple juice, ginger ale, and lemon-lime soda. Stir gently to blend the liquids together without losing the carbonation.
- Add the Grenadine: Pour in the grenadine syrup slowly, allowing it to settle at the bottom of the punch. This will create a layered effect, adding to the eerie appearance of the punch.
- Add the Eyeballs: Gently place the lychee-eyeballs into the punch, making sure they float on the surface for maximum visual effect.
- Chill and Serve: Add ice cubes to keep the punch cool. You can also refrigerate the punch for an hour before serving to make sure it remains chilled. Ladle the punch into cups, ensuring each serving contains at least one lychee eyeball for a spooky surprise.
Extra Tips:
To enhance the visual impact of the Eerie Eyeball Punch, consider serving it in a clear glass bowl or pitcher so that guests can see the floating eyeballs.
If you want to make the punch even spookier, add a few drops of red food coloring to intensify the blood-red hue. You might also consider using dry ice for a foggy, mystical effect, but make sure to handle it with care and remove it before serving to prevent any risk of injury.
Adjust the sweetness by varying the amount of grenadine or adding more citrus juice for a tangy twist. Enjoy the hauntingly delightful punch!
