

Halloween parties often call for finger foods that come together fast without much fuss. These ideas use basic ingredients and simple steps so you can get everything ready in time. You will find a mix of savory bites and sweet treats that work well for both kids and adults. Most recipes need little more than a quick mix or bake and can be prepped ahead. Keep reading for the full list of options.
Helpful Tips Before You Start
These ideas will help you finish your Halloween finger foods fast without extra work.
Choose No Cook Bases
Start with items like crackers, tortillas, or bread that need no oven time. They cut assembly down to minutes.
Prep Veggies and Dips Ahead
Chop carrots, celery, and peppers the night before. Store them in containers so you only need to arrange everything on party day.
Use Simple Shape Cutters
Keep a set of ghost or pumpkin cutters on hand. They turn cheese slices, sandwiches, or fruit into themed bites with one press.
Set Up an Assembly Line
Line up your bases, spreads, and toppings in order. This lets you make multiple pieces quickly without stopping to hunt for ingredients.
Mummy Pigs in a Blanket
These mummy pigs in a blanket give a classic appetizer a quick Halloween twist. Crescent dough strips wrap around mini sausages to create a simple bandage effect that bakes up golden and crisp. The result is a savory bite with a flaky outside and juicy center that works well for parties.
They come together fast with basic ingredients and require no special skills. Place a small bowl of mustard nearby for dipping so guests can add extra flavor as they like.

Serves 4 people.
Ingredients
- 8 cocktail sausages
- 1 can (8 ounces) refrigerated crescent roll dough
- 2 teaspoons yellow mustard
Instructions
- Heat the oven to 375 degrees F and line a baking sheet with parchment paper.
- Unroll the crescent dough on a cutting board and slice it into 16 thin strips.
- Wrap two strips around each sausage, leaving small gaps between the strips to show the sausage underneath.
- Set the wrapped sausages on the prepared baking sheet.
- Bake for 12 to 15 minutes until the dough turns light golden brown.
- Remove from the oven and let them cool for two minutes.
- Use a small dab of mustard on each sausage to make two eyes.
Extra Tips
Space the dough strips evenly so the mummy bandages stay visible after baking. If you need to make them ahead, wrap the sausages and keep them covered in the fridge, then bake just before serving. Leftovers reheat well in a 350-degree oven for five minutes to restore crispness.Course: Appetizer Cuisine: American Equipment: Baking Sheet, Knife, Cutting Board
Black Olive Spider Deviled Eggs
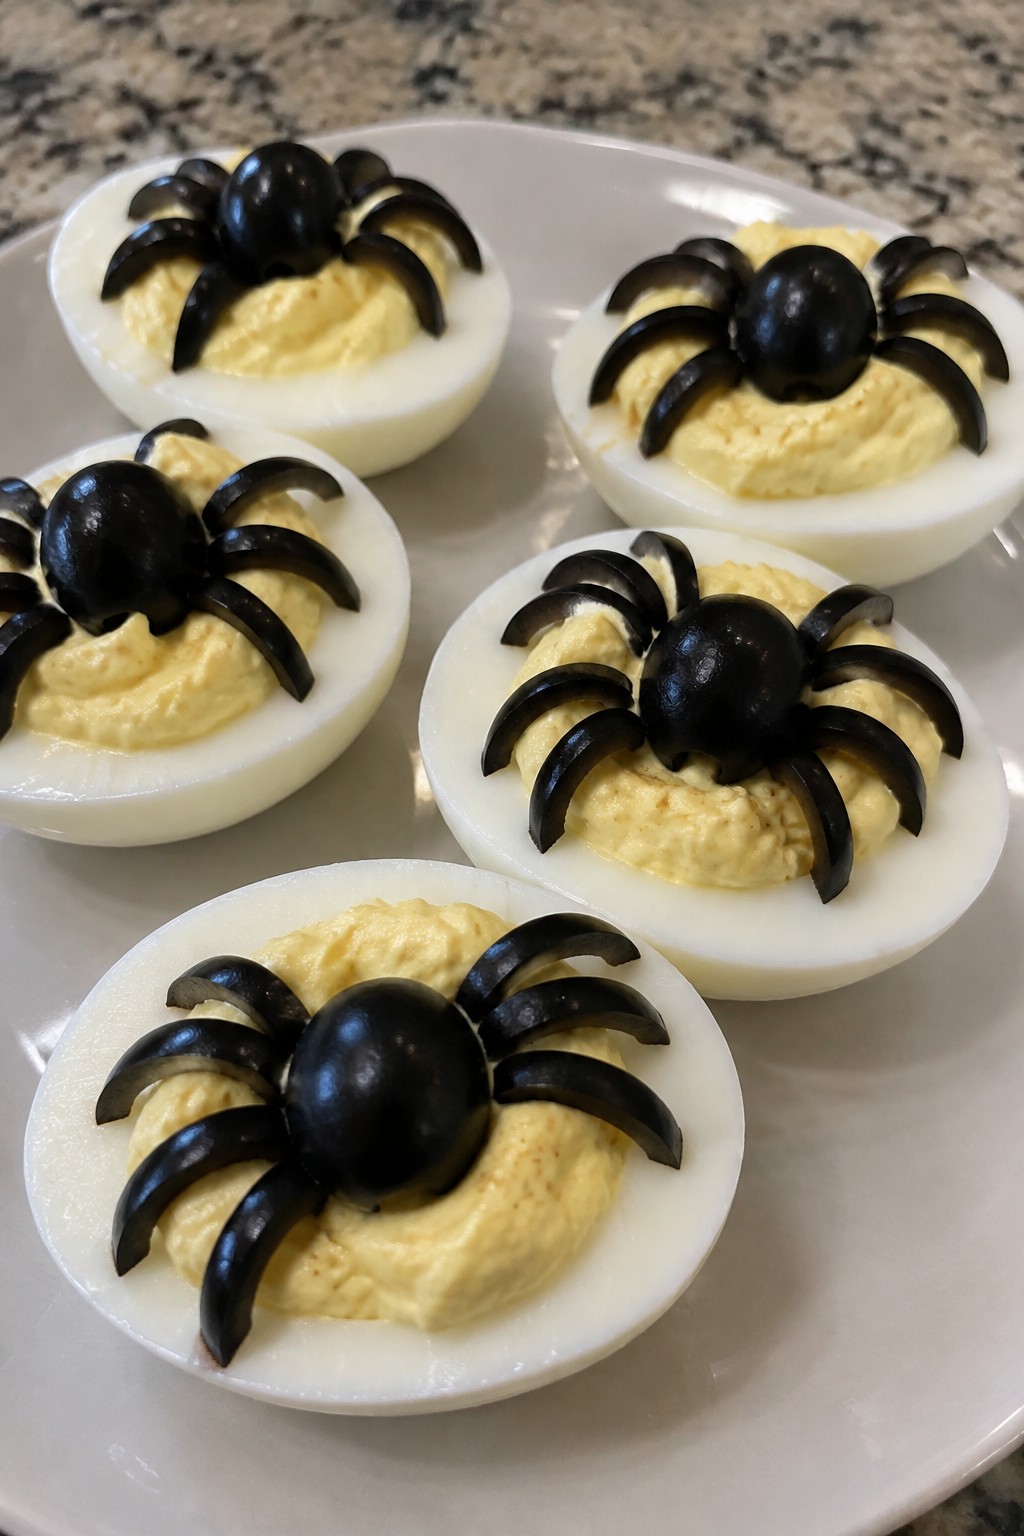
These Black Olive Spider Deviled Eggs bring a playful Halloween element to party platters. They use everyday items and assemble quickly for last-minute gatherings or potlucks.
The eggs offer a smooth, tangy filling that balances the salty bite of the olive spiders on top. They work as finger food that guests can pick up easily without extra plates.
Serves 4 people.
Ingredients
- 6 large eggs
- 3 tablespoons mayonnaise
- 1 teaspoon Dijon mustard
- 1/4 teaspoon salt
- 1/4 teaspoon black pepper
- 12 whole black olives
Instructions
- Place the eggs in a pot and cover them with water. Bring the water to a boil over medium heat, then reduce to a simmer until the eggs are fully cooked.
- Drain the hot water and cool the eggs under cold running water. Peel off the shells once the eggs are easy to handle.
- Slice each egg in half lengthwise and scoop the yolks into a mixing bowl. Arrange the empty whites on a serving plate.
- Mash the yolks with a fork, then stir in the mayonnaise, Dijon mustard, salt, and black pepper until the mixture is smooth.
- Spoon or pipe the yolk mixture back into the egg white halves.
- Cut 6 of the black olives in half lengthwise to form the spider bodies. Slice the remaining olives into thin strips to create the legs.
- Place one olive half in the center of each filled egg and arrange four olive strips on each side to look like spider legs.
Extra Tips
Make the eggs a day ahead and store the filled halves in an airtight container in the fridge. Add the olive spiders right before serving so they stay in place. If you want less tang, swap the Dijon mustard for yellow mustard.Course: Appetizer Cuisine: American Equipment: Pot, Mixing Bowl, Knife
Mini Pumpkin Cheese Balls with Crackers
These mini cheese balls bring a fun fall shape to any party spread without extra fuss. They work well for last-minute Halloween gatherings because they come together fast and need no baking. The mix of sharp cheddar and light paprika gives them an orange tint and savory flavor that pairs nicely with crisp crackers.

Serves 4 people.
Ingredients
- 8 ounces cream cheese, softened
- 2 cups shredded cheddar cheese
- 1 teaspoon paprika
- 1/2 teaspoon garlic powder
- 12 mini pretzel sticks
- 24 crackers
Instructions
- Place the softened cream cheese, shredded cheddar cheese, paprika, and garlic powder in a mixing bowl. Stir until the mixture is smooth and evenly colored.
- Scoop the mixture into 12 equal portions. Roll each portion between your palms to form small balls.
- Insert one mini pretzel stick into the top of each cheese ball to create a pumpkin stem.
- Arrange the cheese balls on a plate or tray. Place the crackers around them for serving.
Extra Tips
Chill the formed cheese balls for 15 minutes before serving so they hold their shape better when guests pick them up. Use a sharp cheddar for stronger flavor or swap in smoked paprika if you want a deeper color. Leftovers keep in an airtight container in the fridge for one day.Course: Appetizer Cuisine: American Equipment: Mixing Bowl, Baking Sheet
Witch’s Broom Pretzel Sticks
These Witch’s Broom Pretzel Sticks add a playful touch to any Halloween spread. They require almost no cooking and use everyday items to create a spooky yet edible snack that guests can grab with one hand.
The combination gives a salty crunch from the pretzels balanced by the mild chew of cheese. They work well for last-minute party prep because the steps stay simple and the result looks intentional.

Serves 4 people.
Ingredients
- 12 pretzel rods
- 4 string cheese sticks
- 8 chives
Instructions
- Pull each string cheese stick apart lengthwise into thin strips to create the broom bristles.
- Press the cheese strips onto one end of a pretzel rod so they fan out like broom bristles.
- Wrap one chive around the top of the cheese strips and the pretzel rod, then tie it securely to hold the bristles in place.
- Repeat with the remaining pretzel rods, cheese, and chives until all 12 brooms are assembled.
- Arrange the finished sticks on a serving plate.
Extra Tips
Chives work best when slightly damp so they tie without breaking. If you need to make these ahead, assemble them up to two hours before the party and cover loosely with plastic wrap to keep the pretzels crisp. Skip any dipping sauces because the simple salty and cheesy flavors already stand on their own.Course: Appetizer Cuisine: American Equipment: Knife, Cutting Board
Chocolate-Dipped Ghost Strawberries
These chocolate-dipped ghost strawberries bring a fun Halloween touch to any party spread. They come together fast with just a few ingredients and require no baking, making them a good choice when you need something sweet and handheld.
The finished treats offer juicy strawberry centers under a smooth white chocolate shell, finished with simple dark chocolate faces. They look festive without much effort and hold up well on a platter.

Serves 4 people.
Ingredients
- 12 large fresh strawberries
- 8 ounces white chocolate chips
- 1/4 cup dark chocolate chips
Instructions
- Rinse the strawberries under cool water and pat them completely dry with paper towels. Moisture will prevent the chocolate from sticking.
- Place the white chocolate chips in a microwave-safe bowl and heat in 30-second intervals, stirring between each, until smooth and fully melted.
- Hold each strawberry by the stem and dip it into the melted white chocolate, leaving a small section near the stem uncovered to create the ghost shape. Let excess chocolate drip off.
- Set the dipped strawberries on a parchment-lined baking sheet. Repeat with the remaining berries.
- Place the dark chocolate chips in a small microwave-safe bowl and melt in 20-second intervals, stirring until smooth. Spoon the melted chocolate into a zip-top bag, snip off a tiny corner, and pipe simple eyes and a mouth on each white chocolate ghost.
- Chill the baking sheet in the refrigerator for 15 to 20 minutes until the chocolate sets.
Extra Tips
Use the darkest chocolate possible for the faces so the details show clearly against the white coating. If the white chocolate thickens while dipping, add a tiny drop of neutral oil and stir to loosen it. Store leftovers in a single layer in the refrigerator for up to one day.Course: Snack Cuisine: American Equipment: Microwave-safe bowl, Baking sheet, Parchment paper, Zip-top bag
Crispy Bat Chicken Wings
These crispy bat chicken wings add a fun Halloween element to any party spread. They bake up with a crunchy coating and savory seasoning that makes them easy to serve as finger foods. Guests can grab them quickly without needing plates or utensils.
The wings stay crisp even after they cool a little, so they hold up well on a buffet table. The simple spice mix gives them a smoky flavor without extra steps or hard-to-find ingredients.

Serves 4 people.
Ingredients
- 2 pounds chicken wings, split into drumettes and flats
- 1 tablespoon baking powder
- 2 teaspoons paprika
- 1 teaspoon salt
- 1 teaspoon garlic powder
- 1/2 teaspoon black pepper
- 2 tablespoons vegetable oil
- 2 tablespoons chopped fresh parsley
Instructions
- Preheat the oven to 425 degrees and line a baking sheet with parchment paper or foil.
- Pat the chicken wings dry with paper towels and place them in a large bowl.
- Add the baking powder, paprika, salt, garlic powder, and black pepper to the bowl. Toss until the wings are evenly coated.
- Drizzle the vegetable oil over the wings and toss again to distribute.
- Arrange the wings in a single layer on the prepared baking sheet.
- Bake for 40 to 45 minutes, flipping the wings halfway through, until they are golden and crisp.
- Remove from the oven and sprinkle with the chopped parsley before serving.
Extra Tips
For the crispiest results, do not overcrowd the baking sheet. If you want to prepare ahead, season the wings with the dry mix and refrigerate them uncovered for a few hours before baking. Leftovers reheat well in a 375-degree oven for 10 minutes to restore crunch.Course: Appetizer Cuisine: American Equipment: Baking sheet, Large bowl, Oven
Eyeball Caprese Skewers
These skewers turn a classic Caprese salad into a fun Halloween party bite. They come together fast with no cooking, which makes them ideal for last-minute party prep. The fresh tomatoes and creamy mozzarella pair with bright basil for a light, savory snack that guests can grab easily.
The eyeball effect comes from pressing a black olive slice into each mozzarella ball. It adds a salty contrast without changing the familiar Caprese flavors.

Serves 4 people.
Ingredients
- 12 cherry tomatoes
- 12 small fresh mozzarella balls (bocconcini)
- 12 fresh basil leaves
- 12 pitted black olives
- 2 tablespoons olive oil
- 1 tablespoon balsamic vinegar
- 1/4 teaspoon salt
- 1/4 teaspoon black pepper
- 12 wooden skewers
Instructions
- Slice each black olive in half crosswise to create 24 thin rounds.
- Press one olive round gently into the center of each mozzarella ball to form the pupil of the eyeball.
- Thread one cherry tomato onto a skewer, followed by a basil leaf, then one prepared mozzarella ball.
- Repeat the tomato-basil-mozzarella pattern once more on the same skewer so each holds two eyeballs.
- Continue until all 12 skewers are assembled.
- Whisk the olive oil, balsamic vinegar, salt, and pepper in a small bowl.
- Drizzle the dressing lightly over the finished skewers just before serving.
Extra Tips
Assemble the skewers up to two hours ahead and keep them covered in the fridge, then add the dressing right before guests arrive so the basil stays fresh. If you need a dairy-free version, swap the mozzarella for small cubes of firm tofu and adjust the salt. These work best on short skewers so they stay easy to eat in one or two bites.Course: Appetizer Cuisine: Italian Equipment: Wooden skewers, Small bowl
Peanut Butter Monster Mouth Apple Bites
These apple bites come together in minutes and give a fun monster look that fits right into a Halloween spread. Crisp apple slices hold creamy peanut butter and marshmallow teeth, making them easy to pick up and eat with your fingers.
The texture mixes a fresh crunch with smooth peanut butter and soft, chewy marshmallows. They work well for quick party prep when you need something simple that still feels themed.

Serves 4 people.
Ingredients
- 2 large red apples
- 1/2 cup creamy peanut butter
- 1 cup mini marshmallows
Instructions
- Wash the apples and cut each one into 8 wedges, removing the core so you have 16 total wedges.
- Spread a thin layer of peanut butter on one cut side of 8 wedges.
- Press 5 to 6 mini marshmallows into the peanut butter on each wedge to form the teeth.
- Top each wedge with a second wedge, peanut butter side down, to close the mouth.
- Arrange the finished bites on a plate and serve right away.
Extra Tips
Choose firm apples so the slices stay crisp and hold their shape once the peanut butter is added. If you want to prep ahead, slice the apples and keep them in lemon water for a short time, then pat dry before spreading the peanut butter. Skip the marshmallows if anyone has nut allergies and swap in sunflower butter instead.Course: Appetizer Cuisine: American Equipment: Knife, Cutting board, Butter knife
Jack-o’-Lantern Stuffed Mini Peppers
These mini peppers stand out at a Halloween party because you can carve simple faces into them before stuffing. The result is a colorful finger food that feels festive without much effort. Guests appreciate the crisp pepper shell around a warm, cheesy center.
The filling stays mild and creamy, which pairs well with the natural sweetness of the peppers. It comes together fast and holds its shape after a short bake, so the peppers stay easy to pick up and eat.

Serves 4 people.
Ingredients
- 12 mini orange bell peppers
- 8 ounces cream cheese, softened
- 1 cup shredded cheddar cheese
- 2 tablespoons chopped green onions
- 1 teaspoon garlic powder
- 1/2 teaspoon smoked paprika
- Salt and black pepper to taste
Instructions
- Preheat the oven to 375 degrees and line a baking sheet with parchment paper.
- Slice the tops off each mini pepper and remove the seeds and membranes. Use a small knife to carve jack-o’-lantern faces on one side of each pepper.
- In a mixing bowl, combine the cream cheese, cheddar cheese, green onions, garlic powder, smoked paprika, salt, and black pepper. Stir until the mixture is smooth and evenly blended.
- Spoon the cheese filling into each carved pepper until it is full but not overflowing.
- Place the stuffed peppers on the prepared baking sheet and bake for 12 to 15 minutes, until the filling is hot and the cheese begins to melt.
- Remove from the oven and let the peppers cool for a few minutes before serving.
Extra Tips
Carve the faces on the firmer side of each pepper so the skin does not tear when you add the filling. You can prepare the peppers and filling a few hours ahead, then bake just before guests arrive. If you want a bit more color, sprinkle a few extra green onion slices on top after baking.Course: Appetizer Cuisine: American Equipment: Baking Sheet, Mixing Bowl, Sharp Knife
Bloody Sausage Meatball Skewers
These skewers turn simple sausage meatballs into a quick party bite that looks right at home on a Halloween spread. The red sauce gives them a striking finish while the meatballs stay juicy and well seasoned. They work well for last-minute prep since everything comes together in one bowl and bakes on a single sheet.

Serves 4 people.
Ingredients
- 1 pound ground Italian sausage
- 1/2 cup breadcrumbs
- 1 large egg
- 2 cloves garlic, minced
- 1 teaspoon dried oregano
- 1/2 teaspoon salt
- 1/4 teaspoon black pepper
- 1 cup marinara sauce
- 8 wooden skewers
- Fresh basil leaves for garnish
Instructions
- Preheat the oven to 400 degrees F and line a baking sheet with parchment paper.
- In a large bowl combine the ground Italian sausage, breadcrumbs, egg, minced garlic, oregano, salt, and black pepper.
- Mix with your hands until the ingredients are evenly distributed, then roll the mixture into 16 meatballs about 1 1/2 inches wide.
- Thread two meatballs onto each wooden skewer, leaving a small space between them.
- Place the skewers on the prepared baking sheet and bake for 18 minutes until the meatballs are cooked through and lightly browned.
- Warm the marinara sauce in a small saucepan over low heat. Drizzle or brush the sauce over the skewers right before serving and add a few basil leaves on top.
Extra Tips
Soak the wooden skewers in water for ten minutes before threading to keep the ends from burning in the oven. If you want a thicker bloody look, reduce the marinara slightly on the stove so it clings better to the meatballs. Leftovers reheat well in a 350 degree F oven for five minutes without drying out.Course: Appetizer Cuisine: American Equipment: Mixing bowl, Baking sheet, Small saucepan
Frankenstein Avocado Toast Points
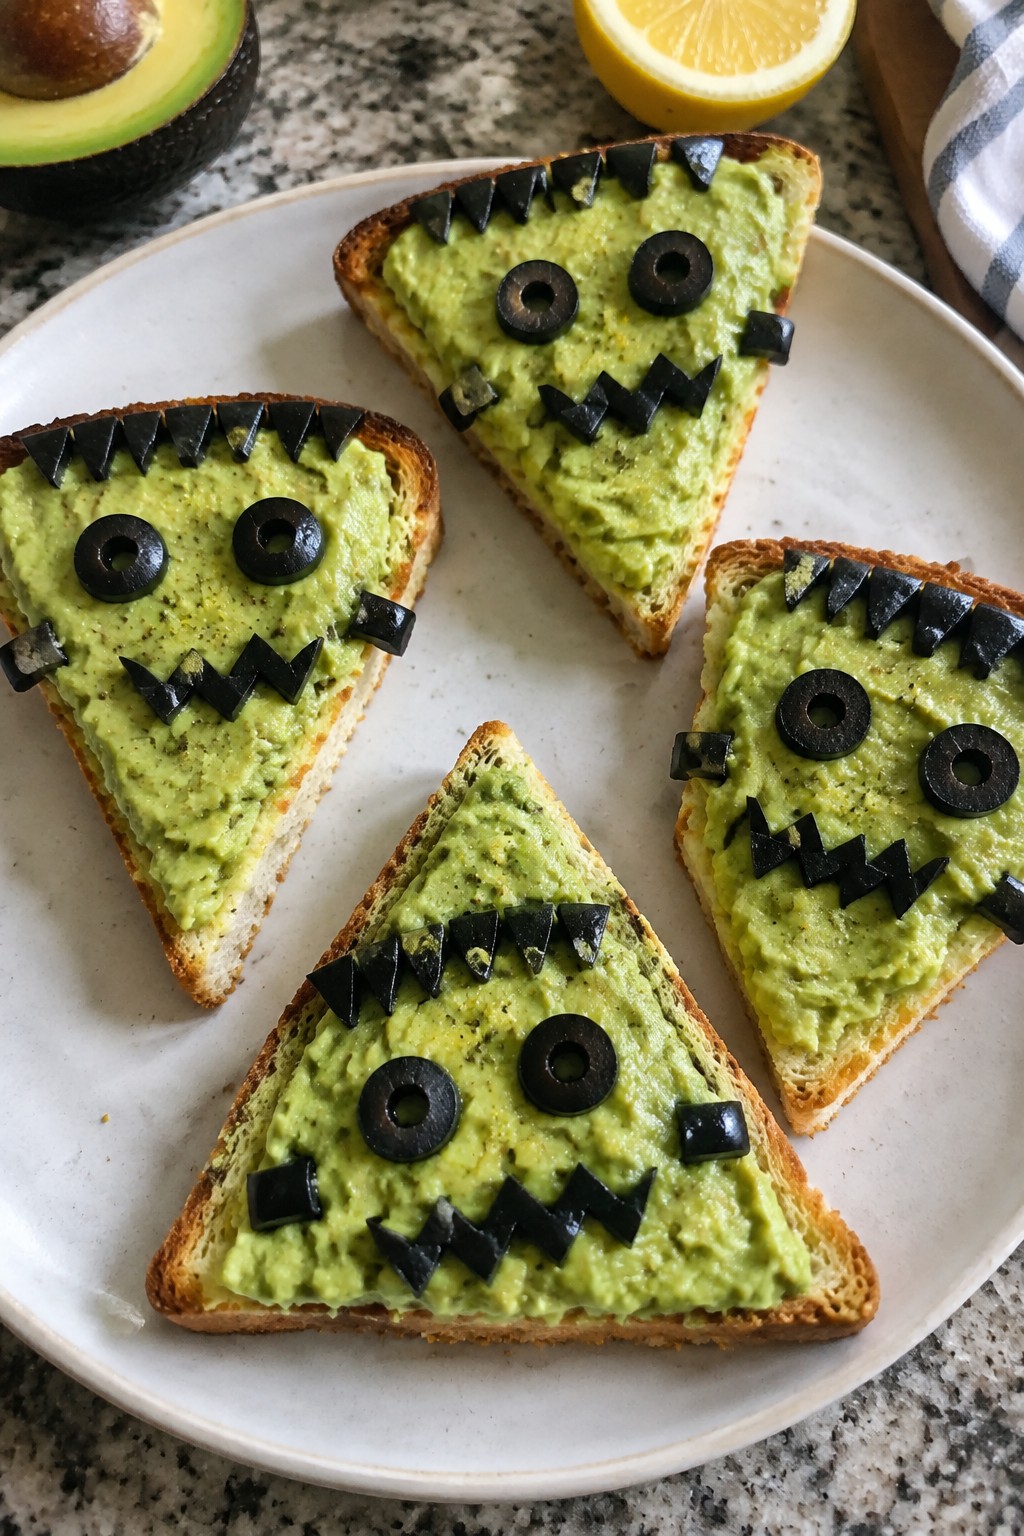
These Frankenstein Avocado Toast Points bring a playful Halloween twist to a simple favorite. Creamy avocado on crisp toast gets decorated with olive details to create fun monster faces. They come together fast and work well as a grab-and-go snack at any party.
The flavor stays mild and fresh with a bit of tang from lemon. The toast adds crunch while the olives give a salty bite. Kids and adults both enjoy assembling or eating them.
Serves 4 people.
Ingredients
- 4 slices of bread
- 2 ripe avocados
- 1 tablespoon lemon juice
- 1/4 teaspoon salt
- 8 black olives
Instructions
- Toast the 4 slices of bread until golden and crisp.
- Cut each avocado in half, remove the pits, and scoop the flesh into a mixing bowl.
- Add the lemon juice and salt to the bowl, then mash everything together until mostly smooth with a few small chunks remaining.
- Spread the avocado mixture evenly over the 4 toasted bread slices.
- Slice each piece of toast into 4 triangles to create the points.
- Slice the black olives and use the pieces to add eyes and side bolts on each triangle for the Frankenstein look.
Extra Tips
Cut the toast right after spreading so the avocado stays in place. Use firm bread to keep the points from getting soggy. If you want a stronger olive flavor, chop a few extra slices and mix them into the avocado mash before spreading.Course: Appetizer Cuisine: American Equipment: Toaster, Mixing bowl, Sharp knife
Caramel Apple Bite Skewers
These Caramel Apple Bite Skewers turn a classic fall flavor into an easy party snack. Guests can pick them up without plates or forks, which makes them ideal for a busy Halloween spread. Each bite gives crisp apple, soft caramel, and a light crunch from the topping.
The recipe keeps things simple with minimal cooking so you can focus on other dishes. It balances sweet caramel with tart apple for a flavor that feels seasonal without much effort.

Serves 4 people.
Ingredients
- 2 large apples, cut into bite-sized pieces
- 20 soft caramel candies
- 2 tablespoons milk
- 1/4 cup chopped pecans
- 8 wooden skewers
- Sea salt for sprinkling
Instructions
- Unwrap the caramels and add them to a microwave-safe bowl along with the milk. Heat in 30-second bursts, stirring between each, until the mixture is fully melted and smooth.
- Dip each apple piece into the warm caramel so it is mostly coated.
- Roll the caramel-covered apple in the chopped pecans, then set it on a plate. Lightly sprinkle sea salt over the top while the caramel is still soft.
- Thread three or four coated apple pieces onto each wooden skewer.
Extra Tips
Use tart apples like Granny Smith so the caramel does not taste overly sweet. If the caramel thickens while you work, warm it for a few seconds to loosen it again. Serve the skewers right away so the apple stays crisp and the caramel does not run.Course: Snack Cuisine: American Equipment: Microwave-safe bowl, Wooden skewers
Ghostly Popcorn Balls
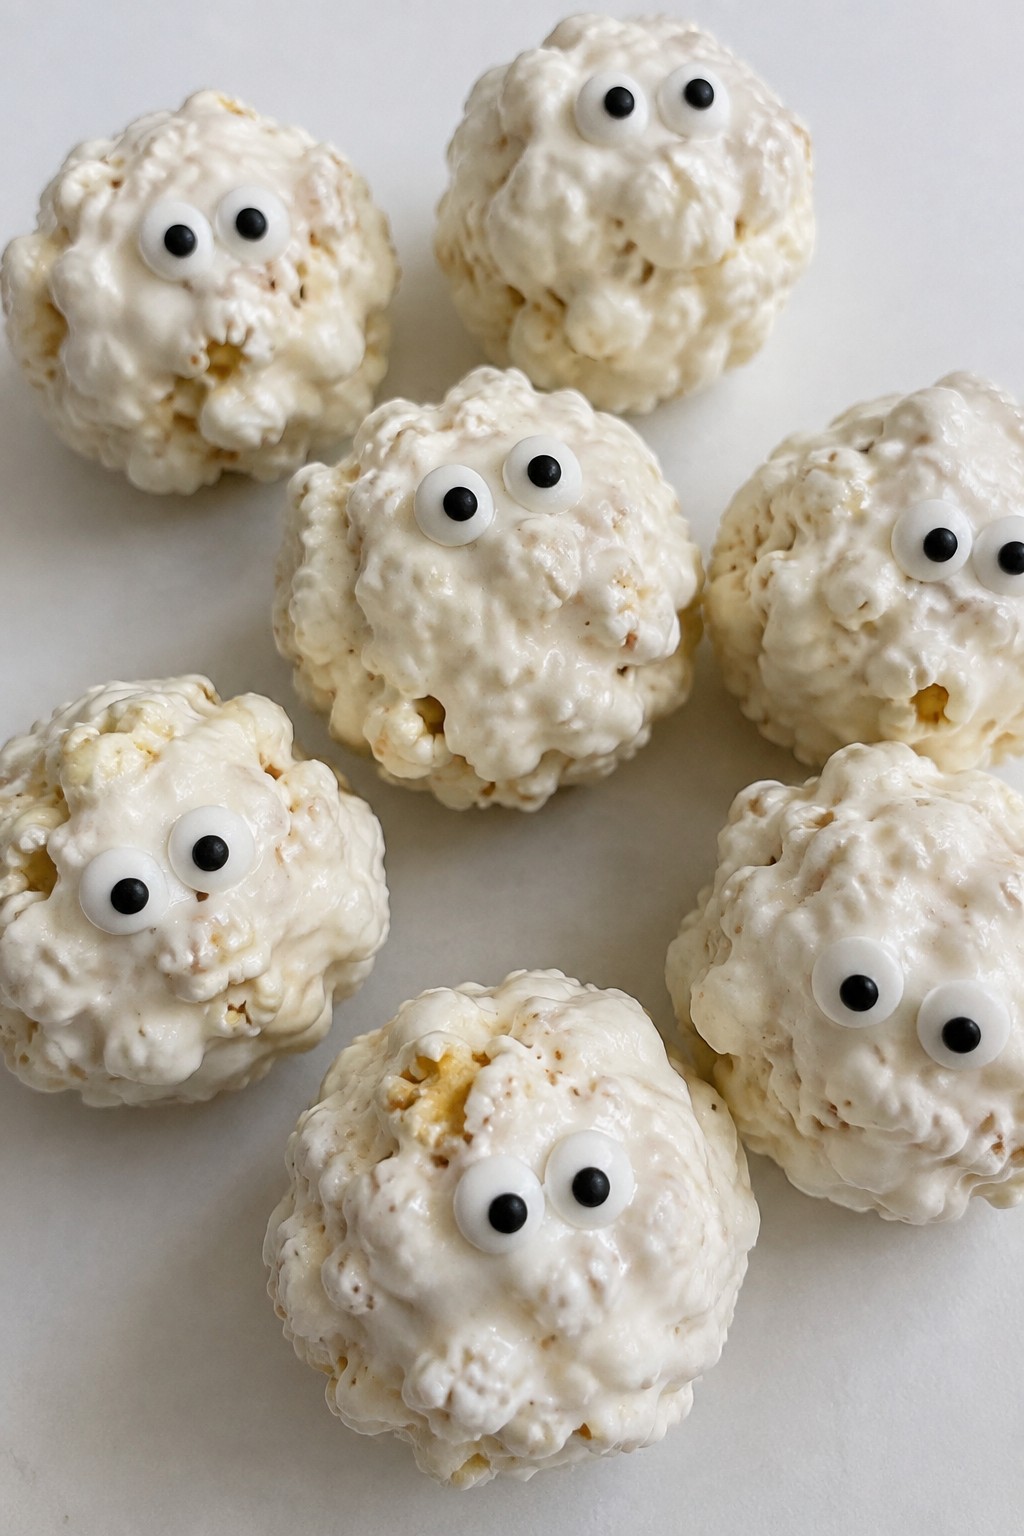
These ghostly popcorn balls bring a light Halloween touch to any party spread. They use basic pantry items and come together in minutes, making them ideal for last-minute gatherings.
The result is a sweet, chewy snack with a soft marshmallow coating. Each ball gets a simple face using candy eyes so they look like friendly ghosts on the table.
Serves 4 people.
Ingredients
- 10 cups popped popcorn
- 1/4 cup butter
- 5 cups mini marshmallows
- 1 teaspoon vanilla extract
- 16 candy eyes
Instructions
- Place the popped popcorn in a large mixing bowl and set it aside.
- Melt the butter in a medium saucepan over medium heat. Add the mini marshmallows and stir until fully melted and smooth.
- Remove the pan from the heat and stir in the vanilla extract.
- Pour the marshmallow mixture over the popcorn. Stir with a wooden spoon until the popcorn is evenly coated.
- Lightly grease your hands with butter or cooking spray. Scoop portions of the mixture and shape them into balls.
- While the balls are still warm, press two candy eyes onto each one to create the ghost faces.
Extra Tips
Grease your hands well before shaping to keep the mixture from sticking. These balls set up quickly, so add the candy eyes right after forming them. Store any leftovers in an airtight container at room temperature for up to two days.Course: Snack Cuisine: American Equipment: Large mixing bowl, Medium saucepan, Wooden spoon
Spiderweb Mini Pizza Bagels
These Spiderweb Mini Pizza Bagels bring a light Halloween touch to any party table. They use everyday items and take little time to prepare, so they fit well when you need finger foods ready in a hurry. The result is a warm, cheesy bite with a crisp bagel base.
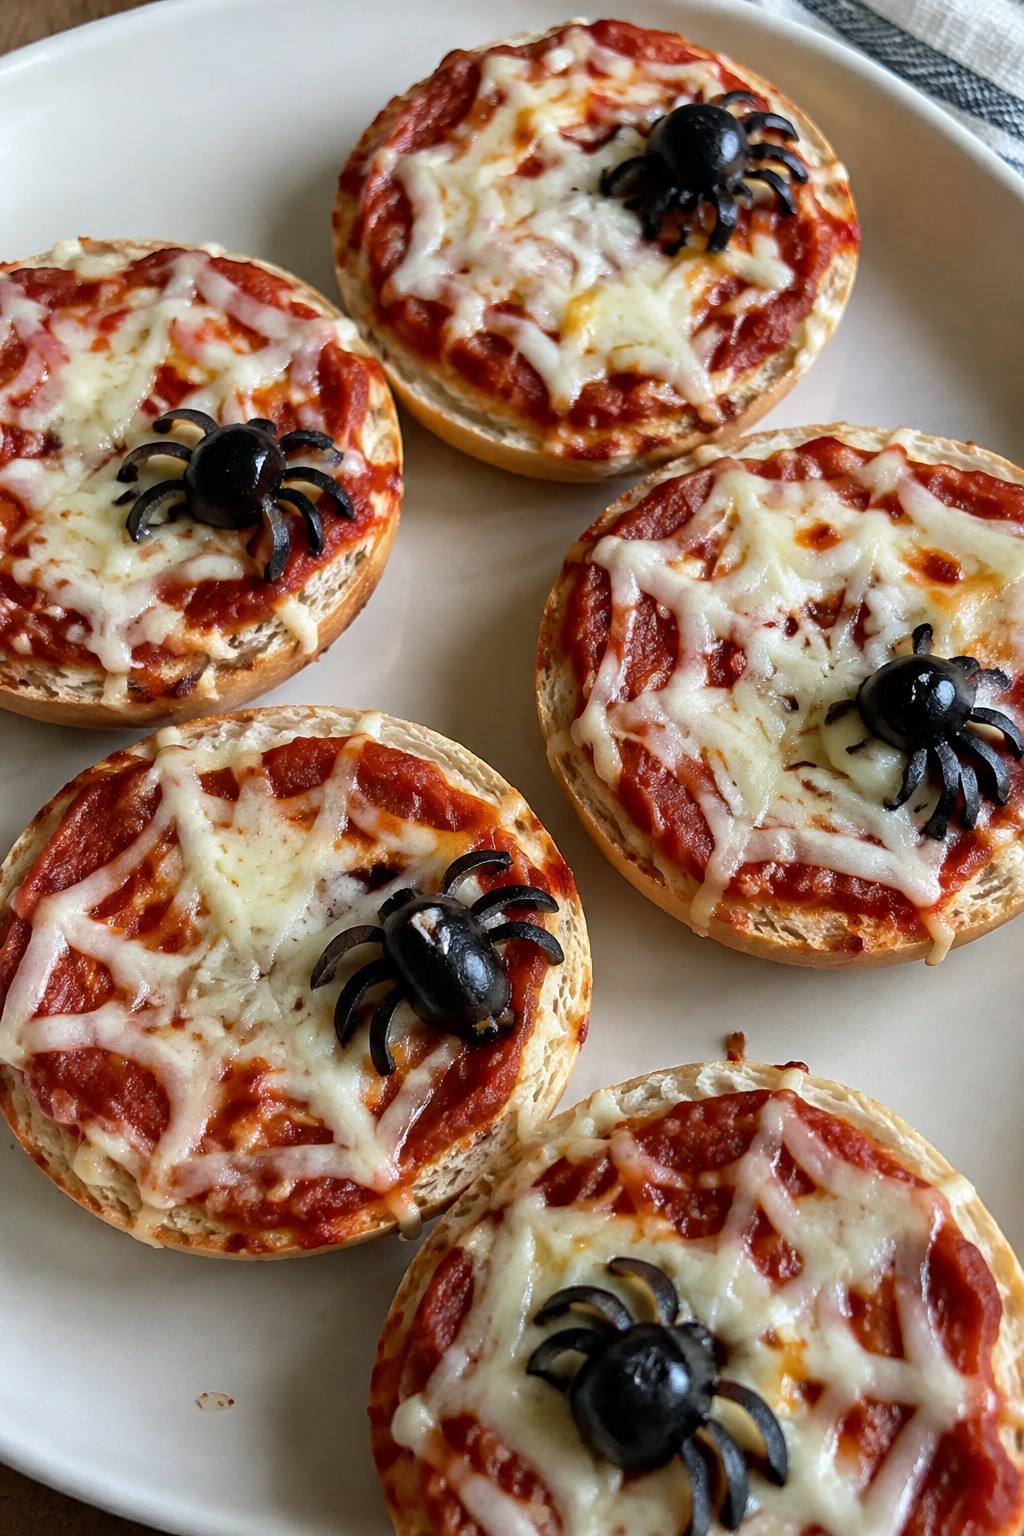
The toppings stay simple, but the spiderweb design on each one adds the right festive note without extra steps. They work as a quick snack or part of a larger spread for guests who want something easy to grab.
Serves 4 people.
Ingredients
- 8 mini bagels, split in half
- 1 cup pizza sauce, divided
- 2 cups shredded mozzarella cheese
- 12 pitted black olives
- 1/2 teaspoon garlic powder
Instructions
- Heat the oven to 400°F and line a baking sheet with parchment paper. Place the bagel halves cut side up on the sheet.
- Spread most of the pizza sauce evenly over each bagel half. Sprinkle the garlic powder over the sauce.
- Top each bagel with a generous layer of mozzarella cheese.
- Spoon the remaining pizza sauce into a small zip-top bag, snip a tiny corner, and pipe thin lines to form a spiderweb pattern on the cheese.
- Slice the black olives into thin rings and small pieces. Place one ring in the center of each web and add thin olive strips around it to form spider legs.
- Bake for 8 to 10 minutes until the cheese is melted and the edges of the bagels turn golden. Serve warm.
Extra Tips
Pipe the sauce webs before baking so they set into the cheese and stay visible. If you want a stronger garlic note, add a light dusting of garlic powder on top after baking. Leftovers reheat well in a toaster oven for a few minutes to keep the bagels crisp.Course: Appetizer Cuisine: American Equipment: Baking sheet, Oven, Zip-top bag, Knife
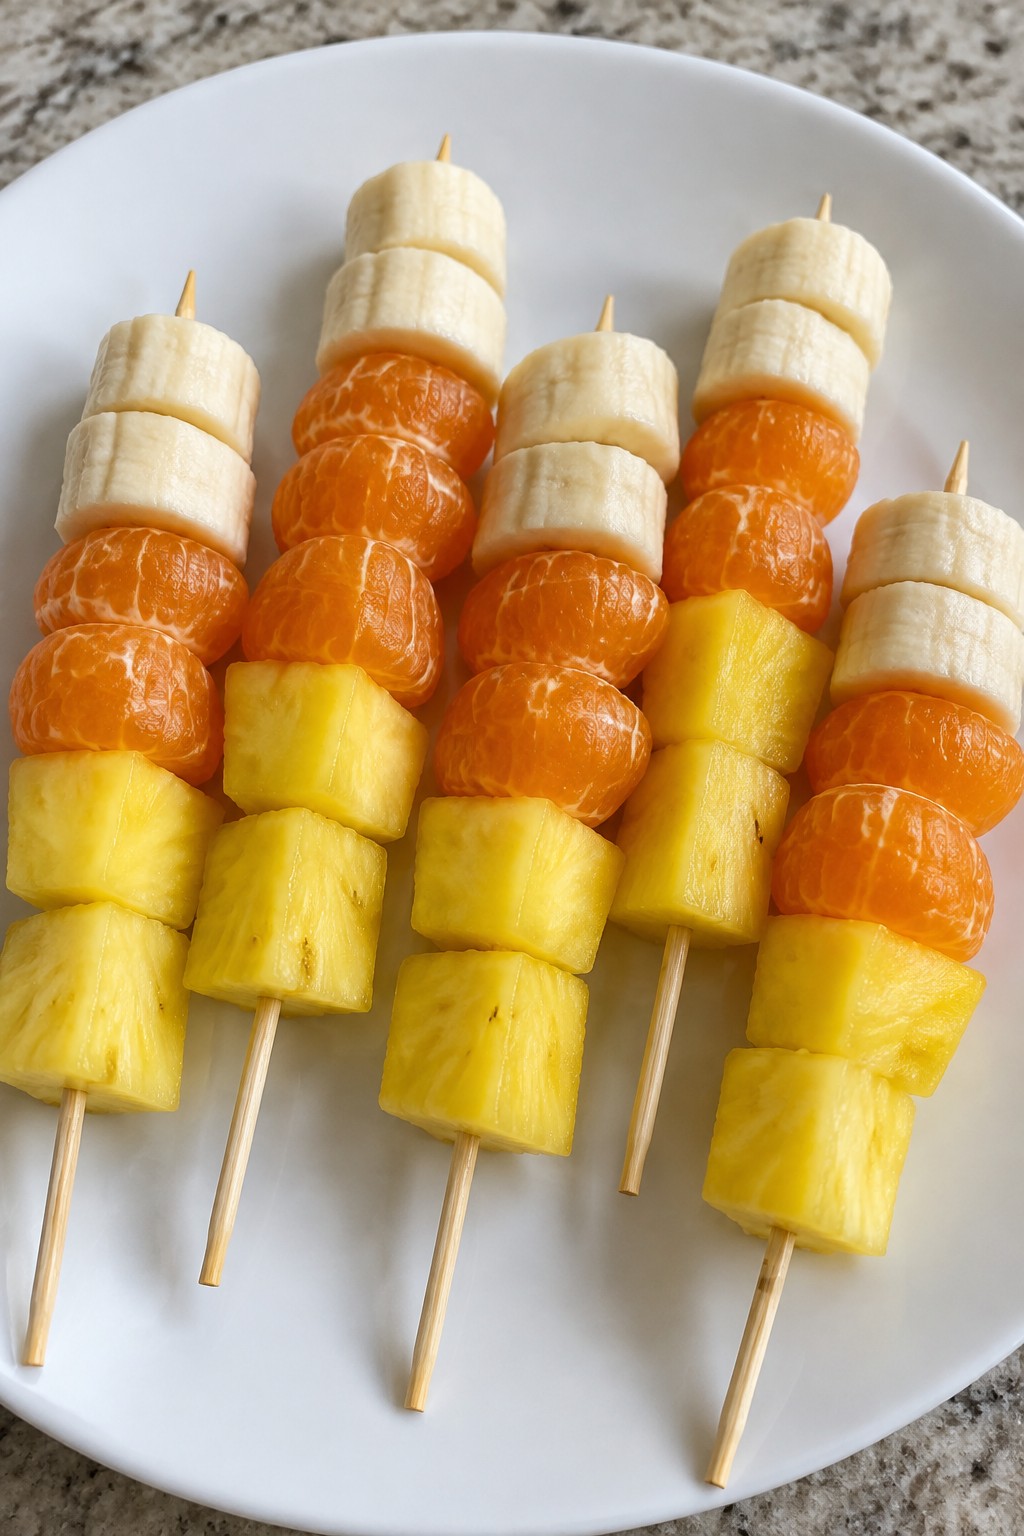
Candy Corn Fruit Skewers
These skewers bring a fun pop of color to any Halloween spread without much effort. The bright layers echo classic candy corn while using fresh fruit for a lighter option that still feels festive. They come together fast and work well for last-minute party prep.
The combination offers juicy sweetness with a bit of chew from the firmer pieces. Kids and adults both reach for them because they look playful yet taste like a simple fruit salad on a stick.
Serves 4 people.
Ingredients
- 2 cups pineapple chunks
- 3 oranges, peeled and segmented
- 2 bananas, cut into thick slices
- 12 wooden skewers
Instructions
- Lay out all the wooden skewers on a clean surface so you can work quickly.
- Thread 2 or 3 pineapple chunks onto each skewer first to form the yellow base layer.
- Add 2 or 3 orange segments next, pushing them gently against the pineapple.
- Finish each skewer with 2 thick banana slices at the top to create the white layer.
- Arrange the finished skewers on a platter and serve right away.
Extra Tips
Chill the pineapple and oranges ahead of time so the skewers stay cool and refreshing at the table. If bananas start to brown before serving, give them a light squeeze of orange juice from one of the segments. These skewers do not hold well once assembled, so make them within an hour of guests arriving.Course: Appetizer Cuisine: American Equipment: Wooden Skewers, Cutting Board, Knife
