
The holiday season is just around the corner, and it’s time to think about festive dishes everyone can enjoy. For those hosting guests with gluten sensitivities, there’s no need to worry. Picture your Christmas table filled with savory stuffed mushrooms, crispy sweet potato fries, and a rich flourless chocolate cake. Each dish is packed with flavor and wholesomeness. Let’s explore how to make your holiday feast both delicious and inclusive.
Savory Stuffed Mushrooms With Herbs
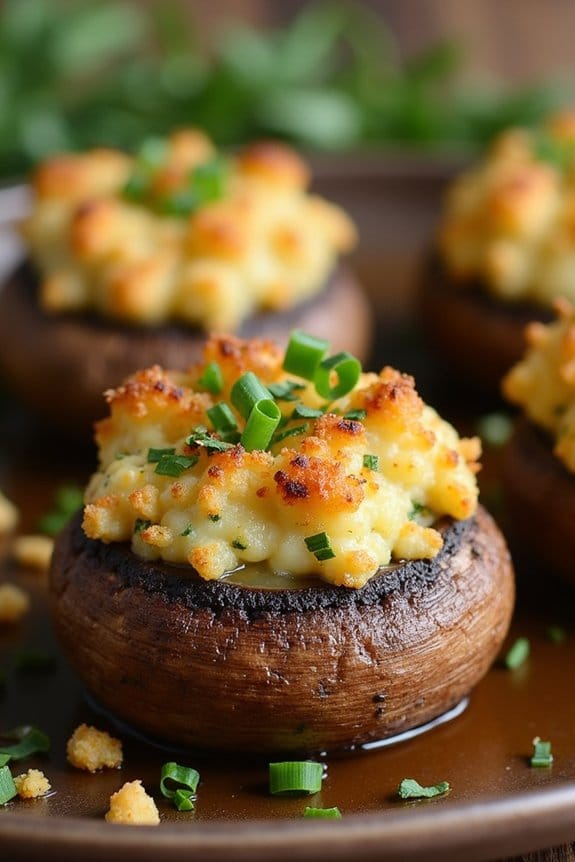
Savory Stuffed Mushrooms With Herbs are a delightful gluten-free appetizer perfect for your Christmas feast. These mushrooms are packed with a flavorful mixture of fresh herbs, creamy cheeses, and savory spices, making them a crowd-pleaser for both gluten-free and non-gluten-free guests. The earthy flavor of the mushrooms pairs beautifully with the aromatic herbs, creating a dish that’s both elegant and comforting.
This recipe is simple to prepare, yet it looks sophisticated enough for your holiday table. The mushrooms can be assembled ahead of time, allowing you to enjoy the festivities without the stress of last-minute preparations. Perfectly baked with a crisp topping, these stuffed mushrooms are sure to become a festive favorite, offering a delectable bite-sized treat to start your Christmas meal.
Ingredients (Serves 4-6):
- 24 medium-sized button mushrooms
- 3 tablespoons olive oil
- 1 small onion, finely chopped
- 3 cloves garlic, minced
- 1/2 cup gluten-free breadcrumbs
- 1/2 cup grated Parmesan cheese
- 4 oz cream cheese, softened
- 2 tablespoons fresh parsley, chopped
- 1 tablespoon fresh thyme leaves
- 1 tablespoon fresh chives, chopped
- Salt and pepper to taste
- 2 tablespoons unsalted butter, melted
Cooking Instructions:
- Preparation: Preheat your oven to 375°F (190°C). Gently clean the mushrooms with a damp paper towel and remove the stems. Set the mushroom caps aside and finely chop the stems.
- Cook the Filling: Heat 2 tablespoons of olive oil in a skillet over medium heat. Add the chopped onion and garlic, sautéing until they’re translucent and fragrant, about 3-4 minutes. Add the chopped mushroom stems and cook until they release their moisture and begin to brown, about 5 minutes more. Remove from heat and let it cool slightly.
- Mix the Filling: In a mixing bowl, combine the cooked mushroom mixture, gluten-free breadcrumbs, Parmesan cheese, cream cheese, parsley, thyme, chives, salt, and pepper. Mix well until all ingredients are fully incorporated.
- Stuff the Mushrooms: Using a spoon, fill each mushroom cap with the prepared filling, pressing gently to compact it. Arrange the stuffed mushrooms on a baking sheet.
- Bake the Mushrooms: Drizzle the remaining olive oil and melted butter over the stuffed mushrooms. Place in the preheated oven and bake for 20-25 minutes, or until the tops are golden and the mushrooms are tender.
- Serve: Allow the mushrooms to cool slightly before serving. They’re best enjoyed warm.
Extra Tips: For added flavor, consider incorporating a splash of white wine to the stuffing mixture during cooking for a slight tang and depth. If you prefer a spicier kick, a pinch of red pepper flakes can be added to the filling.
To guarantee even cooking, try to select mushrooms of a similar size. You can also experiment with different herbs, such as rosemary or basil, to suit your taste preferences. The mushrooms can be assembled a day in advance and baked just before serving, making them a convenient option for holiday entertaining.
Crispy Baked Sweet Potato Fries
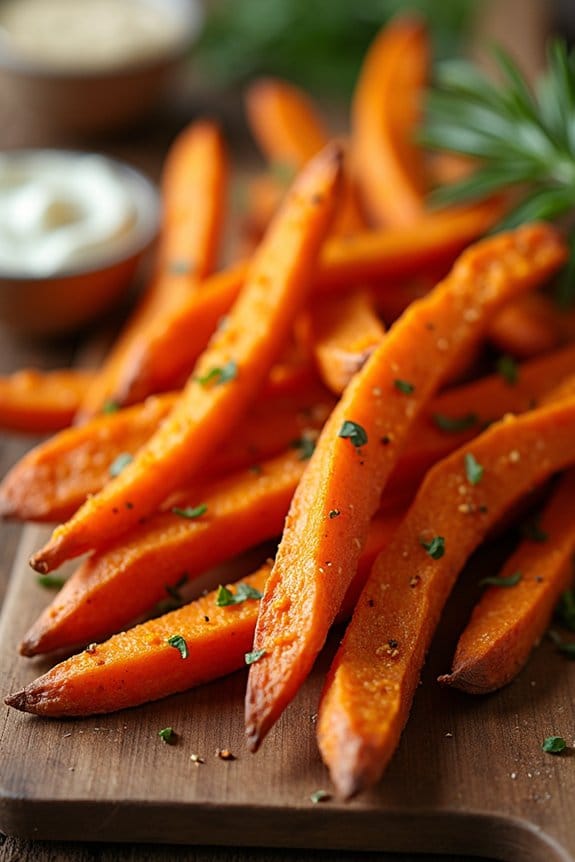
Sweet potato fries are a delightful and healthier alternative to traditional potato fries, offering a naturally sweet flavor that pairs well with a variety of seasonings. This gluten-free recipe is perfect for a festive Christmas side dish, adding both color and a touch of sweetness to your holiday table.
The key to achieving crispy baked sweet potato fries lies in the preparation and cooking technique, guaranteeing that each fry is golden and crisp on the outside while remaining soft on the inside.
This recipe provides a serving size suitable for 4-6 people, making it ideal for a family gathering or holiday feast. With simple ingredients and straightforward steps, these crispy baked sweet potato fries aren’t only easy to prepare but also incredibly satisfying. They can be served alongside your favorite dips or enjoyed as a standalone snack, making them a versatile addition to your gluten-free Christmas menu.
Ingredients:
- 4 large sweet potatoes
- 3 tablespoons olive oil
- 1 teaspoon salt
- 1/2 teaspoon black pepper
- 1 teaspoon garlic powder
- 1 teaspoon paprika
- 1 tablespoon cornstarch (optional for extra crispiness)
Cooking Instructions:
- Preheat the Oven: Start by preheating your oven to 425°F (220°C). This high temperature is essential for getting the fries crispy.
- Prepare the Sweet Potatoes: Peel the sweet potatoes, then cut them into long, thin strips, about 1/4 inch thick. Try to keep them as uniform as possible to guarantee even cooking.
- Soak the Fries (Optional but Recommended): Place the cut sweet potato fries in a bowl of cold water and let them soak for at least 30 minutes. This helps to remove excess starch, which can prevent the fries from becoming crispy. After soaking, drain and pat them dry thoroughly with a clean kitchen towel.
- Coat the Fries: In a large bowl, combine the sweet potato fries with olive oil, salt, black pepper, garlic powder, and paprika. If using, add the cornstarch to the mixture. Toss everything together until the fries are evenly coated.
- Arrange on Baking Sheet: Line a large baking sheet with parchment paper. Spread the fries out in a single layer, guaranteeing they aren’t touching each other. This allows for proper air circulation, which is key for crispiness.
- Bake the Fries: Place the baking sheet in the preheated oven and bake for 25-30 minutes. Halfway through, flip the fries with a spatula to guarantee even cooking. Keep an eye on them towards the end to prevent burning.
- Serve and Enjoy: Once the fries are golden brown and crispy, remove them from the oven. Allow them to cool slightly before serving. Enjoy with your favorite gluten-free dipping sauce.
Extra Tips:
To achieve the best results, make sure the sweet potato fries are as dry as possible before tossing them with oil and seasonings. This will help them crisp up better in the oven.
Additionally, avoid overcrowding the baking sheet, as this can lead to steaming rather than baking, resulting in soggy fries. If you’re making a larger batch, consider using multiple baking sheets.
Finally, if you prefer a spicier kick, consider adding a pinch of cayenne pepper to the seasoning mix.
Roasted Brussels Sprouts With Balsamic Glaze
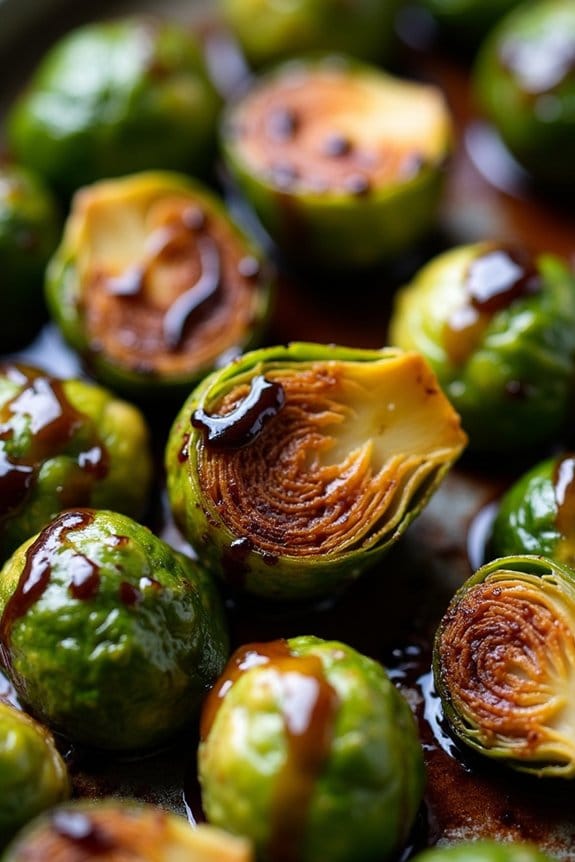
Roasted Brussels Sprouts With Balsamic Glaze is a delightful, gluten-free side dish perfect for your Christmas table. The natural sweetness of the balsamic glaze beautifully complements the earthy flavor of the Brussels sprouts, creating a dish that even those who typically shy away from these tiny cabbages will enjoy.
The roasting process brings out a nutty flavor in the Brussels sprouts, while the balsamic glaze adds a touch of tangy sweetness, making this dish a wonderful addition to any holiday meal. Not only is this dish delicious, but it’s also simple and quick to prepare.
With just a handful of ingredients and minimal prep time, you can focus on other holiday favorites while this dish roasts to perfection in the oven. Whether you’re hosting a large gathering or having an intimate family dinner, Roasted Brussels Sprouts With Balsamic Glaze is sure to impress your guests with its rich flavors and elegant presentation.
Ingredients for 4-6 people:
- 2 pounds Brussels sprouts, trimmed and halved
- 3 tablespoons olive oil
- Salt and pepper to taste
- 1/2 cup balsamic vinegar
- 2 tablespoons honey
Cooking Instructions:
- Preheat the Oven: Start by preheating your oven to 400°F (200°C). Preparing the oven ahead of time guarantees that your Brussels sprouts will roast evenly and develop that perfect caramelized exterior.
- Prepare the Brussels Sprouts: Trim the ends of the Brussels sprouts and remove any yellow or damaged outer leaves. Cut each sprout in half to ensure they cook evenly.
- Season the Sprouts: Place the halved Brussels sprouts in a large mixing bowl. Drizzle with olive oil, and season with salt and pepper. Toss them well to make sure each sprout is thoroughly coated with the oil and seasoning.
- Roast the Sprouts: Spread the seasoned Brussels sprouts in a single layer on a baking sheet. Place them in the preheated oven and roast for 25-30 minutes, stirring halfway through, until they’re crispy on the outside and tender inside.
- Prepare the Balsamic Glaze: While the Brussels sprouts are roasting, prepare the glaze. In a small saucepan, combine the balsamic vinegar and honey. Heat over medium heat and bring to a gentle boil, then reduce the heat and let it simmer for about 10 minutes until the mixture reduces and thickens slightly.
- Combine and Serve: Once the Brussels sprouts are roasted, remove them from the oven and transfer them to a serving dish. Drizzle the balsamic glaze over the top, and give them a gentle toss to coat. Serve immediately while warm.
Extra Tips: When selecting Brussels sprouts, choose ones that are similar in size to guarantee even cooking. If you prefer a sweeter glaze, you can add a little more honey to taste.
Also, make sure to keep an eye on the balsamic glaze as it simmers to prevent it from burning. If you have extra glaze, it can be stored in the refrigerator for up to a week and used on other vegetables or salads.
Gluten-Free Holiday Cheese Board
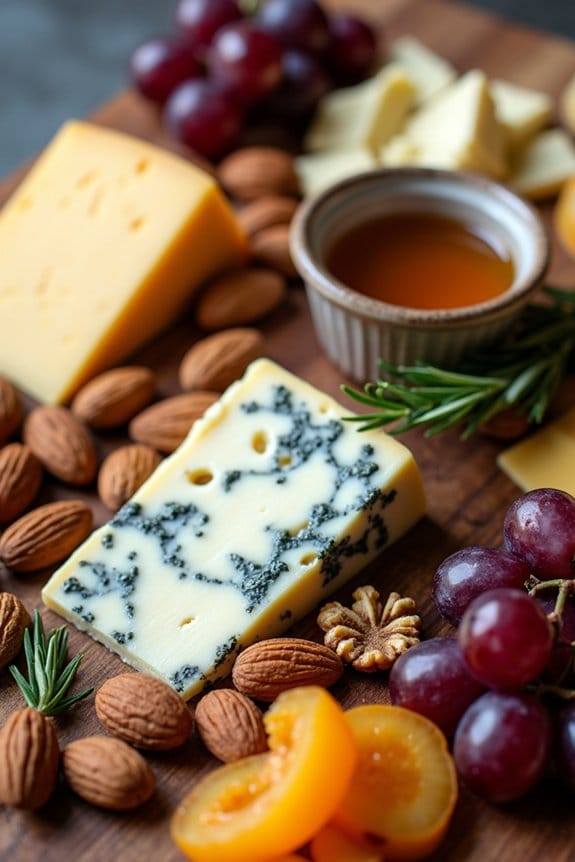
Creating a cheese board that’s both visually appealing and suitable for those with gluten sensitivities can be a delightful addition to your holiday spread. A Gluten-Free Holiday Cheese Board not only caters to guests with dietary restrictions but also offers a variety of textures and flavors that everyone can enjoy.
The key to a successful cheese board lies in the selection of gluten-free cheeses and accompaniments that complement each other, creating a harmonious ensemble that pleases the palate and the eyes.
To make your Gluten-Free Holiday Cheese Board a hit, focus on including a variety of cheese types—soft, semi-soft, hard, and blue—along with gluten-free crackers, nuts, fruits, and spreads. Arrange everything on a beautiful wooden board or platter, and let the natural colors and textures shine. This cheese board serves 4-6 people, making it perfect for small holiday gatherings or family dinners.
Ingredients:
- 200g Brie cheese
- 200g Cheddar cheese
- 200g Blue cheese
- 200g Goat cheese
- 1 package gluten-free crackers
- 1 cup almonds
- 1 cup walnuts
- 1 cup dried apricots
- 1 cup fresh grapes
- 1/2 cup honey
- 1/2 cup fig jam
- Fresh rosemary sprigs for garnish
Cooking Instructions:
- Prepare the Cheeses:
- Cut the Brie and Blue cheese into wedges or slices, leaving some whole for variety.
- Slice the Cheddar cheese into small squares or sticks for easy picking.
- Crumble the Goat cheese into small chunks.
- Arrange the Cheese:
- On a large wooden board or platter, place each type of cheese at different sections to create balance.
- Verify there’s space between each cheese type for the other accompaniments.
- Add Crackers and Nuts:
- Place the gluten-free crackers in several small stacks around the board.
- Scatter almonds and walnuts in small clusters around the cheeses.
- Incorporate Fruits:
- Arrange fresh grapes in small bunches, and place them strategically around the board to add color and freshness.
- Add dried apricots in little piles to introduce a sweet element.
- Include Spreads:
- Spoon honey and fig jam into small bowls or ramekins and place on the board.
- Position these near the cheeses they complement best, such as fig jam with Brie.
- Garnish and Final Touches:
- Tuck sprigs of fresh rosemary between the items on the board for a festive touch.
- Confirm that all items are easily accessible for guests to pick and choose.
Extra Tips:
When selecting cheeses, make certain to check labels for any hidden gluten ingredients or cross-contamination warnings. Opt for cheeses that are naturally gluten-free, and consider including a variety of milk sources, such as cow, goat, and sheep, to cater to different preferences.
Additionally, balance stronger flavored cheeses with milder ones to appeal to a range of palates. Finally, consider adding seasonal elements like pomegranate seeds or cranberries to enhance the holiday theme and add a pop of color to your presentation.
Creamy Butternut Squash Soup
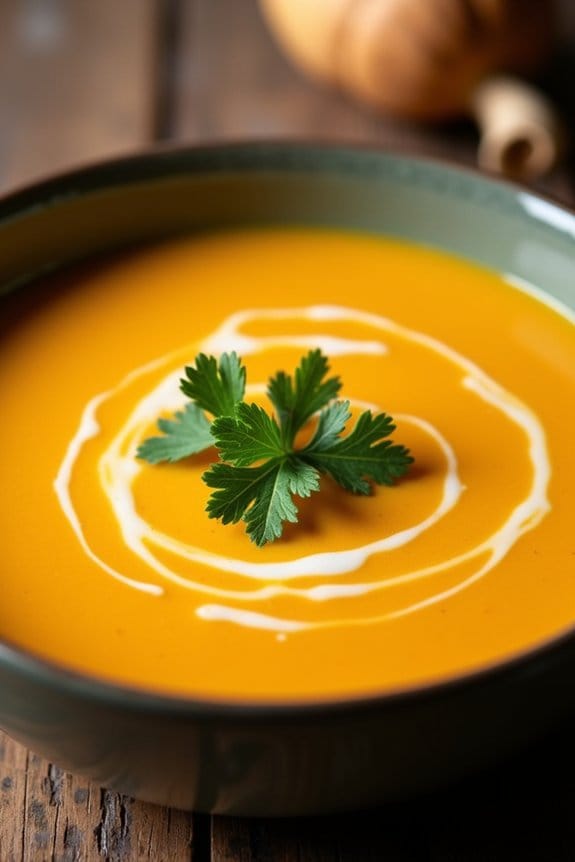
Warm up your holiday celebrations with a comforting bowl of Creamy Butternut Squash Soup. This soup isn’t only rich and velvety but also completely gluten-free, making it a perfect choice for those with dietary restrictions. The natural sweetness of butternut squash, combined with aromatic spices, results in a delightful flavor that captures the essence of the festive season.
Whether served as a starter or a main course, this soup is sure to impress your guests and add a touch of warmth to your Christmas menu. This recipe is designed to serve 4-6 people, making it ideal for family gatherings or small holiday parties. With a blend of simple ingredients, it’s easy to prepare and can be made ahead of time, freeing you up to enjoy more of the holiday festivities.
Follow the steps below to create this delicious and heartwarming dish that’s perfect for your gluten-free Christmas feast.
Ingredients:
- 1 large butternut squash, peeled, seeded, and cubed
- 2 tablespoons olive oil
- 1 medium onion, chopped
- 2 cloves garlic, minced
- 4 cups gluten-free vegetable broth
- 1 teaspoon ground cinnamon
- 1/2 teaspoon ground nutmeg
- Salt and pepper to taste
- 1 cup coconut milk
- Fresh parsley, for garnish
Instructions:
- Prepare the Butternut Squash: Preheat your oven to 400°F (200°C). Spread the cubed butternut squash on a baking sheet, drizzle with olive oil, and sprinkle with a little salt and pepper. Roast in the preheated oven for about 25-30 minutes, or until the squash is tender and slightly caramelized.
- Cook the Aromatics: While the squash is roasting, heat the remaining olive oil in a large pot over medium heat. Add the chopped onion and sauté until it becomes translucent, about 5 minutes. Stir in the minced garlic and cook for another minute, ensuring the garlic doesn’t burn.
- Combine Ingredients: Once the squash is roasted, add it to the pot with the onions and garlic. Pour in the gluten-free vegetable broth, cinnamon, nutmeg, salt, and pepper. Bring the mixture to a simmer and let it cook for about 10 minutes to allow the flavors to meld together.
- Blend the Soup: Remove the pot from heat and use an immersion blender to puree the soup until smooth. If you prefer a silky texture, you can transfer the soup in batches to a blender and process until completely smooth.
- Add Coconut Milk: Return the pureed soup to the pot and stir in the coconut milk. Heat gently over low heat until the soup is warmed through. Taste and adjust seasoning as needed.
- Serve: Ladle the creamy butternut squash soup into bowls, garnish with fresh parsley, and serve hot. Enjoy the comforting and festive flavors that this soup brings to your holiday table.
Extra Tips: For a deeper flavor, consider adding a pinch of smoked paprika or cayenne pepper for a bit of heat. If you prefer a thicker soup, reduce the amount of vegetable broth slightly.
This soup can be made a day in advance and stored in the refrigerator, allowing the flavors to develop even more. When reheating, add a splash of broth or coconut milk to maintain the desired consistency.
And finally, if you want to add a touch of elegance, drizzle a little extra coconut milk on top before serving for a beautiful presentation.
Herb-Crusted Roast Chicken
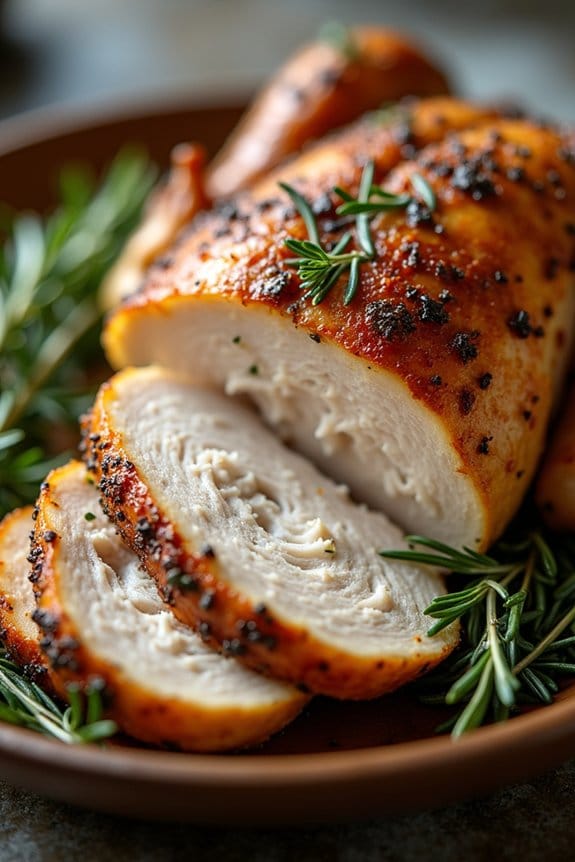
Herb-Crusted Roast Chicken is a delightful and aromatic dish that’s perfect for a gluten-free Christmas feast. This recipe brings together the rich flavors of fresh herbs and the succulent taste of perfectly roasted chicken. The herb crust provides a beautiful, crispy texture that contrasts wonderfully with the tender, juicy meat inside.
Whether you’re hosting a large family gathering or a small, intimate dinner, this roast chicken is certain to impress and satisfy your guests. The key to this dish lies in the combination of herbs that form the crust, infusing the chicken with their fragrant aromas as it cooks.
This recipe is simple yet elegant, allowing the natural flavors of the ingredients to shine through. Served alongside your favorite gluten-free sides, Herb-Crusted Roast Chicken becomes the centerpiece of your Christmas dinner, offering a hearty, satisfying meal that everyone will enjoy.
Ingredients (Serves 4-6):
- 1 whole chicken (4-5 pounds)
- 1 lemon, halved
- 4 tablespoons olive oil
- 1 tablespoon salt
- 1 teaspoon black pepper
- 3 garlic cloves, minced
- 2 tablespoons fresh rosemary, chopped
- 2 tablespoons fresh thyme, chopped
- 2 tablespoons fresh parsley, chopped
- 1 tablespoon Dijon mustard
Cooking Instructions:
- Preheat the Oven: Start by preheating your oven to 400°F (200°C). This guarantees that the chicken will cook evenly and the herb crust will become wonderfully crisp.
- Prepare the Chicken: Rinse the chicken under cold water and pat it dry with paper towels. Removing excess moisture helps the skin to become crispy. Place the chicken in a large roasting pan.
- Season the Chicken: Rub the entire chicken with the halved lemon, squeezing a bit of juice over it as you go. This adds a subtle citrus flavor and helps tenderize the meat.
- Make the Herb Mixture: In a small bowl, combine the olive oil, salt, pepper, minced garlic, rosemary, thyme, parsley, and Dijon mustard. Mix until you have a thick paste.
- Apply the Herb Crust: Generously rub the herb mixture all over the chicken, making sure to get under the skin and inside the cavity. This allows the flavors to penetrate the meat.
- Roast the Chicken: Place the chicken in the preheated oven and roast for 1 hour and 20 minutes, or until the internal temperature reaches 165°F (74°C) and the juices run clear when you cut between a leg and thigh.
- Rest the Chicken: Once done, remove the chicken from the oven and let it rest for about 10-15 minutes before carving. Resting allows the juices to redistribute throughout the meat, assuring it remains juicy and flavorful.
Extra Tips:
For the best results, use fresh herbs rather than dried ones as they provide a more vibrant flavor and aroma. If you want to add extra depth to the dish, consider placing some aromatics like onions, carrots, and celery in the roasting pan under the chicken.
This not only enhances the flavor of the chicken but also creates a delicious base for making gluten-free gravy. Additionally, if you’re short on time, you can prepare the herb mixture a day in advance and store it in the refrigerator, which allows the flavors to meld together even more.
Quinoa and Cranberry Salad
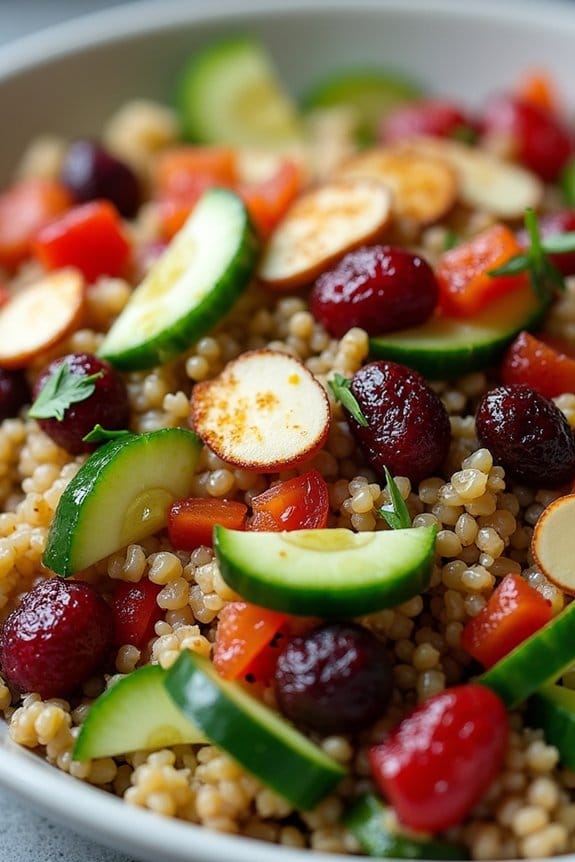
Quinoa and Cranberry Salad is a vibrant and festive dish perfect for your gluten-free Christmas menu. This salad beautifully combines the nutty flavor of quinoa with the tartness of cranberries, creating a delightful contrast that’s both healthy and satisfying.
It’s mixed with fresh vegetables and a simple lemon vinaigrette, making it an excellent addition to any holiday table. The salad can be served as a main dish or as a side, offering versatility for various dietary preferences.
The quinoa provides a protein-rich base, while the cranberries add a touch of sweetness that complements the fresh, crisp vegetables. Not only is this dish delicious, but it’s also visually appealing with its array of colors.
The combination of textures and flavors makes it a crowd-pleaser, guaranteeing it will be a hit at your festive gathering. Suitable for serving 4-6 people, this salad is easy to prepare ahead of time, allowing you to focus on other holiday preparations.
Ingredients:
- 1 cup quinoa, rinsed
- 2 cups water
- 1/2 cup dried cranberries
- 1/4 cup sliced almonds
- 1/2 red bell pepper, diced
- 1/2 cucumber, diced
- 1/4 red onion, finely chopped
- 1/4 cup fresh parsley, chopped
- Juice of 1 lemon
- 1/4 cup olive oil
- Salt and pepper to taste
Instructions:
1. Cook the Quinoa: In a medium saucepan, combine the rinsed quinoa and water. Bring to a boil, then reduce the heat to low, cover, and simmer for about 15 minutes or until the quinoa is tender and has absorbed the water.
Remove from heat and let it sit covered for 5 minutes. Fluff with a fork and set aside to cool.
2. Prepare the Dressing: In a small bowl, whisk together the lemon juice, olive oil, salt, and pepper. Adjust seasoning to taste and set aside.
3. Mix the Salad: In a large mixing bowl, combine the cooked quinoa, dried cranberries, sliced almonds, diced red bell pepper, diced cucumber, finely chopped red onion, and chopped parsley.
4. Dress the Salad: Pour the prepared lemon vinaigrette over the quinoa mixture. Toss well to guarantee all ingredients are evenly coated with the dressing.
5. Chill and Serve: Cover the salad and refrigerate for at least 30 minutes to allow the flavors to meld. Serve chilled or at room temperature for peak flavor.
Extra Tips:
To enhance the flavor of your Quinoa and Cranberry Salad, consider toasting the almonds lightly in a pan before adding them to the salad. This will bring out a richer, nuttier flavor.
You can also experiment with adding other ingredients like feta cheese for a creamy texture or arugula for an additional peppery taste. If preparing in advance, keep the dressing separate and mix it in just before serving to maintain the salad’s freshness.
Gluten-Free Pumpkin Bread
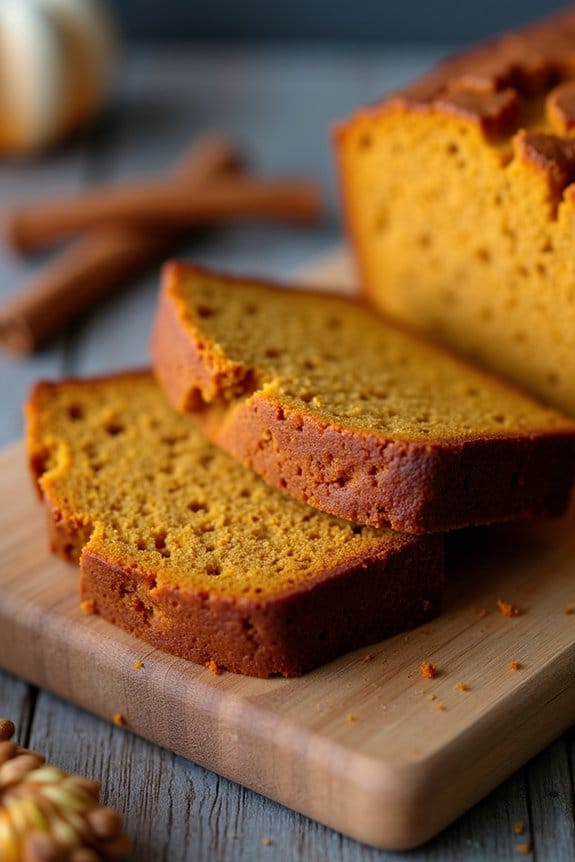
Gluten-Free Pumpkin Bread is a delightful treat perfect for the holiday season. This moist and flavorful bread captures the essence of fall with its rich pumpkin flavor and warm spices.
Whether you’re hosting a festive gathering or simply indulging in some cozy comfort food, this gluten-free version of pumpkin bread is certain to impress all your guests, whether they’re gluten-intolerant or not.
Crafted with a blend of gluten-free flours and aromatic spices such as cinnamon and nutmeg, this bread is as wholesome as it’s delicious. The natural sweetness from the pumpkin pairs beautifully with a hint of vanilla, creating a well-balanced taste that’s both satisfying and heartwarming.
Serve it as a breakfast treat or a dessert, and enjoy the warm, inviting aroma that fills your kitchen as it bakes.
Ingredients for 4-6 servings:
- 1 3/4 cups gluten-free all-purpose flour
- 1 teaspoon baking soda
- 1/2 teaspoon baking powder
- 1/2 teaspoon salt
- 2 teaspoons ground cinnamon
- 1/2 teaspoon ground nutmeg
- 1/4 teaspoon ground ginger
- 1/8 teaspoon ground cloves
- 1 cup canned pumpkin puree
- 1/2 cup vegetable oil
- 1/2 cup granulated sugar
- 1/2 cup brown sugar, packed
- 2 large eggs
- 1 teaspoon vanilla extract
- 1/3 cup water
Cooking Instructions:
- Preheat the Oven: Begin by preheating your oven to 350°F (175°C). Grease a 9×5-inch loaf pan with cooking spray or line it with parchment paper.
- Mix Dry Ingredients: In a medium-sized bowl, whisk together the gluten-free all-purpose flour, baking soda, baking powder, salt, cinnamon, nutmeg, ginger, and cloves until well combined. Set aside.
- Combine Wet Ingredients: In a large bowl, mix the pumpkin puree, vegetable oil, granulated sugar, brown sugar, eggs, vanilla extract, and water. Use a hand mixer or stand mixer to blend until the mixture is smooth and uniform.
- Incorporate Dry Ingredients: Gradually add the dry ingredient mixture into the wet ingredients, stirring gently with a spatula or mixer on low speed, until just combined. Avoid over-mixing to maintain a tender bread texture.
- Pour and Bake: Pour the batter into the prepared loaf pan, spreading it evenly. Bake in the preheated oven for 60-65 minutes, or until a toothpick inserted into the center comes out clean.
- Cool and Serve: Once baked, remove the pumpkin bread from the oven and let it cool in the pan for about 10 minutes. Then, transfer it to a wire rack to cool completely before slicing and serving.
Extra Tips:
For the best results, verify all your ingredients are at room temperature before mixing, which helps the batter come together more smoothly.
If you prefer a nuttier texture, you can stir in a handful of chopped walnuts or pecans into the batter before baking.
Additionally, check your pumpkin puree to verify it’s pure pumpkin and not pumpkin pie filling, which contains added sugars and spices.
This bread can be stored tightly wrapped at room temperature for up to three days or frozen for longer preservation.
Decadent Flourless Chocolate Cake
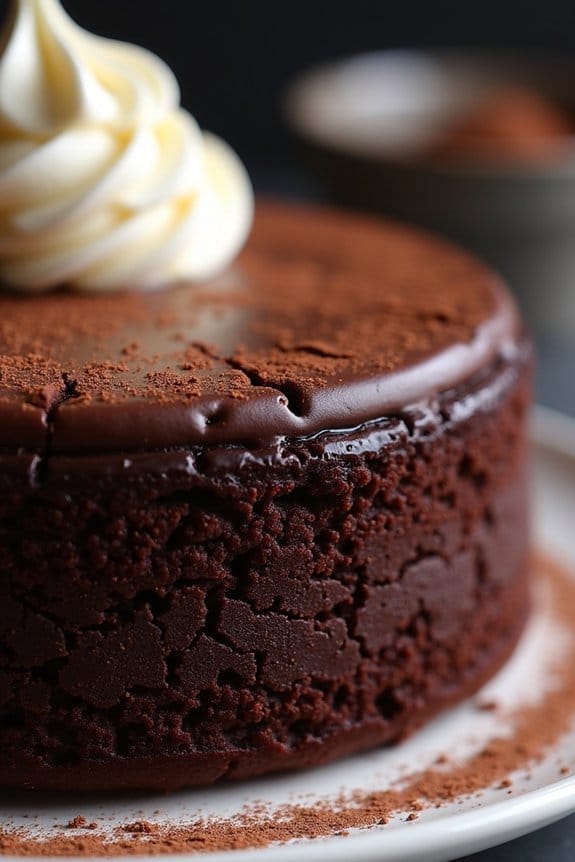
Christmas is a time for indulgence, and nothing says decadence quite like a rich, velvety Flourless Chocolate Cake. This gluten-free dessert is perfect for those with dietary restrictions or anyone seeking a sumptuous treat to celebrate the festive season. The absence of flour makes the cake incredibly dense and fudgy, with an intense chocolate flavor that will delight your taste buds.
Whether you’re hosting a holiday gathering or simply want to make something special for your loved ones, this cake is bound to impress.
The beauty of a Flourless Chocolate Cake lies in its simplicity. With just a few quality ingredients, you can create a dessert that feels both luxurious and homemade. The key is to use high-quality chocolate, as it’s the star of the show. This recipe is designed to serve 4-6 people, making it perfect for an intimate holiday dinner or a small family celebration.
Pair it with a dollop of whipped cream or a scoop of vanilla ice cream, and you have a dessert that’s both elegant and comforting.
Ingredients (Serving Size: 4-6 people):
- 8 ounces semi-sweet or bittersweet chocolate, chopped
- 1/2 cup unsalted butter
- 3/4 cup granulated sugar
- 1/4 teaspoon salt
- 1 teaspoon vanilla extract
- 3 large eggs, at room temperature
- 1/2 cup unsweetened cocoa powder, sifted
Instructions:
- Preheat and Prepare: Preheat your oven to 375°F (190°C). Grease an 8-inch round cake pan and line the bottom with parchment paper to guarantee easy release after baking.
- Melt Chocolate and Butter: In a medium-sized heatproof bowl, combine the chopped chocolate and butter. Melt them together using a double boiler or microwave in 30-second increments, stirring after each interval, until smooth and fully combined.
- Mix Sugar and Salt: Remove the melted chocolate mixture from heat and stir in the granulated sugar and salt until well incorporated. The sugar should fully dissolve, resulting in a glossy mixture.
- Add Vanilla and Eggs: Stir in the vanilla extract. Then, add the eggs one at a time, beating well after each addition. The mixture should become thick and smooth.
- Incorporate Cocoa Powder: Gently fold in the sifted cocoa powder until just combined. Be careful not to overmix, as this could result in a denser cake.
- Bake the Cake: Pour the batter into the prepared cake pan, smoothing the top with a spatula. Bake for about 25 minutes, or until the edges are set but the center remains slightly soft. A toothpick inserted into the center should come out mostly clean with a few moist crumbs.
- Cool and Serve: Let the cake cool in the pan for 10 minutes, then carefully invert it onto a wire rack to cool completely. Once cooled, transfer to a serving plate. Dust with additional cocoa powder or powdered sugar before serving if desired.
Extra Tips:
For the best results, use high-quality chocolate with at least 60% cocoa content, as it will greatly impact the flavor and texture of the cake.
Make sure the eggs are at room temperature to guarantee they blend smoothly into the chocolate mixture. If you’re planning to serve the cake with whipped cream, consider adding a splash of vanilla or a hint of liqueur to the cream for added depth of flavor.
Almond Flour Sugar Cookies
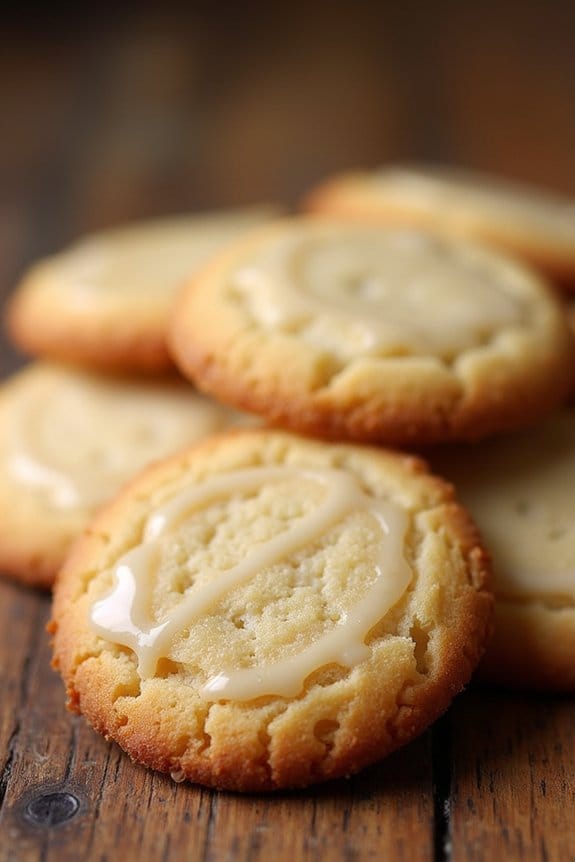
Almond Flour Sugar Cookies are a delightful twist on the classic sugar cookie, perfect for those looking for a gluten-free option during the holiday season. These cookies are soft, slightly chewy, and have a subtle almond flavor that pairs beautifully with the sweetness of the sugar.
Whether you’re making them for a Christmas party or simply for a cozy night in, these cookies are bound to be a hit with everyone, regardless of dietary preferences.
Using almond flour not only makes these cookies gluten-free, but also adds a nutritious element, as almond flour is rich in protein and healthy fats. The dough comes together quickly and can be rolled out and cut into festive shapes or simply formed into balls for a more traditional round cookie.
This recipe yields enough cookies to serve 4-6 people, making it perfect for small gatherings or as a treat for your family.
Ingredients for Almond Flour Sugar Cookies (Serves 4-6):
- 2 cups almond flour
- 1/4 cup coconut oil, melted
- 1/4 cup honey or maple syrup
- 1 tsp pure vanilla extract
- 1/2 tsp almond extract
- 1/4 tsp salt
- 1/2 tsp baking soda
- 1 large egg
Cooking Instructions:
1. Preheat the oven: Set your oven to 350°F (175°C) and line a baking sheet with parchment paper to prevent the cookies from sticking.
2. Mix the wet ingredients**: In a large mixing bowl, combine the melted coconut oil, honey or maple syrup, vanilla extract, almond extract, and the egg. Whisk the mixture until it’s smooth and well combined**.
3. Combine the dry ingredients: In a separate bowl, mix the almond flour, salt, and baking soda. Confirm there are no lumps in the almond flour to achieve a smooth dough.
4. Form the dough: Gradually add the dry ingredients to the wet ingredients, stirring continuously until a dough forms. The dough should be slightly sticky but manageable.
5. Shape the cookies: For traditional round cookies, use a tablespoon to scoop the dough and roll it into balls with your hands. Place each ball on the prepared baking sheet, leaving about two inches of space between each.
For shaped cookies, roll out the dough between two sheets of parchment paper to about 1/4 inch thickness and use cookie cutters to cut into desired shapes.
6. Bake the cookies: Place the cookies in the preheated oven and bake for 10-12 minutes, or until the edges are golden brown. Keep a close eye on them, as almond flour cookies can quickly go from golden to burnt.
7. Cool and serve: Once baked, allow the cookies to cool on the baking sheet for about 5 minutes before transferring them to a wire rack to cool completely. This helps them firm up and makes them easier to handle.
Extra Tips:
For a festive touch, consider adding a sprinkle of cinnamon or nutmeg to the dough for a warm, holiday flavor. If you’d like to decorate the cookies, a simple glaze made from powdered sugar and a splash of milk works well.
Confirm the cookies are completely cool before glazing to prevent the glaze from melting. Additionally, if your dough feels too sticky to handle, refrigerate it for 15-20 minutes to make it easier to roll and shape.
Enjoy these Almond Flour Sugar Cookies with a warm cup of tea or coffee for a cozy holiday treat!
Spiced Apple Cider Sangria

Spiced Apple Cider Sangria is a delightful, warming beverage perfect for the holiday season. This gluten-free recipe combines the rich flavors of apple cider with the crispness of white wine, infused with a medley of spices that evoke festive feelings.
Ideal for gatherings, this sangria not only brings warmth to your holiday table but also adds a touch of elegance with its vibrant colors and aromatic spices. Whether you’re hosting a Christmas party or enjoying a cozy night in, Spiced Apple Cider Sangria is sure to be a hit with family and friends.
This recipe is designed to serve 4-6 people, making it perfect for small gatherings. The combination of fresh fruits, aromatic spices, and the crisp effervescence of sparkling water creates a revitalizing yet comforting drink.
Its versatility allows you to adjust the sweetness and intensity of the spices to suit your personal taste. Enjoy this gluten-free sangria by the fire or under the twinkle of holiday lights, and let its warmth and flavor bring joy to your festive celebrations.
Ingredients:
- 1 bottle (750 ml) white wine (such as Pinot Grigio or Sauvignon Blanc)
- 2 cups apple cider
- 1/2 cup brandy
- 1/4 cup orange liqueur (such as Cointreau or Triple Sec)
- 1 apple, thinly sliced
- 1 orange, thinly sliced
- 1 cinnamon stick
- 3-4 whole cloves
- 1/4 teaspoon ground nutmeg
- 1 cup sparkling water
- Optional: 2 tablespoons honey or maple syrup for added sweetness
Instructions:
- Prepare the Fruits: Begin by washing the apple and orange thoroughly. Thinly slice the apple and orange, removing any seeds to guarantee a smooth texture in your sangria.
- Mix the Base: In a large pitcher or punch bowl, combine the white wine, apple cider, brandy, and orange liqueur. Stir the mixture gently to guarantee the liquids are well integrated.
- Add the Fruits and Spices: Add the sliced apple and orange to the liquid mixture. Next, add the cinnamon stick, whole cloves, and ground nutmeg. These spices will infuse the sangria with a comforting, festive aroma.
- Sweeten the Sangria (Optional): If you prefer your sangria on the sweeter side, incorporate 2 tablespoons of honey or maple syrup. Stir until the sweetener is fully dissolved.
- Chill and Steep: Cover the pitcher and place it in the refrigerator for at least 2-4 hours. This chilling period allows the flavors to meld together, enhancing the overall taste of the sangria.
- Serve with Sparkle: Just before serving, add the sparkling water to the pitcher for a revitalizing fizz. Stir gently to blend.
- Presentation: Pour the sangria into glasses, ensuring each serving includes slices of apple and orange. You can garnish with an additional cinnamon stick or a twist of orange peel for an extra festive touch.
Extra Tips:
For the best flavor, prepare the sangria a day in advance. This allows the spices and fruits to fully infuse the liquid, resulting in a more robust taste.
If you prefer a non-alcoholic version, you can substitute the white wine and brandy with non-alcoholic white grape juice and additional apple cider. Adjust the amount of sparkling water to your preference for a lighter or more effervescent drink.
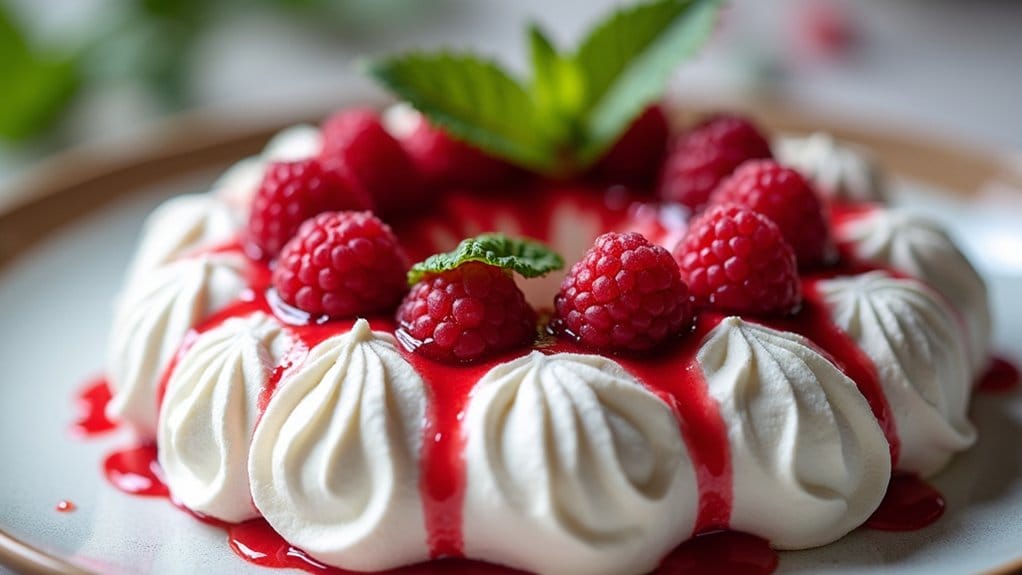
Festive Raspberry Meringue Wreaths

Festive Raspberry Meringue Wreaths are a delightful and visually stunning dessert perfect for adding a touch of elegance to your gluten-free Christmas table. These light and airy meringues are shaped into beautiful wreaths and adorned with a luscious raspberry topping that’s sure to impress your guests.
The meringues’ crisp exterior and soft, marshmallow-like interior provide a lovely contrast to the sweet and slightly tart raspberry sauce, creating a harmonious balance of flavors and textures that will delight everyone at the table.
This recipe serves 4-6 people and requires attention to detail to guarantee the meringues are perfectly baked and the raspberry topping is vibrant and fresh. The key to success is in the preparation and patience, as the meringues need time to dry out in the oven to achieve their signature crispiness.
The raspberry topping, made from fresh or frozen raspberries, adds a festive red color and a burst of flavor that pairs beautifully with the delicate meringues. Whether it’s a festive family gathering or an elegant Christmas dinner, these raspberry meringue wreaths will be the star of your dessert spread.
Ingredients
- 4 large egg whites
- 1 cup granulated sugar
- 1 teaspoon vanilla extract
- 1 teaspoon white vinegar
- 1 teaspoon cornstarch
- 2 cups fresh or frozen raspberries
- 2 tablespoons powdered sugar
- Fresh mint leaves for garnish (optional)
Cooking Instructions
- Preheat the Oven: Preheat your oven to 225°F (110°C). Line a baking sheet with parchment paper and draw circles (about 3 inches in diameter) as a guide for your wreaths. Flip the parchment over so the pencil marks are on the underside.
- Prepare the Meringue: In a clean, dry bowl, beat the egg whites with an electric mixer on medium speed until soft peaks form. Gradually add the granulated sugar, one tablespoon at a time, while continuing to beat. Increase the speed to high and beat until the mixture is glossy and stiff peaks form.
- Add Flavorings: Gently fold in the vanilla extract, white vinegar, and cornstarch into the meringue mixture using a spatula. This helps stabilize the meringue and gives it a lovely texture.
- Shape the Wreaths: Spoon the meringue into a piping bag fitted with a large star tip. Pipe the meringue onto the parchment paper, following the circles you drew, to form wreath shapes. You can do this by piping small rosettes or a continuous circular pattern.
- Bake the Meringues: Place the baking sheet in the preheated oven and bake for 1.5 hours. After baking, turn off the oven and let the meringues cool inside with the door slightly ajar for another hour. This helps them dry out completely.
- Prepare the Raspberry Topping: In a small saucepan over medium heat, combine the raspberries and powdered sugar. Cook until the raspberries break down and the sauce thickens slightly, about 5-7 minutes. Remove from heat and let cool.
- Assemble the Wreaths: Once the meringues are completely cool, carefully transfer them to a serving platter. Spoon the raspberry sauce over each wreath, allowing some to drizzle down the sides.
- Garnish and Serve: Optionally, garnish with fresh mint leaves for an extra festive touch. Serve immediately and enjoy!
Extra Tips
When making meringues, make certain your mixing bowl and beaters are completely free of any grease or moisture, as this can prevent the egg whites from reaching the desired volume.
If you prefer a more intense raspberry flavor, you can add a splash of raspberry liqueur to the sauce. Additionally, make sure to bake the meringues on a low heat for a long period to achieve the perfect texture without browning them.
Store any leftover meringues in an airtight container at room temperature, but note that they’re best consumed the same day for peak texture.
