

Halloween is just around the corner, and I’m on the hunt for easy yet magical dishes to share at our potluck. I remember how my last-minute witch’s broomstick pretzels were such a hit, sparking conversations all night long. There’s something truly special about turning simple ingredients into delightfully eerie creations. Picture a table adorned with ghostly guacamole and spooky spider deviled eggs. Are you curious about what else is on the menu?
Spooky Spider Deviled Eggs
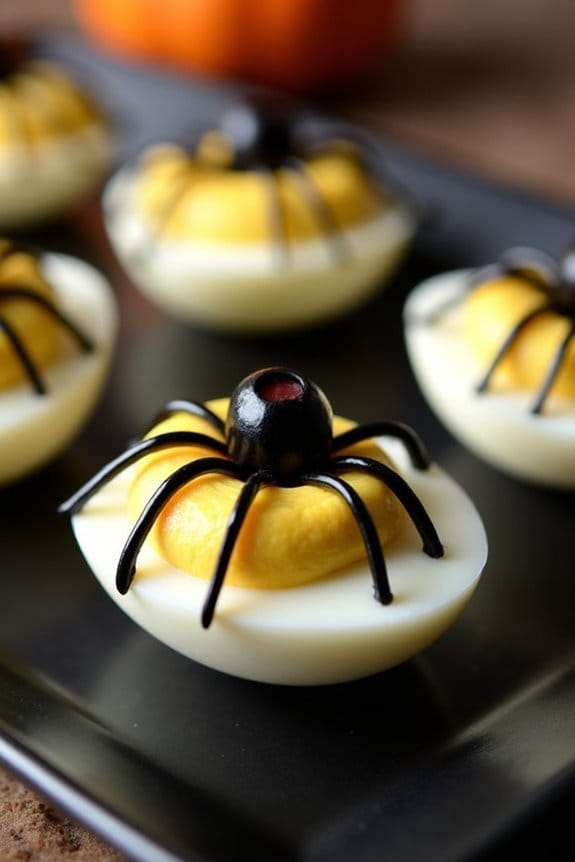
Halloween is the perfect time to get creative in the kitchen, and Spooky Spider Deviled Eggs are a fun and festive way to delight your guests at a potluck. These deviled eggs not only have a deliciously creamy filling but also feature a creepy-crawly design that will instantly put everyone in the Halloween spirit.
Spooky Spider Deviled Eggs bring Halloween spirit to life with their delicious taste and eerie presentation.
The combination of classic deviled egg flavors with a touch of artistry makes them a standout dish that both kids and adults will enjoy. The preparation is straightforward, making them an excellent choice for a potluck where you want to impress without spending hours in the kitchen.
With just a few additional ingredients, you can transform ordinary deviled eggs into a spooky treat. Whether you’re hosting a Halloween party or attending one, these Spooky Spider Deviled Eggs will be a hit.
Ingredients for 4-6 servings:
- 6 large eggs
- 1/4 cup mayonnaise
- 1 teaspoon Dijon mustard
- 1 teaspoon white vinegar
- Salt and pepper to taste
- 12 black olives
Cooking Instructions:
- Boil the Eggs: Place the eggs in a pot and cover them with cold water. Bring the water to a boil over high heat. Once boiling, remove the pot from the heat, cover it, and let the eggs sit for about 10-12 minutes.
- Cool and Peel: After the eggs have rested, transfer them to a bowl of ice water to stop the cooking process and cool them down. Once cooled, peel the eggs carefully, ensuring the whites remain intact.
- Prepare the Egg Halves: Slice each egg in half lengthwise. Gently remove the yolks and place them in a mixing bowl. Arrange the egg whites on a serving platter.
- Make the Filling: Mash the egg yolks with a fork until crumbly. Add mayonnaise, Dijon mustard, white vinegar, salt, and pepper. Mix until smooth and creamy.
- Fill the Eggs: Spoon or pipe the yolk mixture back into the egg whites, filling each cavity generously.
- Create the Spiders: Cut the olives in half lengthwise. Place one half in the center of the yolk mixture to form the spider’s body. Slice the remaining halves into thin strips to create spider legs, arranging them around the body.
- Chill Before Serving: Refrigerate the eggs for at least 30 minutes before serving to allow the flavors to meld and the filling to firm up.
Extra Tips:
For the best appearance, use fresh eggs as they’re easier to peel after boiling. If you’re piping the yolk mixture into the egg whites, use a piping bag with a star tip for a more decorative look.
Be sure to dry the olives thoroughly before placing them on the eggs to avoid any excess moisture. To save time, you can boil the eggs and prepare the filling a day ahead, storing them separately and assembling them just before serving.
Ghostly Guacamole Dip
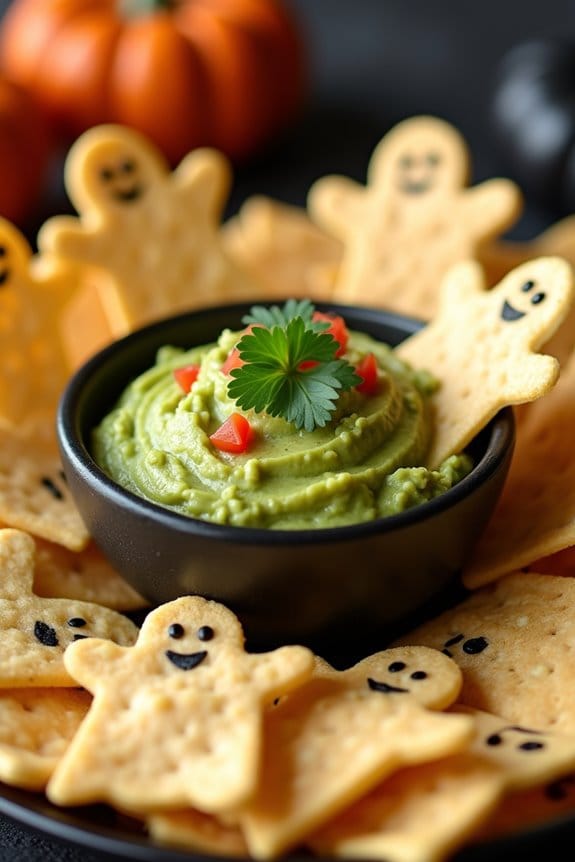
Ghostly Guacamole Dip is a fun and delicious way to add some spooky flair to your Halloween potluck. This eerie twist on a classic favorite is both simple to make and delightfully eye-catching. With its creamy texture and vibrant green color, this dip is perfect for dipping chips, veggies, or even spreading on sandwiches. Not only will it delight the taste buds, but it will also be a conversation starter at your Halloween gathering.
This recipe for Ghostly Guacamole Dip serves 4-6 people, making it ideal for a small party or family get-together. With just a few simple ingredients and minimal preparation time, you can whip up this ghoulishly good dip in no time. Plus, the addition of ghost-shaped tortilla chips adds a whimsical touch that will surely impress your guests.
Ingredients:
- 4 ripe avocados
- 1 small onion, finely chopped
- 2 tomatoes, diced
- 2 cloves garlic, minced
- 1 lime, juiced
- Salt to taste
- 1/4 cup fresh cilantro, chopped
- 1 jalapeño, seeded and chopped (optional)
- Ghost-shaped tortilla chips (available at most grocery stores or make your own)
Instructions:
- Prepare the Avocados: Start by halving and pitting the avocados. Scoop the flesh into a large bowl. Use a fork or a potato masher to mash the avocados to your desired consistency. For a smoother dip, mash the avocados more thoroughly.
- Mix in the Ingredients: Add the chopped onion, diced tomatoes, minced garlic, lime juice, salt, and cilantro to the mashed avocados. If you like a bit of heat, add the chopped jalapeño. Stir everything together until well combined.
- Adjust Seasoning: Taste your guacamole and adjust the seasoning if necessary. You may want to add more lime juice or salt depending on your preference.
- Serve with Ghost Chips: Transfer the guacamole to a serving bowl. Arrange ghost-shaped tortilla chips around the bowl for dipping. You can also decorate the dip with a few extra cilantro leaves or a sprinkle of diced tomatoes for added color.
- Presentation: For an extra spooky touch, place the bowl of guacamole on a Halloween-themed platter or surround it with small decorative pumpkins.
Extra Tips:
To keep your guacamole fresh and vibrant, cover the surface with plastic wrap, pressing it directly onto the guacamole to minimize exposure to air. This will help prevent browning.
If you’re feeling creative, you can easily make your own ghost-shaped tortilla chips by cutting tortillas with a ghost-shaped cookie cutter and baking them until crispy.
Additionally, try experimenting with different levels of spice by adjusting the amount of jalapeño or by adding a dash of cayenne pepper. Enjoy your Ghostly Guacamole Dip with friends and family for a hauntingly delicious treat!
Monster Eyeball Caprese Bites
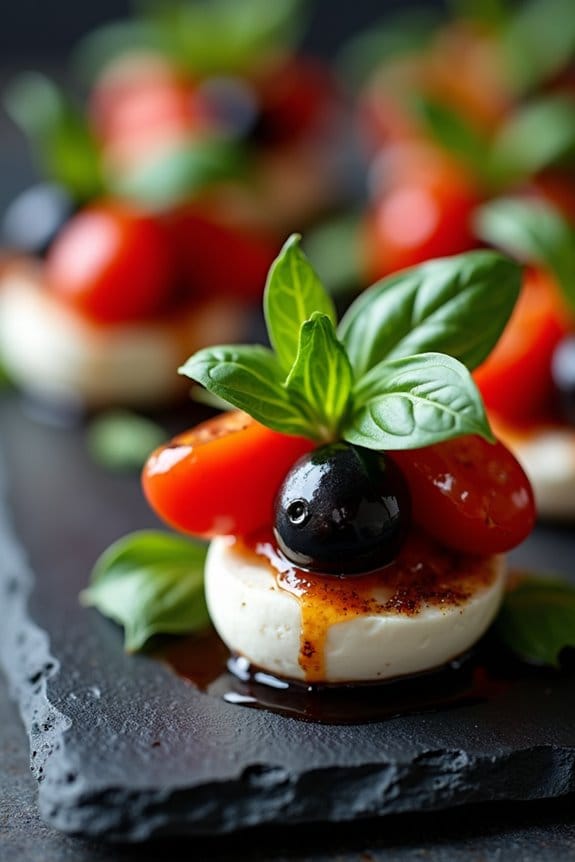
Monster Eyeball Caprese Bites are a spooky twist on the classic Italian caprese salad, perfect for your Halloween potluck. These creepy yet delicious bites are simple to make and will surely be a hit among both kids and adults. The dish combines fresh mozzarella, ripe cherry tomatoes, and aromatic basil leaves, all assembled to look like monstrous eyeballs peering up from your serving platter.
They aren’t only fun to make but also provide a rejuvenating and healthy alternative to more traditional Halloween snacks. The key to making these bites truly “monster-like” is the creative use of ingredients to mimic the appearance of eyeballs. By inserting black olives into the mozzarella balls and using a basil leaf as the “eyelid,” you’ll achieve an eerie effect that’s sure to impress.
Whether you’re hosting a Halloween party or attending a potluck, these Monster Eyeball Caprese Bites will add a touch of ghoulish elegance to your spread. This recipe serves 4-6 people, making it ideal for small gatherings.
Ingredients:
- 12 cherry tomatoes
- 12 fresh mozzarella balls (bocconcini)
- 12 black olives, pitted
- 12 fresh basil leaves
- 2 tablespoons balsamic glaze
- Salt and pepper to taste
- 12 toothpicks
Cooking Instructions:
- Prepare the Tomatoes: Rinse the cherry tomatoes under cold water and pat them dry with a paper towel. Cut a small slice off the bottom of each tomato so they can stand upright without rolling.
- Assemble the Eyeballs: Take the mozzarella balls and use a small knife to carve out a shallow hole on one side. Insert a black olive into each hole, pressing gently to confirm it stays in place.
- Add the Basil Leaves: Place a basil leaf over each mozzarella ball, partially covering the black olive to mimic an eyelid. Secure the basil leaf by inserting a toothpick through it and into the mozzarella.
- Combine with Tomatoes: Place each assembled mozzarella ball on top of a cherry tomato, using the toothpick to hold everything together. Confirm the “eyeball” is centered and stable.
- Season and Glaze: Arrange the assembled Monster Eyeball Caprese Bites on a serving platter. Drizzle with balsamic glaze and sprinkle with salt and pepper to enhance the flavor.
- Serve: Chill in the refrigerator for at least 15 minutes before serving to let the flavors meld together. Serve cold.
Extra Tips:
To enhance the eerie appearance, consider using a small piece of red pepper or sun-dried tomato as a “bloodshot” effect around the olive pupil. You can also experiment with different types of olives for varied “eye colors.”
For best results, use fresh mozzarella and ripe tomatoes for a vibrant and flavorful presentation. If you have extra time, let the basil marinate slightly in olive oil and balsamic glaze for added richness.
Witch’s Broomstick Pretzels
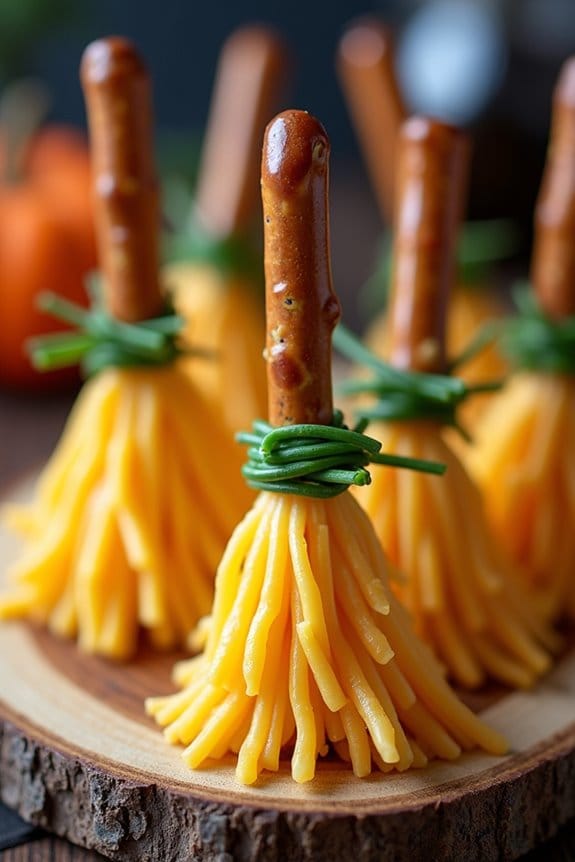
Witch’s Broomstick Pretzels are a delightful and spooky addition to any Halloween potluck. These whimsical snacks aren’t only fun to look at but easy to make, providing a perfect balance of savory and sweet that guests of all ages will enjoy. The combination of pretzel sticks, string cheese, and a hint of herbs gives these witch’s brooms an irresistible flavor and texture.
They aren’t only great for potlucks but also make for a fun activity to prepare with kids, letting them get involved in the Halloween festivities.
Sweet yet salty, Witch’s Broomstick Pretzels are a crowd-pleaser with their whimsical appearance and delightful taste. With minimal ingredients and a straightforward assembly, you can whip up a batch of these tasty treats in no time. Perfect for serving 4-6 people, they’re an excellent addition to any Halloween spread, providing a quick and easy snack that aligns perfectly with the spooky theme.
Whether served as an appetizer or a fun finger food, these broomsticks are sure to cast a spell over your guests.
Ingredients for 4-6 servings:
- 8 pretzel sticks
- 4 string cheese sticks
- 8 fresh chives
Cooking Instructions:
- Prepare the Cheese: Start by cutting each string cheese stick in half to make a total of 8 pieces. Use a small knife to carefully slice the bottom half of each cheese piece into thin strips, being careful not to cut all the way through to the top. This will create the bristles of the broom.
- Assemble the Broomsticks: Gently insert one end of a pretzel stick into the uncut top of the cheese stick. Push it in just enough to confirm it’s secure but avoid breaking the pretzel. The pretzel will act as the handle of the broomstick.
- Secure the Broom Bristles: Take a chive and wrap it around the top of the cheese, where it meets the pretzel stick, to secure the “bristles” in place. Tie a small knot or tuck the ends of the chive under itself to keep it secure.
- Repeat: Repeat the assembly process with the remaining pretzel sticks, cheese pieces, and chives until all 8 broomsticks are complete.
- Serve: Arrange the Witch’s Broomstick Pretzels on a platter for serving. They can be served immediately or stored in the refrigerator until ready to serve.
Extra Tips:
To guarantee the best presentation and taste, choose fresh chives that are flexible and won’t easily break when tying them around the cheese. If chives aren’t available, thin strips of green onion can be used as an alternative.
Make sure the cheese is cold before cutting, as this will help keep the bristles intact without sticking together. If you want to give your broomsticks an extra flavor kick, consider sprinkling some paprika or garlic powder on the cheese before wrapping the chives.
These brooms are best enjoyed fresh, but they can be made a few hours in advance and kept in the refrigerator.
Mummy Hot Dogs
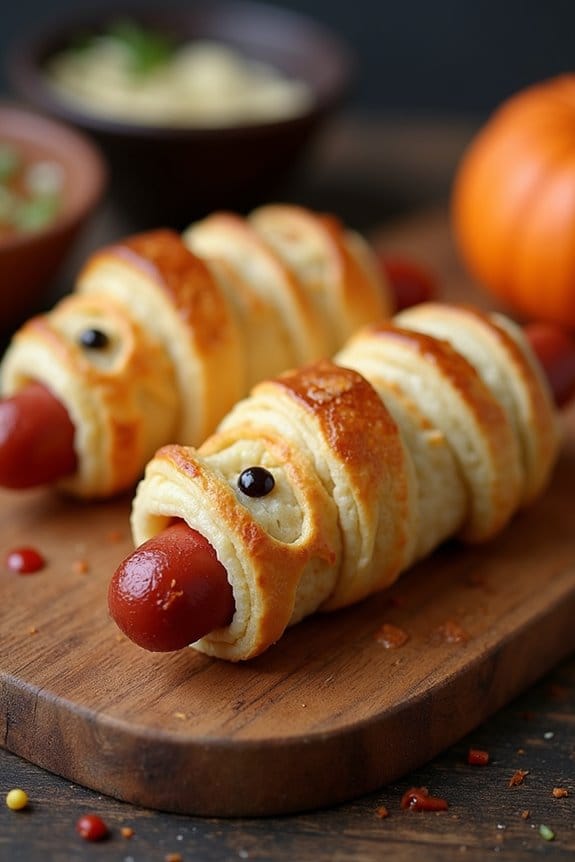
Mummy Hot Dogs are a fun and festive treat perfect for any Halloween potluck. These spooky snacks are incredibly easy to make and add an element of fun to your party spread. By wrapping hot dogs in crescent roll dough to resemble mummies, you delight both children and adults with this whimsical, tasty dish. Not only are they adorable, but they’re also a practical finger food that guests can enjoy without needing utensils.
A delightful, whimsical Halloween snack that’s easy to make and perfect for any festive potluck.
The magic of these Mummy Hot Dogs lies in their simplicity and the creative presentation that instantly catches the eye. With just a few basic ingredients, you can transform ordinary hot dogs into a seasonal delight that fits effortlessly into your Halloween-themed potluck menu. Ideal for a serving size of 4-6 people, this recipe is scalable if you need to cater to a larger crowd.
Keep reading to discover how you can make these delightful Mummy Hot Dogs for your next gathering.
Ingredients for 4-6 People:
- 10 hot dogs
- 1 can of refrigerated crescent roll dough
- 1 egg, beaten
- Mustard or ketchup for decorating
Cooking Instructions:
- Preheat the Oven: Start by preheating your oven to 375°F (190°C). This will guarantee that your mummies bake evenly and to a perfect golden brown.
- Prepare the Dough: Unroll the crescent roll dough on a flat surface. Using a knife or pizza cutter, slice the dough into thin strips about 1/4 inch wide. These strips will become the mummy wrappings for your hot dogs.
- Wrap the Hot Dogs: Take each hot dog and begin wrapping a strip of dough around it, leaving a small gap at the top for the face. Overlap the dough slightly as you wrap to create the appearance of bandages. Be sure to leave a small space near one end of the hot dog for the mummy’s “face.”
- Egg Wash: Brush each wrapped hot dog with a little beaten egg. This will help the dough achieve a nice golden color and become crispy as it bakes.
- Bake the Mummies: Place the wrapped hot dogs on a baking sheet lined with parchment paper. Bake them in the preheated oven for about 12-15 minutes, or until the dough is a light golden brown.
- Decorate the Faces: Once the mummies are out of the oven, let them cool slightly. Use mustard or ketchup to dot eyes onto the exposed part of the hot dog to create little faces.
Extra Tips:
For an added touch of spookiness, consider using different types of sausages or cheese-filled hot dogs for more variety.
If you’re short on time, you can prepare these ahead of time and refrigerate them before baking. When wrapping the dough, don’t worry about making it too neat; the irregularity adds to the mummified look.
You can also experiment with different dipping sauces to serve alongside your Mummy Hot Dogs, offering a range of flavors for your guests to enjoy.
Jack-o’-Lantern Stuffed Peppers

Jack-o’-Lantern Stuffed Peppers are a delightful and festive addition to any Halloween potluck. These adorable and delicious stuffed peppers are carved to resemble jack-o’-lanterns, adding a fun twist to your party spread. Not only do they look the part, but they’re also filled with a savory mixture of ground meat, rice, and vegetables, making them a hearty and satisfying dish that guests of all ages will enjoy.
The beauty of this recipe lies in its versatility. You can customize the filling to suit dietary preferences or use up any leftover ingredients you have on hand. Whether you’re making them for a family dinner or a Halloween gathering, these stuffed peppers are bound to impress. Follow this easy recipe to create 4-6 servings of jack-o’-lantern stuffed peppers that will surely be the star of your Halloween feast.
Ingredients:
- 6 medium orange bell peppers
- 1 pound ground beef or turkey
- 1 cup cooked rice
- 1 small onion, finely chopped
- 2 cloves garlic, minced
- 1 can (14.5 oz) diced tomatoes, drained
- 1 cup shredded cheddar cheese
- 1 tablespoon olive oil
- 1 teaspoon salt
- 1/2 teaspoon black pepper
- 1 teaspoon Italian seasoning
- 1/2 teaspoon smoked paprika
Instructions:
- Preheat the Oven: Preheat your oven to 375°F (190°C). This will guarantee a consistent temperature for cooking the stuffed peppers evenly.
- Prepare the Peppers: Wash the orange bell peppers thoroughly. Slice off the tops and remove the seeds and membranes inside. Use a small paring knife to carve jack-o’-lantern faces into the peppers. Set aside the tops to use later as lids.
- Cook the Filling: In a large skillet, heat the olive oil over medium heat. Add the chopped onion and garlic, sautéing until the onion becomes translucent. Add the ground beef or turkey and cook until browned, breaking it up with a spoon as it cooks.
- Combine Ingredients: Once the meat is cooked, stir in the drained diced tomatoes, cooked rice, salt, black pepper, Italian seasoning, and smoked paprika. Cook for another 5 minutes, allowing the flavors to meld together.
- Stuff the Peppers: Carefully fill each carved pepper with the meat and rice mixture, pressing down slightly to pack it in. Place the tops back on each pepper as lids.
- Bake the Peppers: Arrange the stuffed peppers upright in a baking dish. Cover the dish with aluminum foil and bake in the preheated oven for 30 minutes.
- Add Cheese: Remove the foil and sprinkle shredded cheddar cheese over the tops of the peppers. Return to the oven and bake for an additional 10-15 minutes, or until the cheese is melted and bubbly.
- Serve: Allow the peppers to cool slightly before serving. Enjoy your festive and tasty jack-o’-lantern stuffed peppers!
Extra Tips: When carving the jack-o’-lantern faces, be careful not to cut too large or too close to the edges, as this may cause the peppers to weaken and break. If you want to add extra flavor, consider using a mix of different cheeses or adding a dash of hot sauce to the filling for a spicy kick.
These stuffed peppers can be made ahead of time and reheated just before serving, making them perfect for a busy Halloween evening.
Creepy Crawly Pasta Salad

Creepy Crawly Pasta Salad is a fun and spooky dish perfect for any Halloween potluck. This recipe transforms a classic pasta salad into an eerie treat with the addition of “creepy crawly” ingredients that will surely delight both kids and adults.
It’s colorful, flavorful, and easy to prepare, making it an excellent choice for a festive gathering. The combination of savory and tangy flavors guarantees that this dish isn’t only visually appealing but also delicious.
To create the eerie effect, this pasta salad uses colorful vegetables and cleverly shaped pasta to mimic the appearance of creepy crawlies. The dish is versatile, allowing you to mix and match ingredients based on your preference or availability.
Colorful veggies and creative pasta shapes transform this salad into a creepy crawly delight. Mix and match for versatility!
The dressing is a simple yet tasty blend that ties all the ingredients together, ensuring every bite is packed with flavor. Whether you’re hosting a Halloween party or attending one, this pasta salad is sure to be a crowd-pleaser.
Ingredients (Serves 4-6):
- 12 oz rotini pasta (preferably tri-colored)
- 1 cup cherry tomatoes, halved
- 1 cup black olives, sliced
- 1 cup green bell pepper, diced
- 1/2 cup red onion, finely chopped
- 1/2 cup baby carrots, sliced into thin rounds
- 1 cup mozzarella pearls
- 1/4 cup fresh basil leaves, chopped
- 1/2 cup Italian dressing
- Salt and pepper to taste
Cooking Instructions:
1. Cook the Pasta: Begin by boiling a large pot of salted water. Add the rotini pasta and cook according to the package instructions until al dente.
Once cooked, drain the pasta and rinse it under cold water to stop the cooking process. This also helps to keep the pasta from sticking together. Set aside to cool completely.
2. Prepare the Vegetables: While the pasta is cooking, prepare your vegetables. Halve the cherry tomatoes, slice the olives, dice the bell pepper, chop the red onion, and slice the baby carrots into thin rounds.
Chop the fresh basil leaves as well and set all these aside.
3. Assemble the Salad: In a large mixing bowl, combine the cooled pasta, cherry tomatoes, black olives, green bell pepper, red onion, and sliced carrots.
Add the mozzarella pearls and chopped basil to the bowl.
4. Dress the Salad: Pour the Italian dressing over the pasta and vegetables. Toss everything together gently, making sure the dressing coats all the ingredients evenly.
Season with salt and pepper to taste.
5. Chill and Serve: Cover the bowl with plastic wrap or transfer the salad to an airtight container. Refrigerate for at least 1 hour before serving.
This allows the flavors to meld together and the salad to chill properly.
Extra Tips:
For an extra spooky touch, use Halloween-themed pasta shapes if you can find them, or add a few plastic spiders on top for decoration (just remember to remove them before serving!).
If you prefer a creamier dressing, you can substitute the Italian dressing with a ranch or Caesar dressing. Feel free to add or substitute other vegetables, such as cucumbers or zucchini, to suit your taste.
Preparing the salad a day in advance can enhance the flavors even more, making it an ideal dish for busy hosts.
Bat Wing Chicken Tenders

Looking for a spooky yet tasty dish to bring to your Halloween potluck? Bat Wing Chicken Tenders are the perfect festive treat! These chicken tenders are coated in a dark, crispy crust that gives them a bat wing appearance, making them ideal for a Halloween-themed gathering. Not only are they visually appealing, but they’re also deliciously seasoned and sure to be a hit with guests of all ages.
This recipe uses chicken tenders coated in a mixture of black food coloring and a flavorful breadcrumb mixture, which gives them their signature “bat wing” look. They’re baked to perfection for a healthier yet crunchy alternative to fried chicken. Serve with a side of your favorite dipping sauces, such as ranch, barbecue, or honey mustard, to add a bit of flair to your Halloween spread. This recipe serves 4-6 people.
Ingredients:
- 1 ½ pounds of chicken tenders
- 2 cups panko breadcrumbs
- 1 cup all-purpose flour
- 1 teaspoon salt
- 1 teaspoon black pepper
- 1 teaspoon garlic powder
- 1 teaspoon onion powder
- ½ teaspoon smoked paprika
- 3 large eggs
- 1 tablespoon black food coloring
- Cooking spray
Instructions:
- Preheat the oven: Start by preheating your oven to 400°F (200°C). Line a baking sheet with parchment paper and lightly coat it with cooking spray to prevent sticking.
- Prepare the breadcrumb mixture: In a large shallow bowl, mix the panko breadcrumbs with salt, black pepper, garlic powder, onion powder, and smoked paprika. Stir until all the spices are evenly distributed.
- Set up the dredging station: In another shallow bowl, add the all-purpose flour. In a third bowl, whisk the eggs together with the black food coloring until well combined.
- Coat the chicken tenders: Take a chicken tender and dredge it in the flour, ensuring it’s fully coated. Shake off any excess flour. Dip the floured chicken tender into the egg mixture, making sure it’s completely covered in the black egg wash. Finally, roll the chicken tender in the breadcrumb mixture, pressing it down to adhere the breadcrumbs to the chicken.
- Arrange on the baking sheet: Place the coated chicken tenders on the prepared baking sheet in a single layer, ensuring they don’t touch each other.
- Bake the chicken tenders: Lightly spray the tops of the chicken tenders with cooking spray to help them crisp up in the oven. Bake for 20-25 minutes or until the chicken is cooked through and the coating is crispy and golden. An internal temperature of 165°F (74°C) indicates the chicken is done.
- Serve and enjoy: Remove the chicken tenders from the oven and let them cool slightly before serving. Pair them with your choice of dipping sauces.
Extra Tips:
For an even spookier presentation, serve the Bat Wing Chicken Tenders on a black platter with some Halloween-themed decorations like fake cobwebs or plastic spiders.
If you can’t find black food coloring, you can mix blue, red, and green food colorings to achieve a similar dark hue.
Be mindful of the food coloring as it can stain, so handle the egg mixture carefully. Enjoy your spooky, delicious creation!
Pumpkin Patch Brownies
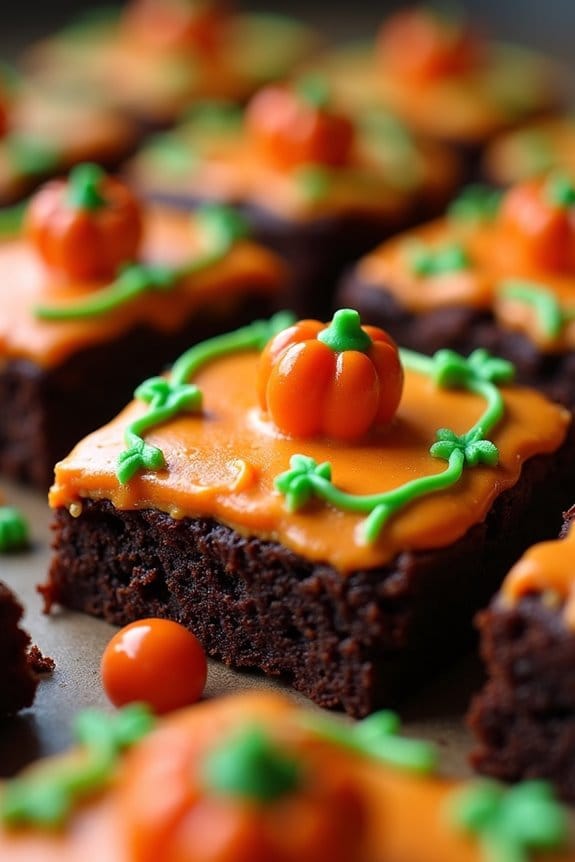
Pumpkin Patch Brownies are a delightful twist on the classic brownie, perfect for a Halloween potluck. These brownies are rich and fudgy, with a hint of pumpkin spice that evokes the warmth of autumn. Topped with a festive pumpkin patch scene made from colored frosting and candy pumpkins, they’ll surely be a hit among both kids and adults at any gathering.
The blend of chocolate and pumpkin creates a unique flavor combination that’s both comforting and exciting, making it an ideal dessert for the spooky season.
A comforting and exciting chocolate-pumpkin blend perfect for the spooky season.
Creating these brownies doesn’t require a lot of time or complicated techniques, making it an excellent choice for those who want to whip up something special without spending hours in the kitchen. The recipe is straightforward and uses ingredients that are easy to find, guaranteeing that you can focus on enjoying the Halloween festivities rather than stressing about the dessert.
The brownies can be prepared a day in advance, allowing the flavors to meld together beautifully, and they taste even better the next day.
Ingredients (Serves 4-6)
- 1 cup unsalted butter
- 2 cups granulated sugar
- 4 large eggs
- 1 teaspoon vanilla extract
- 1 cup all-purpose flour
- 1 cup unsweetened cocoa powder
- 1/2 teaspoon baking powder
- 1/4 teaspoon salt
- 1 teaspoon pumpkin pie spice
- 1 cup mini semi-sweet chocolate chips
- Orange and green frosting (store-bought or homemade)
- Candy pumpkins
Instructions
- Preheat the Oven and Prepare the Baking Dish: Preheat your oven to 350°F (175°C). Grease a 9×13-inch baking dish with butter or non-stick spray, or line it with parchment paper for easy removal.
- Melt the Butter: In a medium saucepan over low heat, melt the butter. Once melted, remove from heat and stir in the sugar until well combined.
- Mix in Wet Ingredients: Add the eggs one at a time to the butter and sugar mixture, beating well after each addition. Then, mix in the vanilla extract.
- Combine Dry Ingredients: In a separate bowl, whisk together the flour, cocoa powder, baking powder, salt, and pumpkin pie spice until thoroughly combined.
- Combine Wet and Dry Mixtures: Gradually add the dry ingredients to the wet ingredients, stirring until just combined. Be careful not to overmix the batter.
- Add Chocolate Chips: Fold in the mini chocolate chips, guaranteeing they’re evenly distributed throughout the batter.
- Bake the Brownies: Pour the batter into the prepared baking dish, spreading it evenly. Bake in the preheated oven for 25-30 minutes, or until a toothpick inserted into the center comes out mostly clean with a few moist crumbs.
- Cool and Decorate: Allow the brownies to cool completely in the pan. Once cooled, use the orange frosting to create a pumpkin patch design on the surface. Use green frosting to pipe vines and leaves, and place candy pumpkins throughout the patch for decoration.
Extra Tips
When making Pumpkin Patch Brownies, make sure that the butter is completely melted before adding the sugar to avoid a gritty texture. For a more intense pumpkin flavor, you can also add a tablespoon of pumpkin puree to the wet ingredients, but be sure to adjust the baking time slightly as needed.
If you’re short on time, using a store-bought brownie mix and adding pumpkin pie spice can be a quick alternative. Finally, let the brownies cool completely before decorating to prevent the frosting from melting and ruining your festive design.
Graveyard Dirt Cups

Graveyard Dirt Cups are a spooky yet delightful treat perfect for a Halloween potluck. These deliciously layered desserts mimic the appearance of a graveyard with edible dirt and tombstones, offering a fun and festive way to celebrate the holiday.
The combination of creamy pudding, crunchy cookie crumbs, and eerie decorations makes Graveyard Dirt Cups a hit with both kids and adults alike. You can easily prepare them in advance, making them a convenient option for any gathering.
The base of this dessert is a smooth and rich chocolate pudding, layered with crushed chocolate sandwich cookies to resemble dirt. Topping off the cups are gummy worms and edible tombstones made from cookies or biscuits. The presentation of these dessert cups not only adds a playful element to your Halloween spread but also provides a deliciously satisfying treat.
Whether you’re hosting a party or attending one, Graveyard Dirt Cups will surely garner compliments for their creativity and taste.
Ingredients (for 4-6 servings):
- 1 box (3.9 oz) instant chocolate pudding mix
- 2 cups cold milk
- 16 chocolate sandwich cookies
- 12 gummy worms
- 6 oval-shaped cookies (like Milano or Nutter Butter)
- 1 tube black decorating gel
- 1 cup whipped topping (optional)
Instructions:
- Prepare the Pudding:
- In a medium-sized mixing bowl, combine the instant chocolate pudding mix with 2 cups of cold milk.
- Whisk the mixture thoroughly for about 2 minutes until it thickens. Let it sit for another 5 minutes to set.
- Make the Cookie Dirt:
- Place the chocolate sandwich cookies in a resealable plastic bag.
- Use a rolling pin to crush the cookies into fine crumbs resembling dirt.
- Decorate the Tombstones:
- Take the oval-shaped cookies and write spooky phrases like “RIP” or draw crosses using the black decorating gel.
- Set them aside to allow the gel to dry slightly.
- Assemble the Cups:
- In individual cups, start by filling the bottom with a layer of chocolate pudding.
- Add a layer of crushed cookie crumbs on top of the pudding.
- Repeat the layering to fill the cup, ending with a generous amount of cookie crumbs on top to resemble dirt.
- Add Decorations:
- Insert a few gummy worms halfway into the cookie crumbs so they appear to be crawling out.
- Place the decorated cookie tombstones into the cups, standing upright, in the cookie crumbs.
- Optional Whipped Topping:
- If desired, add a dollop of whipped topping to each cup for extra creaminess.
- Chill Before Serving:
- Refrigerate the assembled Graveyard Dirt Cups for at least 30 minutes to allow them to set and chill before serving.
Extra Tips:
To enhance the spooky effect, consider adding a few candy pumpkins or edible eyes on top of the dirt cups. You can also use a variety of decorative elements to personalize each cup according to your Halloween theme.
If you want to prepare the dirt cups in advance, assemble the pudding and cookie layers but add the gummy worms and cookie tombstones just before serving to maintain their texture and appearance.
Frankenstein Rice Krispie Treats
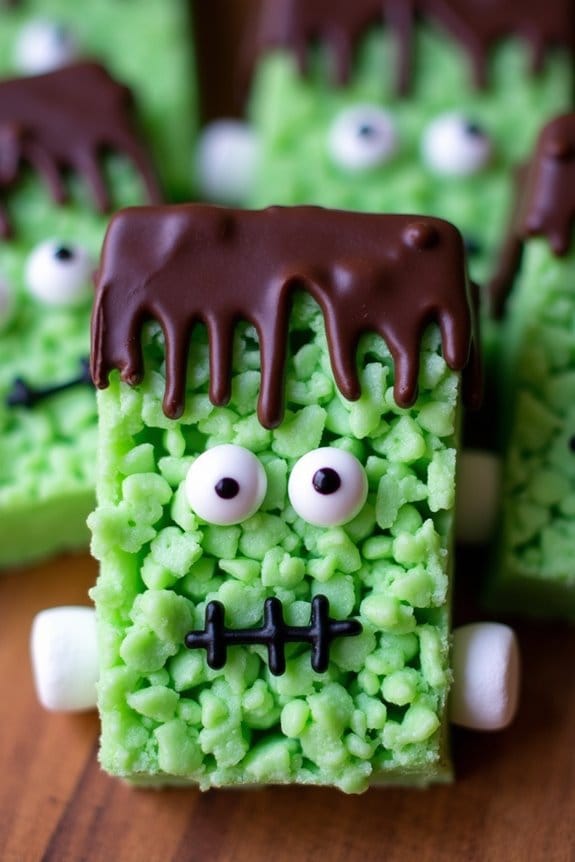
Frankenstein Rice Krispie Treats are a fun and festive way to celebrate Halloween. These spooky sweets are perfect for a potluck and will surely be a hit with both kids and adults. The classic Rice Krispie Treat is given a monstrous makeover, crafted to resemble the iconic creature with green coloring and chocolate features. This treat isn’t only delicious but also easy to make, requiring only a few ingredients and a bit of creativity.
This recipe serves 4-6 people and is a great addition to any Halloween gathering. The gooey marshmallow mixture is dyed a ghoulish green and molded into rectangular shapes to form the base of Frankenstein’s head. With the help of some melted chocolate, candy eyes, and a bit of imagination, you’ll have a delightful batch of treats that are as fun to make as they’re to eat.
Ingredients:
- 3 tablespoons unsalted butter
- 4 cups mini marshmallows
- Green food coloring
- 6 cups Rice Krispies cereal
- 1 cup semi-sweet chocolate chips
- Candy eyes
- Black decorating gel
- Mini marshmallows (for bolts)
Cooking Instructions:
- Prepare the Marshmallow Mixture: In a large saucepan, melt 3 tablespoons of unsalted butter over low heat. Once melted, add 4 cups of mini marshmallows, stirring continuously until fully melted and smooth.
- Add Food Coloring: Remove the saucepan from the heat and add green food coloring to the melted marshmallow mixture. Stir until the desired shade of green is achieved.
- Combine with Cereal: Gradually add 6 cups of Rice Krispies cereal to the green marshmallow mixture, stirring until the cereal is evenly coated.
- Shape the Treats: Pour the mixture into a greased 9×13 inch pan and gently press down with a spatula to flatten. Allow the mixture to cool slightly before cutting into rectangular shapes to mimic Frankenstein’s head.
- Melt the Chocolate: In a microwave-safe bowl, melt 1 cup of semi-sweet chocolate chips in 30-second intervals, stirring in between until smooth.
- Decorate the Faces: Dip the top edge of each rectangle into the melted chocolate to create Frankenstein’s hair. Use a small amount of chocolate to affix candy eyes onto each treat.
- Add Finishing Touches: With black decorating gel, draw a mouth and stitches onto each Frankenstein. For the bolts, cut mini marshmallows in half and attach them to the sides of the treats using a dab of chocolate.
- Set and Serve: Let the treats set at room temperature for about 30 minutes before serving.
Extra Tips: To make the treats even easier to shape, lightly grease your hands or the spatula with butter or cooking spray. If you want to add more detail to Frankenstein’s face, consider using different colored decorating gels for additional features. For a variation, you can use different kinds of cereal or add a layer of chocolate or peanut butter between the cereal and marshmallow mixture for an extra treat. Enjoy your spooky creations!
Bloodshot Eyeball Punch
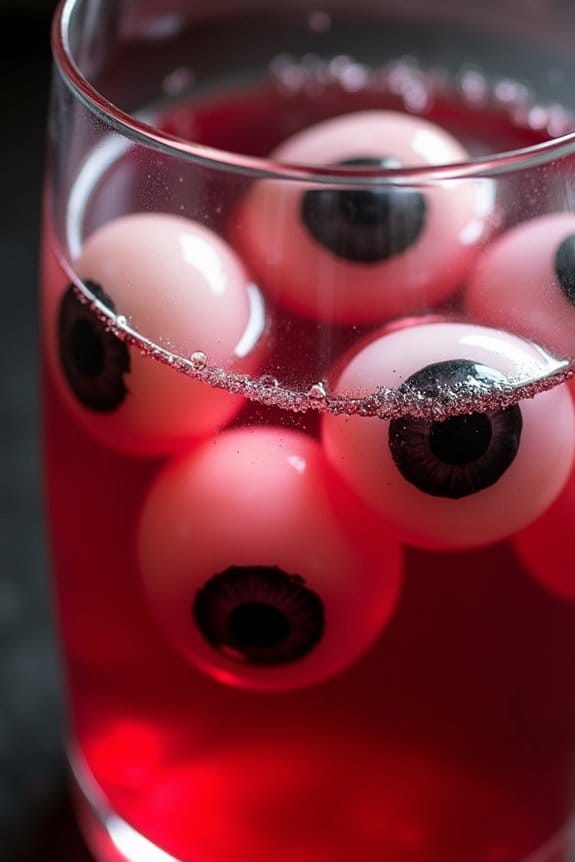
Bloodshot Eyeball Punch is a spooky and fun addition to any Halloween potluck, guaranteed to give your guests a fright while delighting their taste buds. This eerie concoction is both visually striking and deliciously invigorating, making it an ideal centerpiece for your Halloween-themed gathering.
The punch combines a mix of fruity flavors with a creepy twist, featuring floating “eyeballs” that add a gory but playful element to your festive table.
Creating Bloodshot Eyeball Punch is simpler than it looks, and it requires just a few ingredients that you can easily find at your local grocery store. The “eyeballs” are made using lychees, which have a perfect eyeball-like texture and appearance, and they’re filled with blueberries to mimic pupils.
The punch itself is a vibrant mix of cranberry juice, pineapple juice, and a splash of ginger ale for a bit of fizz, giving it a delightful balance of sweet and tart flavors.
Ingredients (Serves 4-6 people):
- 1 can of lychees in syrup (approximately 20-24 lychees)
- 1 pint of fresh blueberries
- 4 cups cranberry juice
- 2 cups pineapple juice
- 1 cup ginger ale
- Ice cubes
- Optional: Red food coloring for extra effect
Instructions:
- Prepare the Eyeballs: Drain the lychees from the can, saving a little bit of the syrup for later use. Insert one blueberry into the cavity of each lychee, making sure the stem side of the blueberry is facing outwards to resemble a pupil.
- Mix the Punch: In a large punch bowl, combine the cranberry juice and pineapple juice. Stir the mixture well to make sure the juices are thoroughly combined.
- Add the Fizz: Just before serving, add the ginger ale to the juice mixture in the punch bowl. Stir gently to keep the carbonation intact, which will add a invigorating fizz to your punch.
- Assemble the Punch: Add the prepared lychee “eyeballs” to the punch bowl. For added effect, you can drizzle a small amount of the reserved lychee syrup into the punch, or add a few drops of red food coloring to enhance the creepy appearance.
- Serve: Add ice cubes to keep the punch chilled. Serve the Bloodshot Eyeball Punch in clear glasses to showcase the eerie eyeballs floating in the crimson liquid.
Extra Tips: For an even spookier presentation, consider serving the punch in a cauldron or a bowl with a misting effect, achieved by placing dry ice underneath the punch bowl in a larger container.
Always handle dry ice with care, using gloves or tongs, and make sure it doesn’t come into direct contact with the punch. Adjust the sweetness of the punch by varying the ratio of cranberry and pineapple juice to suit your taste.
Additionally, for an adult version, consider adding a splash of vodka or rum to the mix.
