
The holiday season is the perfect time to explore vibrant and healthy dishes that bring joy to your table. Picture the bright pop of pomegranate seeds sprinkled over roasted Brussels sprouts. Think of the delightful aroma of honey-glazed carrots paired with fresh thyme. These 14 festive recipes will add a touch of flavor and health to your Christmas feast. Get ready to impress everyone with these delicious side dishes.
Roasted Brussels Sprouts With Pomegranate Seeds
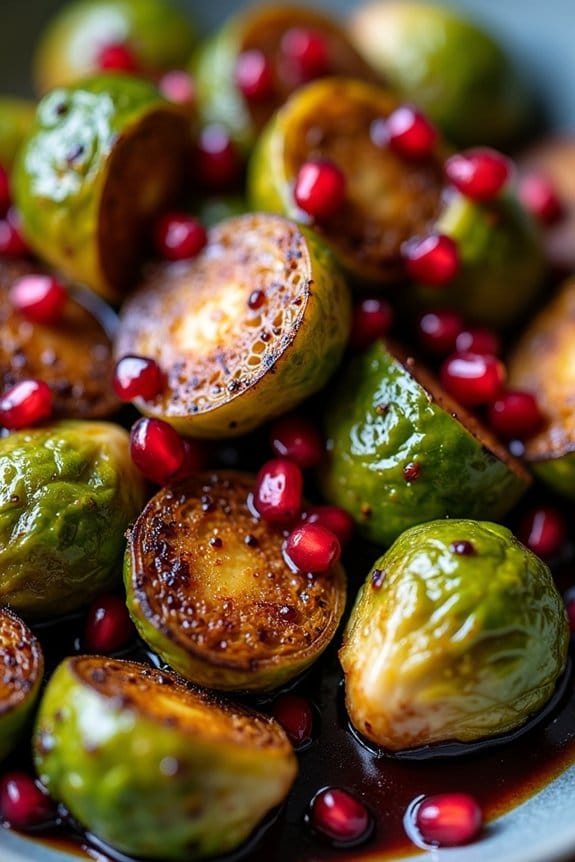
Roasted Brussels Sprouts With Pomegranate Seeds is a delightful side dish that combines the earthy flavors of roasted Brussels sprouts with the bright, tart sweetness of pomegranate seeds.
This dish not only brings a pop of color to your Christmas table but also offers a nutritious option that’s full of fiber, vitamins, and antioxidants. The caramelization of the Brussels sprouts pairs beautifully with the juicy pomegranate seeds, creating a symphony of flavors that will please both the eyes and the palate.
Perfect for serving 4-6 people, this recipe is simple to prepare and can be made in under an hour. It’s an ideal accompaniment to your main holiday dishes, adding a fresh and healthy twist to traditional Christmas meals.
Whether you’re hosting a festive dinner or bringing a dish to a potluck, Roasted Brussels Sprouts With Pomegranate Seeds is sure to be a hit. With its minimal ingredients and straightforward preparation, this recipe will quickly become a staple in your holiday cooking repertoire.
Ingredients for 4-6 servings:
- 1.5 pounds Brussels sprouts, trimmed and halved
- 2 tablespoons olive oil
- Salt and pepper, to taste
- 1/2 cup pomegranate seeds
- 1 tablespoon balsamic glaze
- 1/4 cup chopped fresh parsley (optional)
Cooking Instructions:
- Preheat the Oven: Start by preheating your oven to 400°F (200°C). This will guarantee that the Brussels sprouts cook evenly and achieve the desired caramelization.
- Prepare the Brussels Sprouts: Rinse the Brussels sprouts under cold water and pat them dry with a clean kitchen towel. Trim the ends and cut each sprout in half. This allows for even cooking and more surface area for caramelization.
- Season the Sprouts: In a large bowl, toss the halved Brussels sprouts with olive oil, salt, and pepper until they’re well coated. Make sure the sprouts are evenly coated with oil to enhance the roasting process.
- Roast the Sprouts: Spread the Brussels sprouts in a single layer on a baking sheet. Place them in the preheated oven and roast for 20-25 minutes, or until they’re golden brown and tender. Stir halfway through cooking to guarantee even roasting.
- Add Pomegranate Seeds: Once the Brussels sprouts are done roasting, remove them from the oven and transfer them to a serving platter. Sprinkle the pomegranate seeds evenly over the top of the roasted sprouts.
- Drizzle with Balsamic Glaze: Finish the dish by drizzling balsamic glaze over the Brussels sprouts and pomegranate seeds. The glaze adds a delightful tang that complements the flavors of the dish.
- Garnish and Serve: If desired, garnish with freshly chopped parsley for an added touch of color and freshness. Serve warm as a side dish to your holiday meal.
Extra Tips:
When selecting Brussels sprouts, look for compact, bright green heads that are free from yellowing leaves. Smaller sprouts tend to be sweeter and more tender.
If pomegranate seeds aren’t available, dried cranberries can be used as an alternative for a slight variation in texture and flavor. To make the dish even more festive, consider adding a sprinkle of toasted nuts, such as almonds or pecans, for extra crunch.
Finally, if you prefer a sweeter glaze, you can mix a bit of honey with the balsamic glaze before drizzling it over the dish.
Honey-Glazed Carrots With Fresh Thyme

Honey-Glazed Carrots With Fresh Thyme is a delightful and nutritious side dish perfect for adding a touch of elegance to your Christmas feast. This dish combines the natural sweetness of carrots with the rich, warm flavor of honey, complemented by the earthy notes of fresh thyme.
It’s an ideal side that pairs well with a variety of main courses, adding a vibrant color and a burst of flavor to your holiday table. This recipe serves 4-6 people, making it a great choice for family gatherings or intimate holiday dinners.
The preparation is straightforward, and the result is a crowd-pleasing side dish that’s both healthy and delicious. The carrots are gently cooked to maintain their nutritional benefits while the honey glaze adds just the right amount of indulgence.
Ingredients:
- 2 pounds of carrots, peeled and sliced into 1/4-inch rounds
- 3 tablespoons of honey
- 2 tablespoons of unsalted butter
- 1 teaspoon of fresh thyme leaves
- Salt and pepper to taste
- 1 tablespoon of olive oil
- 1/4 cup of water
Instructions:
- Preparation of Carrots: Start by peeling the carrots and slicing them into 1/4-inch thick rounds. This will guarantee that they cook evenly and absorb the glaze properly.
- Cooking the Carrots: In a large skillet, heat the olive oil over medium heat. Add the carrot slices, seasoning them with a pinch of salt and pepper. Sauté for about 5 minutes until they start to soften.
- Creating the Honey Glaze: Reduce the heat to low and add the butter to the skillet. Once melted, stir in the honey and water, making sure that the carrots are well-coated with the mixture.
- Simmering: Cover the skillet and allow the carrots to simmer for about 10-15 minutes, stirring occasionally. Cook until they’re tender but still slightly firm to the bite.
- Adding Fresh Thyme: Once the carrots are cooked to your desired tenderness, sprinkle the fresh thyme leaves over the top. Stir gently to combine and allow the flavors to meld for a couple of minutes.
- Final Touches: Taste and adjust the seasoning with additional salt and pepper if needed. Serve the honey-glazed carrots warm as an accompaniment to your main Christmas dishes.
Extra Tips:
To make certain your Honey-Glazed Carrots With Fresh Thyme are a hit, consider using a variety of carrot colors such as purple or yellow for an eye-catching presentation.
If you prefer a more intense thyme flavor, add a sprig to the glaze while simmering and remove it before serving. For an added twist, you can incorporate a splash of orange juice to the glaze for a citrusy note.
Remember not to overcook the carrots; they should be tender yet crisp to preserve their flavor and nutritional value.
Quinoa-Stuffed Acorn Squash
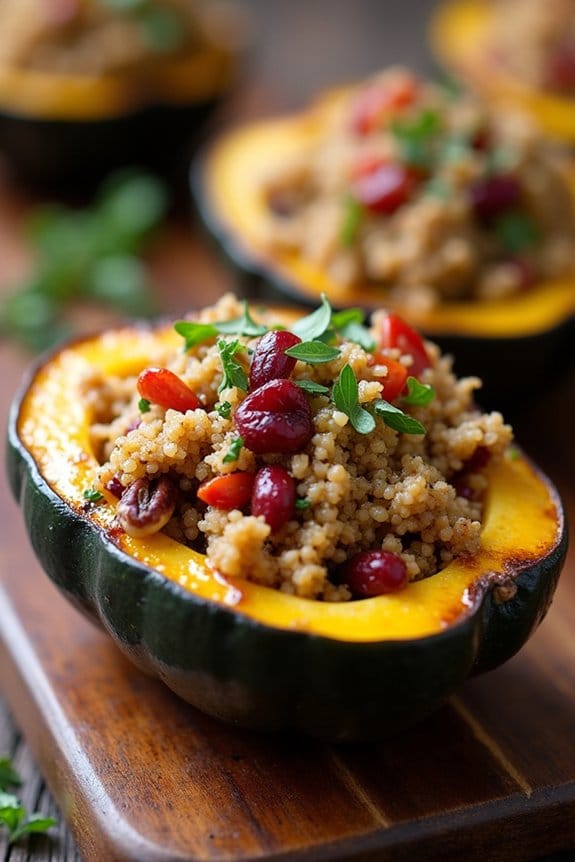
Quinoa-Stuffed Acorn Squash is a delightful and healthy side dish that makes a perfect addition to any Christmas feast. This vibrant dish combines the nutty flavor of quinoa with the natural sweetness of acorn squash, offering a satisfying and nutritious option that’s both visually appealing and delicious.
The stuffing is packed with a mix of savory herbs, vegetables, and a hint of citrus, making it a festive choice that complements the traditional flavors of the holiday season. This recipe is ideal for serving 4-6 people, making it a convenient option for a family gathering or a holiday dinner party.
The presentation of the halved acorn squash, filled with colorful and fragrant quinoa, is sure to impress your guests. Not only is this dish a feast for the eyes, but it’s also a wholesome choice that caters to various dietary preferences, being both vegetarian and gluten-free.
Ingredients (serving size: 4-6 people):
- 3 medium acorn squashes
- 1 cup quinoa, rinsed
- 2 cups vegetable broth or water
- 1 tablespoon olive oil
- 1 small onion, diced
- 2 cloves garlic, minced
- 1 red bell pepper, diced
- 1/2 cup dried cranberries
- 1/2 cup chopped pecans
- 1 teaspoon dried thyme
- 1 teaspoon dried sage
- Salt and pepper to taste
- 1/4 cup fresh parsley, chopped
- 1 tablespoon lemon juice
Cooking Instructions:
- Preheat the oven: Set your oven to 400°F (200°C) to get it ready for roasting the squash.
- Prepare the squash: Cut each acorn squash in half lengthwise and scoop out the seeds. Drizzle the cut sides with olive oil and a sprinkle of salt and pepper. Place them cut-side down on a baking sheet lined with parchment paper.
- Roast the squash: Put the baking sheet in the preheated oven and roast the squash for about 30-40 minutes, or until the flesh is tender and easily pierced with a fork.
- Cook the quinoa: While the squash is roasting, combine the rinsed quinoa with the vegetable broth or water in a medium saucepan. Bring to a boil, then reduce the heat to low, cover, and let it simmer for 15 minutes or until the quinoa is fluffy and all the liquid is absorbed.
- Sauté the vegetables: In a large skillet over medium heat, heat the olive oil. Add the diced onion and garlic, sautéing until the onion is translucent. Stir in the red bell pepper and cook for another 3-4 minutes.
- Mix in the flavors: Add the cooked quinoa to the skillet with the sautéed vegetables. Stir in the dried cranberries, chopped pecans, dried thyme, dried sage, salt, and pepper. Mix everything well and cook for another 2-3 minutes to allow the flavors to meld.
- Finish the stuffing: Remove the skillet from heat and stir in the fresh parsley and lemon juice, giving the stuffing a fresh, vibrant touch.
- Stuff the squash: Once the acorn squashes are roasted, flip them over and fill each half with the quinoa mixture. Return the stuffed squashes to the oven and bake for an additional 10 minutes to warm everything through.
- Serve: Once done, remove from the oven and serve the quinoa-stuffed acorn squash warm. Garnish with extra parsley if desired.
Extra Tips:
When selecting acorn squash, look for ones that are heavy for their size, with a firm exterior free of soft spots or blemishes. This guarantees the best quality and taste.
Feel free to customize the stuffing by adding other vegetables like mushrooms or spinach, or swap pecans for walnuts if preferred. For a touch of sweetness, try drizzling a bit of maple syrup over the top before serving.
Lemon Garlic Green Beans
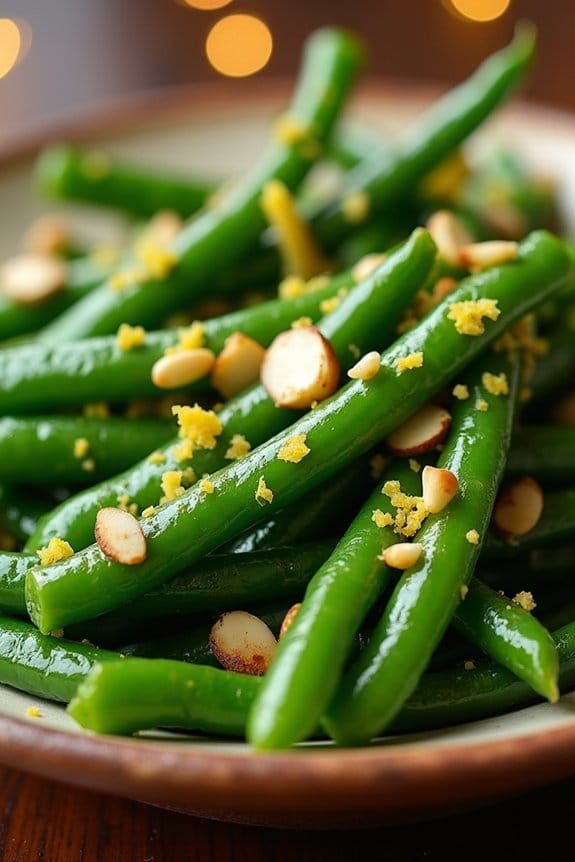
Lemon Garlic Green Beans is a revitalizing and zesty side dish that will brighten up your Christmas table. This dish combines the crispness of fresh green beans with the aromatic and tangy flavors of lemon and garlic. It’s a simple yet elegant recipe that complements a variety of main courses, making it a versatile addition to your holiday menu. Not only is it delicious, but it’s also a health-conscious choice, providing a generous serving of fiber and vitamins with minimal calories.
The preparation of Lemon Garlic Green Beans is straightforward, requiring only a few ingredients and minimal cooking time. This makes it ideal for busy holiday schedules, allowing you to focus on other festive dishes without compromising on flavor or nutrition. The combination of freshly squeezed lemon juice and sautéed garlic enhances the natural taste of the green beans, creating a dish that’s both wholesome and satisfying. Perfect for a gathering of 4-6 people, this recipe is sure to be a hit with your family and friends.
Ingredients for 4-6 servings:
- 1 pound fresh green beans, trimmed
- 2 tablespoons olive oil
- 3 cloves garlic, minced
- 1 lemon, juiced and zested
- Salt, to taste
- Black pepper, to taste
- Optional: 1/4 cup slivered almonds or pine nuts
Cooking Instructions:
- Prepare the Green Beans: Start by washing the green beans thoroughly under cold water. Then trim the ends and remove any strings if present.
- Blanch the Green Beans: Bring a large pot of water to a boil. Add a pinch of salt and then the green beans. Blanch them for about 2-3 minutes until they’re bright green and tender-crisp. Immediately transfer the beans to a bowl of ice water to stop the cooking process. Drain well and set aside.
- Sauté Garlic: In a large skillet, heat the olive oil over medium heat. Add the minced garlic and sauté for about 1 minute until it becomes fragrant, being careful not to burn it.
- Combine Ingredients: Add the blanched green beans to the skillet. Toss them with the garlic and oil, ensuring each bean is coated. Sauté for another 2-3 minutes.
- Add Lemon: Pour the lemon juice over the green beans and add the lemon zest. Season with salt and black pepper to taste. Stir to combine all ingredients evenly.
- Optional Garnish: If desired, sprinkle slivered almonds or pine nuts over the top for added texture and flavor.
- Serve: Transfer the green beans to a serving platter and serve immediately while warm.
Extra Tips:
For the freshest taste, choose bright green beans that are firm and free of blemishes. If you prefer a bit more crunch, reduce the blanching time slightly.
Adding the lemon juice at the end of cooking helps to preserve its bright flavor and prevents it from becoming too bitter. If you want to prepare this dish ahead of time, you can blanch the green beans and store them in the refrigerator, then quickly sauté them with garlic and lemon just before serving.
This dish can also be customized with your favorite herbs such as thyme or parsley for an extra layer of flavor.
Cauliflower Mash With Chives
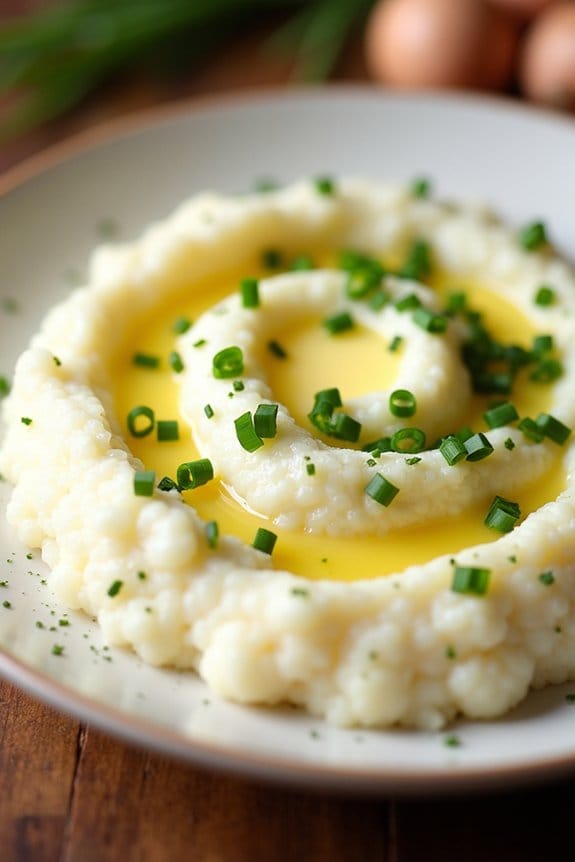
Cauliflower Mash With Chives is a delightful and healthy alternative to traditional mashed potatoes, perfect for a Christmas feast. This creamy and flavorful side dish isn’t only lower in carbs but also packed with vitamins and minerals, making it a nutritious addition to your holiday table.
The subtle hint of chives adds a fresh and aromatic touch that elevates the dish, making it both comforting and sophisticated. This recipe serves 4-6 people and is ideal for those looking to lighten their holiday meals without compromising on taste.
The preparation is simple and requires only a handful of ingredients, guaranteeing that you spend more time enjoying the holiday with loved ones and less time in the kitchen. Let’s explore the ingredients and steps needed to create this delicious Cauliflower Mash with Chives.
Ingredients:
- 2 large heads of cauliflower
- 4 tablespoons unsalted butter
- 1/4 cup heavy cream
- Salt to taste
- Black pepper to taste
- 1/4 cup chopped fresh chives
- 2 garlic cloves, minced
Instructions:
- Prepare the Cauliflower: Begin by removing the leaves and core from the cauliflower heads. Cut the cauliflower into evenly sized florets to guarantee even cooking.
- Cook the Cauliflower: In a large pot, bring water to a boil and add a pinch of salt. Add the cauliflower florets to the boiling water and cook for about 10-12 minutes, or until tender. You should be able to easily pierce them with a fork.
- Drain and Dry: Once the cauliflower is cooked, drain it in a colander. Allow it to sit for a few minutes to let excess moisture evaporate. This will prevent the mash from becoming too watery.
- Mash the Cauliflower: In a large mixing bowl, combine the cooked cauliflower, butter, heavy cream, minced garlic, salt, and pepper. Use an immersion blender or a food processor to blend the mixture until smooth and creamy. Adjust the seasoning with more salt and pepper if needed.
- Add Chives: Stir in the chopped chives until evenly distributed throughout the mash. The chives should add a nice pop of color and flavor to the dish.
- Serve: Transfer the cauliflower mash to a serving dish. For a touch of elegance, sprinkle extra chives on top for garnish. Serve warm alongside your favorite Christmas main courses.
Extra Tips:
For an even creamier texture, consider adding a bit of cream cheese or sour cream to the mash. If you prefer a more rustic, chunky texture, you can mash the cauliflower with a potato masher instead of blending it completely smooth.
Additionally, you can experiment with other herbs such as parsley or dill for different flavor profiles. Remember, the key to a perfect cauliflower mash is guaranteeing the cauliflower is well-drained and free of excess moisture before mashing.
Cranberry Walnut Quinoa Salad
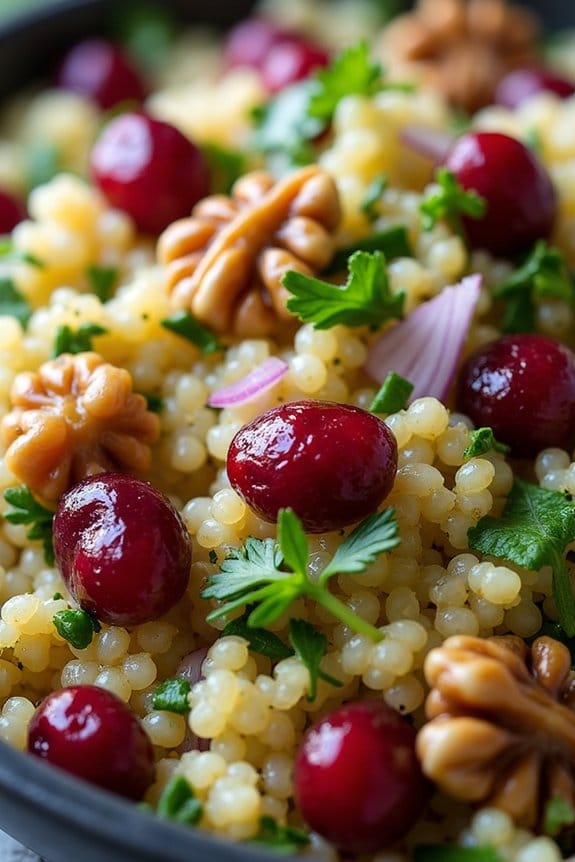
The versatility of this salad allows it to pair well with a variety of Christmas main courses, such as roasted turkey, glazed ham, or a vegetarian nut roast. Not only does it add color and texture to your table, but it also offers a healthful option for your guests, packed with protein, fiber, and antioxidants.
Preparing this dish is straightforward, making it a perfect choice for both novice and experienced cooks looking to impress their guests with a nutritious yet festive side dish.
Ingredients (Serves 4-6):
- 1 cup quinoa
- 2 cups water
- 1/2 teaspoon salt
- 1/2 cup dried cranberries
- 1/2 cup walnuts, toasted and roughly chopped
- 1/4 cup fresh parsley, chopped
- 1/4 cup fresh mint, chopped
- 1/4 cup red onion, finely chopped
- 1/4 cup olive oil
- 2 tablespoons lemon juice
- 1 tablespoon apple cider vinegar
- 1 teaspoon honey
- Salt and pepper to taste
Instructions:
- Cook the Quinoa: Rinse the quinoa under cold water to remove its natural bitterness. In a medium saucepan, combine the rinsed quinoa, 2 cups of water, and 1/2 teaspoon of salt. Bring to a boil over medium-high heat, then reduce the heat to low, cover, and simmer for about 15 minutes or until all the water is absorbed and the quinoa is tender. Fluff the quinoa with a fork and set aside to cool.
- Prepare the Dressing: In a small bowl, whisk together the olive oil, lemon juice, apple cider vinegar, and honey until well combined. Season with salt and pepper to taste. Adjust the seasoning if necessary to achieve a balanced flavor.
- Combine Ingredients: In a large mixing bowl, combine the cooked quinoa, dried cranberries, toasted walnuts, chopped parsley, mint, and red onion. Pour the dressing over the salad ingredients.
- Mix the Salad: Gently toss all the ingredients together until the quinoa is evenly coated with the dressing and the other ingredients are well distributed. Taste and adjust the seasoning if needed.
- Chill and Serve: Allow the salad to chill in the refrigerator for at least 30 minutes to let the flavors meld. Serve the salad cold or at room temperature as a revitalizing side dish on your Christmas table.
Extra Tips:
Toasting the walnuts enhances their flavor and adds an extra layer of crunch to the salad. Be sure to watch them closely while toasting, as nuts can burn quickly.
If you prefer a sweeter touch to the salad, consider adding a handful of pomegranate seeds for a burst of color and juiciness. Additionally, this salad can be made a day ahead of time, allowing the flavors to deepen, and saving you time on the busy day of your holiday celebration.
Balsamic Roasted Root Vegetables
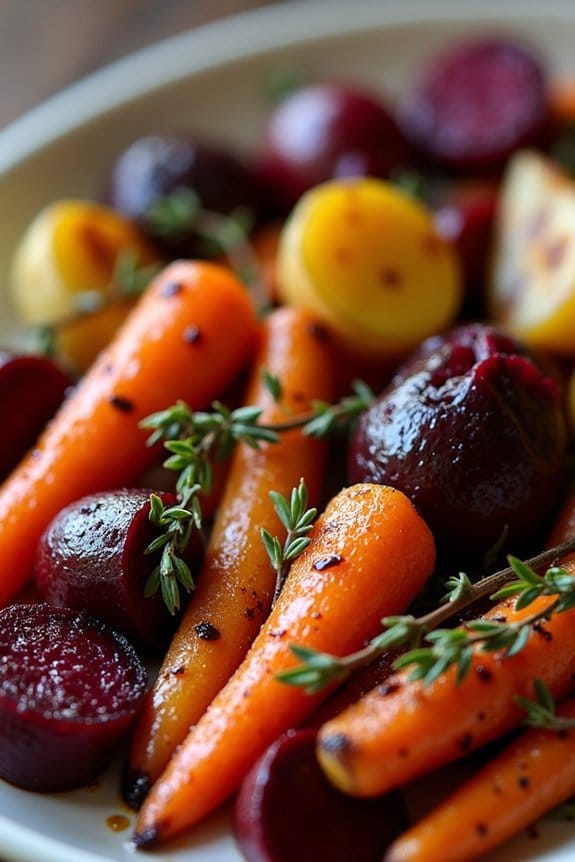
Balsamic Roasted Root Vegetables are a delightful and colorful addition to your holiday table, bringing together the earthy flavors of root vegetables with the tangy sweetness of balsamic vinegar. This dish not only complements your main course with its vibrant taste but also provides a nutritious boost, as root vegetables are rich in fiber, vitamins, and antioxidants.
Perfect for a healthy Christmas side dish, these roasted vegetables are easy to prepare and make an impressive presentation. The roasting process enhances the natural sweetness of the vegetables, while the balsamic glaze adds a sophisticated depth of flavor. This recipe accommodates a variety of root vegetables such as carrots, parsnips, and beets, allowing you to customize it to your liking or based on what you have available.
With a serving size of 4-6 people, this dish is ideal for family gatherings during the festive season.
Ingredients (serves 4-6 people):
- 4 medium carrots, peeled and cut into 1-inch pieces
- 3 medium parsnips, peeled and cut into 1-inch pieces
- 2 medium beets, peeled and cut into 1-inch cubes
- 1 large red onion, cut into wedges
- 3 tablespoons olive oil
- 3 tablespoons balsamic vinegar
- 2 teaspoons honey
- 1 tablespoon fresh thyme leaves
- Salt and pepper to taste
Cooking Instructions:
- Preheat the Oven: Start by preheating your oven to 425°F (220°C). This temperature is ideal for roasting, allowing the vegetables to caramelize and develop a rich flavor.
- Prepare the Vegetables: While the oven is preheating, peel and cut the carrots, parsnips, and beets into 1-inch pieces. Slice the red onion into wedges. Confirm all the pieces are roughly the same size to promote even cooking.
- Mix the Glaze: In a small bowl, whisk together the olive oil, balsamic vinegar, honey, and fresh thyme leaves. Season the mixture with salt and pepper according to your taste preference.
- Toss the Vegetables: Place the prepared vegetables in a large mixing bowl. Pour the balsamic glaze over the vegetables and toss them well to make sure they’re evenly coated.
- Arrange on Baking Sheet: Spread the coated vegetables in a single layer on a large baking sheet. Make sure they aren’t too crowded to allow for proper roasting.
- Roast the Vegetables: Place the baking sheet in the preheated oven and roast for 35-40 minutes, or until the vegetables are tender and caramelized. Stir the vegetables halfway through the cooking time to make sure they roast evenly.
- Serve: Once roasted, remove the vegetables from the oven and transfer them to a serving dish. Garnish with additional fresh thyme leaves if desired, and serve warm.
Extra Tips:
When preparing Balsamic Roasted Root Vegetables, try to cut the vegetables into uniform pieces to guarantee they cook evenly. If you prefer a stronger balsamic flavor, feel free to drizzle a little extra balsamic vinegar over the vegetables just before serving.
Additionally, you can experiment by adding other root vegetables like sweet potatoes or turnips for more variety. Finally, if the beets are taking longer to cook, consider starting them a few minutes earlier than the other vegetables to make sure they’re perfectly tender.
Spinach and Feta Stuffed Mushrooms

Spinach and Feta Stuffed Mushrooms are a delightful and healthy side dish that will add a festive touch to your Christmas table. These savory bites are perfect for those looking to enjoy the holiday season without compromising on health. With their rich flavors and creamy texture, these stuffed mushrooms are bound to be a hit with both vegetarians and meat-lovers alike.
The combination of fresh spinach, tangy feta cheese, and aromatic herbs makes this dish not just nutritious, but also incredibly flavorful. This recipe is designed to serve 4-6 people, making it ideal for a small gathering or as part of a larger holiday spread. The preparation is straightforward, allowing you to focus on the festivities while still impressing your guests with a gourmet appetizer.
Spinach and Feta Stuffed Mushrooms can be prepared in advance and quickly baked before serving, making them a convenient option for any holiday host.
Ingredients:
- 24 large white or cremini mushrooms
- 2 tablespoons olive oil
- 1 small onion, finely chopped
- 2 cloves garlic, minced
- 4 cups fresh spinach, chopped
- 1/2 cup feta cheese, crumbled
- 1/4 cup grated Parmesan cheese
- 1/4 cup breadcrumbs
- 1 teaspoon dried oregano
- Salt and pepper to taste
- 2 tablespoons fresh parsley, chopped
Instructions:
- Prepare the Mushrooms: Preheat your oven to 375°F (190°C). Clean the mushrooms with a damp cloth, then gently remove the stems. Set the caps aside and finely chop the stems.
- Sauté the Vegetables: In a large skillet, heat 1 tablespoon of olive oil over medium heat. Add the chopped onion and garlic, and sauté until they’re soft and fragrant, about 3-4 minutes. Add the chopped mushroom stems and cook for another 2 minutes.
- Cook the Spinach: Add the chopped spinach to the skillet and cook until wilted, about 2-3 minutes. Remove from heat and let the mixture cool slightly.
- Mix the Filling: In a large bowl, combine the cooked spinach mixture with feta cheese, Parmesan cheese, breadcrumbs, oregano, salt, and pepper. Stir until well combined.
- Stuff the Mushrooms: Brush the mushroom caps with the remaining tablespoon of olive oil. Spoon the filling evenly into each mushroom cap, pressing down gently to pack the filling.
- Bake the Mushrooms: Place the stuffed mushrooms on a baking sheet lined with parchment paper. Bake in the preheated oven for 20-25 minutes, or until the mushrooms are tender and the tops are golden brown.
- Serve: Once baked, remove the mushrooms from the oven and let them cool slightly. Sprinkle with fresh parsley before serving.
Extra Tips: To guarantee your Spinach and Feta Stuffed Mushrooms have the best flavor, use fresh ingredients whenever possible. If you want to make the filling richer, consider adding a small amount of cream cheese or ricotta.
You can also experiment with different herbs like thyme or dill to give the dish a unique twist. These mushrooms are best served warm, but they can also be enjoyed at room temperature, making them a flexible option for your holiday menu.
Zesty Citrus Kale Salad
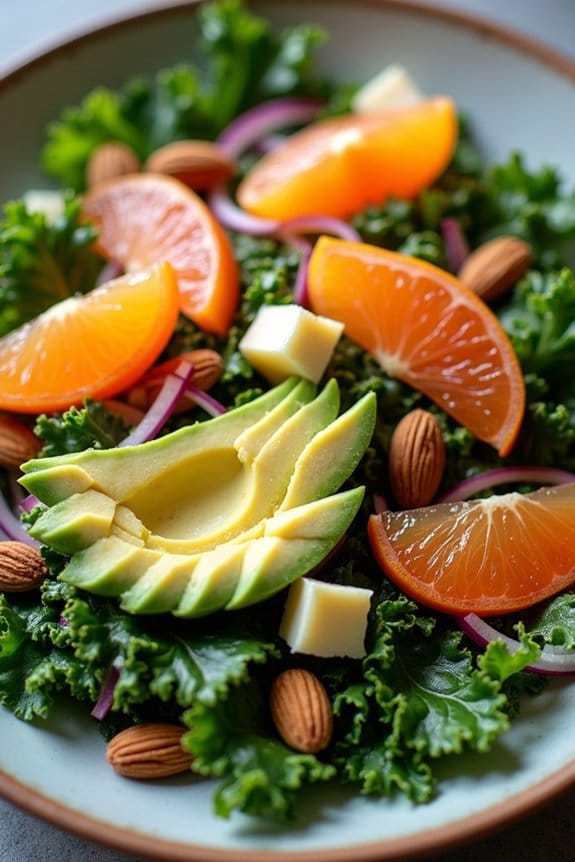
The Zesty Citrus Kale Salad is a revitalizing and vibrant side dish that’s perfect for bringing a burst of color and flavor to your Christmas table. This salad combines the hearty texture of kale with the bright, tangy notes of citrus fruits, offering a delightful contrast that will awaken your taste buds.
The addition of crunchy almonds and creamy avocado elevates the dish, providing a rich and satisfying mouthfeel. This healthy salad isn’t only delicious but also packed with nutrients, making it an excellent choice for a wholesome holiday meal.
Kale is a powerhouse vegetable that’s rich in vitamins K, A, and C, as well as fiber and antioxidants. When paired with citrus fruits like oranges and grapefruits, it becomes a seasonal treat that harnesses the best of winter produce. This salad is easy to prepare ahead of time, allowing the flavors to meld together beautifully.
Plus, it’s a versatile dish that can be adapted to suit a variety of dietary preferences or restrictions. Whether you’re hosting a festive gathering or simply enjoying a quiet holiday meal at home, this Zesty Citrus Kale Salad is sure to impress.
Ingredients (Serves 4-6):
- 1 large bunch of kale, stems removed and leaves chopped
- 2 oranges, peeled and segmented
- 1 grapefruit, peeled and segmented
- 1 avocado, diced
- 1/4 cup sliced almonds
- 1/4 cup red onion, thinly sliced
- 1/4 cup olive oil
- 2 tablespoons fresh lemon juice
- 1 tablespoon honey
- Salt and pepper to taste
Cooking Instructions:
- Prepare the Kale: Begin by washing the kale thoroughly under cold water. Remove the tough stems and chop the leaves into bite-sized pieces. Place the chopped kale in a large salad bowl.
- Segment the Citrus: Peel the oranges and grapefruit, ensuring all the white pith is removed. Carefully segment the fruits and add them to the bowl with the kale. These juicy segments will add a revitalizing burst of flavor to the salad.
- Add the Avocado: Dice the avocado into small cubes and gently mix it into the salad. The avocado will add a creamy texture that complements the crispness of the kale and citrus segments.
- Toast the Almonds: In a small skillet over medium heat, toast the sliced almonds until they’re golden brown and fragrant. This should take about 2-3 minutes. Keep a close eye on them to prevent burning. Once toasted, add them to the salad for a crunchy element.
- Prepare the Dressing: In a small bowl, whisk together the olive oil, fresh lemon juice, honey, salt, and pepper. Adjust the seasoning to taste. This dressing will tie all the flavors together with its sweet and tangy profile.
- Assemble the Salad: Pour the dressing over the kale salad and toss everything together until well combined. Make sure the kale is evenly coated with the dressing, as this will help to soften the leaves slightly.
- Final Touches: Add the thinly sliced red onion to the salad and give it one final toss. The onion adds a slight sharpness that balances the sweetness of the fruit and honey.
Extra Tips:
For maximum flavor, consider preparing the salad a few hours ahead of serving time. This allows the kale to absorb the dressing, making it more tender and flavorful.
If you prefer a slightly sweeter salad, you can add a touch more honey to the dressing. For an added layer of flavor, try incorporating a sprinkle of feta cheese or crumbled goat cheese.
If you want to make this salad ahead of time, leave the avocado out until just before serving to prevent it from browning. Enjoy this healthy and vibrant side dish as part of your festive celebrations!
Maple Roasted Butternut Squash
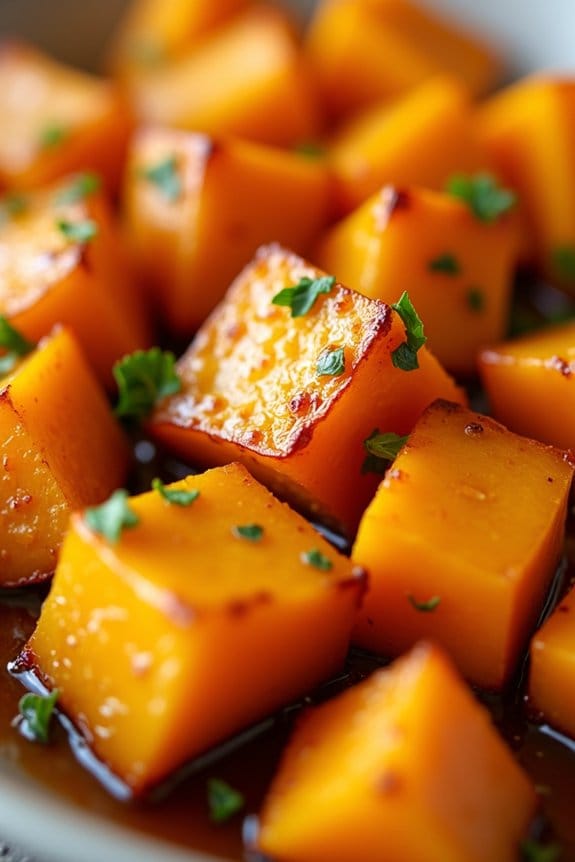
Maple Roasted Butternut Squash is a delicious and healthy side dish that perfectly complements any Christmas meal. This dish combines the natural sweetness of butternut squash with the rich flavor of pure maple syrup, creating a delightful harmony of tastes. The roasting process enhances the squash’s caramelized edges, adding depth and a slight crispiness to each bite.
It’s a perfect way to enjoy seasonal produce and provide a nutritious option on your festive table. Not only is Maple Roasted Butternut Squash visually appealing with its vibrant orange hue, but it’s also packed with vitamins, fiber, and antioxidants. This dish is simple to prepare, making it an easy addition to your holiday menu that doesn’t require hours in the kitchen.
Plus, it’s a versatile side that pairs beautifully with a variety of main courses, from roasted meats to vegetarian dishes. For a serving size of 4-6 people, you’ll find this recipe to be both satisfying and crowd-pleasing.
Ingredients:
- 2 medium butternut squash, peeled and cubed
- 3 tablespoons olive oil
- 1/4 cup pure maple syrup
- 1 teaspoon salt
- 1/2 teaspoon black pepper
- 1/2 teaspoon ground cinnamon
- 1/4 teaspoon ground nutmeg
- 1/4 cup chopped fresh parsley (for garnishing, optional)
Instructions:
- Preheat the Oven: Start by preheating your oven to 400°F (200°C). This temperature is perfect for roasting the squash evenly and achieving that caramelized finish.
- Prepare the Squash: Peel the butternut squash, remove the seeds, and cut it into 1-inch cubes. Try to keep the pieces similar in size to guarantee even cooking.
- Season the Squash: In a large mixing bowl, combine the cubed squash, olive oil, maple syrup, salt, pepper, cinnamon, and nutmeg. Toss everything together until the squash is well coated with the seasoning.
- Arrange on Baking Sheet: Spread the seasoned squash evenly on a large baking sheet. Make sure the pieces are in a single layer to promote even roasting.
- Roast the Squash: Place the baking sheet in the preheated oven and roast for 25-30 minutes. Halfway through, use a spatula to turn the squash pieces to guarantee they roast evenly on all sides.
- Check for Doneness: After 25-30 minutes, check the squash by piercing a piece with a fork. It should be tender and slightly caramelized on the edges. If needed, roast for an additional 5-10 minutes.
- Garnish and Serve: Once done, remove the squash from the oven and let it cool slightly. Transfer to a serving dish, garnish with chopped fresh parsley, and serve warm.
Extra Tips:
To save time, you can peel and cube the butternut squash a day ahead and store it in the refrigerator until you’re ready to cook. If you prefer a little more sweetness, you can drizzle an extra tablespoon of maple syrup over the roasted squash just before serving.
Additionally, feel free to experiment with spices; a pinch of cayenne pepper can add a subtle heat, or try adding a sprinkle of toasted pecans for added crunch. Remember, the key to perfect roasting isn’t overcrowding the baking sheet, so if needed, use two sheets to guarantee the squash roasts properly.
Herbed Wild Rice Pilaf
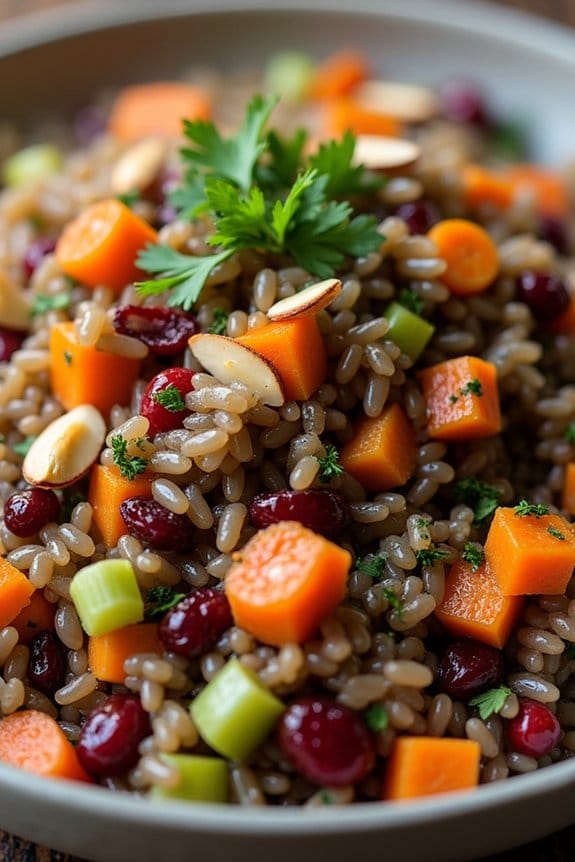
Herbed Wild Rice Pilaf is a delicious and nutritious side dish that complements any holiday meal, especially during Christmas. This dish combines the nutty flavor of wild rice with a mixture of herbs and vegetables, creating a fragrant and flavorful side that’s both satisfying and healthy.
Wild rice is a whole grain that’s high in protein and fiber, making it an excellent choice for those looking to maintain a balanced diet during the festive season. The addition of fresh herbs and vegetables not only enhances the taste of this dish but also adds a burst of color to your Christmas table.
This Herbed Wild Rice Pilaf is perfect for serving 4 to 6 people and can be prepared in advance to save time during the busy holiday period. The recipe is versatile, allowing you to adjust the herbs and vegetables according to your preference or what you have on hand.
Whether you’re hosting a large gathering or a small family dinner, this side dish is sure to impress your guests with its delightful flavors and wholesome ingredients.
Ingredients:
- 1 cup wild rice
- 2 1/2 cups vegetable broth
- 1 tablespoon olive oil
- 1 medium onion, finely chopped
- 2 cloves garlic, minced
- 1 carrot, diced
- 1 celery stalk, diced
- 1/2 cup sliced almonds
- 1/4 cup dried cranberries
- 2 tablespoons fresh parsley, chopped
- 1 tablespoon fresh thyme, chopped
- Salt and pepper to taste
Cooking Instructions:
- Prepare the Wild Rice: Rinse the wild rice under cold water to remove any excess starch. In a medium saucepan, combine the rinsed wild rice and vegetable broth. Bring it to a boil over high heat, then reduce the heat to low, cover, and simmer for about 45-50 minutes, or until the rice is tender and has absorbed most of the liquid.
- Sauté the Vegetables: While the rice is cooking, heat the olive oil in a large skillet over medium heat. Add the chopped onion and sauté for 2-3 minutes until it becomes translucent. Stir in the minced garlic and continue to cook for another minute until fragrant.
- Add Carrots and Celery: Add the diced carrot and celery to the skillet. Cook for 5-7 minutes, stirring occasionally, until the vegetables are tender.
- Combine Ingredients: Once the rice is cooked, add it to the skillet with the sautéed vegetables. Stir in the sliced almonds, dried cranberries, chopped parsley, and thyme. Mix well to combine all the ingredients.
- Season and Serve: Season the pilaf with salt and pepper to taste. Cook for an additional 2-3 minutes, stirring frequently, to guarantee all flavors are well combined. Transfer the Herbed Wild Rice Pilaf to a serving dish and garnish with extra parsley if desired. Serve warm.
Extra Tips:
For an even richer flavor, consider toasting the almonds before adding them to the pilaf. Simply place them in a dry skillet over medium heat and stir frequently until golden brown.
You can also experiment with other herbs like rosemary or sage to suit your taste. If you prefer a bit of zest, a squeeze of lemon juice can brighten up the flavors of the dish.
Finally, if you’re preparing this dish in advance, reheat it gently in the oven or microwave, adding a splash of broth if needed to keep it moist.
Garlic Parmesan Asparagus
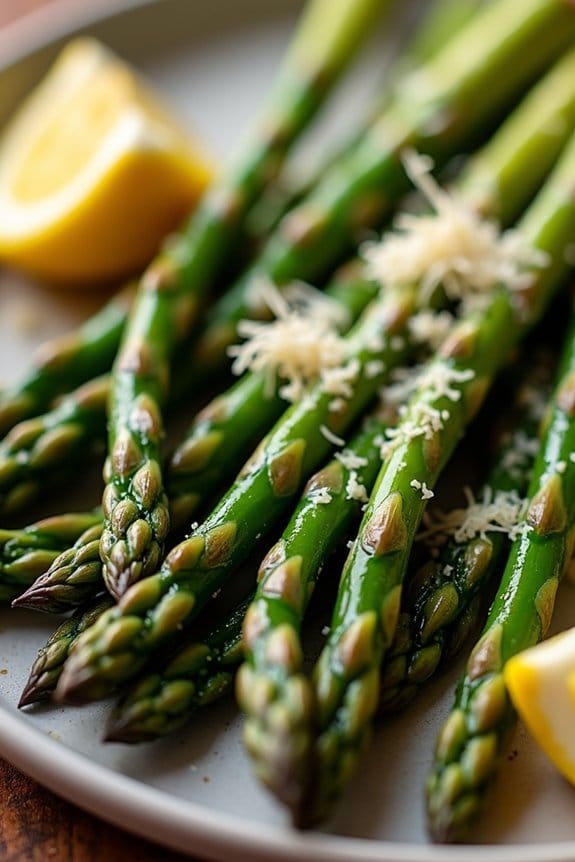
Garlic Parmesan Asparagus is a delightful and healthy side dish that adds a touch of elegance to your Christmas dinner table. This dish combines the fresh, crisp taste of asparagus with the rich flavors of garlic and Parmesan cheese. It’s a simple yet sophisticated recipe that complements any holiday meal, providing a nutritious option without sacrificing taste.
Asparagus is packed with vitamins and minerals, making it a healthful addition to your holiday feast, while the garlic and Parmesan add a savory depth that will have your guests reaching for seconds.
Preparing Garlic Parmesan Asparagus isn’t only quick and easy, but it also requires minimal ingredients, making it an ideal choice for a busy holiday cook. Whether you’re serving a traditional Christmas dinner or a more contemporary menu, this side dish pairs beautifully with a variety of main courses, from roasted meats to vegetarian options.
Its vibrant green color and tantalizing aroma will brighten up your table and delight your guests. This recipe serves 4-6 people and is sure to become a favorite at your holiday gatherings.
Ingredients:
- 2 pounds fresh asparagus
- 3 tablespoons olive oil
- 4 cloves garlic, minced
- 1/2 cup grated Parmesan cheese
- Salt and pepper to taste
- Lemon wedges for serving (optional)
Instructions:
- Preheat the Oven: Preheat your oven to 400°F (200°C). This will guarantee that the asparagus cooks evenly and achieves a nice roasted flavor.
- Prepare the Asparagus: Wash the asparagus thoroughly and trim the woody ends. To do this, gently bend each spear near the base, and it will naturally snap at the right point. Arrange the trimmed asparagus on a large baking sheet in a single layer to ensure even cooking.
- Season the Asparagus: Drizzle the olive oil over the asparagus and sprinkle the minced garlic evenly across the top. Add salt and pepper to taste, ensuring that each spear is well-coated for maximum flavor. Use your hands or tongs to toss everything together gently.
- Roast the Asparagus: Place the baking sheet in the preheated oven and roast for about 15-20 minutes or until the asparagus is tender and slightly crispy. The cooking time may vary depending on the thickness of the asparagus.
- Add Parmesan: Remove the baking sheet from the oven and immediately sprinkle the grated Parmesan cheese over the hot asparagus. The heat from the asparagus will help melt the cheese slightly, enhancing the dish’s flavor.
- Serve: Transfer the asparagus to a serving platter. If desired, squeeze fresh lemon juice over the asparagus for a touch of brightness. Serve immediately while warm.
Extra Tips:
For the best results, choose asparagus spears that are similar in size to ensure even cooking. If you prefer a slightly more charred flavor, you can broil the asparagus for the last 1-2 minutes of cooking.
Be careful not to overcook the asparagus, as it should remain vibrant green and slightly firm. Feel free to experiment with additional seasonings such as red pepper flakes or lemon zest for a bit of extra flavor. Enjoy this simple yet delicious side dish as a healthy accompaniment to your festive meal!
Sweet Potato and Apple Bake
Sweet Potato and Apple Bake is a delightful and nutritious side dish that perfectly complements any festive holiday meal. This recipe combines the natural sweetness of sweet potatoes and apples, with a hint of cinnamon and nutmeg, creating a warm and comforting flavor profile. Ideal for Christmas gatherings, this dish isn’t only delicious but also packed with vitamins and fiber, making it a healthy choice for your holiday spread.
This recipe serves 4-6 people, making it perfect for family dinners or small holiday parties. The natural sweetness from the fruits and vegetables means you can enjoy a guilt-free side dish that satisfies your sweet tooth while providing essential nutrients. The combination of textures from the tender sweet potatoes and juicy apples guarantees every bite is both satisfying and flavorful.
Ingredients:
- 3 large sweet potatoes
- 3 medium apples (such as Granny Smith or Honeycrisp)
- 1/4 cup brown sugar
- 1/4 cup unsalted butter, melted
- 1 teaspoon ground cinnamon
- 1/2 teaspoon ground nutmeg
- 1/4 teaspoon salt
- 1/3 cup chopped pecans (optional)
- Cooking spray
Cooking Instructions:
- Preheat the Oven: Set your oven to 375°F (190°C) to verify it’s properly heated while you prepare the ingredients.
- Prepare the Sweet Potatoes and Apples: Peel the sweet potatoes and cut them into 1/4-inch thick slices. Core the apples and slice them into 1/4-inch thick rounds. Leave the skin on the apples for added texture and nutrients.
- Mix the Ingredients: In a large mixing bowl, combine the sweet potato slices, apple slices, brown sugar, melted butter, cinnamon, nutmeg, and salt. Toss everything together until the sweet potatoes and apples are well coated with the sugar and spices.
- Arrange in a Baking Dish: Lightly spray a 9×13-inch baking dish with cooking spray. Layer the sweet potato and apple mixture evenly in the dish, verifying there’s an even distribution of both.
- Bake the Dish: Cover the baking dish with aluminum foil and bake in the preheated oven for 30 minutes. This initial baking phase allows the sweet potatoes and apples to soften.
- Add Pecans and Finish Baking: After 30 minutes, remove the foil, sprinkle the chopped pecans over the top, and bake for an additional 15-20 minutes. This step helps the pecans toast slightly while allowing the top of the dish to caramelize and achieve a beautiful golden color.
- Serve: Once cooked, remove from the oven and let it cool for a few minutes before serving. Enjoy the Sweet Potato and Apple Bake warm as a delicious accompaniment to your holiday meal.
Extra Tips:
For a vegan version, substitute the unsalted butter with coconut oil or a vegan margarine. If you prefer a sweeter dish, you can increase the brown sugar to 1/3 cup, but taste the mixture first to verify it suits your preference.
Additionally, if pecans aren’t to your liking, consider using walnuts or omitting the nuts entirely. This dish can also be prepared a day in advance; simply cover and refrigerate it, then reheat before serving to save time on the day of your event.
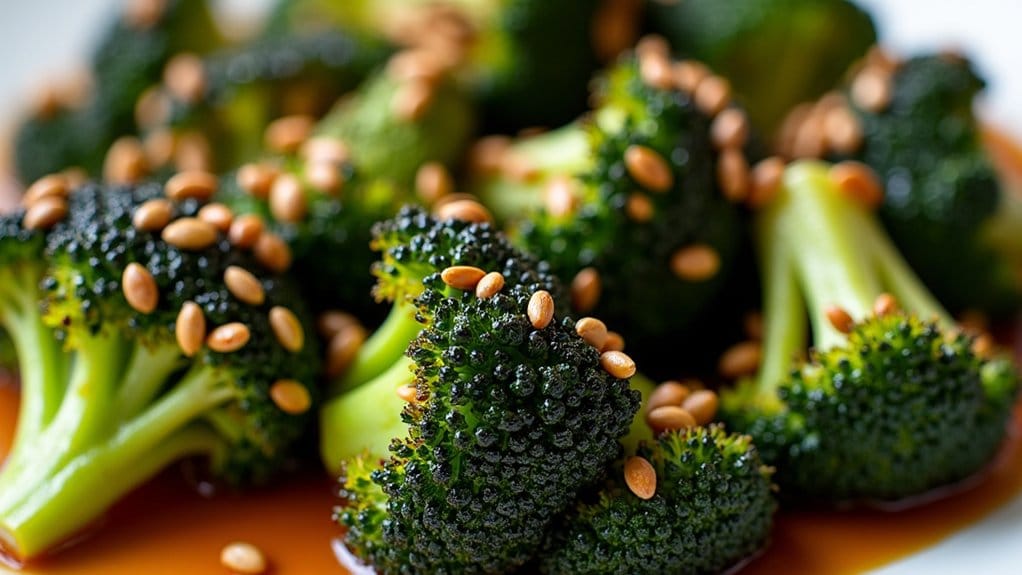
Ginger-Sesame Roasted Broccoli
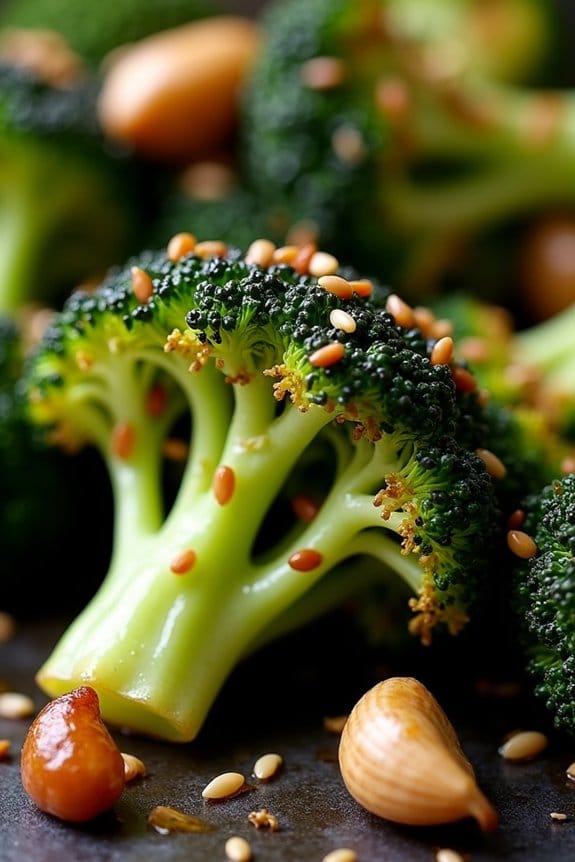
Ginger-Sesame Roasted Broccoli is a delightful and healthy side dish perfect for your Christmas table. This dish combines the earthy flavors of broccoli with the aromatic zing of ginger and the nutty richness of sesame.
It’s not only delicious but also packed with nutrients, making it a guilt-free addition to your holiday meal. The roasting process caramelizes the broccoli, enhancing its natural sweetness and crispiness, while the ginger and sesame add layers of flavor that will have your guests reaching for seconds.
This recipe is ideal for serving 4-6 people, making it a great choice for family gatherings. The preparation is straightforward and requires minimal ingredients, allowing the fresh flavors to shine. Whether you’re a seasoned cook or a beginner, this Ginger-Sesame Roasted Broccoli will be a hit at your Christmas dinner.
Ingredients:
- 2 pounds of broccoli florets
- 3 tablespoons sesame oil
- 1 tablespoon freshly grated ginger
- 2 tablespoons soy sauce
- 1 tablespoon rice vinegar
- 1 tablespoon honey
- 1 clove garlic, minced
- 2 tablespoons sesame seeds
- Salt and pepper to taste
Instructions:
- Preheat the Oven: Start by preheating your oven to 425°F (220°C). This guarantees that the oven is hot enough to roast the broccoli evenly and quickly.
- Prepare the Broccoli: Wash the broccoli florets thoroughly and pat them dry with a paper towel. It’s important that the broccoli is dry to get that perfect roast.
- Make the Marinade: In a large bowl, combine the sesame oil, grated ginger, soy sauce, rice vinegar, honey, and minced garlic. Whisk the ingredients together until they’re well combined.
- Toss the Broccoli: Add the broccoli florets to the bowl with the marinade. Toss them until they’re evenly coated with the mixture. This will guarantee that each piece of broccoli is flavorful and delicious.
- Arrange on a Baking Sheet: Spread the broccoli florets in a single layer on a baking sheet lined with parchment paper. This helps in achieving even roasting.
- Roast the Broccoli: Place the baking sheet in the preheated oven and roast for about 15-20 minutes. Halfway through, turn the broccoli florets to guarantee they roast evenly on all sides.
- Add Sesame Seeds: In the last 5 minutes of roasting, sprinkle the sesame seeds over the broccoli. This will toast the seeds slightly, bringing out their nutty flavor.
- Season and Serve: Once the broccoli is tender and slightly charred, remove it from the oven. Season with salt and pepper to taste, then serve hot.
Extra Tips:
For even more flavor, you can add a sprinkle of red pepper flakes for a bit of heat.
Make sure not to overcrowd the baking sheet, as this can lead to steaming rather than roasting. If you prefer a bit more crunch, consider adding some sliced almonds or chopped cashews along with the sesame seeds.
This dish can also be made ahead of time and reheated in the oven just before serving, making it a convenient option for holiday meal prep.
