

As Halloween nears, I’m on the lookout for appetizers that delight adult taste buds while embracing the spooky season. This year, I’ve crafted a list of 14 mouthwatering recipes that promise to enchant your guests. Think Spooky Stuffed Mushrooms and a bubbling Witch’s Cauldron Queso Dip as the stars of your Halloween table. Curious for more? These treats might just be the highlight of your celebration.
Spooky Stuffed Mushrooms

Halloween is the perfect time to mix up a batch of appetizers that are as eerie as they’re delicious. Spooky Stuffed Mushrooms are a sophisticated treat that tantalizes adult taste buds while adding a touch of mystery to your Halloween spread. These savory bites are stuffed with a creamy blend of cheeses, herbs, and spices, all nestled in earthy mushroom caps. They’re easy to prepare and make for a delightful finger food that your party guests won’t be able to resist.
Spooky Stuffed Mushrooms: a deliciously eerie treat that adds mystery and sophistication to your Halloween celebration.
The secret to making these mushrooms truly “spooky” lies in the presentation and a few special ingredients that add a ghostly flair. Black olives and red bell pepper strips can be used to create eerie faces or designs that pop against the pale stuffing, making each bite a mini masterpiece. Whether you’re hosting a Halloween gathering or simply want to surprise your friends and family with a festive snack, these Spooky Stuffed Mushrooms are sure to impress.
Ingredients for 4-6 servings:
- 24 large white button mushrooms
- 2 tablespoons olive oil
- 1 small onion, finely chopped
- 2 cloves garlic, minced
- 1/2 cup cream cheese, softened
- 1/4 cup grated Parmesan cheese
- 1/4 cup shredded mozzarella cheese
- 2 tablespoons chopped fresh parsley
- 1 teaspoon dried thyme
- Salt and pepper to taste
- 12 black olives, sliced into rings
- 1 small red bell pepper, sliced into thin strips
Cooking Instructions:
- Prepare the Mushrooms: Preheat your oven to 375°F (190°C). Gently clean the mushrooms with a damp cloth and remove the stems, setting the caps aside. Finely chop the stems and set them aside separately.
- Cook the Aromatics: Heat the olive oil in a skillet over medium heat. Add the chopped onion and garlic, sautéing until they become translucent and fragrant, about 3-4 minutes. Add the chopped mushroom stems to the skillet and cook for an additional 2 minutes.
- Mix the Filling: In a mixing bowl, combine the sautéed onion, garlic, and mushroom stems with the cream cheese, Parmesan cheese, mozzarella cheese, parsley, thyme, salt, and pepper. Stir until all ingredients are well incorporated and the mixture is smooth.
- Stuff the Mushrooms: Spoon the cheese mixture into each mushroom cap, mounding it slightly. Place the stuffed mushrooms on a baking sheet lined with parchment paper.
- Decorate with Faces: Use the black olive rings and red bell pepper strips to create spooky faces or designs on top of the stuffed mushrooms. This adds a fun Halloween touch.
- Bake the Mushrooms: Place the baking sheet in the preheated oven and bake for 15-20 minutes, or until the mushrooms are tender and the tops are golden and bubbly.
- Serve: Remove the mushrooms from the oven and let them cool slightly before serving. Arrange them on a platter for your guests to enjoy.
Extra Tips:
When selecting mushrooms, look for ones that are roughly the same size, so they cook evenly. You can prepare the filling a day in advance and store it in the refrigerator, but it’s best to stuff the mushrooms just before baking to keep them fresh.
If you prefer a spicier kick, consider adding a pinch of red pepper flakes to the filling. For an extra touch of Halloween spirit, consider serving these spooky mushrooms on a platter decorated with fake cobwebs or a spooky tablecloth.
Witch’s Cauldron Queso Dip

Transform your Halloween party into a magical affair with this Witch’s Cauldron Queso Dip. This spicy, creamy, and cheesy dip is bound to enchant your adult guests with its bold flavors and bewitching presentation. Served bubbling hot out of a cauldron-like bowl, this appetizer is perfect for creating a spooky atmosphere while delighting taste buds.
With a blend of melted cheeses, spicy chorizo, and diced green chiles, this dip is a surefire way to cast a spell over your Halloween gathering. Ideal for serving 4-6 people, this queso dip isn’t only delicious but also easy to prepare. The combination of ingredients results in a smooth, creamy texture with a hint of heat that makes it irresistibly dippable.
Pair it with tortilla chips or fresh vegetables for a wickedly good time. Whether you’re hosting a full-fledged Halloween party or just a spooky movie night, this Witch’s Cauldron Queso Dip is the perfect addition to your adult Halloween appetizer lineup.
Ingredients:
- 1 tablespoon olive oil
- 8 ounces chorizo sausage, casing removed
- 1 small onion, finely chopped
- 2 cloves garlic, minced
- 2 cups shredded cheddar cheese
- 2 cups shredded Monterey Jack cheese
- 1 tablespoon cornstarch
- 1 can (10 ounces) diced tomatoes with green chiles, undrained
- 1/2 cup milk
- 1/4 cup fresh cilantro, chopped
- 1 jalapeño, seeded and finely chopped (optional)
- Salt and pepper to taste
- Tortilla chips or vegetables for serving
Instructions:
- Cook the Chorizo: In a large skillet, heat the olive oil over medium heat. Add the chorizo sausage and cook until browned, breaking it up with a spoon as it cooks. Once browned, remove the chorizo with a slotted spoon and set aside, leaving the drippings in the skillet.
- Sauté Aromatics: In the same skillet, add the chopped onion and cook until translucent, about 3-4 minutes. Stir in the minced garlic and cook for another minute until fragrant.
- Prepare Cheese Mixture: In a large bowl, toss the cheddar and Monterey Jack cheeses with the cornstarch until evenly coated. This will help thicken the dip and prevent the cheese from becoming stringy when melted.
- Combine Ingredients: Return the cooked chorizo to the skillet with the onions and garlic. Stir in the undrained diced tomatoes with green chiles and milk. Gradually add the cheese mixture, stirring constantly until the cheese is completely melted and smooth.
- Finish and Serve: Stir in the chopped cilantro and, if desired, the finely chopped jalapeño. Season with salt and pepper to taste. Transfer the dip to a heat-safe serving bowl or, for a spooky effect, a small cauldron. Serve immediately with tortilla chips or your choice of fresh vegetables.
Extra Tips:
For an even spookier presentation, consider using dry ice carefully placed under the serving cauldron to create a fog effect around the dip. Confirm the dry ice doesn’t come into contact with the dip itself.
If you prefer a milder dip, omit the jalapeño or reduce the amount of green chiles used. Keep the dip warm by placing it over a tealight candle or in a slow cooker on low heat, as queso tends to thicken as it cools. Enjoy your Halloween festivities with this enchanting appetizer!
Mummy Brie With Puff Pastry
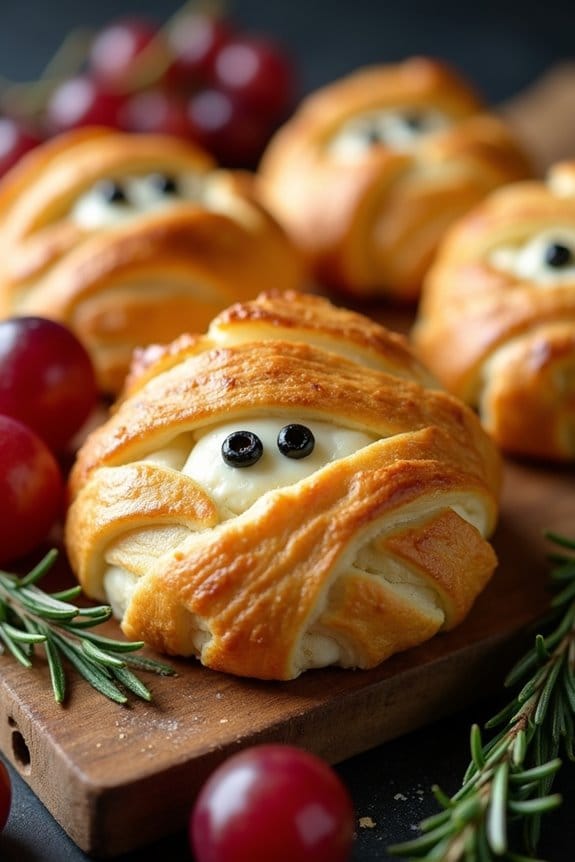
Mummy Brie With Puff Pastry is a delightful and festive appetizer perfect for an adult Halloween gathering. This dish takes the classic elegance of baked brie and adds a whimsical twist by wrapping it in puff pastry to resemble a mummy. The creamy and rich cheese combined with the crispy, golden pastry makes it an irresistible treat that’s as fun to make as it’s to eat.
Whether you’re hosting a Halloween party or simply enjoying a cozy night in with friends, this appetizer is bound to impress. The simplicity of the ingredients allows the delicious flavors to shine through, making it an ideal choice for a crowd. The brie is wrapped in puff pastry and baked until perfectly gooey, creating a deliciously oozy center that pairs well with a variety of accompaniments such as crackers, fruits, or toasted baguette slices.
The final touch includes decorative “eyes” to complete the mummy look, adding a playful and spooky element to your spread.
Ingredients (serving size: 4-6 people):
- 1 wheel of brie cheese (about 8 oz)
- 1 sheet of puff pastry, thawed
- 1 egg, beaten
- 2-3 tablespoons of raspberry or apricot jam (optional)
- 2 black olives or 4 small peppercorns (for eyes)
Cooking Instructions:
- Preheat the Oven: Start by preheating your oven to 375°F (190°C). This guarantees that the puff pastry will bake evenly and become golden brown.
- Prepare the Puff Pastry: On a lightly floured surface, roll out the puff pastry sheet slightly to remove any creases. Cut the sheet into long strips, about 1/2 inch wide, which will be used to wrap the brie.
- Assemble the Mummy: Place the wheel of brie in the center of the puff pastry. If desired, spread a thin layer of raspberry or apricot jam over the top of the brie for added sweetness. Begin wrapping the brie with the pastry strips in a crisscross pattern to mimic the look of mummy bandages, leaving a small space for the eyes.
- Add the Eyes: Slice the black olives into small pieces or use whole peppercorns, and place them on the exposed area of the brie to form the eyes of the mummy.
- Brush with Egg Wash: Lightly brush the entire surface of the wrapped brie with the beaten egg. This will give the pastry a shiny, golden finish as it bakes.
- Bake: Place the wrapped brie on a parchment-lined baking sheet and bake in the preheated oven for about 20-25 minutes, or until the pastry is golden brown and crispy.
- Serve: Allow the mummy brie to cool for a few minutes before serving. This will make it easier to slice and enjoy without the cheese spilling out too quickly.
Extra Tips:
For a more pronounced flavor, consider adding herbs like rosemary or thyme inside the pastry before baking. If you don’t have black olives or peppercorns for the eyes, chocolate chips or small pieces of dried fruit can be a playful alternative.
Confirm the puff pastry is completely thawed before working with it to prevent cracking. Serve your Mummy Brie With Puff Pastry with an assortment of dippers such as apples, grapes, or nuts to complement the rich taste of the cheese.
Vampire Bat Wings
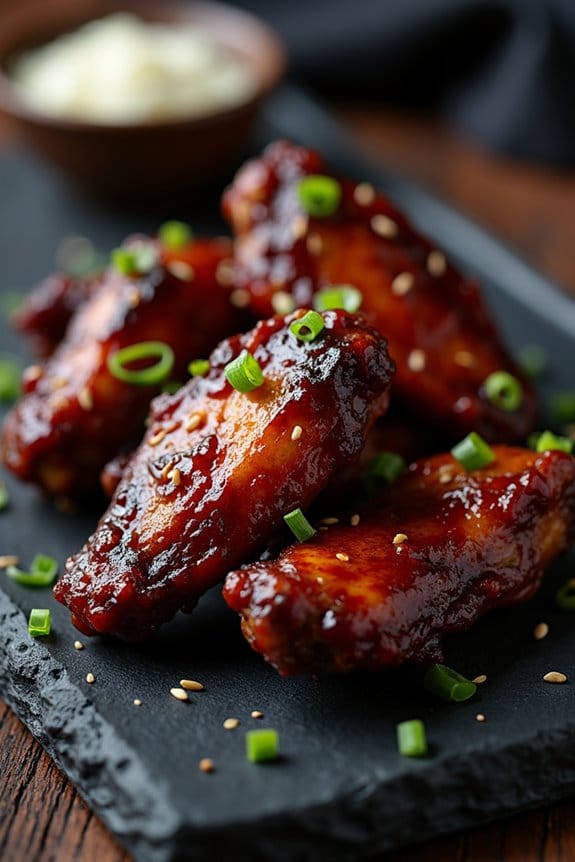
Transform your Halloween gathering into a frightful feast with these deliciously sinister Vampire Bat Wings. Perfect for adults looking to indulge in a bit of spooky fun, these wings are coated in a deep, dark glaze that’s both savory and slightly sweet, reminiscent of the mythical creatures they’re named after.
The rich color and bold flavor make them an irresistible addition to any Halloween appetizer spread. These wings aren’t only visually enchanting but also incredibly easy to prepare, making them a go-to for any festive occasion.
The secret to these tantalizing bat wings lies in the unique marinade and glaze, which combines traditional Asian flavors with a ghoulish twist. The marinade infuses the chicken wings with a smoky, sweet, and slightly spicy taste, while the glaze adds a glossy finish that will have your guests swooning.
This recipe serves 4-6 people, making it ideal for a small Halloween party or gathering. Get ready to take a bite into these deliciously dark wings that will leave everyone bewitched.
Ingredients (serves 4-6):
- 3 pounds chicken wings
- 1/2 cup soy sauce
- 1/4 cup balsamic vinegar
- 1/4 cup honey
- 2 tablespoons sriracha sauce
- 1 tablespoon minced garlic
- 1 tablespoon grated fresh ginger
- 1 teaspoon smoked paprika
- 1/2 teaspoon black food coloring (optional, for extra dark wings)
- 2 tablespoons cornstarch
- 2 tablespoons water
- Green onions, chopped (for garnish)
- Sesame seeds (for garnish)
Cooking Instructions:
- Prepare the Marinade: In a large mixing bowl, combine the soy sauce, balsamic vinegar, honey, sriracha sauce, minced garlic, grated ginger, and smoked paprika. If you desire a darker color, add the black food coloring. Mix well until all ingredients are thoroughly combined.
- Marinate the Wings: Place the chicken wings in a large resealable plastic bag or a shallow dish. Pour the marinade over the wings, ensuring they’re fully coated. Seal the bag or cover the dish and refrigerate for at least 2 hours, preferably overnight for best results.
- Preheat the Oven: When ready to cook, preheat your oven to 400°F (200°C). Line a baking sheet with aluminum foil and place a wire rack on top. This will allow air to circulate around the wings for even cooking.
- Bake the Wings: Remove the wings from the marinade, shaking off any excess liquid, and arrange them in a single layer on the prepared rack. Bake in the preheated oven for 35-40 minutes, turning once halfway through, until the wings are cooked through and crispy.
- Prepare the Glaze: While the wings are baking, pour the remaining marinade into a small saucepan. Bring it to a boil over medium-high heat. In a separate small bowl, mix the cornstarch with water to create a slurry. Stir the slurry into the boiling marinade and cook until thickened, about 2-3 minutes.
- Glaze the Wings: Once the wings are fully cooked, remove them from the oven. Brush the thickened glaze generously over each wing with a pastry brush, ensuring they’re well coated.
- Garnish and Serve: Transfer the glazed wings to a serving platter. Sprinkle with chopped green onions and sesame seeds for garnish. Serve hot and enjoy the spooky delight!
Extra Tips:
To achieve the best flavor, marinate the chicken wings overnight in the refrigerator. This allows the marinade to deeply penetrate the meat, enhancing the taste.
If you prefer a spicier kick, feel free to adjust the amount of sriracha sauce to your liking. Using a wire rack on the baking sheet helps the wings cook evenly and become crispy without sticking.
Finally, if you can’t find black food coloring, the wings will still look wonderfully dark and appealing without it.
Ghostly Deviled Eggs

Ghostly Deviled Eggs are a spooky twist on a classic appetizer, perfect for setting the eerie mood at your Halloween gathering for adults. These devilish delights aren’t only visually appealing but also packed with flavor, making them an ideal addition to your Halloween menu. The traditional deviled egg is transformed with a few simple ingredients to create a ghostly appearance that will have your guests both thrilled and chilled.
With a creamy filling and a hint of spice, these eggs are as delightful to eat as they’re to behold. Creating Ghostly Deviled Eggs involves a few creative touches to accomplish their haunting look. The key to success is in the details, from carefully slicing the eggs to strategically placing the olive eyes. This recipe serves 4-6 people, making it a great option for small to medium-sized gatherings.
The combination of classic deviled egg flavors with a spooky presentation makes this dish a standout on any Halloween table. Gather your ingredients and prepare to impress your guests with this ghoulishly good appetizer.
Ingredients:
- 6 large eggs
- 1/4 cup mayonnaise
- 1 teaspoon Dijon mustard
- 1 teaspoon white vinegar
- Salt and pepper, to taste
- 1/8 teaspoon paprika
- 6 small black olives
- 12 small pieces of chives or green onions
Cooking Instructions:
- Boil the Eggs: Place the eggs in a single layer in a saucepan and cover them with cold water by about an inch. Bring the water to a boil over medium-high heat. Once boiling, cover the saucepan, remove it from the heat, and let it sit for 10-12 minutes.
- Cool and Peel: After the eggs have cooked, transfer them to a bowl of ice water and let them cool for at least 5 minutes. Once cooled, gently peel the eggs.
- Slice and Prepare Yolks: Carefully slice each egg in half lengthwise. Remove the yolks and place them in a small bowl. Set the egg whites aside on a serving platter.
- Make the Filling: Mash the egg yolks with a fork until smooth. Add mayonnaise, Dijon mustard, white vinegar, salt, and pepper. Mix until the ingredients are well combined and the filling is creamy.
- Fill the Egg Whites: Use a spoon or a piping bag to fill each egg white half with the yolk mixture. Fill generously to create the body of the ghost.
- Create the Ghost Faces: Slice the black olives into small pieces to form eyes and mouths. Place two olive pieces on each filled egg half to create eyes. Use another piece to form a mouth. Position the chives or green onions above the eyes to resemble hair or eyebrows.
- Season and Serve: Lightly sprinkle paprika over the filled eggs for added color and flavor. Serve the Ghostly Deviled Eggs immediately, or refrigerate them until ready to serve.
Extra Tips:
For perfectly peeled eggs, it’s important to use eggs that aren’t too fresh, as they tend to peel easier. When placing the olive eyes and mouths, a pair of tweezers can be handy for precise positioning.
If you want to add more spookiness, use food coloring to lightly tint the filling in green or purple hues. Remember to taste the yolk mixture before filling the egg whites to verify the seasoning is to your preference. Enjoy these ghostly appetizers with a glass of wine or a Halloween-themed cocktail for the ultimate adult Halloween experience.
Pumpkin Spice Roasted Nuts
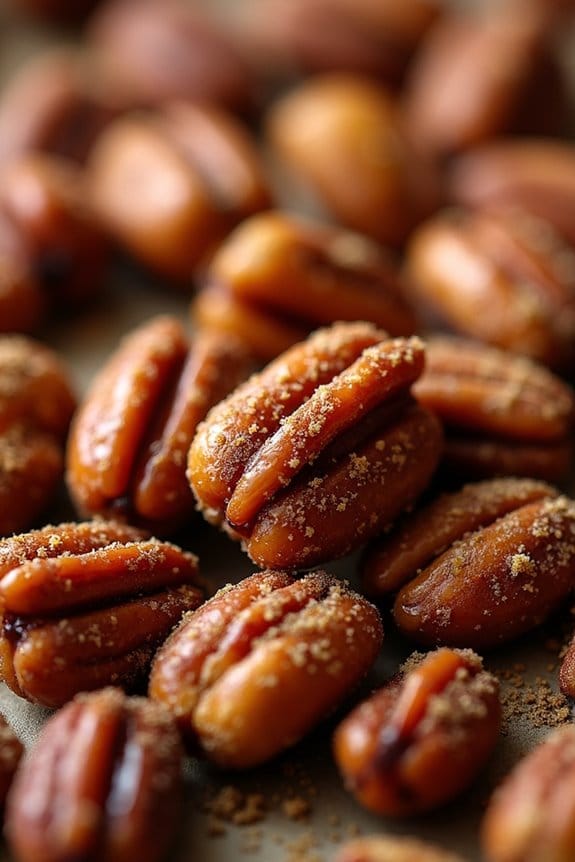
Pumpkin Spice Roasted Nuts are a delightful addition to any Halloween gathering, offering a perfect balance of sweet and savory flavors with a hint of autumnal warmth. This recipe is designed specifically for adults who want to enjoy a sophisticated treat that captures the essence of fall. The combination of crunchy nuts coated in a luscious pumpkin spice blend makes for an irresistible snack that pairs well with seasonal beverages like apple cider or mulled wine.
Whether you’re hosting a Halloween party or enjoying a cozy evening at home, these roasted nuts are bound to be a crowd-pleaser. The preparation of Pumpkin Spice Roasted Nuts is straightforward and doesn’t require much time, making it a convenient option for busy hosts. This recipe serves 4-6 people, allowing you to share the festive flavors with friends and family.
By using a mix of your favorite nuts, you can customize the recipe to suit your taste preferences, guaranteeing everyone finds something they love. The aromatic spices and a hint of sweetness will fill your kitchen with the comforting scents of fall, setting the perfect mood for your Halloween festivities.
Ingredients (serving size: 4-6 people):
- 2 cups mixed nuts (such as almonds, pecans, and cashews)
- 2 tablespoons unsalted butter, melted
- 2 tablespoons brown sugar
- 1 tablespoon maple syrup
- 1 teaspoon pumpkin pie spice
- 1/2 teaspoon ground cinnamon
- 1/4 teaspoon salt
- 1/4 teaspoon vanilla extract
Cooking Instructions:
- Preheat the Oven: Begin by preheating your oven to 350°F (175°C). This guarantees that the oven reaches the right temperature for even roasting of the nuts.
- Prepare the Baking Sheet: Line a baking sheet with parchment paper to prevent the nuts from sticking and to make for easier cleanup.
- Mix the Coating: In a large bowl, combine the melted butter, brown sugar, maple syrup, pumpkin pie spice, ground cinnamon, salt, and vanilla extract. Stir until the mixture is smooth and all ingredients are well incorporated.
- Coat the Nuts: Add the mixed nuts to the bowl, and toss them thoroughly in the pumpkin spice mixture. Make sure each nut is evenly coated for a consistent flavor.
- Spread the Nuts: Spread the coated nuts in a single layer on the prepared baking sheet. This guarantees that they roast evenly and don’t clump together.
- Roast the Nuts: Place the baking sheet in the preheated oven and let the nuts roast for 15-20 minutes. Stir the nuts halfway through the roasting time to guarantee even cooking and prevent burning.
- Cool and Serve: Once roasted, remove the nuts from the oven and let them cool completely on the baking sheet. As they cool, they’ll become crisp. Serve them in a bowl or store in an airtight container until ready to serve.
Extra Tips:
For an extra kick, consider adding a pinch of cayenne pepper to the spice mix for a subtle heat that complements the sweet and spicy flavors. If you prefer a sweeter snack, increase the amount of brown sugar or maple syrup slightly.
To guarantee that the nuts remain crispy, make sure they’re completely cooled before storing them in an airtight container. You can also experiment with different nut varieties to find the perfect combination that suits your taste. Enjoy these Pumpkin Spice Roasted Nuts as a standalone snack or as a topping for salads and desserts to add a festive touch to your Halloween celebrations.
Ghoulish Guacamole and Chips

Ghoulish Guacamole and Chips is a spooktacular appetizer perfect for any Halloween gathering. This eerie dish combines the classic flavors of guacamole with a festive twist that will delight your guests. The creamy texture of ripe avocados is complemented by the zing of lime and a hint of garlic, all while being served alongside crispy, ghostly-shaped tortilla chips.
Whether you’re hosting a Halloween party or simply want to add a little fright to your night, this dish is sure to be a scream. The fun isn’t just in the taste, but also in the presentation. By using cookie cutters, you can transform regular tortilla chips into ghostly figures, adding an extra layer of Halloween spirit.
The guacamole itself can be presented in a carved-out pumpkin or a skull-shaped bowl for an added creepy effect. This recipe is easy to prepare and will have your guests coming back for more. So, let’s plunge into this deliciously ghoulish appetizer that serves 4-6 people.
Ingredients:
- 4 ripe avocados
- 1 small red onion, finely chopped
- 2 tomatoes, diced
- 1 jalapeño, seeded and minced (optional)
- 3 tablespoons fresh lime juice
- 2 tablespoons fresh cilantro, chopped
- 1 teaspoon garlic powder
- Salt and pepper to taste
- 10-12 large flour tortillas
- Olive oil spray
- Salt for seasoning tortilla chips
Instructions:
- Prepare the Tortilla Chips: Preheat your oven to 350°F (175°C). Using ghost-shaped cookie cutters, cut out as many shapes as possible from the flour tortillas. Arrange the ghostly tortilla shapes on a baking sheet. Lightly spray them with olive oil and sprinkle with a little salt. Bake for 8-10 minutes or until they’re golden and crispy. Set aside to cool.
- Mash the Avocados: Cut the avocados in half, remove the pits, and scoop the flesh into a mixing bowl. Use a fork or potato masher to mash the avocados until you reach your desired consistency, leaving some chunks for texture.
- Mix in the Ingredients: Add the red onion, tomatoes, jalapeño (if using), lime juice, cilantro, and garlic powder to the mashed avocados. Stir everything together until well combined. Season with salt and pepper to taste, adjusting the lime juice if necessary to enhance the flavor.
- Serve: Transfer the guacamole to a festive serving bowl, such as a small carved pumpkin or a skull-shaped dish for Halloween flair. Arrange the ghost-shaped tortilla chips around the bowl for dipping.
Extra Tips:
For an even spookier presentation, consider adding a few black olives as “eyes” on the ghost tortilla chips before baking. You can also add a dash of cayenne pepper to the guacamole if you prefer a bit of extra heat.
If you’re preparing the guacamole ahead of time, cover it tightly with plastic wrap, pressing the wrap directly onto the surface to prevent browning. Enjoy your Ghoulish Guacamole and Chips with a cold Halloween-themed cocktail for a complete adult-friendly treat!
Jack-O’-Lantern Stuffed Peppers
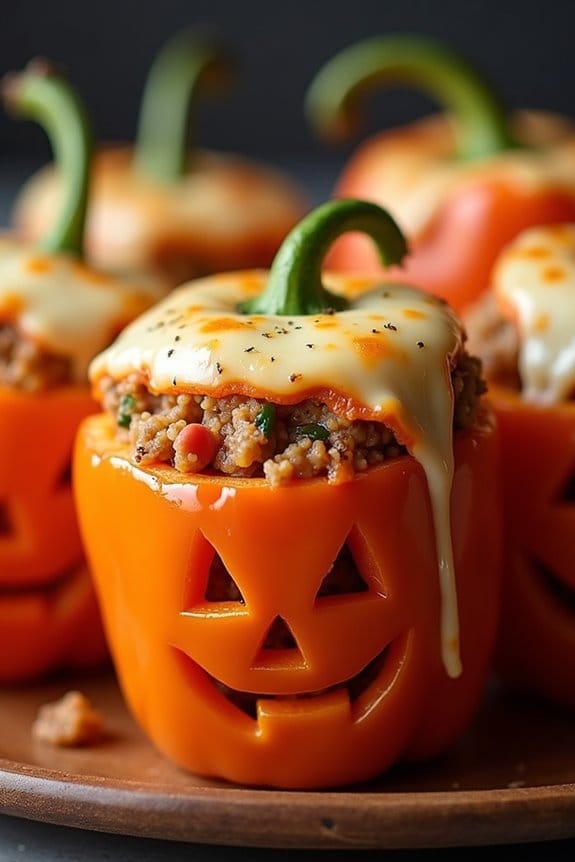
For a fun and festive Halloween appetizer, Jack-O’-Lantern Stuffed Peppers are an ideal choice. These delightful treats not only add a spooky touch to your table but also offer a delicious blend of flavors that adults will love. Stuffed with a savory mixture of ground meat, rice, and vegetables, these peppers are carved to resemble miniature jack-o’-lanterns, providing both a visual and taste sensation.
These stuffed peppers are perfect for a Halloween gathering of 4-6 people, making them a great option for small parties or intimate get-togethers. The recipe is straightforward, guaranteeing that even novice cooks can create an impressive dish. The key to this recipe is balancing the flavors while maintaining the integrity of the carved pepper faces, so your guests can enjoy both the look and taste of these charming appetizers.
Ingredients for 4-6 servings:
- 6 medium orange bell peppers
- 1 pound ground beef or turkey
- 1 cup cooked rice
- 1 onion, finely chopped
- 2 cloves garlic, minced
- 1 cup canned diced tomatoes, drained
- 1 teaspoon Italian seasoning
- Salt and pepper to taste
- 1 cup shredded mozzarella cheese
- 2 tablespoons olive oil
- 1 tablespoon Worcestershire sauce
Cooking Instructions:
- Preheat the Oven: Start by preheating your oven to 375°F (190°C). This guarantees that it reaches the necessary temperature for even cooking once the peppers are ready to be baked.
- Prepare the Peppers: Carefully cut the tops off the bell peppers and remove the seeds and membranes. Using a small paring knife, carve jack-o’-lantern faces into the side of each pepper. Make sure to leave enough uncarved space so the pepper retains its shape during baking.
- Cook the Filling: In a large skillet, heat the olive oil over medium heat. Add the chopped onion and minced garlic, sautéing until fragrant and translucent. Add the ground beef or turkey, cooking until browned. Drain any excess fat before stirring in the diced tomatoes, cooked rice, Italian seasoning, Worcestershire sauce, salt, and pepper. Cook for an additional 5 minutes, allowing the flavors to meld.
- Stuff the Peppers: Fill each carved pepper with the meat and rice mixture, pressing gently to confirm they’re adequately packed. Arrange the stuffed peppers in a baking dish, ensuring they can stand upright.
- Bake the Peppers: Cover the baking dish with aluminum foil and bake in the preheated oven for 25 minutes. Remove the foil, sprinkle each pepper with shredded mozzarella cheese, and return to the oven for another 10-15 minutes, or until the peppers are tender and the cheese is melted and bubbly.
- Serve: Let the peppers cool slightly before serving. These are best enjoyed warm, showcasing both the spooky design and delicious filling.
Extra Tips:
To guarantee the peppers hold their shape, choose ones that have an even base, allowing them to stand upright without tipping over. When carving the jack-o’-lantern faces, keep the designs simple to prevent the peppers from becoming too fragile.
Consider using a mix of ground meats for a more complex flavor, or add some chopped vegetables like zucchini or mushrooms to the filling for added texture and taste. Finally, if you prefer a bit of heat, add a pinch of red pepper flakes to the filling mixture for a spicy kick.
Spider Web Taco Dip
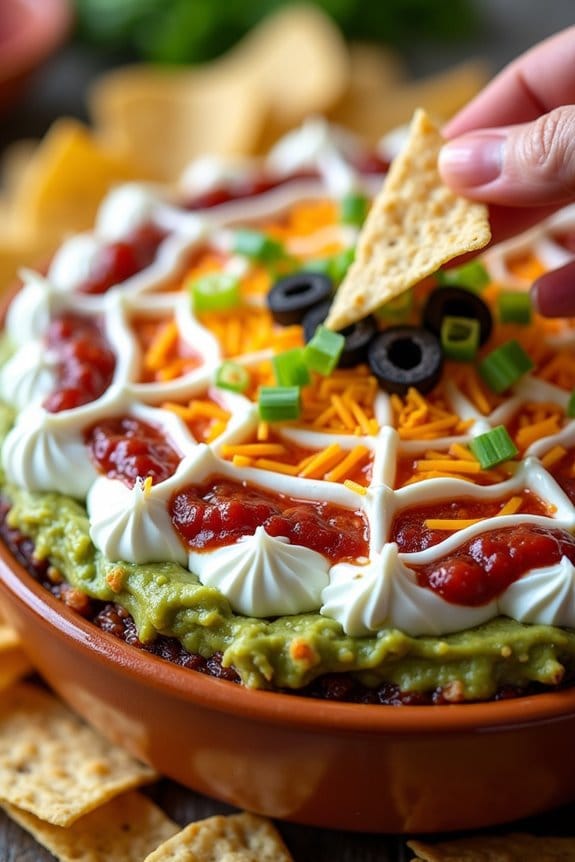
Spider Web Taco Dip is a spooky yet delicious appetizer perfect for any adult Halloween gathering. This dip combines classic Mexican flavors with a festive Halloween twist, making it both attractive and savory. With its layers of creamy, spicy, and cheesy goodness, topped with an artistic sour cream spider web, this dish is sure to impress your guests.
Whether you’re hosting a Halloween party or just looking to enjoy a themed appetizer, this Spider Web Taco Dip is a must-try. This recipe serves 4-6 people and is both easy and quick to prepare. The key to making a memorable Spider Web Taco Dip is in the layering and presentation. By taking time to create each layer with fresh ingredients and then crafting a spooky web design, you’ll create a dish that’s not only visually appealing but also packed with flavor.
So gather your ingredients, and let’s get started on this ghoulishly delightful appetizer!
Ingredients:
- 1 can (15 oz) refried beans
- 1 packet (1 oz) taco seasoning mix
- 1 cup guacamole
- 1 cup sour cream
- 1 1/2 cups salsa
- 1 cup shredded cheddar cheese
- 1/4 cup chopped black olives
- 1/4 cup chopped green onions
- Tortilla chips for serving
Instructions:
- Prepare the Bean Layer: In a medium bowl, mix the refried beans with the taco seasoning until well combined. This will give the beans a zesty flavor that forms the base of your dip.
- Layer the Ingredients: Spread the seasoned beans evenly on the bottom of a shallow serving dish or pie plate. Next, gently spread the guacamole over the bean layer, ensuring it’s evenly distributed. Follow with a layer of salsa.
- Add the Cheese: Sprinkle the shredded cheddar cheese evenly over the salsa layer. The cheese adds a creamy texture and rich flavor that complements the other layers.
- Create the Web Design: Fill a piping bag or a plastic sandwich bag with the sour cream. Snip off a small corner of the bag to create a makeshift piping tool. Carefully pipe a spiral design over the top of the cheese. Use a toothpick or a skewer to drag lines from the center of the spiral outward, creating a web effect.
- Garnish: Sprinkle the chopped black olives and green onions over the top of the dip for added flavor and a pop of color.
- Serve: Arrange tortilla chips around the dip and serve immediately. Encourage guests to scoop up the dip with the chips for a delightful bite.
Extra Tips:
For the best results, use freshly made guacamole and choose a salsa that matches your preferred level of spiciness. If you’re short on time, store-bought versions will work just fine.
Be sure to use a shallow dish to create distinct layers, which will look more appealing when served. If you’re feeling extra creative, add plastic spider decorations around the dish for an added Halloween touch. Just remember to remove them before serving!
Bloody Mary Shrimp Cocktail

Bloody Mary Shrimp Cocktail is a spooky and sophisticated appetizer perfect for an adult Halloween gathering. This dish combines the classic flavors of a Bloody Mary cocktail with a seafood twist, offering a zesty, revitalizing experience that’s perfect for the occasion.
The presentation of this dish is both eerie and elegant, making it an ideal centerpiece for your Halloween spread. The tangy tomato and horseradish sauce complements the succulent shrimp beautifully, while the vodka adds a hint of indulgence that will delight your guests.
This recipe serves 4-6 people and is easy to prepare, making it a great option for those looking to impress without spending hours in the kitchen. The shrimp are poached to perfection and then chilled before being served with the Bloody Mary-inspired cocktail sauce.
Garnished with celery sticks and olives, this appetizer isn’t only delicious but also visually striking. Be prepared for this dish to be a conversation starter as your guests enjoy the unique blend of flavors and the playful nod to the classic cocktail.
Ingredients:
- 1 lb large shrimp, peeled and deveined
- 1 cup tomato juice
- 1/4 cup vodka
- 2 tablespoons lemon juice
- 2 tablespoons Worcestershire sauce
- 1 tablespoon prepared horseradish
- 1 teaspoon hot sauce (adjust to taste)
- Salt and freshly ground black pepper, to taste
- 1 celery stalk, cut into sticks
- Olives, for garnish
Cooking Instructions:
1. Prepare the Shrimp: Begin by bringing a large pot of salted water to a boil. Add the shrimp and cook for about 2-3 minutes, or until they turn pink and are cooked through. Quickly remove the shrimp from the boiling water and transfer them to a bowl of ice water to stop the cooking process.
Once cooled, drain and pat them dry with paper towels.
2. Make the Cocktail Sauce: In a medium bowl, combine the tomato juice, vodka, lemon juice, Worcestershire sauce, horseradish, and hot sauce. Stir well to blend all the ingredients.
Season the sauce with salt and freshly ground black pepper to taste. Adjust the seasoning if necessary, depending on your preference for heat and tanginess.
3. Chill the Ingredients: Cover the cocktail sauce and let it chill in the refrigerator for at least 30 minutes to allow the flavors to meld. Also, keep the shrimp in the refrigerator until you’re ready to serve to ascertain they remain cold and fresh.
4. Assemble the Shrimp Cocktail: To serve, pour the chilled cocktail sauce into individual serving glasses or a large cocktail glass. Arrange the chilled shrimp around the rim of the glasses.
Garnish each with a celery stick and a few olives for a spooky yet sophisticated touch.
Extra Tips:
For a more intense flavor, prepare the cocktail sauce a day in advance and let it chill overnight. This allows the flavors to develop more fully, resulting in a richer taste.
When selecting shrimp, opt for fresh, high-quality shrimp for the best texture and flavor. If you prefer a milder cocktail sauce, reduce the amount of horseradish and hot sauce, or adjust according to your guests’ taste preferences.
Finally, consider experimenting with different garnishes like pickled peppers or a sprig of dill to add an extra layer of flavor and presentation flair.
Monster Meatballs
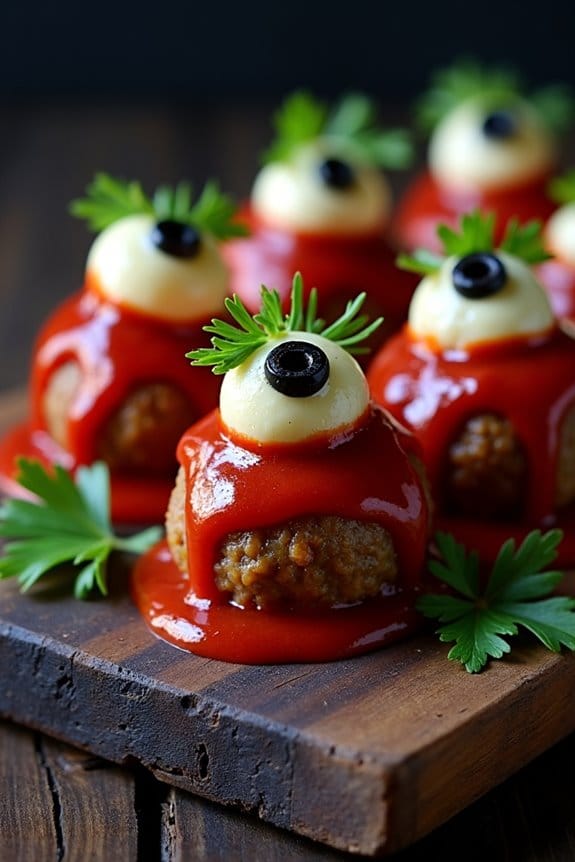
Turn your Halloween gathering into a spooktacular event with these Monster Meatballs. Crafted to bring both flavor and fright to your table, these meatballs aren’t just a feast for the taste buds, but also a visual delight that fits perfectly into the Halloween theme. With a mix of savory spices and a hint of mystery, they’re sure to impress your guests.
These Monster Meatballs are a delightful blend of ground meats, herbs, and spices, and when paired with a spooky sauce and some creative garnishes, they transform into monsters that are almost too cute to eat.
This recipe is designed to serve 4-6 people, making it perfect for an intimate Halloween gathering with friends or family. The meatballs are simple to make, yet incredibly fun to assemble and decorate, allowing you to release your creativity. Whether you’re hosting a costume party or a cozy movie night, these Monster Meatballs will be the star of your appetizer spread.
So, gather your ingredients, roll up your sleeves, and get ready to create a dish that’s both festive and frightfully delicious.
Ingredients:
- 1 pound ground beef
- 1/2 pound ground pork
- 1/2 cup breadcrumbs
- 1/4 cup grated Parmesan cheese
- 1/4 cup milk
- 1 large egg
- 2 cloves garlic, minced
- 1 teaspoon dried oregano
- 1 teaspoon dried basil
- Salt and pepper to taste
- 1 cup marinara sauce
- 24 small mozzarella balls
- Black olives (for eyes)
- Fresh parsley (for decoration)
- Toothpicks
Instructions:
- Preheat the Oven: Preheat your oven to 375°F (190°C). This will guarantee that the meatballs cook evenly and thoroughly.
- Combine Ingredients: In a large bowl, combine the ground beef, ground pork, breadcrumbs, Parmesan cheese, milk, egg, minced garlic, oregano, basil, salt, and pepper. Mix everything together until well combined, but be careful not to overwork the meat, as this can make the meatballs tough.
- Form Meatballs: Roll the meat mixture into golf ball-sized balls, approximately 1 1/2 inches in diameter. You should end up with about 24 meatballs. Place them on a baking sheet lined with parchment paper or a lightly greased baking dish.
- Bake the Meatballs: Place the baking sheet in the preheated oven and bake for about 20-25 minutes, or until the meatballs are browned and cooked through. The internal temperature should reach 160°F (71°C).
- Prepare the Sauce: While the meatballs are baking, heat the marinara sauce in a saucepan over medium heat until it begins to simmer. This will be used to coat the meatballs later.
- Assemble the Monster Meatballs: Once the meatballs are cooked, remove them from the oven and allow them to cool slightly. Insert a toothpick into each meatball to attach a mozzarella ball on top, resembling a monster’s head. Use small pieces of black olives to create eyes on the mozzarella balls.
- Finishing Touches: Carefully spoon some warm marinara sauce over each meatball to give them a “bloody” appearance. Garnish with fresh parsley to mimic hair or any other monster features you desire.
Extra Tips:
To make your Monster Meatballs extra spooky and fun, consider using food coloring to tint the mozzarella balls for a more eerie look. You can also use various edible garnishes such as pimento-stuffed olives or bell pepper strips to add different facial features and expressions to your monsters.
If you’re preparing these in advance, you can keep the meatballs warm in a slow cooker with marinara sauce until ready to serve. Just be sure to add the mozzarella eyes and final touches shortly before serving to guarantee they look their best.
Creepy Caprese Skewers

Halloween is a time to embrace the eerie and the spooky, and what better way to do so than with a dish that’s both delicious and delightfully creepy? Creepy Caprese Skewers are the perfect appetizer for adult Halloween gatherings. They combine the classic flavors of a Caprese salad with a fun twist, making them an intriguing and tasty treat.
The spooky presentation of these skewers is sure to impress your guests, while the combination of fresh ingredients will have them coming back for more. These skewers are a great way to start any Halloween party on a high note. They’re easy to prepare, require minimal cooking, and can be made ahead of time, allowing you to spend more time enjoying the festivities.
The key to these skewers is the presentation—by using mozzarella balls, cherry tomatoes, and basil leaves, you can create a dish that resembles eyeballs on a stick. This creative touch not only adds to the Halloween theme but also makes for a fun conversation starter.
Ingredients for 4-6 servings:
- 12 cherry tomatoes
- 12 mozzarella balls (bocconcini)
- 12 fresh basil leaves
- 1/4 cup balsamic glaze
- 2 tablespoons olive oil
- Salt and pepper to taste
- 12 wooden skewers or toothpicks
Cooking Instructions:
- Prepare the Ingredients: Rinse the cherry tomatoes and fresh basil leaves under cold water and pat them dry with a paper towel. Drain the mozzarella balls from their liquid and set them aside.
- Assemble the Skewers: Take a wooden skewer or toothpick and begin by threading a cherry tomato onto it. Follow this with a fresh basil leaf and then a mozzarella ball. Repeat the process until each skewer has a cherry tomato, basil leaf, and mozzarella ball. Arrange the skewers on a serving platter.
- Season the Skewers: Lightly drizzle olive oil over the assembled skewers. Season them with salt and pepper to taste. This step enhances the flavors of the ingredients, bringing out the freshness of the basil and the creaminess of the mozzarella.
- Add the Creepy Touch: Drizzle balsamic glaze over the skewers. The dark color of the glaze gives the dish a slightly spooky appearance, perfect for Halloween. It also adds a sweet and tangy flavor that complements the other ingredients.
- Chill Before Serving: Place the completed skewers in the refrigerator for at least 15 minutes before serving. Chilling helps the flavors meld together and allows the mozzarella to firm up slightly, making the skewers easier to handle.
Extra Tips: When preparing Creepy Caprese Skewers, be sure to use fresh, high-quality ingredients for the best flavor. If you want to add a little more spookiness, consider using colored toothpicks or skewers that match your Halloween theme.
You can also experiment by using other herbs, like oregano or mint, to add a different flavor profile to the skewers. Finally, if balsamic glaze is unavailable, you can make your own by reducing balsamic vinegar in a saucepan until it thickens.
These simple tweaks can elevate the presentation and taste of your Halloween appetizer, making it even more memorable for your guests.
Haunted Hummus Platter

The Haunted Hummus Platter is a spooktacular addition to your Halloween appetizer lineup, delighting adults with its eerie appearance and delicious flavors. This platter transforms a classic Mediterranean dip into a ghostly gathering of flavors and textures, making it perfect for a Halloween party. The creamy hummus serves as the base of the dish, while an assortment of ghoulish garnishes turns it into a festive and frightfully fun centerpiece for your table.
Whether your guests are vampire fans or ghost enthusiasts, they’ll be enchanted by this deliciously decorated dish. Visual appeal is just as important as taste when it comes to themed dishes, and the Haunted Hummus Platter doesn’t disappoint. By using a variety of vegetables, olives, and creative garnishes, you can craft a platter that not only tastes great but also embodies the spooky spirit of Halloween.
The key is to mix and match colors, shapes, and textures to create a scene straight out of a haunted house. This dish isn’t only a conversation starter but also a healthy option, providing a burst of flavor without the typical sugar overload of Halloween treats.
Ingredients (serves 4-6):
- 2 cups of plain hummus
- 1/4 cup black olives
- 1/4 cup green olives
- 1 small cucumber
- 1 red bell pepper
- 1 yellow bell pepper
- 1 small carrot
- 1 tablespoon olive oil
- 1/2 teaspoon smoked paprika
- 1 tablespoon pumpkin seeds
- Fresh parsley leaves for garnish
- Pita chips or veggie sticks for serving
Cooking Instructions:
- Prepare the Base: Start by spreading the plain hummus evenly onto a large, round serving platter. Use a spoon or spatula to create a smooth, even layer that covers the entire surface.
- Create a Ghostly Scene: Slice the cucumber into rounds and arrange them around the edge of the hummus to form an eerie border. Slice the red and yellow bell peppers into thin strips to create “flames” or “tentacles” emerging from the hummus.
- Add Spooky Features: Cut the black olives in half and place them strategically on the hummus to represent eyes or spooky creatures lurking within. Use the green olives as additional eerie elements, slicing them into rings for a sinister effect.
- Carrot Fingers: Peel the carrot and cut it into small, thin sticks. Arrange them on the hummus to resemble creepy fingers or bones.
- Finish with Seasoning: Drizzle olive oil over the hummus for a silky sheen. Sprinkle smoked paprika over the top to add a pop of color and a hint of smoky flavor.
- Add Crunch and Color: Scatter pumpkin seeds across the platter for a crunchy texture and a nod to Halloween’s favorite gourd. Garnish with fresh parsley leaves to add a pop of green and freshness.
- Serve: Arrange pita chips or veggie sticks around the platter for dipping, ensuring that your guests have plenty of options to enjoy with the hummus.
Extra Tips:
When crafting your Haunted Hummus Platter, feel free to get creative with the garnishes. You can use different colored peppers or other vegetables, like cherry tomatoes or radishes, to add variety and interest to your scene.
If you want to add a bit more flavor to your hummus, consider mixing in roasted garlic or lemon juice before spreading it onto the platter. Remember, the goal is to have fun and make a dish that’s both visually exciting and deliciously satisfying.
Sinister Sausage Rolls

Sinister Sausage Rolls are the perfect Halloween appetizer for adults, offering a spooky twist on a classic dish. These creepy, yet delicious, sausage rolls are sure to be a hit at any Halloween gathering, providing a savory bite that pairs well with any themed drink. The secret to their sinister appearance lies in the creative use of puff pastry and a few strategic cuts that transform ordinary sausage rolls into eerie, finger-like pieces.
The recipe is simple yet effective, guaranteeing your guests are both impressed and slightly unsettled by the ghoulish presentation. The flavors are rich and satisfying, with a hint of spice that warms the palate. Ideal for a serving size of 4-6 people, these Sinister Sausage Rolls combine the flaky goodness of pastry with the hearty taste of seasoned sausage, making them an irresistible addition to your Halloween spread.
Ingredients for 4-6 people:
- 1 package of puff pastry sheets (thawed)
- 1 pound of ground sausage (pork or chicken)
- 1 small onion, finely chopped
- 2 cloves of garlic, minced
- 1 tablespoon of Worcestershire sauce
- 1 teaspoon of dried sage
- 1 teaspoon of smoked paprika
- Salt and pepper to taste
- 1 egg, beaten (for egg wash)
- Black sesame seeds (optional, for decoration)
- Ketchup or mustard (for serving)
Cooking Instructions:
- Preheat and Prepare: Preheat your oven to 400°F (200°C) and line a baking sheet with parchment paper. This will prevent the sausage rolls from sticking and make for easy cleanup.
- Make the Sausage Filling: In a large bowl, combine the ground sausage, finely chopped onion, minced garlic, Worcestershire sauce, dried sage, smoked paprika, salt, and pepper. Mix until all ingredients are well incorporated. This mixture will serve as the savory filling for the rolls.
- Roll the Pastry: Roll out the thawed puff pastry sheets on a lightly floured surface until they’re smooth and even. Cut the pastry into strips that are approximately 4 inches wide.
- Assemble the Rolls: Place a portion of the sausage mixture onto each strip of pastry, shaping it into a log. Carefully roll the pastry around the sausage, sealing the edges with a bit of water to guarantee they stay intact during baking.
- Create the Sinister Look: Use a sharp knife to make small cuts on the top of each roll to create a “knuckle” effect. This will give the appearance of fingers. Optionally, press black sesame seeds into the rolls to simulate fingernails.
- Egg Wash and Bake: Brush each roll with the beaten egg to give them a golden, glossy finish. Place the rolls on the prepared baking sheet and bake in the preheated oven for 20-25 minutes, or until the pastry is puffed and golden brown.
- Serve and Enjoy: Once baked, allow the rolls to cool slightly before serving. Arrange them on a platter with ketchup or mustard for dipping, enhancing their spooky finger-like appearance.
Extra Tips:
To enhance the creepy factor of your Sinister Sausage Rolls, consider using a small amount of red food coloring to highlight the “knuckles” and “nails.” This can be done by lightly brushing the coloring into the cuts before baking.
If you want to add a bit of heat, consider incorporating a pinch of cayenne pepper into the sausage mixture. For a vegetarian option, substitute the ground sausage with a plant-based sausage alternative.
Serve these at your Halloween party and watch your guests marvel at both the taste and presentation of these eerie delights!
