

Halloween is the perfect time to let your creativity shine in the kitchen. Transform your appetizers into a feast of frightful delights that will leave your guests in awe. Witch’s finger breadsticks and spooky spider deviled eggs are sure to add a touch of eerie elegance to your spread. Pair them with ghostly guacamole and mummy jalapeño poppers for a hauntingly delicious table. Get ready for an unforgettable celebration filled with eerily appetizing treats!
Witch’s Finger Breadsticks

Witch’s Finger Breadsticks are a spooky and delightful appetizer perfect for Halloween gatherings. These eerie breadsticks resemble creepy witch fingers, complete with almond fingernails and a hint of garlic flavor. They aren’t only visually striking but also delicious, making them a hit at any Halloween party.
The breadsticks are crispy on the outside but soft and chewy on the inside, offering a perfect contrast in textures. The dough is easy to make and can be flavored with a variety of herbs and spices to suit your taste. Once shaped into finger-like forms, a blanched almond is pressed onto each tip to mimic a fingernail, enhancing the ghoulish appearance.
Served with a side of marinara or your favorite dipping sauce, these Witch’s Finger Breadsticks are sure to become a Halloween staple.
Ingredients (Serves 4-6):
- 1 cup warm water (about 110°F)
- 2 1/4 teaspoons active dry yeast
- 2 1/2 cups all-purpose flour
- 1 tablespoon sugar
- 1 teaspoon salt
- 2 tablespoons olive oil
- 1 tablespoon garlic powder
- 1/2 teaspoon dried oregano
- 1/2 teaspoon dried basil
- 18-24 blanched almonds
- 2 tablespoons melted butter
- Marinara sauce (for dipping)
Cooking Instructions:
- Prepare the Dough: In a large mixing bowl, combine the warm water and sugar. Sprinkle the yeast over the water and let it sit for about 5 minutes, or until it becomes frothy. This indicates that the yeast is active.
- Mix the Ingredients: Add the flour, salt, olive oil, garlic powder, oregano, and basil to the yeast mixture. Stir until a dough begins to form.
- Knead the Dough: Transfer the dough to a lightly floured surface and knead it for about 8-10 minutes, or until it becomes smooth and elastic. If the dough is too sticky, add a little more flour as needed.
- Let the Dough Rise: Place the dough in a lightly oiled bowl, cover it with a clean kitchen towel, and let it rise in a warm area for about 1 hour, or until it has doubled in size.
- Shape the Breadsticks: Punch down the risen dough and divide it into 18-24 equal pieces. Roll each piece into a finger-like shape, about 4-5 inches long. Press a blanched almond into the tip of each breadstick to form a fingernail.
- Second Rise: Place the shaped breadsticks on a baking sheet lined with parchment paper. Cover them with a towel and let them rise for an additional 20-30 minutes.
- Bake the Breadsticks: Preheat your oven to 375°F (190°C). Brush the breadsticks with melted butter and bake for 15-20 minutes, or until they’re golden brown and cooked through.
- Serve: Remove the breadsticks from the oven and let them cool slightly before serving. Serve them with a side of marinara sauce for dipping.
Extra Tips:
For an even creepier look, you can use a small knife to make slits on the breadsticks to resemble knuckles. If you want to add a bit more flavor, consider sprinkling the breadsticks with parmesan cheese before baking.
Make sure the almonds are securely pressed into the dough so they stay in place during baking. If you’re short on time, you can use store-bought pizza dough as a shortcut. Enjoy these spooky treats as part of your Halloween festivities!
Spooky Spider Deviled Eggs
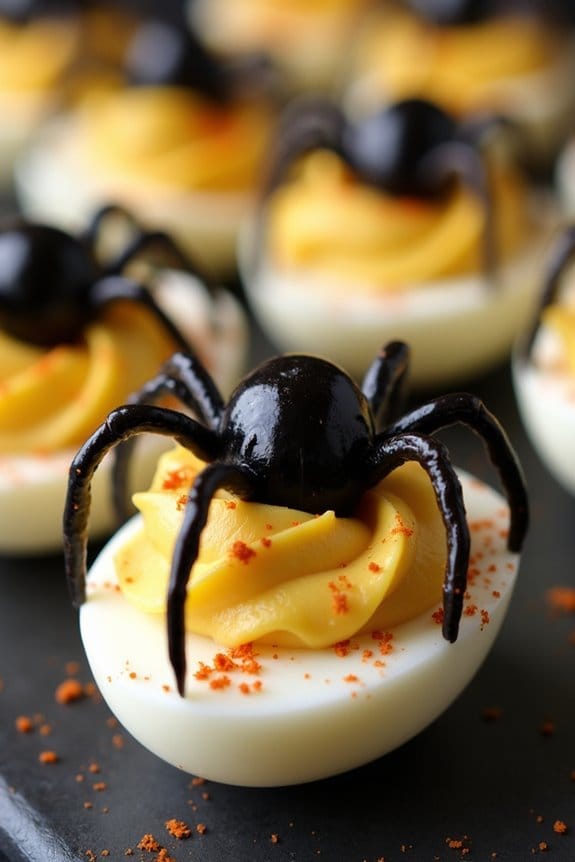
Halloween is the perfect time to get creative with your appetizers, and Spooky Spider Deviled Eggs are sure to be a hit at any festive gathering. These eerie yet delicious treats combine the classic flavors of traditional deviled eggs with a fun, creepy twist that will delight both kids and adults. The addition of black olives transforms these eggs into a spooky spectacle that fits perfectly into any Halloween spread.
Not only are Spooky Spider Deviled Eggs visually appealing, but they’re also incredibly easy to make. The creamy yolk mixture is perfectly balanced with hints of mustard, mayonnaise, and a touch of paprika, giving it a familiar yet flavorful taste. The olives that sit atop each egg are cleverly crafted to resemble spiders, adding to the playful and spooky theme.
Whether you’re hosting a Halloween party or just looking to add some fun to your appetizer menu, these deviled eggs are a must-try.
Ingredients for 4-6 people:
- 6 large eggs
- 1/4 cup mayonnaise
- 1 teaspoon Dijon mustard
- 1/4 teaspoon salt
- 1/8 teaspoon black pepper
- 1/4 teaspoon paprika (plus extra for garnish)
- 12 whole black olives
Cooking Instructions:
- Boil the Eggs: Place the eggs in a saucepan and cover them with water. Bring the water to a boil over medium-high heat. Once boiling, cover the pan, remove it from heat, and let the eggs sit for 12 minutes.
- Cool and Peel: After 12 minutes, transfer the eggs to a bowl of ice water to cool for about 5 minutes. Once cooled, gently peel the eggs under running water to help remove any remaining shell.
- Prepare the Yolks: Cut each egg in half lengthwise and carefully remove the yolks. Place the yolks in a mixing bowl and set the whites aside on a serving platter.
- Make the Filling: Mash the egg yolks with a fork until smooth. Add mayonnaise, Dijon mustard, salt, black pepper, and paprika. Mix until the filling is creamy and well combined.
- Fill the Egg Whites: Spoon or pipe the yolk mixture back into the egg white halves, filling them generously.
- Create the Spiders: Cut the black olives in half. Use one half as the spider’s body, and slice the other half into thin strips for the legs. Arrange the olive pieces on top of the filled eggs to resemble a spider.
- Garnish: Lightly sprinkle extra paprika over the top of the deviled eggs for a dash of color and flavor.
Extra Tips:
When boiling the eggs, adding a tablespoon of vinegar to the water can help prevent the eggs from cracking. If you want a smoother yolk mixture, consider using a food processor to blend the ingredients.
To prevent the eggs from sliding on the platter, you can slice a small piece off the bottom of each egg white to create a flat base. Always use fresh olives to guarantee the best taste and appearance for your spooky spiders.
Ghostly Guacamole Dip
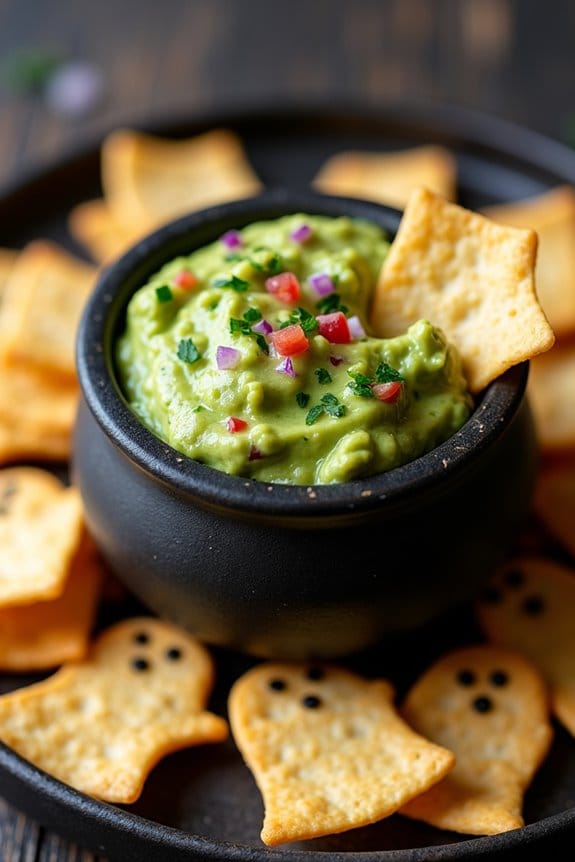
Spice up your Halloween party with a spooky twist on a classic favorite: Ghostly Guacamole Dip. This eerie appetizer combines the rich, creamy flavors of traditional guacamole with a haunting presentation sure to thrill your guests. The key to this dish is the playful use of ghost-shaped tortilla chips, which add a festive and fun element to the dip. Perfect for a gathering of 4-6 people, this recipe is both simple to prepare and a guaranteed crowd-pleaser.
The Ghostly Guacamole Dip isn’t just about the taste; it’s about setting the mood for your Halloween celebration. The dip itself is made with ripe avocados, tangy lime juice, and a hint of jalapeño for a subtle kick. When paired with the ghost-shaped chips, it becomes a centerpiece that invites everyone to dig in. Whether you’re hosting a full-scale costume party or a casual get-together, this appetizer is the perfect way to start the night on a deliciously spooky note.
Ingredients for 4-6 people:
- 3 ripe avocados
- 1 lime, juiced
- 1 small red onion, finely chopped
- 1 jalapeño, seeded and minced
- 2 roma tomatoes, diced
- 2 cloves garlic, minced
- 1/4 cup fresh cilantro, chopped
- Salt and pepper to taste
- Ghost-shaped tortilla chips (store-bought or homemade)
Cooking Instructions:
- Prepare the Avocados: Cut the avocados in half, remove the pit, and scoop the flesh into a mixing bowl. Use a fork or potato masher to mash the avocados to your desired consistency. If you like a chunkier guacamole, leave some pieces unmashed.
- Add Lime Juice: Immediately add the lime juice to the mashed avocados to prevent browning and to give the guacamole a fresh, tangy flavor.
- Mix in Vegetables: Add the finely chopped red onion, minced jalapeño, diced tomatoes, and minced garlic to the avocado mixture. Stir well to combine all ingredients evenly.
- Season and Garnish: Stir in the chopped cilantro, and season the guacamole with salt and pepper to taste. Adjust the seasoning according to your preference.
- Serve with Chips: Transfer the guacamole to a serving bowl and surround it with ghost-shaped tortilla chips. Arrange the chips in a way that makes them look like they’re floating on top of the guacamole.
Extra Tips:
For an extra festive touch, consider using a small pumpkin or cauldron as a serving bowl for the guacamole to enhance the Halloween theme.
If making your own ghost-shaped tortilla chips, use a cookie cutter to create shapes from flour tortillas, then bake them in the oven until crisp. This gives you control over the size and thickness of the chips, ensuring they pair perfectly with the dip.
Finally, if you’re preparing the guacamole ahead of time, press a piece of plastic wrap directly onto the surface to minimize air exposure and keep it fresh until serving.
Mummy Jalapeño Poppers

Create a spooky and delicious appetizer with these Mummy Jalapeño Poppers. Perfect for your Halloween party, these poppers aren’t only visually fun but also pack a flavorful punch. The combination of spicy jalapeños, creamy cheese filling, and a crispy, golden crescent roll wrap makes them irresistible.
Spice up your Halloween with these fun and tasty Mummy Jalapeño Poppers, a sure crowd-pleaser!
Serve them as a starter or a delightful snack that will have your guests coming back for more. These Mummy Jalapeño Poppers are designed to serve 4-6 people, making them a great addition to your Halloween festivities. The preparation is simple, yet the results are impressive, ensuring that your poppers will be the talk of the party.
With just a few ingredients and steps, you can whip up this crowd-pleaser in no time.
Ingredients:
- 12 fresh jalapeño peppers
- 8 ounces cream cheese, softened
- 1 cup shredded cheddar cheese
- 1 teaspoon garlic powder
- 1 teaspoon onion powder
- 1 can refrigerated crescent roll dough
- 24 small candy eyeballs (optional)
- Salt and pepper to taste
Cooking Instructions:
- Prepare the Jalapeños: Begin by washing the jalapeños thoroughly. Slice each jalapeño in half lengthwise and remove the seeds and membranes to reduce the heat. Set them aside.
- Make the Cheese Filling: In a medium-sized bowl, combine the cream cheese, shredded cheddar cheese, garlic powder, onion powder, salt, and pepper. Mix until smooth and well-blended.
- Fill the Jalapeños: Using a spoon, fill each jalapeño half with the cheese mixture, ensuring it’s evenly distributed.
- Wrap with Dough: Unroll the crescent roll dough and slice it into thin strips. Carefully wrap each filled jalapeño half with the dough strips, leaving a small space for the eyes if using. This will give them the appearance of mummies.
- Bake the Poppers: Preheat your oven to 375°F (190°C). Place the wrapped jalapeños on a baking sheet lined with parchment paper. Bake for 12-15 minutes or until the dough is golden brown and crispy.
- Add the Eyes: If using candy eyeballs, press two into the dough of each jalapeño popper while they’re still warm to give them a spooky mummy look.
- Serve: Allow the poppers to cool slightly before serving. They’re best enjoyed warm.
Extra Tips:
For a milder version, consider using mini sweet peppers instead of jalapeños. To make the dish even spookier, you can use black olives cut into small circles as an alternative to candy eyeballs.
If you prefer a more pronounced spice, leave some of the jalapeño seeds in the filling. Remember to handle jalapeños carefully and wash your hands thoroughly after touching them to avoid irritation.
These poppers can be prepared in advance and stored in the refrigerator, then baked just before serving for maximum freshness.
Pumpkin-Shaped Cheese Ball

Create a spooktacular appetizer with this Pumpkin-Shaped Cheese Ball, perfect for your Halloween gathering! This delightful dish combines creamy cheeses with a medley of spices, all shaped into a festive pumpkin that’s sure to impress your guests. Not only is it visually appealing, but the combination of flavors will leave everyone craving for more.
Whether you’re hosting a Halloween party or just looking for a fun, seasonal dish to enjoy, this cheese ball is a must-try. The Pumpkin-Shaped Cheese Ball isn’t only delicious but also easy to prepare. With a few simple ingredients, you can whip up this appetizer in no time.
This recipe serves 4-6 people, making it ideal for small gatherings or as part of a larger spread. The cheesy, savory goodness paired with crackers or fresh veggies will make it a standout addition to your Halloween menu.
Ingredients (serving size: 4-6 people):
- 8 ounces cream cheese, softened
- 2 cups shredded sharp cheddar cheese
- 1 teaspoon garlic powder
- 1 teaspoon onion powder
- 1/2 teaspoon smoked paprika
- 1/2 teaspoon salt
- 1/4 teaspoon black pepper
- 1/4 cup chopped green onions
- 1/4 cup chopped pecans
- 1 small bell pepper stem (for decoration)
- Crackers or veggies for serving
Instructions:
- Prepare the Cheese Mixture: In a large mixing bowl, combine the softened cream cheese, shredded cheddar cheese, garlic powder, onion powder, smoked paprika, salt, and black pepper. Mix thoroughly until all ingredients are well incorporated and the mixture is smooth.
- Shape the Cheese Ball: Once the mixture is ready, transfer it onto a piece of plastic wrap. Use the wrap to help shape the cheese into a ball. For a pumpkin-like appearance, gently press your fingers around the sides to create ridges.
- Chill the Cheese Ball: Wrap the shaped cheese ball tightly with the plastic wrap and refrigerate for at least 2 hours. This will help it firm up and hold its shape better when serving.
- Coat the Cheese Ball: After chilling, remove the cheese ball from the refrigerator and unwrap it. Roll it in the chopped pecans and green onions, pressing gently to guarantee they adhere to the surface.
- Decorate and Serve: Insert the bell pepper stem on top of the cheese ball to resemble a pumpkin stem. Place the cheese ball on a serving platter surrounded by crackers or vegetables of your choice.
Extra Tips: When shaping the cheese ball, it helps to use slightly damp hands to prevent sticking. If you prefer a stronger flavor, you can add a pinch of cayenne pepper to the cheese mixture for an extra kick.
Additionally, the cheese ball can be made a day in advance and stored in the refrigerator; just wait to add the pecans and green onions until just before serving to maintain their fresh crunch. Enjoy your Halloween appetizer with a touch of festive flair!
Creepy Eyeball Caprese

Creepy Eyeball Caprese is the perfect Halloween appetizer that combines the classic flavors of a Caprese salad with a spooky twist. This dish isn’t only delicious but also fun and festive, making it an ideal addition to your Halloween party menu. The combination of fresh mozzarella, ripe tomatoes, and basil leaves, dressed with olive oil and balsamic glaze, creates a revitalizing taste that will delight your guests.
However, it’s the eerie appearance of the “eyeballs” that truly makes this dish stand out. The dish involves crafting mozzarella balls to look like creepy eyeballs, with the help of sliced black olives and a touch of red food coloring for added eeriness. This recipe is quick to prepare and requires minimal cooking, allowing you to spend more time enjoying the party.
With a serving size suitable for 4-6 people, Creepy Eyeball Caprese will surely be a hit among your friends and family, providing both flavor and fright in every bite.
Ingredients for 4-6 people:
- 12 small fresh mozzarella balls (bocconcini)
- 12 cherry tomatoes
- 12 fresh basil leaves
- 6 large black olives
- 2 tablespoons extra-virgin olive oil
- 1 tablespoon balsamic glaze
- Red food coloring
- Salt and pepper to taste
Cooking Instructions:
- Prepare the Mozzarella Eyeballs: Begin by slicing the black olives into thin rings. Each mozzarella ball will require one olive ring. Set the olive rings aside for later use.
- Assemble the Eyeballs: Take a small mozzarella ball and gently press an olive ring onto the center, creating the appearance of an iris. To give the mozzarella an eerie, bloodshot look, dip a toothpick into red food coloring and carefully draw thin lines radiating out from the olive ring.
- Prepare the Tomatoes: Slice the tops off the cherry tomatoes and scoop out a small portion of the insides to create a hollow space. Then, place a basil leaf inside each tomato, allowing some of the leaf to protrude slightly.
- Combine the Components: Place each prepared mozzarella “eyeball” into the hollowed cherry tomatoes, with the decorated side facing up. The mozzarella should fit snugly within the tomato.
- Plate and Dress the Caprese: Arrange the creepy eyeball caprese on a serving platter. Drizzle the olive oil and balsamic glaze over the top, and sprinkle with salt and pepper to taste.
- Finalize the Presentation: For an added spooky effect, you can garnish the plate with additional basil leaves or drizzle more red food coloring around the platter to resemble blood.
Extra Tips:
When making Creepy Eyeball Caprese, it’s best to use fresh, high-quality ingredients to guarantee the best flavor. If you find that the mozzarella balls are too large to fit into the cherry tomatoes, you can slice a small portion off the bottom of each mozzarella ball to help them fit more securely.
Additionally, if you need to prepare this dish ahead of time, you can assemble the mozzarella “eyeballs” and store them in the refrigerator until you’re ready to serve. Just make sure to add the olive oil, balsamic glaze, and final garnishes right before serving to keep everything fresh and vibrant.
Bloody Mary Shrimp Shooters

Bloody Mary Shrimp Shooters are a frightfully fun appetizer perfect for your Halloween gathering. These spicy and zesty shooters combine the classic flavors of a Bloody Mary cocktail with succulent shrimp, creating a tantalizing treat that will delight your guests.
Spooky and spicy, these shrimp shooters are a Halloween hit.
Served in shot glasses, these shooters aren’t only delicious but also make for a visually striking presentation, adding a spooky yet sophisticated touch to your festivities.
Ideal for serving 4-6 people, Bloody Mary Shrimp Shooters are easy to prepare and can be made ahead of time, allowing you to enjoy your Halloween party without being stuck in the kitchen. The combination of savory flavors with a hint of heat makes these shooters a crowd-pleaser that pairs wonderfully with other Halloween-themed appetizers.
Whether you’re hosting a full-blown costume party or an intimate gathering, these shooters are sure to impress.
Ingredients:
- 1 pound large shrimp, peeled and deveined
- 1 cup tomato juice
- 1 tablespoon horseradish
- 1 tablespoon Worcestershire sauce
- 1 tablespoon freshly squeezed lemon juice
- 1 teaspoon hot sauce (adjust to taste)
- 1/2 teaspoon celery salt
- 1/4 teaspoon black pepper
- Celery stalks for garnish
- Lemon wedges for garnish
- 4-6 shot glasses
Cooking Instructions:
1. Prepare the Shrimp:
Fill a pot with water and bring it to a boil. Add the shrimp and cook for 2-3 minutes until they’re pink and opaque. Remove the shrimp using a slotted spoon and place them in a bowl of ice water to stop the cooking process.
Once cooled, drain the shrimp and pat them dry with paper towels.
2. Make the Bloody Mary Mixture:
In a large bowl, combine the tomato juice, horseradish, Worcestershire sauce, lemon juice, hot sauce, celery salt, and black pepper. Whisk the ingredients together until they’re well combined.
Adjust the seasoning to taste, adding more hot sauce or lemon juice if desired.
3. Assemble the Shooters:
Pour the Bloody Mary mixture evenly into each shot glass, filling them about 3/4 full. Skewer one or two shrimp on a cocktail stick and place them in the glass so they rest on the rim.
Garnish each shooter with a small celery stalk and a wedge of lemon.
4. Chill and Serve:
Refrigerate the shooters for at least 30 minutes before serving to allow the flavors to meld. Serve chilled, encouraging guests to squeeze the lemon over the shrimp before enjoying.
Extra Tips:
To enhance the flavors, consider preparing the Bloody Mary mixture a day in advance and keeping it refrigerated, allowing the spices to infuse fully.
When selecting shrimp, opt for fresh or high-quality frozen varieties for the best taste and texture. For a more dramatic presentation, rim the shot glasses with celery salt before pouring in the Bloody Mary mixture.
Adjust the spiciness according to your guests’ preferences, adding more hot sauce for those who enjoy an extra kick.
Monster Meatball Sliders

Get ready to spook your taste buds with these frightfully delicious Monster Meatball Sliders! Perfect for a Halloween party or a fun family dinner, these sliders combine juicy meatballs, zesty marinara sauce, and gooey melted cheese all nestled in a soft slider bun.
The presentation is sure to add a touch of whimsy to your Halloween spread, with each slider topped with olive “eyes” that will make your guests giggle with glee. These sliders aren’t only fun to look at but are also easy to make, allowing you to spend more time enjoying the festivities and less time in the kitchen.
Whether you’re hosting a gathering or simply want to enjoy a spooky meal, these Monster Meatball Sliders are a crowd-pleaser. Each bite offers a perfect harmony of flavors and textures, from the savory meatballs to the slightly sweet marinara and the creamy cheese.
This dish serves 4-6 people, making it ideal for a small crowd. Gather your ingredients, put on your chef’s hat, and let’s get cooking!
Ingredients (Serves 4-6):
- 1 pound ground beef
- 1/2 cup bread crumbs
- 1/4 cup grated Parmesan cheese
- 1 egg
- 2 cloves garlic, minced
- 1 teaspoon Italian seasoning
- Salt and pepper to taste
- 1 cup marinara sauce
- 6 slider buns
- 6 slices mozzarella cheese
- 12 black olives
- Toothpicks
Cooking Instructions:
- Prepare the Meatballs: In a large mixing bowl, combine the ground beef, bread crumbs, Parmesan cheese, egg, minced garlic, Italian seasoning, salt, and pepper. Mix well until all ingredients are fully incorporated.
- Shape the Meatballs: Roll the mixture into 12 equal-sized balls, about 1 inch in diameter. Place the meatballs on a baking sheet lined with parchment paper.
- Cook the Meatballs: Preheat your oven to 375°F (190°C). Bake the meatballs for 20-25 minutes or until they’re cooked through and browned on the outside.
- Warm the Marinara Sauce: While the meatballs are baking, heat the marinara sauce in a small saucepan over medium heat until warm. Stir occasionally to prevent sticking.
- Assemble the Sliders: Once the meatballs are cooked, slice the slider buns in half and place them on a serving platter. Add a spoonful of marinara sauce to the bottom half of each bun.
- Add Cheese and Meatballs: Place a slice of mozzarella cheese on top of the marinara sauce, followed by two meatballs per slider. The heat from the meatballs will help melt the cheese slightly.
- Create the Monster Eyes: Cut the black olives in half. Use a toothpick to secure two olive halves on top of each slider to create “eyes.”
- Finish and Serve: Place the top half of the bun onto each slider, press gently, and serve immediately while warm.
Extra Tips:
To guarantee your meatballs are juicy and flavorful, avoid over-mixing the ingredients, as it can make the meatballs dense.
If you’re short on time, you can use store-bought meatballs and marinara sauce to speed up the process. For added flavor, consider toasting the slider buns before assembling.
Finally, feel free to customize the sliders with additional toppings such as fresh basil or crushed red pepper for a spicy kick!
Bat Wings With Vampire Dip

Get ready to impress your Halloween party guests with this spooky and delicious appetizer: Bat Wings With Vampire Dip. This dish combines crispy, flavorful chicken wings with a creamy, garlicky dip that’s sure to disappear before the witching hour.
Impress your guests with crispy bat wings and a creamy vampire dip this Halloween!
The “bat wings” are simply chicken wings coated in dark spices to give them a dark, eerie appearance, while the “vampire dip” is a tangy, zesty sauce that pairs perfectly with the wings. Not only is this dish a visual treat, but it’s also a mouthwatering delight that will have everyone coming back for more.
Perfect for a gathering of 4-6 people, this recipe is easy to prepare and will set the tone for your Halloween festivities. The bat wings are seasoned with a blend of spices that infuse them with bold flavor, while the dip is made with sour cream, cream cheese, and garlic to give it a rich, savory taste.
Whether you’re hosting a full-on Halloween bash or just enjoying a themed dinner with family, these Bat Wings With Vampire Dip are sure to be a hit.
Ingredients
- 2 pounds chicken wings
- 1 tablespoon olive oil
- 1 teaspoon smoked paprika
- 1 teaspoon ground cumin
- 1 teaspoon garlic powder
- 1 teaspoon onion powder
- 1/2 teaspoon cayenne pepper
- Salt and pepper to taste
- 1 cup sour cream
- 1/2 cup cream cheese, softened
- 3 cloves garlic, minced
- 1 tablespoon lemon juice
- 1 tablespoon chopped fresh parsley
Cooking Instructions
- Preheat the Oven: Preheat your oven to 400°F (200°C). Line a baking sheet with parchment paper or aluminum foil for easy cleanup.
- Prepare the Wings: In a large bowl, toss the chicken wings with olive oil, smoked paprika, ground cumin, garlic powder, onion powder, cayenne pepper, salt, and pepper until they’re well-coated.
- Bake the Wings: Spread the seasoned wings in a single layer on the prepared baking sheet. Bake in the preheated oven for 25-30 minutes, or until they’re crispy and fully cooked through, turning halfway for even cooking.
- Make the Vampire Dip: While the wings are baking, prepare the dip. In a medium bowl, combine the sour cream, softened cream cheese, minced garlic, lemon juice, and chopped parsley. Mix until smooth and well-blended.
- Serve: Once the wings are done baking, remove them from the oven and let them cool slightly. Arrange them on a platter and serve with the vampire dip on the side.
Extra Tips
For an extra touch of Halloween flair, you can use edible black food coloring to darken the wings even more. Simply add a few drops to the seasoning mix before coating the wings.
Additionally, if you’re looking to save time on the day of your event, you can prepare the vampire dip a day in advance and store it in the refrigerator. Just give it a good stir before serving.
Finally, if you prefer a spicier dip, consider adding a pinch of cayenne pepper or a dash of hot sauce to the mix. Enjoy your spooky creation!
Graveyard Layered Taco Dip
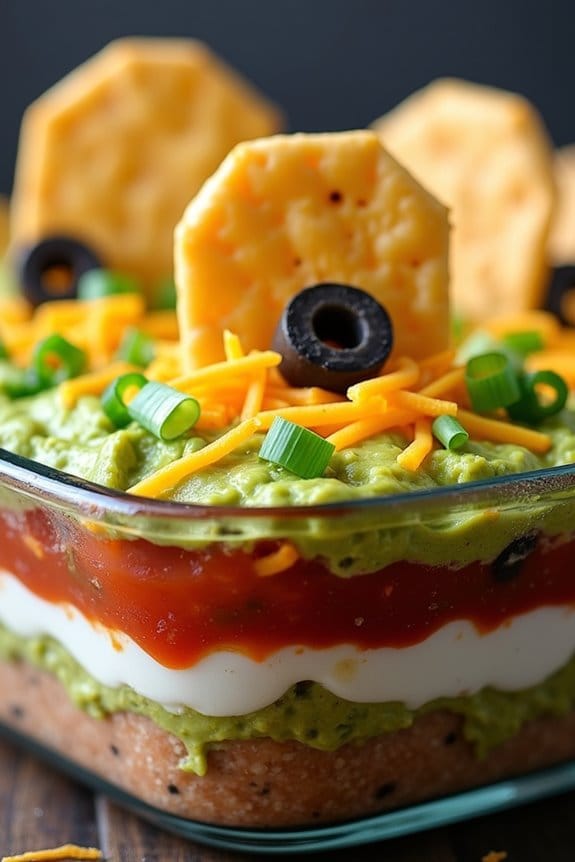
Graveyard Layered Taco Dip is a delightfully spooky appetizer perfect for Halloween gatherings. This dish combines the savory flavors of a classic taco dip with a fun and ghoulish presentation. Imagine layers of creamy refried beans, seasoned sour cream, fresh guacamole, and spicy salsa, all topped off with shredded cheese and olives. The pièce de résistance is the addition of tortilla chips shaped like tombstones, turning this delicious dip into a mini graveyard scene.
Ideal for serving a crowd of 4-6 people, this dish isn’t only visually appealing but also packed with flavor. It’s a great way to set the mood for your Halloween festivities and is sure to be a hit among guests of all ages. The Graveyard Layered Taco Dip can be made quickly, allowing you more time to enjoy the party atmosphere. Whether you’re hosting a large Halloween bash or a small get-together, this appetizer is sure to be a crowd favorite.
Ingredients (Serves 4-6):
- 1 can (16 oz) refried beans
- 1 packet taco seasoning mix
- 1 cup sour cream
- 1 cup guacamole
- 1 cup salsa
- 1 cup shredded cheddar cheese
- 1/2 cup sliced black olives
- 1/4 cup chopped green onions
- Tortilla chips (tombstone-shaped, if possible)
- Fresh cilantro for garnish (optional)
Instructions:
- Prepare the Refried Beans: In a medium bowl, mix the refried beans with half of the taco seasoning mix. Stir until the seasoning is fully incorporated into the beans.
- Layer the Beans: Spread the seasoned refried beans evenly onto the bottom of a medium-size rectangular serving dish. This will form the first layer of your graveyard dip.
- Mix the Sour Cream: In another bowl, combine the sour cream with the remaining taco seasoning mix. Stir well to guarantee the seasoning is evenly distributed.
- Layer the Sour Cream: Gently spread the seasoned sour cream over the layer of refried beans, smoothing it out with a spatula.
- Add the Guacamole: Carefully spread the guacamole over the sour cream layer, making sure it covers the entire surface evenly.
- Spread the Salsa: Pour the salsa over the guacamole layer, using a spoon to distribute it evenly across the top.
- Top with Cheese and Olives: Sprinkle the shredded cheddar cheese over the salsa, followed by the sliced black olives to add a pop of color and flavor.
- Garnish with Green Onions: Scatter the chopped green onions over the top layer for added taste and texture.
- Create the Graveyard Scene: Use the tortilla chips to create tombstones by standing them upright in the layers. Arrange them creatively to resemble a spooky graveyard.
- Optional Garnish: For an extra touch, sprinkle fresh cilantro over the top to enhance the presentation and flavor.
Extra Tips:
For a more festive presentation, consider using a shallow glass dish so guests can see the colorful layers of the dip. If you can’t find tombstone-shaped tortilla chips, you can cut regular tortilla chips into tombstone shapes using a knife or cookie cutter.
This dish can be prepared a few hours in advance; just cover it with plastic wrap and refrigerate until serving time. Be sure to leave the chips out of the refrigerator until ready to serve to keep them crisp. Enjoy your spooky Graveyard Layered Taco Dip with family and friends this Halloween!
Poison Apple Brie Bites

Poison Apple Brie Bites are a delightfully spooky appetizer, perfect for setting the Halloween mood at your party. These delectable bites combine the creamy texture of brie with the tartness of apples, all wrapped up in a flaky pastry. The “poison apple” theme is completed with a drizzle of a sinister-looking glaze that not only adds a touch of sweetness but also gives the bites an eerie, dark finish.
Perfectly bite-sized, they’re both elegant and whimsical, making them a hit with guests of all ages. This recipe serves 4-6 people and is a great way to kick off your Halloween festivities. The combination of flavors and the unique presentation make Poison Apple Brie Bites an unforgettable addition to your Halloween appetizer lineup.
Whether you’re hosting a large gathering or a small get-together, these bites are easy to prepare and sure to impress. Let’s plunge into the ingredients and steps to create these spooky treats.
Ingredients:
- 1 sheet of puff pastry, thawed
- 1 small brie wheel (about 8 ounces)
- 1 large Granny Smith apple
- 1 tablespoon lemon juice
- 2 tablespoons brown sugar
- 1 teaspoon cinnamon
- 1 egg, beaten
- 1 tablespoon water
- 1/4 cup apple jelly
- Red and black food coloring (gel preferred)
Instructions:
- Preheat the Oven: Start by preheating your oven to 375°F (190°C). Line a baking sheet with parchment paper to prevent sticking.
- Prepare the Puff Pastry: On a lightly floured surface, roll out the thawed puff pastry to smooth it out. Cut the pastry into 12 equal squares.
- Slice the Brie: Cut the brie wheel into small, even pieces that will fit comfortably inside the pastry squares.
- Prepare the Apple: Core and thinly slice the Granny Smith apple. Toss the slices in a bowl with lemon juice, brown sugar, and cinnamon to coat evenly.
- Assemble the Bites: Place a piece of brie and a slice of the prepared apple in the center of each puff pastry square. Fold the corners of the pastry over the filling, pinching them together to seal.
- Egg Wash: In a small bowl, mix the beaten egg with 1 tablespoon of water. Brush this egg wash over the tops of the pastry to give them a golden brown finish.
- Bake: Arrange the assembled bites on the prepared baking sheet. Bake in the preheated oven for 15-20 minutes or until the pastry is golden and puffed.
- Prepare the Glaze: While the bites are baking, melt the apple jelly in a small saucepan over low heat. Once melted, divide it into two bowls. Add a few drops of red food coloring to one bowl and black food coloring to the other, mixing until the desired shades are reached.
- Decorate: Once the bites are done baking, allow them to cool slightly. Drizzle the colored glazes over the bites to create a “poisoned” effect.
Extra Tips:
For the best results, make sure to use a high-quality brie that melts smoothly. You can adjust the sweetness of the glaze according to your preference by adding more or less apple jelly.
If you’re preparing these bites ahead of time, you can assemble them and keep them in the refrigerator for a few hours before baking. Just be sure to apply the egg wash right before placing them in the oven.
Finally, using gel food coloring will give you more vibrant colors without altering the consistency of your glaze.
Spicy Skeleton Hand Nachos

Spicy Skeleton Hand Nachos are the perfect Halloween appetizer to impress and spook your guests with their eerie appearance and tantalizing flavor. This dish combines classic nachos with a creepy twist, featuring a “skeleton hand” made from tortillas to add a festive and fun touch to your Halloween spread. The bold spices and gooey cheese make these nachos a delicious treat for both kids and adults, making them a must-have for any Halloween gathering.
Creating these spooky nachos is both fun and straightforward, guaranteeing you can focus more on the festivities than on complicated cooking. This recipe serves 4-6 people, making it ideal for a small party or family gathering. The key to success lies in crafting the tortilla skeleton hand just right and confirming the perfect balance of flavors with the spicy toppings.
Let’s plunge into the ingredients and method for crafting this ghoulishly delightful dish.
Ingredients (Serves 4-6):
- 8 large flour tortillas
- 2 cups shredded cheddar cheese
- 1 cup shredded Monterey Jack cheese
- 1 pound ground beef
- 1 packet taco seasoning
- 1 can (15 oz) black beans, drained and rinsed
- 1 can (15 oz) diced tomatoes with green chilies, drained
- 1 jalapeño, sliced
- 1/4 cup chopped cilantro
- 3/4 cup sour cream
- 1/2 cup chopped green onions
- Cooking spray
- Salt and pepper to taste
Instructions:
1. Prepare the Skeleton Hand: Preheat your oven to 350°F (175°C). Using a small knife, cut out the shape of a skeleton hand from the tortillas. This will require a bit of artistic skill, but you can use a template if necessary.
Place the tortilla hands on a baking sheet lined with parchment paper, spray lightly with cooking spray, and sprinkle with salt. Bake for about 10 minutes or until they’re golden and crispy.
2. Cook the Beef: In a large skillet over medium heat, cook the ground beef until browned, breaking it apart with a wooden spoon. Drain any excess fat. Add the taco seasoning and a little water as directed on the seasoning packet, stirring well to combine. Let it simmer for 5 minutes.
3. Assemble the Nachos: On a large oven-safe platter, spread the tortilla chips in an even layer. Spoon the cooked ground beef evenly over the chips, followed by the black beans and diced tomatoes. Sprinkle both types of cheese generously over the top.
4. Bake the Nachos: Place the platter in the oven and bake for 10-15 minutes, or until the cheese is melted and bubbly.
5. Add the Finishing Touches**: Remove the nachos from the oven and allow them to cool slightly. Carefully position the tortilla skeleton hand on top of the nachos. Scatter the jalapeños and green onions over the top, then dollop the sour cream. Finally, sprinkle with chopped cilantro for a fresh finish**.
Extra Tips: When crafting the tortilla skeleton hand, it’s important to cut carefully to achieve a realistic shape, and using a template can make this easier.
Don’t be afraid to adjust the spice level to suit your guests’ preferences by adding more or less jalapeño. For added crunch, you can also include some chopped bell peppers.
Finally, serve the nachos immediately after assembling and baking to guarantee the chips remain crisp and the cheese stays melted.
Zombie Brain Bruschetta

Zombie Brain Bruschetta is a delightfully ghoulish appetizer perfect for setting the Halloween mood at your party. This dish transforms a traditional Italian bruschetta into a spooky, brain-like creation that will both thrill and chill your guests.
It’s visually striking and packed with flavor, combining creamy ricotta, roasted garlic, and a tangy tomato topping on crunchy bread slices. Whether you’re hosting a big Halloween bash or just a small gathering, this appetizer is sure to be a conversation starter.
The recipe for Zombie Brain Bruschetta is simple yet effective, requiring only a few steps to create the eerie effect of a zombie brain. The key is in the strategic placement of the tomato mixture on the ricotta base, which mimics the appearance of brain folds.
Accompanied by a hint of basil and a drizzle of balsamic reduction, this dish not only looks impressive but tastes delicious as well. It’s an excellent choice for serving 4-6 people, guaranteeing everyone gets a taste of this creepy culinary creation.
Ingredients for 4-6 servings:
- 1 baguette, sliced into 1/2 inch slices
- 1 cup ricotta cheese
- 4 cloves of garlic, roasted
- 1 1/2 cups cherry tomatoes, finely diced
- 2 tablespoons olive oil
- 1 tablespoon balsamic vinegar
- Salt and pepper to taste
- Fresh basil leaves for garnish
- Balsamic reduction for drizzling
Cooking Instructions:
- Preheat the Oven: Start by preheating your oven to 375°F (190°C). This will be used to toast the baguette slices, giving them a perfect crunch.
- Prepare the Baguette: Arrange the baguette slices on a baking sheet. Lightly brush each slice with olive oil on both sides. Place them in the preheated oven and toast for about 8-10 minutes or until they’re golden brown and crispy.
- Roast the Garlic: While the bread is toasting, wrap the garlic cloves in aluminum foil and place them in the oven for about 15 minutes, or until they’re soft and fragrant. Once done, mash the roasted garlic into a paste.
- Prepare the Tomato Topping: In a medium bowl, combine the finely diced cherry tomatoes with the mashed roasted garlic. Add 1 tablespoon of olive oil, balsamic vinegar, salt, and pepper. Mix well to combine the flavors.
- Assemble the Bruschetta: Once the baguette slices are toasted and cooled slightly, spread a generous layer of ricotta cheese on each slice. Follow by spooning the tomato mixture on top, carefully arranging it to resemble brain folds.
- Garnish and Serve: Add a few fresh basil leaves on top of each bruschetta for a pop of color and flavor. Drizzle lightly with balsamic reduction before serving.
Extra Tips: When making Zombie Brain Bruschetta, verify the baguette slices aren’t too thick; this helps achieve the perfect ratio of toppings to bread.
Roasting the garlic brings out its sweetness and mellows its flavor, making it a perfect match for the tangy tomatoes and creamy ricotta. If you prefer a more dramatic effect, consider using heirloom tomatoes in different colors to enhance the eerie appearance.
Finally, always allow the bruschetta to cool slightly before assembling to prevent the ricotta from melting.
Bewitching Black Bean Hummus
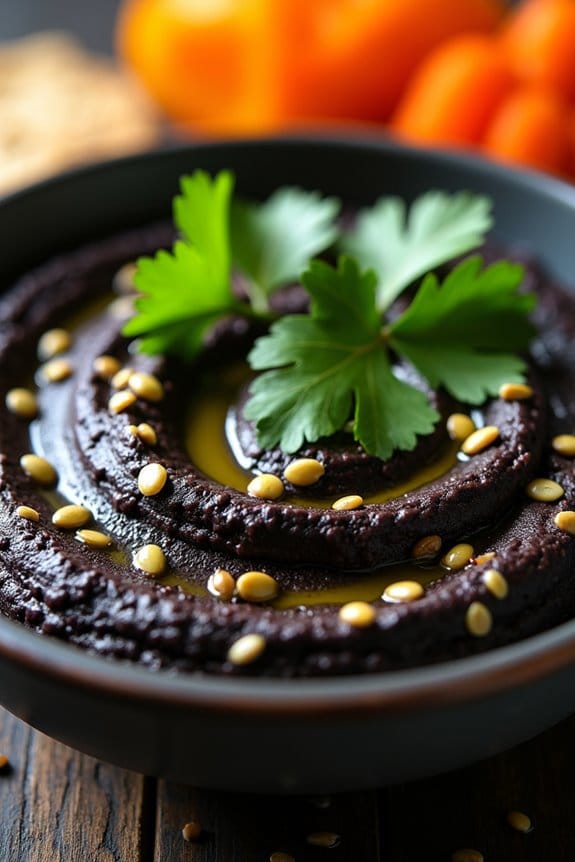
Bewitching Black Bean Hummus is a perfect Halloween appetizer that’s not only delicious but also visually striking with its dark and mysterious appearance. This hummus is a fun twist on the traditional recipe, incorporating black beans instead of the usual chickpeas, giving it a unique flavor and an eerie color that fits perfectly with the Halloween theme.
It’s creamy, packed with flavor, and pairs wonderfully with a variety of dippers like vegetables, crackers, or pita chips. Hosting a spooky soirée or a Halloween gathering? This Bewitching Black Bean Hummus is sure to be a crowd-pleaser.
It’s easy to prepare, healthy, and can be made ahead of time, allowing you to focus on other aspects of your Halloween festivities. This recipe serves 4-6 people, making it a great choice for small parties or as part of a larger spread of appetizers.
Ingredients:
- 2 cups cooked black beans (or 1 can, drained and rinsed)
- 1/4 cup tahini
- 3 tablespoons fresh lime juice
- 2 tablespoons olive oil
- 2 cloves garlic, minced
- 1 teaspoon ground cumin
- 1/2 teaspoon smoked paprika
- Salt and pepper to taste
- 1/4 cup water (or more, if needed for desired consistency)
- Optional garnish: chopped fresh cilantro, pumpkin seeds, or a drizzle of olive oil
Instructions:
- Prepare the Ingredients: If using canned black beans, drain and rinse them thoroughly under cold water to remove any excess sodium and preservatives. If using freshly cooked black beans, verify they’re cooled down before use.
- Blend the Base: In a food processor, combine the black beans, tahini, lime juice, and olive oil. Process until the mixture begins to smooth out.
- Add Flavor: Add the minced garlic, ground cumin, smoked paprika, salt, and pepper to the food processor. Blend again until the mixture is well combined and smooth.
- Adjust Consistency: Gradually add water to the hummus while the food processor is running. Continue adding water until the hummus reaches your desired consistency – it should be creamy but not too runny.
- Taste and Adjust: Taste the hummus and adjust seasoning as necessary. You may want to add more lime juice, salt, or spices according to your preference.
- Serve: Transfer the hummus to a serving bowl. Garnish with chopped cilantro, a sprinkle of pumpkin seeds, or a drizzle of olive oil for extra flavor and visual appeal.
Extra Tips: When making Bewitching Black Bean Hummus, it’s important to blend the mixture thoroughly to ascertain it’s creamy and smooth. If you find the hummus too thick, don’t hesitate to add a little more water or olive oil to reach the right consistency.
For an even spookier presentation, serve the hummus in a hollowed-out pumpkin or alongside ghost-shaped tortilla chips. This hummus can be stored in an airtight container in the refrigerator for up to three days, making it easy to prepare in advance.
Haunted Pumpkin Soup Shooters

Get ready to spook your guests with these delightful and eerie Haunted Pumpkin Soup Shooters. Perfect for Halloween gatherings, these savory treats are served in small shooter glasses, making them both a charming appetizer and a conversation starter.
Delight and spook your guests with charming Haunted Pumpkin Soup Shooters, perfect for Halloween gatherings.
The rich, velvety texture of the pumpkin soup combined with a hint of spice will tantalize the taste buds and set the mood for a night of frightful fun. This recipe is designed to serve 4-6 people, providing just the right amount of flavor and flair for your Halloween spread.
With a blend of fresh pumpkin, aromatic herbs, and a touch of cream, these shooters aren’t only easy to prepare but also visually stunning. The addition of a ghostly garnish will guarantee that your guests are both impressed and intrigued by the spooky twist on a classic favorite.
Ingredients (Serves 4-6):
- 3 cups pumpkin puree (fresh or canned)
- 2 cups vegetable broth
- 1 cup heavy cream
- 1 medium onion, chopped
- 2 cloves garlic, minced
- 1 tablespoon olive oil
- 1 teaspoon ground cinnamon
- 1/2 teaspoon ground nutmeg
- Salt and pepper to taste
- 1/4 teaspoon cayenne pepper (optional for heat)
- 1 tablespoon fresh thyme leaves
- Whipped cream (for garnish)
- Black sesame seeds (for garnish)
- Small shooter glasses
Instructions:
- Prepare the Ingredients: Begin by chopping the onion and mincing the garlic. If using fresh pumpkin, peel and cube it before puréeing it in a blender or food processor until smooth.
- Sauté the Aromatics: In a large pot, heat the olive oil over medium heat. Add the chopped onion and minced garlic, sautéing them until the onion becomes translucent and fragrant, about 5 minutes.
- Combine the Main Ingredients: Add the pumpkin puree to the pot with the sautéed onions and garlic. Stir in the vegetable broth, heavy cream, ground cinnamon, ground nutmeg, salt, pepper, and cayenne pepper if using. Mix well to incorporate all the ingredients.
- Simmer the Soup: Bring the mixture to a gentle simmer over medium heat. Allow it to cook for about 15-20 minutes, stirring occasionally, until the flavors meld together and the soup thickens slightly.
- Blend for Smoothness: Use an immersion blender to puree the soup directly in the pot until it reaches a smooth, velvety consistency. Alternatively, transfer the soup in batches to a countertop blender and blend until smooth, then return it to the pot.
- Adjust Seasoning and Serve: Taste the soup and adjust the seasoning as needed with additional salt and pepper. Ladle the soup into small shooter glasses, filling each about two-thirds full.
- Garnish to Haunt: Top each shooter with a dollop of whipped cream, creating a ghostly effect. Sprinkle a few black sesame seeds on top of the whipped cream to resemble ghost eyes.
Extra Tips:
For an extra spooky touch, consider serving these soup shooters on a black tray or platter to make the colorful soup pop.
You can also add a splash of apple cider vinegar or lemon juice to the soup for a hint of acidity, balancing the creamy richness. If you prefer a vegan version, simply substitute the heavy cream with coconut milk and the whipped cream with a plant-based alternative.
