

When planning an adults-only Halloween party, I love to create a hauntingly good spread of appetizers that are as fun to make as they are to eat. Spooky Stuffed Mushrooms and Ghostly Goat Cheese Balls are sure to tantalize your taste buds. Mummified Bacon-Wrapped Jalapeños add a thrilling twist that’s bound to impress. And don’t forget the Dark Chocolate-Dipped Fruit Skewers that will enchant guests with every bite. Are you ready to discover the rest of the delicious lineup?
Spooky Stuffed Mushrooms

This Halloween, elevate your appetizer game with Spooky Stuffed Mushrooms that are sure to enchant your adult guests. These bite-sized treats are packed with savory goodness, making them perfect for a haunted gathering. The earthy flavor of mushrooms pairs beautifully with a rich, cheesy filling that hides a hint of spiciness, guaranteeing each bite is as thrilling as the last.
Elevate your Halloween appetizers with savory, spooky stuffed mushrooms for an enchanting, thrilling bite-sized treat.
Whether you’re hosting a costume party or a laid-back get-together, these mushrooms are bound to cast a delicious spell on everyone. Crafted for a serving size of 4-6 people, this recipe guarantees that everyone gets to enjoy a taste of the spooky season.
The stuffing includes a blend of cream cheese, garlic, herbs, and a touch of cayenne pepper for that extra kick. The mushrooms are then baked to perfection, allowing the flavors to meld together while the tops become deliciously golden. Easy to make yet impressively flavorful, these Spooky Stuffed Mushrooms are a must-have on your Halloween menu.
Ingredients:
- 24 large button mushrooms
- 8 oz cream cheese, softened
- 1/4 cup grated Parmesan cheese
- 2 cloves garlic, minced
- 1/4 cup finely chopped green onions
- 1/4 teaspoon cayenne pepper
- 1 teaspoon dried thyme
- Salt and pepper to taste
- 2 tablespoons olive oil
- 1/4 cup breadcrumbs
- Fresh parsley for garnish (optional)
Instructions:
- Prepare the Mushrooms: Preheat your oven to 375°F (190°C). Clean the mushrooms with a damp paper towel to remove any dirt, and gently remove the stems. Set the caps aside on a baking sheet lined with parchment paper.
- Make the Filling: In a medium bowl, combine the softened cream cheese, Parmesan cheese, minced garlic, chopped green onions, cayenne pepper, thyme, salt, and pepper. Mix until all ingredients are well incorporated and the mixture is smooth.
- Stuff the Mushrooms: Using a small spoon, fill each mushroom cap generously with the cream cheese mixture. Be sure to mound the filling slightly above the rim of each cap for a hearty bite.
- Top with Breadcrumbs: In a small bowl, combine the breadcrumbs with olive oil, mixing until the crumbs are lightly coated. Sprinkle a small amount of the breadcrumb mixture over each stuffed mushroom.
- Bake the Mushrooms: Place the baking sheet in the preheated oven and bake for 20-25 minutes, or until the mushrooms are tender and the topping is golden brown.
- Garnish and Serve: Remove the mushrooms from the oven and allow them to cool slightly. Garnish with fresh parsley if desired, and serve warm.
Extra Tips: For an extra burst of flavor, consider adding finely chopped cooked bacon or sun-dried tomatoes to the filling. If you prefer a less spicy version, omit the cayenne pepper or replace it with paprika for a milder taste.
To guarantee the mushrooms bake evenly, try to select mushrooms of similar size. These stuffed mushrooms can also be prepared a day in advance—simply store them in the refrigerator and bake just before serving. Enjoy your Spooky Stuffed Mushrooms as a standout addition to your Halloween festivities!
Bloody Mary Shrimp Cocktail
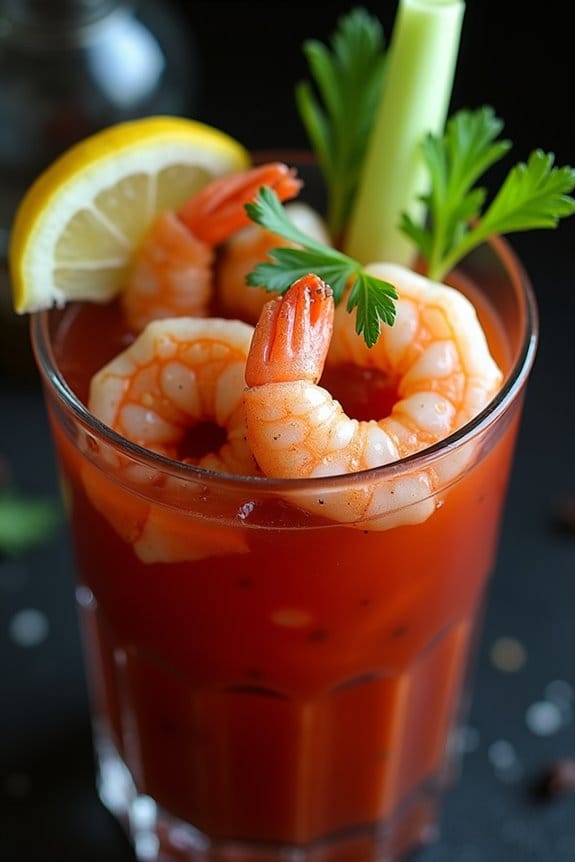
Looking to add a little sophistication and a spooky twist to your Halloween party? The Bloody Mary Shrimp Cocktail is the perfect appetizer to tantalize your guests’ taste buds. This dish combines the classic flavors of a Bloody Mary cocktail with succulent shrimp, creating a deliciously eerie treat that’s both elegant and a little bit creepy. The zingy cocktail sauce, laden with horseradish and a splash of vodka, perfectly complements the sweetness of the shrimp, making it a memorable addition to your Halloween spread.
Whether you’re hosting a small dinner party or a large haunted gathering, this appetizer will surely impress your guests. It’s simple to prepare and can be made ahead of time, allowing you to enjoy the party stress-free. Serve it in martini glasses or hollowed-out pumpkins for an extra festive touch. With a serving size of 4-6 people, this recipe is ideal for a close-knit group of friends or family.
Ingredients (Serves 4-6):
- 1 pound large shrimp, peeled and deveined
- 2 cups tomato juice
- 1/2 cup vodka
- 1/4 cup fresh lemon juice
- 2 tablespoons prepared horseradish
- 1 tablespoon Worcestershire sauce
- 1 teaspoon hot sauce (such as Tabasco)
- 1 teaspoon celery salt
- 1 teaspoon black pepper
- Lemon wedges and celery sticks for garnish
- Fresh parsley, chopped, for garnish
Instructions:
- Prepare the Shrimp: Bring a large pot of salted water to a boil. Add the shrimp and cook for about 2-3 minutes, or until they’re opaque and pink. Immediately transfer the shrimp to an ice bath to stop the cooking process. Once cooled, drain and pat dry with paper towels.
- Make the Cocktail Sauce: In a large mixing bowl, combine the tomato juice, vodka, lemon juice, horseradish, Worcestershire sauce, hot sauce, celery salt, and black pepper. Stir well to guarantee all ingredients are fully incorporated. Taste and adjust seasoning if necessary.
- Combine Shrimp and Sauce: Add the shrimp to the cocktail sauce, guaranteeing they’re fully submerged. Cover the bowl with plastic wrap and refrigerate for at least 1 hour to allow the flavors to meld.
- Serve: Once chilled, divide the shrimp and sauce evenly among serving glasses or small bowls. Garnish each serving with a lemon wedge, celery stick, and a sprinkle of fresh parsley for a pop of color and added flavor.
- Presentation: For an extra spooky presentation, consider serving the shrimp cocktail in hollowed-out mini pumpkins or martini glasses with a black salt rim.
Extra Tips:
When preparing the Bloody Mary Shrimp Cocktail, it’s important to use fresh shrimp for the best flavor and texture. If you’re using frozen shrimp, make sure they’re fully thawed before cooking.
To add an extra layer of flavor, consider grilling the shrimp instead of boiling them. This will impart a smoky taste that complements the zesty cocktail sauce.
Additionally, feel free to adjust the spice level of the sauce to your liking by adding more or less hot sauce. Remember, the dish can be made a day in advance, making it a convenient option for entertaining. Enjoy your spooky yet sophisticated appetizer!
Ghostly Goat Cheese Balls

Ghostly Goat Cheese Balls are the perfect spooky treat for your Halloween gathering! These bite-sized appetizers are both delicious and festive, featuring creamy goat cheese coated with a crunchy exterior and topped with edible decorations to resemble little ghosts. Ideal for an adult party, they bring a touch of sophistication while still maintaining a fun and eerie vibe.
Not only are they easy to prepare, but they also present beautifully on any Halloween-themed spread. With a combination of rich textures and flavors, Ghostly Goat Cheese Balls are sure to be a hit among your guests. The soft, tangy goat cheese pairs beautifully with the crispiness of the coatings, offering a delightful contrast in each bite.
Whether you’re hosting a large party or a small gathering, these cheese balls are designed to impress. Follow the recipe below to create a batch that serves 4-6 people.
Ingredients:
- 8 oz goat cheese
- 4 oz cream cheese, softened
- 1 tablespoon honey
- 1/2 teaspoon garlic powder
- 1/4 teaspoon salt
- 1/4 teaspoon black pepper
- 1/2 cup finely chopped pecans
- 1/2 cup finely chopped fresh herbs (such as parsley or chives)
- Edible eyes or black olives (for decoration)
- Crackers or bread slices (for serving)
Instructions:
- Prepare the Cheese Mixture: In a medium-sized bowl, combine the goat cheese, cream cheese, honey, garlic powder, salt, and black pepper. Use a spatula or an electric mixer to blend the ingredients until smooth and well-combined.
- Shape the Cheese Balls: Using a small ice cream scoop or your hands, scoop the cheese mixture and roll it into approximately 1-inch balls. You should have about 12-15 cheese balls, depending on the size.
- Coat the Cheese Balls: Place the chopped pecans and herbs on separate plates. Roll half of the cheese balls in the chopped pecans and the other half in the fresh herbs, ensuring they’re evenly coated.
- Add the Ghostly Eyes: Gently press two edible eyes or small pieces of black olives onto each cheese ball to create the appearance of ghostly faces.
- Chill the Cheese Balls: Arrange the cheese balls on a serving platter and refrigerate them for at least 30 minutes to firm up before serving.
- Serve: Once chilled, serve the Ghostly Goat Cheese Balls with crackers or bread slices on the side for an elegant and creepy Halloween appetizer.
Extra Tips:
For a more robust flavor, consider adding a teaspoon of your favorite spices such as smoked paprika or cayenne pepper to the cheese mixture. This not only enhances the taste but also adds a hint of warmth perfect for a fall gathering.
If you’re short on time, the cheese balls can be made a day in advance and stored in the refrigerator. Just remember to add the decorative eyes shortly before serving to keep them looking fresh.
Experiment with different coatings, like crushed nuts or seeds, to add variety and texture to your platter.
Creepy Caprese Skewers
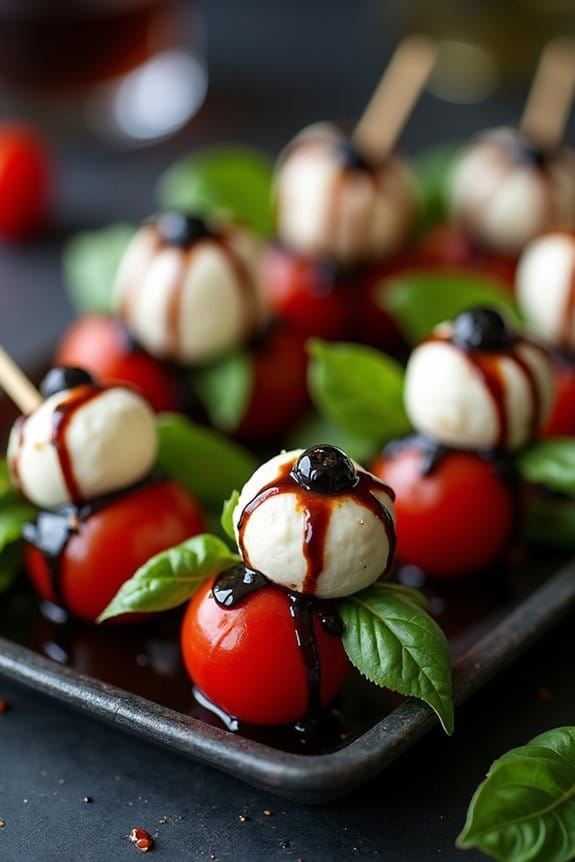
Creepy Caprese Skewers are a spooky twist on the classic Italian salad that will add a ghoulish touch to your Halloween appetizer spread. Perfect for adult gatherings, these skewers maintain the beloved flavors of fresh mozzarella, tomatoes, and basil, but with a creepy aesthetic that will delight your guests. The use of balsamic glaze adds a dark, eerie feel, while strategically placed olive slices transform the mozzarella balls into eyeball-like features, making this dish both delicious and visually appealing.
The beauty of Creepy Caprese Skewers lies in their simplicity and the ease with which they can be prepared, allowing you more time to focus on other party preparations. These skewers are the perfect finger food, combining a blend of textures and tastes that are sure to be a hit at your Halloween party. With the right ingredients and a little creativity, you’ll be able to whip up this spooky treat in no time.
Ingredients for Creepy Caprese Skewers (serving size: 4-6 people):
- 20 cherry tomatoes
- 20 small fresh mozzarella balls (bocconcini)
- 20 fresh basil leaves
- 10 black olives
- Balsamic glaze
- Salt and pepper, to taste
- 20 wooden skewers or toothpicks
Cooking Instructions:
- Prepare the Mozzarella Eyeballs: Begin by slicing the black olives into thin rings. Place one olive ring on each mozzarella ball to create the appearance of an eyeball. Secure the olive slice by gently pressing it into the cheese.
- Skewer the Ingredients: Take a wooden skewer and start layering; begin with a cherry tomato, followed by a basil leaf, then a mozzarella ball with the olive on top. Repeat this sequence until each skewer is filled with the ingredients, making sure to finish with a cherry tomato on top.
- Season and Glaze: Once all the skewers are assembled, lay them flat on a serving platter. Lightly season with salt and pepper according to your taste. Drizzle balsamic glaze over the skewers, ensuring each one gets a generous coating to enhance the flavors and add to the spooky presentation.
- Chill and Serve: Place the skewers in the refrigerator for at least 15 minutes to allow the flavors to meld together. Serve cold or at room temperature on a platter, ready to impress your guests with their eerie look and delightful taste.
Extra Tips:
For an added touch of horror, consider using a food coloring pen to draw bloodshot lines on the mozzarella balls, enhancing the eyeball effect. You can also experiment with different types of tomatoes, like heirloom or grape tomatoes, to add a variety of colors to the skewers.
If you’re aiming for a more robust flavor, marinate the mozzarella balls in olive oil and Italian herbs for a few hours before assembling the skewers. This dish is versatile, so feel free to customize it to suit your taste and the theme of your Halloween party.
Mummified Bacon-Wrapped Jalapeños

If you’re looking to spice up your Halloween party with some adult-friendly appetizers, Mummified Bacon-Wrapped Jalapeños are the perfect choice. These savory treats combine the heat of fresh jalapeños with the savory goodness of cream cheese and the irresistible flavor of crispy bacon. Wrapped in crescent roll dough to mimic the look of mummies, these appetizers not only taste amazing but also fit right into the spooky theme of your gathering.
Whether you’re hosting a small get-together or a larger celebration, these jalapeño poppers are bound to be a hit.
Preparing these Mummified Bacon-Wrapped Jalapeños is both fun and straightforward. The process involves hollowing out jalapeños, filling them with a creamy cheese mixture, wrapping them in bacon, and then adding a final layer of crescent roll dough to complete the mummified look. As they bake, the bacon crisps up, and the cheese becomes wonderfully gooey, making each bite a delightful experience.
Serve them with a side of ranch or your favorite dipping sauce to enhance their flavor even more.
Ingredients (Serves 4-6):
- 12 fresh jalapeños
- 8 ounces cream cheese, softened
- 1 cup shredded cheddar cheese
- 1 teaspoon garlic powder
- 12 slices of bacon
- 1 can refrigerated crescent roll dough
- Cooking spray
Instructions:
- Prepare the Jalapeños:
- Preheat your oven to 375°F (190°C). Line a baking sheet with parchment paper or spray it with cooking spray.
- Cut each jalapeño in half lengthwise and remove the seeds and membranes using a small spoon. Set aside.
- Make the Cheese Filling:
- In a medium bowl, mix together the softened cream cheese, shredded cheddar cheese, and garlic powder until well combined and smooth.
- Fill the Jalapeños:
- Spoon the cheese mixture into each jalapeño half, packing it slightly to guarantee it stays in place.
- Wrap with Bacon:
- Wrap each filled jalapeño with a slice of bacon, starting at one end and spiraling it to the other. Secure with a toothpick if necessary.
- Wrap with Crescent Roll Dough:
- Unroll the crescent roll dough and cut it into thin strips. Wrap a strip around each bacon-wrapped jalapeño, leaving a small gap between strips to create a mummy effect.
- Bake:
- Place the wrapped jalapeños on the prepared baking sheet. Bake in the preheated oven for 15-20 minutes, or until the bacon is crispy and the dough is golden brown.
- Serve:
- Remove from the oven and let them cool slightly before serving. Enjoy with your favorite dipping sauce.
Extra Tips:
When handling jalapeños, it’s advisable to wear gloves to protect your skin from the capsaicin, which can cause irritation. If you prefer milder heat, you can soak the jalapeños in cold water after deseeding them to reduce their spiciness.
For a creative touch, use small pieces of olive to create eyes on your “mummies” before baking. Remember to keep an eye on them while they bake, as oven temperatures can vary, and you want to ascertain the bacon is cooked to a perfect crisp without overcooking the dough.
Witch’s Broomstick Breadsticks

Witch’s Broomstick Breadsticks are a whimsical and delicious addition to any adult Halloween gathering. These clever breadsticks aren’t only tasty but also add a touch of eerie elegance to your party spread. Perfectly designed to resemble a witch’s broomstick, these breadsticks are made using a combination of dough and pretzel sticks, making them both fun to eat and visually appealing.
A whimsical and delicious addition to any adult Halloween gathering, adding eerie elegance to your party spread.
Whether you’re hosting a themed dinner or simply celebrating the spooky season with friends, these appetizers will surely captivate your guests.
These broomstick breadsticks are easy to prepare and can be customized with your choice of seasonings and dips. They pair wonderfully with a variety of dipping sauces, such as marinara, ranch, or garlic butter, allowing you to offer a range of flavors. The recipe below serves 4-6 people, making it an ideal choice for intimate gatherings or as part of a larger spread of Halloween-themed treats.
Ingredients (Serves 4-6):
- 1 can of refrigerated breadstick dough
- 12 pretzel sticks
- 2 tablespoons melted butter
- 1 teaspoon garlic powder
- 1 teaspoon Italian seasoning
- Salt to taste
- Grated Parmesan cheese (optional)
Cooking Instructions:
- Preheat the Oven: Begin by preheating your oven to 375°F (190°C). This guarantees that your breadsticks bake evenly and achieve a golden-brown color.
- Prepare the Dough: Unroll the refrigerated breadstick dough onto a clean surface. If the dough is scored, gently separate it along the lines. Otherwise, use a knife to cut the dough into strips, roughly 6 inches long and 1 inch wide.
- Shape the Broomsticks: Take each strip of dough and wrap it around one end of a pretzel stick, leaving about an inch of pretzel exposed. This will form the handle of the broomstick. Flare out the dough at the end to resemble the bristles of a broom.
- Season the Breadsticks: Place the shaped breadsticks onto a baking sheet lined with parchment paper. Brush each breadstick with melted butter, then sprinkle garlic powder, Italian seasoning, and salt evenly over them. For extra flavor, you can also sprinkle some grated Parmesan cheese.
- Bake: Put the baking sheet in the preheated oven and bake for 10-12 minutes, or until the breadsticks are golden brown and cooked through.
- Serve: Once baked, remove the breadsticks from the oven and let them cool slightly before serving. Arrange them on a platter with your choice of dipping sauces.
Extra Tips:
To guarantee your Witch’s Broomstick Breadsticks have the perfect texture, be careful not to overwork the dough, as this can make the breadsticks tough.
If you prefer a bit of heat, consider adding a pinch of cayenne pepper to the seasoning mix. Additionally, these breadsticks can be prepared a few hours in advance and reheated just before serving. This makes them a convenient choice for those who are juggling multiple recipes for a Halloween event.
Enjoy your magical creations!
Deviled Egg Eyeballs
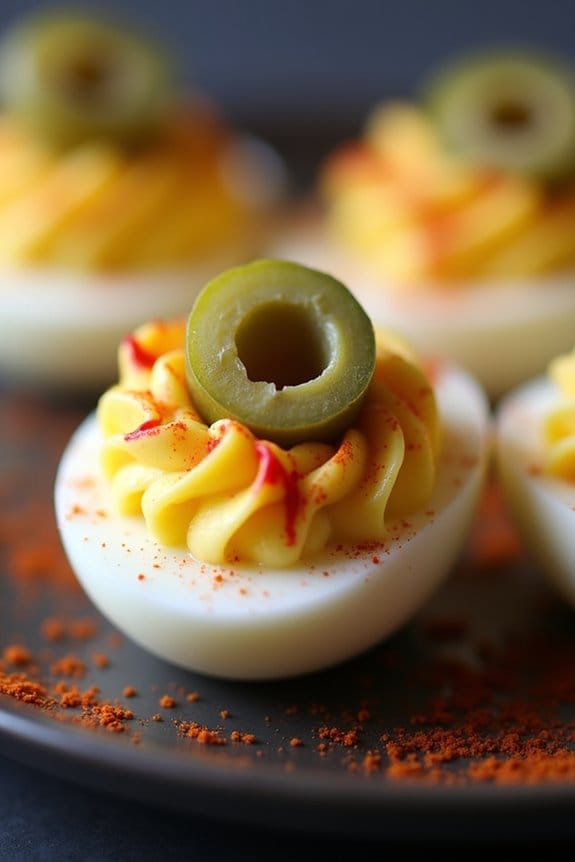
Deviled Egg Eyeballs are a perfect Halloween appetizer for adults, blending the classic taste of deviled eggs with a spooky twist that will delight your guests. These eerie treats aren’t only visually striking but also deliciously creamy and spicy, making them a hit at any Halloween gathering.
The “eyeball” effect is achieved with clever use of olives and food coloring, transforming traditional deviled eggs into a centerpiece that adds a touch of horror to your party spread.
Whether you’re hosting a Halloween dinner or simply indulging in the spirit of the season, these Deviled Egg Eyeballs are bound to impress. The recipe is straightforward, requiring minimal ingredients and effort while delivering maximum impact.
The combination of tangy mustard, creamy mayonnaise, and spicy paprika perfectly complements the smooth egg yolk base, while the olive “pupil” and a dash of red food coloring bring the dish to life – or rather, the undead.
Ingredients for 4-6 servings:
- 6 large eggs
- 3 tablespoons mayonnaise
- 1 teaspoon Dijon mustard
- Salt and pepper to taste
- Paprika for garnish
- 3 green olives with pimentos, sliced in half
- Red food coloring
Cooking Instructions:
- Boil the Eggs: Place the eggs in a medium saucepan and cover them with cold water. Bring to a boil over medium-high heat. Once boiling, cover the saucepan and remove it from the heat. Let the eggs sit in the hot water for 10-12 minutes.
- Cool and Peel: Drain the hot water and transfer the eggs into a bowl of ice water. Let them cool for about 5 minutes. Once cooled, gently peel the eggs, taking care not to damage the whites.
- Prepare the Yolks: Cut each egg in half lengthwise and carefully scoop out the yolks into a small mixing bowl. Place the egg whites on a serving platter.
- Make the Filling: Mash the egg yolks with a fork until smooth. Add mayonnaise, Dijon mustard, salt, and pepper. Mix thoroughly until the filling is creamy and well-combined.
- Fill the Egg Whites: Using a spoon or a piping bag, fill the cavity of each egg white with the yolk mixture. Make sure to mound the filling slightly above the surface.
- Create the Eyeballs: Place one olive half, cut side down, in the center of each filled egg to resemble an eyeball’s pupil. Add a drop of red food coloring on the tip of a toothpick and draw small red lines from the center outward to mimic bloodshot eyes.
- Garnish: Lightly dust the filled eggs with paprika for added flavor and a touch of color.
Extra Tips: To guarantee your Deviled Egg Eyeballs have the best presentation, make sure to use fresh eggs as they’re easier to peel.
When making the filling, taste as you go to adjust seasoning according to your preference. If you prefer a spicier filling, consider adding a dash of hot sauce or cayenne pepper to the yolk mixture.
For a more vibrant “bloodshot” effect, use a gel-based red food coloring which tends to be more vivid than liquid types. Serve these spooky treats chilled for the best taste and texture.
Pumpkin and Sage Crostini

Pumpkin and Sage Crostini is a delightful appetizer that combines the earthy flavors of roasted pumpkin with the aromatic touch of fresh sage, all atop a crispy crostini. Perfect for Halloween gatherings or any autumn-inspired event, this dish is certain to impress your guests with its vibrant colors and sophisticated taste.
The creamy pumpkin mixture paired with the crunchy bread provides a satisfying texture contrast, making it a memorable start to any meal. This recipe is designed to serve 4-6 people, making it ideal for small gatherings. The preparation is straightforward, allowing you to focus on enjoying the time with your guests rather than spending all night in the kitchen.
A delightful starter for intimate gatherings, combining creamy pumpkin with crunchy crostini for a memorable culinary experience.
The combination of seasonal ingredients not only highlights the best of fall produce but also creates a festive presentation that suits the Halloween theme.
Ingredients:
- 1 small pumpkin (about 2 pounds)
- 2 tablespoons olive oil
- Salt and pepper to taste
- 1 French baguette, sliced into 1/4-inch rounds
- 1/2 cup ricotta cheese
- 2 tablespoons honey
- 1 tablespoon fresh sage, chopped
- 2 tablespoons unsalted butter
- 1/4 cup grated Parmesan cheese
- A handful of pumpkin seeds (optional for garnish)
Cooking Instructions:
- Preheat the oven: Begin by preheating your oven to 375°F (190°C). This will guarantee an even roast for the pumpkin.
- Prepare the pumpkin: Cut the pumpkin in half and remove the seeds and stringy insides. Slice the pumpkin into wedges about 1 inch thick. Arrange them on a baking sheet, drizzle with olive oil, and season with salt and pepper.
- Roast the pumpkin: Place the baking sheet in the preheated oven and roast for 25-30 minutes or until the pumpkin is tender and slightly caramelized. Once done, remove from the oven and allow the pumpkin to cool slightly.
- Prepare the crostini: While the pumpkin is roasting, arrange the baguette slices on another baking sheet. Brush each slice lightly with olive oil. Toast in the oven for 5-7 minutes until golden brown and crisp.
- Create the pumpkin spread: Once the pumpkin has cooled, scoop the flesh away from the skin and place it in a bowl. Mash the pumpkin until smooth, then mix in the ricotta cheese, honey, and chopped sage. Season with additional salt and pepper to taste.
- Assemble the crostini: Spread a generous amount of the pumpkin mixture onto each toasted baguette slice.
- Add the finishing touches: In a small pan, melt the butter over medium heat. Add the pumpkin seeds and a pinch of salt, toasting until they’re slightly golden. Sprinkle the toasted seeds over the crostini. Finish with a sprinkle of Parmesan cheese.
- Serve: Arrange the assembled crostini on a platter and serve warm or at room temperature.
Extra Tips:
To make the Pumpkin and Sage Crostini even more flavorful, consider roasting the pumpkin seeds from the pumpkin you used earlier. Simply clean, dry, and toss them in olive oil and salt before roasting them alongside the pumpkin.
This adds a delightful crunch and makes use of the whole pumpkin. Additionally, if you’re short on time, canned pumpkin puree can be used as a substitute for fresh pumpkin, though the flavor will be slightly different. Always taste and adjust the seasoning of your pumpkin mixture according to your preference.
Vampire Bat Wings

Get ready to add a spooky twist to your Halloween party with these tantalizing Vampire Bat Wings! Perfect for adults looking to enjoy a frightful yet delicious appetizer, these wings are marinated in a flavorful concoction that gives them a devilishly dark color. The secret to achieving the deep black hue is using a combination of soy sauce and balsamic glaze, which not only provides color but also infuses the wings with a savory and slightly sweet taste. Ideal for a serving size of 4-6 people, these wings are sure to be a hit at your next Halloween gathering.
The preparation of Vampire Bat Wings is simple yet effective, guaranteeing you spend more time enjoying the festivities and less in the kitchen. The wings are first marinated to absorb all the rich flavors, then baked to perfection until they’re crispy on the outside and juicy on the inside. These spooky wings not only look amazing on your Halloween-themed table but also pack a punch with their irresistible flavor. Pair them with a gory dipping sauce, like a blood-red hot sauce, to enhance the eerie theme.
Ingredients for 4-6 people:
- 3 lbs chicken wings
- 1 cup soy sauce
- 1/2 cup balsamic glaze
- 1/4 cup honey
- 2 tablespoons olive oil
- 1 tablespoon garlic powder
- 1 tablespoon onion powder
- 1 teaspoon smoked paprika
- 1 teaspoon black pepper
- 1 teaspoon salt
- 1 tablespoon sesame seeds (optional, for garnish)
- Fresh parsley (optional, for garnish)
Cooking Instructions:
- Prepare the Marinade: In a large mixing bowl, combine the soy sauce, balsamic glaze, honey, olive oil, garlic powder, onion powder, smoked paprika, black pepper, and salt. Stir well until all ingredients are thoroughly mixed to create a rich marinade.
- Marinate the Wings: Place the chicken wings into the bowl with the marinade, guaranteeing each wing is fully coated. Cover the bowl with plastic wrap and refrigerate for at least 2 hours, or overnight for best results. This allows the flavors to penetrate deeply into the wings.
- Preheat the Oven: Preheat your oven to 400°F (200°C). Line a large baking sheet with parchment paper or aluminum foil for easy cleanup.
- Arrange the Wings: Remove the marinated wings from the refrigerator and arrange them in a single layer on the prepared baking sheet. Make sure they’re spaced out evenly to guarantee even cooking.
- Bake the Wings: Place the baking sheet in the preheated oven and bake for 35-40 minutes, flipping the wings halfway through the cooking time. This will guarantee the wings are crispy on the outside and cooked through on the inside.
- Garnish and Serve: Once baked, remove the wings from the oven and let them cool slightly. Transfer them to a serving platter and sprinkle with sesame seeds and fresh parsley for garnish, if desired.
Extra Tips:
For an extra crispy finish, you can broil the wings for an additional 2-3 minutes after baking. Just keep a close eye on them to prevent burning.
If you prefer a spicier kick, add a pinch of cayenne pepper to the marinade. Additionally, these Vampire Bat Wings can be served with a variety of dipping sauces like ranch dressing or a spicy sriracha mayo to cater to different taste preferences. Enjoy your spooky and delicious Halloween feast!
Sriracha-Spiked Spider Deviled Eggs
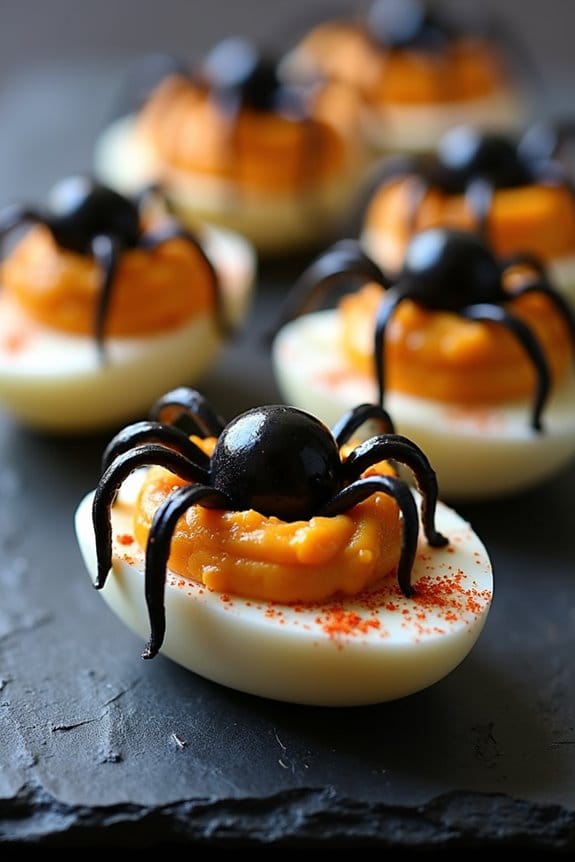
Sriracha-Spiked Spider Deviled Eggs are a devilishly delightful addition to any Halloween gathering, perfect for adults looking to add a spicy twist to their appetizer spread. These deviled eggs not only deliver a burst of flavor with a hint of heat but also come with a creative presentation that will impress your guests. The sriracha adds a modern, fiery kick to the classic deviled egg filling, while the spider decoration brings a touch of eerie fun to the table.
With their spicy edge and spooky flair, these eggs are sure to be a hit at your Halloween party. Whether you’re hosting a large gathering or an intimate get-together, these deviled eggs are easy to prepare and can be made ahead of time, allowing you to enjoy the festivities without spending too much time in the kitchen.
Spicy and spooky, these deviled eggs steal the show at any Halloween gathering!
The combination of creamy yolks, tangy mayonnaise, and spicy sriracha creates a harmonious blend of flavors, while black olives serve as the perfect garnish to complete the spider-like appearance. Follow this simple recipe to make a serving size of 4-6 people and watch as your guests devour these spiced-up treats.
Ingredients (Serves 4-6):
- 6 large eggs
- 3 tablespoons mayonnaise
- 1 tablespoon sriracha sauce
- 1 teaspoon Dijon mustard
- Salt to taste
- Black pepper to taste
- 12 black olives (pitted and halved lengthwise)
- Paprika for garnish
Instructions:
- Boil the Eggs: Place the eggs in a saucepan and cover them with cold water. Bring the water to a boil over medium-high heat. Once boiling, reduce the heat to low and let the eggs simmer for 10 minutes. After cooking, transfer the eggs to a bowl of ice water to cool for about 5 minutes. This will make them easier to peel.
- Peel and Slice the Eggs: After cooling, gently peel the shells off the eggs. Carefully slice each egg in half lengthwise and remove the yolks, placing them in a bowl. Set the egg whites aside on a serving platter.
- Prepare the Filling: Mash the egg yolks with a fork until they’re crumbly. Add mayonnaise, sriracha sauce, and Dijon mustard to the yolks. Mix until the mixture is smooth and creamy. Season with salt and black pepper to taste.
- Fill the Egg Whites: Spoon or pipe the yolk mixture back into the hollowed egg whites. Use a piping bag or a spoon to evenly distribute the filling.
- Create the Spider Decoration: For each egg half, place one olive half in the center of the filling as the spider’s body. Cut the remaining olive halves into thin strips to create spider legs. Arrange four olive strips on each side of the olive “body” to resemble spider legs.
- Garnish and Serve: Lightly sprinkle paprika over the filled eggs for an extra touch of color and flavor. Serve immediately or refrigerate until ready to serve.
Extra Tips:
To guarantee perfectly cooked eggs, use eggs that are slightly older, as they tend to peel more easily than fresh ones. For a smoky flavor variation, consider using smoked paprika instead of regular paprika.
If you’re making these deviled eggs ahead of time, keep the filling and egg whites separate until just before serving to maintain the freshest taste and appearance. Additionally, if you find the sriracha too spicy, you can adjust the amount to suit your heat preference, or substitute with a milder hot sauce.
Black Magic Truffle Popcorn

Halloween is a time for all things spooky and delectable, and Black Magic Truffle Popcorn is the perfect appetizer to set the eerie mood for your adult Halloween gathering. This gourmet treat combines the earthy, luxurious flavor of black truffles with the irresistible crunch of popcorn, creating a snack that’s both sophisticated and playful.
The addition of edible black food coloring gives the popcorn a bewitching appearance, making it an eye-catching centerpiece for your Halloween spread. This recipe is designed to serve 4-6 people, making it ideal for a small get-together. The aroma of truffle oil will fill the room, enticing your guests to plunge into this hauntingly delicious snack.
Whether you’re hosting a Halloween movie marathon or a costume party, Black Magic Truffle Popcorn is sure to captivate your guests with its unique flavor and presentation.
Ingredients (serving size: 4-6 people):
- 1/2 cup popcorn kernels
- 3 tablespoons vegetable oil (for popping)
- 2 tablespoons black truffle oil
- 1 teaspoon edible black food coloring (gel or powder)
- 1/2 cup grated Parmesan cheese
- 1 teaspoon sea salt
- 1 teaspoon ground black pepper
- 1 tablespoon finely chopped fresh parsley (optional, for garnish)
Instructions:
1. Prepare the Popcorn: In a large pot with a tight-fitting lid, heat the vegetable oil over medium heat. Add a few popcorn kernels and cover the pot. When the kernels pop, add the remaining popcorn kernels in an even layer. Cover the pot again and shake it gently back and forth over the heat.
Once the popping slows to about 2 seconds between pops, remove the pot from heat and keep it covered until all popping stops.
2. Transfer and Season: Pour the freshly popped popcorn into a large mixing bowl. Drizzle the black truffle oil over the popcorn and toss to guarantee even distribution.
3. Color the Popcorn: In a small bowl, mix the edible black food coloring with a small amount of water to create a paste if using gel, or apply powder directly. Drizzle this mixture over the popcorn while tossing continuously to achieve an even black hue.
4. Add Cheese and Seasonings: Sprinkle the grated Parmesan cheese, sea salt, and ground black pepper over the popcorn. Toss the popcorn again to distribute the seasonings evenly.
5. Garnish and Serve: If using, sprinkle the finely chopped parsley over the popcorn for a touch of color. Serve immediately or transfer to a serving bowl for your guests to enjoy.
Extra Tips:
For the best results, use high-quality truffle oil and Parmesan cheese, as these ingredients are key to achieving the rich flavor profile of this dish. If you prefer a stronger truffle flavor, you can add an extra tablespoon of truffle oil.
Be cautious with the black food coloring, as a little goes a long way; start with a small amount and add more if needed to reach your desired shade. Finally, if you want to prepare this dish in advance, keep the popcorn in an airtight container to maintain its crispiness until serving time.
Monster Cheese Platter

Indulge your guests this Halloween with a Monster Cheese Platter that’s both a feast for the eyes and the taste buds. This appetizer is perfect for adults looking to add a sophisticated touch to their spooky celebrations. A well-curated cheese platter offers a delightful range of flavors and textures, and when styled creatively, it becomes a centerpiece that complements the eerie ambiance of your Halloween party.
This platter combines a variety of cheeses, fruits, and nuts with a selection of cured meats, all presented in a way that evokes the mysterious allure of the season.
To create your Monster Cheese Platter, select cheeses that offer a balance of flavors—from creamy and mild to sharp and tangy. Accompany these with elements that add contrast and complement the cheeses, like sweet fruits, crunchy nuts, and savory cured meats. The secret to making this platter truly monstrous lies in the presentation: use dark, moody serving boards, and arrange the ingredients in a way that resembles a haunted landscape. Garnish with herbs and edible flowers for an extra touch of magic.
Ingredients for 4-6 servings:
- 200g Brie cheese
- 200g Blue cheese
- 200g Aged cheddar
- 200g Gouda
- 150g Prosciutto
- 150g Salami
- 100g Dried apricots
- 100g Fresh figs, halved
- 100g Green grapes
- 100g Walnuts
- 100g Almonds
- 1 small bunch of fresh rosemary
- Edible flowers (optional)
- Assorted crackers and breadsticks
Cooking Instructions:
- Prepare the Cheese: Begin by slicing the cheeses into various shapes and sizes. Leave the Brie whole or cut into wedges, cube the cheddar and gouda, and crumble the blue cheese. Arrange them on a large serving platter or board, spacing them out to allow room for the other ingredients.
- Add the Meats: Fold the prosciutto into loose ribbons and roll the salami into small cones or stacks. Place them strategically around the cheeses to create visual interest and easy access for guests.
- Incorporate the Fruits: Add the halved figs and clusters of grapes in between the cheeses and meats. Arrange the dried apricots around the platter, filling in any gaps. These sweet elements enhance the flavors of the cheese.
- Add Nuts and Garnishes: Scatter the walnuts and almonds across the platter, focusing on empty spaces to add texture. Tuck sprigs of rosemary among the ingredients, providing a fresh, fragrant touch. If using edible flowers, place them sparingly for a pop of color.
- Serve with Crackers: Set a small basket or plate nearby with an assortment of crackers and breadsticks, allowing guests to build their perfect bite.
Extra Tips:
When assembling your Monster Cheese Platter, consider the contrasts in color and texture to make the presentation visually appealing. Use a dark slate or wooden board for a more dramatic effect.
If you’re hosting outdoors or in a dim setting, incorporate small LED lights or candles around the platter to enhance the spooky atmosphere. Keep some extra ingredients on hand to replenish the platter as needed throughout the evening.
Finally, let the cheeses sit at room temperature for about 30 minutes before serving to guarantee they reach their best flavor and texture.
Dark Chocolate-Dipped Fruit Skewers

Halloween isn’t just for kids, and neither are these delectable Dark Chocolate-Dipped Fruit Skewers. Perfect for a sophisticated touch to your Halloween gathering, these skewers combine the natural sweetness of fresh fruit with the rich, indulgent taste of dark chocolate.
Whether you’re hosting a spooky soiree or a more intimate dinner party, these skewers make for an elegant yet playful appetizer that adults will love. The contrast of the creamy dark chocolate against the vibrant colors of the fruit isn’t only visually appealing but also creates a delightful flavor experience.
These skewers are as easy to make as they’re delicious. With a mix of seasonal fruits, such as strawberries, bananas, and kiwis, each piece is carefully immersed into luscious melted dark chocolate. The skewers can be prepared ahead of time, making them a convenient choice for busy hosts.
Serve them chilled for a revitalizing bite that pairs beautifully with a glass of wine or a Halloween-themed cocktail. Let’s jump into the recipe and learn how to make Dark Chocolate-Dipped Fruit Skewers for your adult Halloween celebration.
Ingredients for 4-6 Servings:
- 2 cups of fresh strawberries
- 2 bananas
- 3 kiwis
- 12 ounces of high-quality dark chocolate (at least 70% cocoa)
- 1 tablespoon coconut oil
- Skewer sticks
Cooking Instructions:
- Prepare the Fruit: Wash the strawberries thoroughly and pat them dry with a paper towel. Peel the bananas and cut them into approximately 1-inch slices. Peel the kiwis and slice them into 1-inch thick rounds.
- Melt the Chocolate: In a heatproof bowl, combine the dark chocolate and coconut oil. Place the bowl over a pot of simmering water, making sure the bottom of the bowl doesn’t touch the water. Stir gently until the chocolate is completely melted and smooth.
- Assemble the Skewers: Thread the fruit onto the skewer sticks, alternating between strawberries, banana slices, and kiwi rounds for variety and color appeal. Leave enough space at the bottom of the skewer for easy handling.
- Dip the Skewers: Carefully dip each skewer into the melted chocolate, turning to coat the fruit evenly. Allow any excess chocolate to drip back into the bowl.
- Set the Skewers: Place the chocolate-dipped skewers on a baking sheet lined with parchment paper. Once all skewers are coated, transfer the sheet to the refrigerator and chill for at least 20-30 minutes or until the chocolate is set.
Extra Tips:
For an added twist, you can sprinkle the chocolate-dipped fruit with sea salt or chopped nuts before the chocolate sets for a hint of extra flavor and texture.
If you prefer a sweeter chocolate coating, consider adding a tablespoon of honey or maple syrup to the melted chocolate mixture. Make sure the fruit is completely dry before dipping to avoid any water causing the chocolate to seize.
These skewers can be made a few hours in advance, but for the best taste and texture, serve them on the same day they’re prepared. Enjoy your Halloween treat!
