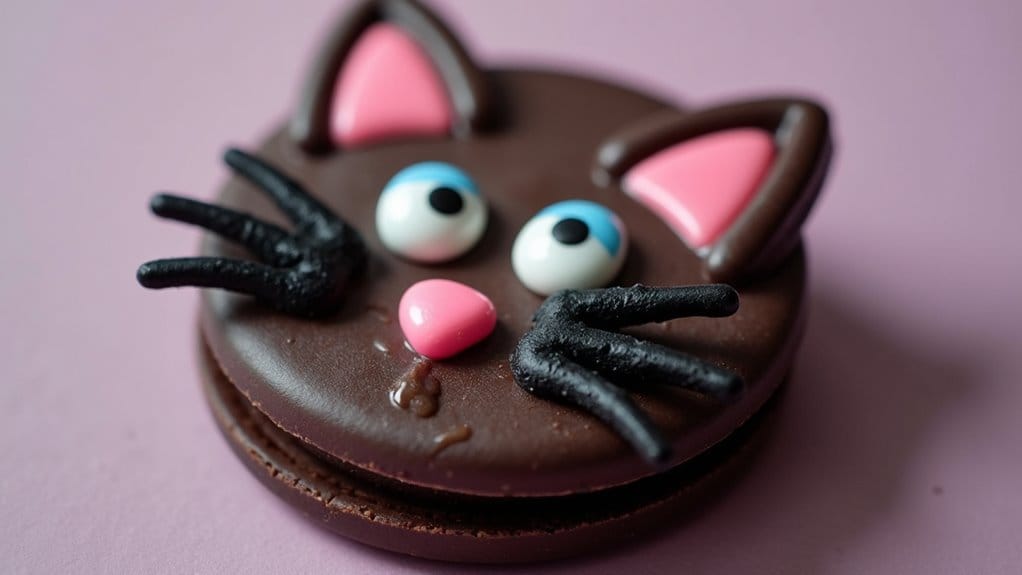
As the leaves start to fall and the air gets that familiar crispness, it’s time to celebrate Halloween with some delightfully spooky treats. These Halloween cookies are not just delicious but also a treat for the eyes with their vibrant colors and playful designs. Picture yourself enjoying a monster eyeball cookie or the sweet spookiness of ghostly meringue cookies. Each bite promises a magical blend of flavors and fun. Ready to get inspired by these hauntingly good creations?
Monster Eyeball Cookies
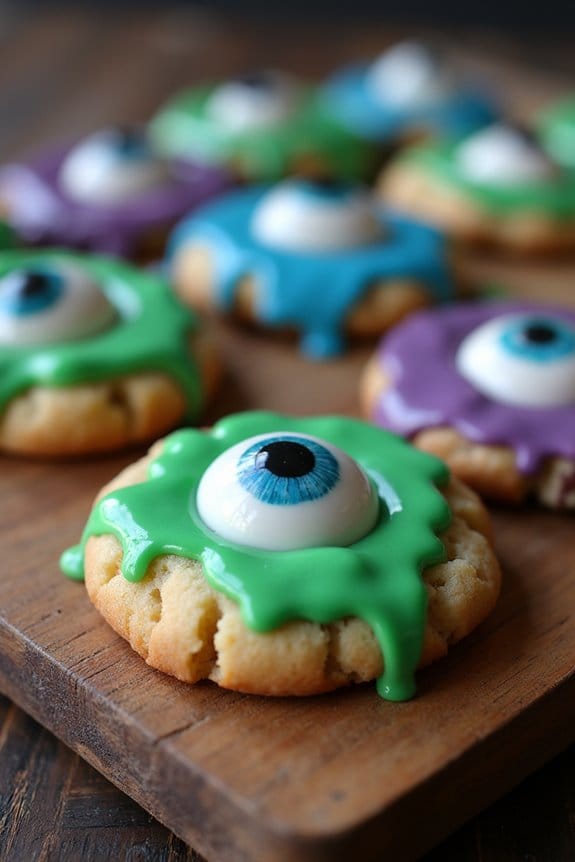
Monster Eyeball Cookies are a spooky and fun addition to any Halloween spread. These cookies not only look eerie but are also delicious, making them a hit for both kids and adults. Perfect for a Halloween party or a spooky night in, these cookies are certain to be a conversation starter.
They’re made from a simple sugar cookie base and decorated with colorful icing and candy eyes to resemble monster eyeballs. This recipe makes enough for 4-6 people, providing ample opportunity for everyone to enjoy these ghoulish treats. The ingredients are easy to find, and the process is straightforward, making it a great baking project for beginners or a fun activity to do with kids. With a little creativity, you can even personalize each monster eyeball with different colors and expressions.
Ingredients:
- 1 cup unsalted butter, softened
- 1 cup granulated sugar
- 1 large egg
- 1 teaspoon vanilla extract
- 2 ½ cups all-purpose flour
- ½ teaspoon baking powder
- ¼ teaspoon salt
- Food coloring (assorted colors)
- Candy eyeballs
- Royal icing (pre-made or homemade)
Instructions:
- Preheat the Oven: Start by preheating your oven to 350°F (175°C). Line a baking sheet with parchment paper to prevent the cookies from sticking and to guarantee even baking.
- Prepare the Dough: In a large bowl, cream together the softened butter and granulated sugar until the mixture is light and fluffy. This should take about 2-3 minutes using an electric mixer. Add the egg and vanilla extract, then mix until well combined.
- Mix Dry Ingredients: In a separate bowl, whisk together the all-purpose flour, baking powder, and salt. Gradually add the dry ingredients to the wet ingredients, mixing until a dough forms.
- Color the Dough: Divide the dough into 3 or 4 portions, depending on how many colors you want. Add a few drops of different food coloring to each portion. Knead the dough until the color is evenly distributed.
- Shape the Cookies: Roll the colored dough into 1-inch balls and place them onto the prepared baking sheet, spacing them about 2 inches apart.
- Bake the Cookies: Bake in the preheated oven for 10-12 minutes, or until the edges are lightly golden. Remove from the oven and let them cool on the baking sheet for a few minutes before transferring to a wire rack to cool completely.
- Decorate the Cookies: Once the cookies are cool, use royal icing to add detail and texture. Attach the candy eyeballs using a small dab of royal icing. Feel free to be creative with the placement for a spooky effect.
- Let Set: Allow the icing to set completely before serving. This may take about 30 minutes to an hour.
Extra Tips:
For the best results, make sure your butter is at room temperature before starting. This helps to guarantee the dough mixes evenly and results in a smoother texture.
If you want to prepare ahead of time, the cookie dough can be made a day in advance and stored in the refrigerator. Just bring it back to room temperature before baking.
When adding food coloring, start with a small amount and gradually increase until you reach your desired intensity. Remember that the color will deepen slightly as the cookies bake.
Witch’s Hat Chocolate Cookies

Witch’s Hat Chocolate Cookies are a delightful and spooky treat perfect for Halloween celebrations. These cookies combine the rich, indulgent flavors of chocolate with a playful and whimsical design that resembles a witch’s hat. Perfect for a Halloween party or just a fun baking project with family and friends, these cookies are sure to impress both in taste and appearance.
Each bite offers a delicious combination of flavors and textures, with the cookie base providing a soft, chewy contrast to the smooth chocolate and decorative candy. Creating these cookies is an enjoyable process that allows for creativity and personalization. You can experiment with different types of chocolate and choose your favorite candies to decorate the hats, adding a personal touch to your Halloween treats.
The recipe yields enough cookies to serve 4-6 people, making it an ideal choice for small gatherings or for sharing with loved ones. Whether you’re a seasoned baker or a kitchen novice, these Witch’s Hat Chocolate Cookies are simple to make and will surely bring a touch of magic to your Halloween festivities.
Perfect for small gatherings, these Witch’s Hat Chocolate Cookies add magic to your Halloween celebrations.
Ingredients (Serves 4-6):
- 1 cup unsalted butter, softened
- 1 cup granulated sugar
- 1 cup brown sugar, packed
- 2 large eggs
- 1 teaspoon vanilla extract
- 2 ¼ cups all-purpose flour
- ¾ cup unsweetened cocoa powder
- 1 teaspoon baking soda
- ½ teaspoon salt
- 24 chocolate kisses
- 24 round chocolate wafer cookies
- Orange or purple icing (for decoration)
- Assorted Halloween candies (optional)
Instructions:
- Preheat and Prep: Preheat your oven to 350°F (175°C). Line two baking sheets with parchment paper to prevent sticking.
- Cream the Butter and Sugars: In a large mixing bowl, cream together the softened butter, granulated sugar, and brown sugar until the mixture is light and fluffy. This typically takes about 3-4 minutes using an electric mixer on medium speed.
- Add Eggs and Vanilla: Beat in the eggs, one at a time, ensuring each is fully incorporated before adding the next. Stir in the vanilla extract.
- Mix Dry Ingredients: In a separate bowl, whisk together the flour, cocoa powder, baking soda, and salt. Gradually add the dry ingredients to the wet mixture, stirring until just combined. Avoid over-mixing to keep the cookies tender.
- Shape the Cookies: Scoop tablespoons of dough and roll them into balls. Place each ball onto the prepared baking sheets, leaving about 2 inches of space between each one.
- Bake the Cookies: Bake in the preheated oven for 8-10 minutes, or until the cookies are set but still soft in the center. Remove from oven and let cool on the pan for 5 minutes.
- Assemble the Witch’s Hats: While the cookies are still warm, press a chocolate kiss into the center of each cookie. Then, place a chocolate wafer cookie on top, pressing gently to adhere.
- Decorate: Once the cookies have cooled completely, use the orange or purple icing to pipe a decorative band around the base of the chocolate kiss to resemble a witch’s hat. Add any additional Halloween candies for extra flair.
- Serve: Allow the icing to set before serving and enjoy your spooky creations!
Extra Tips: For a more intense chocolate flavor, use dark chocolate cocoa powder. If you want to add a bit of crunch, consider mixing in some chopped nuts or chocolate chips into the dough. When pressing the chocolate kiss into the cookie, do so gently to avoid cracking. If you don’t have orange or purple icing, you can mix food coloring into white icing to achieve the desired color. Store any leftover cookies in an airtight container to maintain their freshness.
Mummy Sugar Cookies
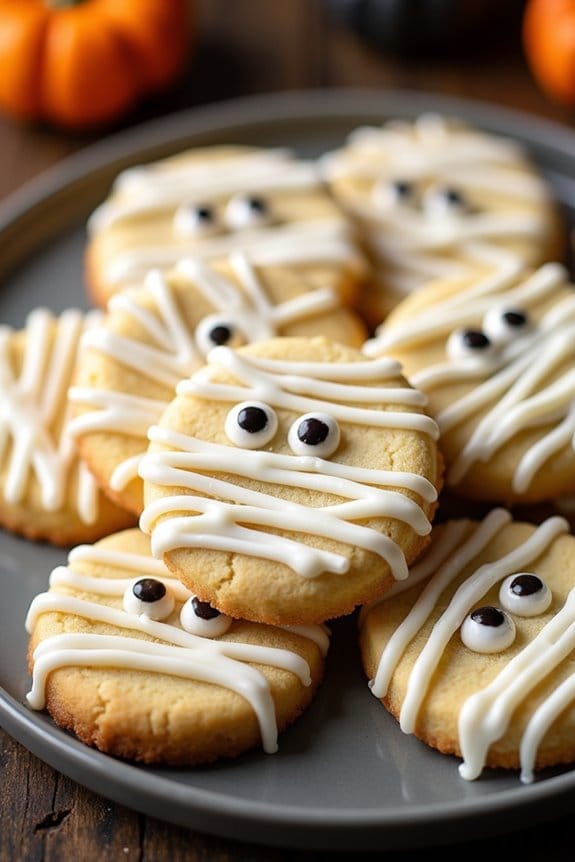
Mummy Sugar Cookies are a fun and festive way to celebrate Halloween. These cookies aren’t only delicious but also simple to make, making them a great activity for baking with kids or hosting a Halloween party. The sugar cookie base is soft and buttery, providing the perfect canvas for the mummy-themed decorations.
With a little creativity and a few basic ingredients, you can transform ordinary cookies into spooky treats that are sure to delight both children and adults. The key to these delightful cookies is in the decoration. Using white icing to mimic the look of mummy bandages, and adding candy eyes for a playful touch, these cookies come to life in a matter of minutes.
The result is a batch of cookies that are as visually appealing as they’re tasty. Whether you’re an experienced baker or a novice in the kitchen, Mummy Sugar Cookies offer a straightforward recipe that yields impressive results.
Ingredients (serves 4-6):
- 2 3/4 cups all-purpose flour
- 1 teaspoon baking powder
- 1/2 teaspoon salt
- 1 cup unsalted butter, softened
- 1 1/2 cups granulated sugar
- 1 large egg
- 1 teaspoon vanilla extract
- White icing (store-bought or homemade)
- Candy eyes
Cooking Instructions:
- Preheat the Oven: Start by preheating your oven to 350°F (175°C). This guarantees the cookies bake evenly.
- Prepare the Dry Ingredients: In a medium bowl, whisk together the all-purpose flour, baking powder, and salt. Set this mixture aside.
- Cream the Butter and Sugar: In a large mixing bowl, cream together the softened butter and granulated sugar using an electric mixer until the mixture is light and fluffy. This should take about 3 minutes.
- Add Egg and Vanilla: Beat in the egg and vanilla extract into the butter and sugar mixture until well combined.
- Combine Wet and Dry Ingredients: Gradually add the dry ingredients to the wet mixture, mixing until just combined. Avoid overmixing to keep the cookies tender.
- Roll Out the Dough: On a lightly floured surface, roll out the dough to about 1/4 inch thickness. Use a round cookie cutter to cut out circles of dough.
- Bake the Cookies: Place the cookie circles onto a baking sheet lined with parchment paper. Bake in the preheated oven for 8-10 minutes or until the edges are lightly golden. Allow the cookies to cool completely on a wire rack.
- Decorate the Cookies: Once the cookies are completely cooled, use the white icing to create mummy bandages by piping random lines across the cookies. Add candy eyes to complete the mummy look.
Extra Tips:
When making Mummy Sugar Cookies, verify that your butter is properly softened for easier mixing and a smoother dough. If your dough becomes too warm and sticky while rolling, chill it in the refrigerator for 15-20 minutes to make it easier to handle.
Additionally, if you want to add some flavor variation, consider incorporating a teaspoon of almond extract or lemon zest to the dough. Be creative with the icing pattern for a unique look on each cookie, and have fun with the process!
Ghostly Meringue Cookies

Ghostly Meringue Cookies are a delightful treat that perfectly capture the spirit of Halloween. These spooky sweets are light, airy, and melt-in-your-mouth delicious, making them a hit at any Halloween gathering. With their ghostly shapes and hauntingly sweet taste, these cookies are sure to enchant both kids and adults alike.
The meringue base gives them a crisp exterior with a slightly chewy interior, creating a texture that’s both fun and satisfying.
Made with just a few simple ingredients, Ghostly Meringue Cookies are surprisingly easy to prepare. The key lies in whipping the egg whites to stiff peaks and then delicately folding in the sugar to create a glossy, stable mixture. Shaping the meringues into little ghost shapes is a fun activity for the whole family.
Once baked, these cookies can be decorated with melted chocolate to give the ghosts eyes and a mouth, adding a playful touch to your spooky creations.
Ingredients (serving size: 4-6 people)
- 4 large egg whites
- 1 cup granulated sugar
- 1/4 teaspoon cream of tartar
- 1/2 teaspoon vanilla extract
- A pinch of salt
- 1/4 cup semi-sweet chocolate chips (for decoration)
Cooking Instructions
- Preheat the Oven: Preheat your oven to 225°F (110°C) and line two baking sheets with parchment paper.
- Prepare the Meringue: In a clean, dry mixing bowl, beat the egg whites on medium speed until they become foamy. Add the cream of tartar and a pinch of salt, and continue to beat until soft peaks form.
- Incorporate Sugar: Gradually add the sugar to the egg whites, a tablespoon at a time, while continuing to beat on high speed. This should take about 5-7 minutes, or until the mixture is glossy and stiff peaks form.
- Add Vanilla: Mix in the vanilla extract gently, making sure it’s fully incorporated into the meringue.
- Shape the Meringues: Transfer the meringue mixture into a piping bag fitted with a round tip. Pipe ghost shapes onto the prepared baking sheets, leaving a little space between each one.
- Bake the Meringues: Place the baking sheets in the preheated oven and bake for 1.5 to 2 hours. The ghosts should be dry to the touch and easily lift off the parchment paper.
- Cool the Meringues: Turn off the oven and leave the meringues inside to cool completely with the oven door slightly ajar for about an hour. This prevents cracking.
- Decorate the Ghosts: Melt the chocolate chips in a microwave-safe bowl in 20-second intervals until smooth. Using a toothpick or a small piping bag, dot on eyes and a mouth to create ghostly faces on each meringue.
Extra Tips
When making meringue, verify that all your equipment is completely free of grease, as any fat can prevent the egg whites from whipping up properly. It’s also helpful to use room temperature eggs for better volume.
If you don’t have a piping bag, you can use a plastic sandwich bag with a corner snipped off as an alternative. Finally, be patient while baking; low and slow is key to achieving the perfect meringue texture without browning them.
Enjoy your Ghostly Meringue Cookies as a spooky, sweet treat perfect for Halloween!
Spiderweb Chocolate Chip Cookies
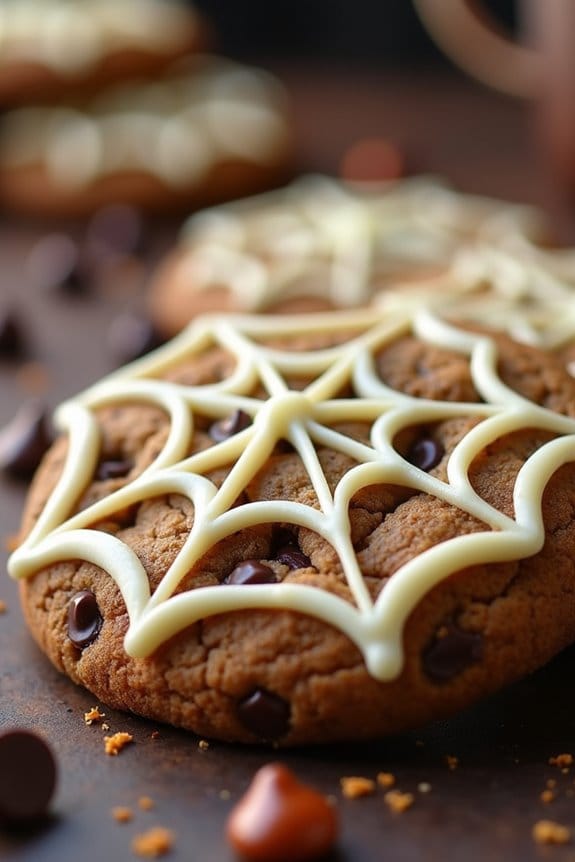
Spiderweb Chocolate Chip Cookies are a festive and fun treat perfect for celebrating Halloween. These cookies combine the classic, chewy goodness of chocolate chip cookies with a spooky spiderweb design that’s sure to impress both kids and adults alike.
The cookies are easy to make and are a great way to get creative in the kitchen while embracing the Halloween spirit. Whether you’re hosting a Halloween party or simply want a themed treat for your family, these Spiderweb Chocolate Chip Cookies are a delightful addition to your holiday festivities.
The key to achieving the spiderweb effect lies in the decoration process, which uses melted chocolate to draw intricate web patterns on the surface of the cookies. This recipe will guide you through each step of creating these delicious and visually appealing cookies, guaranteeing that you end up with a batch that’s not only tasty but also perfectly suited for Halloween.
The serving size for this recipe is designed to yield enough cookies for 4-6 people, making it ideal for small gatherings or family enjoyment.
Ingredients (serving size: 4-6 people):
- 2 1/4 cups all-purpose flour
- 1/2 teaspoon baking soda
- 1 cup unsalted butter, room temperature
- 1/2 cup granulated sugar
- 1 cup packed light-brown sugar
- 1 teaspoon salt
- 2 teaspoons pure vanilla extract
- 2 large eggs
- 2 cups semisweet and/or milk chocolate chips
- 1/2 cup white chocolate chips (for spiderweb decoration)
Cooking Instructions:
- Preheat and Prepare: Preheat your oven to 350°F (180°C). Line two baking sheets with parchment paper or silicone baking mats.
- Mix Dry Ingredients: In a medium bowl, whisk together the flour and baking soda. Set aside.
- Cream Butter and Sugar: In a large bowl, using an electric mixer, beat the butter, granulated sugar, brown sugar, and salt on medium speed until smooth and creamy, about 2 minutes.
- Add Vanilla and Eggs: Add the vanilla extract and eggs to the butter mixture, beating until combined. Scrape down the sides of the bowl as needed.
- Combine Ingredients: Gradually add the flour mixture to the wet ingredients, mixing just until combined. Stir in the semisweet and/or milk chocolate chips.
- Shape and Bake: Use a cookie scoop or tablespoon to drop dough onto the prepared baking sheets, spacing them about 2 inches apart. Bake until cookies are golden brown around the edges but still soft in the center, about 12-15 minutes.
- Cool: Allow the cookies to cool on the baking sheets for 5 minutes before transferring them to a wire rack to cool completely.
- Create Spiderweb Design: Melt the white chocolate chips in a microwave-safe bowl in 15-second intervals, stirring between each interval until smooth. Transfer melted white chocolate to a piping bag or a small zip-top bag with a tiny corner cut off.
- Decorate: Once the cookies are completely cool, pipe a spiral of white chocolate on each cookie. Use a toothpick to drag lines from the center outwards to create a spiderweb effect.
Extra Tips:
To guarantee your spiderweb design is neat, practice drawing the pattern on parchment paper before decorating the actual cookies. If the white chocolate is too thick for piping, add a small amount of coconut oil or vegetable shortening to thin it out.
Make sure the cookies are completely cool before decorating, as any residual warmth could cause the white chocolate to melt and lose its shape. Store the cookies in an airtight container to maintain their freshness and chewiness. Enjoy your spooky, delicious creation!
Pumpkin Spice Jack-O’-Lantern Cookies

Pumpkin Spice Jack-O’-Lantern Cookies are a delightful treat perfect for any Halloween gathering or cozy autumn afternoon. These cookies are a fun and festive way to enjoy the classic flavors of fall, with a spicy pumpkin aroma filling your kitchen as they bake. The charming jack-o’-lantern design is sure to bring a smile to both children and adults alike, making them a great activity for family baking sessions.
The perfect festive treat for Halloween, with a spicy pumpkin aroma and charming jack-o’-lantern designs.
The combination of warm spices, pumpkin puree, and a hint of sweetness creates a perfectly balanced cookie that’s crisp on the outside and soft on the inside. This recipe is designed to serve 4-6 people, making it ideal for small gatherings or as a friendly gift for neighbors. The cookies aren’t only delicious but also visually appealing, with their bright orange hue and carved faces.
Whether you’re a novice baker or an experienced pro, these Pumpkin Spice Jack-O’-Lantern Cookies are a must-try this Halloween season. Gather your ingredients and get ready to create a batch of festive fun that tastes as good as it looks.
Ingredients for 4-6 servings:
- 2 1/2 cups all-purpose flour
- 1 teaspoon baking powder
- 1/2 teaspoon baking soda
- 1/2 teaspoon salt
- 1 teaspoon ground cinnamon
- 1/2 teaspoon ground nutmeg
- 1/4 teaspoon ground cloves
- 1/2 cup unsalted butter, softened
- 1/2 cup granulated sugar
- 1/2 cup brown sugar, packed
- 1 large egg
- 1 teaspoon vanilla extract
- 1/2 cup pumpkin puree
- Orange and black food coloring
- Royal icing or decorating gel for faces
Cooking Instructions:
- Prepare Dry Ingredients: In a medium bowl, whisk together the flour, baking powder, baking soda, salt, cinnamon, nutmeg, and cloves. This will evenly distribute the spices and leavening agents throughout the flour.
- Cream Butter and Sugars: In a large mixing bowl, cream together the softened butter, granulated sugar, and brown sugar using an electric mixer on medium speed. Beat until the mixture is light and fluffy, about 2-3 minutes.
- Add Wet Ingredients: Add the egg, vanilla extract, and pumpkin puree to the butter mixture. Beat on low speed until everything is well combined, and the mixture is smooth.
- Combine Wet and Dry Ingredients: Gradually add the dry ingredients to the wet mixture, beating on low speed until just combined. Be careful not to overmix the dough.
- Color the Dough: Divide the dough in half. Color one half with orange food coloring for the pumpkin base and the other half with black food coloring for the jack-o’-lantern faces.
- Chill the Dough: Wrap each colored dough in plastic wrap and refrigerate for at least 1 hour. This will make the dough easier to roll and cut.
- Preheat Oven: Preheat your oven to 350°F (175°C) and line baking sheets with parchment paper.
- Roll and Cut Cookies: Roll out the orange dough on a lightly floured surface to about 1/4 inch thickness. Use a pumpkin-shaped cookie cutter to cut out the cookies. Use the black dough to create small jack-o’-lantern facial features and press them onto the orange cookies.
- Bake the Cookies: Place the cookies on the prepared baking sheets, leaving some space between each one. Bake for 10-12 minutes, or until the edges are lightly golden. Allow the cookies to cool on the baking sheet for a few minutes before transferring to a wire rack to cool completely.
- Decorate: Once the cookies are completely cool, use royal icing or decorating gel to add any additional details to the jack-o’-lantern faces if desired.
Extra Tips:
When making Pumpkin Spice Jack-O’-Lantern Cookies, verify that the butter is at room temperature for easy creaming, which helps achieve the right cookie texture. If you find the dough too sticky to handle, dust your hands and rolling pin with a bit of flour.
For deeper flavors, consider letting the dough rest overnight in the refrigerator. Always allow the cookies to cool completely before decorating to prevent the icing from melting. Enjoy your festive creations!
Bloody Finger Almond Cookies

Celebrate Halloween with a spooky and delicious treat that’s sure to impress both kids and adults alike. Bloody Finger Almond Cookies are a creative and eerie addition to any Halloween party spread. These cookies are shaped like fingers, with a macabre twist of red icing and almond nails, giving them a creepy yet irresistible appearance. Perfectly buttery and slightly sweet, they’re a delightful balance of flavor and fright, making them the perfect centerpiece for your Halloween dessert table.
Crafting these cookies is a fun and engaging activity that can be enjoyed with family or friends. The process of shaping the dough into finger-like forms and adding the finishing touches with almonds and red icing will surely ignite your Halloween spirit. Whether you’re an experienced baker or a novice in the kitchen, these cookies are simple to make and require only basic ingredients. So, put on your apron and get ready to bake some spooky treats that will leave everyone in awe.
Ingredients (Serving size: 4-6 people)
- 1 cup unsalted butter, softened
- 1 cup powdered sugar
- 1 large egg
- 1 teaspoon vanilla extract
- 1 teaspoon almond extract
- 2 2/3 cups all-purpose flour
- 1 teaspoon baking powder
- 1 teaspoon salt
- 3/4 cup whole blanched almonds
- Red food coloring or red icing gel
Instructions
- Preheat and Prepare: Preheat your oven to 325°F (165°C). Line two baking sheets with parchment paper and set them aside.
- Mix Wet Ingredients: In a large mixing bowl, beat the softened butter and powdered sugar together until light and fluffy. Add the egg, vanilla extract, and almond extract, and continue to mix well until fully combined.
- Combine Dry Ingredients: In a separate bowl, whisk together the flour, baking powder, and salt. Gradually add the dry ingredients to the wet mixture, stirring until a soft dough forms.
- Shape the Fingers: Divide the dough into 24-30 equal pieces. Roll each piece into a log shape, about 3 inches long and 1/2 inch thick. To create knuckles, gently squeeze the dough in two places to form indentations. Use a small knife to make small lines on the knuckles for added realism.
- Add the Nails: Press a whole blanched almond firmly into one end of each cookie to create a fingernail. Make sure the almond is secure.
- Bake: Place the shaped cookies onto the prepared baking sheets, leaving a little space between each. Bake in the preheated oven for 20-25 minutes or until they’re lightly golden.
- Decorate with Blood: Once the cookies have cooled slightly, use red food coloring or red icing gel to add a bloody effect around the almond nails and the base of the fingers for an extra spooky touch.
Extra Tips
To enhance the spooky appearance, you can add a few drops of cocoa powder or dark food coloring to the dough for a more ghastly hue. If the dough becomes too soft while shaping, refrigerate it for about 15 minutes to make it easier to handle. Additionally, for a more realistic look, vary the sizes and shapes of the fingers slightly. Remember, imperfections add to the eerie effect!
Creepy Crawly Bug Cookies

Creepy Crawly Bug Cookies are a delightfully spooky treat perfect for Halloween festivities. These cookies aren’t only fun to make but also a great way to get into the Halloween spirit with friends and family. With their creepy-crawly design resembling bugs, they’re sure to be a hit at any Halloween party or gathering.
The combination of a sweet chocolate base and the creative use of decorations to mimic bugs will bring a playful yet eerie vibe to your dessert table.
These cookies are designed to serve 4-6 people, making them a great snack to share. The recipe involves making a basic chocolate cookie dough, and the magic happens in the decoration phase, where you’ll transform these simple cookies into bug-like creatures using candies and icing.
Whether you’re a seasoned baker or a beginner, these Creepy Crawly Bug Cookies are easy to make and a fun project for all ages.
Ingredients (Serves 4-6)
- 1 cup unsalted butter, softened
- 1 cup granulated sugar
- 1 cup packed brown sugar
- 2 large eggs
- 2 teaspoons vanilla extract
- 2 1/2 cups all-purpose flour
- 3/4 cup unsweetened cocoa powder
- 1 teaspoon baking soda
- 1/2 teaspoon salt
- Assorted candies (like M&Ms, gummy worms, and candy eyes)
- Black or brown icing for decoration
Cooking Instructions
- Preheat the Oven: Start by preheating your oven to 350°F (175°C). Line two baking sheets with parchment paper to prevent sticking.
- Cream the Butter and Sugars: In a large mixing bowl, cream together the softened butter, granulated sugar, and brown sugar until light and fluffy. This should take about 2-3 minutes with an electric mixer.
- Add Wet Ingredients: Add the eggs one at a time, beating well after each addition. Then mix in the vanilla extract.
- Combine Dry Ingredients: In a separate bowl, whisk together the flour, cocoa powder, baking soda, and salt. Gradually add this dry mixture to the wet ingredients, mixing until just combined.
- Form the Cookies: Scoop tablespoon-sized amounts of dough and roll them into balls. Place the balls onto the prepared baking sheets, leaving about 2 inches between each cookie to allow for spreading.
- Bake the Cookies: Bake in the preheated oven for 10-12 minutes, or until the cookies are set but still soft in the center. Remove from the oven and let them cool on the baking sheets for a few minutes before transferring them to a wire rack to cool completely.
- Decorate the Cookies: Once the cookies are completely cool, it’s time to decorate. Use assorted candies to create bug-like features. Use candy eyes for eyes, gummy worms as legs, and M&Ms for additional body details. Use the black or brown icing to draw lines or patterns to enhance the bug effect.
Extra Tips
For the best results, make sure your butter is properly softened, as this will help the cookies achieve the perfect texture.
When decorating, let your creativity run wild, and don’t worry about making each cookie identical—each bug can have its own unique look. If you’re working with kids, consider setting up a decorating station with all the candies and icing ready to go.
Finally, to guarantee the cookies stay soft, store them in an airtight container if not serving immediately. Enjoy your creepy creations!
Vampire Bite Red Velvet Cookies

Vampire Bite Red Velvet Cookies are a delicious and spooky treat, perfect for adding a touch of Halloween magic to your festivities. Their deep red color and eerie bite mark make them an eye-catching addition to any Halloween party spread. With a soft, chewy texture and a hint of chocolate flavor, these cookies are sure to be a hit with both kids and adults alike. The recipe is straightforward, allowing even beginner bakers to craft these frighteningly fun cookies.
These cookies get their dramatic appearance from a combination of red food coloring and a white chocolate “bite” for a realistic effect. The key to achieving the perfect vampire bite is in the decoration, so make certain to set aside enough time to add those finishing touches. With a few simple ingredients and a bit of creativity, you’ll have a batch of cookies that not only taste incredible but also serve as a fantastic centerpiece for your Halloween dessert table.
Ingredients for Vampire Bite Red Velvet Cookies (serving size: 4-6 people):
- 1 1/2 cups all-purpose flour
- 2 tablespoons unsweetened cocoa powder
- 1 teaspoon baking powder
- 1/4 teaspoon salt
- 1/2 cup unsalted butter, softened
- 3/4 cup granulated sugar
- 1 large egg
- 1 tablespoon red food coloring
- 1 teaspoon vanilla extract
- 1/2 cup white chocolate chips
- 1 tablespoon heavy cream
- Red gel icing for decoration
Cooking Instructions:
- Preheat and Prepare: Preheat your oven to 350°F (175°C) and line two baking sheets with parchment paper. This guarantees the cookies bake evenly and don’t stick.
- Mix Dry Ingredients: In a medium-sized bowl, whisk together the flour, cocoa powder, baking powder, and salt. This step helps evenly distribute the leavening agent and cocoa powder throughout the flour.
- Cream Butter and Sugar: In a separate large bowl, use an electric mixer to cream the softened butter and sugar together until light and fluffy, about 2-3 minutes. This step is essential for creating a tender cookie texture.
- Add Wet Ingredients: Beat in the egg, red food coloring, and vanilla extract into the butter mixture until fully combined. The red food coloring gives the cookies their signature hue.
- Combine Mixtures: Gradually add the dry ingredients to the wet ingredients, mixing just until combined. Avoid overmixing to keep the cookies soft.
- Shape Cookies: With a tablespoon or cookie scoop, drop dough onto the prepared baking sheets, spacing them about 2 inches apart. Flatten each slightly with the back of the spoon.
- Bake: Bake in the preheated oven for 10-12 minutes, or until the edges are set and the tops are slightly cracked. Remove from the oven and let them cool on the baking sheet for 5 minutes before transferring to a wire rack.
- Melt White Chocolate: In a small microwave-safe bowl, melt the white chocolate chips with the heavy cream in 20-second intervals, stirring in between until smooth.
- Decorate: Using a small spoon or piping bag, create two small fang-like marks on each cookie with the melted white chocolate. Allow to set briefly.
- Add Vampire Bite Effect: Finally, use red gel icing to add a drop or two of “blood” near each white chocolate fang mark for a realistic vampire bite effect.
Extra Tips:
For a more intense red color, you can adjust the amount of food coloring based on your preference. If you find the dough too sticky to work with, refrigerate it for about 30 minutes before shaping the cookies. Confirm that the white chocolate is fully melted and smooth for easy application of the fang marks. If you prefer a less sweet version, you can reduce the amount of sugar slightly without affecting the texture considerably. Enjoy your Vampire Bite Red Velvet Cookies fresh, or store them in an airtight container for up to a week.
Candy Corn Sugar Cookies
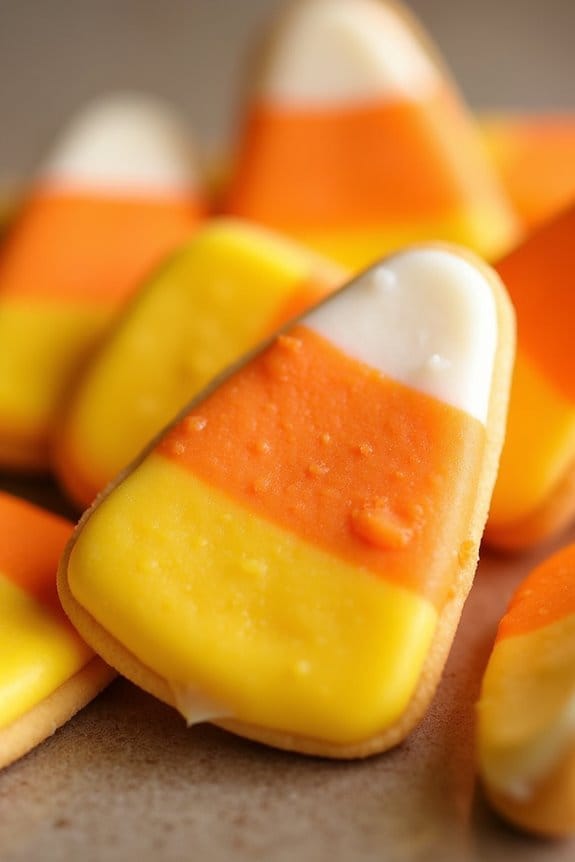
Candy Corn Sugar Cookies are a delightful twist on traditional sugar cookies, inspired by the iconic Halloween treat, candy corn. These colorful cookies are perfect for adding a festive touch to your Halloween gatherings or for simply enjoying the nostalgic flavors of fall.
The cookies are shaped and colored to mimic candy corn, with vibrant layers of orange, yellow, and white, making them both eye-catching and delicious. The sweet, buttery taste of the sugar cookies pairs perfectly with the subtle hints of vanilla, creating a treat that both kids and adults will love.
Not only are Candy Corn Sugar Cookies a visual treat, but they’re also fun to make. The dough is divided and colored before being layered, chilled, and sliced into triangles to resemble the classic candy corn shape. This recipe yields enough cookies to serve a small gathering of 4-6 people, making it ideal for a Halloween party or a cozy afternoon of baking with family and friends.
Whether you’re a seasoned baker or a beginner, this recipe is straightforward and enjoyable, guaranteeing you’ll have a spooktacular time creating these festive cookies.
Ingredients (serving size: 4-6 people):
- 2 1/2 cups all-purpose flour
- 1/2 teaspoon baking powder
- 1/4 teaspoon salt
- 1 cup unsalted butter, softened
- 1 cup granulated sugar
- 1 large egg
- 1 teaspoon vanilla extract
- Orange and yellow food coloring
Cooking Instructions:
- Prepare the Dry Ingredients: In a medium bowl, whisk together the all-purpose flour, baking powder, and salt. Set aside.
- Cream Butter and Sugar: In a large mixing bowl, use an electric mixer to cream the softened butter and granulated sugar until the mixture is light and fluffy, about 2-3 minutes.
- Add Egg and Vanilla: Beat in the egg and vanilla extract until well combined.
- Combine Dry and Wet Ingredients: Gradually add the dry ingredients to the butter mixture, mixing until just combined. Don’t overmix.
- Divide and Color the Dough: Divide the dough into three equal parts. Leave one part plain, color one part with orange food coloring, and the last part with yellow food coloring. Mix the dough until the colors are evenly distributed.
- Layer the Dough: Line a loaf pan with plastic wrap. Press the yellow dough evenly into the bottom of the pan. Next, layer the orange dough on top, followed by the plain dough. Cover with plastic wrap and refrigerate for at least 2 hours or until firm.
- Preheat the Oven: Preheat your oven to 350°F (175°C) and line baking sheets with parchment paper.
- Slice and Shape the Cookies: Remove the dough from the loaf pan and cut into 1/4-inch thick slices. Then, cut each slice into triangles to resemble candy corn.
- Bake the Cookies: Place the triangles on the prepared baking sheets, leaving space between each cookie. Bake for 8-10 minutes or until the edges are lightly golden. Cool on the baking sheet for 5 minutes before transferring to a wire rack to cool completely.
Extra Tips:
When making Candy Corn Sugar Cookies, make sure your butter is at room temperature for easy creaming with the sugar. Chilling the dough is essential for maintaining the shape of the cookies, so don’t skip this step.
When adding food coloring, start with a small amount and gradually increase until you achieve the desired color intensity. If you don’t have a loaf pan, you can shape the layered dough into a rectangular log on a flat surface instead.
Finally, these cookies can be stored in an airtight container for up to a week, making them a great make-ahead option for your Halloween festivities. Enjoy your baking and have a fang-tastic Halloween!
Frankenstein Monster Cookies

Frankenstein Monster Cookies are a playful and spooky treat perfect for Halloween. These cookies aren’t only delicious but also a fun activity to engage in with family or friends. The cookies are designed to resemble the iconic Frankenstein’s monster, with vibrant green coloring and creative decorations that mimic the monster’s face. They’re sure to be a hit at any Halloween party, bringing both smiles and a touch of fright to your gathering.
Crafting these cookies involves a straightforward process that yields a delightful buttery and sweet treat with a slightly crispy edge and a soft center. The decorations are where the creativity shines, allowing you to use chocolate chips, candied eyes, and other edible embellishments to bring your Frankenstein cookies to life. Whether you’re an experienced baker or a novice, this recipe is easy to follow and promises to provide a ghoulishly good time.
Ingredients for 4-6 servings:
- 2 1/4 cups all-purpose flour
- 1/2 teaspoon baking soda
- 1/4 teaspoon salt
- 1 cup unsalted butter, room temperature
- 1 cup granulated sugar
- 1/2 cup packed light-brown sugar
- 2 large eggs
- 1 teaspoon pure vanilla extract
- Green food coloring
- 1 cup chocolate chips
- Black decorating gel
- Candy eyes
- Mini pretzel sticks
Instructions:
- Preheat Oven: Begin by preheating your oven to 350°F (175°C). This guarantees that your cookies bake evenly and are ready to be decorated right out of the oven.
- Mix Dry Ingredients: In a medium bowl, whisk together the flour, baking soda, and salt. Set this mixture aside as you prepare the wet ingredients.
- Cream Butter and Sugars: In a large bowl, using an electric mixer, beat the butter, granulated sugar, and brown sugar until light and fluffy. This should take about 2-3 minutes.
- Add Eggs and Vanilla: Beat in the eggs, one at a time, confirming each is fully incorporated before adding the next. Then, mix in the vanilla extract.
- Add Food Coloring: Gradually add green food coloring to the butter mixture until you achieve the desired shade of green. Stir well to guarantee even coloring.
- Combine Ingredients: Gradually add the dry ingredients to the wet ingredients, mixing until just combined. Don’t overmix.
- Fold in Chocolate Chips: Gently fold in the chocolate chips with a spatula.
- Shape Cookies: Using a cookie scoop or tablespoon, drop rounded tablespoons of dough onto a baking sheet lined with parchment paper. Leave enough space between each cookie for spreading.
- Bake Cookies: Bake the cookies in the preheated oven for 10-12 minutes or until the edges are lightly browned.
- Decorate: Once baked, allow the cookies to cool slightly before decorating. Use black decorating gel to draw Frankenstein’s hair and mouth. Attach candy eyes using a small dab of icing or gel. Insert mini pretzel sticks into the sides of the cookies to represent the bolts.
Extra Tips:
For best results, confirm that your butter is at room temperature before beginning the recipe to achieve the proper creamy texture. If the dough is too sticky after adding food coloring, chill it in the refrigerator for about 15 minutes before shaping.
Feel free to let your imagination run wild with the decorations; add scars, stitches, or any other ghoulish details to your Frankenstein Monster Cookies. These cookies are best served fresh but can be stored in an airtight container for up to a week.
Black Cat Oreos
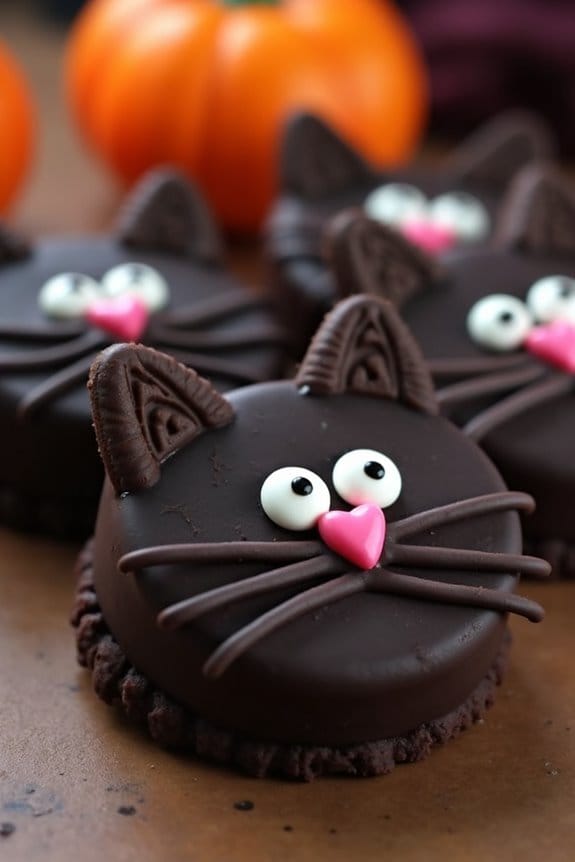
Indulge in a spooky treat this Halloween with Black Cat Oreos, a delightful twist on classic cookies that are both fun and easy to make. These cookies aren’t only a delicious combination of sweet and crunchy but also a festive way to celebrate the Halloween season.
Adding a touch of creativity, these cookies are shaped and decorated to look like adorable black cats, making them a hit at any party or gathering. Perfect for 4-6 people, this recipe uses simple ingredients that you might already have in your pantry.
The base of the cookie is made from Oreo cookies, which are then transformed into charming black cats with the help of a few extra ingredients. Whether you’re making these for kids or adults, Black Cat Oreos are sure to bring a smile to everyone’s face.
Ingredients:
- 24 Oreo cookies
- 1 cup dark chocolate melts or chips
- 48 small candy eyes
- 24 small pink candy-coated chocolates (for the nose)
- 48 almond slivers (for ears)
- Black licorice laces or strings
- Parchment paper
Instructions:
- Prepare the Chocolate: Start by melting the dark chocolate in a microwave-safe bowl. Microwave in 30-second intervals, stirring in between, until the chocolate is fully melted and smooth.
- Coat the Oreos: Dip each Oreo cookie into the melted chocolate using a fork to confirm it’s fully coated. Allow the excess chocolate to drip off before placing it on a piece of parchment paper.
- Decorate the Cats: While the chocolate is still wet, place two candy eyes on each Oreo to form the cat’s eyes. Add a pink candy-coated chocolate below the eyes for the nose.
- Add the Ears: Insert two almond slivers at the top of each Oreo to resemble cat ears. Confirm they’re slightly angled to give a realistic appearance.
- Create the Whiskers: Cut the black licorice laces into small lengths and press three pieces on each side of the nose to create whiskers.
- Set the Cookies: Allow the cookies to set at room temperature for about 30 minutes, or until the chocolate has hardened completely.
- Serve and Enjoy: Once set, serve the Black Cat Oreos on a festive Halloween platter and enjoy the spooky sweetness.
Extra Tips:
For a more polished look, consider using a piping bag to apply the melted chocolate to the cookies, which can give you more control over the coating process.
If you want to add variety, try using different colored candy eyes or nose colors to give each cat its unique personality. Confirm the room temperature is cool enough for the chocolate to set properly, or you may place them in the refrigerator for a quicker setting.

