
As Halloween approaches, it’s time to embrace the joy of creating delightfully spooky treats for the little ones. Picture yourself crafting ghostly vanilla cupcakes and vibrant monster eye treats, each designed to spark creativity and bring smiles. From whimsical witch hat cupcakes to playful graveyard dirt creations, these ideas promise a fun baking adventure. Are you ready to unleash your inner baker and create some Halloween magic in the kitchen? Let’s explore these adorable cupcake ideas together!
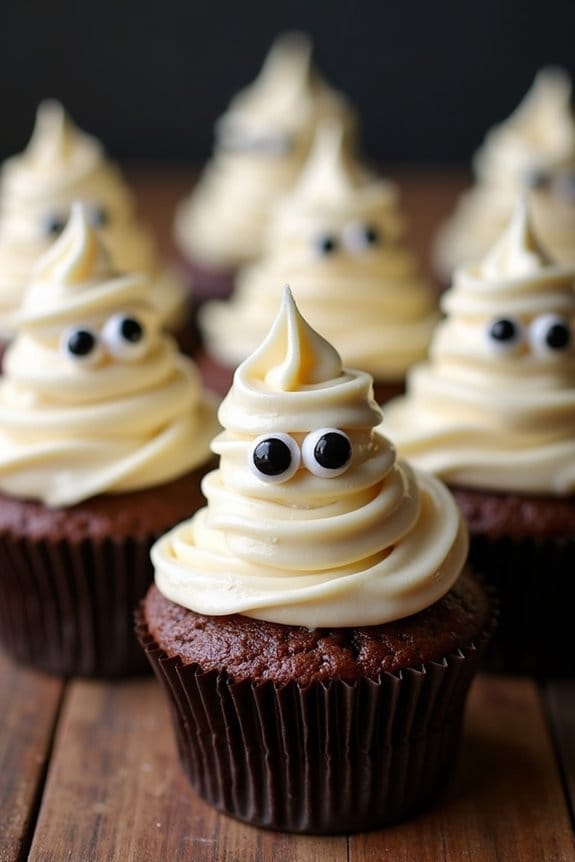
Ghostly Vanilla Cupcakes
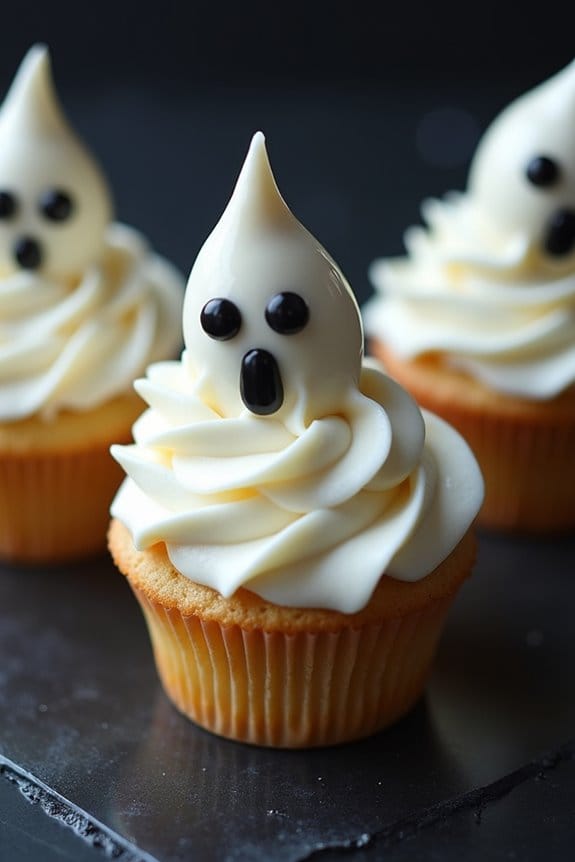
Halloween is the perfect time to get creative in the kitchen and make some spooky treats that will delight kids and adults alike. Ghostly Vanilla Cupcakes are an ideal choice for adding a bit of eerie fun to your Halloween celebrations. These cupcakes aren’t only deliciously moist and rich in vanilla flavor but also come with a ghoulishly fun topping that’s sure to be a hit at any Halloween party. The ghostly decorations make these cupcakes look as if they’re straight out of a haunted bakery, making them irresistible to little trick-or-treaters.
Making these cupcakes is a fantastic activity to involve kids in, allowing them to express their creativity while learning some basic baking skills. The process is simple enough for bakers of all ages, and the end result is both a tasty treat and a spooky decoration for any Halloween-themed event. With a serving size of 4-6 people, this recipe will yield enough cupcakes for a small gathering or as part of a larger spread of Halloween goodies.
Ingredients (Serves 4-6):
- 1 1/2 cups all-purpose flour
- 1 cup granulated sugar
- 1/2 cup unsalted butter, softened
- 2 large eggs
- 2 teaspoons vanilla extract
- 1/2 cup milk
- 1 1/2 teaspoons baking powder
- 1/4 teaspoon salt
- 1 cup heavy cream
- 1/2 cup powdered sugar
- Black gel food coloring
- Mini marshmallows
Instructions:
- Preheat and Prepare: Preheat your oven to 350°F (175°C). Line a 12-cup muffin tin with cupcake liners to guarantee an easy release after baking.
- Mix Dry Ingredients: In a medium-sized bowl, combine the flour, baking powder, and salt. Whisk these dry ingredients together until thoroughly mixed.
- Cream Butter and Sugar: In a large mixing bowl, cream the softened butter and granulated sugar together using an electric mixer on medium speed until light and fluffy, about 2-3 minutes.
- Add Wet Ingredients: Add the eggs one at a time to the creamed mixture, beating well after each addition. Then, mix in the vanilla extract.
- Combine with Milk and Dry Ingredients: Add the flour mixture to the wet ingredients in three parts, alternating with the milk, beginning and ending with the flour. Mix on low speed until just combined.
- Fill and Bake: Evenly distribute the batter among the prepared cupcake liners, filling each about two-thirds full. Bake in the preheated oven for 18-20 minutes, or until a toothpick inserted into the center of a cupcake comes out clean. Allow the cupcakes to cool in the tin for 5 minutes before transferring them to a wire rack to cool completely.
- Prepare the Ghostly Frosting: In a separate bowl, beat the heavy cream until it starts to thicken. Gradually add the powdered sugar and continue to beat until stiff peaks form.
- Decorate: Using a piping bag fitted with a round tip, pipe the whipped cream frosting onto each cooled cupcake in the shape of a ghost. Use the black gel food coloring to dot eyes and a mouth onto each ghost. For an added touch, press a mini marshmallow into the frosting for a 3D effect.
Extra Tips:
For the best results, make sure all your ingredients are at room temperature before you start mixing. This guarantees a smoother, more even batter.
When decorating, have fun with the ghost faces – you can make them look happy, surprised, or even a bit scary!
If you wish to make the cupcakes ahead of time, bake and cool them, then store them in an airtight container at room temperature for up to two days. The frosting can be prepared a few hours in advance and kept in the refrigerator until you’re ready to decorate.
Monster Eye Cupcakes

Monster Eye Cupcakes are a spooktacular treat perfect for Halloween festivities with kids. These fun and colorful cupcakes capture the essence of Halloween with their spooky, yet delightful, monster eye toppings. The cupcakes themselves are rich and moist, while the frosting adds a creamy texture that complements the playful candy eye decorations.
Perfect for a Halloween party or a fun baking activity with kids, these cupcakes are sure to be a hit with little monsters and grown-ups alike. Making Monster Eye Cupcakes is a creative and engaging process. The recipe involves baking delicious chocolate cupcakes, preparing a vibrant green buttercream frosting, and then assembling the adorably frightful monster eyes using candy.
A spooktacular treat for Halloween fun with kids, combining chocolatey cupcakes and vibrant monster eye decorations!
This recipe serves 4-6 people, depending on how many cupcakes each person enjoys. Here’s what you’ll need and how to make these eerie delights.
Ingredients:
- 1 cup all-purpose flour
- 1/2 cup unsweetened cocoa powder
- 1 cup granulated sugar
- 1 teaspoon baking powder
- 1/2 teaspoon baking soda
- 1/4 teaspoon salt
- 1/2 cup unsalted butter, softened
- 2 large eggs
- 1 teaspoon vanilla extract
- 1/2 cup milk
- Green food coloring
- 2 cups confectioners’ sugar
- 2-3 tablespoons heavy cream
- Assorted candy eyes
Instructions:
- Preheat and Prepare: Preheat your oven to 350°F (175°C) and line a muffin tin with cupcake liners.
- Mix Dry Ingredients: In a large mixing bowl, sift together the flour, cocoa powder, baking powder, baking soda, and salt. Set aside.
- Cream Butter and Sugar: In another bowl, cream the softened butter and granulated sugar together until light and fluffy.
- Add Eggs and Vanilla: Add the eggs one at a time to the butter and sugar mixture, beating well after each addition. Mix in the vanilla extract.
- Combine Mixtures: Gradually add the dry ingredients to the wet ingredients, alternating with the milk, and mix until just combined.
- Bake: Divide the batter evenly among the cupcake liners, filling each about two-thirds full. Bake for 18-20 minutes or until a toothpick inserted into the center of a cupcake comes out clean. Let them cool completely on a wire rack.
- Prepare Frosting: In a bowl, beat the remaining butter until creamy. Slowly add the confectioners’ sugar, mixing until smooth. Add a few drops of green food coloring and mix until evenly colored. Add heavy cream to achieve a spreadable consistency.
- Decorate: Once the cupcakes are completely cool, use a piping bag or a knife to frost them with the green buttercream. Decorate with assorted candy eyes to create monster faces.
Extra Tips:
When making the frosting, start with a small amount of food coloring and gradually add more to reach the desired shade of green. If you want a more vivid or darker hue, gel food colors tend to work better than liquid ones.
Also, consider chilling the cupcakes briefly after frosting to help the candy eyes adhere better without sliding off. For an extra fun touch, you can add a few sprinkles or edible glitter to give your Monster Eye Cupcakes some extra sparkle!
Pumpkin Patch Cupcakes
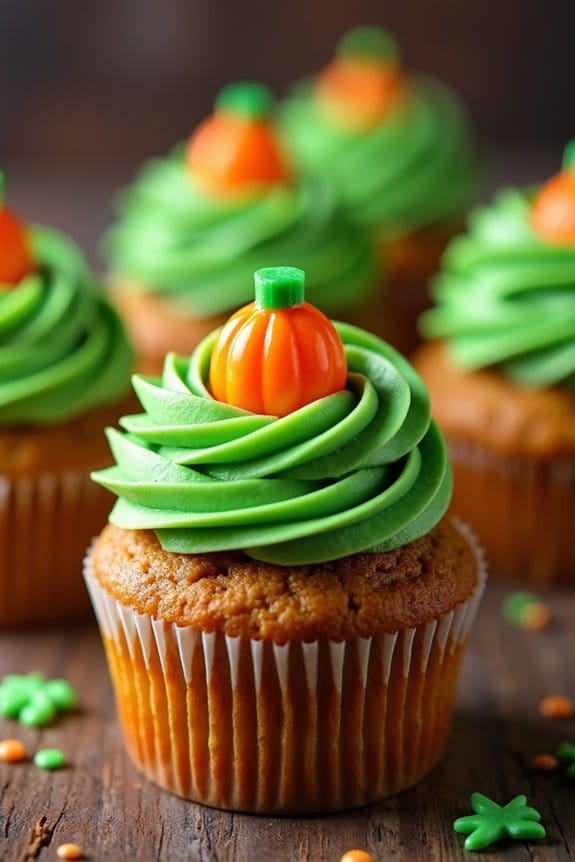
Celebrate Halloween with these delightful Pumpkin Patch Cupcakes that are certain to be a hit with the little ones. These cupcakes aren’t only delicious but also visually appealing, resembling a mini pumpkin patch right on your dessert table.
Perfect for Halloween parties or a fun baking activity with the kids, these cupcakes are a creative and tasty addition to your festive celebrations.
These cupcakes feature a moist and fluffy pumpkin-flavored base, topped with a creamy and sweet frosting that will make every bite a delight. Decorate them with candy pumpkins and green icing to mimic the look of a pumpkin patch. This recipe serves 4-6 people, making it ideal for a small gathering or family treat.
Ingredients (Serves 4-6)
- 1 1/2 cups all-purpose flour
- 1 cup granulated sugar
- 1 teaspoon baking powder
- 1/2 teaspoon baking soda
- 1/2 teaspoon salt
- 1 teaspoon ground cinnamon
- 1/2 teaspoon ground nutmeg
- 1/2 cup pumpkin puree
- 1/2 cup vegetable oil
- 2 large eggs
- 1 teaspoon vanilla extract
- 1/4 cup milk
For the Frosting:
- 1/2 cup unsalted butter, softened
- 2 cups powdered sugar
- 1 teaspoon vanilla extract
- 2 tablespoons milk
- Green food coloring
For Decoration:
- Candy pumpkins
- Green icing or gel
Cooking Instructions
- Preheat and Prepare: Start by preheating your oven to 350°F (175°C). Line a muffin tin with cupcake liners to prepare for the batter.
- Mix Dry Ingredients: In a mixing bowl, whisk together the flour, sugar, baking powder, baking soda, salt, cinnamon, and nutmeg until evenly combined.
- Combine Wet Ingredients: In a separate bowl, mix the pumpkin puree, vegetable oil, eggs, vanilla extract, and milk until smooth.
- Create the Batter: Gradually add the dry ingredients to the wet ingredients, stirring gently until just combined. Be careful not to overmix.
- Fill the Cupcake Liners: Spoon the batter into the cupcake liners, filling each about 2/3 full to allow room for rising.
- Bake the Cupcakes: Place the muffin tin in the preheated oven and bake for 18-20 minutes or until a toothpick inserted into the center comes out clean. Let them cool completely on a wire rack.
- Prepare the Frosting: In a bowl, beat the softened butter until creamy. Gradually add the powdered sugar, vanilla extract, and milk. Add green food coloring until you reach the desired shade for your “pumpkin patch.”
- Frost and Decorate: Once the cupcakes are cooled, pipe or spread the green frosting on top. Place a candy pumpkin on each cupcake and use green icing or gel to create vines and leaves.
Extra Tips
For the best results, make sure that all your ingredients are at room temperature before starting, which helps the batter come together smoothly.
If you want to add a bit of texture, consider stirring in some chopped nuts or raisins into the batter.
When decorating, let your creativity shine; you can use different shades of green or add more candy decorations to personalize your pumpkin patches. Enjoy the process and have fun with the kids while making these festive treats!
Spider Web Cupcakes
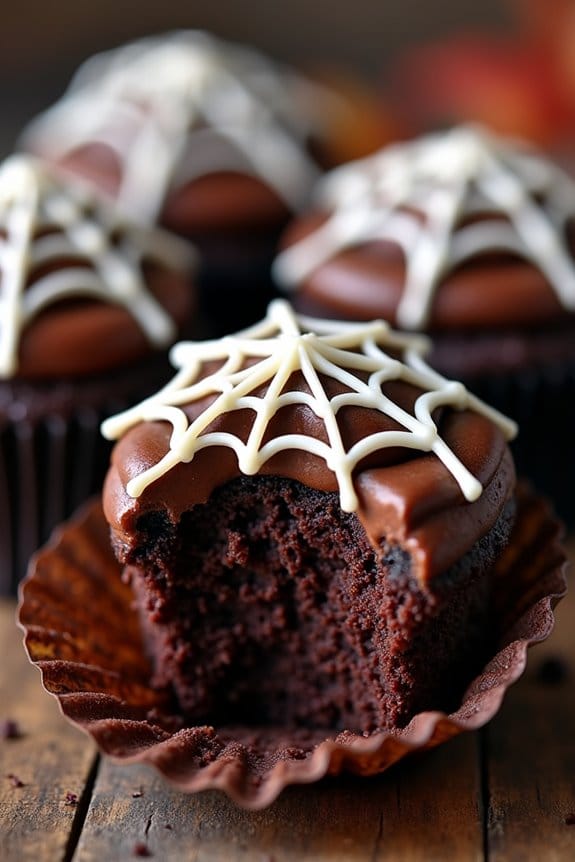
Spider Web Cupcakes are a fun and spooky treat that will delight kids and adults alike this Halloween. These cupcakes are visually striking with their intricate web designs, yet surprisingly easy to make. The rich chocolate base provides a deliciously sweet and moist foundation, while the decorative webbing adds a playful and eerie touch to your Halloween spread.
Perfect for parties or just an afternoon of baking with the kids, these cupcakes will surely be a hit.
To create the spider web effect, you’ll be using a simple yet effective technique involving melted white chocolate or icing. The contrast between the dark chocolate cupcake and the bright white web makes these treats as visually appealing as they’re tasty.
With a serving size of 4-6 people, this recipe is just the right amount for a small gathering or a family night of Halloween fun.
Ingredients (for 4-6 servings):
- 1 cup all-purpose flour
- 1/2 cup unsweetened cocoa powder
- 1 teaspoon baking powder
- 1/2 teaspoon baking soda
- 1/4 teaspoon salt
- 1/2 cup unsalted butter, softened
- 1 cup granulated sugar
- 2 large eggs
- 1 teaspoon vanilla extract
- 1/2 cup whole milk
- 1/2 cup heavy cream
- 1/2 cup white chocolate chips or white icing for webbing
Cooking Instructions:
- Preheat and Prepare: Preheat your oven to 350°F (175°C). Line a muffin tin with cupcake liners to prepare for baking.
- Mix Dry Ingredients: In a medium bowl, whisk together the flour, cocoa powder, baking powder, baking soda, and salt. This guarantees an even distribution of the dry ingredients.
- Cream Butter and Sugar: In a large bowl, beat the softened butter and sugar together using an electric mixer until light and fluffy, about 3-4 minutes.
- Add Eggs and Vanilla: Beat in the eggs one at a time, making sure each is fully incorporated before adding the next. Stir in the vanilla extract.
- Combine Wet and Dry Ingredients: Gradually add the dry ingredients to the butter mixture, alternating with the milk. Start and end with the dry ingredients, mixing just until combined.
- Fill Cupcake Liners: Pour the batter into the prepared cupcake liners, filling each about two-thirds full.
- Bake: Bake in the preheated oven for 18-20 minutes or until a toothpick inserted into the center comes out clean. Allow the cupcakes to cool completely on a wire rack.
- Prepare Web Design: While the cupcakes cool, melt the white chocolate chips in a microwave-safe bowl in 30-second intervals, stirring between each interval until smooth. Alternatively, prepare your white icing for piping.
- Decorate: Once the cupcakes are cool, use a piping bag or a plastic bag with a small corner snipped off to pipe a spiral design on top of each cupcake. Drag a toothpick from the center of the spiral outward to create a web effect.
- Finish and Serve: Allow the web designs to set before serving. Enjoy your spooky Spider Web Cupcakes!
Extra Tips:
For an even more festive touch, consider adding small plastic spiders or candy spiders on top of each cupcake for an added creepy-crawly effect.
If you prefer, you can tint the white chocolate or icing with a few drops of food coloring to create colorful webs. Confirm your cupcakes are completely cool before decorating to prevent the webbing from melting.
These cupcakes can be made a day in advance and stored in an airtight container at room temperature.
Witch Hat Cupcakes
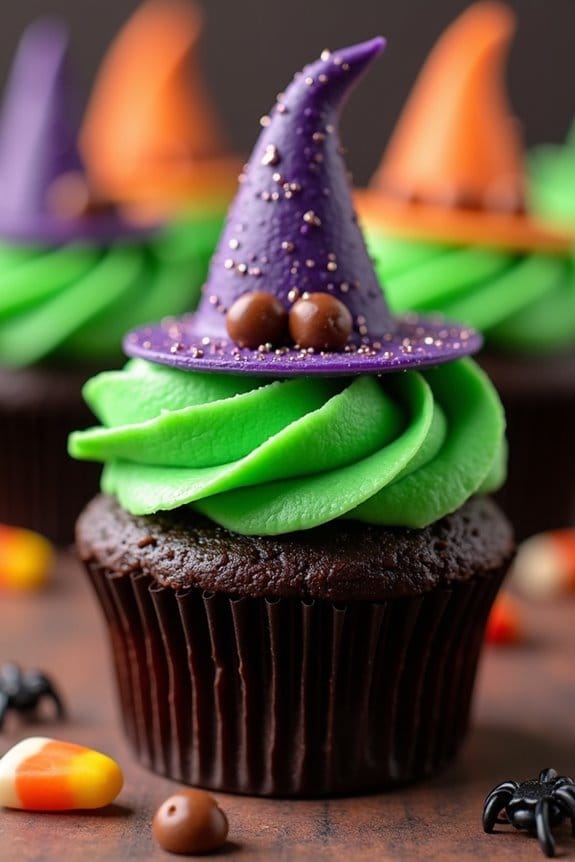
Halloween is the perfect time to get creative in the kitchen, and these Witch Hat Cupcakes are a fun and festive treat that kids will love. These cupcakes not only look enchanting with their whimsical witch hat toppers but are also delightfully delicious. Perfect for Halloween parties or a spooky night in, these cupcakes will surely cast a spell on everyone who tries them. The combination of chocolate cupcakes, colorful frosting, and a crisp chocolate cone is sure to be a hit.
Making Witch Hat Cupcakes is a fantastic activity to involve your kids in, as the decoration process is simple yet allows for plenty of creativity. You can choose to bake your cupcakes from scratch or use a boxed mix if you’re short on time. Either way, the real magic happens with the decorations, where you transform ordinary cupcakes into enchanting witch hats complete with vibrant colors and fun details.
Ingredients for 4-6 servings:
- 1 box chocolate cake mix (plus ingredients listed on the box)
- 1 cup of butter, softened
- 4 cups powdered sugar
- 1/4 cup milk
- 1 teaspoon vanilla extract
- Green and purple food coloring
- 6 chocolate sugar cones
- 1/2 cup mini chocolate chips
- Edible glitter or sprinkles (optional)
Instructions:
- Prepare the Cupcakes: Start by preheating your oven to the temperature specified on the cake mix box. Follow the instructions on the box to make the chocolate cake batter. Line a cupcake pan with paper liners and fill each about two-thirds full with the batter. Bake according to the package instructions, then allow the cupcakes to cool completely on a wire rack.
- Make the Frosting: In a large mixing bowl, cream the softened butter until smooth. Gradually add in the powdered sugar, one cup at a time, beating well after each addition. Add the milk and vanilla extract, and beat the mixture until light and fluffy. Divide the frosting into two bowls, coloring one with green food coloring and the other with purple. Mix until you achieve the desired shades.
- Decorate the Cupcakes: Once the cupcakes are cooled, spread or pipe a generous amount of green frosting on each cupcake. This will act as the base for the witch’s hat.
- Create the Witch Hats: Take the chocolate sugar cones and dip the rim into the remaining purple frosting to create a brim. You can roll the frosted rim in edible glitter or sprinkles for extra sparkle. Place the cone, open side down, on top of each frosted cupcake.
- Add Final Touches: Press a few mini chocolate chips around the base of the cone to resemble buttons or add extra texture. If desired, use any leftover frosting to pipe designs on the cone hats for added detail.
Extra Tips:
When making these Witch Hat Cupcakes, consider using a piping bag with a star tip for a more professional-looking frosting swirl. You can also substitute the mini chocolate chips with small candies like M&Ms for added color and variety.
For a gluten-free option, simply use a gluten-free cake mix. To make the presentation even more magical, serve the cupcakes on a platter decorated with Halloween-themed napkins or small plastic spiders.
These cupcakes are best enjoyed fresh, but they can also be stored in an airtight container for up to three days.
Batty Chocolate Cupcakes
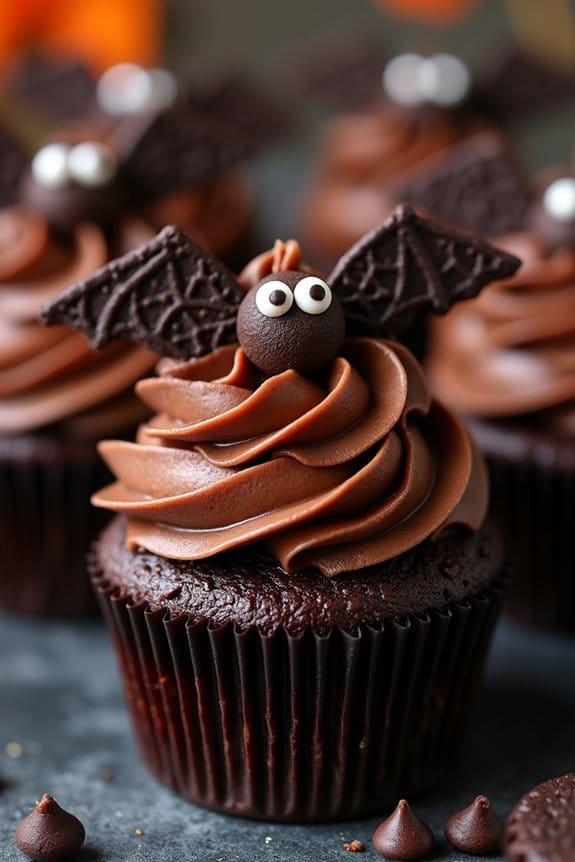
Batty Chocolate Cupcakes are a spooktacular treat perfect for any Halloween party or festive gathering. These rich, moist chocolate cupcakes are topped with a smooth, creamy frosting and garnished with chocolate bat decorations to delight both kids and adults alike. The combination of decadent chocolate and whimsical bat design makes them an irresistible addition to any Halloween dessert table.
Creating Batty Chocolate Cupcakes is an excellent way to involve kids in the kitchen, encouraging creativity and fun. The process of making these cupcakes is simple and straightforward, with the decoration allowing for plenty of room for personal touches. Whether you’re hosting a Halloween bash or simply looking for a fun baking activity, these cupcakes are bound to please.
Ingredients (Serves 4-6 people)
- 1 cup all-purpose flour
- 1 cup granulated sugar
- 1/2 cup unsweetened cocoa powder
- 1 teaspoon baking powder
- 1/2 teaspoon baking soda
- 1/4 teaspoon salt
- 1/2 cup milk
- 1/4 cup vegetable oil
- 1 large egg
- 1 teaspoon vanilla extract
- 1/2 cup boiling water
- 1 cup chocolate frosting
- 12 chocolate sandwich cookies (for bat wings)
- 1/2 cup mini chocolate chips (for bat eyes)
Instructions
- Preheat the Oven: Begin by preheating your oven to 350°F (175°C). Line a muffin tin with cupcake liners to prepare for the batter.
- Mix Dry Ingredients: In a large mixing bowl, combine the flour, sugar, cocoa powder, baking powder, baking soda, and salt. Stir these dry ingredients together until well-blended.
- Combine Wet Ingredients: In another bowl, whisk together the milk, vegetable oil, egg, and vanilla extract. Mix until the ingredients are fully combined.
- Combine Mixtures: Gradually add the wet ingredients to the dry ingredients, stirring continuously until the batter is smooth. Once mixed, slowly incorporate the boiling water into the batter. The batter will be thin, but that’s perfect for these cupcakes.
- Fill and Bake: Pour the batter evenly into the prepared cupcake liners, filling each about two-thirds full. Bake in the preheated oven for 18-20 minutes, or until a toothpick inserted into the center of a cupcake comes out clean.
- Cool and Frost: Allow the cupcakes to cool completely on a wire rack. Once cooled, spread a generous layer of chocolate frosting on each cupcake.
- Decorate with Bat Wings and Eyes: To create the bat wings, carefully separate the chocolate sandwich cookies and cut each half into two semi-circles. Position these on either side of the cupcake to resemble wings. Use mini chocolate chips to form the eyes on top of the frosting.
Extra Tips
For an even more festive touch, consider adding a few drops of food coloring to the frosting to create a spooky effect, such as purple or orange.
Confirm the cupcakes are completely cooled before frosting to prevent the icing from melting. If you’re making these cupcakes in advance, store them in an airtight container to keep them fresh.
Letting kids decorate their own cupcakes can add an extra layer of fun, allowing them to express their creativity and try different designs with the bat wings and eyes.
Mummy Wrapped Cupcakes
Mummy Wrapped Cupcakes are a spooky and delightful treat perfect for Halloween celebrations with kids. These cupcakes aren’t only delicious but also a fun activity for children to help with in the kitchen. They transform ordinary cupcakes into adorable mummy faces, wrapped in sweet frosting bandages. Whether you’re hosting a Halloween party or just looking for a fun baking project, these Mummy Wrapped Cupcakes are sure to be a hit.
The process begins with a basic cupcake recipe, which can be made from scratch or using a boxed mix for convenience. Once baked, these cupcakes are topped with a creamy layer of frosting and decorated with candy eyes to bring your little mummies to life. Creating the mummy wrap effect is simple and involves using a piping bag to create the illusion of bandages. This recipe will make enough for 4-6 servings, making it ideal for a small group of little goblins.
Ingredients (Serves 4-6)
- 1 box of chocolate or vanilla cupcake mix (with required ingredients as per box)
- 1 cup of butter, softened
- 3-4 cups powdered sugar
- 2 teaspoons vanilla extract
- 2-4 tablespoons of milk
- Black or dark chocolate candy eyes
- White gel food coloring (optional, for extra white frosting)
Instructions
- Bake the Cupcakes: Preheat your oven to 350°F (175°C) and line a cupcake pan with paper liners. Prepare the cupcake mix according to the package instructions, then fill each liner about two-thirds full with batter. Bake for 18-20 minutes or until a toothpick inserted into the center comes out clean. Allow them to cool completely on a wire rack.
- Prepare the Frosting: In a large bowl, beat the softened butter until smooth and creamy. Gradually add the powdered sugar, one cup at a time, beating well after each addition. Mix in the vanilla extract. Add milk, one tablespoon at a time, until the frosting reaches your desired consistency. If you want a brighter white for the bandages, add a few drops of white gel food coloring.
- Frost the Cupcakes: Once the cupcakes are completely cooled, spread a thin layer of frosting over the top of each cupcake using a spatula. This will act as the base for the mummy bandages.
- Create the Mummy Wrap Effect: Fill a piping bag fitted with a flat nozzle tip with the prepared frosting. Pipe lines across the top of each cupcake to resemble mummy bandages, leaving gaps for the eyes. Make sure to layer the lines randomly to create a messy, wrapped look.
- Add the Eyes: Place two candy eyes on each cupcake in the gaps between the frosting lines. Press them slightly so they stick to the frosting.
- Finish and Serve: Once decorated, serve these Mummy Wrapped Cupcakes at your Halloween gathering or enjoy them as a fun treat with the kids.
Extra Tips
To make the wrapping effect more authentic, practice different piping techniques on a piece of parchment paper before decorating the cupcakes. If you don’t have candy eyes, you can use small chocolate chips or M&M’s.
For an added twist, consider adding some edible glitter to give your mummies a ghoulish sparkle. Remember, the key to these cupcakes is to have fun and let your creativity shine through the decorations.
Frankenstein’s Monster Cupcakes
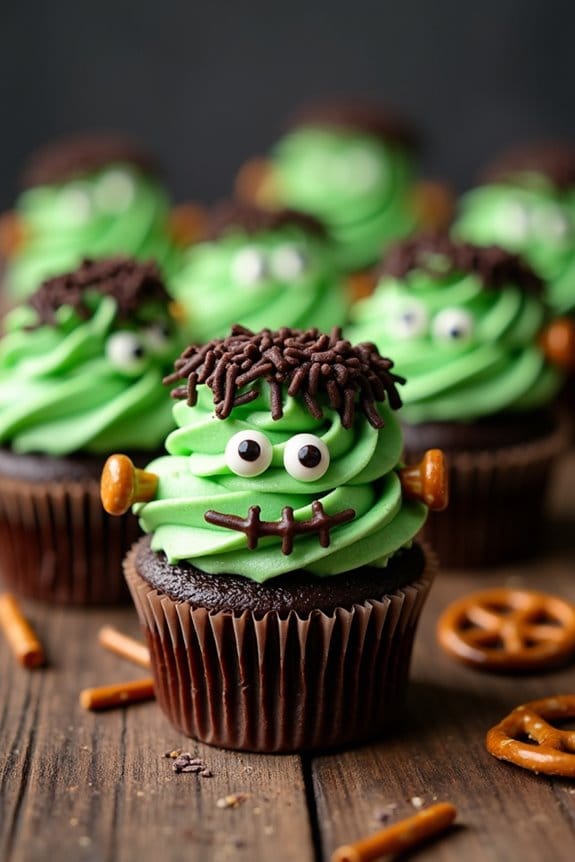
Frankenstein’s Monster Cupcakes are a spookily delightful treat that will add both fun and flavor to your Halloween celebrations. Perfect for kids, these cupcakes combine the classic taste of chocolate with a creative twist, turning ordinary cupcakes into a batch of adorable monsters. With their green frosting and charmingly monstrous features, these cupcakes are sure to be a hit at any gathering.
Spookily delightful cupcakes that merge chocolate goodness with monstrous Halloween charm, perfect for kids and adults alike.
Whether you’re hosting a Halloween party or just looking for a fun baking project with your children, these Frankenstein-themed cupcakes are destined to bring smiles and excitement.
Not only are these cupcakes delicious, but they also offer a great opportunity for kids to get involved in the kitchen. Decorating each cupcake to resemble Frankenstein’s monster is a fun activity that encourages creativity and allows for endless variations. You can use different candies and sprinkles to give each cupcake its own unique personality.
Serve these at your Halloween event, and you’ll have a spooky-sweet treat that everyone will enjoy. Here’s how to make them for a serving size of 4-6 people:
Ingredients:
- 1 cup all-purpose flour
- 1/2 cup unsweetened cocoa powder
- 1 teaspoon baking powder
- 1/2 teaspoon baking soda
- 1/4 teaspoon salt
- 1/2 cup unsalted butter, softened
- 1 cup granulated sugar
- 2 large eggs
- 1 teaspoon vanilla extract
- 1/2 cup buttermilk
- Green food coloring
- 1 cup of buttercream frosting
- Black decorating gel
- Candy eyes
- Chocolate sprinkles
- Pretzel sticks
Cooking Instructions:
- Preheat the Oven: Begin by preheating your oven to 350°F (175°C). Line a muffin tin with cupcake liners to prepare for baking.
- Mix Dry Ingredients: In a medium-sized bowl, whisk together the all-purpose flour, cocoa powder, baking powder, baking soda, and salt. This will guarantee that all dry ingredients are evenly distributed.
- Cream Butter and Sugar: In a separate large bowl, beat the softened butter and granulated sugar together until the mixture is light and fluffy. This should take about 3-4 minutes using an electric mixer.
- Add Eggs and Vanilla: Add the eggs one at a time, beating well after each addition. Then, mix in the vanilla extract until well incorporated.
- Combine Ingredients: Gradually add the dry ingredients to the butter mixture, alternating with the buttermilk. Begin and end with the dry ingredients, mixing until just combined. Be careful not to overmix.
- Bake the Cupcakes: Divide the batter evenly among the prepared cupcake liners, filling each about two-thirds full. Bake in the preheated oven for 18-20 minutes, or until a toothpick inserted into the center comes out clean. Allow the cupcakes to cool completely on a wire rack.
- Prepare the Frosting: Tint the buttercream frosting with green food coloring until you reach the desired shade of Frankenstein green. Transfer the frosting to a piping bag fitted with a round tip.
- Decorate the Cupcakes: Pipe the green frosting onto each cooled cupcake. Add candy eyes to each cupcake to create the monster face. Use the black decorating gel to draw a mouth and stitches. Stick chocolate sprinkles on top for hair and insert small pieces of pretzel sticks on the sides for the bolts.
Extra Tips:
When decorating your Frankenstein’s Monster Cupcakes, you can use a variety of candies for added facial features, such as small chocolate chips for noses or gummy worms for a spooky touch.
If you don’t have buttermilk on hand, you can make a quick substitute by adding a tablespoon of lemon juice or vinegar to regular milk and letting it sit for 5 minutes. For a fun twist, consider adding a drop of mint extract to the frosting to give your monster cupcakes a revitalizing flavor.
Black Cat Cupcakes
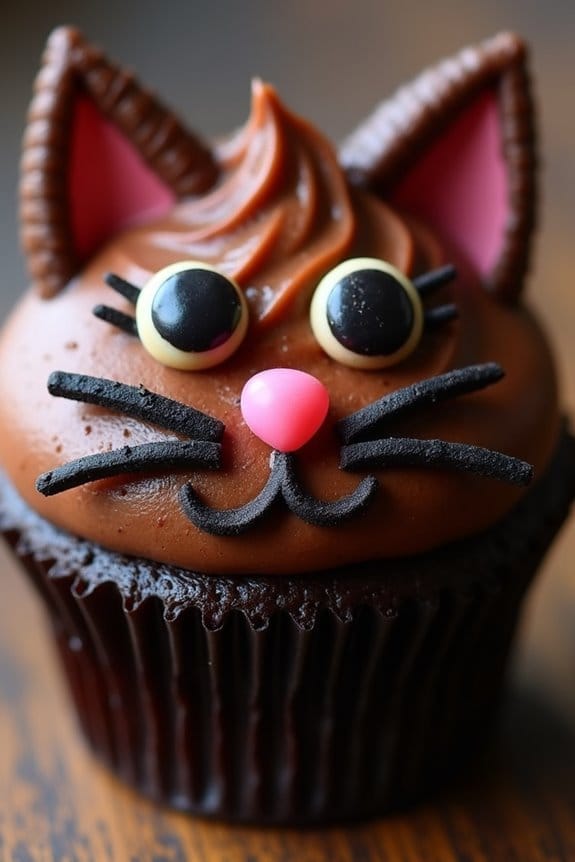
Halloween is the perfect time for kids to indulge in some spooky treats, and Black Cat Cupcakes are an ideal choice to delight little ones. These cupcakes aren’t only delicious but also fun to make and decorate. With their cute cat faces, complete with chocolate ears and licorice whiskers, these cupcakes are sure to be a hit at any Halloween party.
Plus, they offer a wonderful opportunity for children to get involved in the kitchen, enhancing their creativity and baking skills.
The base of these cupcakes can be a classic chocolate cupcake, which provides a rich and moist foundation. Topped with creamy chocolate frosting, these cupcakes are then transformed into adorable black cats using simple decorations. This recipe yields enough cupcakes to serve 4-6 people, making it perfect for a small gathering or family treat.
Let’s explore the ingredients and step-by-step instructions for creating these delightful Black Cat Cupcakes.
Ingredients (Serves 4-6)
- 1 cup all-purpose flour
- 1 cup granulated sugar
- 1/2 cup unsweetened cocoa powder
- 1 teaspoon baking powder
- 1/2 teaspoon baking soda
- 1/4 teaspoon salt
- 1/2 cup milk
- 1/4 cup vegetable oil
- 1 large egg
- 1 teaspoon vanilla extract
- 1/2 cup hot water
- 1 cup chocolate frosting
- 24 chocolate chips (for eyes)
- 12 chocolate wafer cookies (cut in half for ears)
- Black licorice strings (cut into short whiskers)
- 6 pink jelly beans (for noses)
Instructions
- Preheat and Prepare: Preheat your oven to 350°F (175°C). Line a muffin tin with cupcake liners to prepare for baking.
- Mix Dry Ingredients: In a large bowl, sift together the all-purpose flour, granulated sugar, cocoa powder, baking powder, baking soda, and salt. This guarantees that the dry ingredients are well combined and free of lumps.
- Combine Wet Ingredients: In a separate bowl, whisk the milk, vegetable oil, egg, and vanilla extract until the mixture is smooth and well blended.
- Combine and Mix: Gradually add the wet ingredients to the dry ingredients, mixing until just combined. Then, slowly add the hot water, and mix until the batter is smooth and well incorporated.
- Fill and Bake: Divide the batter evenly among the cupcake liners, filling each about 2/3 full. Bake in the preheated oven for 18-22 minutes, or until a toothpick inserted into the center comes out clean. Allow the cupcakes to cool completely on a wire rack.
- Decorate: Once cooled, frost each cupcake with a generous layer of chocolate frosting. Place two chocolate chips on each cupcake for the eyes. Insert two half chocolate wafer cookies on top for ears. Add a pink jelly bean in the center for the nose, and place short black licorice strings on either side for whiskers.
Extra Tips
When making Black Cat Cupcakes, make sure the cupcakes are completely cooled before decorating to prevent the frosting from melting.
For a more intense chocolate flavor, consider using dark cocoa powder. If you’re working with kids, allow them to personalize their cat faces with different expressions or additional candy decorations.
If you want to prepare in advance, bake the cupcakes a day ahead and store them in an airtight container to keep them fresh before decorating. Enjoy creating these whimsical treats with your little ones!
Candy Corn Cupcakes

Celebrate the spooky season with these delightful Candy Corn Cupcakes, perfect for kids and adults alike! These cupcakes aren’t only visually appealing with their vibrant layers of color but also deliciously moist and sweet.
Whether you’re hosting a Halloween party or just want to surprise your little ones with a festive treat, these cupcakes are sure to be a hit. Inspired by the classic Halloween candy, these cupcakes combine a simple vanilla cake base with layers of orange and yellow frosting, topped with candy corn for that perfect seasonal finish.
Creating these cupcakes is a simple and fun baking project that you can even do with your kids. The key to achieving the iconic candy corn look is in the colorful layers of frosting, so be certain to have plenty of food coloring on hand.
With this easy-to-follow recipe, you’ll have a batch of festive cupcakes ready in no time, making your Halloween celebrations all the more special.
Ingredients (Serves 4-6 people):
- 1 ½ cups all-purpose flour
- 1 cup granulated sugar
- ½ cup unsalted butter, softened
- 2 large eggs
- 1 teaspoon vanilla extract
- 1 ½ teaspoons baking powder
- ½ teaspoon salt
- ½ cup milk
- Yellow and orange food coloring
- 1 ½ cups buttercream frosting
- 24-36 candy corn pieces
Cooking Instructions:
- Preheat the Oven: Begin by preheating your oven to 350°F (175°C). Line a muffin tin with cupcake liners to prepare for baking.
- Mix Dry Ingredients: In a medium bowl, whisk together the flour, baking powder, and salt. This guarantees that the baking powder is evenly distributed throughout the flour.
- Cream Butter and Sugar: In a large mixing bowl, beat the softened butter and sugar together using an electric mixer until the mixture is light and fluffy.
- Add Eggs and Vanilla: Beat in the eggs one at a time, ensuring each one is fully incorporated before adding the next. Stir in the vanilla extract.
- Combine Wet and Dry Ingredients: Gradually add the dry ingredient mixture to the wet mixture, alternating with the milk. Begin and end with the dry ingredients, mixing until just combined.
- Divide and Color the Batter: Divide the batter evenly between two bowls. Add a few drops of yellow food coloring to one bowl and orange food coloring to the other, mixing until the desired colors are achieved.
- Layer and Fill Cupcake Liners: Spoon a layer of yellow batter into each cupcake liner, followed by a layer of orange batter. Fill each liner about two-thirds full.
- Bake: Place the muffin tin in the preheated oven and bake for 18-20 minutes, or until a toothpick inserted into the center of a cupcake comes out clean.
- Cool and Frost: Allow the cupcakes to cool in the tin for a few minutes before transferring them to a wire rack to cool completely. Once cooled, frost the cupcakes with the buttercream frosting.
- Decorate: Top each frosted cupcake with 2-3 candy corn pieces for a fun and festive finish.
Extra Tips:
For an even more festive touch, consider using Halloween-themed cupcake liners and sprinkle a little edible glitter on top of the frosting for extra sparkle.
When mixing the food coloring into the batter, start with a small amount and gradually add more until you reach the desired shade. If you prefer homemade buttercream, you can easily make it by beating together 1 cup of softened butter, 3-4 cups of powdered sugar, 2 teaspoons of vanilla extract, and a few tablespoons of milk until fluffy.
Finally, make sure the cupcakes are completely cooled before frosting to prevent the buttercream from melting. Enjoy your spooky, sweet creations!
Vampire Bite Cupcakes
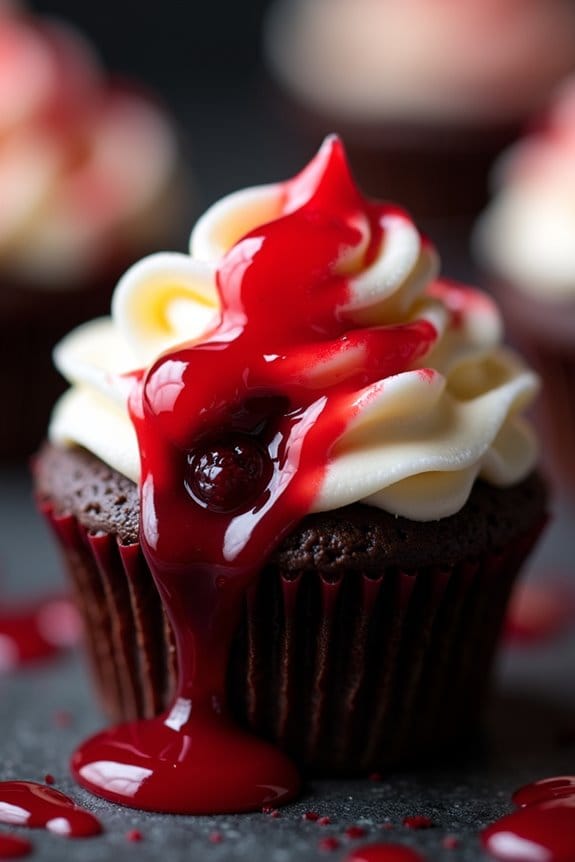
Vampire Bite Cupcakes are a spooky and fun treat that will delight kids and adults alike at any Halloween gathering. These cupcakes aren’t only delicious but also visually striking, mimicking the iconic vampire bite with a clever combination of flavors and colors. The rich chocolate cupcake base is complemented by a surprise filling of red raspberry jam, creating the perfect “bloody” effect when you take a bite. Topped with a smooth cream cheese frosting and finished with a dash of red food coloring, these cupcakes are sure to be a hit.
Perfect for a party or a festive family gathering, this recipe makes 12-16 cupcakes, which is ideal for serving 4-6 people. Kids will enjoy the process of decorating these treats, and you can even turn it into a fun activity by letting them help with filling the cupcakes or adding the “blood” effect. The combination of chocolate, raspberry, and cream cheese creates a harmonious blend of flavors that captures the spirit of Halloween, making these cupcakes a must-try for your spooky celebrations.
Ingredients:
- 1 cup all-purpose flour
- 1/2 cup unsweetened cocoa powder
- 1 teaspoon baking powder
- 1/2 teaspoon baking soda
- 1/4 teaspoon salt
- 1/2 cup unsalted butter, softened
- 1 cup granulated sugar
- 2 large eggs
- 1 teaspoon vanilla extract
- 1/2 cup buttermilk
- 1/2 cup raspberry jam
- 8 oz cream cheese, softened
- 1/4 cup unsalted butter, softened
- 2 cups powdered sugar
- 1 teaspoon vanilla extract
- Red food coloring gel
Instructions:
- Preheat and Prep: Preheat your oven to 350°F (175°C) and line a muffin tin with cupcake liners.
- Combine Dry Ingredients: In a medium bowl, whisk together the flour, cocoa powder, baking powder, baking soda, and salt. Set this dry mixture aside.
- Cream Butter and Sugar: In a large bowl, use an electric mixer to beat the softened butter and granulated sugar until light and fluffy, about 3 minutes.
- Add Eggs and Vanilla: Add the eggs one at a time, beating well after each addition, then mix in the vanilla extract.
- Incorporate Dry Ingredients and Buttermilk: Gradually add the dry ingredients to the butter mixture, alternating with the buttermilk. Start and end with the dry ingredients, mixing until just combined.
- Fill the Cupcake Liners: Divide the batter evenly among the cupcake liners, filling each about two-thirds full.
- Bake the Cupcakes: Bake in the preheated oven for 18-20 minutes, or until a toothpick inserted into the center comes out clean. Allow the cupcakes to cool completely on a wire rack.
- Prepare the Filling: Once cooled, use a small knife or a cupcake corer to remove a small portion from the center of each cupcake. Fill each hole with about 1 teaspoon of raspberry jam.
- Make the Frosting: In a medium bowl, beat the cream cheese and butter until smooth. Gradually add the powdered sugar and vanilla extract, beating until fluffy.
- Decorate the Cupcakes: Spread or pipe the cream cheese frosting over each cupcake. Use a toothpick or a small brush to add a few drops of red food coloring gel to create “blood” drips on the frosting.
Extra Tips:
For an authentic vampire bite effect, you can use a small piping bag with a narrow tip to add the raspberry jam, ensuring it fills the hole evenly.
If you’re making these cupcakes ahead of time, store them in an airtight container in the refrigerator, but make sure to bring them to room temperature before serving for the best flavor.
You can also experiment with different fillings, like strawberry or cherry jam, to change up the flavor while maintaining the spooky theme.
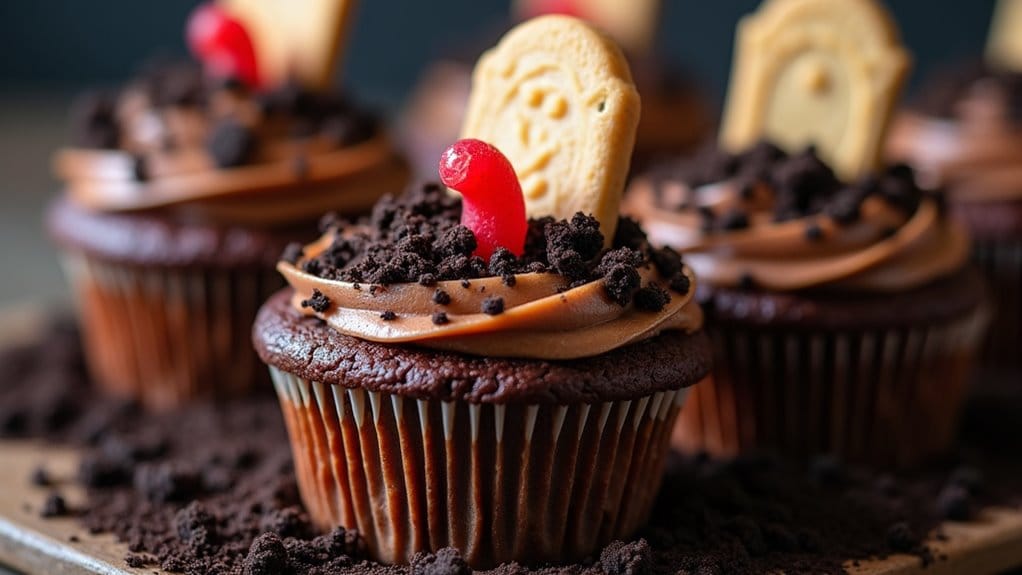
Graveyard Dirt Cupcakes
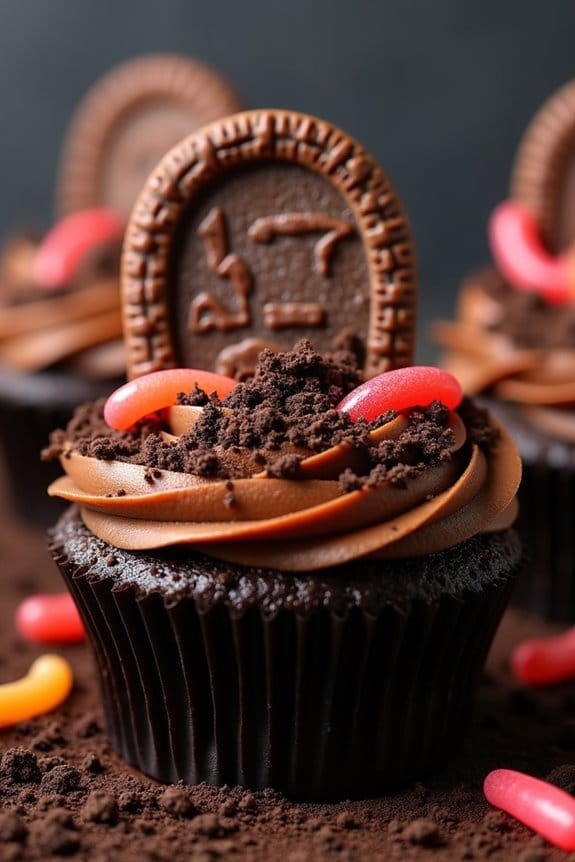
Graveyard Dirt Cupcakes are a spooky and delicious treat that kids will love during Halloween. These cupcakes aren’t only fun to make but also provide a creative way for children to get involved in the kitchen. By transforming simple chocolate cupcakes into miniature graveyards, complete with cookie tombstones and candy worms, you can create a festive and memorable Halloween dessert.
These cupcakes are perfect for a Halloween party or a fun family baking activity. The cupcakes start with a rich, moist chocolate base, which is then topped with a creamy, chocolatey frosting that resembles dirt. Crushed chocolate cookies are sprinkled on top to add the dirt-like texture, and gummy worms are added for a creepy, crawly effect. The final touch is a cookie or candy tombstone, which can be personalized with spooky messages or names.
These Graveyard Dirt Cupcakes are sure to be a hit with kids and adults alike, bringing a touch of Halloween magic to your table.
Ingredients (Serves 4-6 people):
- 1 cup all-purpose flour
- 1 cup granulated sugar
- 1/4 cup unsweetened cocoa powder
- 1/2 teaspoon baking powder
- 1/4 teaspoon baking soda
- 1/4 teaspoon salt
- 1/2 cup unsalted butter, melted
- 2 large eggs
- 1 teaspoon vanilla extract
- 1/2 cup whole milk
- 1 cup chocolate frosting
- 1 cup crushed chocolate sandwich cookies
- Gummy worms
- Oval-shaped cookies or candy for tombstones
Cooking Instructions:
- Preheat the Oven and Prepare the Pan: Preheat your oven to 350°F (175°C). Line a muffin tin with cupcake liners to guarantee the cupcakes don’t stick to the pan.
- Mix Dry Ingredients: In a medium-sized bowl, whisk together the flour, sugar, cocoa powder, baking powder, baking soda, and salt. This guarantees that all dry ingredients are evenly distributed.
- Combine Wet Ingredients: In a separate large bowl, beat the melted butter, eggs, and vanilla extract until well combined. Slowly add the milk and continue mixing until the mixture is smooth.
- Combine Wet and Dry Ingredients: Gradually add the dry ingredients to the wet ingredients, mixing until just combined. Be careful not to overmix to keep the cupcakes light and fluffy.
- Fill the Cupcake Liners: Divide the batter evenly among the prepared cupcake liners, filling each about two-thirds full.
- Bake the Cupcakes: Place the muffin tin in the preheated oven and bake for 18-20 minutes, or until a toothpick inserted into the center of a cupcake comes out clean. Allow the cupcakes to cool in the pan for a few minutes before transferring them to a wire rack to cool completely.
- Decorate the Cupcakes: Once cooled, spread a layer of chocolate frosting on each cupcake. Sprinkle the crushed chocolate cookies over the frosting to create the “dirt.” Insert gummy worms into the frosting, letting them peek out for a spooky effect.
- Add Tombstones: Use the oval-shaped cookies or candy to create tombstones by writing spooky messages with edible ink pens or frosting. Insert them into the cupcakes for the final touch.
Extra Tips:
To make the Graveyard Dirt Cupcakes even more festive, consider using food coloring to tint the frosting a darker shade of brown or black for an extra eerie effect. Additionally, you can use different types of candy to add variety to the graveyard scene, such as candy bones or skulls.
If you prefer a homemade touch, try making your own chocolate frosting or even a cream cheese frosting dyed with cocoa for the dirt effect. Store the cupcakes in an airtight container to keep them fresh, and for a fun presentation, display them on a layered tray with Halloween-themed decorations.
