
As the spooky season approaches, I’ve been conjuring up some enchanting dinner ideas that kids will adore. Picture serving Creepy-Crawly Pasta or Mummy Hot Dogs that are just as delightful to eat as they are to behold. These dishes add a touch of creativity and eerie charm to any table setting. I’m thrilled to share how you can make your Halloween feast an unforgettable one. Ready to explore some ghoulishly good recipes?
Creepy-Crawly Pasta

When it comes to Halloween, transforming everyday meals into spooky, fun dishes for kids can make the holiday even more exciting. Creepy-Crawly Pasta is a delightful way to bring a bit of trick and treat to the dinner table. This dish combines the festive spirit of Halloween with the comfort and deliciousness of pasta, making it a surefire hit with both kids and adults alike.
With black spaghetti as the centerpiece, this dish features “spiders” made from black olives and a rich tomato sauce, ensuring that each bite is as delicious as it’s spooky. Perfect for a Halloween-themed dinner, this pasta dish isn’t only visually appealing but also easy to prepare. The combination of simple ingredients and a touch of creativity will result in a fun, creepy meal that kids will love.
The black spaghetti provides the perfect eerie backdrop for the olive spiders, while the tomato sauce adds a burst of flavor and color. This recipe serves 4-6 people, making it ideal for family dinners or Halloween parties.
Ingredients:
- 1 pound black spaghetti (squid ink pasta)
- 1 jar (24 oz) marinara sauce
- 1 cup pitted black olives
- 1 tablespoon olive oil
- 1 teaspoon garlic powder
- 1 teaspoon onion powder
- 1 teaspoon dried oregano
- Salt and pepper to taste
- Grated Parmesan cheese for serving (optional)
Instructions:
- Cook the Pasta: Begin by bringing a large pot of salted water to a boil. Add the black spaghetti and cook according to the package instructions until al dente. Once cooked, drain the pasta and set aside.
- Prepare the Sauce: In a large skillet, heat the olive oil over medium heat. Add the marinara sauce, garlic powder, onion powder, and dried oregano. Stir well to combine and let it simmer for about 10 minutes, allowing the flavors to meld together. Season with salt and pepper to taste.
- Create the Spiders: While the sauce simmers, take the pitted black olives and slice them in half lengthwise. Use some of these halves as the spider bodies. For the legs, slice additional olives into thin strips. Arrange the strips around the halved olives on a plate to form spider shapes.
- Combine Pasta and Sauce: Add the cooked spaghetti to the skillet with the sauce, tossing gently to coat the pasta evenly with the sauce.
- Serve: Divide the pasta among plates or shallow bowls. Place a few of the olive spiders on top of each serving to create the creepy-crawly effect. Sprinkle with grated Parmesan cheese if desired.
Extra Tips:
For an added Halloween effect, consider mixing some cooked spinach or kale into the pasta for a touch of green that resembles vines or cobwebs. You can also use capers or small mozzarella balls as additional creepy toppings.
The black spaghetti can be substituted with standard spaghetti if you prefer or can’t find squid ink pasta, though the effect will be less eerie. Be sure to involve the kids in arranging the olive spiders for a fun and engaging activity that makes them part of the cooking process.
Mummy Hot Dogs

Mummy Hot Dogs are a spooktacular treat perfect for a Halloween dinner with kids. These delightful snacks aren’t only visually entertaining but also delicious and simple to make. They resemble mummies wrapped in bandages, adding a festive touch to the dinner table. Kids will love unraveling, and devouring, these fun and tasty creations.
A spooktacular treat, Mummy Hot Dogs delight kids with their festive, bandaged appearance and tasty simplicity.
This recipe is an excellent way to get children involved in the kitchen, as they can help with wrapping the dough around the hot dogs. Mummy Hot Dogs are versatile, allowing for different types of sausages or hot dogs to be used according to preference. Whether you’re hosting a Halloween party or just enjoying a themed family dinner, these mummies will surely be a hit!
Ingredients for 4-6 Servings:
- 8 hot dogs
- 1 package refrigerated crescent roll dough (8 ounces)
- 2 tablespoons mustard or ketchup
- Cooking spray or parchment paper
- Optional: candy eyes or small dots of cheese for eyes
Cooking Instructions:
- Preheat the Oven: Start by preheating your oven to 375°F (190°C). This guarantees that the oven is at the perfect temperature once you’re ready to bake the Mummy Hot Dogs.
- Prepare the Baking Sheet: Line a baking sheet with parchment paper or spray it lightly with cooking spray. This prevents the dough from sticking and makes for easy clean-up.
- Roll Out the Dough: Open the package of crescent roll dough and unroll it on a clean surface. Use a knife or pizza cutter to slice the dough into thin strips, approximately 1/4 inch wide.
- Wrap the Hot Dogs: Take each hot dog and wrap the dough strips around them, leaving a small space at the top for the “face.” Confirm that the strips overlap slightly to mimic the appearance of bandages. Continue wrapping until all hot dogs are mummified.
- Bake the Mummies: Place the wrapped hot dogs on the prepared baking sheet. Bake them in the preheated oven for about 12-15 minutes or until the dough is golden brown and cooked through.
- Add the Eyes: Once out of the oven, allow the Mummy Hot Dogs to cool slightly before adding eyes. Use mustard or ketchup to dot the eyes on the exposed parts of the hot dogs, or attach candy eyes or small pieces of cheese for a fun visual effect.
- Serve and Enjoy: Serve your Mummy Hot Dogs warm with extra mustard or ketchup for dipping. They make a delightful main dish or appetizer for your Halloween festivities.
Extra Tips:
For added flavor, consider using different types of sausages, such as chicken or turkey, to suit your family’s preferences.
If you’re short on time, pre-made dough sheets can be used as an alternative to crescent rolls.
For a healthier version, whole wheat dough can be substituted.
Finally, if you want to make them spookier, try using black olives cut into tiny pieces for the eyes.
Jack-O’-Lantern Stuffed Peppers
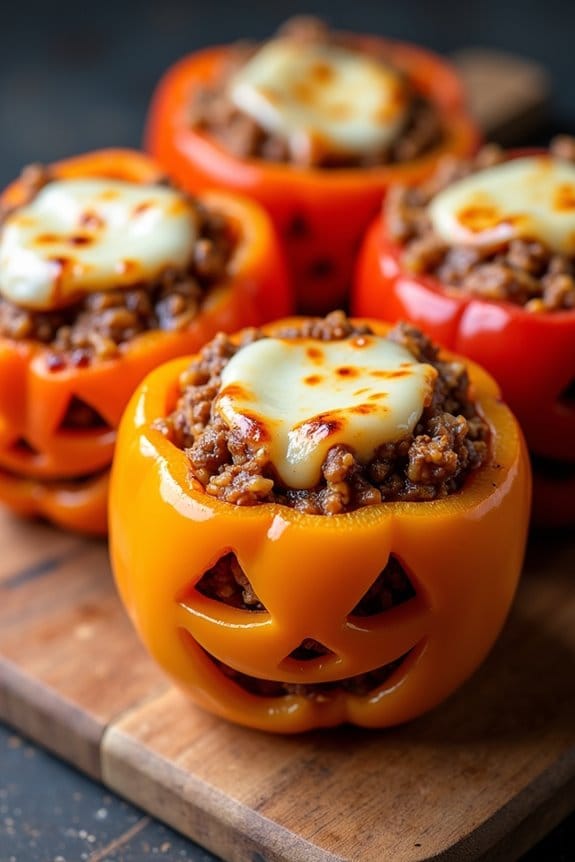
Get into the Halloween spirit with these delightful Jack-O’-Lantern Stuffed Peppers. This dish isn’t only festive but also packed with nutritious ingredients, making it a perfect choice for a family dinner that kids will love.
The vibrant bell peppers are carved to resemble spooky jack-o’-lanterns, adding a fun twist to the traditional stuffed pepper recipe. Filled with a savory mixture of rice, ground beef, and vegetables, these stuffed peppers are as delicious as they’re visually appealing.
Perfect for a serving size of 4-6 people, this recipe is sure to be a hit at your Halloween gathering. The combination of spices and cheese creates a comforting and hearty meal that will keep everyone satisfied. Plus, the creative presentation is sure to be a conversation starter at the dinner table.
Let your kids join in on the fun by helping to carve the faces into the peppers for an interactive cooking experience.
Ingredients:
- 6 large orange bell peppers
- 1 lb ground beef
- 1 cup cooked rice
- 1 onion, finely chopped
- 2 cloves garlic, minced
- 1 can (14 oz) diced tomatoes
- 1 cup shredded mozzarella cheese
- 1 teaspoon Italian seasoning
- Salt and pepper to taste
- Olive oil
Cooking Instructions:
- Preheat the Oven: Preheat your oven to 375°F (190°C) to make sure it’s ready for baking the peppers.
- Prepare the Peppers: Cut the tops off the bell peppers and remove the seeds and membranes. Carve jack-o’-lantern faces into one side of each pepper using a small knife. Be careful not to cut too much, so the filling stays inside.
- Cook the Filling: In a large skillet, heat a bit of olive oil over medium heat. Add the chopped onion and garlic, sautéing until they become translucent. Add the ground beef, cooking until it’s browned and fully cooked. Drain any excess fat.
- Mix the Ingredients: Stir in the cooked rice, diced tomatoes, Italian seasoning, salt, and pepper. Let the mixture simmer for about 5 minutes, allowing all flavors to meld together.
- Stuff the Peppers: Carefully spoon the beef and rice mixture into each carved pepper, filling them generously. Place them in a baking dish upright.
- Bake the Peppers: Cover the baking dish with aluminum foil and bake in the preheated oven for 25 minutes. Remove the foil, sprinkle the mozzarella cheese on top of each stuffed pepper, and bake for an additional 10 minutes, or until the cheese is melted and bubbly.
- Serve: Allow the peppers to cool for a few minutes before serving. Enjoy your Jack-O’-Lantern Stuffed Peppers while they’re warm and cheesy.
Extra Tips:
For an extra kick, consider adding a pinch of red pepper flakes to the beef mixture if your family enjoys a bit of spice. You can also customize the filling by adding other vegetables like mushrooms or zucchini for more variety.
If you want to make the dish vegetarian, substitute the ground beef with black beans or a meat substitute. Confirm the peppers are all similar in size so they cook evenly, and use a sharp knife for precise carving.
Monster Meatball Sliders

Halloween is a time for fun, creativity, and of course, deliciously spooky treats! What better way to celebrate than with a batch of Monster Meatball Sliders? These bite-sized delights are perfect for a Halloween dinner for kids, offering a playful twist on the classic meatball slider.
With a little imagination and some simple ingredients, you can create a monstrous feast that will delight and entertain your little ghouls and goblins.
These Monster Meatball Sliders are easy to make and can be customized with your favorite toppings to add a unique flair to your Halloween spread. The savory meatballs are the heart of this dish, nestled in soft slider buns and adorned with edible eyes and other fun decorations.
Customize these Monster Meatball Sliders with your favorite toppings for a spooky and delightful Halloween treat!
Whether you’re hosting a Halloween party or just looking for a fun dinner idea, these sliders are bound to be a hit.
Ingredients for 4-6 servings:
- 1 pound ground beef or turkey
- 1/2 cup breadcrumbs
- 1/4 cup grated Parmesan cheese
- 1 egg
- 2 cloves garlic, minced
- 1 teaspoon Italian seasoning
- Salt and pepper to taste
- 12 slider buns
- 1 cup marinara sauce
- 6 slices of mozzarella or provolone cheese, halved
- Black olives, sliced (for eyes)
- Fresh basil leaves (optional)
- Ketchup or mustard (for decoration)
Cooking Instructions:
- Preheat the Oven: Start by preheating your oven to 375°F (190°C). This will guarantee that your meatballs cook evenly.
- Prepare the Meatball Mixture: In a large mixing bowl, combine the ground beef or turkey, breadcrumbs, Parmesan cheese, egg, minced garlic, Italian seasoning, salt, and pepper. Mix thoroughly until all ingredients are well incorporated.
- Form the Meatballs: Using your hands, shape the mixture into 12 evenly sized meatballs. Place them on a baking sheet lined with parchment paper.
- Bake the Meatballs: Place the baking sheet in the preheated oven and bake for 20-25 minutes, or until the meatballs are cooked through and golden brown.
- Heat the Marinara Sauce: While the meatballs are baking, warm the marinara sauce in a small saucepan over medium heat. Stir occasionally and keep it warm until the meatballs are ready.
- Assemble the Sliders: Once the meatballs are cooked, remove them from the oven. Place each meatball on a slider bun, spoon a little marinara sauce over the top, and add a half slice of cheese.
- Create the Monster Faces: Use two slices of black olives to create “eyes” on the top of the cheese. You can use a dab of ketchup or mustard to “glue” them in place if needed.
- Add Decorative Touches: Place a fresh basil leaf under each meatball for a “hairy” effect if desired. Serve the sliders warm, with extra ketchup or mustard for added decoration.
Extra Tips:
To make the Monster Meatball Sliders even more fun, consider letting the kids help with decorating the sliders. They can get creative with the faces, using different toppings like sliced pickles or bell peppers for added features.
You can also prepare the meatballs a day ahead and simply reheat them before assembling the sliders, saving time on the day of your Halloween event. If you prefer a spicier kick, add a pinch of red pepper flakes to the meatball mixture. Enjoy your monstrous meal!
Spooky Pizza Faces

Get ready to delight your little goblins and ghouls with Spooky Pizza Faces this Halloween! This fun and creative dish is perfect for getting the kids involved in the kitchen, allowing their imaginations to run wild as they design their own edible masterpieces.
Spooky Pizza Faces aren’t only a hit at Halloween parties but also a great way to sneak some healthy veggies into your children’s diet without them even noticing. They can use a variety of toppings to make silly, scary, or goofy faces, transforming a simple dinner into a festive and engaging activity.
Crafting Spooky Pizza Faces is an enjoyable experience for everyone, from the youngest toddlers to the adults who are young at heart. The base of these pizzas is made with English muffins or personal-sized pizza bases, making them the perfect portion size for little hands.
With the freedom to choose toppings ranging from pepperoni eyes to olive pupils, and bell pepper mouths, each child can create their own unique expression. This recipe serves 4-6 people, guaranteeing there’s enough fun to go around the table.
Ingredients for 4-6 Servings:
- 6 English muffins or personal-sized pizza bases
- 1 cup pizza sauce
- 2 cups shredded mozzarella cheese
- 1 cup sliced black olives
- 1 cup sliced pepperoni
- 1 bell pepper, assorted colors
- 1/2 cup sliced mushrooms
- 1/2 cup cherry tomatoes, halved
- Olive oil (for brushing)
Cooking Instructions:
- Preheat the Oven: Begin by preheating your oven to 375°F (190°C). This guarantees that the pizzas will cook evenly and develop a nice, crispy base.
- Prepare the Bases: Slice each English muffin in half to create the base for your pizzas. Place them on a large baking sheet, cut side up. Lightly brush each piece with olive oil to help them crisp up in the oven.
- Spread the Sauce: Using a spoon, spread a generous layer of pizza sauce over each muffin half. Make sure to cover the surface evenly, leaving a small border around the edge.
- Add the Cheese: Sprinkle a layer of shredded mozzarella cheese over the sauce on each muffin. The cheese will act as the ‘glue’ to hold your spooky face toppings in place.
- Create the Faces: Let your creativity shine! Use the sliced black olives for eyes, pepperoni for mouths, bell peppers for hair or noses, mushrooms for ears, and cherry tomatoes for cheeks. Arrange the toppings to create unique and spooky faces on each pizza.
- Bake the Pizzas: Once all the faces are assembled, place the baking sheet in the preheated oven. Bake for about 10-12 minutes or until the cheese is melted and bubbly, and the edges of the muffins are golden brown.
- Serve and Enjoy: Remove the pizzas from the oven and let them cool slightly before serving. Encourage the kids to admire each other’s creations before digging in.
Extra Tips:
When making Spooky Pizza Faces, encourage the kids to get creative with their topping combinations. If you want to add more variety, consider using pre-cooked sausage slices, pineapple chunks, or even artichoke hearts.
For a gluten-free option, try using gluten-free pizza bases or cauliflower crusts. These pizzas are also a great way to accommodate different tastes and dietary needs, so feel free to customize them with your favorite ingredients.
Don’t forget to capture photos of these adorable pizzas before they disappear!
Witch’s Brew Stew
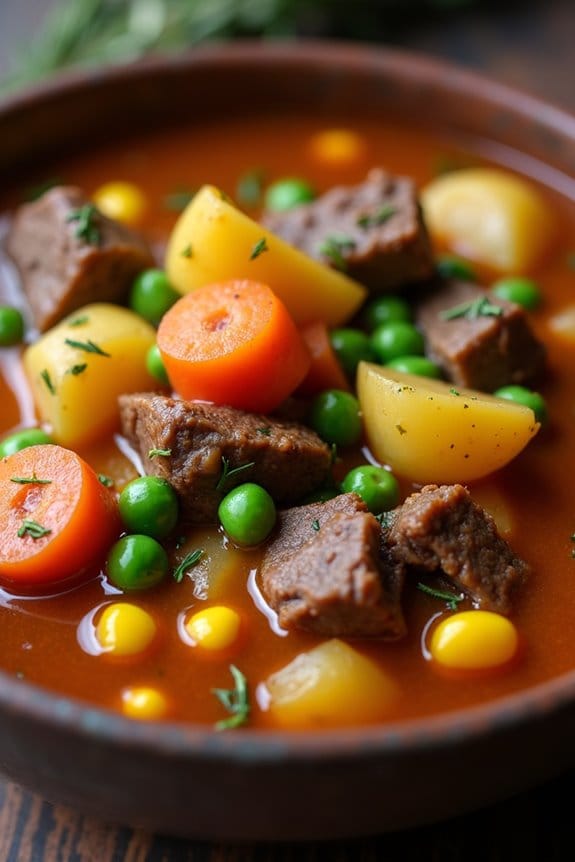
- 2 tablespoons olive oil
- 1 pound beef stew meat, cut into 1-inch cubes
- 1 large onion, chopped
- 3 garlic cloves, minced
- 4 cups beef broth
- 2 cups water
- 4 medium potatoes, peeled and cubed
- 3 carrots, peeled and sliced
- 2 celery stalks, sliced
- 1 cup frozen peas
- 1 cup corn kernels
- 1 teaspoon dried thyme
- 1 teaspoon dried rosemary
- Salt and pepper to taste
- 2 tablespoons all-purpose flour
- 2 tablespoons cold water
Cooking Instructions:
- Heat the Oil: In a large pot or Dutch oven, heat the olive oil over medium-high heat. Add the beef stew meat and brown on all sides. This should take about 5-7 minutes. Remove the meat from the pot and set aside.
- Sauté the Vegetables: In the same pot, add the chopped onion and minced garlic. Sauté until the onion is translucent and fragrant, about 3-4 minutes.
- Combine Ingredients: Return the browned beef to the pot. Add the beef broth, water, potatoes, carrots, celery, peas, and corn. Stir in the thyme, rosemary, salt, and pepper. Bring the mixture to a boil.
- Simmer the Stew: Once boiling, reduce the heat to low, cover the pot, and let it simmer for about 1.5 to 2 hours, or until the beef is tender and the vegetables are cooked through.
- Thicken the Stew: In a small bowl, mix the flour with cold water to create a slurry. Gradually add the slurry to the stew, stirring constantly, until the desired thickness is reached. Cook for an additional 5 minutes to allow the stew to thicken.
- Adjust Seasoning: Taste the stew and adjust the seasoning with more salt and pepper, if needed. Serve hot and enjoy the magical flavors of your Witch’s Brew Stew.
Extra Tips:
For an extra spooky touch, serve the stew in small cauldrons or bowls that resemble cauldrons.
You can also add a few drops of green food coloring to the stew for a more witchy appearance.
If you prefer a vegetarian version, simply omit the beef and substitute vegetable broth for the beef broth.
To make the stew ahead of time, prepare it up to the point of adding the thickening slurry, then cool and refrigerate. Reheat and thicken just before serving.
Ghostly Grilled Cheese Sandwiches

Ghostly Grilled Cheese Sandwiches are a spooky twist on the classic comfort food that’s perfect for a Halloween-themed dinner with kids. These sandwiches aren’t only delicious but also fun to make and eat, featuring a ghostly appearance that will delight children and adults alike. The gooey cheese oozes out of the ghost-shaped bread, making it an irresistible treat for a night of Halloween festivities.
This recipe is simple enough for kids to help with, making it a great family activity that combines cooking and creativity.
To make these Ghostly Grilled Cheese Sandwiches, you’ll start by cutting bread slices into ghost shapes using a cookie cutter. Then, you’ll fill them with a melty cheese of your choice, like cheddar or mozzarella, which will give the sandwiches their deliciously gooey texture. When grilled, the sandwiches take on a golden-brown crust that’s perfectly crispy, while the inside remains wonderfully cheesy.
Serve these with a side of tomato soup or a fresh salad to complete the meal, and watch as your kids’ faces light up with delight.
Ingredients for 4-6 Servings:
- 12 slices of white or whole wheat bread
- 8 slices of cheddar or mozzarella cheese
- 4 tablespoons of butter, softened
- Ghost-shaped cookie cutter
Cooking Instructions:
- Prepare the Bread: Start by laying out your slices of bread on a clean surface. Use the ghost-shaped cookie cutter to cut out ghost shapes from each slice. You should aim for an even number of ghost-shaped bread pieces to make complete sandwiches.
- Add the Cheese: Place a slice of cheese on half of the ghost-shaped bread pieces. Feel free to mix and match cheeses if you want a different flavor blend.
- Assemble the Sandwich: Top each cheese-covered ghost bread with another ghost-shaped bread slice to form a sandwich.
- Butter the Bread: Spread a thin layer of softened butter on the outside of each sandwich, guaranteeing the entire surface is covered for an even golden-brown finish when grilled.
- Grill the Sandwiches: Preheat a non-stick skillet or griddle over medium heat. Once hot, place the sandwiches in the skillet buttered side down. Grill for 3-4 minutes on one side until golden brown, then flip the sandwiches and grill the other side for another 3-4 minutes until the cheese is melted and the bread is crispy.
- Serve: Remove the sandwiches from the skillet and let them cool slightly before serving. Optionally, serve with a side of tomato soup or a salad.
Extra Tips:
For a more festive look, you can use edible markers to draw ghostly faces on the top slice of bread before grilling, or use small pieces of olives or peppers to make eyes and mouths.
If you don’t have a ghost-shaped cookie cutter, any Halloween-themed shape will work just as well. Also, verify that the butter is soft enough to spread easily to avoid tearing the bread.
Finally, keep an eye on the sandwiches while they grill to prevent burning, as bread can brown quickly.
Frankenstein Burgers

Frankenstein Burgers are a fun and spooky way to celebrate Halloween with your kids. These burgers aren’t only delicious but also visually entertaining, making them a perfect centerpiece for your Halloween dinner table. With a little creativity, you can transform a simple burger into a monstrous meal that will delight both kids and adults alike. The key to these burgers is the presentation, where you’ll use various toppings and decorations to create a face that resembles everyone’s favorite monster, Frankenstein.
This recipe is designed for a serving size of 4-6 people, ensuring that everyone at your Halloween gathering gets to enjoy their own Frankenstein Burger. The base of the burger will be a juicy beef patty, which you can season to your liking. From there, you’ll add cheese, vegetables, and other ingredients to craft the monstrous face. The result is a playful and tasty dish that will be a hit at any Halloween party. Now, let’s gather the ingredients and jump into the cooking process.
Ingredients for 4-6 servings:
- 4-6 hamburger buns
- 1 1/2 pounds ground beef
- Salt and pepper to taste
- 4-6 slices of cheddar cheese
- 1/2 cup mayonnaise
- 1 tablespoon mustard
- 2 tablespoons ketchup
- 1 small cucumber, thinly sliced
- 1 small red onion, thinly sliced
- 1/2 cup lettuce, shredded
- 1/4 cup black olives, sliced
- 12-24 pretzel sticks
- 4-6 large pickles, sliced lengthwise
- Ketchup and mustard for decoration
Cooking Instructions:
- Prepare the Beef Patties: In a large bowl, mix the ground beef with salt and pepper. Divide the mixture into 4-6 equal portions and shape them into patties. Make sure the patties are slightly larger than the buns, as they’ll shrink when cooked.
- Cook the Patties: Heat a grill or a skillet over medium-high heat. Cook the patties for about 4-5 minutes on each side or until they reach your desired level of doneness. In the last minute of cooking, place a slice of cheddar cheese on each patty to melt.
- Prepare the Buns: While the patties are cooking, split and lightly toast the hamburger buns. This will provide a nice texture and prevent them from becoming soggy.
- Assemble the Burgers: Mix mayonnaise, mustard, and ketchup in a small bowl. Spread the mixture on the bottom half of each bun. Place a lettuce leaf on top, followed by the beef patty with melted cheese.
- Create Frankenstein’s Face: Use cucumber slices for the eyes, placing them on top of the cheese. Add a piece of black olive in the center of each cucumber slice for pupils. Use red onion slices to create a mouth and eyebrows. For the bolts on the side of Frankenstein’s head, insert a pretzel stick into each side of the burger.
- Decorate the Burgers: Use ketchup and mustard to draw stitches or scars on Frankenstein’s face. Place the top bun on the burger, slightly askew, to give the impression of a tilted head.
- Add the Pickle Hair: Arrange the pickle slices on top of the bun to mimic Frankenstein’s signature flat-top hair.
Extra Tips:
When crafting your Frankenstein Burgers, feel free to get creative with the toppings and decorations. You can use additional vegetables or condiments to further personalize each burger.
If you want to make the patties ahead of time, they can be prepared and stored in the refrigerator for up to a day before cooking. Also, consider using turkey or veggie patties as an alternative to beef to accommodate different dietary preferences.
Enjoy bringing these monstrous creations to life and watching the delight on your kids’ faces as they dig into their Halloween-themed meal.
Skeleton Quesadillas

Skeleton Quesadillas are a spooky and delightful treat, perfect for getting kids excited about Halloween dinner. These creatively designed quesadillas transform a simple meal into a fun-filled culinary adventure. By crafting the tortillas into skeleton shapes and using vibrant, fresh ingredients, you can serve a dish that not only looks festive but also tastes delicious. The combination of gooey melted cheese and colorful veggies tucked between crispy tortillas is sure to be a hit with children and adults alike.
Preparing Skeleton Quesadillas isn’t only enjoyable but also easy, making it a great activity to involve kids in the kitchen. This dish adds a playful twist to the traditional quesadilla, making it ideal for Halloween gatherings or themed family dinners. The skeleton design can be personalized, allowing creativity to shine through while maintaining a nutritious and satisfying meal. With the right ingredients and a little imagination, you can create a memorable and tasty Halloween experience for the whole family.
Ingredients (Serves 4-6):
- 6 large flour tortillas
- 2 cups shredded cheddar cheese
- 1 cup cooked, shredded chicken (optional)
- 1 cup black beans, drained and rinsed
- 1/2 cup red bell pepper, diced
- 1/2 cup green bell pepper, diced
- 1/4 cup sliced black olives
- 1/4 cup chopped green onions
- 1 tablespoon olive oil
- Sour cream (for serving)
- Salsa (for serving)
Cooking Instructions:
- Prepare the Tortillas: Begin by using a sharp knife or kitchen scissors to cut out skeleton shapes from the tortillas. You can create bones, skulls, or any spooky shapes you prefer. Set these aside for later assembly.
- Create the Filling: In a medium-sized bowl, combine the shredded cheddar cheese, shredded chicken (if using), black beans, diced red and green bell peppers, and chopped green onions. Mix well to guarantee the ingredients are evenly distributed.
- Assemble the Quesadillas: Heat a large skillet over medium heat and add a small amount of olive oil. Place one whole tortilla in the skillet, then sprinkle a generous amount of the filling mixture over it, guaranteeing even coverage. Place another tortilla on top, pressing down gently.
- Cook the Quesadillas: Cook for 3-4 minutes on each side, or until the tortillas are golden brown and the cheese has melted completely. Carefully remove the quesadilla from the skillet and place it on a cutting board.
- Add the Skeleton Designs: Once the quesadillas are cooked, position the skeleton-shaped tortilla pieces on top of each quesadilla. This can be done by lightly pressing them down onto the melted cheese to help them adhere.
- Serve: Cut the quesadillas into wedges and serve with a side of sour cream and salsa for dipping. Arrange the wedges to showcase the skeleton designs for a festive presentation.
Extra Tips:
For even more fun, consider using cookie cutters to create various Halloween shapes from the tortillas. If you want to make the quesadillas vegetarian, simply omit the chicken and add more veggies or beans.
Make sure to supervise children closely if they’re helping with cutting or cooking, and encourage them to choose their favorite colors and shapes for added engagement. Additionally, for a crispier finish, use a lightly greased baking sheet and bake the assembled quesadillas in the oven at 375°F (190°C) for about 10-12 minutes instead of using a skillet.
Eyeball Spaghetti

Halloween is the perfect time to get creative in the kitchen, especially when crafting a spooky meal for kids. Eyeball Spaghetti is a fun and delicious dish that will certainly become a hit at your Halloween dinner table. This imaginative recipe combines classic spaghetti with a ghoulish twist, transforming simple meatballs into eerie eyeballs that will delight children and adults alike.
The combination of flavorful tomato sauce and creepy yet tasty meatball eyeballs is sure to make your Halloween dinner both memorable and enjoyable.
This Eyeball Spaghetti recipe is designed to serve 4-6 people, making it ideal for a family Halloween dinner or a small gathering. The dish consists of perfectly cooked spaghetti topped with a savory homemade tomato sauce and creepy meatball eyeballs that feature mozzarella and olives for an authentic eye-like appearance. With just a few simple ingredients and some creative presentation, you can serve up a Halloween meal that’s as entertaining as it’s delicious.
Ingredients (Serves 4-6):
- 1 lb (450 g) spaghetti
- 1 lb (450 g) ground beef or turkey
- 1 cup breadcrumbs
- 1/4 cup grated Parmesan cheese
- 1/4 cup milk
- 1 egg
- 2 cloves garlic, minced
- Salt and pepper to taste
- 2 cups marinara sauce
- 12 small mozzarella balls (ciliegine)
- 6 black olives, sliced into rings
- Fresh basil leaves (optional, for garnish)
Cooking Instructions:
- Prepare the Meatballs: In a large bowl, combine the ground beef or turkey, breadcrumbs, Parmesan cheese, milk, egg, minced garlic, salt, and pepper. Mix well until all ingredients are thoroughly combined.
- Form the Eyeballs: Roll the meat mixture into 12 equal-sized balls. Press a mozzarella ball into the center of each meatball, shaping the meat around it to form an eyeball. Make sure the mozzarella is partially exposed at the top to resemble an eye.
- Cook the Meatball Eyeballs: Preheat your oven to 375°F (190°C). Place the meatball eyeballs on a baking sheet lined with parchment paper. Bake for 20-25 minutes, or until the meatballs are cooked through and golden brown.
- Cook the Spaghetti: While the meatballs are baking, bring a large pot of salted water to a boil. Add the spaghetti and cook according to package instructions. Once cooked, drain the spaghetti and set aside.
- Prepare the Sauce: In a large saucepan, heat the marinara sauce over medium heat until it begins to simmer. Add the baked meatball eyeballs to the sauce, gently stirring to coat them evenly.
- Plate the Dish: Divide the cooked spaghetti among plates. Top each serving with the saucy meatball eyeballs. Place a slice of black olive on each mozzarella ball to complete the eyeball look.
- Garnish and Serve: Optionally, garnish with fresh basil leaves for added flavor and color. Serve immediately while hot.
Extra Tips:
When preparing the meatballs, make sure that the meat mixture is well-seasoned for maximum flavor. If you’re preparing this dish in advance, you can make the meatball eyeballs and refrigerate them until you’re ready to bake. This not only saves time but also allows the flavors to meld together.
For an extra touch of Halloween fun, consider serving the Eyeball Spaghetti with a side of garlic bread shaped like fingers or a spooky green salad.
Bat Wing Chicken

Create a spooky and delicious Halloween dinner for the kids with this Bat Wing Chicken recipe. Inspired by the eerie wings of bats, this dish is sure to be a hit at your Halloween gathering. The chicken wings are marinated in a flavorful blend of spices and sauces, then baked to perfection, resulting in tender and juicy wings that are both savory and slightly sweet. The deep, dark color of the wings adds to the Halloween theme, making them both fun and tasty for the kids.
Evoke Halloween magic with these savory, sweet Bat Wing Chicken wings—perfectly spooky and delicious for your little goblins.
This recipe is perfect for serving 4-6 people and is a great addition to any Halloween party menu. The preparation is simple, and the end result is a platter of wings that will have your little ghouls and goblins coming back for seconds. So gather your ingredients, preheat your oven, and get ready to make a dish that’s as festive as it’s delicious.
Ingredients (Serves 4-6):
- 2 pounds chicken wings
- 1/2 cup soy sauce
- 1/4 cup balsamic vinegar
- 1/4 cup honey
- 3 tablespoons olive oil
- 4 cloves garlic, minced
- 1 teaspoon ground ginger
- 1 teaspoon onion powder
- 1 teaspoon black food coloring (optional)
- Salt and pepper to taste
- Sesame seeds (optional, for garnish)
- Fresh parsley (optional, for garnish)
Cooking Instructions:
- Prepare the Marinade: In a large mixing bowl, combine the soy sauce, balsamic vinegar, honey, olive oil, minced garlic, ground ginger, onion powder, and black food coloring (if using). Mix well until all ingredients are thoroughly combined.
- Marinate the Chicken: Add the chicken wings to the bowl of marinade. Make sure each wing is coated evenly with the sauce. Cover the bowl with plastic wrap and refrigerate for at least 2 hours, or overnight for a more intense flavor.
- Preheat the Oven: Preheat your oven to 400°F (200°C). Line a baking sheet with aluminum foil or parchment paper for easy cleanup.
- Arrange the Wings: Remove the marinated wings from the refrigerator and arrange them in a single layer on the prepared baking sheet. Confirm that they aren’t touching each other to allow for even cooking.
- Bake the Wings: Place the baking sheet in the preheated oven and bake for 30-35 minutes, turning the wings halfway through to confirm they cook evenly on both sides. The wings should be crispy and cooked through.
- Serve: Once cooked, remove the wings from the oven and let them cool slightly. Transfer them to a serving platter and garnish with sesame seeds and fresh parsley if desired. Serve warm and enjoy!
Extra Tips:
For the best flavor, allow the chicken wings to marinate overnight. If you can’t find black food coloring, you can skip it without affecting the taste, though it adds a dramatic Halloween effect.
To guarantee the wings are crispy, avoid overcrowding the baking sheet. If necessary, bake the wings in batches. Adjust the level of sweetness by altering the amount of honey to suit your taste preferences.
Goblin Guacamole Tacos

The combination of creamy guacamole, seasoned ground beef, and crunchy taco shells creates a delightful contrast in textures and flavors that even the pickiest eaters will enjoy.
With the addition of spooky toppings like shredded lettuce hair and olive eyes, these tacos aren’t only tasty but also a visual treat. Let’s plunge into this fun and frightfully delicious recipe, which serves 4-6 people.
Ingredients:
- 1 pound ground beef
- 1 tablespoon taco seasoning
- 1 tablespoon olive oil
- 12 taco shells
- 3 ripe avocados
- 1 lime, juiced
- 1/2 teaspoon garlic powder
- Salt to taste
- 1/2 cup diced tomatoes
- 1/4 cup chopped cilantro
- 1 cup shredded lettuce
- 1/2 cup sliced black olives
- 1/2 cup shredded cheese (optional)
Instructions:
1. Prepare the Ground Beef: In a large skillet, heat the olive oil over medium heat. Add the ground beef and cook until browned, breaking it apart with a spoon.
Drain any excess fat and stir in the taco seasoning. Cook for an additional 2-3 minutes until the seasoning is well combined with the beef. Remove from heat and set aside.
2. Make the Guacamole: Cut the avocados in half, remove the pits, and scoop the flesh into a bowl.
Add lime juice, garlic powder, and salt. Mash the avocados with a fork until you reach your desired consistency. Stir in the diced tomatoes and chopped cilantro.
3. Assemble the Tacos: Lay out the taco shells on a serving platter. Fill each shell with a spoonful of the seasoned ground beef.
Top with a generous amount of guacamole, making sure it fills the shell to the edges. This is your goblin base.
4. Decorate the Tacos: Add shredded lettuce on top of the guacamole to resemble goblin hair.
Place two sliced black olives on each taco to create eyes. If desired, sprinkle a little shredded cheese for extra flavor.
5. Serve: Arrange the Goblin Guacamole Tacos on a platter and serve immediately. Enjoy the spooky yet delicious meal with your little goblins!
Extra Tips:
To make the meal even more festive, consider using various colored taco shells available in stores, like blue corn or red shells, to add a pop of Halloween colors.
If your kids love spice, add a bit of chopped jalapeno to the guacamole for an extra kick. For a vegetarian version, substitute the ground beef with black beans or lentils.
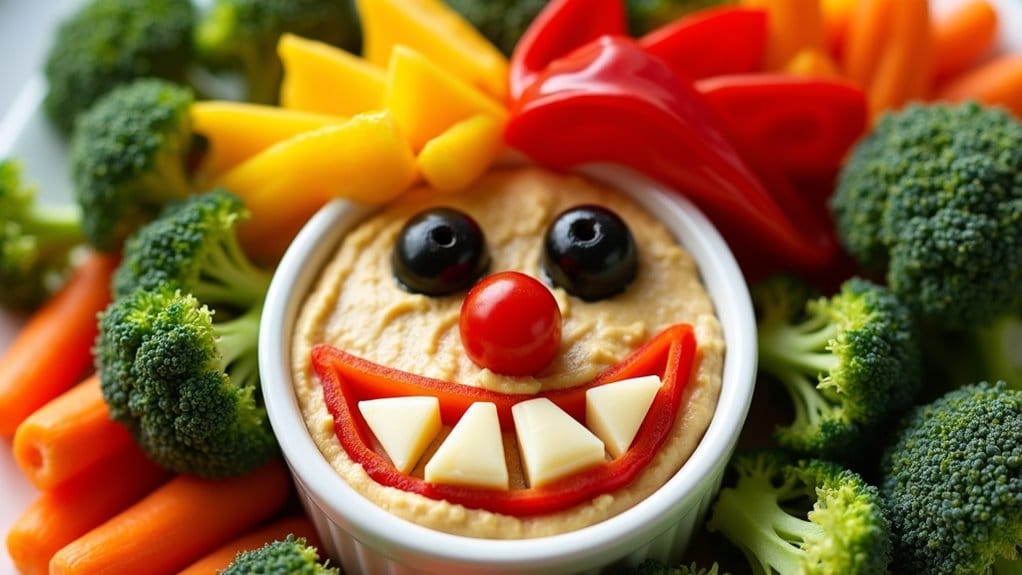
Vampire Veggie Platter

Halloween is the perfect time to get creative with your food presentation, and a Vampire Veggie Platter is an exciting way to delight kids and encourage them to eat their veggies. This platter combines fun, spooky elements with nutritious snacks, perfect for a Halloween gathering or dinner party. By incorporating a variety of colorful vegetables, this dish isn’t only visually appealing but also packed with vitamins and minerals.
The Vampire Veggie Platter is designed to resemble a vampire’s face, complete with fangs, eyes, and a haunting expression. The key to this dish is using vegetables of different shapes and colors to build the features of the vampire. It’s a great opportunity to involve the kids in the kitchen as they can help assemble the platter, making it a fun, collaborative activity. Here’s how you can create this ghoulishly delightful dish for a serving size of 4-6 people.
Ingredients:
- 1 large cucumber
- 1 red bell pepper
- 1 yellow bell pepper
- 1 small bunch of broccoli
- 10-12 cherry tomatoes
- 1 small bunch of carrots
- 1 small bunch of celery sticks
- 1 small bunch of black olives
- 1 cup of hummus
- 1 cup of ranch dressing
- 2 small pieces of cheese (for fangs)
Instructions:
- Prepare the Vegetables: Wash all the vegetables thoroughly. Peel the cucumber and cut it into thin slices. Slice the red and yellow bell peppers into strips. Cut the broccoli into small florets, and halve the cherry tomatoes. Peel and cut the carrots into sticks. Cut the celery into bite-sized sticks.
- Assemble the Vampire Face: On a large platter, arrange the cucumber slices in a circular shape to form the outline of the vampire’s face. Use the red bell pepper strips to create hair at the top of the face. Place two yellow bell pepper strips in the center for eyebrows.
- Create the Eyes and Nose: Place two small bowls of hummus on the platter for eyes. Add a black olive in the center of each bowl to complete the eyes. Use a cherry tomato for the nose, positioning it below the eyes.
- Form the Mouth and Fangs: Use the remaining red bell pepper strips to form a wide, open mouth below the nose. For fangs, cut small triangles from the pieces of cheese and place them at the top and bottom of the mouth.
- Add Details and Serve: Surround the face with broccoli florets, carrot sticks, and celery sticks to give the platter a full and finished appearance. Place the remaining cherry tomatoes and black olives around the platter for added decoration. Serve the ranch dressing in a small bowl on the side for dipping.
Extra Tips:
When creating the Vampire Veggie Platter, feel free to substitute or add any of your favorite vegetables to suit your family’s tastes. If you want to make the platter even more engaging for the kids, consider using cookie cutters to shape the veggies into fun Halloween-themed shapes like bats or pumpkins.
Additionally, you can offer a variety of dipping sauces to cater to different preferences, such as guacamole or a spicy salsa for an extra kick. Remember, the key to this dish is creativity, so have fun with the design and let the kids’ imaginations run wild!
