
Planning a Halloween dinner party? I’ve curated a list of hauntingly delicious ideas that will captivate your guests. Start with a Bewitching Butternut Squash Soup, setting the stage with its rich, warm flavors. From Mummy Meatball Sliders to Creepy Crawly Pasta Salad, each dish adds a touch of spookiness to your table. Ready to make your party unforgettable? Let’s explore these creative culinary delights together!
Bewitching Butternut Squash Soup

As the chilly winds of Halloween sweep through the night, warm up with a bowl of Bewitching Butternut Squash Soup. This velvety and flavorful soup is perfect for a cozy dinner before or after trick-or-treating. With its rich orange hue and delightful blend of spices, it adds a magical touch to your Halloween festivities.
Not only is it visually appealing, but it’s also packed with nutrients, making it a healthy yet delicious choice for the entire family. The natural sweetness of butternut squash is enhanced by the aromatic spices used in this recipe. The creamy texture is achieved without using any heavy cream, making it a lighter option that doesn’t compromise on flavor.
Visually appealing and nutrient-packed, this lighter soup offers creamy goodness without compromising on flavor.
Whether you’re hosting a Halloween dinner or just looking for a comforting meal, this Bewitching Butternut Squash Soup is sure to cast a spell on your taste buds.
Ingredients (Serves 4-6):
- 1 large butternut squash (about 3 pounds), peeled, seeded, and cubed
- 2 tablespoons olive oil
- 1 large onion, chopped
- 3 cloves garlic, minced
- 1 teaspoon ground cinnamon
- 1/2 teaspoon ground nutmeg
- 1/2 teaspoon ground ginger
- 4 cups vegetable broth
- Salt and pepper to taste
- 1/2 cup coconut milk
- Pumpkin seeds (optional, for garnish)
Cooking Instructions:
- Prepare the Squash: Preheat your oven to 400°F (200°C). Spread the cubed butternut squash on a baking sheet, drizzle with 1 tablespoon of olive oil, and sprinkle with a pinch of salt and pepper. Toss to coat evenly and roast in the oven for 25-30 minutes, or until the squash is tender and slightly caramelized.
- Sauté the Aromatics: While the squash is roasting, heat the remaining tablespoon of olive oil in a large pot over medium heat. Add the chopped onion and cook for about 5 minutes until it becomes translucent. Stir in the minced garlic, cinnamon, nutmeg, and ginger, and sauté for another 1-2 minutes until fragrant.
- Combine Ingredients: Add the roasted butternut squash to the pot with the sautéed onions and spices. Pour in the vegetable broth and bring the mixture to a boil. Reduce the heat to low and let it simmer for about 15 minutes, allowing the flavors to meld together.
- Blend the Soup: Using an immersion blender, puree the soup until smooth and creamy. Alternatively, you can transfer the soup in batches to a blender, blending until smooth and returning it to the pot.
- Add Finishing Touches: Stir in the coconut milk and let the soup simmer for an additional 5 minutes. Taste and adjust the seasoning with salt and pepper as needed.
- Serve: Ladle the soup into bowls and garnish with a sprinkle of pumpkin seeds for a festive touch.
Extra Tips:
For a richer flavor, consider adding a dash of maple syrup or a pinch of cayenne pepper for a hint of sweetness or heat. If you prefer a thicker soup, reduce the amount of vegetable broth slightly.
The soup can be made a day ahead and reheated, which allows the flavors to deepen and makes it a great make-ahead option for a stress-free Halloween dinner. If using a blender, be sure to allow the soup to cool slightly before blending to avoid any hot splashes.
Enjoy your Bewitching Butternut Squash Soup with some crusty bread or a spooky side salad for a complete meal.
Mummy Meatball Sliders

Mummy Meatball Sliders are a spooky yet delicious addition to your Halloween dinner spread. These sliders combine the classic flavors of juicy meatballs, savory marinara sauce, and gooey cheese, all wrapped up in a fun and festive presentation. Perfect for a family dinner or a Halloween party, Mummy Meatball Sliders are bound to be a hit with both kids and adults alike.
The sliders aren’t only tasty but also easy to make, allowing you to focus on other Halloween festivities while still serving up a memorable meal.
The key to these sliders is in their presentation – each meatball is cleverly wrapped in strips of dough to resemble a mummy, complete with edible eyes made from olives or sliced cheese. When baked, the dough turns golden brown and the cheese melts to perfection, creating an irresistible combination of flavors and textures.
Served on slider buns and drizzled with marinara sauce, these Mummy Meatball Sliders are both fun and flavorful, making them an ideal choice for a Halloween-themed meal.
Ingredients (Serves 4-6):
- 1 pound ground beef
- 1/2 cup breadcrumbs
- 1/4 cup grated Parmesan cheese
- 1 large egg
- 2 cloves garlic, minced
- 1 teaspoon Italian seasoning
- Salt and pepper, to taste
- 1 cup marinara sauce
- 6 slices mozzarella cheese
- 12 slider buns
- 1 can refrigerated crescent roll dough
- 24 small black olive slices or cheese rounds for eyes
Instructions:
- Preheat the Oven: Begin by preheating your oven to 375°F (190°C). This will guarantee that it’s hot enough to cook the meatballs evenly.
- Prepare the Meatballs: In a large mixing bowl, combine the ground beef, breadcrumbs, Parmesan cheese, egg, minced garlic, Italian seasoning, salt, and pepper. Mix thoroughly until all ingredients are well incorporated.
- Shape the Meatballs: Using your hands, form the mixture into 12 evenly sized meatballs. Make sure they’re compact so they hold their shape while cooking.
- Cook the Meatballs: Place the meatballs on a baking sheet lined with parchment paper. Bake in the preheated oven for about 20 minutes, or until they’re cooked through and browned on the outside.
- Wrap the Meatballs: While the meatballs are baking, unroll the crescent dough and cut it into thin strips. Once the meatballs are baked, remove them from the oven and allow them to cool slightly. Wrap each meatball with the dough strips to resemble a mummy, leaving small gaps for the eyes.
- Add Eyes: Place two olive slices or cheese rounds on each meatball to create eyes.
- Bake the Mummies: Return the wrapped meatballs to the oven and bake for an additional 10 minutes, or until the dough is golden brown.
- Assemble the Sliders: Slice the mozzarella cheese into pieces that fit the slider buns. Place a cheese slice on the bottom half of each bun, then top with a mummy meatball. Spoon marinara sauce over the top and finish with the top half of the bun.
Extra Tips:
For an added kick, consider incorporating a dash of hot sauce or red pepper flakes into the meatball mixture. If you’re short on time, store-bought meatballs can be used instead of homemade.
To prevent the cheese from sliding off the sliders when serving, you can use a toothpick to secure the top bun to the meatball. Finally, feel free to get creative with the eyes by using different edible options such as capers or small pieces of bell pepper.
Spooky Stuffed Peppers

As Halloween approaches, conjure up some frightfully fun culinary magic with Spooky Stuffed Peppers. These delightful treats not only add a splash of color to your Halloween table but also bring a healthy and delicious twist to your festivities. The peppers are carved like little jack-o’-lanterns and filled with a savory mixture of rice, ground meat, and flavorful seasonings.
Whether you’re hosting a Halloween party or simply looking to treat your family to a themed dinner, these stuffed peppers are sure to please both young and old witches and wizards alike.
Creating Spooky Stuffed Peppers is a straightforward process that allows for creativity and personalization. You can carve the faces on the peppers as simple or as intricate as you like, making it a perfect family activity to get everyone in the spooky spirit. The filling can be easily customized to suit your tastes or dietary preferences, guaranteeing everyone has a terrifyingly tasty time.
Let’s plunge into this ghoulishly good recipe that serves 4-6 people.
Ingredients:
- 6 medium orange or red bell peppers
- 1 pound ground beef or turkey
- 1 cup cooked rice
- 1 small onion, chopped
- 2 cloves garlic, minced
- 1 can (15 ounces) diced tomatoes, drained
- 1 tablespoon Worcestershire sauce
- 1 teaspoon dried oregano
- 1 teaspoon salt
- 1/2 teaspoon black pepper
- 1 cup shredded mozzarella cheese
- 2 tablespoons olive oil
Cooking Instructions:
- Prepare the Peppers: Preheat your oven to 375°F (190°C). Cut the tops off the peppers and remove the seeds and membranes. Using a small knife, carve jack-o’-lantern faces into the sides of each pepper. Be gentle to avoid breaking the peppers. Set them aside.
- Cook the Filling: In a large skillet, heat the olive oil over medium heat. Add the chopped onion and minced garlic, sautéing until the onion is translucent. Add the ground beef or turkey, cooking until browned. Break up any large chunks with a spatula as it cooks.
- Mix the Filling: Once the meat is browned, stir in the drained diced tomatoes, cooked rice, Worcestershire sauce, oregano, salt, and black pepper. Cook for an additional 5 minutes, allowing the flavors to meld together.
- Stuff the Peppers: Carefully spoon the meat and rice mixture into each carved pepper, pressing down gently to pack the filling in. Place the filled peppers in a baking dish.
- Bake the Peppers: Cover the dish with foil and bake in the preheated oven for 25 minutes. Remove the foil, sprinkle the tops with shredded mozzarella cheese, and return to the oven. Bake for an additional 10-15 minutes, or until the cheese is melted and bubbly.
- Serve: Allow the peppers to cool slightly before serving. Arrange them on a platter, showcasing their spooky faces for a festive presentation.
Extra Tips:
For an extra touch of flavor, consider adding chopped fresh herbs like parsley or basil to the filling. If you prefer a vegetarian version, substitute the meat with cooked lentils or a meat substitute such as crumbled tofu or tempeh.
To confirm the peppers don’t tip over during baking, use a muffin tin to hold them upright. Finally, feel free to experiment with different cheese varieties such as cheddar or pepper jack to cater to your taste buds. Enjoy your ghoulishly delightful meal!
Vampire Bat Wings

Looking to add a spooky twist to your Halloween dinner? Try these delicious and eerie Vampire Bat Wings, a perfect blend of sweet, spicy, and savory flavors that will enchant your guests. This dish, with its deep, dark glaze and crispy texture, resembles the wings of a vampire bat and is sure to be a hit at your Halloween gathering. Not only is it visually mesmerizing, but it also packs a punch of flavor that’s irresistible.
Vampire Bat Wings are fundamentally chicken wings coated in a luscious, dark sauce made with soy, balsamic vinegar, and a hint of sweetness. This dish can serve as a delightful appetizer or a main course for 4-6 people, making it ideal for a small festive gathering. With just a handful of ingredients and a simple cooking process, you can whip up this spooky treat in no time.
Ingredients (Serves 4-6):
- 2 pounds chicken wings
- 1/2 cup soy sauce
- 1/4 cup balsamic vinegar
- 1/4 cup honey
- 2 tablespoons brown sugar
- 1 tablespoon olive oil
- 1 tablespoon minced garlic
- 1 teaspoon ground ginger
- 1/2 teaspoon black pepper
- 1/2 teaspoon cayenne pepper
- Green onion or chives for garnish (optional)
Cooking Instructions:
- Preparation: Start by preheating your oven to 400°F (200°C). Line a large baking sheet with aluminum foil or parchment paper for easy cleanup.
- Marinate the Wings: In a large mixing bowl, combine soy sauce, balsamic vinegar, honey, brown sugar, olive oil, minced garlic, ground ginger, black pepper, and cayenne pepper. Whisk these ingredients together until fully mixed. Add the chicken wings to the bowl and toss them until they’re thoroughly coated in the marinade. Allow the wings to marinate for at least 30 minutes, or up to 2 hours for a more intense flavor.
- Bake the Wings: Arrange the marinated wings on the prepared baking sheet in a single layer. Reserve the leftover marinade. Bake the wings in the preheated oven for 25-30 minutes, flipping them halfway through, until they’re golden brown and cooked through.
- Glaze the Wings: While the wings are baking, pour the reserved marinade into a small saucepan. Bring it to a boil over medium heat, then reduce the heat and let it simmer until it thickens into a glaze, about 5-7 minutes. Stir occasionally to prevent burning.
- Coat and Serve: Once the wings are cooked, remove them from the oven and brush them generously with the thickened glaze. Return the wings to the oven for an additional 5 minutes to allow the glaze to set. Garnish with chopped green onion or chives if desired, and serve immediately.
Extra Tips:
For an even more intense flavor, you can marinate the wings overnight in the refrigerator. If you prefer your wings extra crispy, consider broiling them for an additional 2-3 minutes after glazing. Be sure to keep an eye on them to prevent burning. For a smokier flavor, you can also add a teaspoon of smoked paprika to the marinade. Enjoy your Vampire Bat Wings with a side of blue cheese or ranch dressing for dipping.
Witchy Finger Breadsticks

Witchy Finger Breadsticks are the perfect spooky addition to your Halloween dinner table. These eerie breadsticks aren’t only delicious but also delightfully themed to match the Halloween spirit. Shaped like gnarly witch fingers, they’re a fun and creative way to get everyone in the mood for the festivities.
Add a ghastly touch to your Halloween with these deliciously eerie Witchy Finger Breadsticks!
With a crispy exterior and a soft, airy inside, these breadsticks are sure to be a hit with both kids and adults alike. Crafting these Witchy Finger Breadsticks is a breeze, making them an ideal choice for anyone looking to add a homemade touch to their Halloween party menu. The recipe incorporates simple ingredients that you probably already have in your pantry, and the result is a ghoulishly good treat that can be enjoyed on its own or paired with your favorite dips.
Whether you’re hosting a large gathering or a cozy family dinner, these breadsticks are a must-have.
Ingredients (Serves 4-6 people):
- 2 cups all-purpose flour
- 1 packet (2 1/4 teaspoons) active dry yeast
- 1 teaspoon salt
- 1 teaspoon sugar
- 3/4 cup warm water (110°F/45°C)
- 2 tablespoons olive oil
- Whole almonds (for fingernails)
- 1 egg (for egg wash)
- Coarse sea salt (optional, for topping)
Cooking Instructions:
- Prepare the Dough: In a large bowl, combine the flour, salt, and sugar. In a small bowl, dissolve the yeast in warm water and let it sit for about 5 minutes until it becomes foamy. Pour the yeast mixture and olive oil into the flour mixture and stir to combine.
- Knead the Dough: Transfer the dough onto a floured surface and knead for about 5-7 minutes until it becomes smooth and elastic. Place the dough in a lightly oiled bowl, cover it with a damp cloth, and let it rise in a warm place for about 1 hour or until it has doubled in size.
- Shape the Fingers: Preheat your oven to 375°F (190°C). Once the dough has risen, punch it down and divide it into 12 equal pieces. Roll each piece into a finger-like shape, making sure to taper one end for the tip of the finger.
- Add Details: Press a whole almond into the tapered end of each finger to create the nail. Use a sharp knife to make small cuts along the dough to mimic knuckles.
- Apply Egg Wash: Beat the egg in a small bowl and brush it over each breadstick to give them a golden color when baked. If desired, sprinkle a little coarse sea salt over the top for extra flavor and texture.
- Bake the Breadsticks: Place the shaped fingers on a baking sheet lined with parchment paper and bake for 18-20 minutes, or until they’re golden brown and cooked through.
Extra Tips: To make the Witchy Finger Breadsticks even more realistic, consider adding a drop of red food coloring around the almond to mimic blood for a scarier effect. You can also experiment with different herbs mixed into the dough for extra flavor, like rosemary or thyme.
If you want softer breadsticks, cover them with a clean towel immediately after baking to retain moisture. Enjoy these fun breadsticks with marinara or any of your favorite dips for a complete Halloween-themed experience.
Pumpkin Risotto With Sage

Looking to impress your family and friends this Halloween with a sophisticated yet festive meal? Pumpkin Risotto with Sage is a delightful dish that captures the essence of autumn with its rich flavors and creamy texture. The combination of pumpkin and sage creates a warm and comforting meal that’s perfect for a spooky night in.
This dish not only highlights the earthy sweetness of pumpkin but also brings in the aromatic presence of fresh sage, making it an ideal choice for a Halloween dinner that stands out.
Pumpkin Risotto with Sage is a versatile dish that can serve as an elegant main course or a stunning side dish. Its vibrant orange hue, reminiscent of Halloween pumpkins, adds a seasonal touch to your dinner table.
With the right balance of creamy Arborio rice, savory Parmesan, and the subtle hint of sage, this risotto will surely become a favorite in your Halloween recipe repertoire. The following recipe serves 4-6 people, making it perfect for an intimate gathering or a family meal.
Ingredients:
- 2 cups Arborio rice
- 1 cup pumpkin puree
- 1 small onion, finely chopped
- 2 cloves garlic, minced
- 4 cups vegetable or chicken broth
- 1 cup dry white wine
- 1/2 cup grated Parmesan cheese
- 2 tablespoons olive oil
- 2 tablespoons unsalted butter
- 1 tablespoon fresh sage, chopped
- Salt and pepper to taste
- Optional: additional sage leaves for garnish
Instructions:
- Prepare the Ingredients: Begin by finely chopping the onion and mincing the garlic. Measure out the pumpkin puree, white wine, and broth. Grate the Parmesan cheese and chop the fresh sage leaves. Keep all ingredients within reach as you’ll need to add them at various stages of the cooking process.
- Sauté the Aromatics: In a large, heavy-bottomed pan, heat the olive oil and butter over medium heat. Add the chopped onion and garlic, sautéing until the onion is translucent and fragrant, about 3-4 minutes.
- Toast the Rice: Add the Arborio rice to the pan, stirring constantly for about 2 minutes. This step allows the rice to absorb the flavors of the onion and garlic while starting to toast, which enhances the nutty flavor of the rice.
- Add the Wine: Pour in the white wine and stir until it’s fully absorbed by the rice. This will deglaze the pan and add a depth of flavor to the dish.
- Cook the Risotto: Begin adding the broth, one ladle at a time, stirring frequently and allowing each addition to be absorbed before adding the next. This process should take about 18-20 minutes, ensuring the rice becomes creamy and tender.
- Incorporate the Pumpkin: Once the rice is cooked, stir in the pumpkin puree and chopped sage. Continue to stir until the mixture is fully incorporated and heated through.
- Finish the Dish: Remove the pan from the heat and stir in the grated Parmesan cheese. Season the risotto with salt and pepper to taste. Let it sit for a minute to thicken.
- Serve: Spoon the Pumpkin Risotto with Sage into bowls and garnish with additional sage leaves if desired. Serve immediately.
Extra Tips:
When making risotto, patience is key. Stirring often and gradually adding the broth helps release the starches from the rice, creating the creamy texture that’s characteristic of a good risotto.
If you prefer a more intense sage flavor, you can sauté whole sage leaves in butter until crisp and use them as a garnish. For an added touch of luxury, consider drizzling a bit of truffle oil before serving.
Adjust the seasoning to your preference, and remember that the Parmesan will add a salty note, so taste before adding additional salt.
Ghostly White Pizza

Embrace the spooky spirit of Halloween with a Ghostly White Pizza that’s sure to captivate both kids and adults alike. This pizza is a hauntingly delicious treat, featuring a creamy white sauce base topped with an assortment of white cheeses and ghost-shaped mozzarella slices. The contrast of the white ingredients against a crispy crust creates an eerie yet irresistible appearance, perfect for a Halloween dinner or party.
The Ghostly White Pizza isn’t only visually appealing but also packed with flavor. The combination of ricotta and Alfredo sauce forms a luscious base, while the blend of mozzarella, fontina, and Parmesan cheeses adds a gooey, savory layer. The ghost-shaped mozzarella slices add a festive touch, making this pizza a fun and tasty centerpiece for your Halloween feast. This recipe serves 4-6 people.
Ingredients:
- 1 pre-made pizza dough or crust
- 1 cup Alfredo sauce
- 1/2 cup ricotta cheese
- 1 1/2 cups shredded mozzarella cheese
- 1 cup shredded fontina cheese
- 1/2 cup grated Parmesan cheese
- 8 oz fresh mozzarella cheese, sliced
- 1 tablespoon olive oil
- 1 teaspoon garlic powder
- Salt and pepper to taste
- Fresh basil leaves for garnish
Instructions:
- Preheat the Oven: Preheat your oven to 475°F (245°C). If you’re using a pizza stone, place it in the oven during the preheat to guarantee it gets hot.
- Prepare the Dough: Roll out the pizza dough on a lightly floured surface until it reaches your desired thickness. Transfer the dough to a baking sheet or a pizza peel dusted with cornmeal to prevent sticking.
- Mix the Sauce: In a bowl, combine the Alfredo sauce and ricotta cheese. Stir until smooth and well-blended. Add garlic powder, salt, and pepper to taste for extra flavor.
- Assemble the Pizza: Spread the Alfredo-ricotta mixture evenly over the pizza dough, leaving a small border for the crust. Sprinkle the shredded mozzarella, fontina, and Parmesan cheeses evenly over the sauce.
- Create Ghosts: Use a small ghost-shaped cookie cutter to cut ghost shapes out of the fresh mozzarella slices. Arrange the ghost mozzarella slices on top of the pizza.
- Bake the Pizza: Drizzle the pizza with olive oil and place it in the preheated oven. Bake for 10-12 minutes or until the crust is golden brown and the cheese is bubbly and slightly browned.
- Garnish and Serve: Remove the pizza from the oven and let it cool for a few minutes. Garnish with fresh basil leaves for a pop of color. Slice and serve warm.
Extra Tips:
For an extra spooky touch, you can use black olives sliced into small rings as eyes for the ghost mozzarella slices. Additionally, if you prefer a thinner crust, roll the dough out more thinly, and adjust the baking time accordingly, keeping a close watch to prevent burning.
If you don’t have a pizza stone, a baking sheet will do just fine, but a perforated pizza pan can help achieve a crisper crust. Enjoy the playful and delicious Ghostly White Pizza during your Halloween festivities!
Cauldron Mac and Cheese

Envision this: a bubbling cauldron filled with creamy, gooey mac and cheese, perfect for a spine-chilling Halloween dinner. The Cauldron Mac and Cheese isn’t only a delightful comfort food but also a festive treat that adds a touch of whimsy to your Halloween spread.
With its deep cheesy flavors and ghostly appearance, this dish is sure to enchant your guests and make your Halloween gathering unforgettable. This recipe is designed to serve 4-6 people, making it an ideal choice for a small party or family dinner.
The mac and cheese is enriched with a blend of cheeses that melt smoothly into a luscious sauce, coating every curve of the pasta. The addition of a few special ingredients transforms this classic dish into a Halloween spectacle, ensuring it’s both a visual and culinary delight.
Ingredients:
- 16 oz elbow macaroni
- 4 cups milk
- 1/4 cup all-purpose flour
- 1/4 cup unsalted butter
- 2 cups shredded cheddar cheese
- 1 cup shredded mozzarella cheese
- 1/2 cup grated Parmesan cheese
- 1/2 teaspoon garlic powder
- 1/2 teaspoon onion powder
- 1/2 teaspoon smoked paprika
- Salt and pepper to taste
- Optional: a few drops of green or purple food coloring
- Optional: Halloween-themed pasta shapes for decoration
Cooking Instructions:
- Cook the Pasta: Begin by boiling a large pot of salted water. Add the elbow macaroni and cook according to the package instructions until al dente. Drain and set aside.
- Prepare the Cheese Sauce: In a large saucepan, melt the butter over medium heat. Whisk in the flour and cook for about 1 minute until it forms a paste, known as a roux.
- Add Milk: Gradually whisk in the milk, ensuring there are no lumps. Continue to cook, stirring constantly, until the mixture thickens and begins to simmer.
- Incorporate Cheese: Reduce the heat to low and add the cheddar, mozzarella, and Parmesan cheeses. Stir until the cheeses have melted into a smooth sauce.
- Season the Sauce: Add the garlic powder, onion powder, smoked paprika, salt, and pepper. Stir to combine. If desired, add a few drops of food coloring to give the sauce a spooky hue.
- Combine Pasta and Sauce: Add the cooked macaroni to the cheese sauce, stirring until the pasta is thoroughly coated.
- Serve: Transfer the mac and cheese to a large serving bowl or cauldron. Garnish with Halloween-themed pasta shapes for added flair, if using.
Extra Tips:
For the best results, use freshly grated cheese as it melts more smoothly compared to pre-shredded varieties, which often contain anti-caking agents.
Feel free to experiment with different cheese combinations to suit your taste. If you want to add a crunchy topping, consider sprinkling breadcrumbs over the mac and cheese and broiling it for a few minutes until golden brown.
Finally, if serving this dish to kids, you can skip the food coloring to avoid any messes. Enjoy your bewitchingly delicious Cauldron Mac and Cheese!
Creepy Crawly Pasta Salad

Bring some ghoulish fun to your Halloween dinner with this Creepy Crawly Pasta Salad. This dish is both spooky and delicious, making it the perfect addition to your festive table. The pasta salad is loaded with flavor and decorated with edible creepy crawlies that will delight both kids and adults. The combination of vibrant vegetables, savory dressing, and eerie decorations make it a hit at any Halloween gathering.
The Creepy Crawly Pasta Salad isn’t only visually appealing but also easy to prepare. This dish can be made in advance, allowing you to focus on other aspects of your Halloween party. The pasta serves as the perfect base for a variety of textures and flavors, while the vegetables add a revitalizing crunch. To top it all off, the edible creepy crawlies make this salad both frightening and fun. Prepare this dish for 4-6 people and watch your guests marvel at your culinary creativity.
Perfect for Halloween, this fun pasta salad is easy, delicious, and delightfully creepy.
Ingredients:
- 12 ounces of rotini pasta (preferably tri-color)
- 1 cup cherry tomatoes, halved
- 1 cup black olives, pitted and sliced
- 1 cup baby carrots, sliced
- 1/2 cup red onion, thinly sliced
- 1 cup cucumber, diced
- 1/2 cup mozzarella balls
- 1/2 cup Italian dressing
- 1/4 cup Parmesan cheese, grated
- Salt and pepper to taste
- 6-8 gummy worms or edible fake insects for decoration
Instructions:
- Cook the Pasta: Begin by boiling a large pot of salted water. Add the rotini pasta and cook according to the package instructions until al dente. Drain and rinse the pasta under cold water to stop the cooking process, then set aside to cool completely.
- Prepare the Vegetables: While the pasta is cooling, prepare the vegetables. Halve the cherry tomatoes, slice the olives, baby carrots, and red onion, and dice the cucumber. Place all the prepared vegetables in a large mixing bowl.
- Combine Ingredients: Add the cooled pasta to the bowl with the vegetables. Toss in the mozzarella balls and pour the Italian dressing over the mixture. Stir well to confirm all ingredients are evenly coated with the dressing.
- Season and Garnish: Add the grated Parmesan cheese to the salad and season with salt and pepper to taste. Mix thoroughly so that the cheese is evenly distributed.
- Chill the Salad: Cover the salad and refrigerate for at least 30 minutes to allow the flavors to meld together.
- Decorate: Before serving, arrange the gummy worms or edible fake insects on top of the salad for a creepy crawly effect.
Extra Tips:
To make the Creepy Crawly Pasta Salad even more festive, consider adding a few drops of food coloring to the water while boiling the pasta to enhance its vibrancy. You can also switch up the vegetables based on your personal preferences or what you have on hand.
If you’re preparing this dish in advance, keep the gummy worms or edible insects separate until just before serving to confirm they maintain their shape and don’t become soggy. Enjoy your spooky creation and have a happy Halloween!
Jack-o’-Lantern Stuffed Bell Peppers

As Halloween approaches, it’s the perfect time to bring a spooky twist to your dinner table with Jack-o’-Lantern Stuffed Bell Peppers. This dish combines the fun of carving with the deliciousness of a hearty meal, making it a great choice for a festive family dinner or a Halloween party. By using orange bell peppers carved like mini pumpkins and filling them with a savory mixture, you create a dish that’s both visually appealing and satisfying.
The filling for these stuffed peppers can be customized to suit your taste. Classic options include a blend of seasoned ground beef or turkey, rice, and vegetables, but you can modify the recipe to include quinoa, black beans, or even a vegetarian mix. The key is to guarantee the filling is flavorful and complements the sweetness of the roasted bell peppers.
Once baked, the peppers soften, and their sweet flavor enhances the savory filling inside, creating a delightful balance of tastes and textures.
Ingredients (Serves 4-6):
- 6 medium orange bell peppers
- 1 pound ground beef or turkey
- 1 cup cooked rice
- 1 cup canned black beans, drained and rinsed
- 1 small onion, chopped
- 2 cloves garlic, minced
- 1 cup tomato sauce
- 1 teaspoon cumin
- 1 teaspoon paprika
- Salt and pepper to taste
- 1 cup shredded cheese (cheddar or mozzarella)
- Olive oil for drizzling
Cooking Instructions:
- Preheat the Oven: Start by preheating your oven to 375°F (190°C). This will guarantee that the peppers cook evenly and the filling gets heated through.
- Prepare the Bell Peppers: Carefully slice off the tops of the bell peppers and remove the seeds and membranes. Using a small paring knife, carve jack-o’-lantern faces into the sides of the peppers. Be gentle to avoid tearing the walls of the peppers. Set aside.
- Cook the Filling: In a large skillet over medium heat, add a drizzle of olive oil and sauté the chopped onion and minced garlic until they’re soft and fragrant. Add the ground beef or turkey and cook until browned, breaking it apart with a spoon as it cooks.
- Combine Filling Ingredients: Once the meat is cooked, stir in the cooked rice, black beans, tomato sauce, cumin, paprika, salt, and pepper. Mix well to combine, allowing the flavors to meld together. Remove the skillet from heat.
- Stuff the Peppers: Carefully fill each carved bell pepper with the prepared meat and rice mixture. Pack the filling tightly to guarantee each pepper is filled to the top.
- Bake the Peppers: Place the stuffed peppers in a baking dish, ensuring they sit upright. Drizzle a little olive oil over the peppers and cover the dish with foil. Bake in the preheated oven for 30 minutes.
- Add Cheese and Finish Baking: Remove the foil and sprinkle shredded cheese over each stuffed pepper. Return to the oven and bake for an additional 10-15 minutes, or until the cheese is melted and bubbly.
- Serve: Allow the peppers to cool slightly before serving, as the filling will be very hot. Enjoy your festive Jack-o’-Lantern Stuffed Bell Peppers!
Extra Tips:
When carving the bell peppers, it’s important to use a small, sharp knife and carve gently to prevent breaking the pepper walls. If you prefer a vegetarian version, omit the meat and add more beans, vegetables, or even tofu to the filling.
To save time, you can make the filling a day in advance and refrigerate it, allowing the flavors to enhance overnight. Feel free to experiment with different spices and herbs to tailor the dish to your taste.
Bloody Beetroot Hummus

Elevate your Halloween dinner spread with this spooky yet delicious Bloody Beetroot Hummus. This vibrant red dip not only looks the part for a Halloween party but also delivers a burst of earthy and savory flavors. Ideal for serving with fresh vegetables, pita chips, or as part of a ghoulish charcuterie board, this hummus is sure to be a hit with your guests.
The striking color comes naturally from roasted beets, which also add a subtle sweetness that pairs beautifully with tahini, garlic, and lemon juice. It’s a nutritious option that can be made in advance, freeing you up to focus on other aspects of your Halloween festivities. Its creamy texture and rich taste will leave your guests coming back for more, and it’s suitable for both children and adults alike.
Ingredients for 4-6 servings:
- 2 medium-sized beetroots
- 1 can (15 oz) chickpeas, drained and rinsed
- 3 tablespoons tahini
- 2 cloves garlic, peeled
- Juice of 1 lemon
- 1/4 cup olive oil
- Salt and pepper to taste
- 1/2 teaspoon ground cumin
- 1/4 teaspoon smoked paprika
- Water, as needed
- Extra olive oil and paprika for garnish
Cooking Instructions:
- Prepare and Roast Beetroots: Preheat your oven to 400°F (200°C). Wash the beetroots thoroughly, then wrap them individually in aluminum foil. Place them on a baking sheet and roast for about 45-60 minutes or until they’re tender when pierced with a fork. Let them cool slightly, then peel and chop into chunks.
- Blend Ingredients: In a food processor, combine the roasted beetroot chunks, chickpeas, tahini, garlic cloves, lemon juice, olive oil, salt, pepper, cumin, and smoked paprika. Blend until smooth and creamy. You may need to stop and scrape down the sides of the bowl occasionally.
- Adjust Consistency: If the hummus is too thick, add water a tablespoon at a time until you reach your desired consistency. Taste and adjust the seasoning if necessary.
- Serve and Garnish: Transfer the beetroot hummus to a serving bowl. Drizzle with a little extra olive oil and sprinkle with smoked paprika for an extra spooky touch. Serve with your choice of dippables like pita chips, carrot sticks, or celery.
Extra Tips:
For an extra creamy texture, consider peeling the chickpeas before blending. This step isn’t essential, but it can make a noticeable difference in the smoothness of the hummus.
If you want to save time, you can use pre-cooked beets available at most grocery stores. This hummus can be made a day in advance, allowing the flavors to meld together beautifully. Store it in an airtight container in the refrigerator, and be sure to stir it well before serving.
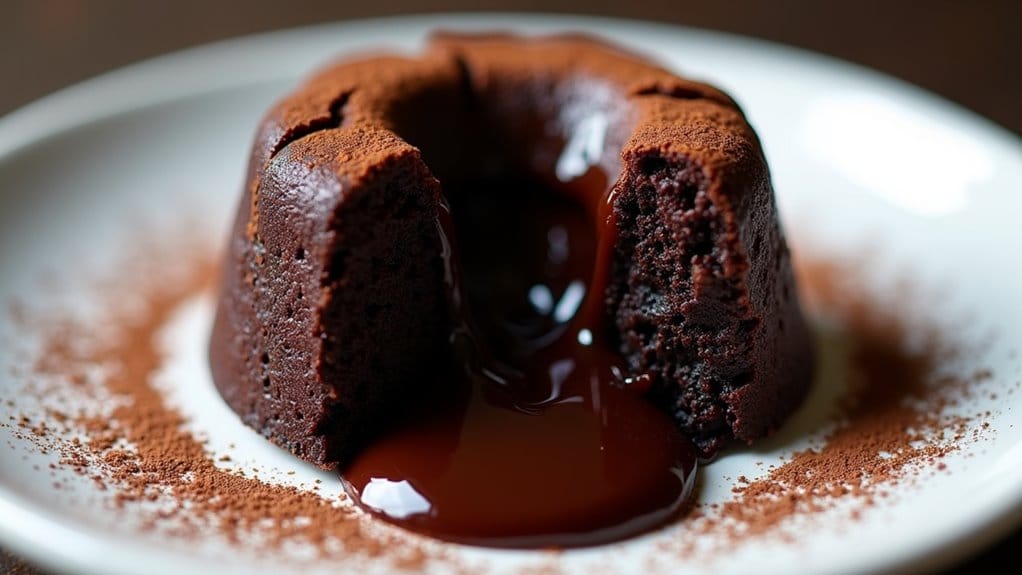
Haunted Chocolate Lava Cakes

Halloween is the perfect time to indulge in a little bit of dark decadence, and what better way to do so than with Haunted Chocolate Lava Cakes? These rich and gooey desserts are a delightful blend of chocolatey goodness with a hint of haunting mystery. As you break into the center of these cakes, a molten lava of dark chocolate flows out, embodying the essence of a spooky, yet delicious Halloween treat.
Dark decadence awaits with Haunted Chocolate Lava Cakes, a spooky blend of rich chocolate and mysterious molten centers.
Perfect for a Halloween dinner party or a cozy night in, these cakes are sure to impress both kids and adults alike. Creating these Haunted Chocolate Lava Cakes is easier than it seems, and with just a few ingredients, you can whip up a batch of these hauntingly delicious treats. The key to the perfect lava cake lies in the timing—making certain that the outer cake is perfectly baked while the inside remains deliciously molten.
Serve them with a scoop of vanilla ice cream or a dollop of whipped cream for an extra touch of indulgence. This recipe serves 4-6 people, making it ideal for sharing the spooky spirit.
Ingredients (serving size 4-6 people):
- 1 cup (170g) bittersweet chocolate chips
- 1/2 cup (115g) unsalted butter, plus more for greasing
- 1 cup (120g) powdered sugar
- 2 large eggs
- 2 large egg yolks
- 1 teaspoon vanilla extract
- 1/4 cup (30g) all-purpose flour
- A pinch of salt
- Cocoa powder, for dusting
Cooking Instructions:
- Preheat and Prepare: Preheat your oven to 425°F (220°C). Grease 4-6 ramekins with butter and dust them lightly with cocoa powder to prevent the cakes from sticking.
- Melt Chocolate and Butter: In a medium-sized microwave-safe bowl, combine the chocolate chips and butter. Microwave in 30-second intervals, stirring between each, until the mixture is smooth and fully melted.
- Mix Sugar and Eggs: In a separate bowl, whisk together the powdered sugar, eggs, egg yolks, and vanilla extract until the mixture is light and fluffy.
- Combine Ingredients: Gradually add the melted chocolate mixture to the egg mixture, stirring continuously until well combined. Gently fold in the flour and salt until the batter is smooth and uniform.
- Fill Ramekins: Divide the batter evenly among the prepared ramekins, filling each about three-quarters full.
- Bake: Place the ramekins on a baking sheet and bake in the preheated oven for 12-14 minutes. The edges should be firm, but the center should remain soft.
- Cool and Serve: Allow the cakes to cool for 1 minute, then run a knife along the edges to loosen them. Carefully invert each ramekin onto a serving plate and gently tap to release the cake. Serve immediately.
Extra Tips:
To make certain the perfect molten center, keep a close eye on your oven during the last few minutes of baking. Over-baking will result in a solid center, while under-baking may cause the cake to collapse when turned out.
If you prefer a more intense chocolate flavor, consider using a higher cocoa content chocolate. For an added touch of Halloween flair, dust the cakes with powdered sugar in the shape of a ghost or spider web using a stencil. Enjoy your Haunted Chocolate Lava Cakes warm for the best gooey experience!
