

Hey there, lovely foodies! 🎃 With Halloween just around the corner, I’ve been bubbling with excitement to whip up some gourmet finger foods that scream sophistication and festive fun.
Think Black Garlic and Truffle Deviled Eggs or Prosciutto Wrapped Figs with Blue Cheese—each bite is a tantalizing treat.
Whether you’re hosting or bringing a dish to share, these recipes will surely wow every guest.
Let’s get creative in the kitchen and make this Halloween one to remember!
Spicy Pumpkin and Cheese Stuffed Mushrooms
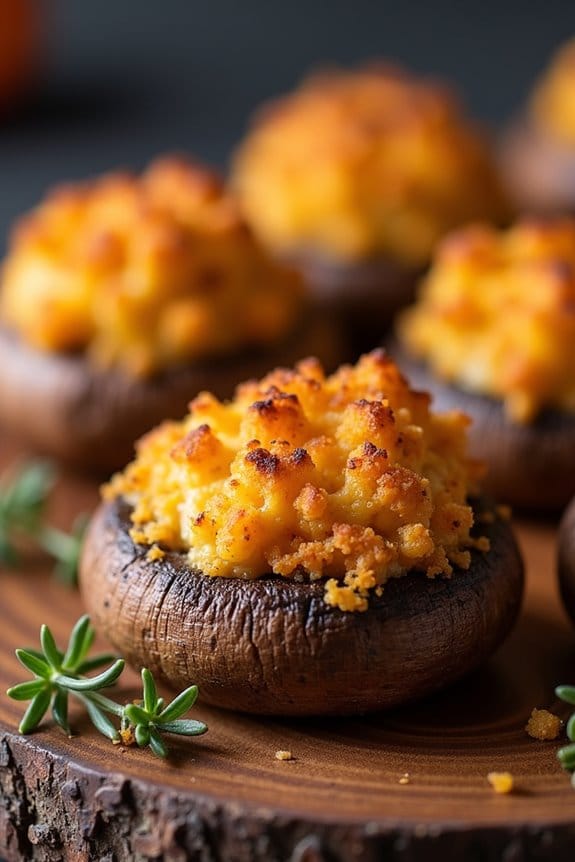
Transform your Halloween gathering with these Spicy Pumpkin and Cheese Stuffed Mushrooms, a savory finger food that’s perfect for adults. The rich flavors of earthy mushrooms, creamy pumpkin, and spicy cheese create an irresistible combination that will leave your guests craving more.
These bite-sized delights not only capture the spirit of the season but also provide a gourmet twist to classic party fare, making them an ideal addition to your Halloween party spread. This recipe balances the sweetness of pumpkin with the heat of spicy cheese, all packed into meaty mushroom caps.
Ideal for a serving size of 4-6 people, these stuffed mushrooms are both easy to prepare and a delight to serve. Whether you’re hosting a sophisticated gathering or a casual spooky soirée, these mushrooms will fit right in with the festive mood. Follow these simple steps to bring a deliciously spooky touch to your Halloween celebration.
Ingredients (Serving Size: 4-6 people):
- 20 large cremini or button mushrooms
- 1 cup pumpkin puree
- 1 cup shredded spicy cheese (e.g., pepper jack or habanero cheddar)
- 2 tablespoons olive oil
- 1 teaspoon garlic powder
- 1 tablespoon chopped fresh thyme
- 1/2 teaspoon cayenne pepper
- Salt and pepper to taste
- 1/4 cup breadcrumbs
- 2 tablespoons grated Parmesan cheese
Cooking Instructions:
- Prepare the Mushrooms: Preheat the oven to 375°F (190°C). Clean the mushrooms gently with a damp paper towel and remove the stems. Hollow out the caps a little more if necessary to create enough space for the filling.
- Make the Filling: In a medium bowl, mix together the pumpkin puree, shredded spicy cheese, olive oil, garlic powder, chopped thyme, cayenne pepper, and a pinch of salt and pepper. Stir until well combined and the mixture is smooth and cheesy.
- Stuff the Mushrooms: Using a small spoon, fill each mushroom cap generously with the pumpkin and cheese mixture. Make sure to press it down slightly so it stays in place during baking.
- Add Topping: In a small bowl, combine the breadcrumbs and Parmesan cheese. Sprinkle this mixture evenly over the stuffed mushroom caps to add a crunchy topping.
- Bake the Mushrooms: Arrange the stuffed mushrooms on a baking sheet lined with parchment paper. Bake in the preheated oven for about 20-25 minutes, or until the mushrooms are tender and the topping is golden brown.
- Serve: Remove from the oven and let cool for a few minutes before serving. These are best enjoyed warm and fresh out of the oven.
Extra Tips:
For an extra kick, consider adding finely chopped jalapeños or a dash of hot sauce to the filling. If you prefer a milder version, substitute the spicy cheese with a milder one like mozzarella or gouda.
Additionally, make certain your mushrooms are similar in size for even cooking. If you want to prepare the dish ahead of time, you can assemble the stuffed mushrooms and refrigerate them until ready to bake. Enjoy these delightful bites with a chilled glass of white wine or a spooky Halloween cocktail to enhance the festive atmosphere.
Black Garlic and Truffle Deviled Eggs

Deviled eggs are a timeless appetizer that can be easily elevated for a sophisticated Halloween gathering with the addition of black garlic and truffle oil. The rich umami flavor of black garlic, combined with the earthy notes of truffle oil, creates an indulgent twist on this classic dish.
The eggs, with their creamy and flavorful filling, aren’t only delicious but also visually striking, making them a perfect finger food for adults looking to indulge in a more elegant Halloween snack.
These Black Garlic and Truffle Deviled Eggs will serve 4-6 people, making them ideal for a small get-together or as part of a larger spread. The unique combination of ingredients guarantees that each bite is packed with flavor, offering a gourmet experience that’s both memorable and satisfying.
Whether you’re hosting a Halloween party or attending one, these deviled eggs are sure to be a hit with your guests.
Ingredients:
- 6 large eggs
- 2 tablespoons mayonnaise
- 1 tablespoon Dijon mustard
- 3 cloves black garlic, finely minced
- 1 teaspoon truffle oil
- Salt and black pepper to taste
- Fresh chives, finely chopped, for garnish
- Smoked paprika, for garnish
Instructions:
- Boil the eggs: Place the eggs in a single layer in a saucepan and cover them with water by about an inch. Bring the water to a boil over medium-high heat. Once boiling, remove the saucepan from the heat, cover, and let the eggs sit in the hot water for 10-12 minutes.
- Cool and peel the eggs: After the eggs have finished cooking, transfer them to a bowl of ice water to cool for about 5 minutes. Once cooled, gently peel the eggs and pat them dry with a paper towel.
- Prepare the filling: Slice each egg in half lengthwise and carefully remove the yolks, placing them in a mixing bowl. Set the egg whites aside on a serving platter.
- Mix the filling ingredients: Mash the yolks with a fork until smooth. Add mayonnaise, Dijon mustard, black garlic, and truffle oil to the mashed yolks. Mix until well combined and creamy. Season with salt and black pepper to taste.
- Fill the egg whites: Use a spoon or a piping bag to fill each egg white half with the yolk mixture. Make sure to heap the filling slightly for a visually appealing presentation.
- Garnish and serve: Sprinkle the tops of the deviled eggs with finely chopped chives and a light dusting of smoked paprika. Serve immediately or refrigerate until ready to serve.
Extra Tips:
For the best results, confirm your eggs aren’t too fresh, as slightly older eggs are easier to peel. To avoid breaking the eggs while peeling, gently tap them on a hard surface to crack the shell and roll them under your hand to loosen it.
If black garlic isn’t readily available, you can substitute with roasted garlic, although it will alter the flavor slightly. When garnishing, feel free to experiment with other herbs such as dill or parsley for additional flavor profiles.
Enjoy these deviled eggs as a decadent treat that brings a touch of elegance to any Halloween celebration.
Blood Orange and Herb Marinated Olives

Blood Orange and Herb Marinated Olives are a sophisticated and spooky addition to any adult Halloween party. This dish combines the rich, briny flavor of olives with the vibrant and slightly sweet notes of blood orange, all enhanced by a blend of fresh herbs. The result is a visually striking and flavorful appetizer that pairs perfectly with a variety of drinks, making it a hit at any gathering.
The deep red hue of the blood orange lends a mysterious, eerie appeal that fits perfectly with the Halloween theme, while the marinated olives offer a delightful burst of flavor with each bite. Perfect for serving 4-6 people, this dish isn’t only delicious but also incredibly easy to prepare. The key is to allow the olives to marinate long enough to absorb the flavors, guaranteeing every bite is bursting with taste.
Whether you’re hosting a Halloween cocktail party or simply looking for a creative appetizer to enjoy at home, these Blood Orange and Herb Marinated Olives are sure to impress your guests and add a touch of elegance to your Halloween festivities.
Ingredients:
- 2 cups mixed olives, pitted
- 1 blood orange, juiced and zested
- 2 tablespoons extra-virgin olive oil
- 2 tablespoons fresh parsley, finely chopped
- 1 tablespoon fresh rosemary, finely chopped
- 1 tablespoon fresh thyme, finely chopped
- 2 garlic cloves, minced
- 1/2 teaspoon crushed red pepper flakes
- Salt to taste
- Pepper to taste
Instructions:
- Prepare the Marinade: In a mixing bowl, combine the blood orange juice and zest, olive oil, parsley, rosemary, thyme, minced garlic, and crushed red pepper flakes. Mix well to guarantee all ingredients are evenly distributed.
- Season the Marinade: Add salt and pepper to taste, guaranteeing the marinade is well-seasoned. Remember that olives are naturally salty, so taste the marinade before adding too much salt.
- Marinate the Olives: Place the olives in a sealable plastic bag or a glass container with a lid. Pour the marinade over the olives, guaranteeing they’re fully submerged. Seal the bag or container tightly.
- Refrigerate: Allow the olives to marinate in the refrigerator for at least 2 hours, or overnight if possible. The longer they marinate, the more flavorful they’ll become.
- Serve: Before serving, allow the olives to sit at room temperature for about 30 minutes. This will enhance their flavor and make them more enjoyable to eat. Serve them in a decorative bowl for a festive touch.
Extra Tips: When selecting olives, aim for a mix of green and black varieties for an appealing contrast in color and flavor. If you can find blood oranges out of season, regular oranges can be used, but the color will be less vibrant.
Feel free to adjust the amount of crushed red pepper flakes based on your spice preference. For an extra kick, consider adding a splash of red wine vinegar to the marinade. Always taste and adjust the seasoning before serving to guarantee the perfect balance of flavors.
Smoky Chipotle Pumpkin Hummus

Elevate your Halloween finger food game with this deliciously smoky and spicy chipotle pumpkin hummus. It’s the perfect blend of creamy textures and savory flavors that will leave your guests craving more. The subtle heat of the chipotle combined with the sweetness of the pumpkin creates a unique twist on the classic hummus, making it an ideal appetizer for an adult Halloween gathering.
Whether you’re hosting a party or simply want a festive snack, this hummus is bound to be a hit. Not only is this hummus packed with flavor, but it’s also rich in nutrients. Pumpkin is an excellent source of vitamins A and C, while chickpeas provide a healthy dose of protein and fiber.
The best part is that it’s quick and easy to prepare, allowing you to spend more time enjoying the festivities rather than being stuck in the kitchen. Serve it with an array of colorful vegetables, pita chips, or even spooky themed tortilla chips to keep in line with the Halloween spirit.
Ingredients for 4-6 people:
- 1 can (15 oz) chickpeas, drained and rinsed
- 1 cup canned pumpkin puree
- 1/4 cup tahini
- 2 tablespoons olive oil
- 2 tablespoons lemon juice
- 2 tablespoons adobo sauce from chipotle peppers
- 1-2 chipotle peppers in adobo sauce, chopped
- 2 garlic cloves, minced
- 1 teaspoon ground cumin
- 1 teaspoon smoked paprika
- Salt and pepper to taste
- Pumpkin seeds and smoked paprika for garnish (optional)
Instructions:
- Prepare the Ingredients: Start by draining and rinsing the canned chickpeas thoroughly. This helps to remove any excess sodium and guarantees a smoother texture for your hummus.
- Blend the Base: In a food processor, combine the chickpeas, pumpkin puree, tahini, olive oil, lemon juice, adobo sauce, chipotle peppers, minced garlic, ground cumin, and smoked paprika. Blend until the mixture is smooth and creamy. You may need to stop occasionally to scrape down the sides and verify everything is evenly mixed.
- Adjust Seasoning: Taste the hummus and add salt and pepper to your preference. If you desire more heat, feel free to add additional chipotle peppers or adobo sauce. Blend again to incorporate any added ingredients.
- Serve and Garnish: Transfer the hummus to a serving bowl. For a festive touch, garnish with pumpkin seeds and a sprinkle of smoked paprika. This not only enhances the presentation but also adds an extra layer of flavor and texture.
- Chill: Allow the hummus to chill in the refrigerator for at least 30 minutes before serving. This helps the flavors meld together and improves the overall taste.
Extra Tips:
For a smoother hummus, consider removing the skins from the chickpeas before blending. It’s a bit tedious, but it greatly enhances the texture. If you prefer a thinner consistency, you can gradually add water or more olive oil until you reach your desired thickness.
Additionally, this hummus can be made a day ahead, allowing the flavors to develop even further. Just be sure to store it in an airtight container in the refrigerator. Enjoy your Halloween with this delightful and nutritious treat!
Bewitching Black Sesame Seed Crackers

These Bewitching Black Sesame Seed Crackers are a spooky yet sophisticated addition to your Halloween festivities. With their striking jet-black color and nutty flavor, they make for an impressive snack that’s certain to enchant your adult guests. The crackers are made with black sesame seeds, which not only give them their unique color but also add a delightful crunch and a touch of earthiness that pairs perfectly with a variety of dips and spreads.
Striking jet-black crackers with nutty flavor, perfect for enchanting adult guests at Halloween festivities.
Perfect for a serving size of 4-6 people, these crackers are easy to prepare and can be made ahead of time, allowing you to enjoy the party without spending too much time in the kitchen. The recipe uses simple ingredients that come together to create a visually appealing and delicious treat that will stand out on your Halloween snack table.
Ingredients:
- 1 cup all-purpose flour
- 1/2 cup black sesame seeds
- 1/2 teaspoon salt
- 1/2 teaspoon baking powder
- 1/4 cup olive oil
- 1/4 cup water
- 1/2 teaspoon activated charcoal powder (optional for extra black color)
Instructions:
- Preheat the Oven: Start by preheating your oven to 350°F (175°C). This will guarantee that it reaches the right temperature by the time you’re ready to bake the crackers.
- Mix Dry Ingredients: In a large bowl, combine the all-purpose flour, black sesame seeds, salt, baking powder, and activated charcoal powder if using. Stir the ingredients together until they’re well combined, making sure the charcoal is evenly distributed to avoid color streaks.
- Incorporate Wet Ingredients: Make a well in the center of the dry ingredients and add the olive oil and water. Mix the ingredients with a spoon or your hands until they form a cohesive dough. The dough should be pliable but not sticky. If it’s too dry, add a little more water, a teaspoon at a time.
- Roll Out the Dough: On a lightly floured surface, roll out the dough to about 1/8 inch thick. Try to keep the thickness consistent to guarantee even baking.
- Cut the Crackers: Use a sharp knife or a cookie cutter to cut the dough into your desired shapes. Transfer the cut pieces to a baking sheet lined with parchment paper, leaving a small space between each cracker.
- Bake the Crackers: Place the baking sheet in the preheated oven and bake for 12-15 minutes or until the edges are lightly golden and the crackers are crisp. Keep an eye on them to prevent burning.
- Cool and Serve: Remove the crackers from the oven and let them cool on the baking sheet for a few minutes before transferring them to a wire rack. Once completely cooled, serve them with your favorite dips or cheeses.
Extra Tips:
To enhance the flavor of these crackers, consider adding a pinch of garlic powder or a sprinkle of finely chopped rosemary to the dough. If you prefer a gluten-free option, you can substitute the all-purpose flour with a gluten-free flour blend.
These crackers can be stored in an airtight container for up to a week, making them a convenient make-ahead option for your Halloween gathering. Enjoy experimenting with different shapes and sizes to add a playful touch to your spooky snack spread!
Prosciutto Wrapped Figs With Blue Cheese

Prosciutto Wrapped Figs with Blue Cheese is a delightful, savory-sweet appetizer that’s perfect for any Halloween gathering. The contrast of flavors from the salty prosciutto and the creamy blue cheese against the natural sweetness of the figs creates an exquisite bite-sized morsel.
This dish isn’t only easy to prepare but also adds an elegant touch to your Halloween finger food spread, making it an excellent choice for adult parties. Whether you’re hosting a spooky get-together or attending a potluck, these wrapped figs are sure to impress your guests with both their taste and presentation.
They can be prepared in advance and either served at room temperature or slightly warmed, making them a versatile option for any event. The following recipe will guide you through the process of creating these delectable treats for a serving size of 4-6 people.
Ingredients:
- 12 fresh figs
- 12 slices of prosciutto
- 4 oz blue cheese, crumbled
- 1 tablespoon honey
- Freshly ground black pepper
- Fresh rosemary sprigs (optional, for garnish)
Cooking Instructions:
- Prepare the Figs: Begin by washing the figs under cold water and drying them thoroughly with a paper towel. Using a sharp knife, make a small slit in each fig, about halfway through the center, being careful not to cut all the way through.
- Stuff the Figs: Gently stuff each fig with a small amount of crumbled blue cheese, pressing it into the slit. Be careful not to overfill, as this could cause the figs to split apart.
- Wrap with Prosciutto: Take one slice of prosciutto and wrap it around each stuffed fig, making sure the cheese opening is covered. The prosciutto should hold firmly but not be overly tight.
- Preheat the Oven: Preheat your oven to 375°F (190°C). Line a baking sheet with parchment paper or lightly grease it to prevent sticking.
- Arrange and Season: Place the wrapped figs on the prepared baking sheet, ensuring they’re evenly spaced. Drizzle a small amount of honey over each fig, and season with freshly ground black pepper to taste.
- Bake the Figs: Bake in the preheated oven for about 10-12 minutes, or until the prosciutto is crisp and the blue cheese is slightly melted.
- Serve and Garnish: Remove from the oven and allow the figs to cool slightly before transferring them to a serving platter. Garnish with fresh rosemary sprigs if desired, and serve warm or at room temperature.
Extra Tips:
When selecting figs for this recipe, look for ones that are plump and slightly soft to the touch but not overly ripe. This guarantees they hold their shape during baking and provide the perfect texture when paired with the other ingredients.
For a twist, you could substitute goat cheese for blue cheese if you or your guests prefer a milder flavor. Additionally, if you’re preparing these in advance, you can wrap them and store them in the refrigerator, then bake just before serving for peak freshness.
Ghostly Goat Cheese and Beet Crostini

Ghostly Goat Cheese and Beet Crostini is a sophisticated and spooky appetizer perfect for adult Halloween parties. This dish cleverly combines the earthy sweetness of roasted beets with the tangy creaminess of goat cheese, all atop a crisp crostini. The deep, blood-red hue of the beets contrasts beautifully with the stark white goat cheese, creating a visually striking and delicious treat.
These crostinis aren’t only a feast for the eyes but also a delight for the taste buds, with a blend of textures and flavors that will enchant your guests. This recipe is designed to serve 4-6 people, making it an ideal choice for a small gathering or as part of a larger spread of Halloween-inspired finger foods.
Presented with a touch of elegance, these crostinis are sure to leave a lasting impression, combining the best of seasonal ingredients in a bite-sized form. Easy to assemble and visually appealing, Ghostly Goat Cheese and Beet Crostini will add a touch of gourmet flair to your spooky soirée.
Ingredients:
- 1 French baguette, sliced into 1/4-inch rounds
- 2 medium-sized beets
- 1 tablespoon olive oil
- Salt and pepper, to taste
- 8 ounces goat cheese
- 2 tablespoons honey
- 1 tablespoon balsamic reduction
- Fresh thyme leaves, for garnish
Instructions:
- Prepare the Beets:
- Preheat your oven to 400°F (200°C). Wash the beets thoroughly, then wrap each beet individually in aluminum foil. Place them on a baking sheet and roast in the oven for 45-60 minutes until tender. Allow them to cool, then peel and slice them into thin rounds.
- Prepare the Crostini:
- While the beets are roasting, arrange the baguette slices on a baking sheet. Brush both sides lightly with olive oil and sprinkle with a pinch of salt and pepper. Bake in the oven at 400°F (200°C) for 8-10 minutes or until golden brown and crispy. Remove from oven and let cool.
- Assemble the Crostini:
- Spread a generous layer of goat cheese on each crostini. Place a slice of roasted beet on top of the cheese. Drizzle with honey and a few drops of balsamic reduction, then sprinkle with fresh thyme leaves for garnish.
- Serve:
- Arrange the crostini on a serving platter and serve immediately. These crostinis are best enjoyed fresh to maintain the crispness of the bread and the flavors of the toppings.
Extra Tips:
When preparing the beets, wearing gloves can help prevent staining your hands with beet juice. If you prefer a smoother goat cheese spread, you can mix the goat cheese with a little bit of cream or milk to achieve your desired consistency.
Additionally, for a touch of extra flavor, lightly toast the baguette slices with a garlic rub before adding the toppings. These little tweaks can enhance the overall taste and presentation of your Ghostly Goat Cheese and Beet Crostini, making them an unforgettable part of your Halloween festivities.
Charcoal-Infused Shrimp Skewers
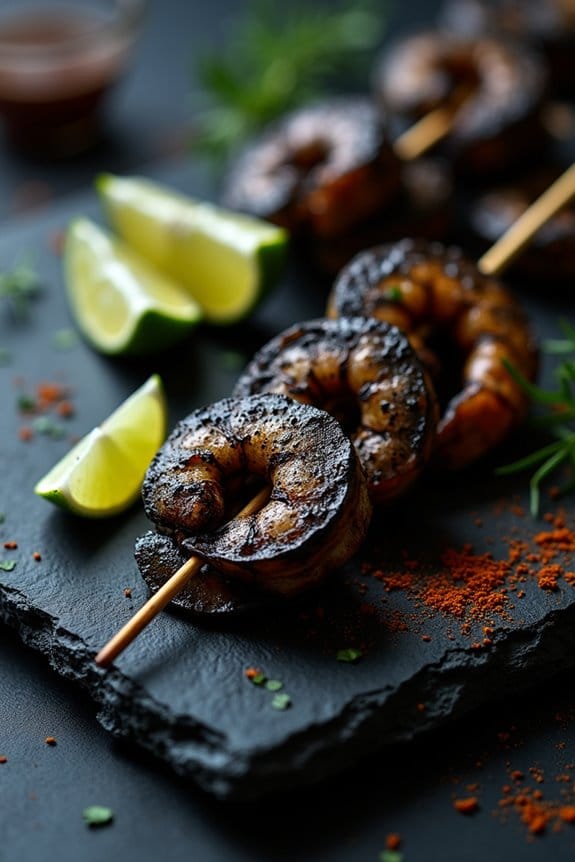
Charcoal-Infused Shrimp Skewers are a perfect addition to your Halloween finger foods menu, offering a spooky yet sophisticated twist on traditional shrimp skewers. The unique addition of activated charcoal not only gives the shrimp a mysterious black hue but also adds an intriguing, subtle smokiness to the flavor profile. These skewers are sure to be a conversation starter at your Halloween gathering, impressing your guests with both their appearance and taste.
The key to mastering this dish is in the balance of flavors and the proper infusion of the charcoal into the marinade. Activated charcoal, known for its detoxifying properties, is perfectly safe in culinary applications and provides an exciting visual element to the meal. Pairing the shrimp with a garlic and lime marinade enhances the natural sweetness of the shrimp, creating a delightful contrast to the charcoal’s earthiness. These skewers aren’t only a treat for the taste buds but also a visual feast that fits right into the Halloween theme.
Ingredients (Serves 4-6):
- 1 pound large shrimp, peeled and deveined
- 1 tablespoon activated charcoal powder
- 3 cloves garlic, minced
- 1/4 cup fresh lime juice
- 2 tablespoons olive oil
- 1 tablespoon honey
- 1 teaspoon smoked paprika
- Salt and pepper to taste
- Wooden or metal skewers
Cooking Instructions:
- Prepare the Marinade: In a large mixing bowl, combine the minced garlic, fresh lime juice, olive oil, honey, smoked paprika, salt, and pepper. Stir the ingredients until well blended.
- Add Charcoal: Gradually whisk in the activated charcoal powder into the marinade until fully incorporated. Confirm there are no lumps of charcoal left in the mixture.
- Marinate the Shrimp: Add the peeled and deveined shrimp to the bowl, making certain each piece is thoroughly coated with the marinade. Cover the bowl with plastic wrap and refrigerate for at least 30 minutes, allowing the flavors to meld and the charcoal to infuse the shrimp.
- Prepare the Skewers: If using wooden skewers, soak them in water for 20-30 minutes to prevent burning during cooking. Thread the marinated shrimp onto the skewers, leaving a small space between each piece for even cooking.
- Grill the Skewers: Preheat a grill or grill pan over medium-high heat. Once hot, place the shrimp skewers on the grill. Cook for about 2-3 minutes on each side, or until the shrimp are opaque and cooked through.
- Serve: Remove the skewers from the grill and serve immediately, either as they’re or with a side of lime wedges for squeezing over the top.
Extra Tips: When working with activated charcoal, be cautious as it can easily stain kitchen surfaces and utensils. Wearing gloves while handling the charcoal powder can prevent stains on your hands.
Additionally, make sure not to over-marinate the shrimp, as the acidic lime juice can start to “cook” the shrimp if left for too long. Adjust the seasoning to taste, and feel free to experiment with other spices that complement the charcoal’s smokiness.
Roasted Butternut Squash and Sage Tartlets

Roasted Butternut Squash and Sage Tartlets are a delightful addition to any Halloween gathering, offering a savory twist on traditional finger foods. These tartlets combine the earthy flavors of roasted butternut squash with the aromatic notes of fresh sage, all encased in a flaky pastry shell. Perfect for adults looking to enjoy a sophisticated snack, these tartlets are both satisfying and easy to make.
With their warm, comforting flavors, they’re sure to be a hit at your next Halloween party. This recipe is designed to serve 4-6 people, making it ideal for a small gathering. The preparation involves roasting the squash to bring out its natural sweetness and combining it with a simple yet flavorful filling.
The tartlet shells can be prepared in advance, allowing you to focus on assembling and baking them just before your guests arrive. Whether you’re hosting a Halloween bash or simply enjoying a quiet evening with friends, these Roasted Butternut Squash and Sage Tartlets are bound to impress.
Ingredients:
- 1 medium butternut squash, peeled and cubed
- 2 tablespoons olive oil
- Salt and pepper to taste
- 1 sheet of puff pastry, thawed
- 1 cup ricotta cheese
- 1/4 cup grated Parmesan cheese
- 2 tablespoons fresh sage, chopped
- 1 egg, beaten
- 1 tablespoon milk (for egg wash)
Cooking Instructions:
- Preheat the Oven: Begin by preheating your oven to 400°F (200°C). This guarantees a hot environment for roasting the squash and later for baking the tartlets.
- Prepare the Butternut Squash: Toss the cubed butternut squash with olive oil, salt, and pepper. Spread them evenly on a baking sheet. Roast in the preheated oven for about 25-30 minutes, or until the squash is tender and slightly caramelized. Remove from the oven and let it cool.
- Prepare the Tartlet Shells: While the squash is roasting, roll out the puff pastry on a lightly floured surface. Cut into 12 equal squares or circles, depending on your preference. Place them into a muffin tin, pressing down gently to form small shells.
- Make the Filling: In a mixing bowl, combine the ricotta cheese, grated Parmesan, chopped sage, and the roasted butternut squash. Mix well until the ingredients are evenly distributed.
- Assemble the Tartlets: Spoon the squash and cheese mixture into each pastry shell, filling them generously. Brush the edges of the pastry with the beaten egg mixed with milk to give them a golden finish.
- Bake the Tartlets: Place the muffin tin in the oven and bake for 15-20 minutes, or until the pastry is puffed and golden brown. Remove from the oven and let cool slightly before serving.
Extra Tips:
For an added depth of flavor, consider tossing the squash with a pinch of nutmeg or a sprinkle of cinnamon before roasting. This will enhance the sweetness of the squash and complement the sage beautifully.
If you prefer a heartier filling, you can add cooked bacon or pancetta to the mixture. These tartlets can also be prepared a few hours ahead and reheated in the oven just before serving, which makes them a convenient option for entertaining.
Dark Chocolate and Chili Truffle Bites

Dark Chocolate and Chili Truffle Bites are the perfect Halloween finger food for adults who enjoy a sophisticated treat with a little kick. These truffles combine the rich, velvety smoothness of dark chocolate with the subtle heat of chili, creating an indulgent snack that’s both decadent and intriguing.
Ideal for a spooky gathering or an elegant party, they offer a unique flavor experience that will delight your guests and leave them wanting more.
Preparing these truffles isn’t only about creating a delicious treat, but also about crafting a visually appealing dessert that fits the Halloween theme. The deep, dark chocolate exterior with a hint of red chili flakes will look stunning on any serving platter.
Plus, they’re straightforward to make and can be prepared ahead of time, making them a convenient choice for hosts looking to impress without spending too much time in the kitchen.
Ingredients (Serves 4-6 people):
- 1 cup heavy cream
- 8 oz dark chocolate (70% cocoa), finely chopped
- 1 tsp vanilla extract
- 1/2 tsp ground cinnamon
- 1/2 tsp chili powder
- Pinch of cayenne pepper
- 1/4 cup unsweetened cocoa powder (for dusting)
- 1/4 cup finely chopped nuts or red chili flakes (optional, for decoration)
Instructions:
- Heat the Cream: In a small saucepan, heat the heavy cream over medium heat until it just begins to simmer. Be careful not to let it boil.
- Melt the Chocolate: Place the finely chopped dark chocolate in a heatproof bowl. Pour the hot cream over the chocolate and let it sit for about 2 minutes to allow the chocolate to soften.
- Mix Ingredients: Add the vanilla extract, ground cinnamon, chili powder, and a pinch of cayenne pepper to the chocolate mixture. Stir gently until the chocolate is completely melted and the mixture is smooth and well combined.
- Cool and Thicken: Cover the bowl with plastic wrap and refrigerate for about 2 hours, or until the mixture is firm enough to handle.
- Shape the Truffles: Once the mixture is set, use a melon baller or a teaspoon to scoop small portions of the chocolate mixture and roll them into balls using your palms.
- Coat the Truffles: Roll each truffle in unsweetened cocoa powder to coat. For additional flair, press some finely chopped nuts or red chili flakes onto the truffles for a decorative touch.
- Chill Before Serving: Place the truffles on a baking sheet lined with parchment paper and refrigerate for at least 30 minutes before serving to guarantee they hold their shape.
Extra Tips:
For a more intense chili flavor, consider adjusting the amount of chili powder and cayenne pepper to suit your taste. Always taste the ganache mixture before chilling to ascertain the spice level is to your preference.
If you’re hosting a party, these truffles can be made a day in advance and stored in an airtight container in the refrigerator. Just remember to bring them to room temperature before serving for the best texture and flavor.
Maple Bacon Wrapped Dates With Almonds

Maple Bacon Wrapped Dates With Almonds are a delicious and sophisticated finger food perfect for an adult Halloween gathering. The combination of sweet, smoky, and nutty flavors will tantalize your guests’ taste buds and leave them wanting more.
These bite-sized treats are simple to prepare and require only a few ingredients, making them an excellent choice for entertaining. The sweet dates are stuffed with crunchy almonds, then wrapped in savory bacon and glazed with rich maple syrup.
As they bake, the bacon crisps up, and the maple syrup caramelizes to create an irresistible, mouth-watering appetizer. These Maple Bacon Wrapped Dates With Almonds are bound to be a hit at your Halloween party, offering a delightful mix of textures and flavors in every bite.
Ingredients for 4-6 people:
- 24 pitted Medjool dates
- 24 whole almonds
- 12 slices of bacon, cut in half
- 1/4 cup pure maple syrup
- Toothpicks
Cooking Instructions:
- Preheat the Oven: Preheat your oven to 375°F (190°C). Line a baking sheet with parchment paper to prevent sticking and make for easy cleanup.
- Prepare the Dates: Take each pitted date and gently open it up. Insert one almond into the center of each date, then close the date around the almond.
- Wrap in Bacon: Take a half-slice of bacon and wrap it around each stuffed date. Secure the bacon with a toothpick by inserting it through the date.
- Glaze with Maple Syrup: Place the bacon-wrapped dates on the prepared baking sheet. Using a pastry brush, lightly brush each one with maple syrup, guaranteeing they’re well-coated.
- Bake: Place the baking sheet in the preheated oven and bake for 20-25 minutes, or until the bacon is crispy and the syrup has caramelized. Turn the dates halfway through the cooking time to guarantee even crispiness.
- Cool and Serve: Once done, remove the dates from the oven and let them cool for a few minutes. Transfer them to a serving platter and serve warm.
Extra Tips:
When selecting your bacon, opt for thin or medium-cut to guarantee it crisps up properly without overcooking the dates. If using thick-cut bacon, you may need to increase the baking time slightly.
Be sure to monitor the dates closely towards the end of cooking, as the maple syrup can cause them to brown quickly. For a spicier kick, consider adding a small slice of jalapeño inside each date along with the almond. Enjoy these delicious bites as part of your Halloween celebration!
Sweet Potato and Black Bean Sliders

Sweet Potato and Black Bean Sliders are the perfect Halloween finger food for adults. These sliders aren’t only visually appealing but also pack a punch with their combination of flavors and textures. The sweetness of the sweet potatoes pairs beautifully with the earthy black beans, creating a satisfying and hearty bite.
Whether you’re hosting a spooky Halloween gathering or simply looking to enjoy a delicious fall meal, these sliders are sure to be a hit.
These sliders aren’t only delicious but also nutritious, making them a great option for those looking to enjoy a healthier treat during the Halloween festivities. The use of sweet potatoes provides a boost of vitamins and minerals, while the black beans add a dose of protein and fiber.
The recipe is simple to put together, making it an excellent choice for both seasoned cooks and kitchen novices. With this recipe, you’ll have a delightful and festive dish that will leave your guests impressed and satisfied.
Ingredients (Serves 4-6)
- 2 large sweet potatoes
- 1 can (15 oz) black beans, drained and rinsed
- 1/2 cup breadcrumbs
- 1 small onion, finely chopped
- 2 cloves garlic, minced
- 1 teaspoon ground cumin
- 1/2 teaspoon smoked paprika
- Salt and pepper to taste
- 1 tablespoon olive oil
- Mini slider buns
- Optional toppings: avocado slices, lettuce, tomato, cheese
Cooking Instructions
1. Prepare the Sweet Potatoes: Preheat your oven to 400°F (200°C). Wash the sweet potatoes thoroughly and pierce them with a fork several times. Place them on a baking sheet and bake for 45-50 minutes or until they’re tender and easily pierced with a fork.
Once done, remove them from the oven and allow them to cool.
2. Mash the Sweet Potatoes: Once cooled, peel the sweet potatoes and place the flesh in a large mixing bowl. Use a fork or potato masher to mash them until smooth.
3. Prepare the Bean Mixture: In a separate bowl, lightly mash the black beans with a fork, leaving some whole for texture. Add the mashed beans to the sweet potatoes.
4. Combine Ingredients: Add the breadcrumbs, chopped onion, minced garlic, cumin, smoked paprika, salt, and pepper to the sweet potato and bean mixture. Mix until all the ingredients are well combined.
The mixture should be firm enough to hold its shape. If it’s too wet, add more breadcrumbs.
5. Form the Patties: Divide the mixture into small portions and form them into patties that fit the size of your slider buns.
6. Cook the Patties: Heat the olive oil in a large skillet over medium heat. Cook the Patties for about 3-4 minutes on each side or until they’re golden brown and heated through.
7. Assemble the Sliders: Place each patty on a mini slider bun and add your choice of toppings such as avocado slices, lettuce, tomato, or cheese. Serve immediately.
Extra Tips
When forming the patties, wet your hands slightly to prevent the mixture from sticking to your fingers. This will make it easier to shape the patties.
If you prefer a spicier kick, consider adding a pinch of cayenne pepper or a dash of hot sauce to the mixture. Additionally, these patties can be prepared ahead of time and stored in the refrigerator for up to 24 hours before cooking, making them a convenient option for party planning.
Enjoy these sliders warm for the best flavor and texture.
