

Hey there, lovely readers! 🎃
Are you ready to make your Halloween celebration a feast for both the eyes and taste buds? I’ve rounded up 14 spook-tacular Halloween food ideas that are sure to enchant your guests. From Witch’s Brew bubbling away to Vampire Bat Wings that might just steal the show, there’s something here for every style of celebration. Get ready to create some hauntingly delicious memories that you and your guests will cherish!
Creepy Cocktail Concoctions

Welcome to the hauntingly delightful world of Halloween cocktails! The Witch’s Brew Cocktail is perfect for those looking to add a little magic and mystery to their spooky celebrations. This eerie concoction combines a mix of vibrant colors and tantalizing flavors that will leave your guests spellbound.
Whether you’re hosting a haunted house party or a cozy gathering, this cocktail is sure to be the centerpiece of your chilling festivities.
The Witch’s Brew Cocktail is as aesthetically pleasing as it’s delicious. With its deep green hue, created by the enchanting blend of ingredients, it perfectly embodies the spirit of Halloween. The addition of dry ice adds a mystical, fog-like effect that will wow your guests and create an unforgettable experience.
Preparing this cocktail is surprisingly simple, and it can be easily adapted to serve a crowd. Let’s plunge into the recipe to conjure up this bewitching drink for 4-6 people.
Ingredients:
- 1 cup vodka
- 1 cup orange liqueur
- 2 cups pineapple juice
- 1 cup lime juice
- 1 cup club soda
- 1/4 cup simple syrup
- Green food coloring
- Ice cubes
- Dry ice (optional, for effect)
- Lime slices for garnish
- Black sugar for rimming glasses
Instructions:
- Prepare the Glasses:
- Rim each glass with lime juice and then dip into black sugar to create a spooky edge. This won’t only look striking but also add a sweet touch to each sip.
- Mix the Base Cocktail:
- In a large pitcher or punch bowl, combine the vodka, orange liqueur, pineapple juice, lime juice, and simple syrup. Stir well until all ingredients are fully integrated.
- Add the Club Soda:
- Pour in the club soda and gently stir to incorporate. This will add a revitalizing fizz to the cocktail.
- Color the Brew:
- Add a few drops of green food coloring to the mixture. Stir until the color is evenly distributed and reaches your desired shade of eerie green.
- Serve with Ice:
- Fill each prepared glass with ice cubes. Pour the cocktail mixture over the ice, filling each glass about three-quarters full.
- Add Dry Ice for Effect (optional):
- Carefully add a small piece of dry ice to each glass for a foggy, bubbling effect. Verify that the dry ice is food-grade and use tongs or gloves to handle it safely.
- Garnish and Serve:
- Garnish with a slice of lime on the rim of each glass for an extra touch of flavor and visual appeal. Serve immediately for the best effect.
Extra Tips:
When using dry ice, confirm that it’s completely dissolved before sipping the cocktail to prevent any risk of injury. Dry ice should never be ingested.
If you prefer a non-alcoholic version, simply omit the vodka and orange liqueur and replace them with additional pineapple juice and lime soda for a family-friendly version.
Adjust the sweetness by adding more or less simple syrup according to your taste. Enjoy the magical ambiance this cocktail brings to your Halloween gathering!
Spooky Spider Deviled Eggs
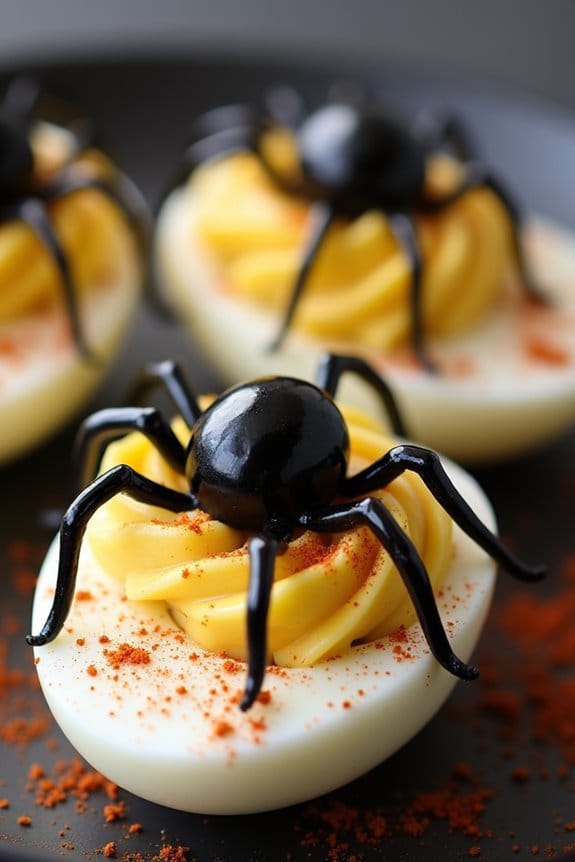
Spooky Spider Deviled Eggs are a hauntingly delightful addition to your Halloween spread. These creepy yet delicious deviled eggs are designed to resemble little spiders, making them perfect for a festive gathering. The classic tangy and creamy deviled egg filling is enhanced with simple decorations to transform an ordinary appetizer into something extraordinary and eerie.
This dish isn’t only visually appealing but also packed with flavor, guaranteeing it will be a hit with both kids and adults alike. Creating Spooky Spider Deviled Eggs is a fun and easy way to get into the Halloween spirit. With just a few ingredients and some creativity, you can whip up a batch of these spooky treats in no time.
A visually striking and flavorful Halloween treat that delights all ages effortlessly.
They serve as a great conversation starter at any Halloween party and add a unique twist to your typical holiday menu. Whether you’re hosting a large event or just a small family gathering, these deviled eggs are sure to impress your guests with their spooky presentation and delicious taste.
Ingredients for 4-6 servings:
- 6 large eggs
- 3 tablespoons mayonnaise
- 1 teaspoon Dijon mustard
- 1 teaspoon white vinegar
- Salt and pepper to taste
- Paprika for garnish
- 12 black olives
Cooking Instructions:
- Boil the Eggs: Place the eggs in a saucepan and cover them with cold water. Bring to a boil over medium-high heat. Once boiling, cover the pan and remove it from heat. Let the eggs sit in the hot water for 10-12 minutes.
- Prepare the Eggs: After boiling, transfer the eggs to an ice bath to cool for at least 5 minutes. Once cooled, gently peel the eggs and slice them in half lengthwise. Carefully remove the yolks and place them in a mixing bowl.
- Make the Filling: Mash the yolks with a fork until smooth. Add mayonnaise, Dijon mustard, and white vinegar to the yolks. Mix well until the filling is creamy and smooth. Season with salt and pepper to taste.
- Fill the Egg Whites: Spoon or pipe the yolk mixture back into the hollowed-out egg whites, filling each egg half generously.
- Create the Spider Decoration: Cut the black olives in half. Use one half for the spider body and slice the other half into thin strips to form the legs. Arrange one olive half on top of each deviled egg, then place the strips around it to resemble spider legs.
- Garnish: Lightly sprinkle paprika over the eggs for a touch of color and an extra burst of flavor.
Extra Tips: To guarantee your eggs peel easily, use eggs that are at least a week old. Fresh eggs tend to be more difficult to peel after boiling.
If you don’t have a piping bag, you can use a plastic sandwich bag with a small corner snipped off to fill the egg whites. For a more intense flavor, consider adding a pinch of cayenne pepper or a dash of hot sauce to the yolk mixture.
Remember to keep the deviled eggs chilled until serving to maintain their freshness and flavor.
Pumpkin Patch Cheese Ball
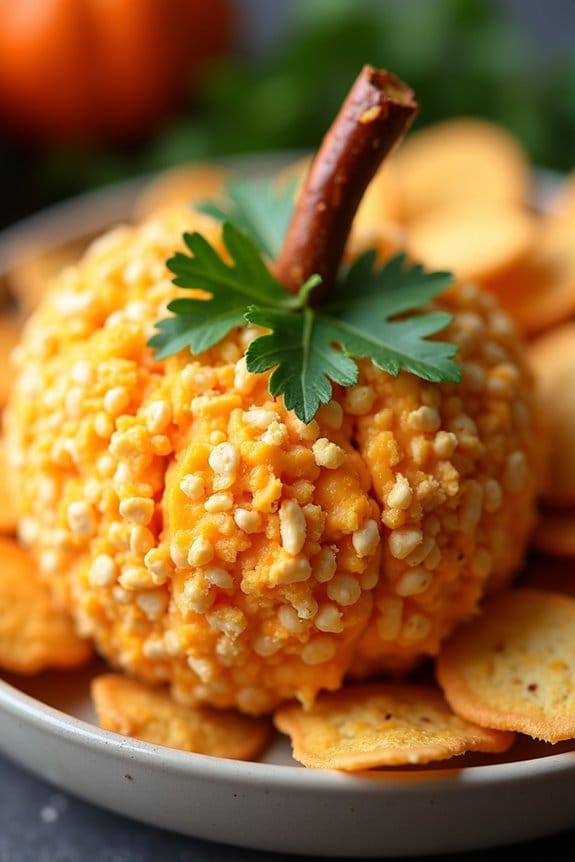
Bring a festive touch to your Halloween party with this delightful Pumpkin Patch Cheese Ball. This fun and easy-to-make appetizer is shaped like a pumpkin and boasts a creamy, flavorful blend of cheeses, herbs, and spices. Perfect for serving with crackers, fresh vegetables, or bread, this cheese ball will surely be a hit at any gathering. Not only does it taste delicious, but it also adds a whimsical, seasonal flair to your table.
Whether you’re hosting a Halloween bash or simply want to enjoy a themed treat, the Pumpkin Patch Cheese Ball is an ideal choice. The combination of sharp cheddar, cream cheese, and a hint of garlic creates a savory delight that’s perfect for both adults and kids. Its adorable pumpkin shape, complete with a pretzel stick as a stem, makes it an eye-catching centerpiece for your spread.
Let’s jump into the recipe so you can create this festive appetizer for 4-6 people.
Ingredients:
- 2 cups sharp cheddar cheese, shredded
- 8 ounces cream cheese, softened
- 1/4 cup sour cream
- 1 tablespoon Worcestershire sauce
- 1 teaspoon garlic powder
- 1/2 teaspoon onion powder
- 1/4 teaspoon smoked paprika
- Salt and pepper to taste
- 1 cup crushed nacho cheese tortilla chips
- 1 pretzel rod (for the stem)
- Fresh parsley (for garnish)
Cooking Instructions:
- Prepare the Cheese Mixture: In a large mixing bowl, combine the shredded cheddar cheese, softened cream cheese, and sour cream. Mix thoroughly until smooth and well blended.
- Add Flavorings: Stir in the Worcestershire sauce, garlic powder, onion powder, smoked paprika, and a pinch of salt and pepper. Mix until all ingredients are evenly incorporated.
- Form the Cheese Ball: Once the mixture is well combined, shape it into a ball using your hands. Try to make it as round as possible to resemble a pumpkin.
- Coat with Chips: Spread the crushed nacho cheese tortilla chips on a plate. Roll the cheese ball over the chips until it’s completely covered, pressing gently to guarantee the chips stick to the cheese.
- Add the Stem: Place the pretzel rod into the top center of the cheese ball to mimic a pumpkin stem.
- Garnish and Chill: Arrange fresh parsley around the base of the stem as leaves. Transfer the cheese ball to a serving platter and refrigerate for at least 1 hour to allow it to firm up.
- Serve: Once chilled, serve the Pumpkin Patch Cheese Ball with crackers, fresh vegetables, or slices of bread.
Extra Tips:
For the best results, make sure the cream cheese is fully softened before mixing to achieve a smooth texture. You can prepare the cheese ball a day in advance, which will allow the flavors to meld beautifully.
If you wish to add some color, consider using food coloring to tint the cheese ball orange before rolling it in the chips. Finally, if you don’t have nacho cheese chips, you can substitute with finely crushed cheese-flavored crackers or panko breadcrumbs mixed with paprika for a similar effect.
Ghostly Guacamole

Ghostly Guacamole is the perfect spooky treat for your Halloween festivities. This deliciously eerie dish combines the creamy, zesty flavors of traditional guacamole with a haunting presentation that will leave your guests both thrilled and chilled. The vibrant green of the avocado provides the perfect backdrop for the ghostly decorations, making it an irresistible centerpiece for your Halloween spread. Plus, it’s not just about looks; this guacamole is packed with nutritious ingredients that will keep your energy up for a night full of trick-or-treating and partying.
Creating Ghostly Guacamole is simple and fun, making it a great project to involve the whole family or your friends. The key is to use fresh and ripe avocados combined with a mix of classic ingredients such as lime, cilantro, and jalapeño, for a flavorful dip with just the right amount of kick. The ghostly aspect comes from the creative use of sour cream and black olives to form spooky ghost faces. Whether you’re hosting a party or serving it as a snack, this dish is sure to be a hit!
Ingredients (serves 4-6):
- 3 ripe avocados
- 1 lime, juiced
- 1 teaspoon salt
- 1/2 cup diced onion
- 3 tablespoons chopped fresh cilantro
- 2 roma tomatoes, diced
- 1 teaspoon minced garlic
- 1 pinch ground cayenne pepper (optional)
- 1 jalapeño pepper, seeded and minced
- 1/4 cup sour cream
- Black olives, sliced
Instructions:
- Prepare the Avocados: Cut the avocados in half, remove the pits, and scoop the flesh into a medium bowl. Mash the avocados using a fork or a potato masher until you achieve a chunky consistency.
- Mix the Ingredients: Add lime juice and salt to the mashed avocados and stir well to combine. This will help to prevent the avocados from browning and enhance the flavor.
- Add Fresh Vegetables: Incorporate the diced onion, chopped cilantro, diced tomatoes, minced garlic, and minced jalapeño. Mix thoroughly to guarantee all ingredients are evenly distributed.
- Spice It Up: If you like a little heat, add a pinch of cayenne pepper and mix again. Adjust the seasoning according to your taste.
- Create Ghost Faces: Spread the guacamole into a serving dish. Use the sour cream to create ghostly shapes on the surface of the guacamole. You can do this by spooning the sour cream into a plastic bag, cutting a small hole in one corner, and piping ghost shapes.
- Add Eyes: Slice black olives into small pieces and place them on the ghost shapes to form eyes and mouth, completing the ghostly faces.
- Chill and Serve: Refrigerate the guacamole for at least 30 minutes to allow the flavors to meld together. Serve with tortilla chips or vegetable sticks.
Extra Tips:
For the best results, use avocados that are just ripe; they should yield slightly to gentle pressure but not be overly soft. If you want to add a fun twist, consider adding a hint of cumin or smoked paprika for extra depth of flavor.
When creating ghost shapes, practice a few designs on a plate first to perfect your technique before adding them to the guacamole. Finally, keep the guacamole covered with plastic wrap by pressing the wrap directly onto the surface to minimize exposure to air, which helps prevent browning until you’re ready to serve.
Monster Meatball Sliders

Monster Meatball Sliders are a spooky yet scrumptious addition to your Halloween feast. These mini sandwiches are perfect for a themed party, offering a fun twist on a classic favorite. The sliders are packed with flavor and are sure to be a hit with both kids and adults.
With their quirky presentation, they add a playful element to your Halloween spread, making them the talk of the party. This recipe combines juicy meatballs with tangy marinara sauce, all nestled in soft slider buns. The “monster” theme comes alive with the addition of edible eyes and cheese “teeth” that give each slider its own personality.
Preparing these sliders is a straightforward process, making them an ideal choice for a quick and easy party dish. Whether you’re serving them as an appetizer or a main course, these Monster Meatball Sliders are sure to delight your guests.
Ingredients (Serves 4-6 people):
- 1 pound ground beef
- 1/4 cup breadcrumbs
- 1/4 cup grated Parmesan cheese
- 1 egg
- 1 teaspoon garlic powder
- 1 teaspoon onion powder
- Salt and pepper to taste
- 1 cup marinara sauce
- 12 slider buns
- 12 slices of mozzarella or provolone cheese
- 24 edible candy eyes
- Ketchup or mustard for decorating
Instructions:
- Prepare the Meatballs: Preheat your oven to 375°F (190°C). In a large mixing bowl, combine the ground beef, breadcrumbs, Parmesan cheese, egg, garlic powder, onion powder, salt, and pepper. Mix until all ingredients are well incorporated.
- Shape the Meatballs: Roll the mixture into small meatballs, about 1 inch in diameter, ensuring they’re uniform in size for even cooking. You should have approximately 12 meatballs.
- Bake the Meatballs: Place the meatballs on a baking sheet lined with parchment paper. Bake in the preheated oven for 15-20 minutes, or until they’re cooked through and golden brown.
- Simmer in Sauce: While the meatballs are baking, heat the marinara sauce in a saucepan over medium heat. Once the meatballs are done, add them to the saucepan and gently stir to coat them in the sauce.
- Assemble the Sliders: Slice each slider bun in half and place a slice of cheese on the bottom half. Add a saucy meatball on top of the cheese. Then, place the top half of the bun over the meatball.
- Decorate the Sliders: Use ketchup or mustard to adhere two candy eyes to the top of each slider bun. For the cheese “teeth,” cut a zig-zag pattern into the remaining slices of cheese and tuck them under the top bun to create a fun monster face.
- Serve and Enjoy: Arrange the sliders on a platter and serve them warm. Watch as your guests delight in these spooky treats.
Extra Tips:
For best results, use freshly grated Parmesan cheese and avoid pre-shredded varieties which can be drier and less flavorful. If you want to make the sliders ahead of time, you can prepare the meatballs a day in advance and store them in the refrigerator.
Simply reheat in the marinara sauce before assembling the sliders. To add even more creativity, consider using different colors of cheese or toppings such as sliced olives for eyes to give each slider its own unique monster character.
Witches’ Finger Breadsticks

Get ready to spook your guests with a hauntingly delicious treat this Halloween with Witches’ Finger Breadsticks. These eerie breadsticks not only make for a fun and festive presentation but also taste absolutely delicious with their crunchy exterior and soft, fluffy interior.
Perfect for a Halloween party or a spooky dinner night at home, these breadsticks are designed to resemble creepy witches’ fingers, complete with almond nails and knobbly knuckles. They’re sure to be a hit with both kids and adults alike, adding a touch of whimsy to your Halloween festivities.
The dough for these breadsticks is simple to make and can be flavored with your favorite herbs and spices, such as garlic, rosemary, or thyme, to suit your taste preferences. Shaping them into finger-like forms is easy and adds to the fun of preparing this dish.
Serve these Witches’ Finger Breadsticks with a side of marinara sauce or a blood-red beet hummus for an extra gory effect. Whether you’re hosting a Halloween bash or just looking to enjoy some themed treats, these breadsticks are a must-try.
Ingredients (Serves 4-6 people):
- 2 1/4 teaspoons active dry yeast
- 1 cup warm water (110°F)
- 2 1/2 cups all-purpose flour
- 1 teaspoon salt
- 1 tablespoon sugar
- 2 tablespoons olive oil
- 1/2 teaspoon garlic powder
- 1/4 teaspoon dried rosemary
- 1/4 teaspoon dried thyme
- 24 whole almonds
- 1 egg (beaten, for egg wash)
- Red food coloring (optional)
Cooking Instructions:
- Prepare the Yeast Mixture: Begin by dissolving the active dry yeast in a small bowl with the warm water. Allow it to sit for about 5 minutes until it becomes frothy, indicating that the yeast is active.
- Make the Dough: In a large mixing bowl, combine the all-purpose flour, salt, and sugar. Create a well in the center and pour in the yeast mixture and olive oil. Mix until a rough dough forms.
- Knead the Dough: Transfer the dough onto a floured surface and knead for about 8-10 minutes until it becomes smooth and elastic. If the dough is sticky, sprinkle a little more flour as needed.
- First Rise: Place the dough in a lightly oiled bowl, cover it with a damp cloth, and allow it to rise in a warm place for about 1 hour or until it doubles in size.
- Preheat and Prepare the Baking Sheet: Preheat your oven to 375°F (190°C). Line a baking sheet with parchment paper.
- Shape the Breadsticks: Punch down the risen dough and divide it into 24 equal pieces. Roll each piece into a thin, finger-like shape. Use a knife to make small cuts to mimic knuckles and press an almond at one end to resemble a fingernail.
- Egg Wash and Bake: Using a pastry brush, lightly coat each breadstick with the beaten egg. If you want extra spooky fingers, add a drop of red food coloring near the almond for a bloody effect. Bake in the preheated oven for 15-20 minutes or until golden brown and crisp.
- Cool and Serve: Allow the breadsticks to cool on a wire rack before serving. Enjoy them warm or at room temperature with your favorite dip.
Extra Tips:
When shaping the breadsticks, don’t worry about making them perfectly uniform; the more irregular, the more realistic they look as spooky fingers.
If you’d like a stronger herb flavor, feel free to adjust the amount of garlic powder, rosemary, or thyme according to your preference. For an added eerie touch, you can use black food coloring instead of red to create a witchy effect.
If you’re preparing these in advance, they can be stored in an airtight container for up to two days and reheated in the oven for a few minutes before serving.
Mummy Hot Dogs

Mummy Hot Dogs are a fun and festive treat perfect for Halloween gatherings. These spooky snacks aren’t only easy to make but also delicious, making them a hit with kids and adults alike. Wrapped in crescent roll dough to resemble mummies, these hot dogs are a creative way to add some Halloween spirit to your party spread. Served alongside ketchup or mustard for dipping, they’re as enjoyable to eat as they’re to look at.
This recipe is designed to serve 4-6 people and makes for an ideal appetizer or snack. The preparation time is minimal, allowing you to focus on other aspects of your Halloween festivities. With a few simple ingredients, you can create these adorable mummy hot dogs that are sure to impress your guests. Whether you’re hosting a Halloween party or just looking for a fun cooking activity with the kids, these mummy hot dogs are sure to be a crowd-pleaser.
Ingredients:
- 1 can of refrigerated crescent roll dough
- 8 hot dogs
- 1 slice of cheese (optional)
- Cooking spray or parchment paper
- Ketchup and/or mustard for dipping
- Candy eyes or small dots of mustard/ketchup for eyes
Instructions:
- Preheat the Oven: Preheat your oven to 375°F (190°C). This will guarantee it’s hot enough to cook the mummy hot dogs evenly.
- Prepare Baking Sheet: Line a baking sheet with parchment paper or lightly spray it with cooking spray to prevent sticking.
- Cut the Dough: Unroll the crescent roll dough and separate it into 4 rectangles, pressing the perforations to seal. Using a knife or pizza cutter, cut each rectangle into thin strips, about 1/4 inch wide.
- Wrap the Hot Dogs: Take one hot dog and begin wrapping strips of dough around it, leaving a small space at the top for the face. Overlap the strips to create a mummy-like appearance. Repeat this process with the remaining hot dogs.
- Add Cheese (Optional): If desired, cut the slice of cheese into small strips and wrap one or two strips around each hot dog before wrapping with the dough.
- Bake: Place the wrapped hot dogs on the prepared baking sheet and bake in the preheated oven for 12-15 minutes, or until the dough is golden brown.
- Decorate the Mummies: Once baked, remove from the oven and allow to cool slightly. Use small dots of mustard or ketchup to create eyes, or stick on candy eyes for a fun effect.
- Serve: Serve warm with ketchup and mustard for dipping.
Extra Tips:
For the best results, make sure the dough strips aren’t too thick, as this can prevent them from cooking evenly. If you’re using cheese, be careful not to wrap too much around each hot dog, as it can melt and make the dough soggy.
If you don’t have candy eyes, you can easily make the eyes using small dots of mustard or ketchup. Feel free to get creative with the wrapping technique to give each mummy a unique appearance.
Vampire Bat Wings

Vampire Bat Wings are a spookily delicious treat perfect for Halloween gatherings. These appetizing wings aren’t only a visual delight but also packed with bold flavors that will have your guests coming back for more. The deep, dark glaze gives these chicken wings a bat-like appearance, making them an ideal addition to your Halloween menu.
With a combination of sweet, savory, and spicy notes, these wings are sure to be the star of your Halloween spread. To attain the perfect Vampire Bat Wings, you’ll need to cook them to crispy perfection and coat them with a sticky, flavorful glaze. This dish serves 4-6 people, making it an excellent choice for a small party or family gathering.
The recipe combines simple ingredients to create a hauntingly delicious dish that will have your guests howling for more. Whether you’re hosting a Halloween party or simply want to enjoy a themed dinner, these Vampire Bat Wings are a must-try.
Ingredients:
- 2 pounds chicken wings
- 1/2 cup soy sauce
- 1/4 cup balsamic vinegar
- 1/4 cup honey
- 2 tablespoons olive oil
- 2 tablespoons Worcestershire sauce
- 1 tablespoon brown sugar
- 1 teaspoon smoked paprika
- 1 teaspoon garlic powder
- 1/2 teaspoon onion powder
- 1/2 teaspoon black pepper
- 1/4 teaspoon cayenne pepper (optional for extra heat)
- 1 tablespoon sesame seeds (for garnish)
- Fresh parsley (for garnish)
Instructions:
- Prepare the Wings: Preheat your oven to 400°F (200°C). Line a baking sheet with aluminum foil and place a wire rack on top. This setup will help the wings cook evenly and achieve a crispy texture.
- Mix the Marinade: In a large mixing bowl, combine soy sauce, balsamic vinegar, honey, olive oil, Worcestershire sauce, brown sugar, smoked paprika, garlic powder, onion powder, black pepper, and cayenne pepper. Whisk until all ingredients are well combined.
- Marinate the Wings: Add the chicken wings to the marinade, making sure they’re fully coated. Cover the bowl with plastic wrap and refrigerate for at least 1 hour, or up to overnight for deeper flavor.
- Bake the Wings: Remove the wings from the marinade and place them on the prepared wire rack. Bake in the preheated oven for 25-30 minutes, or until the wings are crispy and cooked through, turning them halfway through the cooking time to ensure even browning.
- Prepare the Glaze: While the wings are baking, pour the remaining marinade into a small saucepan. Bring it to a boil over medium heat, then reduce the heat and let it simmer until it thickens to a glaze consistency.
- Coat the Wings: Once the wings are baked, remove them from the oven and brush the thickened glaze generously over each wing. Return the wings to the oven for an additional 5 minutes to set the glaze.
- Garnish and Serve: Remove the wings from the oven and let them rest for a few minutes. Sprinkle sesame seeds over the wings and garnish with fresh parsley before serving.
Extra Tips:
To guarantee your Vampire Bat Wings are perfectly crispy, make sure they’re spaced apart on the wire rack so air can circulate around them as they bake. This will help them cook evenly and achieve that desirable crispy texture.
If you prefer a spicier kick, feel free to increase the amount of cayenne pepper in the marinade. Additionally, if you have any leftover glaze, you can serve it as a dipping sauce on the side for even more flavor.
Poison Toffee Apples

Halloween is the perfect time to get creative in the kitchen, and what better way to add a spooky touch to your festivities than with Poison Toffee Apples? These eerie treats are a fun twist on the traditional toffee apple, with a sinister black coating that will delight both kids and adults. The combination of sweet, crisp apples and a dark, glossy toffee shell makes for a deliciously wicked addition to any Halloween gathering.
Not only are they visually striking, but they also offer a delightful contrast of textures and flavors. Poison Toffee Apples aren’t only easy to make, but they also provide a great opportunity to get the whole family involved in the kitchen. The recipe involves simple ingredients and straightforward steps, making it a fun and interactive experience for everyone.
Whether you’re hosting a Halloween party, looking for a festive treat, or simply want to surprise your family with something special, these apples are sure to impress. So, gather your ingredients and prepare to create some spooky magic with these hauntingly delicious Poison Toffee Apples.
Ingredients (Serves 4-6):
- 6 medium apples (Granny Smith or your preferred variety)
- 3 cups granulated sugar
- 1 cup water
- 1/2 cup light corn syrup
- 1 teaspoon black gel food coloring
- 1/2 teaspoon vanilla extract
- Wooden sticks or skewers
Cooking Instructions:
- Prepare the Apples: Start by washing and drying the apples thoroughly. Remove the stems and insert a wooden stick or skewer into the top of each apple, making sure it’s securely in place. Set the apples aside on a tray lined with parchment paper.
- Make the Toffee: In a medium-sized saucepan, combine the granulated sugar, water, and light corn syrup. Stir the mixture over medium heat until the sugar is completely dissolved.
- Cook the Toffee: Increase the heat to high and allow the mixture to come to a boil. Attach a candy thermometer to the side of the saucepan, making sure it doesn’t touch the bottom. Boil the mixture without stirring until it reaches 300°F (150°C), also known as the hard crack stage.
- Add the Coloring and Flavoring: Once the toffee reaches the desired temperature, remove the saucepan from heat. Carefully stir in the black gel food coloring and vanilla extract until evenly combined, resulting in a smooth, glossy black toffee.
- Coat the Apples: Working quickly, dip each apple into the toffee, tilting the saucepan as needed to fully coat the apple. Let any excess toffee drip off before placing the apple onto the prepared parchment paper. Repeat with the remaining apples.
- Let Set: Allow the coated apples to cool and set completely at room temperature. This should take about 30 minutes to an hour, depending on the ambient temperature and humidity.
Extra Tips:
When making Poison Toffee Apples, it’s important to verify your apples are completely dry before dipping them into the toffee. Any moisture can prevent the toffee from sticking properly.
Additionally, if you find the toffee begins to harden during the coating process, gently reheat it over low heat until it returns to a workable consistency. Finally, using a gel food coloring is key for achieving that intense black hue, as liquid food coloring may not provide the same depth of color. Enjoy your spooky treats!
Jack-O’-Lantern Stuffed Peppers

Jack-O’-Lantern Stuffed Peppers are a festive and delicious way to celebrate Halloween while serving a nutritious meal. This dish is perfect for a family dinner or a spooky gathering with friends. The peppers are carved like jack-o’-lanterns and filled with a savory mixture of ground meat, rice, vegetables, and spices. The result is a fun and flavorful dish that looks as good as it tastes.
Celebrate Halloween with nutritious Jack-O’-Lantern Stuffed Peppers, combining festive fun with savory flavors for a delightful meal.
The key to making these stuffed peppers a hit is in the preparation and presentation. By choosing vibrant orange bell peppers and carving them with classic jack-o’-lantern faces, you create a visually appealing dish that’s sure to impress. The filling, made with seasoned ground meat and hearty grains, offers a satisfying and comforting flavor profile that complements the sweetness of the baked peppers. This recipe serves 4-6 people, making it an ideal choice for a small gathering.
Ingredients:
- 4-6 large orange bell peppers
- 1 pound ground beef or turkey
- 1 cup cooked rice
- 1 small onion, diced
- 2 cloves garlic, minced
- 1 cup canned diced tomatoes, drained
- 1 cup shredded cheddar cheese
- 1 tablespoon olive oil
- 1 teaspoon salt
- 1/2 teaspoon black pepper
- 1 teaspoon paprika
- 1 teaspoon dried oregano
- 1/2 teaspoon chili powder (optional)
- Fresh parsley for garnish (optional)
Instructions:
- Preheat the Oven: Begin by preheating your oven to 375°F (190°C). This guarantees that the oven is at the right temperature when you’re ready to bake the peppers.
- Prepare the Peppers: Wash the bell peppers thoroughly and pat them dry. Carefully cut the tops off each pepper and remove the seeds and membranes. Use a small knife to carve jack-o’-lantern faces into one side of each pepper, being cautious not to cut through the entire pepper.
- Cook the Filling: In a large skillet, heat the olive oil over medium heat. Add the diced onion and minced garlic, sautéing until they’re soft and fragrant. Add the ground beef or turkey, cooking until browned and fully cooked. Drain any excess fat from the skillet.
- Mix the Filling: In the skillet with the cooked meat, add the drained diced tomatoes, cooked rice, salt, black pepper, paprika, oregano, and chili powder (if using). Stir well to combine all the ingredients and cook for another 3-4 minutes until heated through.
- Stuff the Peppers: Place the carved peppers in a baking dish. Spoon the meat and rice mixture into each pepper, packing it tightly. Top each filled pepper with shredded cheddar cheese.
- Bake the Peppers: Cover the baking dish with aluminum foil and place it in the preheated oven. Bake for 30 minutes. Remove the foil and bake for an additional 10-15 minutes, or until the peppers are tender and the cheese is melted and bubbly.
- Serve and Garnish: Once baked, remove the peppers from the oven and let them cool slightly. Garnish with fresh parsley if desired. Serve warm and enjoy your festive creation!
Extra Tips:
When carving the faces into the peppers, it’s helpful to use a small, sharp knife for more precise cuts. If you’re feeding a larger crowd, feel free to double the recipe and use multiple baking dishes.
You can also customize the filling by adding other vegetables like mushrooms, zucchini, or corn for extra flavor and nutrition. For a spicier version, consider adding more chili powder or a dash of hot sauce to the filling mixture.
Finally, these stuffed peppers can be made ahead of time and stored in the refrigerator until ready to bake, making them a convenient option for busy weeknights or party preparations.
Skeleton Veggie Platter
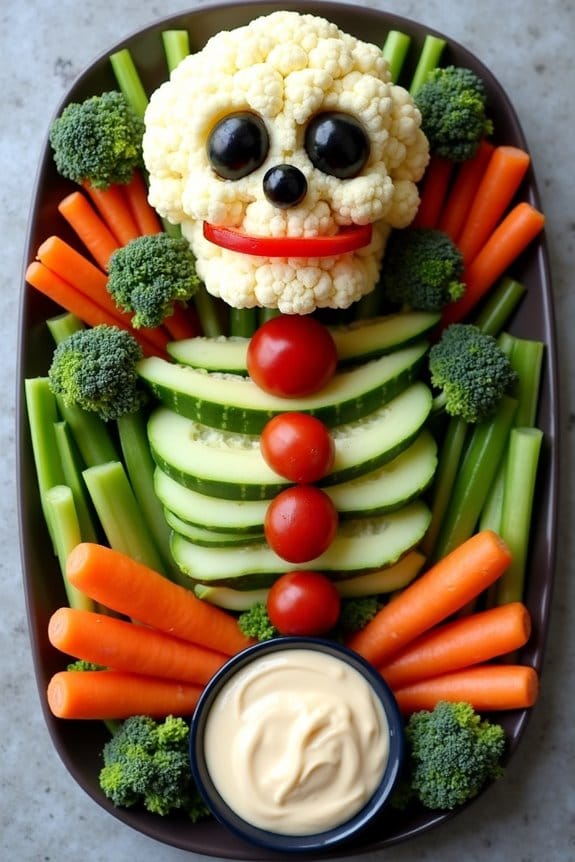
Transform your Halloween celebrations into a spooktacularly healthy affair with a Skeleton Veggie Platter. This creative and nutritious dish combines the fun of Halloween with a variety of fresh vegetables, arranged to resemble a skeleton. It’s an eye-catching centerpiece that’s not only fun to make but also promotes everyone to enjoy their veggies. Perfect for parties or family gatherings, this dish will delight both kids and adults alike with its playful presentation and vibrant colors.
The Skeleton Veggie Platter isn’t just visually appealing, but it’s also incredibly versatile. You can tailor the vegetable selection to suit your taste or dietary preferences, allowing that everyone can enjoy it. The platter is accompanied by a delicious dip, which adds an extra layer of flavor to the fresh, crisp vegetables. With minimal preparation time and no cooking required, this platter is a breeze to assemble, making it an ideal last-minute addition to your Halloween menu.
Ingredients (Serving Size: 4-6 people):
- 1 head of broccoli
- 1 head of cauliflower
- 1 red bell pepper
- 1 yellow bell pepper
- 1 cucumber
- 1 pint cherry tomatoes
- 1 bunch of celery
- 1 bag of baby carrots
- 1 small can of black olives
- 1 cup of hummus or ranch dip
Cooking Instructions:
- Prepare the Vegetables: Start by washing all the vegetables thoroughly. Cut the broccoli and cauliflower into small florets. Slice the bell peppers into strips and the cucumber into rounds. Trim the celery sticks to manageable lengths.
- Assemble the Skeleton: On a large platter or board, begin by arranging the cauliflower florets in the shape of a skull at the top. Use black olives for the eyes and nose, and a red bell pepper slice for the mouth.
- Create the Ribcage: Use the celery sticks to create the ribcage, placing them vertically below the cauliflower skull. Intermingle some cucumber rounds and cherry tomatoes within the ribs to add color and variety.
- Form the Arms and Legs: Use the baby carrots to form the arms and legs. Align them below the ribcage, curving slightly to give a natural skeletal appearance. At the end of each arm and leg, place broccoli florets to represent hands and feet.
- Add Final Touches: Fill in any gaps with extra cherry tomatoes and bell pepper strips, making sure the skeleton is fully formed and vibrant. Place the hummus or ranch dip in a small bowl at the bottom of the platter to resemble a skeleton’s pelvis.
- Serve and Enjoy: Once assembled, your Skeleton Veggie Platter is ready to serve. Place it at the center of your table and watch as your guests delight in this fun and healthy Halloween treat.
Extra Tips:
For the best results, use the freshest vegetables available to guarantee the platter is colorful and crisp. Feel free to substitute or add other vegetables like snap peas, radishes, or zucchini for added variety.
If you’re short on time, you can prepare the vegetables in advance and store them in airtight containers in the refrigerator until you’re ready to assemble the platter. To make the dip more festive, consider adding a few drops of natural food coloring to match the Halloween theme.
Eyeball Pasta Salad
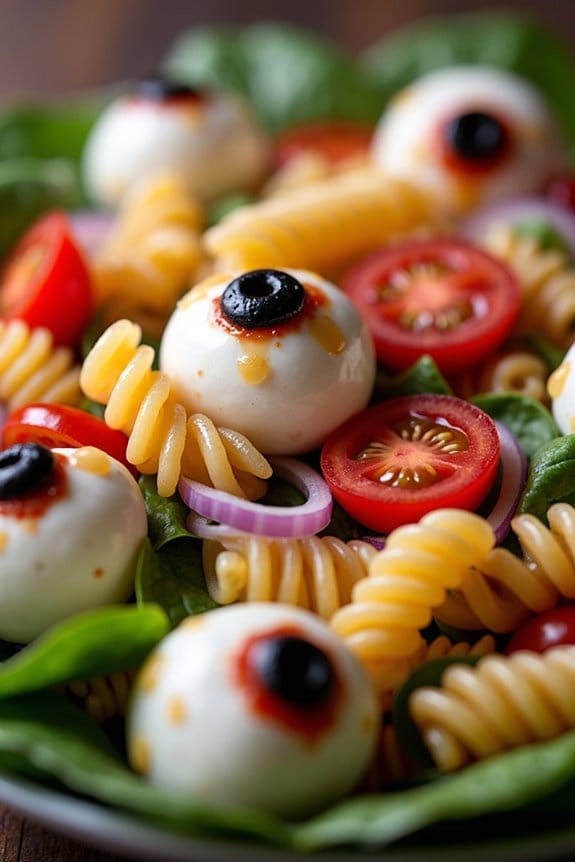
This Halloween, surprise your guests with a spooky and delicious Eyeball Pasta Salad that’s as fun to make as it’s to eat.
This dish combines colorful pasta, creepy mozzarella eyeballs, and a tangy dressing for a festive treat that’s perfect for any Halloween gathering. The blend of flavors and textures will delight both kids and adults, making it a must-have on your party menu.
Eyeball Pasta Salad serves 4-6 people and is easy to prepare in advance, allowing you to focus on other festive activities.
Perfect for planning ahead, this spooky salad lets you enjoy time with your guests.
The key to this dish is the presentation, with mozzarella balls transformed into eerie eyeballs using black olives and red bell peppers. This creative twist on a classic pasta salad will surely be a hit at your Halloween celebration.
Ingredients (Serves 4-6):
- 12 ounces rotini pasta
- 1 cup cherry tomatoes, halved
- 1 cup black olives, sliced
- 8 ounces mozzarella balls (bocconcini)
- 1 red bell pepper
- 1 cup baby spinach leaves
- 1/4 cup red onion, thinly sliced
- 1/2 cup Italian dressing
- Salt and pepper to taste
Cooking Instructions:
- Cook the Pasta: Begin by boiling a large pot of salted water. Add the rotini pasta and cook according to package instructions until al dente. Drain and rinse under cold water to cool it down, then set aside.
- Prepare the Eyeballs: Take the mozzarella balls and cut small circles out of the red bell pepper. Place a piece of bell pepper onto each mozzarella ball, then add a black olive slice on top to create the appearance of an eyeball.
- Mix the Pasta Salad: In a large mixing bowl, combine the cooked pasta, cherry tomatoes, sliced olives, baby spinach, and red onion. Gently toss to mix the ingredients evenly.
- Add the Dressing: Pour the Italian dressing over the pasta mixture and toss until everything is well coated. Season with salt and pepper to taste.
- Assemble the Dish: Transfer the pasta salad to a serving platter or bowl. Carefully place the mozzarella eyeballs on top of the salad to create a spooky effect.
- Chill: Cover the salad and refrigerate for at least 30 minutes before serving to allow the flavors to meld together.
Extra Tips:
For an extra pop of color, consider using tri-colored rotini pasta, which can add more visual appeal to your dish.
If you’re short on time, prepare the pasta and assemble the mozzarella eyeballs the day before, storing them separately. When ready to serve, mix everything together and add the dressing.
This dish can be served cold or at room temperature, making it versatile for any party setting.
Haunted Graveyard Cupcakes

Bring a spooky touch to your Halloween festivities with these delicious and visually haunting Haunted Graveyard Cupcakes. Perfect for both kids and adults, these cupcakes not only taste delightful but also serve as a charming centerpiece for your Halloween party. With a moist chocolate base, creepy decorations, and a hint of the eerie, these cupcakes are sure to be a hit among all your goblins and ghouls.
These cupcakes are fun and easy to assemble, making them a fantastic activity for the whole family to enjoy together. Let your creativity take the lead as you design gravestones, ghostly figures, and eerie landscapes on top of your cupcakes. This recipe yields 12 cupcakes, which is an ideal serving size for a small gathering of 4-6 people, ensuring everyone gets to enjoy their own little slice of haunted heaven.
Ingredients:
- 1 cup all-purpose flour
- 1/2 cup unsweetened cocoa powder
- 1 teaspoon baking powder
- 1/2 teaspoon baking soda
- 1/4 teaspoon salt
- 1/2 cup unsalted butter, softened
- 1 cup granulated sugar
- 2 large eggs
- 1 teaspoon vanilla extract
- 1/2 cup buttermilk
- Black food coloring (optional, for added spookiness)
- 1 cup chocolate frosting
- 1 cup crushed chocolate cookies (for “dirt”)
- 12 chocolate sandwich cookies, halved (for gravestones)
- Edible gel pens or icing (for writing on gravestones)
- Assorted Halloween candies (e.g., candy bones, gummy worms)
Cooking Instructions:
- Preheat the Oven: Start by preheating your oven to 350°F (175°C) and line a 12-cup muffin pan with cupcake liners.
- Combine Dry Ingredients: In a medium bowl, whisk together the flour, cocoa powder, baking powder, baking soda, and salt. Set aside.
- Cream Butter and Sugar: In a large mixing bowl, beat the softened butter and sugar together using an electric mixer until light and fluffy, about 2-3 minutes.
- Add Eggs and Vanilla: Mix in the eggs one at a time, beating well after each addition. Stir in the vanilla extract.
- Incorporate Dry Ingredients and Buttermilk: Gradually add the dry ingredients to the butter mixture, alternating with the buttermilk. Begin and end with the dry ingredients. If using, add a few drops of black food coloring to achieve a darker hue.
- Fill the Cupcake Liners: Divide the batter evenly among the cupcake liners, filling each about two-thirds full.
- Bake the Cupcakes: Place the muffin pan in the preheated oven and bake for 18-20 minutes, or until a toothpick inserted into the center of a cupcake comes out clean.
- Cool Completely: Allow the cupcakes to cool in the pan for 5 minutes, then transfer them to a wire rack to cool completely.
- Prepare Decorations: While the cupcakes cool, prepare your gravestones by carefully writing eerie messages on the halved chocolate sandwich cookies using edible gel pens or icing.
- Frost the Cupcakes: Once cool, spread a generous amount of chocolate frosting over each cupcake.
- Create the Graveyard Scene: Sprinkle crushed chocolate cookies over the frosting to resemble dirt. Insert a decorated cookie gravestone into each cupcake. Add Halloween candies to complete the spooky scene, such as bones or gummy worms partially buried in the “dirt.”
Extra Tips:
For an extra creepy effect, consider adding a few drops of red food coloring to the frosting for a blood-like appearance. You can also use different candies to personalize each cupcake, such as candy eyes or mini marshmallows shaped into ghosts.
If you find the cupcakes are browning too quickly while baking, lower the oven temperature slightly and extend the baking time by a few minutes. Remember, the key to these cupcakes is creativity, so feel free to experiment with different decoration ideas to truly make them your own haunted masterpiece.
Bloody Berry Punch

Halloween is the perfect time to indulge in spooky treats and eerie drinks, and Bloody Berry Punch is a fantastic choice to add some frightful fun to your gathering. This punch combines the rich, tart flavors of mixed berries with a splash of citrus and a hint of fizz, making it both invigorating and visually striking. Its deep red hue, reminiscent of blood, is sure to captivate your guests and enhance the Halloween ambiance.
Whether you’re hosting a party or simply enjoying a festive evening at home, this punch is an easy-to-make, crowd-pleasing addition to your Halloween menu.
The great thing about Bloody Berry Punch is that it can be easily customized to suit the preferences of your guests. If you’re catering to a younger crowd or those who prefer non-alcoholic options, you can prepare it as a mocktail by omitting the alcohol. For those who enjoy a little kick, a splash of rum or vodka can be added for an adult version of this spooktacular drink.
No matter how you choose to serve it, this punch is bound to be a hit, with its combination of sweet and tangy flavors that perfectly capture the spirit of Halloween.
Ingredients (serving size: 4-6 people):
- 2 cups cranberry juice
- 1 cup pomegranate juice
- 1 cup mixed berry juice
- 1 cup ginger ale or lemon-lime soda
- 1 cup frozen mixed berries
- 1 orange, sliced
- 1 lemon, sliced
- Ice cubes
- Optional: 1 cup rum or vodka
Cooking Instructions:
- Prepare the Base: In a large punch bowl or pitcher, combine the cranberry juice, pomegranate juice, and mixed berry juice. Stir well to make sure all the juices are thoroughly mixed together.
- Add the Fizz: Slowly pour in the ginger ale or lemon-lime soda. This will give the punch its fizzy, effervescent quality. Stir gently to incorporate the soda without losing too much of the carbonation.
- Incorporate the Fruit: Add the frozen mixed berries to the punch. These won’t only enhance the fruity flavor of the drink but also help keep it cool. Add the sliced orange and lemon for a touch of citrus and a vibrant visual appeal.
- Cool Down: Add a generous amount of ice cubes to the punch to chill it further. If you prefer, you can chill the juices and soda beforehand to minimize dilution from the ice.
- Optional Alcohol Addition: If you’re making an alcoholic version, add the rum or vodka at this point. Stir gently to mix the alcohol evenly throughout the punch.
- Serve: Once everything is well combined and chilled, ladle the punch into individual glasses. Make sure each glass gets some of the fruit for garnish and added flavor. Enjoy your invigorating Bloody Berry Punch!
Extra Tips:
For an extra spooky touch, consider adding some novelty ice cubes shaped like skulls or bats, which can be found at most party supply stores.
If you want to make the punch ahead of time, prepare the juice mixture and refrigerate it without the soda; add the soda and ice just before serving to maintain its fizz.
Adjust the sweetness by choosing different brands or types of juice; some might be more tart or sweet, so taste as you go to balance the flavors to your liking.
