
Halloween is almost here, and I’m thrilled to share some spooktacular Rice Krispie Treats that will add a festive touch to your celebrations. From Spooky Spider to Ghostly Marshmallow designs, these treats are as fun to make as they are to eat. Each recipe is a chance to get creative and enjoy some quality time with family. Ready to transform simple ingredients into hauntingly delicious treats? Let’s explore these recipes that are sure to impress and delight!
Spooky Spider Rice Krispie Treats
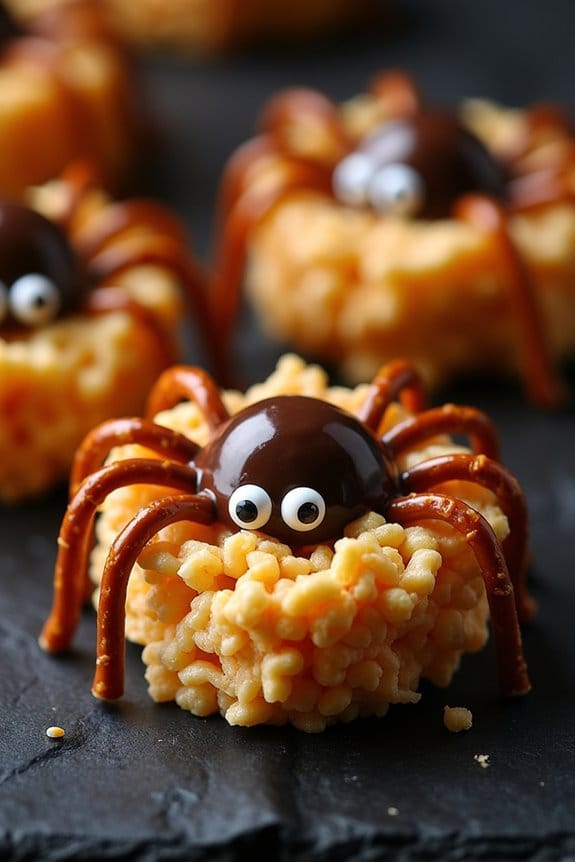
Spooky Spider Rice Krispie Treats are the perfect Halloween-themed dessert to add a touch of frightful fun to your festive gatherings. These treats aren’t only delicious but also easy to make, adding a creative twist to the classic Rice Krispie treats we all love.
The combination of gooey marshmallows, crispy rice cereal, and the addition of chocolate creates an irresistible delight that both kids and adults will enjoy. Shaped like eerie little spiders, these treats will surely be a hit at any Halloween party or event.
Transforming ordinary Rice Krispie treats into spooky spiders involves a few extra ingredients and some crafty assembly. You’ll need to shape the treats into balls to form spider bodies and use pretzels or licorice for spider legs. The finishing touch comes from using chocolate or candy eyes to give your spiders a playful and slightly creepy look.
This recipe is designed to serve 4-6 people, making it ideal for small gatherings or family treats. Follow the instructions below to create your own batch of Spooky Spider Rice Krispie Treats.
Ingredients (Serves 4-6):
- 6 cups Rice Krispies cereal
- 4 tablespoons unsalted butter
- 1 package (10 oz) mini marshmallows
- 1 teaspoon vanilla extract
- 1 cup semisweet chocolate chips
- 24 pretzel sticks or strands of black licorice (for legs)
- 24 candy eyes or chocolate chips (for eyes)
Instructions:
- Prepare the Base Mixture: In a large saucepan, melt the butter over low heat. Once melted, add the mini marshmallows and stir continuously until completely melted and smooth. Remove the saucepan from heat and stir in the vanilla extract.
- Combine with Cereal: Gradually add the Rice Krispies cereal to the melted marshmallow mixture. Stir well until the cereal is evenly coated with the marshmallow mixture.
- Shape the Spiders: Allow the mixture to cool slightly so it’s easy to handle, but still warm enough to shape. Grease your hands with a little butter or cooking spray and scoop out small handfuls of the mixture. Shape each portion into a ball to form the spider bodies.
- Add the Legs: Insert 3 pretzel sticks or pieces of licorice into each side of the Rice Krispie balls to create the spider legs. Arrange them so they resemble a spider’s legs extending out from the body.
- Melt the Chocolate: In a microwave-safe bowl, melt the semisweet chocolate chips in 30-second intervals, stirring in between until smooth and fully melted.
- Attach the Eyes: Use a small amount of the melted chocolate as “glue” to attach two candy eyes or chocolate chips to each spider. Dip a toothpick into the melted chocolate, then dab it onto the back of the eyes before placing them on the spider.
- Set and Serve: Allow the spiders to cool and set completely at room temperature or in the refrigerator for faster setting. Once set, your Spooky Spider Rice Krispie Treats are ready to be served and enjoyed!
Extra Tips: For a quicker assembly, consider using pre-made candy eyes available at most baking supply stores. If you’re using licorice for the legs, verify they’re cut into lengths that are proportionate to the spider bodies.
To prevent sticking while shaping the spiders, lightly grease your hands with butter or cooking spray. You can also experiment with different colors of melted chocolate or candy melts to add variety and more spookiness to your spider creations. Enjoy crafting these treats with friends or family for an interactive and fun Halloween activity.
Ghostly Marshmallow Rice Krispie Treats

Halloween is the perfect time to get creative in the kitchen with spooky and fun treats, and Ghostly Marshmallow Rice Krispie Treats are a delightful way to celebrate the season. These treats aren’t only easy to make but also a hit at any Halloween gathering. With their eerie ghostly shapes and sweet marshmallow flavor, they’re sure to be a favorite among both kids and adults.
Whether you’re hosting a Halloween party or just looking for a festive activity to do with the family, these ghostly treats are sure to impress. The process of making Ghostly Marshmallow Rice Krispie Treats involves a few simple steps, and with a little imagination, you can create some truly hauntingly delicious results.
Ghostly Marshmallow Rice Krispie Treats: a simple, imaginative way to create hauntingly delicious Halloween magic.
The key is to have fun and not worry too much about making them perfect. After all, ghosts come in all shapes and sizes! So, gather your ingredients and get ready to conjure up some spooky magic in the kitchen. This recipe yields enough treats to serve 4-6 people, making it perfect for a small gathering or a family treat night.
Ingredients:
- 6 cups Rice Krispies cereal
- 1 package (10 oz) mini marshmallows
- 3 tablespoons unsalted butter
- 1 teaspoon vanilla extract
- 1 cup white chocolate chips
- Edible black gel icing or mini chocolate chips for decorating
Instructions:
- Prepare the workspace: Before starting, lay out parchment paper on a flat surface or on baking sheets. This will be where you set the treats to cool and shape them into ghosts.
- Melt the marshmallows: In a large saucepan, melt the butter over low heat. Once melted, add the mini marshmallows and stir continuously until they’re completely melted and smooth. Remove the mixture from the heat and stir in the vanilla extract.
- Mix with cereal: Pour the melted marshmallow mixture over the Rice Krispies cereal in a large bowl. Stir quickly to evenly coat the cereal with the marshmallow mixture.
- Shape the ghosts: With buttered hands or a buttered spatula, scoop out portions of the mixture and shape them into ghostly forms. Place each ghost on the prepared parchment paper. Allow them to cool and firm up slightly.
- Decorate the ghosts: Melt the white chocolate chips in a microwave-safe bowl, heating in 30-second intervals and stirring in between until smooth. Use a spoon or piping bag to drizzle the melted white chocolate over the ghost shapes, giving them a ghostly appearance. Use the edible black gel icing or mini chocolate chips to create eyes and mouths on the ghosts.
- Set and serve: Allow the treats to set at room temperature until the chocolate hardens. Once set, the ghosts are ready to serve and be enjoyed.
Extra Tips: For a more defined ghost shape, you can use ghost-shaped cookie cutters instead of freehand shaping them. If the marshmallow mixture becomes too sticky to handle, lightly coat your hands with butter or cooking spray.
Be sure to work quickly when shaping the ghosts, as the mixture will firm up as it cools. These treats can be stored in an airtight container at room temperature for up to two days, making them a great make-ahead option for parties.
Pumpkin Patch Rice Krispie Treats
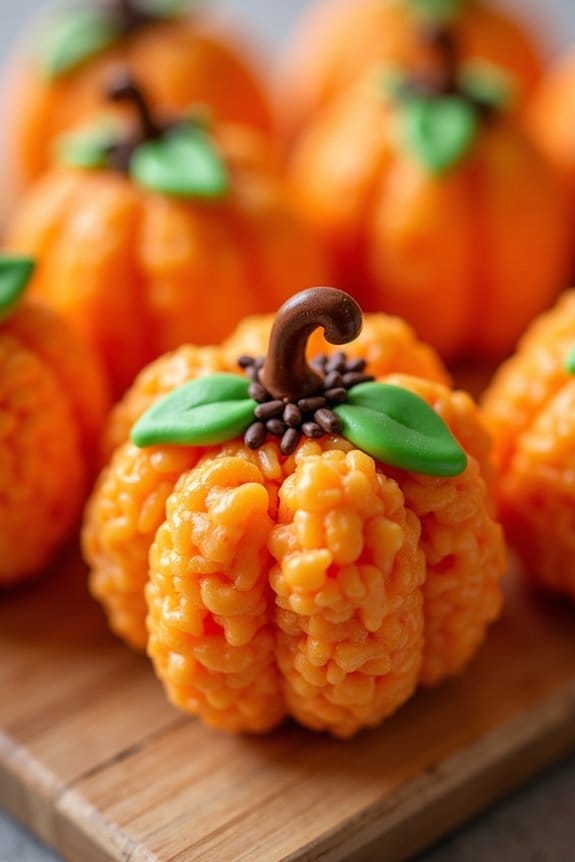
Celebrate the Halloween season with these delightful Pumpkin Patch Rice Krispie Treats. These fun and festive treats are perfect for a family gathering or a Halloween party. Shaped and decorated to resemble miniature pumpkins, these Rice Krispie treats aren’t only easy to make but also add a whimsical touch to your dessert spread.
The combination of marshmallows, crispy rice cereal, and a hint of pumpkin spice creates a delicious and chewy treat that everyone will love. This recipe makes enough Pumpkin Patch Rice Krispie Treats to serve 4-6 people. The orange hue of the treats, achieved with food coloring, and the addition of chocolate sprinkles for “pumpkin stems” make these treats visually appealing.
Whether you’re looking for a fun activity to do with kids or a creative way to enjoy a classic treat, these Pumpkin Patch Rice Krispie Treats are sure to be a hit.
Ingredients (for 4-6 servings):
- 3 tablespoons unsalted butter
- 4 cups mini marshmallows
- 6 cups Rice Krispies cereal
- 1 teaspoon vanilla extract
- 1/2 teaspoon pumpkin spice
- Orange gel food coloring
- Chocolate sprinkles or pretzel sticks (for stems)
- Green candy melts or icing (for leaves, optional)
Cooking Instructions:
- Prepare the Mixture: In a large saucepan, melt the butter over low heat. Once melted, add the mini marshmallows to the pan and stir continuously until they’re completely melted and smooth. Stir in the vanilla extract and pumpkin spice for that delightful autumn flavor.
- Add Color and Cereal: Remove the saucepan from the heat and add a few drops of orange gel food coloring to the melted marshmallow mixture. Stir well until the color is evenly distributed. Gradually add the Rice Krispies cereal, stirring until they’re fully coated with the marshmallow mixture.
- Shape the Treats: Allow the mixture to cool slightly until it’s safe to handle. Lightly coat your hands with cooking spray or butter to prevent sticking. Take small handfuls of the mixture and shape them into small pumpkin-like balls. Place them on a sheet of wax paper to set.
- Decorate: Insert a chocolate sprinkle or a piece of pretzel stick into the top of each Rice Krispie pumpkin to create the stem. If desired, melt the green candy melts according to package instructions and use a piping bag or a ziplock bag with a small corner cut off to pipe leaves onto the pumpkins.
- Set and Serve: Allow the Pumpkin Patch Rice Krispie Treats to cool completely and set at room temperature. Once set, they’re ready to serve and enjoy.
Extra Tips:
For an extra festive touch, consider adding a few drops of green food coloring to the candy melts or icing for the leaves. If you find the mixture too sticky to handle, try refrigerating it for a few minutes to firm up.
Additionally, adjusting the amount of food coloring can help you achieve the perfect shade of pumpkin orange. Finally, involve kids in the decorating process to make it a fun and interactive Halloween activity.
Monster Eye Rice Krispie Treats

Halloween is the perfect time to indulge in fun and spooky treats, and Monster Eye Rice Krispie Treats are a delightful way to get into the spirit. These festive, gooey, and crispy delights aren’t only easy to make but also a hit among kids and adults alike. Ideal for Halloween parties, these treats add a whimsical touch with their “monster eyes,” making them as entertaining to look at as they’re delicious to eat.
These Monster Eye Rice Krispie Treats are fundamentally your classic rice cereal treat with a spooky twist. Marshmallows and butter combine to create a chewy base, while candy eyes and food coloring transform them into something fit for a Halloween celebration. This recipe yields enough for 4-6 servings, making it perfect for a small gathering or as a fun family activity.
Ingredients for 4-6 servings:
- 6 cups rice cereal
- 4 tablespoons unsalted butter
- 10 ounces mini marshmallows
- Green food coloring
- Candy eyes (variety of sizes)
- 1 teaspoon vanilla extract
- Cooking spray or parchment paper
Instructions:
- Prepare the Pan: Lightly spray a 9×13-inch baking dish with cooking spray or line it with parchment paper. This will prevent the treats from sticking and make them easier to remove later.
- Melt the Butter and Marshmallows: In a large saucepan, melt the butter over low heat. Once the butter is melted, add the mini marshmallows. Stir continuously until the marshmallows are completely melted and smooth.
- Add Color and Flavor: Remove the saucepan from the heat and stir in the vanilla extract and a few drops of green food coloring. Mix until the color is evenly distributed. Add more food coloring if necessary to reach your desired shade of green.
- Combine with Rice Cereal: Add the rice cereal to the melted marshmallow mixture. Stir gently but quickly until all the cereal is evenly coated with the marshmallow mixture.
- Shape the Mixture: Transfer the rice cereal mixture into the prepared baking dish. Using a spatula or your hands (lightly coated with cooking spray to prevent sticking), press the mixture evenly into the pan. Make sure it’s compact and smooth on top.
- Decorate with Candy Eyes: While the mixture is still warm, press the candy eyes into the surface of the treats. Arrange them randomly to give a monster-like appearance. Let the treats cool completely in the pan.
- Cut and Serve: Once cooled and set, cut the treats into squares or rectangles. Serve and enjoy the spooky fun!
Extra Tips:
For best results, work quickly when incorporating the food coloring and cereal into the marshmallow mixture to guarantee even distribution before it sets.
If you’re feeding a larger crowd, simply double the recipe and use a larger pan, guaranteeing the thickness remains consistent for best texture.
Additionally, get creative with the candy eyes by using different sizes and colors to give each treat a unique “monster” personality.
Store any leftovers in an airtight container at room temperature to maintain their chewy texture.
Witch Hat Rice Krispie Treats

Witch Hat Rice Krispie Treats are a festive and whimsical addition to your Halloween treat lineup. These delightful snacks are a creative twist on the classic Rice Krispie Treat, making them perfect for Halloween parties or a fun treat for the kids.
With a combination of crunchy Rice Krispies, gooey marshmallows, and a touch of chocolate, these treats are both delicious and visually appealing. The witch hat shape adds a charming and spooky touch, making them a hit with both children and adults alike.
The process of making Witch Hat Rice Krispie Treats is as enjoyable as eating them. This recipe will guide you through creating these delightful snacks, ensuring that they come out perfectly every time. The treats are easy to shape and decorate, allowing for some creativity and fun in the kitchen.
Not only will you have a tasty treat, but also a fun activity that can be enjoyed by the whole family. Serving size for this recipe is intended for 4-6 people, making it perfect for a small gathering or a family Halloween night.
Ingredients:
- 3 tablespoons unsalted butter
- 4 cups mini marshmallows
- 6 cups Rice Krispies cereal
- 1 cup semisweet chocolate chips
- 12 chocolate sugar cones
- 1/2 cup colored sprinkles (orange, purple, green, etc.)
- 1/2 cup candy melts (in Halloween colors)
- 1/4 cup powdered sugar
- 1 tablespoon milk
- 12 small candies (like M&M’s or candy eyes)
Instructions:
- Prepare the Base: In a large saucepan, melt the butter over low heat. Once melted, add the mini marshmallows and stir continuously until the marshmallows are completely melted and smooth.
- Mix in the Cereal: Remove the pan from the heat and immediately add the Rice Krispies cereal. Stir quickly until all the cereal is well-coated with the marshmallow mixture.
- Shape the Treats: Allow the mixture to cool slightly, then lightly grease your hands with butter or cooking spray. Take small portions of the mixture and shape them into discs about 3 inches in diameter. These will form the brim of the witch hats. Set aside on a lined baking sheet.
- Melt the Chocolate: In a microwave-safe bowl, melt the semisweet chocolate chips in 30-second intervals, stirring in between, until smooth and fully melted.
- Decorate the Cones: Dip the rim of each chocolate sugar cone into the melted chocolate and then into the colored sprinkles. Allow the chocolate to set slightly before proceeding.
- Assemble the Hats: Place a small dollop of melted chocolate in the center of each Rice Krispie disc. Carefully place a decorated cone onto the chocolate, securing it onto the disc to create the witch hat shape.
- Add Final Touches: Melt the candy melts according to package instructions and use them to create decorative bands around the cones. Mix powdered sugar with milk to create a simple icing, and use it to attach small candies to each hat as additional decor.
- Set and Serve: Allow the assembled treats to set completely. Once set, they’re ready to serve!
Extra Tips:
For best results, work quickly when shaping and assembling the treats, as the Rice Krispie mixture can harden as it cools. If the mixture becomes too sticky, lightly grease your hands again.
You can customize the decorations by using different colored candies or sprinkles to match your Halloween theme. Store the treats in an airtight container at room temperature to keep them fresh and crunchy. Enjoy experimenting with different decorations and have fun creating these charming Witch Hat Rice Krispie Treats!
Candy Corn Rice Krispie Treats

Halloween is the perfect time to get creative with festive treats, and Candy Corn Rice Krispie Treats are a delightful addition to your Halloween spread. These colorful treats combine the classic crunch of Rice Krispies with the whimsical appeal of candy corn, making them a hit with both kids and adults. The layers of orange, yellow, and white mimic the look of candy corn, adding a fun and seasonal touch to your dessert table.
Ideal for a gathering of 4-6 people, these treats aren’t only easy to make but also quick, allowing you more time to enjoy the spooky festivities. All you need is a few basic ingredients and some food coloring to create these eye-catching snacks. Whether served at a Halloween party or as an everyday autumnal snack, Candy Corn Rice Krispie Treats are sure to be a crowd-pleaser.
Ingredients:
- 6 cups Rice Krispies cereal
- 3 tablespoons unsalted butter
- 1 package (10 oz) mini marshmallows
- Food coloring (yellow and orange)
- 1 cup candy corn
- Non-stick cooking spray
Instructions:
- Prepare the Pan: Begin by thoroughly lining a 9×13-inch baking dish with parchment paper, allowing some overhang on the sides. Lightly coat the parchment paper with non-stick cooking spray to facilitate easy removal of the treats later.
- Melt the Butter and Marshmallows: In a large saucepan, melt the butter over low heat. Once melted, add the mini marshmallows and stir continuously until they’re completely melted and smooth.
- Divide and Color the Mixture: Divide the melted marshmallow mixture into three separate bowls. Add a few drops of yellow food coloring to one bowl and mix until the color is even. Add orange food coloring to the second bowl, adjusting the drops until you reach the desired shade. Leave the third bowl uncolored for the white layer.
- Mix with Rice Krispies: In three separate large bowls, place 2 cups of Rice Krispies cereal in each. Pour the yellow marshmallow mixture over one bowl, the orange over the second, and the plain over the third. Mix each until the cereal is well-coated with the respective colored marshmallow mixtures.
- Layer the Mixtures: Working quickly, press the yellow layer evenly into the prepared baking dish using a spatula. Follow with the orange layer, pressing it evenly on top of the yellow layer, and finally, add the white layer on top.
- Add Candy Corn: While the mixture is still warm, gently press candy corn pieces into the top layer to decorate.
- Set and Slice: Allow the treats to set at room temperature for about an hour. Once set, use the parchment paper overhang to lift the entire block out of the pan. Cut into squares or triangles and serve.
Extra Tips: For a neater finish, lightly grease your hands or a spatula with non-stick spray when pressing the cereal layers into the pan. This will prevent sticking and allow you to evenly distribute each layer.
If you find the marshmallow mixture hardening too quickly, pop it back into the microwave in 10-second intervals to soften it. Finally, when cutting the treats, use a sharp knife and wipe it clean between cuts to maintain clean edges. Enjoy your spooky, crunchy delights!
Frankenstein Rice Krispie Treats
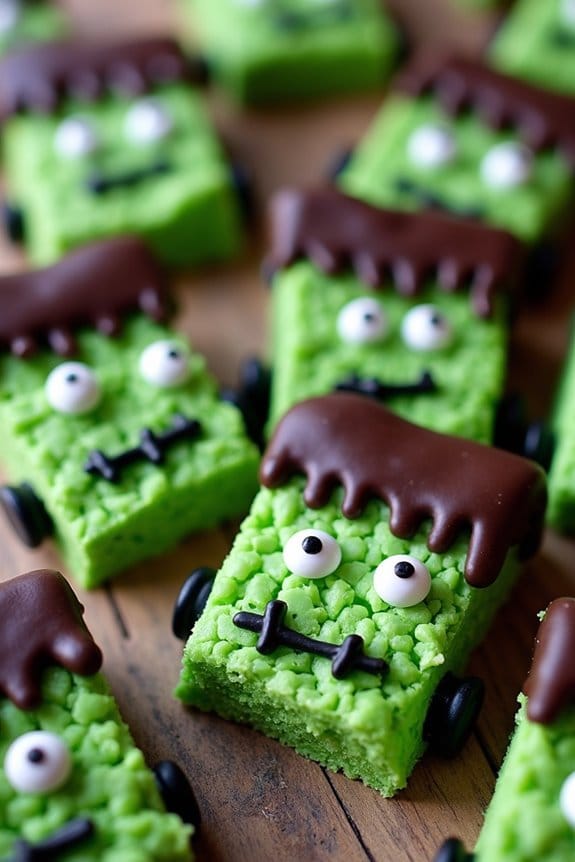
Frankenstein Rice Krispie Treats are the perfect spooky snack to add to your Halloween festivities. These deliciously gooey treats aren’t only easy to make but also fun to decorate, making them a great activity for the whole family. With their vibrant green color and adorable Frankenstein faces, they’ll surely be a hit at any Halloween party.
Whether you’re hosting a gathering or just want to enjoy a themed treat, these Frankenstein Rice Krispie Treats are sure to bring some monster fun to your table.
To craft these delightful treats, you start with the classic Rice Krispie Treats recipe and give it a Halloween twist. The addition of green food coloring transforms the marshmallow mixture into a creepy yet festive hue, while the decorating allows your creativity to shine. Using candy eyes and chocolate for the facial features, you’ll bring Frankenstein to life in the most delicious way possible.
This recipe makes enough for 4 to 6 servings, perfect for sharing with friends and family.
Ingredients (for 4-6 servings):
- 3 tablespoons unsalted butter
- 1 package (10 oz) mini marshmallows
- 6 cups Rice Krispies cereal
- Green food coloring
- 1 cup semi-sweet chocolate chips
- Candy eyes
- Black decorating gel or melted chocolate for details
Cooking Instructions:
- Prepare the Base: Melt 3 tablespoons of unsalted butter in a large saucepan over low heat. Add the mini marshmallows and stir constantly until they’re fully melted and smooth.
- Add Color: Once the marshmallows are melted, add a few drops of green food coloring to the mixture. Stir well until the color is evenly distributed, adding more food coloring if necessary to achieve the desired shade of green.
- Combine with Cereal: Remove the saucepan from heat and immediately add 6 cups of Rice Krispies cereal. Stir until the cereal is completely coated with the green marshmallow mixture.
- Shape and Cool: Transfer the mixture into a greased 9×13 inch baking dish. Press down gently with a spatula to spread the mixture evenly. Allow it to cool and set for about 30 minutes.
- Cut and Decorate: Once set, cut the treats into rectangles, approximately 3 inches by 2 inches, to form the Frankenstein heads. Melt the semi-sweet chocolate chips in a microwave-safe bowl in 30-second intervals, stirring between each, until smooth. Dip the top of each rectangle into the melted chocolate to create Frankenstein’s hair.
- Add Features: Place candy eyes onto the front of each treat while the chocolate is still warm so they stick. Use the black decorating gel or melted chocolate to draw a mouth and any other desired facial features.
- Set and Serve: Allow the treats to set at room temperature until the chocolate has hardened. Serve and enjoy your spooky Frankenstein Rice Krispie Treats!
Extra Tips: When cutting the treats, use a sharp knife that has been lightly greased with butter or cooking spray to prevent sticking. For a more detailed Frankenstein face, consider using additional decorations like colored icing for scars or bolts.
Store any leftover treats in an airtight container to keep them fresh for a few days. If you’re making these with kids, let them have fun with the decorating process, as they might come up with some creative monster faces!
Mummy Rice Krispie Treats

Mummy Rice Krispie Treats are a fun and spooky twist on the classic Rice Krispie Treats, perfect for Halloween festivities. These treats are simple to make and require just a few ingredients, making them a great activity for both children and adults. The combination of gooey marshmallows, crispy rice cereal, and sweet white chocolate adds delightful texture and flavor, while the mummy decorations make them a visual treat for any Halloween party.
To start, you’ll need to transform your traditional Rice Krispie Treats into mummies by adding a layer of white chocolate to mimic the mummy’s bandages and using candy eyes to bring them to life. The process is simple and can be done in under an hour, allowing you to focus on other Halloween preparations. Whether you’re hosting a spooky gathering or simply want to surprise your family with a festive dessert, these Mummy Rice Krispie Treats are bound to be a hit.
Ingredients (serving size: 4-6 people):
- 6 cups Rice Krispies cereal
- 3 tablespoons unsalted butter
- 1 package (10 oz) mini marshmallows
- 1 cup white chocolate chips
- 12-20 candy eyes
- Non-stick cooking spray (for greasing)
Cooking Instructions:
- Prepare the Pan: Lightly grease a 9×13-inch baking dish with non-stick cooking spray to prevent sticking. Set aside.
- Melt the Butter: In a large saucepan, melt the unsalted butter over low heat. Stir occasionally to guarantee it doesn’t burn.
- Add Marshmallows: Once the butter is melted, add the mini marshmallows to the saucepan. Stir continuously until the marshmallows are completely melted and the mixture is smooth.
- Mix with Cereal: Remove the saucepan from heat and gradually add the Rice Krispies cereal, stirring until the cereal is fully coated with the marshmallow mixture.
- Transfer to the Pan: Pour the cereal mixture into the prepared baking dish. Use a greased spatula or wax paper to press the mixture evenly into the pan. Allow it to cool and set for about 15 minutes.
- Cut into Rectangles: Once set, cut the Rice Krispie mixture into rectangular bars of your desired size, typically yielding 12-20 treats depending on cut size.
- Melt White Chocolate: In a microwave-safe bowl, melt the white chocolate chips in 30-second intervals, stirring in between until smooth.
- Decorate the Mummies: Using a spoon or a piping bag, drizzle the melted white chocolate over the Rice Krispie rectangles in a back-and-forth motion to create “bandages.” Place candy eyes on each treat while the chocolate is still wet, pressing gently to adhere.
- Set the Chocolate: Allow the white chocolate to harden at room temperature, or place the treats in the refrigerator for about 10 minutes to speed up the process.
Extra Tips:
For a fun variation, you can add a few drops of food coloring to the white chocolate to create colored bandages. If you don’t have candy eyes, you can use chocolate chips or small candy pieces as a substitute.
For best results, store the Mummy Rice Krispie Treats in an airtight container at room temperature for up to three days to maintain freshness. Kids can also help with the decorating process, making it a fun and interactive Halloween activity for the whole family.
Batty Rice Krispie Treats
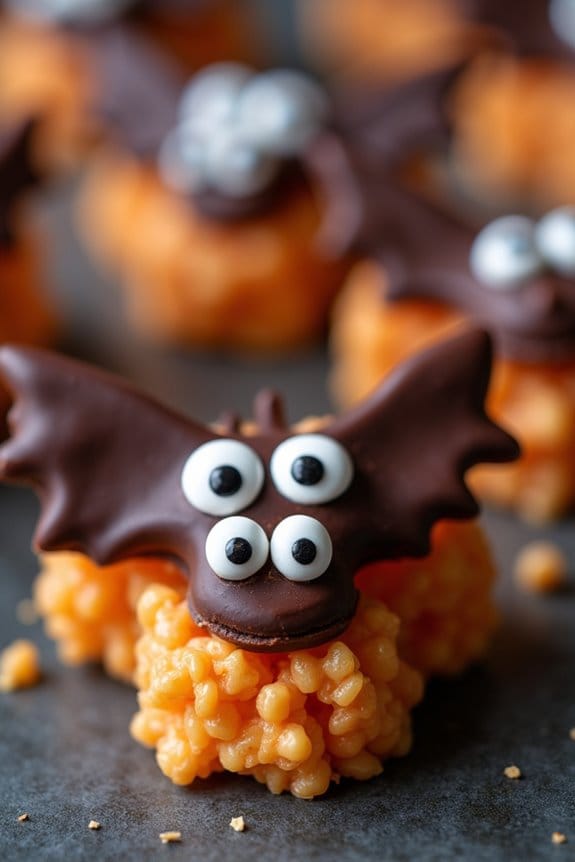
Batty Rice Krispie Treats are a spooktacular twist on the classic treat, perfect for Halloween festivities. These bat-shaped delights won’t only satisfy your sweet tooth but also add a fun and eerie touch to your celebration. Made with the beloved combination of marshmallows and crispy rice cereal, these treats are easy to mold into bat shapes and decorate with chocolate and candy for a festive look.
Creating these Batty Rice Krispie Treats is an easy and enjoyable project that you can do with kids or friends. With just a few ingredients and a little creativity, you can whip up a batch of these delicious Halloween snacks in no time. Whether you’re hosting a party or just looking for a fun activity, these treats are sure to be a hit with everyone.
A fun and creative Halloween treat that everyone will enjoy making and eating!
Ingredients (Serves 4-6 people):
- 6 cups crispy rice cereal
- 4 tablespoons unsalted butter
- 1 package (10 oz) mini marshmallows
- 1 teaspoon vanilla extract
- 1 cup semi-sweet chocolate chips
- Candy eyes
- Black food coloring (optional)
- Cooking spray or butter for greasing
Cooking Instructions:
- Prepare the Work Area: Lightly grease a 9×13 inch baking dish with cooking spray or butter to prevent sticking. Set aside.
- Melt the Butter and Marshmallows: In a large saucepan over low heat, melt the butter. Once melted, add the mini marshmallows and stir continuously until they’re completely melted and smooth. Stir in the vanilla extract.
- Add Food Coloring: If you want to make the treats darker, add a few drops of black food coloring to the melted marshmallow mixture and stir until the color is evenly distributed.
- Mix in the Cereal: Remove the saucepan from heat and immediately add the crispy rice cereal. Stir quickly and thoroughly until all the cereal is evenly coated with the marshmallow mixture.
- Transfer to Baking Dish: Pour the mixture into the prepared baking dish. Using a greased spatula or your hands (lightly buttered), press the mixture evenly into the dish. Allow it to cool for 10-15 minutes.
- Cut into Bat Shapes: Once cooled, use a bat-shaped cookie cutter to cut out bat shapes from the Rice Krispie mixture. Re-press any leftover mixture and cut out additional shapes as needed.
- Melt Chocolate and Decorate: In a microwave-safe bowl, melt the chocolate chips in 30-second intervals, stirring in between until smooth. Dip the top of each bat-shaped treat into the melted chocolate and place them on a parchment-lined tray.
- Add Candy Eyes: Before the chocolate hardens, place candy eyes onto each bat. Allow the chocolate to set completely before serving or packaging.
Extra Tips:
For a more intense batty appearance, consider using black melted candy wafers instead of chocolate chips for coating. If you don’t have a bat-shaped cookie cutter, you can use a sharp knife to cut the shapes freehand.
To make the process more kid-friendly, have all the decorating supplies ready and let the kids add the candy eyes and any other spooky embellishments. Store the treats in an airtight container at room temperature to keep them fresh and chewy.
Enjoy your Halloween festivities with these fun and delicious Batty Rice Krispie Treats!
Skeleton Bone Rice Krispie Treats

Skeleton Bone Rice Krispie Treats are a spooktacular addition to your Halloween festivities, perfect for both kids and adults. These eerie treats aren’t only fun to make but also a delight to eat, combining the classic crunchy sweetness of Rice Krispie Treats with a bone-chilling twist.
Shaped like skeleton bones, they add an extra layer of creativity to your Halloween spread and are guaranteed to be a hit at any party. This recipe is simple enough to get the whole family involved, turning kitchen time into a fun-filled activity.
With just a few ingredients and some creativity, you can whip up a batch of these themed treats in no time. They’re great for serving a crowd, with this recipe making enough for 4-6 people, depending on how big you make each “bone.”
Ingredients (for 4-6 servings):
- 3 tablespoons unsalted butter
- 4 cups miniature marshmallows
- 6 cups Rice Krispies cereal
- White candy melts or white chocolate chips (about 1 cup)
- 1 tablespoon coconut oil (optional, for smoother melt)
- Black decorating gel or edible marker
Cooking Instructions:
1. Prepare the Workstation: Start by lining a large baking sheet with parchment paper. This will be where you’ll shape and cool your Skeleton Bone Rice Krispie Treats.
2. Melt the Butter and Marshmallows****: In a large saucepan, melt the butter over low heat. Add the marshmallows, stirring continuously until they’re completely melted and smooth.
3. Mix in the Cereal: Remove the saucepan from heat and immediately add the Rice Krispies cereal. Stir well until the cereal is fully coated with the marshmallow mixture.
4. Shape the Treats: While the mixture is still warm, lightly butter your hands and begin shaping the mixture into bone shapes. You can do this by forming a long cylinder for the bone shaft and adding two small balls at each end for the joints.
Place each shaped bone onto the prepared baking sheet.
5. Melt the Candy Coating: In a microwave-safe bowl, melt the white candy melts (or white chocolate chips) with coconut oil, if using, in 30-second intervals, stirring between each until smooth.
6. Coat the Bones: Dip each Rice Krispie bone into the melted candy coating, ensuring it’s completely covered. Place them back on the parchment paper to set.
7. Decorate: Once the coating has hardened, use black decorating gel or an edible marker to add details, such as cracks or lines, to mimic real bones.
8. Serve and Enjoy: Allow the decorated bones to completely set before serving to your ghoulish guests.
Extra Tips: For best results, work quickly when shaping the Rice Krispie mixture, as it becomes more difficult to shape as it cools. If the mixture begins to harden too quickly, gently reheat it for a few seconds in the microwave to soften it up.
When melting the candy coating, adding a bit of coconut oil can create a smoother finish and make dipping easier. Finally, if you want to get more creative, you can color the candy melts or chocolate with food coloring to give your bones a unique hue. Enjoy these treats as part of a Halloween party or as a fun snack with a spooky twist!
Vampire Teeth Rice Krispie Treats
Vampire Teeth Rice Krispie Treats are a spooky twist on the classic dessert, perfect for adding a touch of fun to any Halloween gathering. These delightful treats combine the familiar crunchy and chewy texture of Rice Krispie treats with a festive and slightly eerie aesthetic.
By using simple ingredients and a bit of creativity, you can transform a beloved snack into a ghoulish yet tasty delight that will captivate both kids and adults alike. The main feature of these Vampire Teeth Rice Krispie Treats is the visually striking teeth design, which is achieved using marshmallows and red food coloring.
They aren’t only fun to make but also incredibly easy, making them an ideal project for getting children involved in the kitchen. Whether you’re hosting a Halloween party or looking for a fun family activity, these treats are sure to be a hit.
Ingredients (Serves 4-6):
- 6 cups of Rice Krispies cereal
- 10 ounces of mini marshmallows (plus extra for decorating)
- 3 tablespoons of unsalted butter
- Red food coloring
- Mini chocolate chips
- Cooking spray
Instructions:
- Prepare the Mixture: In a large saucepan, melt the unsalted butter over low heat. Once completely melted, add in the 10 ounces of mini marshmallows. Stir continuously until the marshmallows are fully melted and the mixture is smooth.
- Add the Cereal: Remove the saucepan from heat and quickly stir in the Rice Krispies cereal. Mix until the cereal is thoroughly coated with the marshmallow mixture.
- Shape the Treats: Lightly spray a 9×13-inch baking dish with cooking spray. Pour the Rice Krispies mixture into the dish. Use a greased spatula or wax paper to press down and evenly spread the mixture across the dish.
- Create Teeth Shapes: Allow the mixture to cool slightly, then cut into rectangles or circles, depending on your preference. Use a small knife to carve a slight curve on one side, creating the shape of an open mouth.
- Decorate: Once the shapes are cut, apply a few drops of red food coloring onto the marshmallows. Arrange additional mini marshmallows along the curved edge to resemble teeth. Place mini chocolate chips in between the marshmallows to add detail and depth to the teeth.
- Set and Serve: Allow the decorated treats to set for at least 30 minutes. Once set, carefully remove them from the pan and serve on a platter.
Extra Tips:
When making Vampire Teeth Rice Krispie Treats, it’s important to work quickly once the marshmallow mixture is ready, as it tends to set fast.
If you’re involving kids, pre-cutting the shapes before decorating can make the process smoother and more enjoyable. Experiment with different shapes and designs to customize your vampire teeth, and remember that imperfections add character to these playful treats!
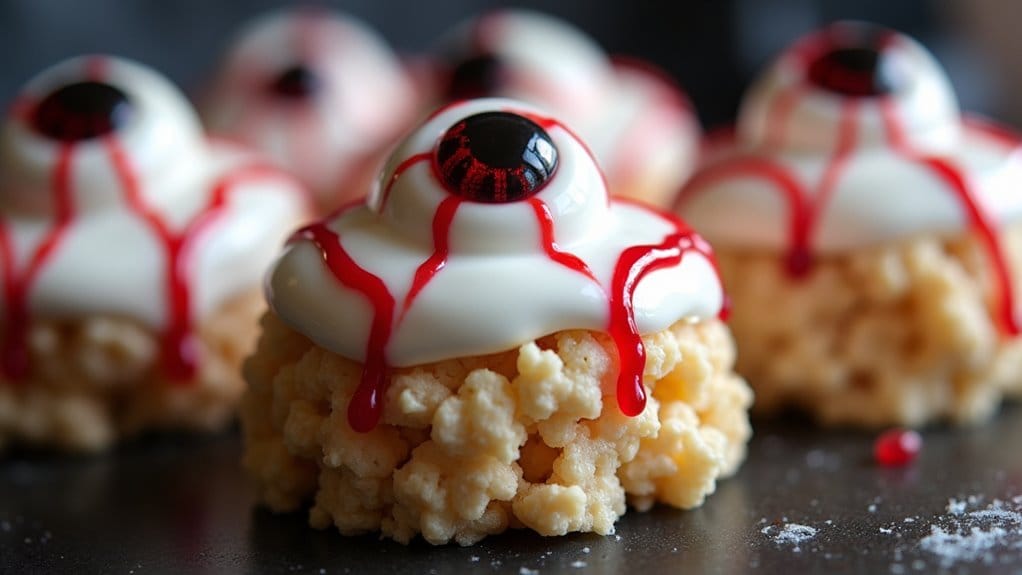
Eyeball Rice Krispie Treats
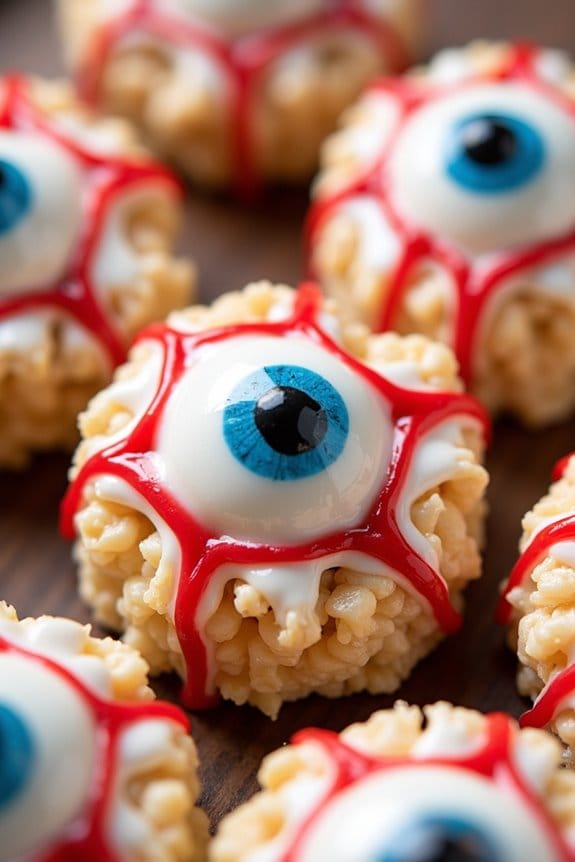
Eyeball Rice Krispie Treats are a spooky twist on the classic treat, perfect for Halloween festivities. These delicious and creepy snacks are sure to be a hit at any Halloween party or gathering. With their gooey marshmallow base and eerie candy eyeball decoration, they’re both fun to make and delightful to eat. The combination of the crunchy rice cereal and the sticky sweetness of the melted marshmallows creates a texture that’s loved by both kids and adults alike.
Creating these Eyeball Rice Krispie Treats is a simple process that involves only a few ingredients and minimal cooking time. This makes them an ideal choice for those looking to whip up a last-minute Halloween treat that doesn’t compromise on creativity or flavor. The recipe yields enough to serve 4-6 people, making it perfect for small parties or family gatherings.
With just a bit of imagination and a few simple steps, you can transform ordinary ingredients into a festive and frightening snack that captures the Halloween spirit.
Ingredients (serving size for 4-6 people):
- 4 cups of Rice Krispies cereal
- 3 tablespoons of unsalted butter
- 1 package (10 oz) regular marshmallows or 4 cups mini marshmallows
- 1 teaspoon vanilla extract
- Candy eyeballs
- Red gel icing
Cooking Instructions:
- Prepare the Pan: Lightly grease a 9×13 inch baking pan with butter or non-stick spray and set aside. This will prevent the treats from sticking to the pan.
- Melt the Butter and Marshmallows: In a large saucepan, melt the butter over low heat. Once melted, add the marshmallows and stir continuously until they’re completely melted and combined with the butter. Remove from heat and stir in the vanilla extract.
- Combine with Cereal: Add the Rice Krispies cereal to the marshmallow mixture. Stir until the cereal is evenly coated with the marshmallow mixture.
- Press into the Pan: Pour the mixture into the prepared baking pan. Using a buttered spatula or wax paper, press the mixture evenly into the pan. Work quickly as the mixture will begin to harden as it cools.
- Decorate: Before the mixture fully sets, press candy eyeballs onto the surface of the treats to create the appearance of eyeballs. Use red gel icing to add veins around the eyes for a more realistic and spooky effect.
- Cool and Serve: Allow the treats to cool completely in the pan. Once set, cut into squares or rectangles and serve.
Extra Tips:
For a more colorful and festive appearance, consider using food coloring to tint the melted marshmallow mixture before adding the cereal. You can also add a few drops of green or purple food coloring to make the treats more Halloween-themed.
If you’re making these treats in advance, store them in an airtight container to keep them fresh. When pressing the mixture into the pan, a bit of butter on your hands or spatula will help prevent sticking. Enjoy your spooky creations!
