

Halloween is just around the corner, and I am so excited to share some spooktacular treats that your guests will adore. From Monster Eyeball Cookies that gaze right back at you, to Mummy Jalapeño Poppers with a fiery twist, there’s a little bit of magic for everyone. Picture the fun of whipping up Vampire Blood Salsa and the laughter that comes with serving Ghostly Popcorn Balls. Ready to enchant your party menu with these frightfully delicious recipes? Let’s get started and create some unforgettable kitchen magic together!
Monster Eyeball Cookies
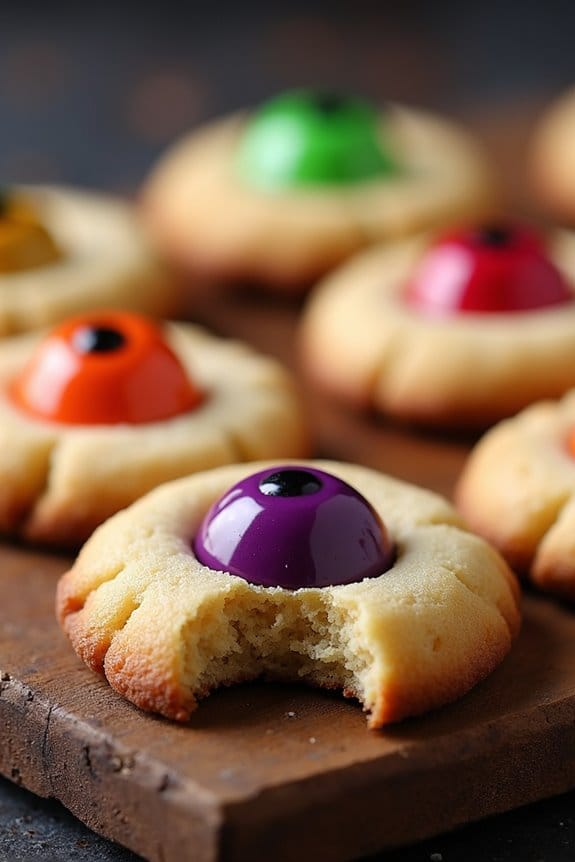
Monster Eyeball Cookies are a spooktacular treat perfect for adding a fun and creepy flair to your Halloween party. These cookies not only look delightfully eerie but also taste deliciously sweet and buttery, making them a hit with both kids and adults. The combination of a soft cookie base with a gooey, colorful candy center creates an eye-catching effect that will have your guests reaching for seconds.
A spooktacular treat that combines eerie looks with sweet and buttery flavors, perfect for Halloween!
Whether you’re hosting a large Halloween bash or a small gathering, these Monster Eyeball Cookies are certain to make a memorable impression.
The beauty of this recipe lies in its simplicity and the opportunity for creativity. You can customize the colors of the candy centers to match your Halloween theme or your personal preferences. Additionally, these cookies can be prepared in advance, allowing you to focus on other party preparations.
The recipe below will yield approximately 24 cookies, which is perfect for serving 4-6 people depending on how many cookies each person indulges in.
Ingredients:
- 1 cup unsalted butter, softened
- 1 cup granulated sugar
- 1 large egg
- 1 teaspoon vanilla extract
- 2 ½ cups all-purpose flour
- ½ teaspoon baking powder
- ¼ teaspoon salt
- 48 candy eyeballs
- 1 package (about 200g) of assorted colored candy melts (red, green, and purple are recommended)
Cooking Instructions:
- Preheat and Prepare: Preheat your oven to 350°F (175°C). Line two baking sheets with parchment paper and set aside.
- Cream the Butter and Sugar: In a large mixing bowl, cream together the softened butter and granulated sugar until the mixture is light and fluffy. This should take about 3-4 minutes using an electric mixer on medium speed.
- Add Wet Ingredients: Beat in the egg and vanilla extract until they’re well incorporated into the butter-sugar mixture.
- Combine Dry Ingredients: In a separate bowl, whisk together the all-purpose flour, baking powder, and salt. Gradually add this to the wet mixture, blending on low speed just until the dough forms and no dry streaks remain.
- Shape the Cookies: Scoop tablespoon-sized amounts of dough and roll them into balls. Place them on the prepared baking sheets, leaving about 2 inches of space between each dough ball.
- Create Indentations: Use your thumb or the back of a spoon to gently press an indentation into the center of each dough ball. This will be where the candy melt will sit.
- Bake: Place the cookies in the preheated oven and bake for 10-12 minutes, or until the edges are lightly golden. Be careful not to overbake as you want the cookies to remain soft.
- Melt Candy Centers: While the cookies bake, melt the candy melts in separate bowls according to the package instructions. This usually involves microwaving them in 30-second intervals, stirring in between, until smooth.
- Fill Indentations: Once the cookies are baked and slightly cooled, fill each indentation with a small amount of the melted candy. Place a candy eyeball on top of the melted candy, pressing down lightly so it sticks.
- Cool Completely: Allow the cookies to cool completely on a wire rack, letting the candy centers harden before serving.
Extra Tips:
To prevent the cookies from spreading too much while baking, make certain that your baking sheets are cool to the touch before placing the dough on them. If the dough becomes too warm while you’re working with it, chill it in the refrigerator for 15 minutes before baking.
Feel free to experiment with different candy colors and patterns to create unique monster eyeballs. If you’re making these ahead of time, store them in an airtight container to keep them fresh until your Halloween party.
Spooky Spider Deviled Eggs
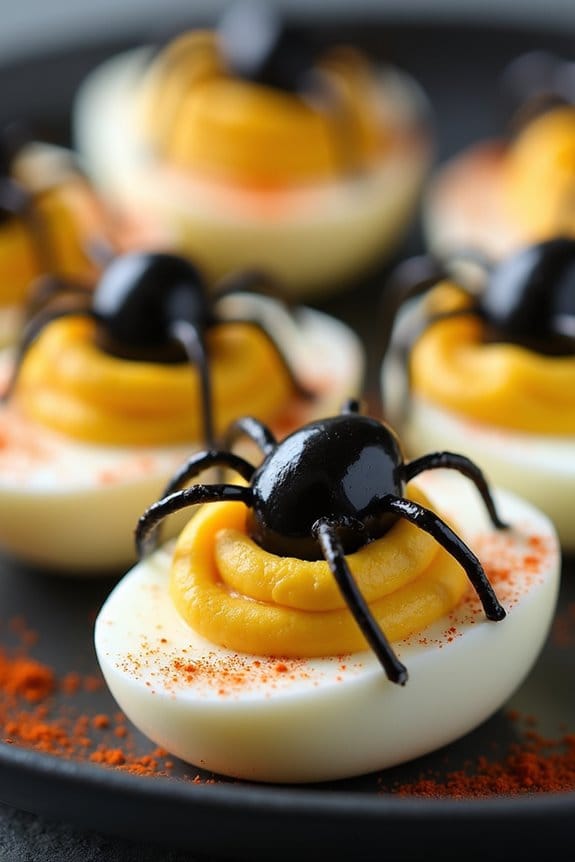
Spooky Spider Deviled Eggs are a fun and creepy addition to your Halloween party spread, certain to thrill your guests with their eerie presentation and savory taste. These deviled eggs aren’t only easy to make, but they’re also a crowd-pleaser with their classic creamy filling topped with black olive spider decorations.
They offer a perfect balance of flavor and festivity, making them a must-have for any Halloween gathering. The unique spider design on each egg adds a whimsical touch, transforming ordinary deviled eggs into a spooktacular treat!
To make a serving size of 4-6 people, you’ll need the following ingredients, guaranteeing you have everything on hand to create these delightful spooky snacks. The recipe is simple enough for even a novice cook to master, and the results are sure to impress both young and old alike.
With just a few basic ingredients and some creative flair, you can whip up these Spooky Spider Deviled Eggs in no time.
Ingredients:
- 6 large eggs
- 3 tablespoons mayonnaise
- 1 teaspoon Dijon mustard
- 1 teaspoon apple cider vinegar
- Salt and pepper to taste
- Paprika for garnish
- 16-20 black olives (pitted)
Instructions:
- Boil the Eggs: Place the eggs in a medium saucepan and cover them with cold water. Bring the water to a boil over medium-high heat. Once boiling, turn off the heat, cover, and let the eggs sit for 10-12 minutes.
- Cool and Peel: Drain the hot water and transfer the eggs to a bowl of ice water to cool for about 5 minutes. Once cool, gently tap the eggs on a hard surface and peel them under running water to help remove the shells easily.
- Prepare the Filling: Slice the eggs in half lengthwise and carefully remove the yolks, placing them into a small bowl. Add the mayonnaise, Dijon mustard, apple cider vinegar, salt, and pepper to the yolks. Mash everything together with a fork until smooth and creamy.
- Fill the Egg Whites: Spoon or pipe the yolk mixture back into the hollowed-out egg whites, dividing the filling evenly among them.
- Create the Spiders: Slice the black olives in half. Use one half for the spider body by placing it on top of the filled egg. Slice the remaining half into thin strips to form the legs. Position 4 strips on each side of the olive body to resemble spider legs.
- Garnish: Lightly sprinkle paprika over the filled eggs for added color and flavor.
Extra Tips:
When making Spooky Spider Deviled Eggs, consider using a piping bag with a large star tip for a more professional look when filling the egg whites. If you don’t have a piping bag, a simple plastic bag with the corner snipped off will work just fine.
Additionally, to guarantee the eggs are easier to peel, use eggs that are a few days old rather than fresh ones. Finally, if you want to add a bit more flavor, consider incorporating a dash of hot sauce or a pinch of smoked paprika into the yolk mixture. Enjoy the spooky fun!
Ghostly Popcorn Balls

If you’re planning a Halloween party and are in need of a spooky yet delicious treat, search no further than Ghostly Popcorn Balls! These whimsical snacks aren’t only fun to make but also a delightful treat for guests of all ages.
The light and crunchy popcorn balls are brought to life with the addition of mini marshmallows and a hint of vanilla, creating a treat that’s both eerie and enticing. Perfect for both kids and adults, these ghostly goodies are sure to be a hit at your Halloween bash.
Crafting Ghostly Popcorn Balls is a simple and enjoyable process, making it an excellent activity to involve the whole family. The blend of buttery popcorn coated in a sweet marshmallow mixture is irresistible, while the spooky ghostly shape adds a festive touch to your party table.
A fun family activity, crafting Ghostly Popcorn Balls delights with its sweet marshmallow-coated popcorn and spooky festive flair.
With just a few ingredients and a bit of creativity, you can transform ordinary popcorn into a hauntingly delicious masterpiece. Let’s explore the ingredient list and cooking instructions to make these delightful snacks for 4-6 people.
Ingredients:
- 10 cups popped popcorn
- 1/4 cup unsalted butter
- 3 cups mini marshmallows
- 1/2 teaspoon vanilla extract
- 1/4 teaspoon salt
- Candy eyes or chocolate chips (for decoration)
Cooking Instructions:
- Prepare the Popcorn: Start by popping your popcorn if it isn’t already popped. Confirm you have about 10 cups. Remove any unpopped kernels to avoid any unpleasant surprises while eating.
- Melt the Butter: In a large pot or saucepan, melt the 1/4 cup of unsalted butter over medium heat. Stir occasionally to prevent burning.
- Add Marshmallows: Once the butter is fully melted, add 3 cups of mini marshmallows to the pot. Stir continuously until the marshmallows are completely melted and smooth.
- Add Vanilla and Salt: Remove the pot from heat and quickly stir in 1/2 teaspoon of vanilla extract and 1/4 teaspoon of salt. Mix until well combined.
- Combine Popcorn and Marshmallow Mixture: Pour the melted marshmallow mixture over the popped popcorn in a large mixing bowl. Use a spatula or wooden spoon to gently fold the mixture until the popcorn is evenly coated.
- Shape the Popcorn Balls: Allow the mixture to cool slightly so it’s easier to handle. Grease your hands with a bit of butter and form the popcorn into small balls, about the size of a tennis ball. Work quickly before the mixture sets.
- Decorate: While the popcorn balls are still slightly sticky, press candy eyes or chocolate chips into each ball to create ghostly faces. Allow the popcorn balls to set fully at room temperature for about 30 minutes before serving.
Extra Tips:
When shaping the popcorn balls, it’s crucial to work swiftly to prevent the marshmallow mixture from hardening too quickly.
If the mixture becomes too sticky to handle, a light coating of butter or cooking spray on your hands can make shaping easier. Additionally, get creative with the decorations; you might use other types of candy to give each ghost its own unique expression.
Store any leftovers in an airtight container to keep them fresh for a few days. Enjoy your spooky treat and happy haunting!
Mummy Jalapeño Poppers

Mummy Jalapeño Poppers are a spooky and delicious treat that will bring a touch of frightful fun to your Halloween party. These savory snacks are a creative twist on traditional jalapeño poppers, wrapped in crescent roll dough to resemble little mummies. With a creamy, cheesy filling and a hint of heat from the jalapeños, they’re bound to be a hit with your guests.
The best part is, they’re easy to make and can be prepared ahead of time, allowing you to enjoy the festivities without being stuck in the kitchen.
Whether you’re hosting a Halloween bash or just want to add some festive flair to your snack table, these Mummy Jalapeño Poppers are the perfect choice. They not only look adorable but also pack a delightful punch of flavor. Serve them up with a side of ranch or your favorite dipping sauce, and watch them disappear faster than a ghost in the night.
Let’s get started on making these deliciously spooky treats for a serving size of 4-6 people.
Ingredients:
- 12 fresh jalapeños
- 8 oz cream cheese, softened
- 1 cup shredded cheddar cheese
- 1/2 teaspoon garlic powder
- 1/4 teaspoon salt
- 1/4 teaspoon black pepper
- 1 tube crescent roll dough
- 24 small candy eyeballs
Cooking Instructions:
- Preheat Oven: Start by preheating your oven to 400°F (200°C). Line a baking sheet with parchment paper to prevent sticking.
- Prepare Jalapeños: Slice each jalapeño in half lengthwise and remove the seeds and membranes. This will help reduce the heat; however, if you prefer them spicier, you can leave some seeds in.
- Make Filling: In a medium bowl, mix together the softened cream cheese, shredded cheddar cheese, garlic powder, salt, and black pepper until smooth and well combined.
- Stuff Jalapeños: Use a spoon to fill each jalapeño half with the cheese mixture, pressing it in slightly to guarantee it’s well packed.
- Wrap with Dough: Unroll the crescent roll dough and cut it into thin strips. Wrap each stuffed jalapeño half with the dough strips, leaving a small gap to insert the candy eyeballs after baking.
- Bake: Place the wrapped jalapeños on the prepared baking sheet. Bake in the preheated oven for 12-15 minutes, or until the dough is golden brown and cooked through.
- Add Eyes: Once baked, remove the poppers from the oven and allow them to cool slightly. Gently press two candy eyeballs into each popper where the gaps are left.
Extra Tips:
When working with jalapeños, it’s a good idea to wear gloves to protect your skin from the pepper’s oils, which can cause irritation.
If you prefer a milder flavor, consider using mini sweet peppers instead of jalapeños. Additionally, you can make the cheese filling a day in advance and store it in the refrigerator, allowing you to assemble the poppers quickly on the day of your event.
Keep an eye on the baking time, as ovens may vary, and you want to make sure the crescent dough is perfectly golden without burning.
Witch’s Brew Punch

Witch’s Brew Punch is the perfect spooky beverage to enchant your Halloween party guests. This deliciously eerie concoction is a vibrant green punch that not only looks the part but also tastes invigoratingly delightful. With a blend of fruity flavors and a hint of fizz, this punch will have your guests coming back for more.
A bewitching green punch that delights with its fruity fizz, perfect for enchanting Halloween guests.
Whether you’re hosting a gathering of witches and wizards or a haunted house party, Witch’s Brew Punch will add a magical touch to your celebration.
This punch is simple to make and can be easily prepared ahead of time, allowing you to focus on other party preparations. It’s kid-friendly, but for an adult-only version, you can add a splash of your favorite spirit to give it an extra kick.
Served in a cauldron or a large punch bowl and garnished with spooky decorations, Witch’s Brew Punch will be a showstopper at any Halloween event.
Ingredients (serving size: 4-6 people):
- 4 cups of lemon-lime soda
- 2 cups of pineapple juice
- 1 cup of lime sherbet
- 1 cup of orange juice
- 1/2 cup of grenadine
- 1 lime, sliced
- Green food coloring (optional)
- 1 cup of crushed ice
- Optional: gummy worms, candy eyeballs for garnish
Cooking Instructions:
- Prepare the Base: In a large punch bowl or cauldron, combine the lemon-lime soda, pineapple juice, and orange juice. Stir the mixture gently to blend the flavors.
- Add the Sherbet: Scoop the lime sherbet into the punch bowl, allowing it to float on top. As it melts, it will create a frothy, mystical layer.
- Create the Color: Stir in the grenadine for a hint of blood-red color. If you desire a more vibrant green hue, add a few drops of green food coloring and stir well to achieve the desired shade.
- Chill the Punch: Add the crushed ice to the mixture to keep it cool and invigorating. Stir gently to incorporate the ice throughout the punch.
- Garnish and Serve: Float lime slices on top for a decorative touch. For a spooky effect, add gummy worms or candy eyeballs. Serve in clear glasses to showcase the punch’s eerie color.
Extra Tips:
For an extra chilling effect, consider freezing some gummy worms in ice cubes a day before the party and adding them to the punch. This not only keeps the punch cool but enhances the spooky theme.
If you’re serving adults, consider adding a splash of vodka or rum for a spirited version. Keep a ladle handy for serving, and provide your guests with themed straws or cups to add to the Halloween ambiance.
If you want to keep the punch from getting too diluted, serve the ice in cups rather than adding too much to the punch bowl.
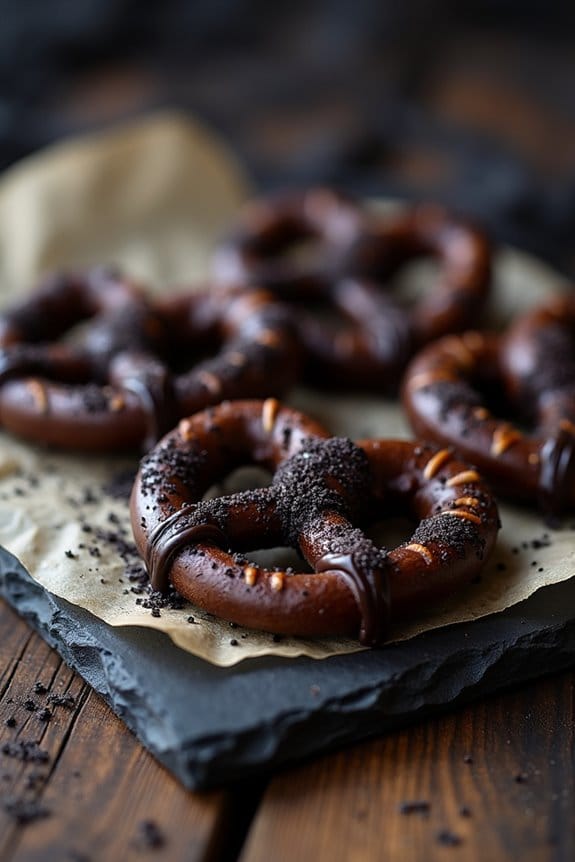
Bat Wing Pretzels
Are you looking for a fun and spooky snack to serve at your Halloween party? Seek no further than these Bat Wing Pretzels! This delicious and whimsical treat isn’t only easy to make but also a perfect addition to your Halloween festivities.
With just a few simple ingredients, you can transform ordinary pretzels into something spectacular. The dark, salty crunch of these Bat Wing Pretzels will captivate both kids and adults alike, making them an instant hit at your gathering.
These Bat Wing Pretzels are perfect for a serving size of 4-6 people, making sure everyone gets a taste of the Halloween spirit. The recipe involves coating pretzels with a rich, dark chocolate glaze and sprinkling them with black sanding sugar for a spooky, wing-like appearance.
Whether you’re hosting a haunted house or a cozy get-together, these pretzels are sure to become a festive favorite. So gather your ingredients and get ready to create a memorable treat for your guests!
Ingredients:
- 24 large pretzel twists
- 1 cup semisweet chocolate chips
- 1 tablespoon coconut oil
- Black sanding sugar
- 1/2 teaspoon vanilla extract
- Parchment paper
Cooking Instructions:
- Prepare the Work Area: Line a baking sheet with parchment paper. This will be where you place your chocolate-coated pretzels to set.
- Melt the Chocolate: In a microwave-safe bowl, combine the semisweet chocolate chips and coconut oil. Microwave in 30-second intervals, stirring after each, until the chocolate is fully melted and smooth. Stir in the vanilla extract for added flavor.
- Coat the Pretzels: Dip each pretzel twist into the melted chocolate, ensuring it’s evenly coated. Use a fork to lift the pretzel out of the chocolate and gently tap it on the edge of the bowl to remove excess chocolate.
- Add the Sanding Sugar: Place the chocolate-coated pretzels onto the parchment-lined baking sheet. Immediately sprinkle each pretzel with black sanding sugar to mimic the appearance of bat wings.
- Set the Pretzels: Allow the pretzels to sit at room temperature for about 15 minutes or until the chocolate hardens. For quicker setting, you can place the baking sheet in the refrigerator for 5-10 minutes.
- Serve and Enjoy: Once the chocolate is fully set, your Bat Wing Pretzels are ready to be served. Arrange them on a festive platter and watch your guests enjoy this fun Halloween snack!
Extra Tips:
For an extra touch of Halloween magic, consider adding a few drops of black food coloring to the melted chocolate to deepen the color before coating the pretzels.
If you’re hosting a larger party, feel free to double or triple the recipe to accommodate more guests. Additionally, these pretzels can be made a day in advance and stored in an airtight container at room temperature, making them a convenient option for party planning.
Pumpkin Cheese Ball
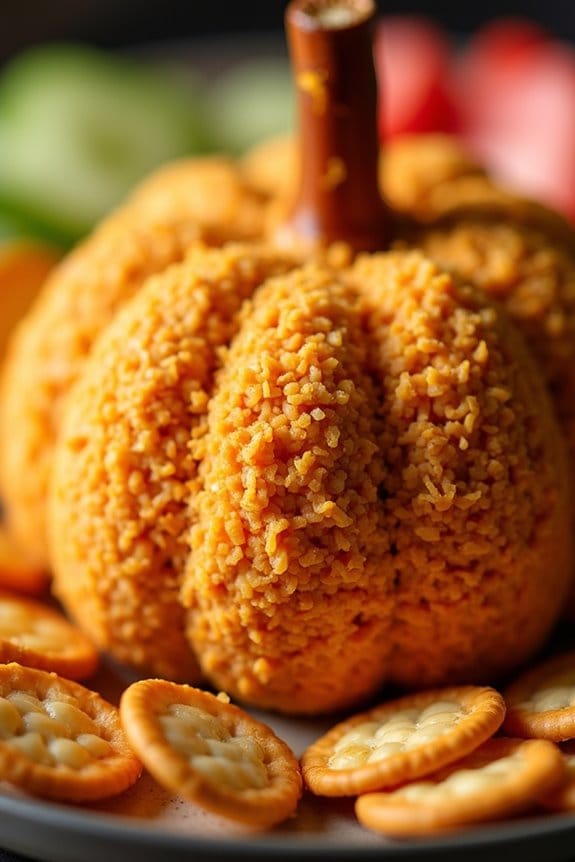
Searching to impress your guests with a festive and delicious appetizer at your Halloween party? Seek no further than the Pumpkin Cheese Ball. This creative dish not only brings all the flavors of fall to your table but also adds a touch of whimsy with its pumpkin-like appearance. Perfectly creamy and packed with delightful seasonings, this cheese ball will be the star of your spooky spread.
Whether you’re hosting a small gathering or a larger bash, this recipe serves 4-6 people, making it ideal for sharing. The Pumpkin Cheese Ball is a versatile snack that pairs well with a variety of dippers, such as crackers, pretzels, or sliced vegetables. The combination of cream cheese, cheddar, and spices creates a rich and flavorful treat that will have your guests coming back for more.
To enhance the festive theme, the cheese ball is shaped to resemble a pumpkin and can be garnished with a pretzel stick or a real pumpkin stem for an authentic appearance. With this recipe, you can easily add a touch of Halloween magic to your party table.
Ingredients (serving size: 4-6 people):
- 16 oz cream cheese, softened
- 2 cups shredded sharp cheddar cheese
- 1 tablespoon Worcestershire sauce
- 1 teaspoon garlic powder
- 1 teaspoon onion powder
- 1/2 teaspoon paprika
- 1/4 teaspoon cayenne pepper (optional, for heat)
- 1/4 cup finely chopped green onions
- 1 cup crushed nacho-flavored tortilla chips
- 1 pretzel rod or real pumpkin stem for decoration
Cooking Instructions:
- Prepare the Cheese Mixture: In a large mixing bowl, combine the softened cream cheese, shredded cheddar cheese, Worcestershire sauce, garlic powder, onion powder, paprika, and cayenne pepper. Use an electric mixer on medium speed to blend the ingredients until smooth and well combined.
- Add Green Onions: Gently fold in the chopped green onions using a spatula. This will add a fresh and slightly tangy flavor to the cheese ball, enhancing its overall taste.
- Shape the Cheese Ball: Lay a large piece of plastic wrap on your work surface. Transfer the cheese mixture onto the plastic wrap and form it into a ball shape. Wrap it tightly, making sure it’s well compressed to hold the shape.
- Chill the Cheese Ball: Refrigerate the wrapped cheese ball for at least 2-3 hours or until it’s firm. This step is essential to guarantee the ball holds its shape and allows the flavors to meld together.
- Coat with Chips: Once the cheese ball is firm, remove it from the fridge and unwrap it. Roll the cheese ball in the crushed tortilla chips until it’s evenly coated on all sides. The chips will add a crunchy texture and a hint of extra flavor.
- Decorate: Insert the pretzel rod or pumpkin stem into the top of the cheese ball to mimic a pumpkin stem. For an authentic pumpkin appearance, you can use a dull knife to create vertical indentations around the cheese ball, resembling pumpkin ridges.
- Serve: Place the completed cheese ball on a serving platter along with an assortment of dippers like crackers, pretzels, or vegetable sticks. Enjoy!
Extra Tips:
When crafting your Pumpkin Cheese Ball, make sure the cream cheese is thoroughly softened before mixing; this will make the blending process smoother and prevent any lumps. If you prefer a spicier kick, feel free to adjust the cayenne pepper to your taste.
For a personalized touch, consider adding other mix-ins like chopped nuts or dried cranberries. Remember to chill the cheese ball thoroughly as it helps in maintaining the shape and enhances the overall flavor. If you’re short on time, you can prepare the cheese ball a day in advance and keep it refrigerated until your party.
Enjoy creating this delightful and festive dish that will surely be a hit at your Halloween gathering!
Vampire Blood Salsa
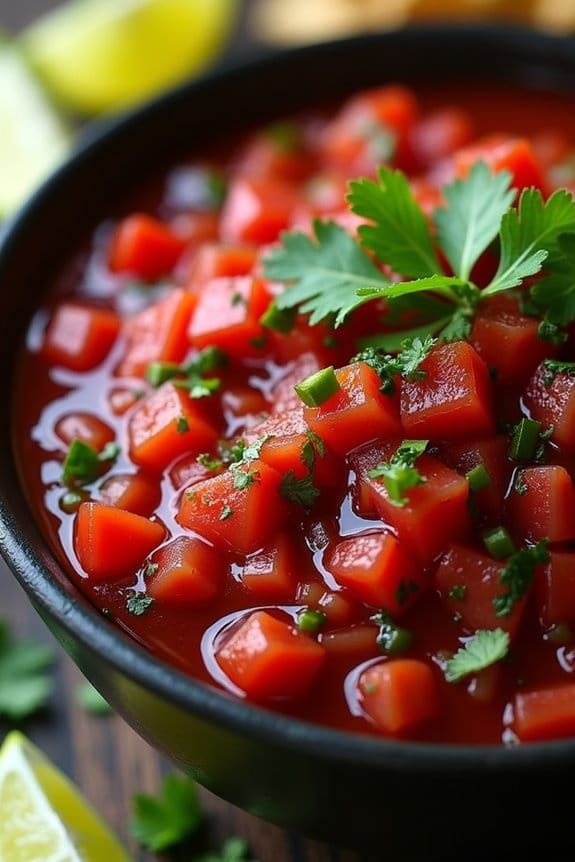
Are you seeking a spooky yet delicious addition to your Halloween party menu? Search no further than Vampire Blood Salsa! This vibrant and tangy salsa will add a ghoulish twist to your snack table, delighting your guests with its eerie blood-red appearance and deliciously fresh flavors. Perfect for dipping with chips or adding a chilling touch to tacos and burritos, this salsa is sure to be a hit at your haunted gathering.
Vampire Blood Salsa combines the richness of ripe tomatoes with fiery jalapeños, sweet red peppers, and a splash of lime juice for a zesty kick. The deep red color isn’t only visually striking but also a feast for the taste buds. This recipe is simple to prepare, allowing you to focus on other party preparations while still serving up a dish that will have everyone talking. With a serving size that caters to 4-6 people, this salsa is perfect for small gatherings or as an accompaniment to your Halloween feast.
A vibrant, tangy salsa that’ll be the talk of your Halloween party! Perfect for small gatherings.
Ingredients (for 4-6 people):
- 4 large ripe tomatoes
- 1 medium red bell pepper
- 1 small red onion
- 2 cloves of garlic
- 1-2 jalapeño peppers (depending on desired spice level)
- 1/4 cup fresh cilantro leaves
- 1 lime
- 1 tablespoon olive oil
- Salt to taste
- Freshly ground black pepper to taste
Cooking Instructions:
- Prepare the Ingredients:
- Begin by washing all the fresh produce thoroughly. Dice the tomatoes and red bell pepper into small, even pieces. This guarantees that every bite of salsa has a balanced flavor.
- Finely chop the red onion and garlic cloves. The smaller the pieces, the more they’ll blend into the salsa, providing a subtle yet essential flavor.
- Depending on your preferred spice level, deseed and finely dice the jalapeño peppers. Remember to wash your hands thoroughly after handling the peppers to avoid irritation.
- Mix the Salsa:
- In a large mixing bowl, combine the diced tomatoes, red bell pepper, red onion, garlic, and jalapeños. Stir well to guarantee all ingredients are evenly distributed.
- Add the chopped cilantro leaves, which will add a fresh and slightly citrusy flavor to your salsa.
- Add the Finishing Touches:
- Squeeze the juice of one lime over the salsa mixture. Lime juice adds acidity, balancing the sweetness of the tomatoes and peppers.
- Drizzle the olive oil over the salsa. This brings all the flavors together and adds a slight richness to the dish.
- Season with salt and freshly ground black pepper to taste. Mix everything thoroughly, guaranteeing the lime juice and olive oil coat all ingredients evenly.
- Chill and Serve:
- For the best flavor, cover the bowl with a lid or plastic wrap and refrigerate for at least 30 minutes. This allows the flavors to meld together.
- Before serving, give the salsa a final stir, taste for seasoning adjustments, and transfer it to a serving dish.
Extra Tips:
For an even more authentic “blood” appearance, consider using heirloom tomatoes or a mix of different red tomato varieties to enhance the color and depth of the salsa.
If you prefer a smoother texture, you can pulse the ingredients in a food processor for a few seconds. Just be careful not to over-process to maintain a chunky consistency.
Additionally, you can customize the heat level by adjusting the amount and type of peppers used. If you want to add a smoky flavor, consider using smoked paprika or chipotle peppers.
With these variations, your Vampire Blood Salsa can suit any palate, making it a versatile and crowd-pleasing party dish.
Frankenstein Marshmallow Pops
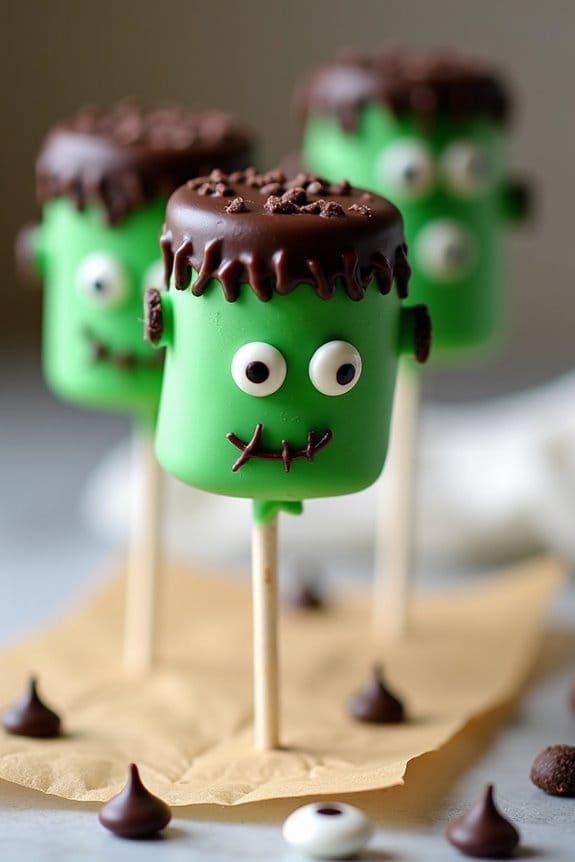
This Halloween, treat your party guests to a spooky delight with these Frankenstein Marshmallow Pops. These playful yet delicious treats are perfect for adding a touch of frightful fun to your Halloween spread. With their green marshmallow heads, chocolate hair, and adorable candy eyes, these pops aren’t only easy to make but also a hit with both kids and adults alike.
They make a great addition to any Halloween party menu, offering a creative and tasty way to celebrate the spookiest time of the year. Crafting these Frankenstein Marshmallow Pops involves a few simple steps and ingredients that come together to make a memorable and eye-catching treat.
You’ll need large marshmallows, green candy melts, lollipop sticks, and a few more decorative items to complete your Franken-creations. The beauty of this recipe is in its simplicity and adaptability, allowing you to customize the details to suit your personal style. Whether you’re hosting a large gathering or an intimate get-together, these pops will surely be a monstrous hit!
Ingredients (Serves 4-6):
- 12 large marshmallows
- 12 lollipop sticks
- 1 cup green candy melts
- 1/2 cup mini chocolate chips
- 24 candy eyes
- 1/4 cup black decorating gel
- 1/4 cup white chocolate chips
- 1 tablespoon vegetable oil
Cooking Instructions:
- Prepare the Marshmallows: Insert a lollipop stick into each marshmallow, ensuring they’re stable and secure.
- Melt the Candy: In a microwave-safe bowl, combine the green candy melts with the vegetable oil. Heat in the microwave in 30-second intervals, stirring after each, until fully melted and smooth.
- Coat the Marshmallows: Dip each marshmallow into the melted green candy, ensuring it’s fully coated. Allow any excess to drip back into the bowl. Place on a sheet of parchment paper to set.
- Create Frankenstein’s Hair: Once the green coating has set, melt the white chocolate chips in a similar manner as the green candy melts. Dip the top of each marshmallow into the melted white chocolate and then immediately press mini chocolate chips into the chocolate to form Frankenstein’s hair.
- Add the Face: Using the black decorating gel, draw a mouth and any other desired facial features on each marshmallow. Attach two candy eyes to complete the face.
- Let it Set: Allow the pops to set completely at room temperature or in the refrigerator for faster results.
Extra Tips:
For an added twist, you can flavor the marshmallows with mint or vanilla extract before coating them in green candy melts. If you want to make your Frankenstein Pops even more unique, consider using colored candy melts for the hair or experimenting with different expressions for the faces.
These pops can be made a day in advance and stored in an airtight container, making them an excellent option for pre-party preparation. With these simple tips, your Frankenstein Marshmallow Pops will be the star of your Halloween celebration!
Creepy Crudité Platter
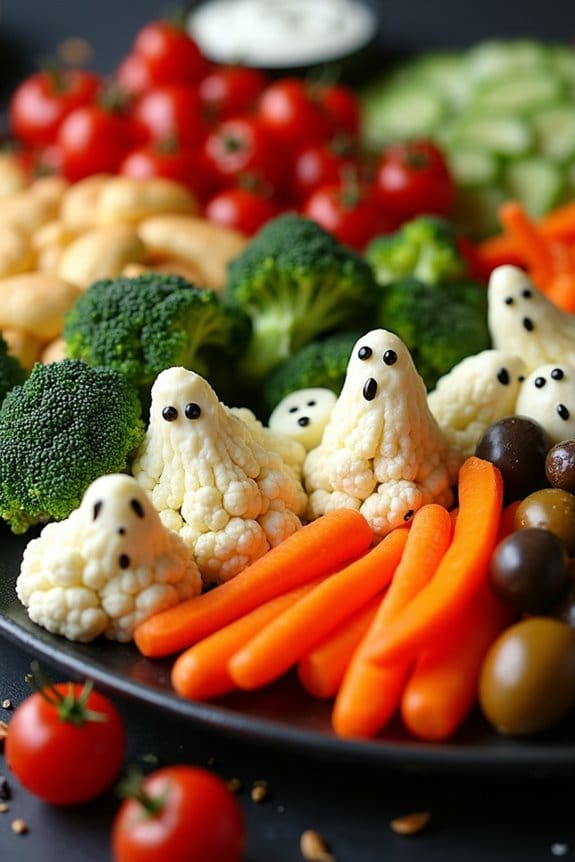
This Halloween, delight your party guests with a Creepy Crudité Platter that’s as spooky as it’s delicious. This platter is a fun and festive way to serve fresh vegetables and dip, all styled to mimic spooky creatures and eerie landscapes. With a little creativity and some simple ingredients, you can turn ordinary veggies into ghoulish delights that will have everyone reaching for a healthy snack amidst the candy and sweets.
Crafting the perfect Creepy Crudité Platter involves selecting a variety of colorful vegetables that not only taste great but also add visual appeal. The key is in the presentation—arranging the vegetables to resemble creepy forms or spooky scenes. Pair these veggies with a delicious dip, such as a tangy ranch or creamy hummus, and you’ll have a platter that’s both fun and nutritious. Let’s explore the ingredients and steps needed to create this spook-tacular dish for a serving size of 4-6 people.
Select vibrant veggies and craft spooky scenes. Pair with dips for a fun and nutritious Halloween treat!
Ingredients:
- 1 cup baby carrots
- 1 cup cherry tomatoes
- 1 cup broccoli florets
- 1 cup cucumber slices
- 1 cup red bell pepper strips
- 1 cup black olives
- 1 cup cauliflower florets
- 1/2 cup green olives
- 1/2 cup ranch dressing
- 1/2 cup hummus
- 2 tablespoons black sesame seeds
- 1 tablespoon fresh dill, chopped
- 1/2 lemon, juiced
Instructions:
- Prepare the Vegetables: Wash all the vegetables thoroughly. Slice the red bell peppers into strips, cut the cucumber into slices, and break the broccoli and cauliflower into small florets. Keep the cherry tomatoes and baby carrots whole.
- Prepare the Dip: In two small bowls, pour the ranch dressing into one and the hummus into the other. Sprinkle fresh dill into the ranch dressing and stir in the lemon juice into the hummus for added flavor.
- Assemble the Platter: On a large serving platter, start by placing the bowls of dip on opposite sides. Arrange the vegetables around the dips in sections. For a spooky effect, create patterns or shapes like spiders using the olives as eyes on top of cauliflower “bodies” or use broccoli as “trees” in a “haunted forest.”
- Add Finishing Touches: Sprinkle black sesame seeds over the platter for a touch of “dirt” or “bugs,” enhancing the creepy aesthetic. Confirm the platter is balanced in color and shape to make it visually appealing.
- Serve and Enjoy: Present the platter to your guests and enjoy their reactions to the creepy creations. Encourage them to dip the vegetables into the ranch or hummus for a delightful taste experience.
Extra Tips:
For an extra eerie effect, carve mini jack-o’-lantern faces into the cherry tomatoes using a small paring knife. You can also use cookie cutters to shape cucumber slices into ghosts or bats.
If you want to add more variety, consider including other vegetables such as asparagus or snap peas. Remember, the more imaginative you’re with the shapes and arrangements, the spookier your Crudité Platter will be. Keep the platter fresh by refrigerating it until just before serving.
Haunted Haystack Cookies
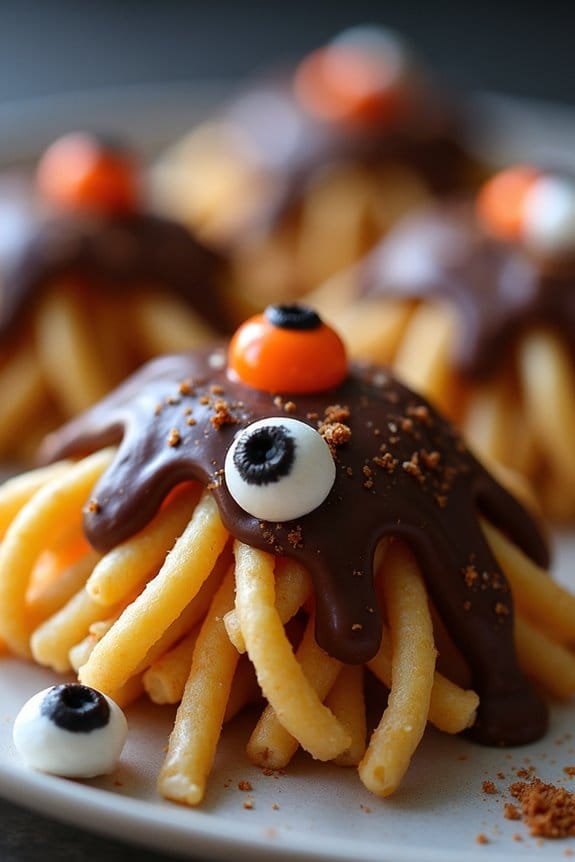
Halloween is the perfect time to get creative with your treats, and Haunted Haystack Cookies are a ghoulishly delightful addition to any spooky celebration. These cookies aren’t only easy to make but also require no baking, making them a convenient option for busy party hosts. With their unique appearance resembling a haunted haystack, these treats are sure to be a hit with both kids and adults.
Haunted Haystack Cookies combine crunchy and sweet ingredients to form a delightful texture that everyone will enjoy. The blend of chocolate and peanut butter coats the crunchy noodles, creating a rich and satisfying flavor profile perfect for the Halloween season. This recipe serves 4-6 people, making it ideal for small gatherings or as part of a larger party spread.
Ingredients:
- 2 cups of chow mein noodles
- 1 cup of semi-sweet chocolate chips
- 1/2 cup of creamy peanut butter
- 1/2 cup of butterscotch chips
- 1/4 cup of mini marshmallows
- 1/4 cup of candy eyeballs
Cooking Instructions:
- Prepare Your Ingredients: Gather all ingredients and line a baking sheet with parchment paper to prepare for the cookies. This will prevent the cookies from sticking and make them easier to remove once set.
- Melt Chocolate and Butterscotch: In a large microwave-safe bowl, combine the chocolate chips, peanut butter, and butterscotch chips. Microwave on medium power in 30-second intervals, stirring in between, until the mixture is smooth and fully melted.
- Combine and Mix: Once the chocolate mixture is melted, add the chow mein noodles and mini marshmallows to the bowl. Gently stir until the noodles and marshmallows are evenly coated with the chocolate mixture.
- Form Haystacks: Using a spoon, drop heaping tablespoonfuls of the mixture onto the prepared baking sheet, forming small stacks that resemble haystacks. Space them about an inch apart to allow for spreading.
- Decorate: Before the haystack cookies set, place candy eyeballs on top of each stack to create a spooky, haunted look. Press them gently into the mixture to make sure they stick.
- Chill to Set: Place the baking sheet in the refrigerator for about 30 minutes or until the cookies are firm and set. This will help the cookies hold their shape and make them easier to handle.
- Serve: Once set, remove the cookies from the parchment paper and arrange them on a serving platter. They’re now ready to delight your party guests!
Extra Tips:
For a nut-free version, substitute the peanut butter with sunflower seed butter or another alternative. If you want to add a little extra flair, drizzle some white chocolate or colored candy melts over the cookies for an added touch of Halloween spirit.
Be sure to store any leftover cookies in an airtight container at room temperature to keep them fresh and crunchy.
Skeleton Bone Breadsticks

Making these Skeleton Bone Breadsticks is a fun kitchen activity that can be done solo or with friends and family. The dough is easy to work with, allowing you to shape each breadstick into a bone, creating a unique and chilling presentation.
Craft spooky bone-shaped breadsticks solo or with loved ones for a chillingly delightful kitchen adventure.
The preparation process involves a few simple steps, and before you know it, you’ll have a tray full of spooky breadsticks ready to serve. Whether you’re hosting a Halloween party or just in the mood for a themed snack, these breadsticks are certain to be a hit.
Ingredients for 4-6 servings:
- 1 packet (2 ¼ teaspoons) active dry yeast
- 1 cup warm water (about 110°F)
- 2 ¾ cups all-purpose flour
- 1 tablespoon sugar
- 1 teaspoon salt
- 2 tablespoons olive oil
- 1 egg, beaten
- 1 teaspoon garlic powder
- ½ teaspoon dried Italian seasoning
- ¼ cup grated Parmesan cheese
Cooking Instructions:
- Activate the Yeast: In a large bowl, dissolve the sugar in warm water. Sprinkle the yeast over the water and let it sit for about 5 minutes, or until it becomes frothy. This indicates that the yeast is active.
- Prepare the Dough: Add the flour, salt, and olive oil to the yeast mixture. Stir until a dough forms. Turn the dough out onto a floured surface and knead for about 5 minutes, until it’s smooth and elastic.
- Let the Dough Rise: Place the dough in a lightly oiled bowl, cover it with a damp cloth, and let it rise in a warm place for about 1 hour, or until it has doubled in size.
- Shape the Breadsticks: Preheat your oven to 375°F (190°C). Punch down the risen dough and divide it into 12 equal pieces. Roll each piece into a log about 6 inches long. Shape each log into a bone by pinching the ends to form knobs.
- Adding Flavor: Place the shaped breadsticks on a baking sheet lined with parchment paper. Brush them with the beaten egg. In a small bowl, mix the garlic powder, Italian seasoning, and Parmesan cheese. Sprinkle this mixture over the breadsticks.
- Bake: Bake the breadsticks in the preheated oven for 15-18 minutes, or until they’re golden brown.
Extra Tips:
For the best results, make sure that all your ingredients are at room temperature, especially the egg and flour. This helps in achieving a consistent dough texture.
If you want to add more flavor, consider incorporating some finely chopped fresh herbs into the dough before kneading. Additionally, you can make these breadsticks ahead of time and reheat them at 350°F for about 5 minutes just before serving to keep them fresh and crispy.
Enjoy these fun and festive treats with your guests!
Jack-o’-Lantern Fruit Cups
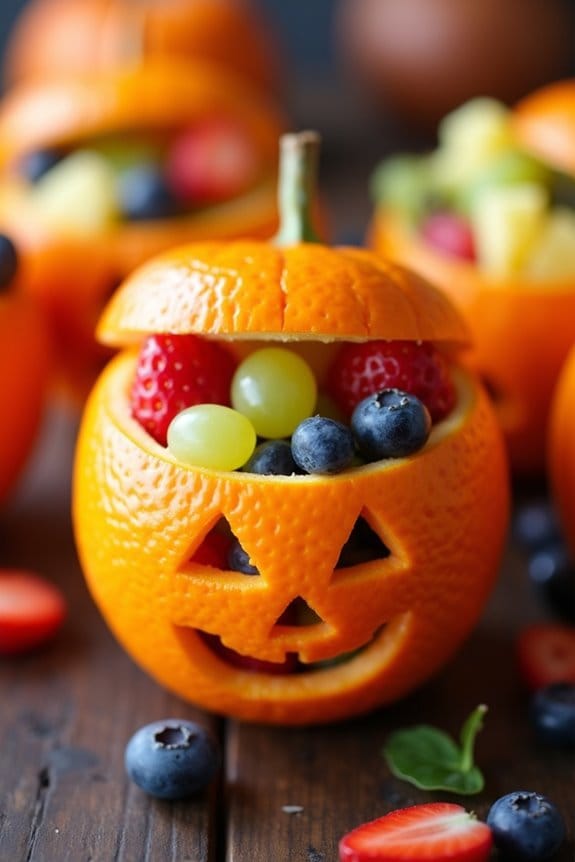
Delight your party guests with these adorable and healthy Jack-o’-Lantern Fruit Cups! Perfect for a Halloween gathering, these cups are both festive and nutritious. The vibrant colors and fun presentation will surely capture everyone’s attention and guarantee your party is a memorable one.
These fruit cups are made by carefully carving out oranges to resemble jack-o’-lanterns and filling them with a medley of fresh fruits. This recipe is simple enough to prepare with kids, making it a fun family activity.
Not only are these Jack-o’-Lantern Fruit Cups a treat for the eyes, but they also provide a revitalizing and light snack option amidst the usual Halloween candies and sweets. They cater to a wide range of dietary preferences, being naturally vegan and gluten-free.
The combination of citrus with assorted fruits offers a burst of flavor that will enchant both adults and children. This recipe serves 4-6 people, making it ideal for small gatherings or as part of a larger dessert spread.
Ingredients (serving size: 4-6 people):
- 6 medium-sized oranges
- 1 cup of diced pineapple
- 1 cup of diced kiwi
- 1 cup of diced strawberries
- 1/2 cup of blueberries
- 1/2 cup of seedless grapes, halved
- Optional: 1 tablespoon of honey or maple syrup
Cooking Instructions:
- Prepare the Oranges: Begin by washing the oranges thoroughly. Use a sharp knife to slice off the top quarter of each orange, which will serve as the lid of your jack-o’-lantern. Carefully scoop out the inside of the oranges using a spoon, being careful not to puncture the rind. Set the orange flesh aside in a bowl.
- Carve the Faces: Using a small paring knife, carve jack-o’-lantern faces into one side of each hollowed-out orange. Be creative with your designs, but be cautious to avoid cutting too large or too close to the edges to maintain the integrity of the cups.
- Prepare the Fruit Filling: In a large mixing bowl, combine the diced pineapple, kiwi, strawberries, blueberries, and grapes. If you prefer a sweeter fruit salad, drizzle with honey or maple syrup and gently toss to coat.
- Assemble the Fruit Cups: Fill each carved orange with the mixed fruit salad, packing it gently to guarantee it’s full but not overflowing. Replace the top of the orange to complete the jack-o’-lantern look.
- Chill and Serve: For best results, chill the fruit cups in the refrigerator for at least 30 minutes before serving. This will allow the flavors to meld together and make the cups more revitalizing.
Extra Tips:
When carving the faces, it’s helpful to sketch your design with a pen or toothpick before using the knife. This will help you visualize the final product and avoid mistakes.
If orange pulp remains after scooping, use it in a fruit smoothie or save it for another recipe. Feel free to customize the fruit filling with seasonal fruits or your favorites.
For a more adult version, consider adding a splash of rum or serving with a side of yogurt dip. Enjoy these delightful treats, and have a spooktacular Halloween!
Zombie Trail Mix

Zombie Trail Mix is the perfect eerie treat to serve at your Halloween party. This snack isn’t only delicious but also visually enchanting, making it a hit among both children and adults. The combination of sweet and salty ingredients, along with a touch of spooky creativity, will surely impress your guests and add a festive touch to your celebration.
Eerie and enchanting, Zombie Trail Mix delights all ages with its sweet, salty, spooky flair.
Serve it in a large bowl or individual bags to make it easy for your guests to grab and enjoy as they mingle through the party.
Creating the perfect Zombie Trail Mix involves selecting a variety of ingredients that offer a delightful mix of textures and flavors. This recipe combines crunchy nuts, sweet candies, and spooky-themed elements to create a harmonious blend that will satisfy any craving.
The best part is that it’s quick and easy to prepare, allowing you to focus on other party preparations. Whether you’re hosting a large gathering or a small get-together, this trail mix recipe is scalable and can be adjusted to suit your needs.
Ingredients (Serving size: 4-6 people):
- 1 cup of pretzel sticks
- 1 cup of roasted peanuts
- 1 cup of candy corn
- 1 cup of dried cranberries
- 1 cup of mini marshmallows
- 1 cup of chocolate candies (M&Ms or similar)
- 1/2 cup of gummy worms
- 1/2 cup of white chocolate chips
Cooking Instructions:
- Prepare the Base: Begin by selecting a large mixing bowl. Add the pretzel sticks and roasted peanuts to the bowl. These will form the crunchy base of your trail mix.
- Add Sweet Elements: Introduce the candy corn and dried cranberries to the mix. This duo adds a sweet and slightly tangy flavor to the trail mix, enhancing the overall taste.
- Incorporate Softness: Toss in the mini marshmallows. Their soft texture provides a pleasant contrast to the crunchy components of the mix.
- Color and Fun: Add the chocolate candies. These not only contribute to the sweetness but also add vibrant colors that make the mix visually appealing.
- Spooky Touch: For a Halloween twist, mix in the gummy worms. These add a fun and spooky element, perfect for your themed party.
- Final Touch: Finish by sprinkling the white chocolate chips over the mix. Their creamy sweetness ties all the flavors together.
- Combine Thoroughly: Use a large spoon to gently mix all the ingredients together, ensuring that they’re evenly distributed.
- Serve: Transfer the Zombie Trail Mix to a decorative bowl or portion it into individual treat bags for easy serving.
Extra Tips:
To enhance the spooky theme, consider using Halloween-themed bowls or bags for serving the trail mix. You can also add a few drops of green or purple food coloring to the white chocolate chips before mixing them in for an extra eerie effect.
If you want to make the mix healthier, substitute some of the candies with more dried fruits or seeds. Additionally, you can easily adjust the quantities of each ingredient to suit your guests’ preferences or dietary restrictions, making this a versatile snack option for any Halloween party.
