
As Halloween draws near, it’s time to stir up some magical kitchen fun that will captivate the little witches and wizards at your celebration. Picture the excitement as they munch on Monster Eyeball Tacos or enjoy Witches’ Broomstick Snacks. The kitchen transforms into a hub of creativity, with each dish becoming more spooktacular than the last. From sweet to savory, there’s a ghoulishly delightful recipe for every palate. Are you ready to create some thrilling treats?
Monster Eyeball Tacos
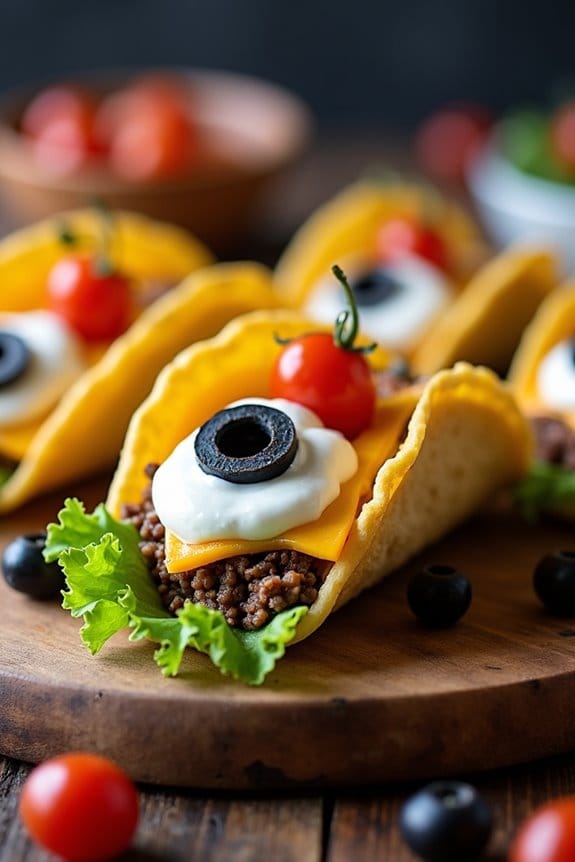
Celebrate Halloween in style with these spooky yet delicious Monster Eyeball Tacos. Perfect for a festive dinner, these tacos combine a traditional Mexican favorite with a creepy twist that will delight kids and adults alike. Each taco features a “monster eyeball,” made from seasoned beef and adorned with an olive slice, giving it an eerie appearance.
This dish isn’t only fun to make but also a great way to get creative in the kitchen with your little ones. These Monster Eyeball Tacos are perfect for a Halloween party or a themed dinner night. The recipe is designed to serve 4-6 people, making it ideal for a small gathering.
A frightfully fun family cooking activity, perfect for Halloween parties or themed dinner nights. Serves 4-6.
With easy-to-follow instructions and readily available ingredients, you’ll have this ghoulish meal ready in no time. Get ready to enjoy a meal that’s as fun as it’s flavorful, and watch as your kids delight in devouring these tasty tacos.
Ingredients:
- 1 pound ground beef
- 1 packet taco seasoning
- 1/4 cup water
- 6-8 taco shells
- 1 cup shredded lettuce
- 1 cup shredded cheddar cheese
- 1/2 cup cherry tomatoes, halved
- 1/2 cup black olives, sliced
- 1/2 cup sour cream
- 1/2 cup guacamole
- 1 small onion, diced
Instructions:
- Preheat the Oven: Begin by preheating your oven to 350°F (175°C) to warm the taco shells.
- Cook the Beef: In a large skillet over medium-high heat, add the ground beef and diced onion. Cook until the beef is browned and the onions are tender, about 7-10 minutes. Drain any excess fat.
- Season the Meat: Add the taco seasoning and water to the beef. Stir well to combine and allow it to simmer for about 5 minutes, or until the mixture thickens.
- Warm the Taco Shells: While the beef simmers, place the taco shells on a baking sheet and warm them in the preheated oven for about 5 minutes.
- Assemble the Tacos: Remove the taco shells from the oven. Fill each shell with a layer of shredded lettuce, a generous scoop of the seasoned beef, and top with shredded cheese.
- Make the Monster Eyeballs: To create the eyeballs, place a dollop of sour cream on top of each taco. Carefully set a sliced black olive on the sour cream to resemble an eyeball. Add a cherry tomato half for a gory effect.
- Serve with Add-Ons: Serve the tacos with a side of guacamole and extra sour cream for dipping.
Extra Tips:
For an added touch of spookiness, you can use food coloring to tint the sour cream a fun color like green or purple. If you want to make the tacos spicier, consider adding some jalapeños or hot sauce to the beef mixture.
Kids can also participate by helping to assemble the tacos and creating their own monster designs, making it a fun family activity.
Witches’ Broomstick Snacks

Bring some magical fun to your Halloween celebrations with these adorable and tasty Witches’ Broomstick Snacks. Perfect for kids and adults alike, these snacks aren’t only easy to make but also add a delightful touch to any Halloween-themed gathering.
With their whimsical appearance and savory flavor, these broomsticks will surely be a hit among your little wizards and witches. They’re a simple combination of pretzel sticks and cheese, designed to resemble miniature broomsticks, making them a quick and delightful snack option.
These Witches’ Broomstick Snacks require minimal ingredients and preparation time, making them a perfect last-minute addition to your Halloween party menu. They’re also a fun activity for kids to assemble, allowing them to get creative in the kitchen.
Whether you’re hosting a party or just looking for a themed snack to enjoy at home, these broomstick snacks will bring a touch of Halloween spirit to your table.
Ingredients (serving size: 4-6 people):
- 12 pretzel sticks
- 6 string cheese sticks
- Fresh chives or thin strips of green onion
Instructions:
- Prepare the Cheese: Start by unwrapping the string cheese sticks. Use a knife to cut each string cheese stick in half, giving you a total of 12 pieces.
- Create the Broom Bristles: Take each half of the string cheese and carefully use your fingers to separate the bottom half into thin strips. This will resemble the bristles of a broom. Be gentle to avoid breaking the cheese.
- Assemble the Broomsticks: Insert a pretzel stick into the unseparated end of the string cheese, pushing gently but firmly to secure it. Confirm the cheese is securely attached to the pretzel stick.
- Tie the Chive: Take a fresh chive or a thin strip of green onion and wrap it around the top of the cheese, just above the separated strips, to resemble the broom’s binding. Tie it into a small knot or simply wrap it around snugly.
- Serve: Arrange your Witches’ Broomstick Snacks on a platter and serve immediately. Enjoy!
Extra Tips:
For added flavor, consider using flavored string cheese such as garlic or herb-infused varieties. If you find that the chives or green onions are hard to tie, you can soften them slightly by soaking them in warm water for a few minutes. This will make them more pliable and easier to work with.
To prevent the cheese from drying out, assemble the broomsticks shortly before serving or keep them covered until ready to eat. These snacks are best enjoyed fresh, so try to make them as close to serving time as possible for the best taste and presentation.
Ghostly Popcorn Balls

Ghostly Popcorn Balls are a spooktacular treat perfect for adding a touch of Halloween magic to your festivities. These delightful snacks combine the crunchy goodness of popcorn with a sweet, gooey coating, all shaped into fun ghostly figures that are sure to be a hit with kids.
Whether you’re hosting a Halloween party or just looking for a fun kitchen activity with your children, Ghostly Popcorn Balls provide a creative and delicious way to celebrate the season.
The process of making Ghostly Popcorn Balls isn’t only simple but also a great opportunity to get the kids involved in the kitchen. With just a few ingredients and a bit of imagination, you can craft these whimsical snacks that are both tasty and entertaining.
Plus, they can be customized with different decorations to give each ghost its own unique personality. Here’s how to make a batch that serves 4-6 people.
Ingredients
- 10 cups popped popcorn
- 1 cup mini marshmallows
- 1/2 cup granulated sugar
- 1/2 cup light corn syrup
- 1/4 cup unsalted butter
- 1 teaspoon vanilla extract
- A pinch of salt
- Black gel icing for decorating
Instructions
- Prepare the Popcorn: Start by popping your popcorn using your preferred method. Once done, place the popcorn in a large mixing bowl, making sure to remove any unpopped kernels.
- Make the Syrup: In a medium saucepan, combine the mini marshmallows, granulated sugar, light corn syrup, butter, and a pinch of salt. Place the saucepan over medium heat and stir continuously until the mixture is smooth and the marshmallows are completely melted.
- Add Vanilla Extract: Remove the saucepan from the heat and stir in the vanilla extract. This will add a lovely aroma and flavor to your popcorn balls.
- Coat the Popcorn: Carefully pour the hot syrup over the popcorn in the mixing bowl. Use a spatula to gently mix until all the popcorn is evenly coated with the syrup.
- Form the Balls: Allow the mixture to cool slightly, so it’s easier to handle. Lightly grease your hands with butter or cooking spray, then shape the coated popcorn into balls, about the size of a golf ball, pressing firmly to hold their shape.
- Decorate: Once the popcorn balls are formed, use black gel icing to draw ghostly faces on each one. Let the icing set for a few minutes before serving.
Extra Tips
When making Ghostly Popcorn Balls, be sure to work quickly after adding the syrup to the popcorn, as it can harden and make shaping difficult.
If the mixture becomes too sticky, lightly greasing your hands again can help. Additionally, for a more festive touch, you can add white chocolate chips or edible glitter to the popcorn before coating it with the syrup.
These additions won’t only enhance the flavor but also add an extra layer of fun to your ghostly creations.
Creepy-Crawly Spider Cookies
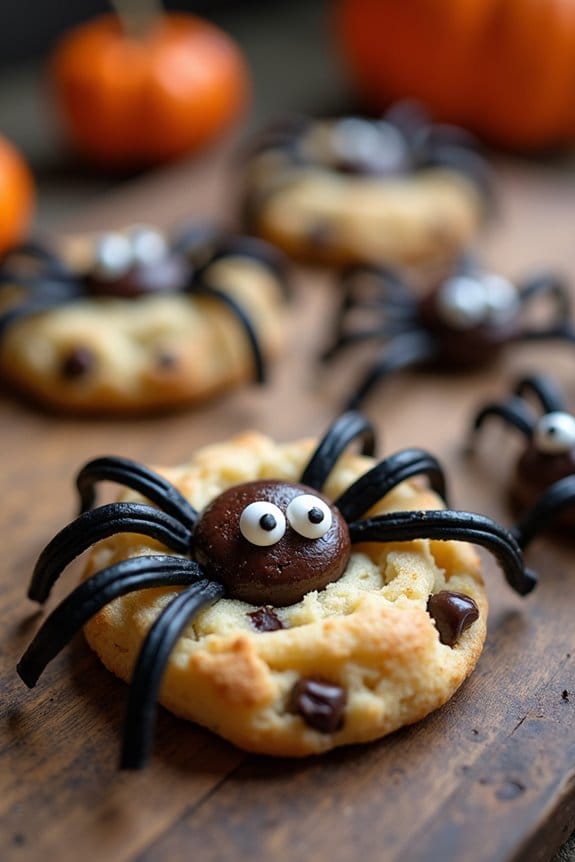
Halloween is the perfect time to get creative in the kitchen, and these Creepy-Crawly Spider Cookies are sure to delight and spook your little ones! This fun and delicious recipe combines classic chocolate chip cookies with a spooky twist, making them the ideal treat for a Halloween party or a fun baking activity with kids.
The cookies are soft and chewy, while the “spider” decorations add a crunchy texture and a ghoulish appearance that will both entertain and satisfy.
These spider cookies aren’t only easy to make but also a fantastic way to involve children in the kitchen. Kids will love forming the cookie dough and adding the final touches to create their edible spiders. With a few ingredients and a little imagination, you can whip up a batch of these tasty treats in no time.
The following recipe is designed to serve 4-6 people, perfect for a small gathering or a family Halloween celebration.
Ingredients:
- 1 cup unsalted butter, softened
- 1 cup granulated sugar
- 1 cup packed brown sugar
- 2 large eggs
- 2 teaspoons vanilla extract
- 3 cups all-purpose flour
- 1 teaspoon baking soda
- 1/2 teaspoon baking powder
- 1/2 teaspoon salt
- 2 cups semi-sweet chocolate chips
- Black licorice, cut into thin strips
- Candy eyes
Instructions:
- Preheat and Prepare: Preheat your oven to 350°F (175°C). Line two baking sheets with parchment paper or silicone baking mats to prevent the cookies from sticking.
- Cream Butter and Sugars: In a large mixing bowl, cream together the softened butter, granulated sugar, and brown sugar until the mixture is light and fluffy. This should take about 2-3 minutes using an electric mixer on medium speed.
- Add Wet Ingredients: Beat in the eggs one at a time, making sure each is fully incorporated before adding the next. Stir in the vanilla extract for flavor.
- Mix Dry Ingredients: In a separate bowl, whisk together the all-purpose flour, baking soda, baking powder, and salt. Gradually add the dry ingredients to the wet mixture, mixing just until combined.
- Fold in Chocolate Chips: Stir in the semi-sweet chocolate chips, distributing them evenly throughout the dough.
- Shape Cookies: Scoop out heaping tablespoons of dough and roll them into balls. Place them on the prepared baking sheets, leaving about 2 inches of space between each ball to allow for spreading.
- Bake: Bake the cookies in the preheated oven for 10-12 minutes, or until the edges are golden brown. The centers should still be soft.
- Create Spider Legs: Immediately after removing the cookies from the oven, push in four pieces of black licorice on each side of the cookie to form the spider legs.
- Add Candy Eyes: Place two candy eyes on the top of each cookie while they’re still warm, gently pressing them into place.
- Cool: Allow the cookies to cool on the baking sheets for 5 minutes before transferring them to a wire rack to cool completely.
Extra Tips:
For the best results, make sure your butter is softened but not melted, as this will help achieve the ideal cookie texture.
When adding the candy eyes, do so while the cookies are warm to make certain they adhere properly. If you don’t have candy eyes, you can use small chocolate chips or icing to make them instead.
To make the cookies even spookier, consider dyeing the dough with a few drops of black food coloring. Enjoy the process and have fun with the decorations — the more whimsical, the better!
Mummy Hot Dogs

Get ready to spook and delight your little monsters this Halloween with a fun and easy treat: Mummy Hot Dogs! These adorable snacks are perfect for a Halloween party or a festive meal at home. Wrapped in crescent dough to mimic the look of ancient mummies, these hot dogs aren’t only visually appealing but also delicious. Kids will love helping out in the kitchen as they wrap the mummies and bring them to life with edible eyes.
Perfect Halloween treat: Mummy Hot Dogs! Adorably spooky, easy to make, and deliciously fun for kids!
The beauty of Mummy Hot Dogs lies in their simplicity. With just a few ingredients and a little creativity, you can whip up a batch in no time. This recipe serves 4-6 people, making it ideal for small gatherings or family dinners. Whether you’re a seasoned chef or a beginner in the kitchen, these mummies are a foolproof way to bring some Halloween magic to your table.
Ingredients (Serves 4-6):
- 1 can refrigerated crescent roll dough
- 8 beef or turkey hot dogs
- 1 large egg, beaten
- Mustard or ketchup (for decoration)
- Optional: candy eyes or small pieces of olives for eyes
Cooking Instructions:
- Preheat the Oven: Start by preheating your oven to 375°F (190°C). This guarantees that the mummies bake evenly and develop a golden crust.
- Prepare the Dough: Open the can of crescent roll dough and separate it into 8 triangles. Use a knife or pizza cutter to slice each triangle into thin strips, about 1/4 inch wide, for wrapping around the hot dogs.
- Wrap the Hot Dogs: Take one hot dog and begin wrapping the dough strips around it, leaving a small gap near one end for the mummy’s face. Criss-cross the strips to create a bandage effect. Repeat with the remaining hot dogs.
- Place on Baking Sheet: Arrange the wrapped hot dogs on a baking sheet lined with parchment paper, making sure they’re evenly spaced.
- Apply Egg Wash: Using a pastry brush, lightly coat each mummy with the beaten egg. This will give them a shiny, golden finish once baked.
- Bake: Place the mummies in the preheated oven and bake for 12-15 minutes, or until the dough is golden brown and cooked through.
- Create the Eyes: Once the mummies have cooled slightly, use mustard or ketchup to dot eyes on each one. If using candy eyes or olive pieces, press them gently into the dough.
- Serve and Enjoy: Your Mummy Hot Dogs are now ready to be devoured! Serve them with extra ketchup or mustard on the side for dipping.
Extra Tips:
To guarantee your Mummy Hot Dogs come out perfectly, make sure not to wrap the dough too tightly around the hot dogs, as this can cause the dough to not cook evenly.
If you have picky eaters, feel free to swap out beef hot dogs for chicken or even veggie dogs. For an extra spooky touch, use different colors of mustard or ketchup to add facial expressions to your mummies.
Enjoy your Halloween feast!
Frankenstein Rice Krispie Treats
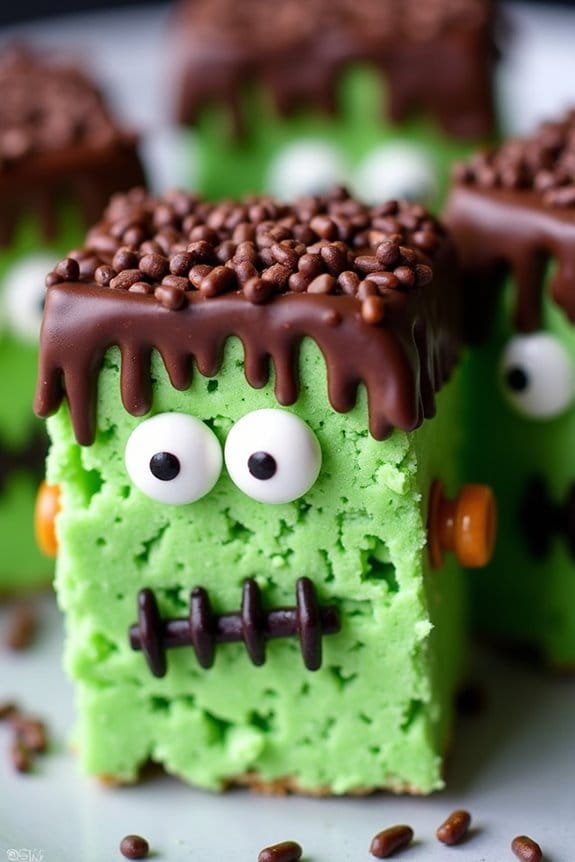
Frankenstein Rice Krispie Treats are a fun, spooky, and delicious way to celebrate Halloween with kids. These treats are sure to be a hit at any Halloween party or gathering, combining the classic flavor of Rice Krispie Treats with a creative and festive twist. Not only are they easy to make, but they also provide a perfect opportunity for kids to get involved in the kitchen, sparking their creativity as they decorate the treats to resemble the famous monster.
This recipe is designed to serve 4-6 people, making it ideal for a small party or family gathering. The treats are made using traditional ingredients like Rice Krispies cereal and marshmallows, but with a few additional elements to create the Frankenstein effect. With green food coloring, candy eyes, and chocolate sprinkles, these treats come alive and are as fun to look at as they’re to eat.
Ingredients:
- 6 cups Rice Krispies cereal
- 3 tablespoons unsalted butter
- 4 cups mini marshmallows
- Green food coloring
- 1 cup chocolate sprinkles
- 12 candy eyes
- 6 pretzel sticks, broken in half
- 1/4 cup melted chocolate or chocolate chips
Cooking Instructions:
- Prepare the Pan: Lightly grease a 9×13-inch baking pan and set it aside. This will prevent the treats from sticking to the pan once they’re cool.
- Melt Butter and Marshmallows: In a large saucepan over medium heat, melt the unsalted butter. Once the butter is melted, add the mini marshmallows and stir continuously until they’re completely melted and combined with the butter.
- Add Food Coloring: Remove the saucepan from heat and immediately stir in a few drops of green food coloring. Mix well until the color is evenly distributed throughout the melted marshmallow mixture.
- Mix in Cereal: Add the Rice Krispies cereal to the marshmallow mixture, stirring until all the cereal is evenly coated.
- Press into Pan: Pour the mixture into the prepared pan. Use a buttered spatula or wax paper to evenly press the mixture into the pan, guaranteeing an even layer.
- Cool the Mixture: Allow the mixture to cool for about 15-20 minutes. This will make it easier to cut and handle.
- Cut into Rectangles: Once cooled, cut the treats into 12 equal rectangles.
- Decorate: Dip the top of each rectangle in melted chocolate and immediately sprinkle with chocolate sprinkles to create Frankenstein’s “hair.” Press two candy eyes into each treat, and insert half a pretzel stick into each side for the “bolts.”
- Set the Decorations: Allow the chocolate to set completely before serving. You can speed up this process by placing the treats in the refrigerator for a few minutes.
Extra Tips:
For best results, make certain that your marshmallows are fresh, as stale marshmallows can make the mixture difficult to work with.
If you prefer a darker shade of green, adjust the amount of food coloring accordingly.
When decorating, get creative with different expressions for Frankenstein’s face using additional candies or icing.
Finally, if you’re making these treats ahead of time, store them in an airtight container to keep them fresh and chewy.
Vampire Fang Apples
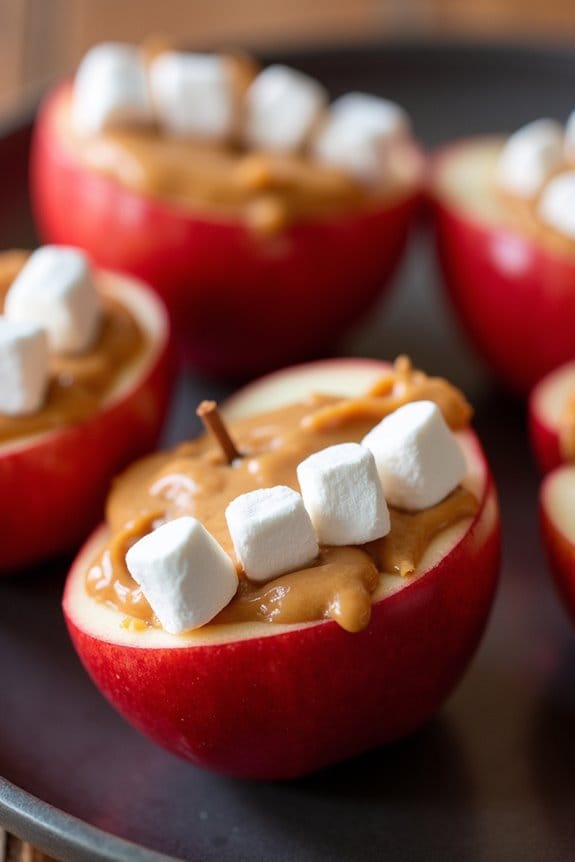
Halloween is the perfect time to get creative in the kitchen, and what better way to celebrate than with some spooky, delicious treats? Vampire Fang Apples are a fun and healthy option that will delight kids and adults alike. These treats aren’t only festive but also incredibly easy to make, making them an excellent activity for a Halloween party or a fun family cooking project.
With just a few simple ingredients and a little bit of imagination, you can transform ordinary apples into a frightfully fun snack that resembles a vampire’s toothy grin. The combination of apples, peanut butter, and marshmallows creates a delightful blend of flavors and textures that will have everyone coming back for more.
The natural sweetness of the apples, combined with the creamy peanut butter and the soft marshmallows, makes for a treat that’s both nutritious and indulgent. Whether you’re planning a Halloween party or simply want to surprise your kids with a fun snack, Vampire Fang Apples are sure to be a hit. Let’s explore the ingredients and steps needed to create this ghoulishly good treat for 4-6 people.
Ingredients:
- 3 medium red apples
- 1/2 cup smooth peanut butter
- 1/2 cup mini marshmallows
- Lemon juice (optional, for preventing browning)
Instructions:
- Prepare the Apples: Begin by washing and drying the apples thoroughly. This guarantees that any wax or dirt is removed. Once cleaned, cut each apple into quarters, and remove the core and seeds. You should have 12 quarters from 3 apples when you’re done.
- Prevent Browning: If you prefer to keep the apples from browning, lightly brush the cut sides with lemon juice. This step is optional but recommended if the apples will be sitting out for a while before serving.
- Create the Vampire Fangs: Take each apple quarter and spread a thin layer of smooth peanut butter on one cut side. This will serve as the “gums” for the vampire fangs.
- Add the Teeth: Line mini marshmallows along the peanut butter side of the apple, pressing them in gently so they stick. The marshmallows will act as the “teeth,” so arrange them to look like a toothy grin.
- Assemble and Serve: Once all apple quarters are prepared with marshmallow teeth, arrange them on a platter for serving. These treats can be served immediately or stored in the refrigerator for later.
Extra Tips:
For a nut-free alternative, consider using sunflower seed butter or a similar spread if you have guests with nut allergies. Additionally, for a more dramatic effect, you can use green apples instead of red for a “monster” look.
If you want to add more variety, try including chocolate chips or raisins as fillings between the marshmallows for “cavities” or “gold teeth.” Remember to serve these treats soon after preparation or keep them chilled to maintain the apple’s freshness.
Skeleton Bone Breadsticks

Skeleton Bone Breadsticks are a spooktacular treat perfect for any Halloween gathering with kids. These fun and crispy breadsticks are shaped like bones, making them not only delicious but also visually appealing for little ones who are excited about the holiday. The texture is perfectly crunchy on the outside, while soft and chewy on the inside, satisfying both picky eaters and those who crave a little Halloween thrill.
Serve these breadsticks with a side of marinara sauce to mimic the look of blood for an extra eerie factor.
These breadsticks are easy to make and can be a fun activity for the whole family to get involved in. Children can help shape the breadsticks into bone shapes, making this an interactive experience. Not only do these Skeleton Bone Breadsticks make a great snack, but they can also be a fantastic accompaniment to any Halloween-themed meal you have planned.
Plus, they can be prepared ahead of time and baked just before serving, making them a convenient option for busy parents.
Ingredients (serving size: 4-6 people):
- 1 package (13.8 oz) refrigerated pizza dough
- 2 tablespoons olive oil
- 1 teaspoon garlic powder
- 1 teaspoon salt
- 1/4 cup grated Parmesan cheese
- 1 tablespoon dried oregano
- Marinara sauce (for dipping)
Instructions:
- Preheat and Prepare: Preheat your oven to 375°F (190°C). Line a baking sheet with parchment paper to prevent the breadsticks from sticking.
- Roll Out the Dough: On a lightly floured surface, roll out the pizza dough into a rectangle approximately 10×12 inches. This will make it easier to cut into strips.
- Cut and Shape the Dough: Using a sharp knife or a pizza cutter, cut the dough into strips about 1 inch wide. To create the bone shape, cut notches on both ends of each strip to form an “X” shape at the ends, giving it the appearance of a bone.
- Prepare the Topping: In a small bowl, mix together olive oil, garlic powder, and salt. Lightly brush each shaped breadstick with the mixture to add flavor.
- Add Cheese and Herbs: Sprinkle the grated Parmesan cheese and dried oregano evenly over the breadsticks. This will give them a cheesy, herby flavor that kids will love.
- Bake: Place the breadsticks on the prepared baking sheet, ensuring they’re spaced out to allow even baking. Bake in the preheated oven for 12-15 minutes or until they’re golden brown and crispy.
- Serve: Allow the breadsticks to cool slightly before serving with a side of marinara sauce for dipping. The red sauce adds a spooky touch, resembling blood, perfect for Halloween.
Extra Tips: If you want to make the dough from scratch, consider adding herbs directly into the dough for additional flavor. Make sure to watch the breadsticks closely towards the end of the baking time to prevent them from burning.
You can also add a little black food coloring to the dough for an even spookier look. If you’re making these ahead of time, store them in an airtight container and reheat them in the oven for a few minutes before serving to regain their crispiness.
Pumpkin Patch Cupcakes
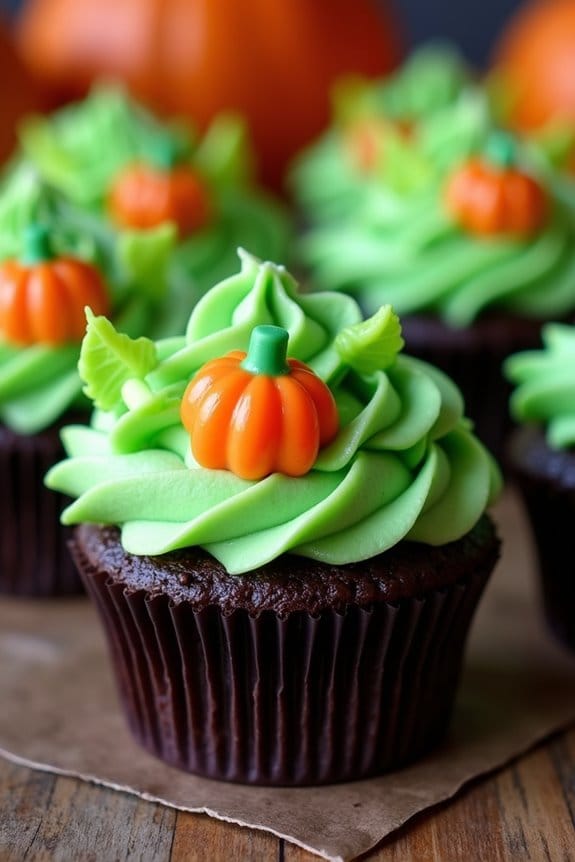
These delightful Pumpkin Patch Cupcakes are sure to be a hit at any Halloween gathering, especially with kids. With a rich chocolate base and a playful decoration featuring mini pumpkins and vines, these cupcakes are as fun to make as they’re to eat. The combination of textures and flavors, along with the festive appearance, makes them perfect for celebrating the spooky season.
The cupcakes are made with a moist chocolate cake batter, topped with a creamy green frosting that resembles the look of a pumpkin patch. Tiny candy pumpkins and green icing vines add to the charm, making each cupcake a miniature work of art. Not only are they visually appealing, but the taste is sure to delight children and adults alike.
Let’s explore the recipe to create a batch that serves 4-6 people.
Ingredients:
- 1 cup all-purpose flour
- 1 cup granulated sugar
- 1/2 cup unsweetened cocoa powder
- 1 teaspoon baking powder
- 1/2 teaspoon baking soda
- 1/4 teaspoon salt
- 1/2 cup unsalted butter, melted
- 2 large eggs
- 1 teaspoon vanilla extract
- 1/2 cup milk
- 1 cup green buttercream frosting
- 12 mini candy pumpkins
- Green icing pen for vines
Instructions:
- Preheat the Oven: Start by preheating your oven to 350°F (175°C). Line a muffin tin with cupcake liners to prepare for the batter.
- Mix Dry Ingredients: In a large mixing bowl, whisk together the flour, sugar, cocoa powder, baking powder, baking soda, and salt until well combined.
- Combine Wet Ingredients: In another bowl, mix the melted butter, eggs, vanilla extract, and milk.
- Create Batter: Gradually add the wet ingredients to the dry ingredients, stirring until just combined. Be careful not to overmix, as this can make the cupcakes dense.
- Fill Cupcake Liners: Spoon the batter evenly into the prepared cupcake liners, filling each about two-thirds full.
- Bake: Place the muffin tin in the preheated oven and bake for 18-20 minutes, or until a toothpick inserted into the center of a cupcake comes out clean.
- Cool: Remove the cupcakes from the oven and let them cool in the pan for about 5 minutes, then transfer to a wire rack to cool completely.
- Decorate: Once the cupcakes are completely cool, spread a layer of green buttercream frosting on each one. Place a mini candy pumpkin in the center of each cupcake.
- Add Vines: Use the green icing pen to draw whimsical vines extending from the candy pumpkin across the frosting.
Extra Tips:
For a more intense chocolate flavor, consider adding a teaspoon of instant coffee granules to the batter. This will enhance the chocolate taste without making the cupcakes taste like coffee.
If you’re short on time, store-bought green frosting and candy pumpkins work just as well, but homemade buttercream can add a personal touch.
Finally, get creative with the vines—swirls, loops, and zigzags can all add to the fun, making each cupcake unique.
Ghoulish Guacamole Dip
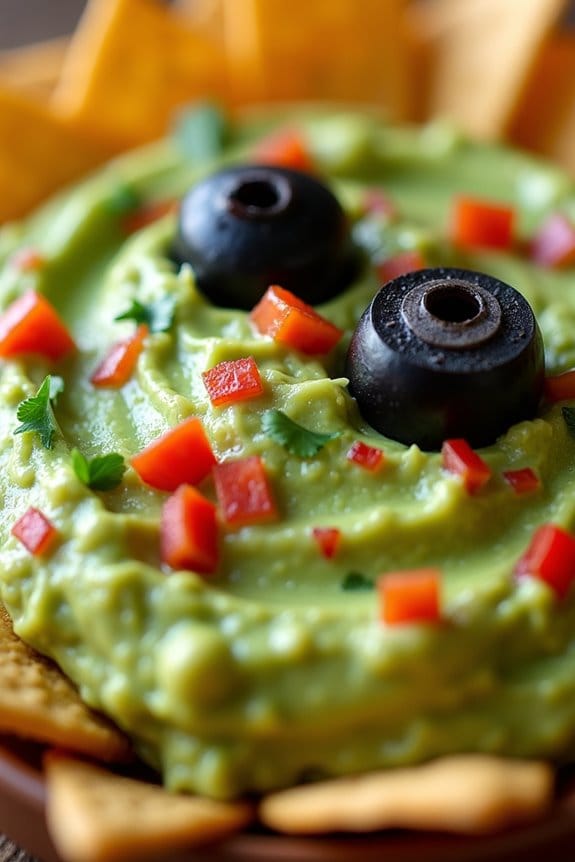
Ghoulish Guacamole Dip is the perfect Halloween-themed snack to delight children with its spooky appearance and delicious taste. This vibrant green dip not only resembles a witch’s brew but also offers a healthy and nutritious option for the festive season.
Whether you’re hosting a Halloween party or simply looking to add a bit of fun to snack time, this Ghoulish Guacamole Dip is certain to be a hit with kids and adults alike.
The dip is made using fresh avocados, which provide a creamy texture and are packed with healthy fats. To add a spooktacular twist, the guacamole is served with toppings that resemble creepy crawlies and gory garnishes.
Pair it with some crispy tortilla chips or vegetable sticks to complete the Halloween theme. Follow this simple recipe to whip up a batch for a serving size of 4-6 people.
Ingredients:
- 4 ripe avocados
- 2 tablespoons lime juice
- 1 teaspoon salt
- 1/2 teaspoon ground cumin
- 1/2 teaspoon cayenne pepper
- 1/2 cup diced onion
- 2 Roma tomatoes, seeded and diced
- 1 tablespoon chopped cilantro
- 1 clove garlic, minced
- 2 tablespoons sour cream (optional)
- Black olives, sliced (for decoration)
- Red bell pepper, diced (for decoration)
- Tortilla chips or vegetable sticks (for serving)
Cooking Instructions:
- Prepare the Avocados: Start by cutting the avocados in half, removing the pits, and scooping the flesh into a mixing bowl. Use a fork to mash the avocados until you achieve your desired consistency. For a chunkier dip, mash lightly; for a smoother dip, mash thoroughly.
- Season the Guacamole: Add lime juice, salt, ground cumin, and cayenne pepper to the mashed avocados. Mix well to guarantee the spices are evenly distributed.
- Add Vegetables and Herbs: Stir in the diced onion, seeded and diced Roma tomatoes, chopped cilantro, and minced garlic. Mix until all ingredients are well combined.
- Adjust for Creaminess: If you prefer a creamier guacamole, fold in the sour cream at this stage. This step is optional and can be skipped if you prefer the traditional texture.
- Create Ghoulish Decorations: Transfer the guacamole to a serving dish and smooth the surface. Use black olive slices to create spooky eyes and a mouth, or arrange them into any creepy patterns you like. Add diced red bell pepper to simulate blood or fiery elements.
- Serve and Enjoy: Serve the Ghoulish Guacamole Dip with tortilla chips or vegetable sticks. Make sure to place it in a prominent spot on your Halloween snack table for the full spooky effect.
Extra Tips:
For the best flavor, make the guacamole just before serving to preserve the vibrant green color and prevent browning. If you need to prepare it in advance, cover the surface with plastic wrap, pressing it directly onto the guacamole to minimize air exposure.
This will help slow down oxidation. Feel free to get creative with the decorations, using additional items like shredded cheese or jalapeño slices to add to the spooky theme. Enjoy your Ghoulish Guacamole Dip and have a hauntingly good Halloween!
Bloodshot Eyeball Deviled Eggs
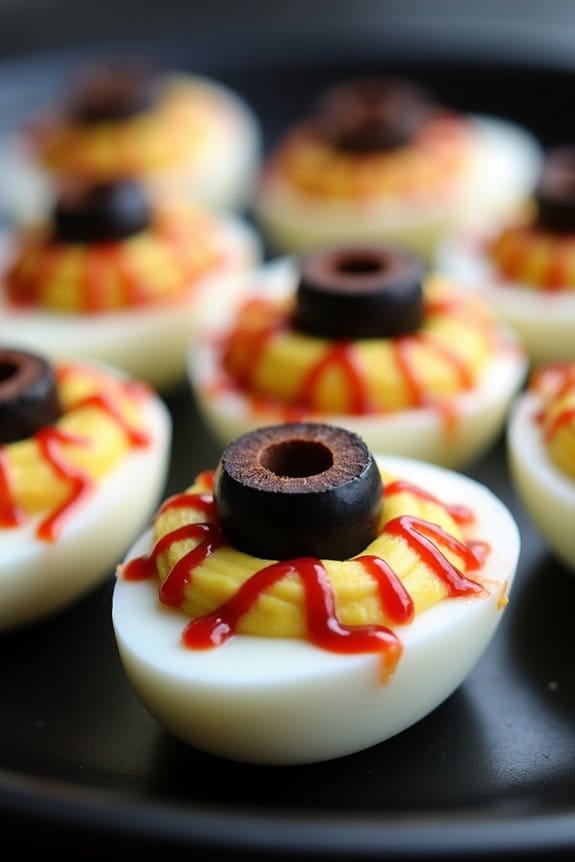
Bloodshot Eyeball Deviled Eggs are a spooky twist on the classic deviled eggs, perfect for adding a little fright to your Halloween festivities. These creepy yet delicious treats will thrill your young ghouls and goblins as they feast on their eerie appearance. The deviled eggs are designed to resemble bloodshot eyeballs, complete with olive irises and ketchup blood vessels, making them a hit at any Halloween gathering.
Whether you’re hosting a Halloween party or just looking to delight your kids with a festive snack, these Bloodshot Eyeball Deviled Eggs are bound to be a memorable and tasty addition. The recipe isn’t only fun but also easy to prepare, guaranteeing that you spend more time enjoying Halloween than in the kitchen.
With just a few simple ingredients, you can transform ordinary hard-boiled eggs into a spooky snack that will captivate the imaginations of young ones. The creamy yolk filling is seasoned with classic deviled egg ingredients, providing a familiar taste that’s loved by many, while the creative decoration brings the Halloween spirit to the table.
Serve these at your next Halloween bash, and watch them disappear quickly!
Ingredients for 4-6 People:
- 6 large eggs
- 3 tablespoons mayonnaise
- 1 teaspoon yellow mustard
- Salt and pepper to taste
- 12 black olives, sliced
- Red food coloring
- 1 tablespoon ketchup
Cooking Instructions:
- Boil the Eggs: Place the eggs in a saucepan, cover with cold water, and bring to a boil over medium-high heat. Once boiling, reduce the heat to low and let the eggs simmer for 10 minutes.
- Cool and Peel the Eggs: After boiling, transfer the eggs to a bowl of ice water to cool for about 5 minutes. Once cooled, gently peel the shells off the eggs.
- Prepare the Yolks: Slice each egg in half lengthwise and carefully remove the yolks, placing them in a separate bowl. Set the egg whites aside on a serving platter.
- Make the Filling: Mash the yolks with a fork and mix in the mayonnaise, mustard, salt, and pepper until smooth and creamy.
- Fill the Egg Whites: Spoon or pipe the yolk mixture back into the hollow of each egg white half.
- Create the Eyeball Effect: Place a slice of black olive on top of each filled egg to form the iris.
- Add Blood Vessels: Mix a few drops of red food coloring into the ketchup. Use a toothpick to draw squiggly lines from the olive outward on the white of the egg, creating the appearance of bloodshot veins.
Extra Tips:
When preparing Bloodshot Eyeball Deviled Eggs, it’s important to handle the eggs gently to avoid tearing the whites. If you want to save time, consider boiling the eggs a day in advance and refrigerating them.
For a more intense red color in the veins, adjust the amount of red food coloring in the ketchup as needed. If you’re hosting a large party, this recipe can easily be doubled or tripled.
Finally, make sure the eggs are well-chilled before serving to keep the filling firm and the eyeballs looking their best. Enjoy your spooky creation!
Zombie Brain Jello
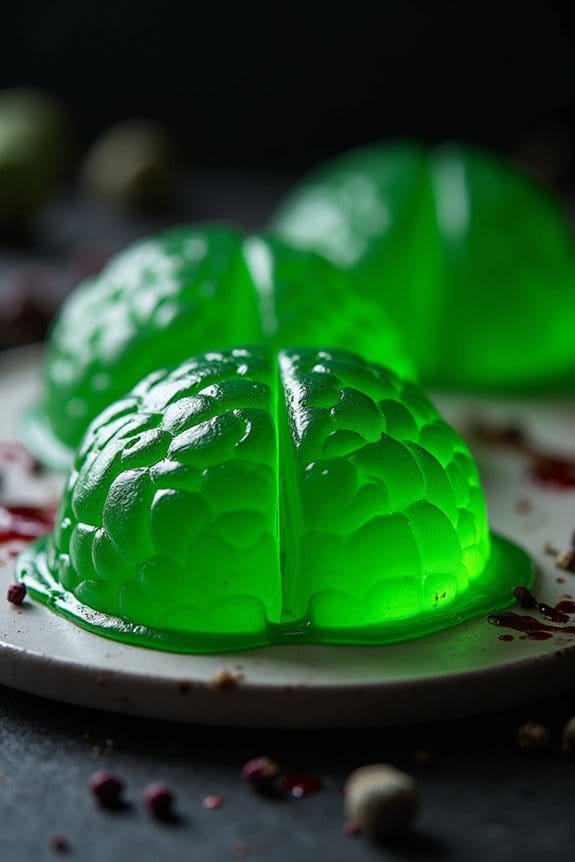
Zombie Brain Jello is a spooktacular treat that will delight kids and adults alike at your next Halloween party. This creepy, gelatinous dessert isn’t only fun to eat but also fun to make. With its eerie green color and brain-like appearance, it’s sure to be the centerpiece of your Halloween spread. The wobbly texture and sweet flavor will have your little ghouls and goblins coming back for seconds.
Zombie Brain Jello: A creepy, wobbly treat that will be the star of your Halloween party!
This recipe is designed to serve 4-6 people, making it perfect for a small gathering or as part of a larger Halloween buffet. The process involves creating a jello mixture that’s then molded into a brain-shaped silicone mold. Once set, the jello brain can be decorated with edible fake blood for an extra gruesome touch. Gather your ingredients and let’s bring this creepy creation to life!
Ingredients:
- 2 packages (3 oz each) of lime-flavored gelatin
- 1 1/2 cups boiling water
- 1 cup cold water
- 1 cup evaporated milk
- Red food coloring (optional)
- Edible fake blood (optional for decoration)
- Brain-shaped silicone mold
Cooking Instructions:
- Prepare the Gelatin Mixture:
- In a large mixing bowl, pour 1 1/2 cups of boiling water over the lime-flavored gelatin powder. Stir continuously until the gelatin is fully dissolved.
- Add Cold Ingredients:
- Slowly add 1 cup of cold water to the dissolved gelatin mixture, stirring well to combine. Incorporate 1 cup of evaporated milk into the mixture, continuing to stir until the liquid is smooth and consistent.
- Add Color (Optional):
- If you desire a more ghastly appearance, add a few drops of red food coloring to the mixture to create a slightly more sinister shade of green. Stir until the color is evenly distributed.
- Molding the Brain:
- Carefully pour the gelatin mixture into the brain-shaped silicone mold. Make certain that the mold is placed on a stable surface before pouring to prevent spills.
- Chill and Set:
- Place the mold in the refrigerator and allow the jello to set for at least 4-6 hours, or overnight if possible, to guarantee it holds its shape.
- Unmold the Brain:
- Once the jello is fully set, gently invert the mold onto a serving platter. Carefully remove the mold to reveal the brain shape.
- Decorate (Optional):
- For a more dramatic effect, drizzle edible fake blood over the jello brain. This can be made from a mixture of corn syrup and red food coloring or purchased pre-made.
Extra Tips:
To achieve the perfect brain consistency, make sure your gelatin is completely dissolved in the boiling water before adding any other ingredients.
If the jello brain doesn’t release easily from the mold, dip the mold briefly in warm water to help loosen it. Be cautious not to let water splash onto the jello.
If you need to make this ahead of time, the jello brain can be kept in the refrigerator for up to two days before serving.
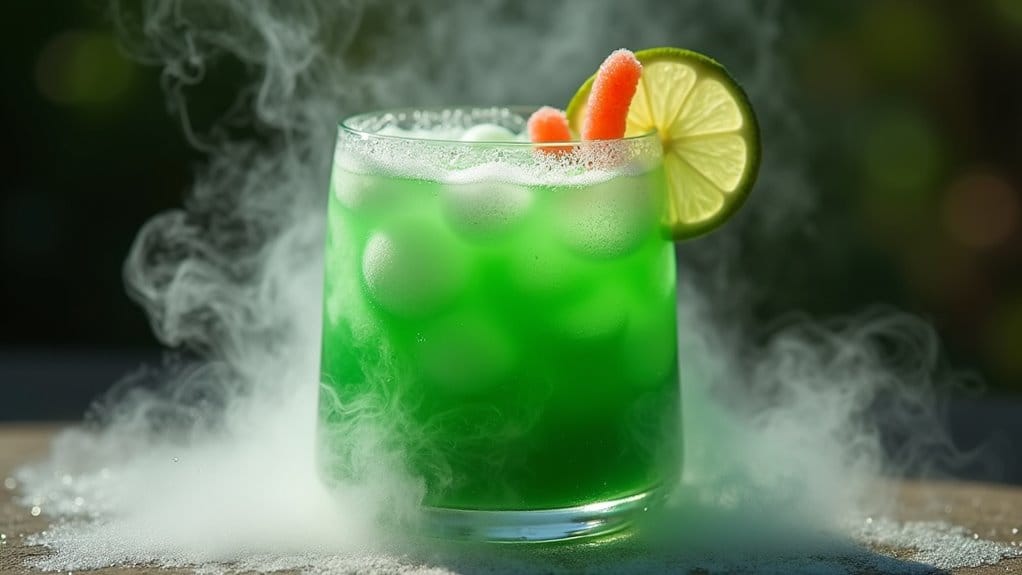
Witch’s Brew Punch

Halloween is the perfect time to bring a little magic and mystery into your kitchen, and what better way to do so than with a bewitching concoction like Witch’s Brew Punch? This spine-tingling drink is sure to captivate both kids and adults alike with its vibrant color and spooky, bubbling presentation.
The punch combines a delicious mix of fruity flavors with a touch of fizz to create an unforgettable experience that will have everyone coming back for more. Whether you’re hosting a Halloween party or simply looking for a fun way to celebrate the season with your family, this Witch’s Brew Punch is a must-try.
The beauty of Witch’s Brew Punch lies not only in its enchanting appearance but also in its simplicity. With just a few ingredients, you can whip up a batch of this magical punch in no time. The combination of lemon-lime soda and pineapple juice creates a revitalizing base, while the addition of lime sherbet adds a creamy texture and a pop of color.
To give it that spooky, bubbling effect, a little dry ice can be used, but this is optional. Get your cauldrons ready, because this delicious and festive punch is about to become the highlight of your Halloween celebrations.
Ingredients for 4-6 servings:
- 2 liters of lemon-lime soda
- 1 liter of pineapple juice
- 1 pint of lime sherbet
- Optional: A small piece of dry ice (for bubbling effect)
- Lime slices or gummy worms for garnish
Instructions:
- Prepare the Punch Base: In a large punch bowl, combine 2 liters of lemon-lime soda with 1 liter of pineapple juice. Stir gently to mix the flavors without losing too much carbonation.
- Add the Sherbet: Scoop out the pint of lime sherbet and add it to the punch bowl. The sherbet will slowly melt, adding a creamy texture and vibrant color to the punch.
- Create the Bubbling Effect: If you choose to use dry ice, handle it with care using gloves or tongs. Place a small piece of dry ice in the punch bowl just before serving. This will create a foggy, bubbling effect that adds to the spooky presentation. Confirm that pieces of dry ice remain large enough to be easily visible and avoid ingestion.
- Garnish and Serve: For a finishing touch, float lime slices or gummy worms on top of the punch for a fun and festive garnish. Serve the punch in clear cups to showcase its eerie color and bubbling action.
Extra Tips:
When using dry ice, it’s essential to handle it safely. Never touch dry ice with your bare hands, as it can cause burns. Use gloves or tongs, and confirm that it’s completely evaporated before drinking to avoid accidental ingestion.
If you’re serving to very young children, you might want to skip the dry ice and instead rely on the lime sherbet for your spooky effect. Additionally, for a more intense green color, consider adding a few drops of green food coloring to the punch.
Always taste-test before serving to confirm the punch has the right balance of sweetness and fizz.
