
Halloween is just around the corner, and I can’t wait to share some spooky food inspiration with you all. Picture a potluck table filled with ghostly deviled eggs and mummy jalapeño poppers. Each dish is more creative and fun than the last. It’s all about those charming details that turn regular snacks into hauntingly delightful treats. What other deliciously eerie surprises can we conjure up for this spooky gathering?
Ghostly Deviled Eggs
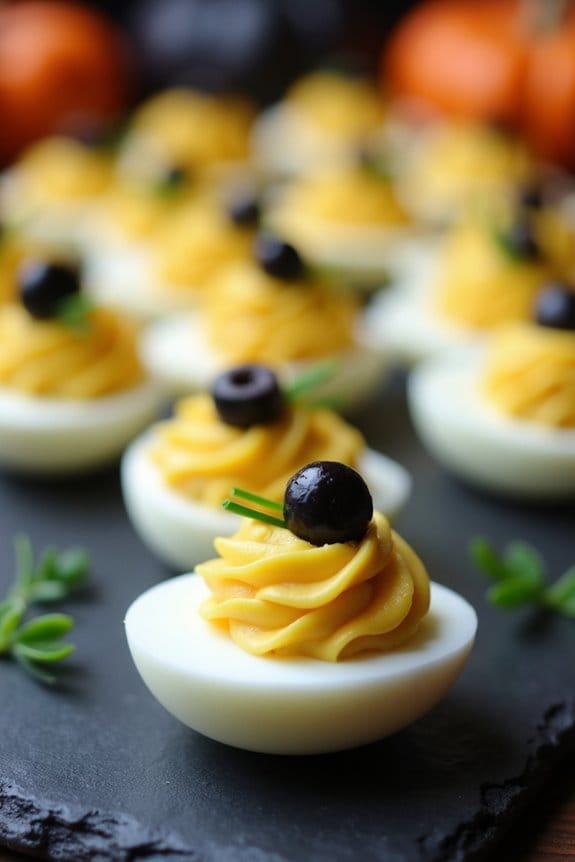
Transform your classic deviled eggs into a spooky Halloween treat with this Ghostly Deviled Eggs recipe. Perfect for a Halloween party or to add a festive touch to your family meal, these ghostly delights aren’t only fun to make but also delicious to eat. The creamy filling, paired with a touch of spookiness, makes it a hit among both kids and adults.
Transform classic deviled eggs into spooky Halloween treats with a ghostly twist, perfect for festive gatherings.
The recipe uses simple ingredients and can be easily prepared in advance to save time on the day of your Halloween event. The ghostly appearance is achieved with a little creativity, using black olives and chives to create eerie ghost faces on each egg. This recipe serves 4-6 people, making it ideal for small gatherings or as part of a larger spread.
Whether you’re hosting a fright night or just want to surprise your loved ones with a spooky snack, these deviled eggs will surely be the highlight of your Halloween menu.
Ingredients (serves 4-6):
- 12 large eggs
- 1/2 cup mayonnaise
- 1 teaspoon Dijon mustard
- 1 teaspoon white vinegar
- Salt and pepper to taste
- Black olives (for eyes)
- Fresh chives (for mouths)
Cooking Instructions:
- Boil the Eggs: Place the eggs in a large saucepan and cover them with water. Bring the water to a boil over medium-high heat. Once boiling, remove the saucepan from the heat, cover it with a lid, and let the eggs sit for 12 minutes.
- Cool and Peel the Eggs: After 12 minutes, transfer the eggs to a bowl of ice water to cool for at least 5 minutes. Once cooled, gently crack and peel the eggs under running water to remove the shells.
- Prepare the Filling: Slice each egg in half lengthwise and carefully scoop out the yolks into a medium-sized bowl. Mash the yolks with a fork until smooth.
- Mix the Filling: Add mayonnaise, Dijon mustard, white vinegar, salt, and pepper to the mashed yolks. Stir until the mixture is smooth and creamy.
- Fill the Egg Whites: Spoon or pipe the yolk mixture back into the hollowed egg whites, mounding it slightly.
- Create Ghost Faces: Slice black olives into small pieces to form eyes and cut the chives into short strips for the mouths. Place two olive pieces on each filled egg to resemble eyes and a chive strip below them to create a spooky ghostly mouth.
- Chill Before Serving: Arrange the ghostly deviled eggs on a platter and refrigerate for at least 30 minutes before serving to allow flavors to meld.
Extra Tips:
For the best presentation, use a star-tipped piping bag to fill the egg whites with the yolk mixture, creating a neat and professional look. If black olives aren’t available, you can substitute with capers or small dots of black food coloring for the eyes.
Adjust the seasoning of the yolk filling to taste, and feel free to add a dash of hot sauce or a pinch of smoked paprika for an extra flavor kick. Remember, the key to getting perfectly peeled eggs is to cool them quickly in ice water after boiling, which helps separate the membrane from the shell.
Enjoy crafting these ghostly deviled eggs and have a spooktacular Halloween!
Mummy Jalapeño Poppers

Mummy Jalapeño Poppers are a spooktacular treat perfect for any Halloween gathering. These fun and festive appetizers combine the spicy kick of jalapeños with creamy cheese filling, all wrapped up in a flaky, golden crescent roll dough to mimic the look of a mummy. Not only are they adorable in appearance, but they also deliver a delightful blend of flavors and textures that will captivate your guests’ taste buds.
Whether you’re hosting a Halloween party or just want to add some seasonal fun to your dinner table, these Mummy Jalapeño Poppers are bound to be a hit.
To create this delicious dish, fresh jalapeños are halved and filled with a savory mixture of cream cheese, cheddar cheese, and spices. Each filled jalapeño half is then wrapped with strips of crescent roll dough, leaving a small space open for the “eyes,” which can be made using small pieces of black olives. The result is a batch of mummies with cheesy, spicy centers and crispy, doughy exteriors – perfect for munching on while celebrating Halloween.
Ingredients (Serves 4-6):
- 12 large jalapeños
- 8 oz cream cheese, softened
- 1 cup shredded cheddar cheese
- 1 teaspoon garlic powder
- 1 teaspoon onion powder
- 1/2 teaspoon smoked paprika
- 1/2 teaspoon salt
- 1/4 teaspoon black pepper
- 1 can (8 oz) crescent roll dough
- Small black olives, sliced (for eyes)
Cooking Instructions:
- Prepare the Jalapeños: Preheat your oven to 375°F (190°C). Cut each jalapeño in half lengthwise and remove the seeds and membranes. This will reduce the heat of the peppers and create space for the filling.
- Make the Filling: In a mixing bowl, combine the softened cream cheese, shredded cheddar cheese, garlic powder, onion powder, smoked paprika, salt, and black pepper. Mix well until all ingredients are thoroughly combined and the mixture is smooth.
- Fill the Jalapeños: Using a spoon or small spatula, fill each jalapeño half with the cheese mixture, pressing it in gently to guarantee they’re generously filled.
- Wrap with Dough: Open the can of crescent roll dough and unroll it. Cut the dough into thin strips, about 1/4 inch wide. Wrap each filled jalapeño half with a strip of dough, leaving an opening for the “eyes” near the top.
- Add the Eyes: Place two small pieces of black olive on the exposed filling near the top of each jalapeño to create the appearance of eyes.
- Bake the Poppers: Place the wrapped jalapeños on a baking sheet lined with parchment paper. Bake in the preheated oven for 12-15 minutes, or until the dough is golden brown and cooked through.
- Serve and Enjoy: Allow the poppers to cool slightly before serving. They can be enjoyed warm or at room temperature.
Extra Tips: When preparing the jalapeños, consider wearing gloves to protect your hands from the spicy oils, which can cause irritation if they come into contact with your skin or eyes.
Adjust the level of spice by leaving some seeds in the jalapeños if you prefer a hotter popper. Additionally, feel free to experiment with different types of cheese or add crumbled bacon to the filling for added flavor.
Spooky Spider Mini Pizzas
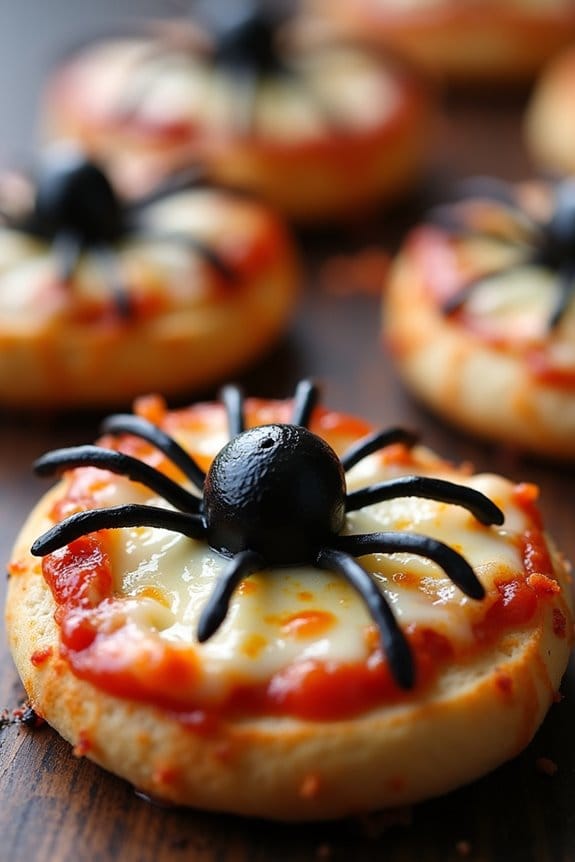
Spooky Spider Mini Pizzas are a fun and delicious way to add a bit of Halloween flair to your meal. Perfect for gatherings or a themed family dinner, these mini pizzas are both easy to make and a delight to eat. Each mini pizza is topped with a “spider” made from black olives, making them look both festive and appetizing. Kids and adults alike will enjoy the flavors and the creativity behind these spooky treats.
These mini pizzas can be customized with your favorite toppings, but the key is to keep them simple to guarantee the spider design is visible. You can prepare these in advance and bake them just before serving for a warm, crispy crust and melted cheese. Whether you’re hosting a Halloween party or simply want to surprise your family with some themed food, Spooky Spider Mini Pizzas are sure to be a hit.
Ingredients (Serves 4-6 people):
- 6 English muffins, split in half
- 1 cup pizza sauce
- 2 cups shredded mozzarella cheese
- 1/2 cup sliced black olives
- 1/4 cup sliced pepperoni (optional)
- 2 tablespoons olive oil
- 1 teaspoon dried oregano
- 1 teaspoon garlic powder
Cooking Instructions:
- Preheat the Oven: Preheat your oven to 375°F (190°C). This temperature will guarantee the mini pizzas cook evenly with a crispy base.
- Prepare the Muffins: Place the English muffin halves on a baking sheet. Brush each half lightly with olive oil to enhance the crispiness of the base.
- Add the Sauce: Spread about a tablespoon of pizza sauce over each English muffin half, making sure to cover the entire surface.
- Layer the Cheese: Sprinkle a generous amount of shredded mozzarella cheese on top of the sauce, ensuring even coverage for a gooey topping.
- Create the Spiders: Slice the black olives in half for the spider bodies and into slivers for the legs. Arrange one olive half in the center of each pizza and place 6-8 slivers around it to form the legs.
- Optional Pepperoni: If using pepperoni, add a few slices around the spider to create additional flavor and texture.
- Season: Sprinkle each pizza with a pinch of dried oregano and garlic powder for added taste.
- Bake: Place the baking sheet in the preheated oven and bake for about 10-12 minutes, or until the cheese is melted and bubbly, and the muffins are golden brown.
- Serve: Remove from the oven and let cool for a minute before serving. Enjoy your spooky creations!
Extra Tips:
For an even spookier appearance, you can use different colored olives or add a few drops of food coloring to the cheese for a more vibrant look. If you want a gluten-free option, consider using gluten-free English muffins.
Additionally, you can prepare all the muffin bases and toppings in advance, and simply assemble and bake them right before serving to save time. Adjust the spider design to your liking or let kids get creative with their own spooky interpretations.
Witch’s Broomstick Pretzels

This recipe is wonderfully straightforward, requiring minimal ingredients and preparation time, making it an ideal last-minute addition to your Halloween spread.
It’s a great way to get creative in the kitchen, and it can also be a fun activity to involve kids in the preparation. The result is a plate full of adorable broomsticks that are sure to be a hit at any Halloween party.
A fun, creative kitchen activity for kids, resulting in adorable broomsticks perfect for any Halloween celebration.
Ingredients (Serves 4-6 people)
- 24 pretzel sticks
- 6 string cheese sticks
- 24 fresh chives
Cooking Instructions
1. Prepare the Cheese Bristles: Begin by unwrapping the string cheese sticks. Use a knife to cut each string cheese into four equal pieces, resulting in a total of 24 pieces.
Then, gently peel each piece into thin strips to create the broom bristles.
2. Assemble the Broomsticks: Take one piece of the cut cheese and place it at one end of a pretzel stick. Make sure the strips are hanging down, resembling broom bristles.
3. Secure with Chives: To secure the cheese bristles to the pretzel, wrap a fresh chive around the top of the cheese, just below where it meets the pretzel stick.
Tie the chive tightly to guarantee the cheese stays in place, and trim any excess chive for a neat appearance.
4. Repeat the Process: Repeat steps 2 and 3 for the remaining pretzel sticks and cheese pieces until all 24 broomsticks are assembled.
5. Serve and Enjoy: Arrange the Witch’s Broomstick Pretzels on a platter for serving. They can be enjoyed immediately or stored in the refrigerator until ready to serve.
Extra Tips
When making Witch’s Broomstick Pretzels, verify the cheese is cold for easier handling and peeling into strips.
If the cheese becomes too warm and soft, it can be difficult to manage. You can also experiment with different types of cheese if string cheese isn’t your favorite.
Cheddar or mozzarella sticks can add a different flavor profile to your broomsticks. Additionally, if fresh chives are unavailable, you can use thin strips of green onion as an alternative.
These broomsticks are best enjoyed on the same day but can be kept in an airtight container in the fridge for a short period if needed.
Pumpkin Patch Cheese Ball
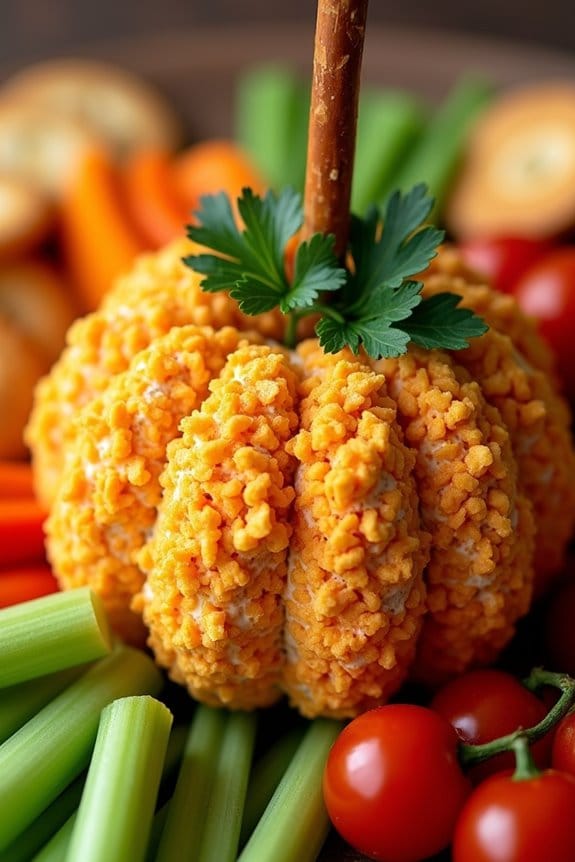
The Pumpkin Patch Cheese Ball is a delightful and festive appetizer perfect for any Halloween gathering. This fun and creative dish adds a touch of whimsy to your spread, while also delivering a burst of flavor that will have your guests coming back for more.
The cheese ball is shaped and decorated to resemble a pumpkin, making it an eye-catching centerpiece on your appetizer table. It combines cream cheese, cheddar, and a mix of spices to create a savory and creamy texture that pairs perfectly with crackers or fresh vegetables.
Crafting this cheese ball is straightforward, and the result is a deliciously spooky treat that can be made ahead of time. The combination of cheeses and spices along with a few decorative touches will make this dish both delectable and visually appealing.
Whether you’re hosting a Halloween party or just want to add a seasonal touch to your meal, the Pumpkin Patch Cheese Ball is sure to be a hit with kids and adults alike.
Ingredients for 4-6 servings:
- 2 cups shredded sharp cheddar cheese
- 8 oz cream cheese, softened
- 1/2 cup finely chopped green onions
- 1/2 cup finely chopped pecans
- 1 teaspoon Worcestershire sauce
- 1/2 teaspoon garlic powder
- 1/4 teaspoon smoked paprika
- 1/4 teaspoon cayenne pepper
- 1/2 cup crushed nacho-flavored tortilla chips
- 1 pretzel rod
- Fresh parsley leaves (for garnish)
- Crackers and fresh vegetables for serving
Instructions:
- Combine Ingredients: In a large mixing bowl, combine the shredded cheddar cheese, softened cream cheese, chopped green onions, chopped pecans, Worcestershire sauce, garlic powder, smoked paprika, and cayenne pepper. Use a fork or an electric mixer to blend these ingredients thoroughly until the mixture is smooth and well combined.
- Shape the Cheese Ball: Transfer the cheese mixture onto a large piece of plastic wrap. Gather the edges of the plastic wrap around the cheese mixture and shape it into a ball. Once shaped, wrap it tightly in the plastic wrap and refrigerate for at least 2 hours, or until firm.
- Add the Coating: Once the cheese ball has firmed, remove it from the refrigerator. Roll the cheese ball in the crushed nacho-flavored tortilla chips, pressing gently so that the chips adhere to the surface, giving it a pumpkin-like texture.
- Decorate: Insert a pretzel rod into the top of the cheese ball to resemble the pumpkin’s stem. Arrange fresh parsley leaves around the base of the pretzel to mimic pumpkin leaves.
- Serve: Place the decorated cheese ball on a serving platter. Surround it with an assortment of crackers and fresh vegetables for dipping. Serve immediately or refrigerate until ready to serve.
Extra Tips:
For an extra punch of flavor, you can incorporate other ingredients such as chopped jalapeños or sun-dried tomatoes into the cheese mixture.
If you find the cheese ball too spicy, adjust the amount of cayenne pepper to your preference. The cheese ball can be prepared a day in advance, making it a great option for stress-free party planning.
Just remember to let it sit at room temperature for about 15 minutes before serving to allow the flavors to fully develop.
Monster Eye-Topped Meatballs
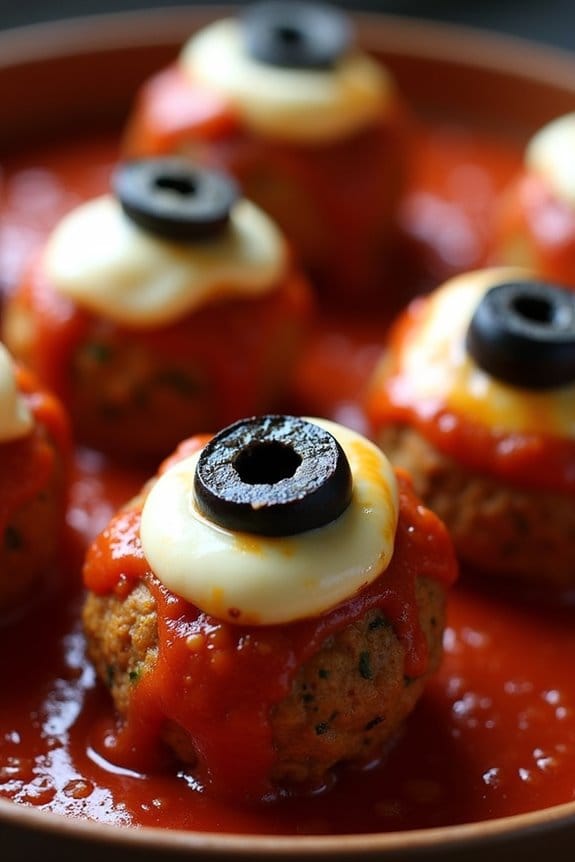
Monster Eye-Topped Meatballs are a spooky and delicious addition to any Halloween celebration. These savory treats combine flavorful meatballs with a creepy yet fun garnish that will delight both kids and adults. Perfect for parties, these meatballs are easy to make and can be prepared in advance, allowing you to enjoy the festivities without spending too much time in the kitchen. With a mix of spices and herbs, these meatballs aren’t only festive but also packed with flavor.
The highlight of this dish is the monster eye topping, which is created using mozzarella cheese slices and black olives. The cheese melts slightly over the meatballs, holding a sliced olive in place to form a perfect “eye.” These meatballs can be served as an appetizer or as part of a main course, and they pair wonderfully with a variety of dipping sauces. Whether you’re hosting a Halloween party or just want to surprise your family with a themed dinner, Monster Eye-Topped Meatballs are sure to be a hit.
Ingredients (Serves 4-6):
- 1 pound ground beef
- 1/2 cup breadcrumbs
- 1/4 cup grated Parmesan cheese
- 1 egg
- 2 cloves garlic, minced
- 1 teaspoon onion powder
- 1 teaspoon dried oregano
- 1 teaspoon salt
- 1/2 teaspoon black pepper
- 1 tablespoon olive oil
- 1 cup marinara sauce
- 6 slices mozzarella cheese
- 12 black olives, pitted and sliced
Cooking Instructions:
- Prepare the Meatball Mixture: In a large bowl, combine the ground beef, breadcrumbs, grated Parmesan cheese, egg, minced garlic, onion powder, dried oregano, salt, and black pepper. Mix well until all ingredients are evenly incorporated.
- Shape the Meatballs: Using your hands, shape the mixture into 1.5-inch meatballs. You should have around 12-15 meatballs, depending on the size.
- Cook the Meatballs: Heat the olive oil in a large skillet over medium heat. Add the meatballs to the skillet, making sure not to overcrowd. Cook for about 8-10 minutes, turning occasionally, until they’re browned on all sides and cooked through.
- Simmer in Sauce: Pour the marinara sauce into the skillet with the meatballs. Lower the heat to a simmer and cook for an additional 5 minutes, allowing the meatballs to absorb some of the sauce’s flavors.
- Add the Monster Eyes: Preheat your oven to 375°F (190°C). Transfer the meatballs and sauce to an oven-safe dish. Cut each mozzarella slice into quarters, and place one piece on top of each meatball. Top the cheese with a slice of black olive to create the “eye.”
- Melt the Cheese: Place the dish in the preheated oven and bake for 5-7 minutes, or until the cheese has melted slightly and resembles an eye.
- Serve: Remove from the oven and let cool slightly before serving. Enjoy these spooky meatballs with your favorite dipping sauces.
Extra Tips:
For added flavor, consider adding fresh herbs like parsley or basil to the meatball mixture. Additionally, if you prefer a spicier kick, a pinch of red pepper flakes can be mixed in.
To guarantee the meatballs hold their shape, avoid overmixing the ingredients, as this can make them dense. If you’re preparing for a larger crowd, you can easily double the recipe.
Creepy Crawly Pasta Salad
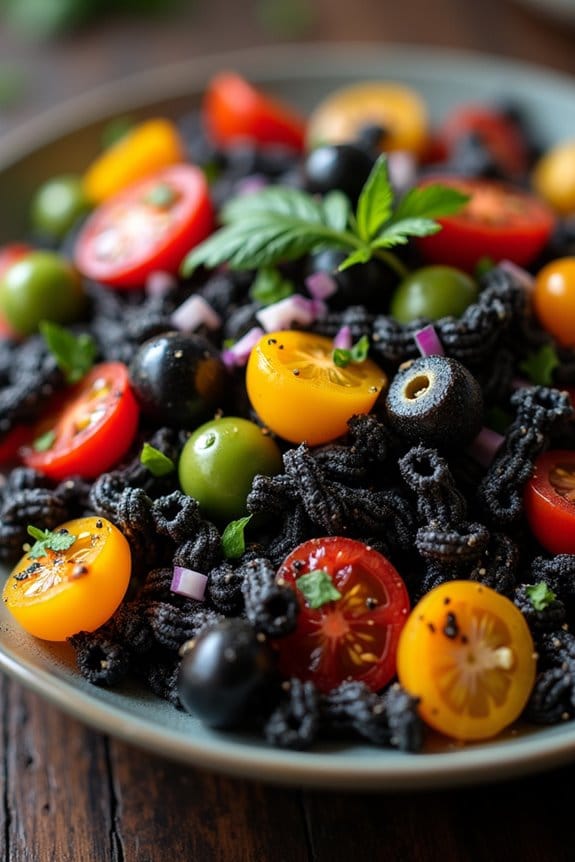
Get ready to serve up a spooktacular dish with this Creepy Crawly Pasta Salad, perfect for your Halloween festivities! This vibrant and horrifyingly delicious salad isn’t only a visual treat but also a flavor-packed delight. The dish combines eerie, black-colored pasta with themed vegetables and a tangy dressing to create a delightful meal that will both thrill and chill your guests. Perfect for a crowd of 4-6 people, this pasta salad will surely be the star of your Halloween spread.
Serve a spooktacular Creepy Crawly Pasta Salad, a horrifyingly delicious visual and flavor-packed Halloween feast!
The Creepy Crawly Pasta Salad is an ideal dish for those looking to add a touch of the macabre to their menu. The use of squid ink or black food coloring gives the pasta an ominous look, while the addition of vegetables and olives enhances its creepy appearance, mimicking wriggling worms and bug eyes. A zesty vinaigrette ties everything together, offering a revitalizing contrast to the spooky presentation. This dish is simple to prepare and can be whipped up in no time, making it a convenient choice for busy hosts.
Ingredients (Serving Size: 4-6):
- 12 oz black pasta (squid ink pasta or pasta colored with black food dye)
- 1 cup cherry tomatoes, halved
- 1/2 cup black olives, sliced
- 1/2 cup green olives, sliced
- 1/2 cup red bell pepper, diced
- 1/2 cup yellow bell pepper, diced
- 1/4 cup red onion, finely chopped
- 1/4 cup fresh parsley, chopped
- 1/3 cup olive oil
- 2 tablespoons red wine vinegar
- 1 tablespoon lemon juice
- 1 teaspoon Dijon mustard
- Salt and pepper to taste
Instructions:
- Cook the Pasta: Start by bringing a large pot of salted water to a boil. Add the black pasta and cook according to the package instructions until al dente. Once cooked, drain the pasta and rinse it under cold water to stop the cooking process and cool it down.
- Prepare the Vegetables: While the pasta is cooking, prepare the vegetables. Halve the cherry tomatoes, slice the black and green olives, dice the red and yellow bell peppers, and finely chop the red onion. Set these aside.
- Make the Dressing: In a small mixing bowl, whisk together the olive oil, red wine vinegar, lemon juice, Dijon mustard, salt, and pepper. Adjust the seasoning to your taste.
- Combine Ingredients: In a large mixing bowl, combine the cooked and cooled pasta with the prepared vegetables. Pour the dressing over the pasta and vegetables, and toss everything together until well coated.
- Add Final Touches: Add the chopped fresh parsley to the salad and give it a final toss. Make sure all ingredients are evenly distributed and coated with the dressing.
- Chill and Serve: Cover the salad and refrigerate it for at least 30 minutes to allow the flavors to meld together. Serve cold or at room temperature as a creepy, crawly centerpiece for your Halloween table.
Extra Tips:
For an added eerie effect, consider using a variety of pasta shapes, such as rotini or bow ties, to add texture and mimic different creepy crawlies. If you can’t find squid ink pasta, simply use regular pasta and add a few drops of black food coloring to the boiling water.
Feel free to get creative with additional ingredients like capers or artichoke hearts to enhance the salad’s flavor and spook factor. Remember to taste the dressing before adding it to the salad to confirm it has the right balance of tanginess and seasoning.
Bloody Finger Hot Dogs

Halloween is the perfect time to get creative with your culinary skills, and Bloody Finger Hot Dogs are a spooky and delicious choice to thrill your guests. These eerie appetizers are a playful twist on the classic hot dog, designed to resemble severed fingers complete with ketchup for a gory effect. The best part? They’re simple to make and will surely be a hit at any Halloween gathering.
Whether you’re throwing a party for kids or a grown-up soirée, these hot dogs are bound to be a conversation starter. To create this creepy dish, you’ll be crafting ‘fingers’ out of hot dogs and ‘nails’ from almonds or onions, with strategic cuts to simulate the knuckles. Ketchup or mustard will serve as the ‘blood’, oozing out from the base of each ‘finger’. This recipe is designed to serve 4-6 people, guaranteeing everyone gets a frightful bite.
It’s time to roll up your sleeves and explore this monstrous meal!
Ingredients (Serves 4-6):
- 8 hot dogs
- 8 hot dog buns
- 8 almonds (or small slices of onion for nail alternative)
- Ketchup
- Mustard (optional)
- 1 cup of water
Cooking Instructions:
- Prepare the Hot Dogs: Begin by taking each hot dog and making a few shallow cuts across the middle to create the look of knuckles. Make sure the cuts aren’t too deep, as you want the hot dogs to remain intact.
- Create the Nail Beds: On one end of each hot dog, slice a small, thin piece off the top to create a flat surface. This will be your ‘nail bed’. If using almonds, slice them in half so they’ll stick easily; if using onion, cut small, thin pieces to resemble nails.
- Cook the Hot Dogs: Place the prepared hot dogs in a large saucepan with 1 cup of water. Bring the water to a boil and let the hot dogs cook for about 6-8 minutes until heated through. Alternatively, grill them on a barbecue for a smoky flavor.
- Assemble the Hot Dogs: Once cooked, remove the hot dogs from the heat and let them cool slightly. Carefully press the almond or onion piece onto the flat end of each hot dog to create the ‘fingernail’.
- Dress the Dish: Place each hot dog into a bun, and drizzle ketchup at the base of each hot dog to mimic blood. If desired, add a touch of mustard for extra flavor and color contrast.
- Serve: Arrange the Bloody Finger Hot Dogs on a serving platter for maximum fright effect. Serve immediately to make sure they’re warm and delicious.
Extra Tips:
For an added gruesome effect, consider using whole wheat or dark rye buns to create a more ‘decayed’ look to your fingers.
If you want to make the fingers even more realistic, take a toothpick and gently score some additional lines on the hot dogs for more detailed knuckles.
Keep the ketchup at hand for guests who want to add extra ‘blood’ to their fingers. Finally, if you prefer a smokier flavor, consider grilling the hot dogs instead of boiling them. Enjoy your spooky culinary creation!
Graveyard Taco Dip

Graveyard Taco Dip is a spooky, delicious twist on a classic party favorite, perfect for Halloween gatherings. This dip layers savory ingredients to create a flavorful and eye-catching dish that will impress guests with its ghoulish design. The base is a traditional taco dip with a hauntingly fun decoration on top that mimics a graveyard scene, complete with tombstone-shaped tortilla chips and olive spiders. It’s not only tasty but also a fantastic way to add a little fright to your holiday spread.
The Graveyard Taco Dip is designed to serve 4-6 people, making it ideal for small parties or family gatherings. It’s easy to prepare and requires minimal cooking, allowing you to focus more on the presentation and spooky aesthetics. The dip can be customized to your taste by adding more or less spice or including additional toppings. The outcome is a festive dish that combines flavors and fun, sure to be a hit at any Halloween event.
Ingredients:
- 1 can (16 oz) refried beans
- 1 packet taco seasoning mix
- 1 cup sour cream
- 1 cup guacamole
- 1 cup salsa
- 1 cup shredded cheddar cheese
- 1/2 cup sliced black olives
- 3 green onions, chopped
- 6-8 tombstone-shaped tortilla chips
- 1-2 tablespoons chopped cilantro (optional)
- 1/4 cup sliced jalapeños (optional)
Instructions:
- Prepare the Bean Layer: In a medium bowl, combine the refried beans with the taco seasoning mix. Stir until well blended. Spread this mixture evenly in the bottom of a shallow serving dish or a 9×9 inch square baking dish.
- Layer the Ingredients: Over the bean layer, gently spread the sour cream, followed by the guacamole. Next, layer the salsa on top, ensuring each layer is visible from the side for a layered look.
- Add the Cheese and Toppings: Sprinkle the shredded cheddar cheese evenly over the salsa layer. Scatter the sliced black olives and green onions on top of the cheese. If using, add the sliced jalapeños and cilantro for extra flavor and color.
- Create the Graveyard Scene: Insert the tombstone-shaped tortilla chips vertically into the dip to resemble grave markers. Arrange them in a way that they stand upright. To add to the spooky effect, you can use additional olives to create “spiders” by slicing olives in half for bodies and using smaller slices to create legs.
- Chill and Serve: Cover the dish with plastic wrap and refrigerate for at least 30 minutes before serving. This allows the flavors to meld together and makes the dip easier to serve.
Extra Tips:
For an added touch of creativity, you can use edible markers to write spooky words or R.I.P. on the tombstone tortilla chips before inserting them into the dip.
If you prefer a milder dip, you can omit the jalapeños or replace them with diced bell peppers. For a heartier dip, consider adding a layer of cooked ground beef or turkey seasoned with taco seasoning between the bean and sour cream layers.
Remember that presentation is key for this dish, so take your time arranging the toppings to enhance the spooky graveyard effect.
Bewitched Caramel Apples

Bewitched Caramel Apples are a delightful Halloween treat that combines the crisp sweetness of fresh apples with the rich, buttery flavor of homemade caramel. These apples are perfect for a spooky party or to enjoy as a festive dessert with family and friends. Not only are they delicious, but their enchanting appearance adds a touch of magic to any Halloween celebration.
With a simple recipe and a few creative touches, these caramel apples are certain to captivate your guests. Creating Bewitched Caramel Apples is a fun and rewarding process that allows you to add your own personal touch to each apple. The process involves dipping fresh apples into a homemade caramel sauce, then decorating them with a variety of toppings to create a bewitching effect.
Whether you’re using black and orange sprinkles, crushed nuts, or drizzles of chocolate, the possibilities are endless. Plus, by making your own caramel, you can guarantee that the flavor is just right and avoid any unnecessary additives found in store-bought options.
Ingredients for Bewitched Caramel Apples (Serves 4-6):
- 6 medium-sized apples (Granny Smith or Honeycrisp work well)
- 1 cup unsalted butter
- 2 cups packed brown sugar
- 1 cup light corn syrup
- 1 can (14 ounces) sweetened condensed milk
- 1 teaspoon vanilla extract
- Wooden sticks or skewers
- Assorted toppings (e.g., sprinkles, crushed nuts, chocolate chips)
Cooking Instructions:
- Prepare the Apples:
- Thoroughly wash and dry the apples to remove any wax or residue. Insert a wooden stick or skewer into the stem end of each apple, making sure it’s secure. Set them aside on a parchment-lined baking sheet.
- Make the Caramel:
- In a heavy saucepan, melt the butter over medium heat. Add the brown sugar and corn syrup, stirring until the sugar dissolves. Gradually stir in the sweetened condensed milk, continuously stirring to prevent sticking.
- Cook the Caramel:
- Bring the mixture to a gentle boil, stirring constantly. Cook until the caramel reaches 240°F (soft-ball stage) on a candy thermometer. Remove from heat and stir in the vanilla extract.
- Dip the Apples:
- Allow the caramel to cool slightly, then carefully dip each apple into the caramel, tilting the pan if necessary to coat evenly. Allow excess caramel to drip off before placing the apple back on the parchment-lined baking sheet.
- Decorate:
- While the caramel is still warm, immediately sprinkle or roll the apples in your desired toppings. This will help them adhere to the caramel.
- Set the Apples:
- Let the apples sit at room temperature until the caramel sets completely. For faster results, you can place them in the refrigerator for about 15-20 minutes.
Extra Tips:
To achieve the best results with your Bewitched Caramel Apples, make certain the apples are completely dry before dipping them in caramel, as any moisture can cause the caramel to slide off.
If you prefer a thinner coating of caramel, you can swirl the apple in the caramel for a shorter time. For an extra magical touch, consider adding a few drops of food coloring to the caramel before dipping the apples. Finally, when storing the apples, keep them in a cool place and try to consume them within a day or two for ideal freshness.
Haunted Brownie Bites
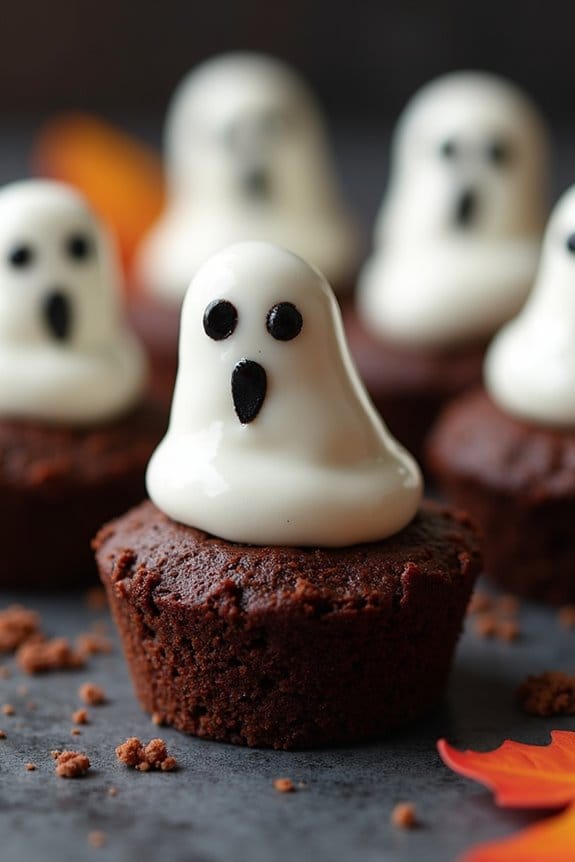
Get ready to spook your taste buds with these deliciously eerie Haunted Brownie Bites! Perfect for a Halloween party or a fun family treat, these bite-sized delights are as scrumptious as they’re spooky. With a rich, chocolatey base and ghostly decorations, these brownies are sure to be a hit with kids and adults alike.
Whether you’re hosting a ghoulish gathering or simply want to add some frightful fun to your dessert table, these Haunted Brownie Bites are the perfect way to celebrate the Halloween season.
Perfect for adding a spooky touch to any Halloween celebration, Haunted Brownie Bites are a delightful treat!
These hauntingly delicious treats aren’t just about their spooky appearance; they’re also incredibly easy to make. The brownie bites serve as the perfect canvas for your Halloween creativity, allowing you to design ghostly faces or other creepy characters with ease.
With a few simple ingredients and a bit of imagination, you can whip up these delightful treats in no time. Serve them at your next Halloween party, and watch them disappear faster than a ghost in the night!
Ingredients for Serving Size of 4-6 People:
- 1 cup of unsalted butter
- 2 cups of granulated sugar
- 4 large eggs
- 1 teaspoon of vanilla extract
- 1 cup of all-purpose flour
- 1 cup of unsweetened cocoa powder
- 1/2 teaspoon of salt
- 1 teaspoon of baking powder
- 1 cup of dark chocolate chips
- 1 cup of white chocolate chips
- Black food coloring or edible black gel
- Mini marshmallows or white fondant for decoration
Cooking Instructions:
- Preheat the Oven – Start by preheating your oven to 350°F (175°C). Line a 9×13-inch baking pan with parchment paper or lightly grease it to prevent sticking.
- Prepare the Batter – In a large mixing bowl, melt the unsalted butter over medium heat. Once melted, stir in the granulated sugar and mix until combined. Let it cool slightly before adding the eggs, one at a time, whisking well after each addition. Stir in the vanilla extract.
- Mix Dry Ingredients – In a separate bowl, sift together the all-purpose flour, unsweetened cocoa powder, salt, and baking powder. Gradually add the dry ingredients to the wet mixture, stirring until just combined. Be careful not to over-mix.
- Add Chocolate Chips – Fold in the dark chocolate chips into the brownie batter, ensuring they’re evenly distributed. This will add an extra layer of chocolatey goodness to your bites.
- Bake the Brownies – Pour the batter into the prepared baking pan, spreading it evenly with a spatula. Bake in the preheated oven for 25-30 minutes, or until a toothpick inserted into the center comes out with a few moist crumbs.
- Cool and Cut – Once baked, allow the brownies to cool completely in the pan. Once cooled, lift them out using the parchment paper and cut into bite-sized squares.
- Decorate – Melt the white chocolate chips in a microwave-safe bowl in 30-second intervals, stirring in between, until smooth. Add black food coloring or edible black gel as desired to create spooky faces or designs on mini marshmallows or pieces of white fondant. Place these ghostly decorations on top of each brownie bite.
Extra Tips:
To make your Haunted Brownie Bites even more festive, consider using Halloween-themed cookie cutters to shape your brownies before adding the decorations.
Additionally, if you want to add some extra flavor, you could mix in some chopped nuts or a splash of espresso to the brownie batter. Remember, the key to perfect brownie bites isn’t to over-bake them, as they should remain moist and fudgy.
Have fun with the decorations, and let your creativity run wild!
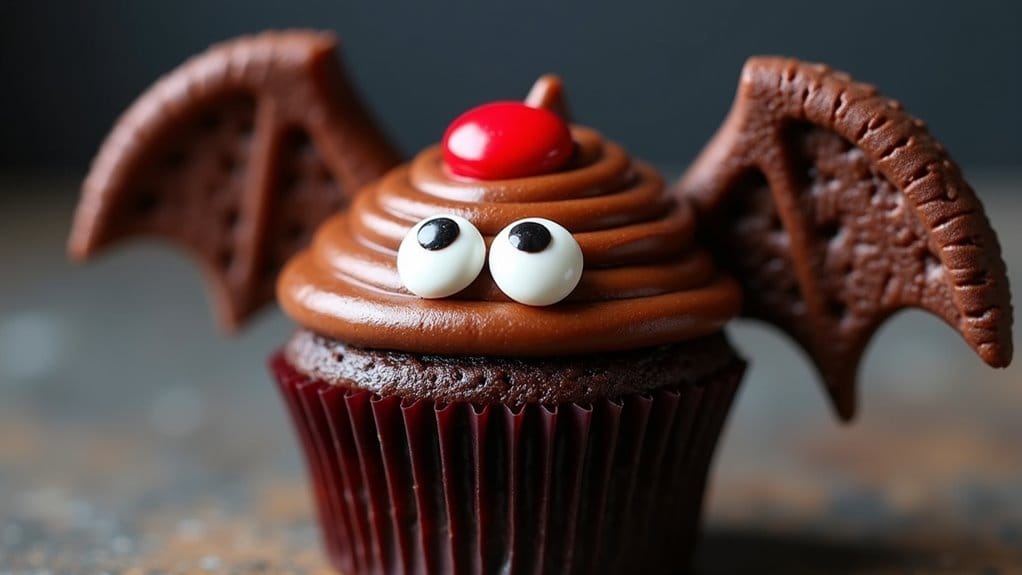
Vampire Bat Cupcakes

Halloween is the perfect time to get creative in the kitchen, and there’s no better way to impress your guests than with spooky Vampire Bat Cupcakes. These eerie yet adorable treats will add a touch of the macabre to your Halloween party spread. With a rich chocolate base and a hauntingly delicious design, these cupcakes are certain to be a hit with both children and adults alike.
They combine the decadence of chocolate with a fun, themed decoration that will have everyone reaching for seconds. To craft these Vampire Bat Cupcakes, you’ll need to start with a basic chocolate cupcake recipe. Once baked, each cupcake will be transformed into a tiny bat complete with wings and fangs, using simple decorating techniques.
With only a few ingredients and a bit of creativity, you can create a spooky snack that’s as delightful to look at as it’s to eat. This recipe serves between 4-6 people, making it a great choice for a small gathering or to add to a larger Halloween dessert table.
Ingredients:
- 1 cup all-purpose flour
- 1 cup granulated sugar
- 1/2 cup unsweetened cocoa powder
- 1 teaspoon baking powder
- 1/2 teaspoon baking soda
- 1/4 teaspoon salt
- 1/2 cup milk
- 1/4 cup vegetable oil
- 1 teaspoon vanilla extract
- 1 large egg
- 1/2 cup boiling water
- 1 cup chocolate frosting
- 12 chocolate sandwich cookies (like Oreos)
- 24 small candy eyes
- 12 red M&M’s or similar small candies
Instructions:
- Preheat the Oven: Begin by preheating your oven to 350°F (175°C) and lining a cupcake tin with paper liners. This will prevent the cupcakes from sticking and make them easy to remove.
- Mix Dry Ingredients: In a large bowl, whisk together the flour, sugar, cocoa powder, baking powder, baking soda, and salt until well combined.
- Add Wet Ingredients: Add the milk, vegetable oil, vanilla extract, and egg to the dry ingredients. Mix until the batter is smooth and all ingredients are well incorporated.
- Incorporate Boiling Water: Carefully stir in the boiling water, which will thin the batter. Mix until smooth and uniform in consistency.
- Fill and Bake: Pour the batter evenly into the prepared cupcake liners, filling each about two-thirds full. Bake in the preheated oven for 18-20 minutes, or until a toothpick inserted into the center comes out clean. Allow cupcakes to cool completely on a wire rack.
- Decorate: Once cooled, frost the tops of each cupcake with chocolate frosting. Split the chocolate sandwich cookies in half, and use each half as bat wings by pressing them gently into the frosting on opposite sides of the cupcake. Place two candy eyes on top of each cupcake, using a small dot of frosting as glue if necessary. Add a red M&M to form a nose or mouth.
Extra Tips:
For the best results, make sure your cupcakes are completely cool before decorating, as warm cupcakes can cause the frosting to melt and decorations to slide off.
If you want your bat wings to remain upright, consider inserting a small piece of toothpick into each cookie half before placing them in the frosting. For a gluten-free option, substitute the all-purpose flour with a gluten-free baking mix and ascertain all other ingredients are certified gluten-free.
Have fun with the decoration process and feel free to get creative with different colors and candy choices to make your cupcakes uniquely spooky!
