
Halloween is almost here, and if you’re like me, you’re on the lookout for treats that will enchant the little ones. This year, I’ve created a list of 12 spooktacular goodies that are guaranteed to bring smiles to your little goblins’ faces. From creepy-crawly cupcakes to mummy hot dogs, there’s a whimsical blend of savory and sweet surprises waiting for you. Are you ready to discover these magical delights? Let’s make this Halloween truly unforgettable with these bewitching treats!
Creepy-Crawly Cupcakes

Creepy-Crawly Cupcakes are the perfect Halloween treat to delight and spook the little ones. These fun and festive cupcakes aren’t only delicious, but they’re also a wonderful way to get into the Halloween spirit. With a moist chocolate base and creepy decorations that resemble little critters, these cupcakes are bound to be a hit at any Halloween gathering.
Whether you’re hosting a party or just want to surprise your kids with a special treat, these creepy-crawly cupcakes are a must-try.
The recipe involves creating a batch of rich chocolate cupcakes, which are then topped with a luscious chocolate buttercream frosting. The highlight of this treat is the decoration, where you’ll use a variety of candies and edible items to craft spiders, worms, and other creepy crawlies that will sit atop your cupcakes.
The process is simple and a lot of fun, making it a great activity to do with kids. They’ll love creating their own little creepy creatures to decorate their cupcakes. Let’s get started on creating these spooky treats for a serving size of 4-6 people.
Ingredients:
- 1 cup all-purpose flour
- 1 cup granulated sugar
- 1/2 cup unsweetened cocoa powder
- 1 teaspoon baking powder
- 1/2 teaspoon baking soda
- 1/4 teaspoon salt
- 1/2 cup milk
- 1/4 cup vegetable oil
- 1 large egg
- 1 teaspoon vanilla extract
- 1/2 cup boiling water
- 1/2 cup unsalted butter, softened (for frosting)
- 1 3/4 cups powdered sugar (for frosting)
- 1/4 cup unsweetened cocoa powder (for frosting)
- 1/4 cup milk (for frosting)
- 1 teaspoon vanilla extract (for frosting)
- Edible decorations: gummy worms, licorice strings, candy eyes, chocolate sprinkles
Instructions:
- Preheat the Oven: Begin by preheating your oven to 350°F (175°C) and line a muffin pan with cupcake liners.
- Prepare the Dry Ingredients: In a large mixing bowl, combine the flour, sugar, cocoa powder, baking powder, baking soda, and salt. Mix well to guarantee there are no lumps.
- Mix Wet Ingredients: In another bowl, whisk together the milk, vegetable oil, egg, and vanilla extract until fully combined.
- Combine Ingredients: Gradually add the wet ingredients to the dry ingredients, stirring continuously until the batter is smooth. Carefully mix in the boiling water until the batter is well blended and slightly thin.
- Bake the Cupcakes: Pour the batter into the prepared cupcake liners, filling each about two-thirds full. Bake in the preheated oven for 18-20 minutes, or until a toothpick inserted into the center of a cupcake comes out clean. Allow to cool completely on a wire rack.
- Prepare the Frosting: While the cupcakes are cooling, beat the softened butter in a bowl until creamy. Gradually add the powdered sugar and cocoa powder, alternating with the milk, and beat until smooth. Stir in the vanilla extract.
- Decorate the Cupcakes: Once the cupcakes are cooled, spread or pipe the chocolate frosting on top. Use gummy worms, licorice strings, candy eyes, and chocolate sprinkles to create creepy-crawly designs on each cupcake.
Extra Tips:
For an even spookier effect, you can use colored frosting to create a more vibrant look. If you want to make the decorating process easier, prepare all your edible decorations in advance and have them ready to place on the cupcakes.
Additionally, you can get creative with the decorations by using your favorite candies or adding edible glitter for extra sparkle. Remember to have fun and let the kids’ imaginations run wild as they create their own creepy-crawly masterpieces!
Eerie Eyeball Cookies

Eerie Eyeball Cookies are the perfect Halloween treat to delight and spook your kids. These creepy yet delicious cookies aren’t only fun to make but also a hit at any Halloween gathering. With a combination of a classic sugar cookie base and a spooky icing decoration, these cookies will leave your little ghouls and goblins amazed. The recipe is straightforward, making it a great activity to involve kids in the kitchen for some Halloween fun.
These Eerie Eyeball Cookies aren’t just about their spine-chilling appearance; they also boast a delightful taste that will have everyone reaching for more. The sugar cookie dough is easy to work with, while the icing provides a playful canvas for designing the eerie eyeballs. The recipe makes enough for 4-6 people, perfect for a small Halloween party or family gathering. Follow the steps below to conjure up these spooky treats and watch your kids’ faces light up with frightful delight!
Ingredients:
- 2 1/2 cups all-purpose flour
- 1/2 teaspoon baking powder
- 1/4 teaspoon salt
- 1 cup unsalted butter, softened
- 3/4 cup granulated sugar
- 1 large egg
- 1 teaspoon vanilla extract
- 1/4 teaspoon almond extract (optional)
- 1 1/2 cups powdered sugar
- 2-3 tablespoons milk
- Food coloring (red, blue, green)
- Chocolate chips or candy eyeballs
Cooking Instructions:
1. Preheat the Oven:
Preheat your oven to 350°F (175°C). Line two baking sheets with parchment paper or silicone baking mats to prevent sticking.
2. Prepare the Dough:
In a medium bowl, whisk together the flour, baking powder, and salt. In a separate large bowl, beat the softened butter and granulated sugar until creamy and fluffy. Add the egg, vanilla extract, and almond extract, mixing until combined.
3. Combine Ingredients:
Gradually add the dry ingredients to the wet mixture, stirring until a dough forms. If the dough is too sticky, add a little more flour until it reaches a workable consistency.
4. Shape the Cookies:
Roll the dough into small balls (about 1 inch in diameter) and place them on the prepared baking sheets, spacing them about 2 inches apart. Flatten each ball slightly with the palm of your hand.
5. Bake the Cookies:
Bake for 10-12 minutes or until the edges are lightly golden. Remove from the oven and let them cool completely on a wire rack.
6. Prepare the Icing:
In a small bowl, mix the powdered sugar with 2-3 tablespoons of milk until smooth. Divide the icing into separate bowls and add different food coloring to each bowl to create the desired icing colors for the eyeballs.
7. Decorate the Cookies:
Once the cookies are cool, use a spoon or a piping bag to apply the colored icing to form eyeballs on each cookie. Place a chocolate chip or candy eyeball in the center of each icing circle to complete the look.
8. Let the Icing Set:
Allow the icing to set for about 30 minutes at room temperature before serving.
Extra Tips:
When working with food coloring, start with a small amount and gradually add more until you reach the desired shade. This will help prevent overly vibrant colors that mightn’t look realistic for the eerie eyeballs.
If you plan to involve kids in decorating, consider setting up a decorating station with various icing colors and toppings to let them release their creativity.
Finally, confirm the cookies are completely cool before icing them to prevent the icing from melting. Enjoy these spooky treats with a glass of milk or a Halloween-themed beverage for a complete festive experience!
Monster Marshmallow Pops
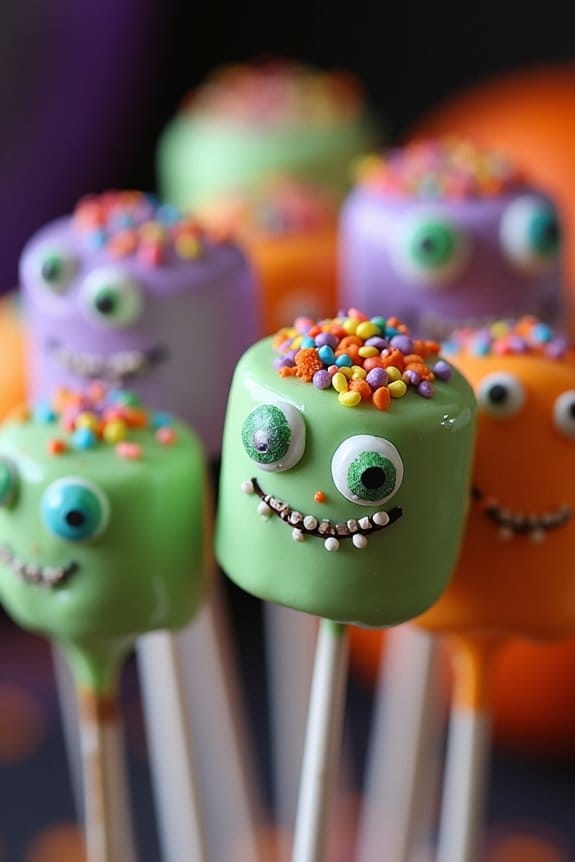
Monster Marshmallow Pops are a fun and spooky treat that kids will love to make and eat this Halloween. These delightful pops are perfect for Halloween parties or just a sweet snack to enjoy at home. The colorful combination of marshmallows, candy melts, and various edible decorations make these pops look like adorable monsters.
A spooky treat kids will adore, perfect for Halloween parties or a sweet snack at home.
Not only are they simple and quick to prepare, but they also allow for creativity, making them an excellent activity for kids. Using large marshmallows as the base, these pops are dipped in vibrant candy melts and adorned with candy eyes, sprinkles, and other edible embellishments. The result is a collection of monster pops, each with a unique personality, thanks to the variety of decorations available.
Easy to make and extremely customizable, Monster Marshmallow Pops are sure to be a hit among children and adults alike. This recipe will make enough for 4-6 people, making it ideal for sharing with friends and family.
Ingredients:
- 12 large marshmallows
- 1 cup green candy melts
- 1 cup purple candy melts
- 1 cup orange candy melts
- 24 candy eyes
- Assorted sprinkles and edible decorations
- 12 lollipop sticks
- 1 tablespoon vegetable oil (divided among candy melts colors)
- Wax paper or parchment paper
Instructions:
1. Prepare the Workstation:
Lay a sheet of wax paper or parchment paper on a flat surface to place the finished pops. This will help prevent sticking and make for easy cleanup.
2. Melt the Candy:
In three separate microwave-safe bowls, place the green, purple, and orange candy melts. Add about 1/3 tablespoon of vegetable oil to each bowl. Microwave each bowl separately in 30-second intervals, stirring in between, until the candy is completely melted and smooth. This usually takes about 1-2 minutes.
3. Insert Sticks into Marshmallows:
Carefully insert a lollipop stick into each marshmallow, ensuring it’s secure but not poking through the top.
4. Dip the Marshmallows:
Dip a marshmallow into the melted candy of your choice, swirling it around to coat it evenly. Let any excess candy drip back into the bowl.
5. Decorate the Pops:
Before the candy coating hardens, quickly press candy eyes, sprinkles, or any other decorations onto the surface of the marshmallow. Be creative and make each monster unique.
6. Set the Pops:
Place the decorated marshmallow pops onto the prepared wax or parchment paper. Allow them to set completely, which should take about 20-30 minutes at room temperature.
7. Serve and Enjoy:
Once the candy coating is firm, your Monster Marshmallow Pops are ready to serve. Display them in a fun container or arrange them on a platter for a spooky touch.
Extra Tips:
For the best results, make sure not to overheat the candy melts, as this can cause them to seize and become unusable. If the candy coating becomes too thick while dipping, add a small amount of vegetable oil to thin it out.
When decorating, try using tweezers to place small decorations precisely. If you’re planning to make a large batch, consider using a styrofoam block to stand the pops upright while they set. This will prevent any flat spots from forming on one side.
Witch’s Broomstick Pretzels

Witch’s Broomstick Pretzels are a delightful and spooky treat perfect for Halloween festivities. These whimsical snacks aren’t only fun to make but also incredibly easy, making them an excellent choice for a cooking activity with kids. With their playful appearance and crunchy, salty taste, Witch’s Broomstick Pretzels are sure to be a hit at any Halloween party or gathering.
These themed pretzels mimic the look of a classic witch’s broom, complete with a pretzel stick handle and a shredded cheese broom head. The combination of the pretzel’s salty crunch with the soft, savory cheese creates a delicious bite that kids will love. The recipe can be prepared in just a few simple steps, allowing you to focus on enjoying the Halloween festivities with your little ones.
Ingredients (Serves 4-6 people):
- 12 pretzel sticks
- 12 slices of cheddar cheese (or any cheese of your choice)
- Fresh chives, for tying
- Mustard, for dipping (optional)
Instructions:
- Prepare the Cheese Slices: Begin by cutting the cheese slices into thin strips, about 1 inch wide. This will form the bristles of the broom. You can use a knife or kitchen scissors for precision cutting.
- Create the Broom Head: Take each cheese strip and gently wrap it around one end of a pretzel stick. Make sure to leave enough space at the top of the pretzel for a handle. The cheese should cover about 1/3 of the pretzel stick.
- Secure the Cheese: Once the cheese is wrapped around the pretzel, use a fresh chive to tie around the cheese, securing it in place. This will help maintain the shape of the broom. Trim any excess chive for a neater look.
- Repeat: Repeat the process for the remaining pretzel sticks and cheese strips until you have prepared all the Witch’s Broomstick Pretzels.
- Serve and Enjoy: Arrange the broomsticks on a serving platter. Optionally, serve with a side of mustard for dipping, adding an extra layer of flavor.
Extra Tips:
For best results, use cheese slices that are firm enough to hold their shape when wrapped around the pretzel, yet flexible enough to bend without breaking.
If the chives are too delicate to tie easily, consider blanching them briefly in hot water to make them more pliable.
Additionally, you can experiment with different types of cheese to find the flavor combination your kids enjoy the most.
This recipe is versatile and can be adapted to suit various taste preferences. Enjoy making these with your kids and delight in their reactions when they see and taste their spooky creations!
Ghostly Rice Krispie Treats

Ghostly Rice Krispie Treats are a delightful Halloween treat that are certain to be a hit with kids and adults alike. These spooky snacks are a fun twist on the classic Rice Krispie Treats, incorporating a ghostly theme that’s perfect for the Halloween season.
Whether you’re hosting a Halloween party or looking for an engaging activity to do with children, making these ghostly treats is both simple and enjoyable. They offer a sweet and marshmallowy flavor with a hauntingly fun appearance that will capture the spirit of Halloween.
The preparation process is straightforward, allowing for creativity while making these treats. By using a few additional ingredients, you can mold the classic Rice Krispie mixture into ghostly shapes and decorate them to your heart’s content.
With just a little effort, you can create a batch of Ghostly Rice Krispie Treats that will leave your guests impressed and your kids delighted. Not only do they taste delicious, but they also make for an eye-catching display on any Halloween-themed table.
Ingredients for 4-6 servings:
- 6 cups Rice Krispies cereal
- 4 cups mini marshmallows
- 3 tablespoons unsalted butter
- 1 teaspoon vanilla extract
- 1 cup white chocolate, melted
- Black gel icing or edible markers for decoration
Cooking Instructions:
- Prepare the Pan: Line a 9×13 inch baking pan with parchment paper or lightly grease it to prevent sticking.
- Melt the Butter: In a large saucepan over low heat, melt the unsalted butter. Stir occasionally to guarantee the butter doesn’t burn.
- Add Marshmallows: Once the butter is melted, add the mini marshmallows to the saucepan. Stir continuously until the marshmallows are completely melted and the mixture is smooth.
- Mix in Vanilla: Remove the saucepan from the heat and stir in the vanilla extract until fully incorporated.
- Combine with Cereal: Add the Rice Krispies cereal to the melted marshmallow mixture. Stir quickly until the cereal is evenly coated with the marshmallow mixture.
- Shape the Treats: While the mixture is still warm, scoop portions of it and shape them into ghostly figures using your hands. You may need to lightly grease your hands with butter to prevent sticking.
- Cool and Set: Place the shaped treats onto the prepared baking pan. Allow them to cool and set for about 30 minutes.
- Decorate: Once the treats have set, use the melted white chocolate to coat the surface of each ghost, giving them a ghostly white appearance. Use black gel icing or edible markers to decorate the faces of the ghosts with spooky expressions.
Extra Tips:
To make the shaping process easier, work with small portions of the Rice Krispie mixture while it’s still warm, as it will harden as it cools.
If you’re making these treats with children, let them have fun decorating the ghostly figures – creativity is encouraged! Additionally, if you want to add a little more flavor, consider mixing in a pinch of salt or some mini chocolate chips into the marshmallow mixture before shaping your ghosts.
Enjoy crafting and indulging in these Ghostly Rice Krispie Treats!
Pumpkin Patch Brownies

Halloween is the perfect time to indulge in creative and festive treats that delight both the eyes and the taste buds. Pumpkin Patch Brownies serve as an exciting addition to any Halloween gathering, combining the rich, chocolatey goodness of brownies with a whimsical pumpkin patch theme.
This treat combines the fun of decorating with the satisfaction of enjoying a delicious dessert, making it an excellent choice for kids and adults alike. These brownies aren’t just a fun project; they’re also a delicious treat. Imagine biting into a soft, fudgy brownie topped with vibrant orange pumpkins made of frosting.
The brownies are easy to make, and the decorating process allows for creativity, making it a perfect activity for kids to join in. Whether you’re hosting a Halloween party or simply want a fun dessert to enjoy at home, Pumpkin Patch Brownies are bound to be a hit.
Ingredients (Serves 4-6 people):
- 1 cup unsalted butter
- 2 cups granulated sugar
- 4 large eggs
- 1 teaspoon vanilla extract
- 1 cup all-purpose flour
- 1/2 cup cocoa powder
- 1/4 teaspoon salt
- 1/4 teaspoon baking powder
- 1 cup chocolate chips
- Green icing (for grass)
- Orange icing (for pumpkins)
- Pretzel sticks (optional, for pumpkin stems)
- Black icing (optional, for pumpkin faces)
Instructions:
- Preheat and Prepare: Preheat your oven to 350°F (175°C). Grease a 9×13-inch baking pan or line it with parchment paper to guarantee easy removal of the brownies after baking.
- Melt Butter and Mix: In a large microwave-safe bowl, melt the butter. Once melted, stir in the granulated sugar until well combined. Add the eggs one at a time, beating well after each addition. Stir in the vanilla extract.
- Combine Dry Ingredients: In a separate bowl, whisk together the flour, cocoa powder, salt, and baking powder. Gradually add the dry ingredients to the wet ingredients, mixing until just combined. Be careful not to overmix, as this can result in tough brownies.
- Add Chocolate Chips: Fold in the chocolate chips, ensuring they’re evenly distributed throughout the batter.
- Bake the Brownies: Pour the batter into the prepared baking pan and spread it evenly. Bake in the preheated oven for 25-30 minutes, or until a toothpick inserted into the center comes out with a few moist crumbs. Don’t overbake, as the brownies will continue to cook slightly as they cool.
- Cool and Decorate: Let the brownies cool completely in the pan on a wire rack. Once cooled, spread green icing over the top to resemble grass. Use the orange icing to create small pumpkin shapes on top of the brownies.
Add pretzel sticks as stems and use black icing to draw faces on the pumpkins if desired.
Extra Tips:
For an even more festive presentation, consider using edible glitter or candy eyes to add extra flair to your pumpkin patches. If you find the icing too stiff for piping, you can soften it slightly by microwaving it for a few seconds, but be cautious not to make it too runny.
Vampire Fang Apples
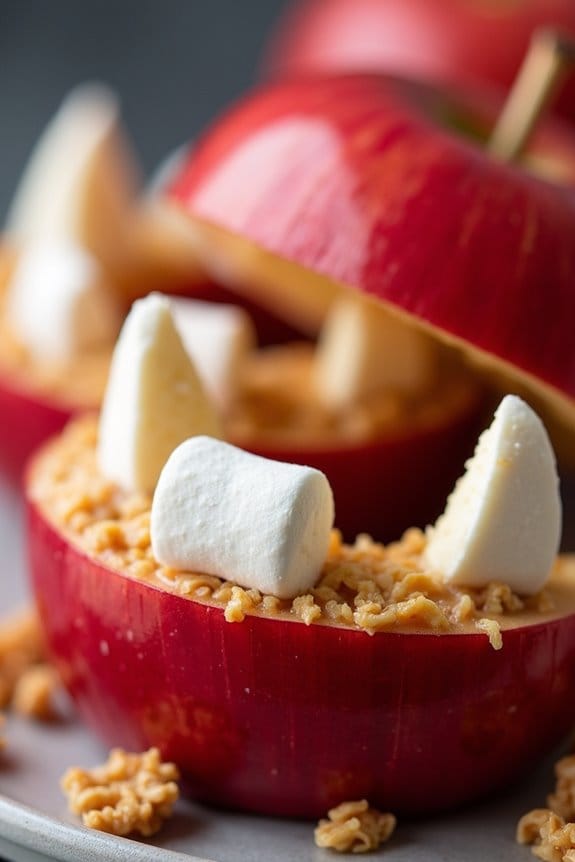
Vampire Fang Apples are a fun and spooky treat that are perfect for Halloween celebrations. This simple yet creative recipe involves transforming ordinary apple slices into vampire fangs, making them an exciting and healthy option for kids. Not only do they look great on a Halloween snack table, but they also provide a nutritious alternative to candy, keeping parents happy and kids energized for all the trick-or-treating festivities.
Spooky and healthy, Vampire Fang Apples transform ordinary snacks into Halloween fun, perfect for trick-or-treat energy!
The recipe combines fresh apple slices with a gooey peanut butter filling and jagged marshmallow “teeth,” creating a visually striking and delicious snack. The contrasting textures of the crisp apples, creamy peanut butter, and soft marshmallows are sure to delight children and adults alike. This recipe is designed to serve 4-6 people, making it an ideal choice for small gatherings or family parties.
Ingredients:
- 4 large red apples
- 1 cup smooth peanut butter
- 1 cup mini marshmallows
- 1 tablespoon lemon juice (optional, to prevent browning)
- 1/4 cup granola (optional, for added crunch)
Instructions:
- Prepare the Apples: Wash and dry the apples thoroughly. This guarantees that any wax or dirt is removed. Cut each apple into quarters and remove the core from each piece.
- Slice the Apples: Slice each apple quarter into 3 to 4 wedges, depending on the size of the apple. If using lemon juice to prevent browning, lightly brush each slice with lemon juice.
- Apply Peanut Butter: Spread about 1 tablespoon of peanut butter on one side of each apple slice. This will be the “glue” that holds the marshmallow “teeth” in place.
- Add the Teeth: Press mini marshmallows into the peanut butter on half of the apple slices, creating a jagged line to resemble vampire teeth. Make sure they’re set firmly into the peanut butter so they don’t fall off.
- Assemble the Fangs: Take another apple slice and press it onto the marshmallow-covered slice, peanut butter side in, to create the look of a mouth with fangs. Repeat until all the apple slices are used.
- Optional Crunch: Sprinkle a bit of granola inside the “mouth” for added texture and flavor, if desired.
- Serve: Arrange the Vampire Fang Apples on a serving platter and present them immediately for best freshness and visual impact.
Extra Tips:
For a twist on this recipe, consider using different nut butters like almond or cashew, especially if there are peanut allergies. You can also get creative with the “teeth” by using alternatives like sliced almonds for a more sinister look.
Make sure to serve these treats soon after preparation to prevent the apples from browning. If making ahead, store them in an airtight container in the refrigerator, and consume within a few hours for peak freshness.
Spooky Spiderweb Pizzas

Spooky Spiderweb Pizzas are a fun and delicious way to get kids excited about Halloween while enjoying a tasty treat. These mini pizzas aren’t only easy to make but also allow kids to get creative in the kitchen. The spiderweb design made from cheese adds a festive touch that’s certain to delight little ones.
Perfect for a Halloween party or a fun family dinner, these pizzas are a great way to incorporate Halloween spirit into your meals.
Creating Spooky Spiderweb Pizzas is an engaging activity that encourages children to participate in the cooking process. This recipe is simple enough for kids to assist with assembling the pizzas, making it a great opportunity for some kitchen bonding time.
Plus, with the ability to customize toppings to suit each child’s preferences, you can guarantee that everyone is happy with their own spooky creation.
Ingredients (Serves 4-6)
- 6 English muffins, split
- 1 cup pizza sauce
- 2 cups shredded mozzarella cheese
- 12 black olives, sliced
- 1/2 cup mini pepperoni slices
- 1 green bell pepper, sliced into thin strips
- Cooking spray
Cooking Instructions
- Preheat the Oven: Preheat your oven to 375°F (190°C). Line a baking sheet with parchment paper or lightly coat it with cooking spray.
- Prepare the Muffins: Place the split English muffins on the prepared baking sheet with the cut side facing up.
- Add the Sauce: Spread a generous tablespoon of pizza sauce over each muffin half, making sure it covers the surface evenly.
- Create the Spiderwebs: Sprinkle a layer of shredded mozzarella cheese over the sauce. To form the spiderweb pattern, use the sliced green bell pepper strips to create a crisscross pattern on top of the cheese.
- Add the Toppings: Decorate each pizza with black olive slices and mini pepperoni. Place the olives strategically to resemble spiders on the web.
- Bake: Place the baking sheet in the preheated oven and bake for about 10-12 minutes, or until the cheese is melted and bubbly.
- Serve: Remove from the oven and let the pizzas cool slightly before serving. Enjoy your spooky creations!
Extra Tips
For an even spookier effect, try using different colored bell peppers to create a variety of web colors.
If your kids enjoy a bit of heat, consider adding a sprinkle of crushed red pepper flakes for an extra kick.
It’s also a good idea to prepare all toppings ahead of time and let the kids assemble their pizzas as they like. This not only makes the process smoother but also allows them to express their creativity fully.
Mummy Hot Dogs
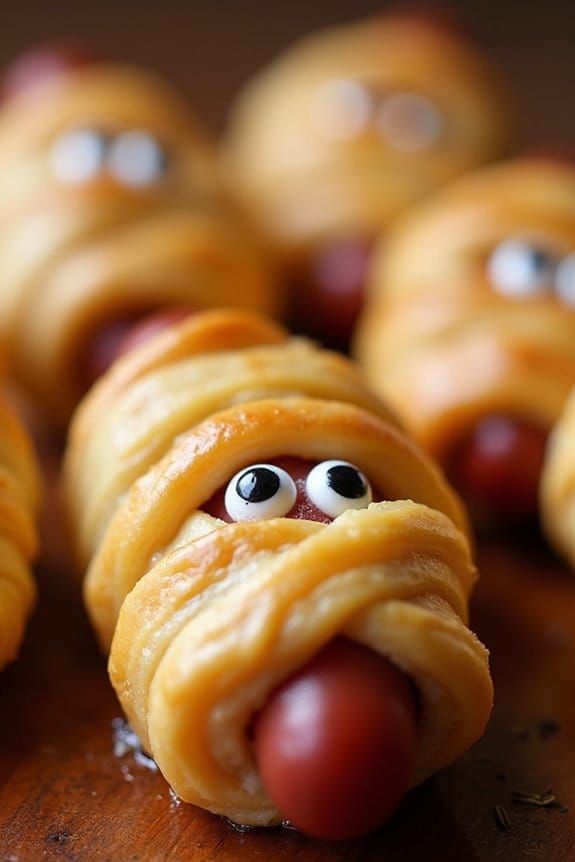
Mummy Hot Dogs are a fun and festive treat that perfectly embody the playful spirit of Halloween. These adorable snacks are fundamentally hot dogs wrapped in crescent roll dough to resemble mummies. They’re easy to make and are sure to be a hit with kids and adults alike at any Halloween gathering. The flaky and buttery texture of the crescent rolls complements the savory taste of the hot dogs, making them irresistible to any party guest.
A spooky snack sensation: hot dogs wrapped in crescent dough, perfect for Halloween fun!
This recipe is ideal for a serving size of 4-6 people, making it perfect for small gatherings or family events. The process is simple enough that even little helpers can get involved in wrapping the dough around the hot dogs, adding a fun and interactive element to your Halloween preparations. With just a few ingredients and minimal preparation time, Mummy Hot Dogs are a quick and convenient option for a spooky-themed snack.
Ingredients:
- 1 can of crescent roll dough
- 8 hot dogs
- 16 small candy eyes (optional)
- Mustard or ketchup for dipping
Cooking Instructions:
- Preheat the Oven: Start by preheating your oven to 375°F (190°C) to guarantee it’s ready for baking once your mummies are assembled.
- Prepare the Dough: Unroll the crescent roll dough and separate it into triangles. Then, using a knife or pizza cutter, slice each triangle into thin strips, approximately 1/4 inch wide. These strips will be used to wrap the hot dogs to mimic mummy bandages.
- Wrap the Hot Dogs: Take one hot dog and begin wrapping it with a strip of dough, starting at one end and leaving a small space for the face. Continue to wrap until the hot dog is covered, but make sure the dough overlaps slightly to create the mummy effect. Repeat this process for each hot dog.
- Bake the Mummies: Place the wrapped hot dogs on a baking sheet lined with parchment paper. Bake in the preheated oven for 12-15 minutes or until the dough is golden brown and cooked through.
- Add the Eyes: Once the mummies are baked and slightly cooled, place two small candy eyes on each hot dog in the space left for the face. If you don’t have candy eyes, you can use small dots of mustard or ketchup to create eyes.
- Serve and Enjoy: Arrange the Mummy Hot Dogs on a platter and serve with your choice of mustard or ketchup for dipping. Enjoy the spooky treats with your little ones or guests!
Extra Tips: For an extra twist, you can add a slice of cheese underneath the dough before wrapping for a cheesy surprise. Also, feel free to experiment with different types of hot dogs, such as turkey or veggie, to accommodate dietary preferences.
If you’re short on time, you can use pre-cooked hot dogs, but make sure they’re heated thoroughly during baking. Finally, if you’re making these in advance, they can be reheated in the oven for a few minutes before serving to maintain their delicious, flaky texture.
Frankenstein Cake Pops
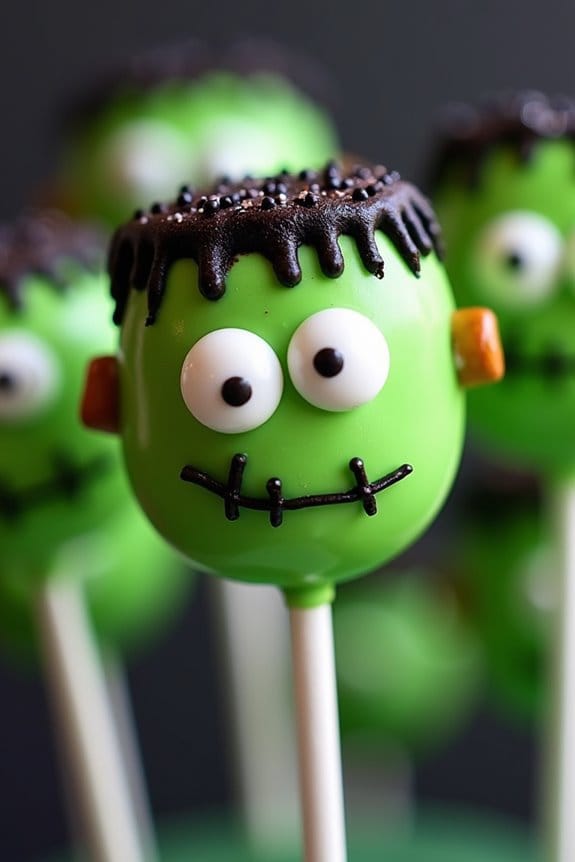
Frankenstein Cake Pops are a delightful and spooky treat perfect for Halloween festivities. These charming and easy-to-make cake pops bring the iconic monster to life in a delicious form that kids will love. Imagine moist and flavorful cake, mixed with frosting, shaped into balls, and covered in vibrant green candy coating. They’re decorated with chocolate and candies to create a fun and eerie face, making them a perfect addition to any Halloween party or gathering.
Making Frankenstein Cake Pops can be a fun and creative project to do with children. It not only satisfies their sweet tooth but also encourages their artistic side as they decorate their own mini monsters. These cake pops aren’t only a feast for the eyes but also for the palate, with their soft cake interior and crunchy candy shell. The following recipe will make around 12-15 cake pops, which is a perfect serving size for 4-6 people, allowing everyone to enjoy a couple of these frightfully fun treats.
Ingredients:
- 1 box of chocolate cake mix
- Ingredients required for cake mix (typically eggs, oil, and water)
- 1 cup chocolate frosting
- 1 package of green candy melts
- 1 package of black candy melts
- 1 package of candy eyes
- 1 package of pretzel sticks
- Lollipop sticks
- Optional: edible glitter or sprinkles
Instructions:
- Bake the Cake: Follow the instructions on the cake mix box to prepare and bake the chocolate cake. Allow it to cool completely before proceeding to the next step.
- Crumble the Cake: Once the cake is cooled, crumble it into a large bowl until it resembles fine crumbs. Mix in the chocolate frosting gradually until the mixture is well combined and can hold together when formed into a ball.
- Shape the Cake Pops: Using your hands, scoop portions of the cake mixture and roll them into golf ball-sized balls. Place them on a baking sheet lined with parchment paper.
- Insert Sticks: Melt a small amount of green candy melts in the microwave. Dip the tip of each lollipop stick into the melted candy, then insert it halfway into each cake ball. This helps secure the stick in place. Refrigerate the cake pops for about 30 minutes.
- Coat with Candy Melts: Melt the rest of the green candy melts in a microwave-safe bowl, stirring until smooth. Dip each cake pop into the melted candy, making sure it’s fully coated. Allow any excess to drip off before placing it back on the parchment paper.
- Decorate: Before the candy coating hardens, carefully press two candy eyes onto each pop. Break pretzel sticks into small pieces and insert them as bolts on either side of the ‘head.’ Use melted black candy melts to draw a mouth and stitch marks. You can also add edible glitter or sprinkles for extra flair.
- Set the Pops: Allow the decorated cake pops to set completely. This can be done by placing them in the refrigerator for about 15 minutes until the candy coating is firm.
Extra Tips:
For best results, confirm the cake is fully cooled before crumbling to avoid a mushy texture. When inserting lollipop sticks, be gentle to prevent cracking the cake balls. If the candy melts are too thick, add a teaspoon of vegetable shortening to thin them out for easier dipping. For a neater finish, twirl the pops gently to remove excess candy coating. Enjoy crafting these monstrous treats and watch them become a hit at your Halloween celebration!
Goblin Green Slime Jello

Goblin Green Slime Jello is a spooky and fun treat perfect for Halloween festivities, especially for kids. This gooey, vibrant dessert isn’t only eye-catching but also deliciously sweet with a hint of tanginess. It’s an excellent choice to liven up your Halloween party table, and it’s easy to make with just a few ingredients. Kids will love its creepy appearance, reminiscent of eerie potion concoctions or ghastly goo from their favorite tales.
Goblin Green Slime Jello is a spooky, sweet, and tangy treat, perfect for Halloween festivities.
The gelatinous texture of Goblin Green Slime Jello makes it a sensory delight, with a wobbly consistency that kids will find amusing. It’s a great opportunity to get the kids involved in the kitchen, allowing them to help mix and pour the ingredients. The recipe is simple and requires minimal effort, making it a stress-free addition to your Halloween celebrations. Plus, it’s a versatile dish that can be customized with add-ins like fruit or candy for extra fun.
Ingredients for 4-6 servings:
- 2 packages of lime-flavored gelatin (3 oz each)
- 2 cups boiling water
- 2 cups cold water
- 1 cup green apple soda
- Green food coloring (optional)
- 1 cup gummy worms or other spooky candy
Cooking Instructions:
- Dissolve the Gelatin: In a large bowl, combine the lime-flavored gelatin powder with 2 cups of boiling water. Stir the mixture until the gelatin is completely dissolved. This will guarantee a smooth, even texture without any lumps.
- Add Cold Liquids: Once the gelatin has dissolved, pour in 2 cups of cold water and 1 cup of green apple soda. Stir gently to combine. The soda will add a fizzy, sweet apple flavor, enhancing the “slime” experience.
- Enhance the Color: If desired, add a few drops of green food coloring to intensify the color of your slime. Mix well until the color is evenly distributed throughout the gelatin mixture.
- Chill the Mixture: Transfer the gelatin mixture to a large, shallow dish or individual serving cups. Cover and refrigerate for at least 4 hours, or until set.
- Add the Final Touches: Once the jello has set, gently stir the surface with a spoon to create a slimy, gooey appearance. Embed gummy worms or other spooky candies into the jello for an extra Halloween flair.
Extra Tips:
To make your Goblin Green Slime Jello even more exciting, consider using different molds or cups to set the jello in unique shapes. For a more interactive experience, allow kids to add their own spooky candies on top before serving.
If you want to amplify the slime effect, gently stir the jello just before serving to break up the surface and create a more liquid-like texture. Remember to keep the jello refrigerated until serving to maintain its structure and cool, invigorating consistency.
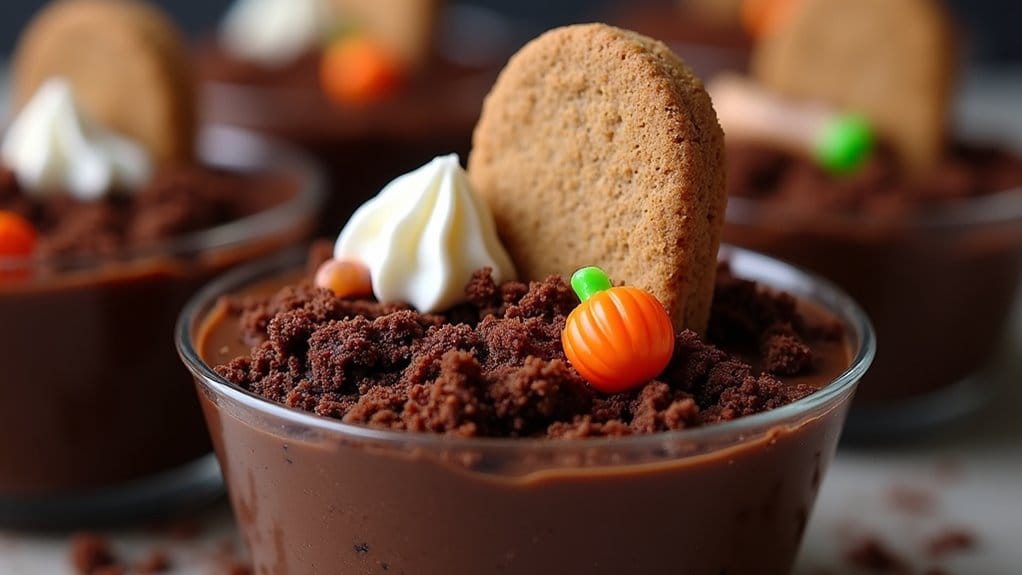
Haunted Graveyard Pudding Cups

Transform your Halloween gathering into a spooky delight with these Haunted Graveyard Pudding Cups. Perfectly themed for the occasion, these treats aren’t only fun to make but also a deliciously eerie dessert that will enchant kids and adults alike.
With layers of rich chocolate pudding, crumbled cookies, and spooky decorations, these cups are a creative way to celebrate the holiday. Serve them up at your Halloween party, and watch as your guests delight in the spooky graveyard scene crafted right in their cups.
Each pudding cup resembles a tiny graveyard, complete with crumbled cookie “dirt,” candy pumpkins, and tombstone cookies. This recipe is simple enough to involve the kids in the preparation, making it a festive family activity.
The combination of textures and flavors makes these pudding cups irresistibly delicious, providing a perfect balance of creamy, crunchy, and sweet.
Ingredients for 4-6 People:
- 2 cups of milk
- 1 package (3.9 ounces) instant chocolate pudding mix
- 1 cup heavy whipping cream
- 1 tablespoon powdered sugar
- 1 teaspoon vanilla extract
- 1 package chocolate sandwich cookies (e.g., Oreos)
- 6-8 rectangular chocolate cookies or graham crackers (for tombstones)
- Edible writing gel (optional, for tombstones)
- Candy pumpkins or gummy worms
- Clear plastic cups
Cooking Instructions:
- Prepare the Pudding:
- In a medium-sized bowl, whisk together the instant chocolate pudding mix and milk until smooth. Let the pudding set for about 5 minutes, or until thickened according to the package instructions.
- Make the Whipped Cream:
- In another bowl, beat the heavy whipping cream, powdered sugar, and vanilla extract together with an electric mixer until soft peaks form. This will be used as a topping for the pudding cups.
- Create the “Dirt”:
- Place the chocolate sandwich cookies in a resealable plastic bag and crush them using a rolling pin or your hands. The result should resemble fine crumbs, which will mimic the appearance of dirt.
- Assemble the Pudding Cups:
- Spoon a layer of pudding into each plastic cup, filling about halfway. Add a layer of cookie crumbs on top of the pudding, ensuring it covers the pudding layer completely.
- Decorate the Graveyard:
- Insert one rectangular chocolate cookie or graham cracker into each cup as a “tombstone.” Use edible writing gel to write spooky messages like “RIP” on the tombstones, if desired.
- Add candy pumpkins or gummy worms around the tombstones to enhance the graveyard appearance.
- Finish with Whipped Cream:
- Top each pudding cup with a dollop of the whipped cream you prepared earlier. This will add a creamy contrast to the crunchy cookie crumbs.
- Chill Before Serving:
- Refrigerate the assembled pudding cups for at least 30 minutes before serving to allow the flavors to meld together.
Extra Tips:
For an added touch of spookiness, you can incorporate additional Halloween-themed candy decorations, such as candy bones or skulls, to your Haunted Graveyard Pudding Cups.
If you want to save time, you can use ready-made whipped topping instead of making fresh whipped cream. Additionally, consider using clear cups to showcase the layered effect of the pudding, dirt, and decorations.
Keep the pudding cups refrigerated until ready to serve, ensuring they remain fresh and delicious for your Halloween festivities.
