

The holidays are such a special time to savor delicious flavors while keeping our health in mind. This year, I’m thrilled to share some heart-healthy Christmas dinner recipes that are full of taste. Picture a table adorned with herb-crusted salmon, vibrant quinoa-stuffed peppers, and a decadent dark chocolate avocado mousse. Doesn’t that sound amazing? Let’s explore how to enjoy these festive dishes without the guilt.
Herb-Crusted Salmon With Lemon-Dill Sauce
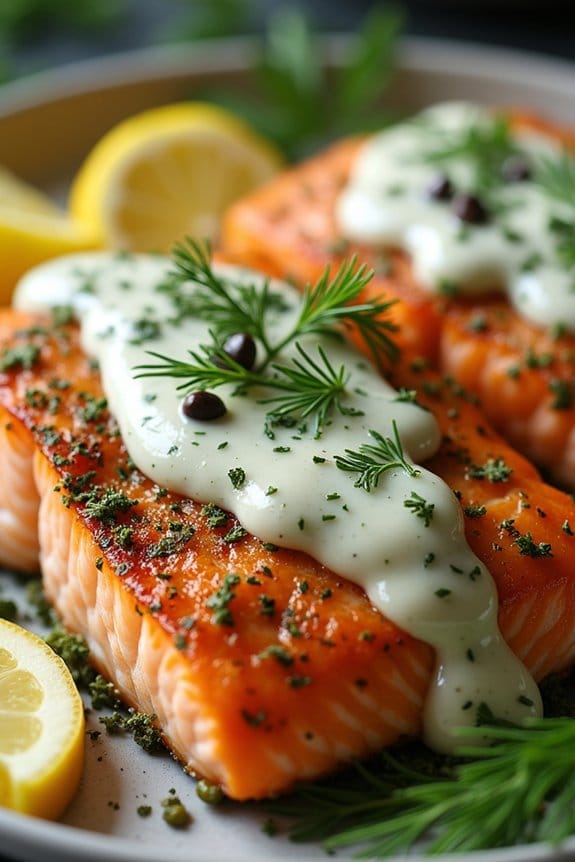
Herb-Crusted Salmon With Lemon-Dill Sauce is a delightful and nutritious option for a heart-healthy Christmas dinner. This dish combines the rich flavors of fresh herbs with the light, citrusy tang of lemon-dill sauce, creating a perfect harmony that complements the natural taste of the salmon. Not only is salmon an excellent source of omega-3 fatty acids, which are beneficial for heart health, but the herbs and lemon enhance its flavor without the need for unhealthy additives.
This recipe is designed to serve 4-6 people, making it ideal for a family gathering or an intimate holiday meal with friends. The herb crust provides a delightful texture, while the lemon-dill sauce adds a fresh, zesty finish. With minimal preparation and cooking time, this dish allows you to enjoy a festive meal without spending hours in the kitchen.
Ingredients:
- 4-6 salmon fillets (approximately 6 ounces each)
- 2 tablespoons olive oil
- Salt and pepper to taste
- 1 cup panko breadcrumbs
- 1/4 cup fresh parsley, chopped
- 1/4 cup fresh dill, chopped
- 1 tablespoon lemon zest
- 1 tablespoon Dijon mustard
- 1/2 cup plain Greek yogurt
- 2 tablespoons fresh lemon juice
- 1 tablespoon capers, rinsed and chopped
- 1 clove garlic, minced
Cooking Instructions:
- Prepare the Oven and Baking Sheet: Preheat your oven to 400°F (200°C). Line a baking sheet with parchment paper or lightly grease it with olive oil to prevent the salmon from sticking.
- Season the Salmon: Place the salmon fillets on the prepared baking sheet. Drizzle them with olive oil and season with salt and pepper to taste.
- Make the Herb Crust: In a medium bowl, combine the panko breadcrumbs, parsley, dill, and lemon zest. Mix well to guarantee the herbs are evenly distributed throughout the breadcrumbs.
- Apply the Mustard: Using a pastry brush or the back of a spoon, spread a thin layer of Dijon mustard over the top of each salmon fillet. This will help the herb crust adhere to the fish.
- Coat the Salmon: Press the herb mixture onto the mustard-coated side of each salmon fillet, ensuring an even layer. The herb crust should stick well to the mustard.
- Bake the Salmon: Place the baking sheet in the preheated oven and bake for 12-15 minutes, or until the salmon is cooked through and the herb crust is golden brown. The fish should flake easily with a fork.
- Prepare the Lemon-Dill Sauce: While the salmon is baking, whisk together the Greek yogurt, lemon juice, capers, and minced garlic in a small bowl. Season with salt and pepper to taste.
- Serve: Once the salmon is ready, serve it hot with a generous drizzle of lemon-dill sauce on top or on the side.
Extra Tips:
For the best results, make sure your salmon fillets are of even thickness to promote uniform cooking. If you’re using frozen salmon, be sure to thaw it completely before cooking. Fresh herbs make a significant difference in flavor, so try to use them if possible.
If you prefer a spicier kick, add a pinch of crushed red pepper flakes to the herb crust mixture. Finally, this dish pairs well with a side of roasted vegetables or a simple green salad to complete your heart-healthy Christmas dinner.
Garlic and Rosemary Roasted Turkey Breast
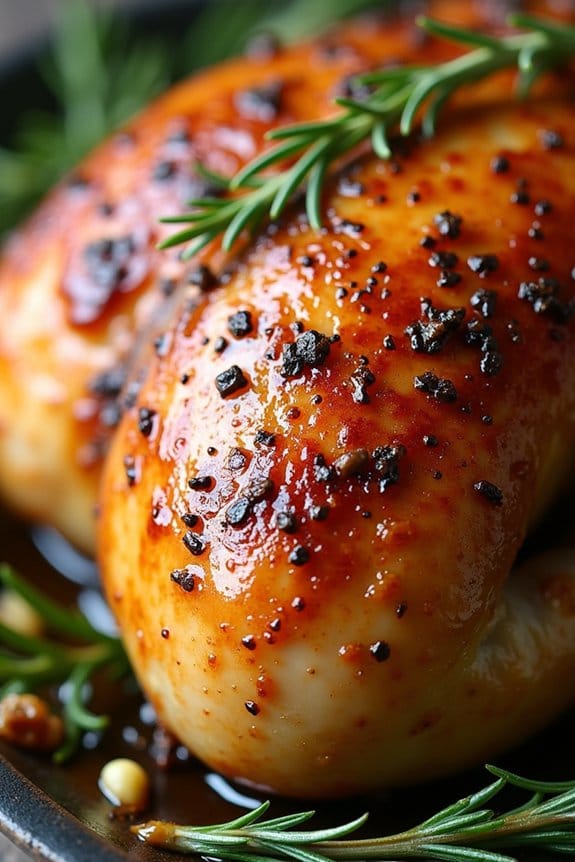
As the holiday season approaches, many of us are looking for ways to enjoy traditional meals while staying heart-healthy. One delicious option is Garlic and Rosemary Roasted Turkey Breast, which is perfect for a Christmas dinner that’s both flavorful and mindful of health. This dish combines aromatic rosemary and garlic with the succulent, lean turkey breast, providing a festive centerpiece without the need for additional, less healthy sides.
The beauty of this recipe is in its simplicity, allowing the natural flavors to shine through while guaranteeing the turkey remains juicy. Turkey breast is a great choice for those looking to reduce their intake of saturated fats, as it’s leaner than other cuts. The addition of rosemary and garlic not only enhances the taste but also adds nutritional benefits. Rosemary is known for its antioxidant properties, while garlic is celebrated for its ability to support heart health. Together, they create a flavorful, aromatic roast that’s sure to impress your guests.
Here is how you can prepare Garlic and Rosemary Roasted Turkey Breast for 4-6 people.
Ingredients:
- 1 (3-pound) boneless turkey breast
- 4 cloves garlic, minced
- 2 tablespoons fresh rosemary, chopped
- 2 tablespoons olive oil
- 1 teaspoon salt
- 1/2 teaspoon black pepper
- 1 lemon, zested and juiced
- 1/2 cup low-sodium chicken broth
Instructions:
- Prepare the Oven and Baking Dish: Preheat your oven to 375°F (190°C). Lightly grease a roasting pan or baking dish with a small amount of olive oil to prevent the turkey from sticking.
- Make the Marinade: In a small bowl, combine minced garlic, chopped rosemary, olive oil, salt, pepper, lemon zest, and lemon juice. Mix until well blended to form a fragrant marinade.
- Season the Turkey: Place the turkey breast on a clean surface or cutting board. Rub the marinade all over the turkey breast, ensuring it’s evenly coated. Let it sit for about 15 minutes to allow the flavors to infuse.
- Roast the Turkey: Transfer the seasoned turkey breast to the prepared roasting pan. Pour the chicken broth into the bottom of the pan to keep the meat moist during cooking. Cover the pan with aluminum foil.
- Cook the Turkey: Place the pan in the preheated oven and roast for about 1.5 to 2 hours, or until the internal temperature of the turkey reaches 165°F (74°C) when checked with a meat thermometer. Remove the foil for the last 30 minutes of cooking to allow the skin to crisp up.
- Let it Rest: Once cooked, remove the turkey breast from the oven and let it rest for 10-15 minutes. This helps the juices redistribute, keeping the meat tender and juicy.
- Slice and Serve: After resting, slice the turkey breast into thin slices and serve with your favorite sides.
Extra Tips:
To guarantee your turkey breast is juicy and flavorful, consider marinating it overnight in the refrigerator. This allows the flavors to penetrate deeper into the meat.
If you prefer a more pronounced citrus flavor, you can add an extra tablespoon of lemon juice to the marinade. Always use a meat thermometer to check the doneness of the turkey to avoid overcooking.
If you notice the turkey browning too quickly, cover it with foil to prevent burning. Pair this dish with roasted vegetables or a fresh salad for a complete heart-healthy meal.
Quinoa-Stuffed Bell Peppers
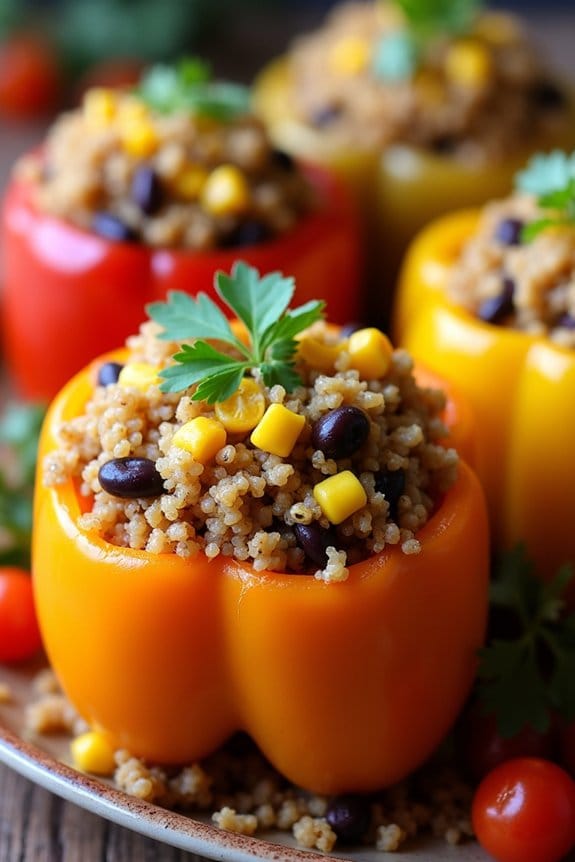
Quinoa-stuffed bell peppers are a delicious and heart-healthy addition to your Christmas dinner that will leave your guests satisfied and impressed. This dish combines the nutty flavor of quinoa with the sweetness of bell peppers, creating a delightful contrast that’s both nutritious and flavorful. Not only is it packed with protein and fiber, but it’s also visually appealing, making it a perfect centerpiece for your holiday table.
Whether you’re catering to vegetarians or simply looking to add more plant-based dishes to your menu, quinoa-stuffed bell peppers are a versatile choice that can be easily adapted to suit various tastes. The beauty of this recipe is in its simplicity and adaptability. You can customize the stuffing with your favorite ingredients, such as various herbs, spices, vegetables, or even a sprinkle of cheese for added richness.
The combination of wholesome ingredients guarantees that this dish isn’t only heart-friendly but also fulfilling. Serving 4-6 people, this recipe will guarantee everyone at your table gets a taste of this festive and healthy delight.
Ingredients for 4-6 servings:
- 6 large bell peppers (any color of choice)
- 1 cup quinoa
- 2 cups vegetable broth or water
- 1 can (15 oz) black beans, drained and rinsed
- 1 cup corn kernels (fresh, frozen, or canned)
- 1 medium onion, finely chopped
- 2 cloves garlic, minced
- 1 teaspoon ground cumin
- 1 teaspoon smoked paprika
- 1 cup cherry tomatoes, halved
- 1/4 cup fresh cilantro, chopped
- 1 tablespoon olive oil
- Salt and pepper to taste
- Optional: 1/2 cup shredded cheese (such as mozzarella or cheddar)
Cooking Instructions:
- Preheat the Oven: Begin by preheating your oven to 375°F (190°C) to guarantee it’s ready for the stuffed peppers.
- Prepare the Quinoa: Rinse the quinoa under cold water using a fine-mesh sieve. In a medium saucepan, combine the quinoa with the vegetable broth or water. Bring to a boil, then reduce the heat to low, cover, and simmer for about 15 minutes, or until the quinoa is cooked and fluffy. Remove from heat and set aside.
- Prepare the Peppers: While the quinoa cooks, prepare your bell peppers. Slice the tops off and remove the seeds and membranes. Lightly brush the exterior with olive oil and place them upright in a baking dish.
- Sauté the Veggies: In a large skillet over medium heat, add olive oil and sauté the onion and garlic until the onion is translucent. Stir in the cumin and smoked paprika, cooking for another minute until fragrant.
- Mix the Stuffing: Add the black beans, corn, cherry tomatoes, and cooked quinoa to the skillet. Stir well to combine, then season with salt and pepper to taste. Let this mixture cook together for about 5 minutes, allowing the flavors to meld.
- Stuff the Peppers: Evenly spoon the quinoa mixture into each of the prepared bell peppers, packing the mixture gently. If you’re using cheese, sprinkle it on top of each stuffed pepper.
- Bake: Cover the baking dish with foil and bake in the preheated oven for about 30 minutes. Remove the foil and continue to bake for an additional 10-15 minutes, or until the peppers are tender and the cheese (if using) is melted and bubbly.
- Garnish and Serve: Once baked, remove the peppers from the oven and let them cool for a few minutes. Garnish with fresh cilantro before serving.
Extra Tips:
When selecting bell peppers, choose ones that are similar in size so that they cook evenly. Red, yellow, and orange peppers are sweeter and make the dish more colorful.
If you like a bit of heat, consider adding a pinch of cayenne pepper or diced jalapeños to the stuffing mix. For an added twist, you can incorporate other vegetables like spinach or zucchini, or even add a handful of nuts or seeds for extra crunch.
These quinoa-stuffed peppers can also be prepared a day ahead and baked just before serving, making your holiday meal prep even easier.
Balsamic Glazed Brussels Sprouts
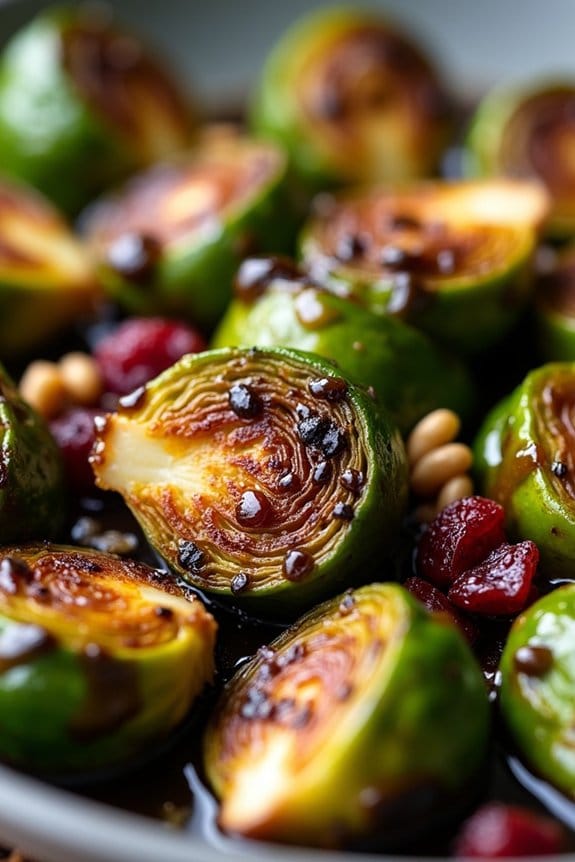
Brussels sprouts often get a bad rap, but when cooked correctly, they’re a delightful addition to any meal. With their rich, nutty flavor enhanced by a balsamic glaze, they become a standout dish even among the abundant spread of Christmas dinner. The balsamic glaze adds a sweet tanginess that perfectly complements the savory notes of the sprouts, making them not only heart-healthy but also irresistibly delicious.
This recipe serves 4-6 people and is perfect as a side dish during your Christmas celebrations. The method is straightforward, yet the results are nothing short of gourmet. You’ll find that these balsamic glazed Brussels sprouts aren’t only quick to prepare but also a hit among those who might typically shy away from this nutrient-packed vegetable.
Ingredients:
- 2 lbs Brussels sprouts, trimmed and halved
- 3 tablespoons olive oil
- Salt and pepper to taste
- 1/2 cup balsamic vinegar
- 2 tablespoons honey
- 1/4 cup chopped walnuts (optional)
- 1/4 cup dried cranberries (optional)
Instructions:
- Prepare the Brussels Sprouts: Preheat your oven to 400°F (200°C). Begin by trimming the ends off the Brussels sprouts and cutting them in half. This will help them cook evenly and absorb more flavor.
- Season and Roast: Place the halved Brussels sprouts in a large bowl. Drizzle with olive oil and season generously with salt and pepper. Toss to guarantee each sprout is evenly coated. Spread the Brussels sprouts in a single layer on a baking sheet.
- Roast the Sprouts: Place the baking sheet in the preheated oven and roast for 25-30 minutes. Halfway through, stir the sprouts to guarantee even roasting. They’re ready when they’re tender and have a nice golden-brown color.
- Prepare the Balsamic Glaze: While the Brussels sprouts are roasting, prepare the glaze. In a small saucepan over medium heat, combine the balsamic vinegar and honey. Bring to a simmer and let it cook for about 10 minutes or until it reduces by half and thickens into a glaze. Remove from heat and let it cool slightly.
- Combine and Serve: Once the Brussels sprouts are roasted, transfer them to a serving dish. Drizzle the balsamic glaze over the top and toss to coat evenly. If using, sprinkle the chopped walnuts and dried cranberries over the top for added flavor and texture.
Extra Tips:
For an enhanced flavor profile, try adding a pinch of red pepper flakes to the balsamic glaze for a subtle kick. If you prefer a less sweet dish, reduce the amount of honey or substitute with maple syrup for a different depth of sweetness.
Additionally, confirm that the Brussels sprouts are spread out evenly on the baking sheet to avoid steaming and achieve that perfect roasted texture. Finally, feel free to experiment with other nuts or seeds like pecans or sunflower seeds for a bit of crunch.
Cranberry-Orange Salad With Walnuts
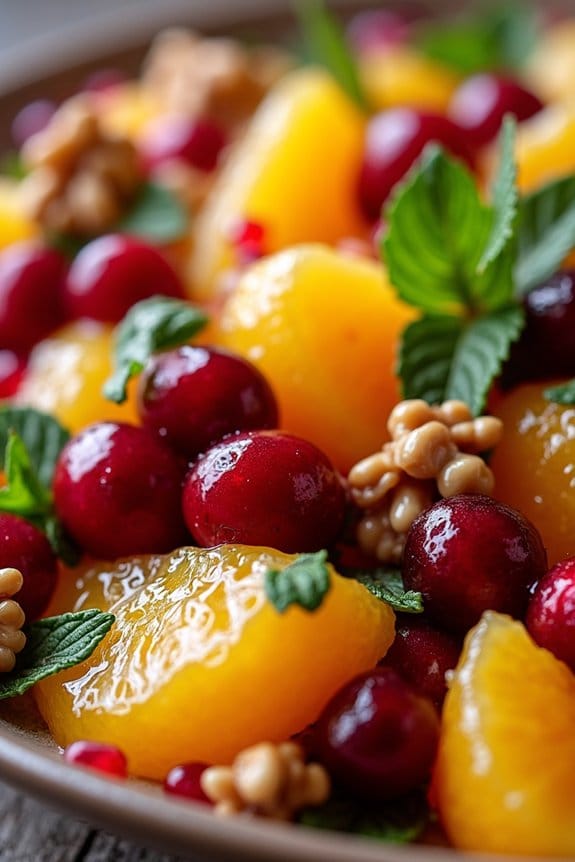
Cranberry-Orange Salad With Walnuts is a delightful and invigorating addition to any Christmas dinner menu, offering a perfect balance of sweet and tangy flavors. This heart-healthy salad isn’t only visually appealing with its vibrant colors but also packed with nutrients that contribute to cardiovascular health.
The combination of tart cranberries, juicy oranges, and crunchy walnuts creates a symphony of textures and tastes that will leave your guests craving more. The salad is simple to prepare and can be made ahead of time, allowing you to focus on other dishes during your holiday cooking.
The antioxidants in cranberries and the vitamin C in oranges play an essential role in supporting heart health, while walnuts provide a good source of omega-3 fatty acids. Together, these ingredients create a nutritious and delicious side dish that complements any festive meal. This recipe serves 4-6 people, making it ideal for family gatherings.
Ingredients (serves 4-6):
- 1 cup fresh cranberries
- 2 large navel oranges
- 1/4 cup honey
- 1/2 cup chopped walnuts
- 1/4 cup fresh mint leaves
- 1/4 cup pomegranate seeds (optional)
- 1/4 teaspoon ground cinnamon
- 1/8 teaspoon salt
Instructions:
- Prepare the Cranberries: Rinse the fresh cranberries under cold water and pat them dry with a paper towel. Place them in a medium-sized mixing bowl.
- Section the Oranges: Peel the oranges and carefully section them into segments, removing any seeds. Cut each segment into bite-sized pieces and add them to the bowl with the cranberries.
- Mix the Dressing: In a small bowl, combine the honey, ground cinnamon, and salt. Whisk until the honey is well incorporated with the spices.
- Combine Ingredients: Pour the dressing over the cranberries and oranges. Gently toss the mixture to make sure the fruits are evenly coated.
- Add Walnuts and Mint: Fold in the chopped walnuts and fresh mint leaves, gently mixing them with the fruit.
- Chill and Serve: Cover the salad with plastic wrap and refrigerate for at least 30 minutes to allow the flavors to meld. Before serving, sprinkle the pomegranate seeds over the top for an extra burst of color and flavor, if using.
Extra Tips:
For added convenience, you can prepare the cranberry-orange salad a day in advance and store it in the refrigerator. This will enhance the flavors as they meld together overnight.
If you prefer a sweeter salad, adjust the honey to taste. Toast the walnuts lightly in a dry skillet over medium heat for a few minutes to bring out their nutty flavor before adding them to the salad. This dish can also be customized with additional fruits or nuts, such as sliced apples or pecans, to suit your taste preferences.
Sweet Potato and Lentil Shepherd’s Pie
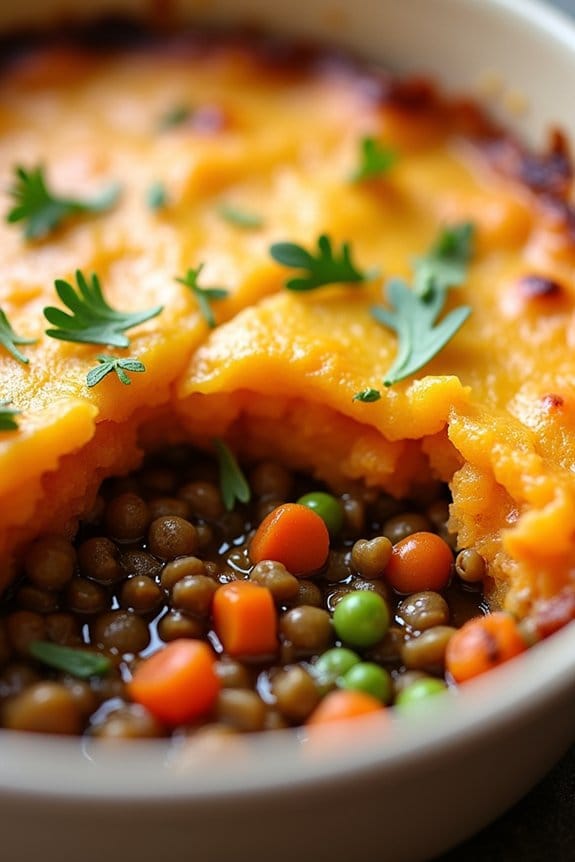
Sweet Potato and Lentil Shepherd’s Pie is a delicious and heart-healthy twist on a classic comfort food dish. It’s perfect for your Christmas dinner, offering a satisfying meal that’s packed with flavor and nutrients. The combination of sweet potatoes and lentils not only provides a delightful taste but also a great boost of fiber and essential vitamins. This shepherd’s pie is sure to become a family favorite, and it’s an excellent option for those looking to enjoy a hearty meal without compromising on health.
This recipe uses sweet potatoes for a naturally sweet topping, and lentils as a protein-rich base, making it vegetarian-friendly. The inclusion of wholesome vegetables and aromatic herbs enhances the overall flavor, while maintaining the dish’s nutritional value. Whether you’re serving it to a crowd or enjoying leftovers the next day, Sweet Potato and Lentil Shepherd’s Pie is a versatile and nourishing choice for your holiday table.
Ingredients for 4-6 servings:
- 4 large sweet potatoes
- 2 tablespoons olive oil
- 1 onion, diced
- 2 cloves garlic, minced
- 2 carrots, diced
- 1 cup frozen peas
- 1 cup brown or green lentils
- 4 cups vegetable broth
- 1 teaspoon thyme
- 1 teaspoon rosemary
- Salt and pepper to taste
- 2 tablespoons tomato paste
- 1 tablespoon balsamic vinegar
- Optional: fresh parsley for garnish
Cooking Instructions:
- Prepare the Sweet Potatoes: Preheat your oven to 375°F (190°C). Peel the sweet potatoes and cut them into large chunks. Place them in a pot of boiling water and cook until tender, about 15-20 minutes.
- Cook the Lentil Base: In a large skillet, heat olive oil over medium heat. Add the diced onion and garlic, sautéing until the onion becomes translucent. Add the carrots and continue to cook for another 5 minutes until they begin to soften.
- Add the Lentils and Broth: Stir in the lentils, vegetable broth, thyme, rosemary, salt, and pepper. Bring the mixture to a boil, then reduce the heat to low and let it simmer, uncovered, for about 25-30 minutes or until the lentils are tender. Stir in the peas, tomato paste, and balsamic vinegar, cooking for an additional 5 minutes.
- Mash the Sweet Potatoes: Drain the cooked sweet potatoes and return them to the pot. Mash them with a potato masher until smooth. Season with salt and pepper to taste.
- Assemble the Shepherd’s Pie: Pour the lentil mixture into a baking dish, spreading it out evenly. Spoon the mashed sweet potatoes over the top, smoothing it out to cover the filling entirely.
- Bake the Pie: Place the dish in the preheated oven and bake for 20-25 minutes, or until the top is slightly golden and the filling is bubbly.
- Serve and Garnish: Remove from the oven and let it cool for a few minutes. Garnish with fresh parsley if desired before serving.
Extra Tips:
When making Sweet Potato and Lentil Shepherd’s Pie, it’s important to verify the lentils are fully cooked and tender before assembling the dish, as they’ll not cook much further in the oven.
If you prefer a creamier texture for the sweet potato topping, you can add a splash of almond milk or a tablespoon of butter while mashing. Additionally, you can experiment with adding other vegetables like mushrooms or bell peppers to the lentil mixture for extra flavor and nutrition.
This dish can be made ahead of time and stored in the refrigerator, allowing you to simply reheat it before serving, making it a convenient option for holiday meal planning.
Whole Wheat Dinner Rolls With Flaxseeds

Whole Wheat Dinner Rolls With Flaxseeds are a heart-healthy addition to your Christmas dinner table. These rolls are made with whole wheat flour, which is high in fiber and helps maintain a healthy digestive system. The addition of flaxseeds provides a good source of omega-3 fatty acids, which are known for their heart-protective properties. By choosing whole wheat over refined flour and incorporating nutrient-rich flaxseeds, you’re offering your loved ones a nutritious treat that complements the festive spirit without compromising on health.
These rolls are soft, fluffy, and slightly nutty from the flaxseeds, making them a delightful accompaniment to any holiday meal. They’re easy to prepare and can be made in advance, allowing you to focus on spending quality time with your family and friends. Perfectly balancing health and flavor, these Whole Wheat Dinner Rolls With Flaxseeds are sure to be a hit at your Christmas gathering.
Ingredients for 4-6 People:
- 3 cups whole wheat flour
- 1/4 cup ground flaxseeds
- 2 tablespoons sugar
- 1 teaspoon salt
- 1 packet (2 1/4 teaspoons) active dry yeast
- 1 cup warm water (110°F to 115°F)
- 3 tablespoons olive oil
- 1 egg
Cooking Instructions:
- Prepare the Yeast Mixture: In a small bowl, dissolve the sugar in warm water. Stir in the yeast and let it sit for about 5-10 minutes until it becomes frothy. This indicates that the yeast is active.
- Mix the Dry Ingredients: In a large mixing bowl, combine the whole wheat flour, ground flaxseeds, and salt. Make a well in the center of the mixture.
- Combine Ingredients: Pour the yeast mixture and olive oil into the well of the dry ingredients. Crack the egg into the mixture and mix everything together until a dough starts to form.
- Knead the Dough: Transfer the dough onto a lightly floured surface. Knead it for about 8-10 minutes until it becomes smooth and elastic. If the dough is too sticky, sprinkle a little more flour as needed.
- First Rise: Place the kneaded dough in a lightly greased bowl, cover it with a clean cloth, and let it rise in a warm place for about 1 hour, or until it has doubled in size.
- Shape the Rolls: Once the dough has risen, punch it down to release the air. Divide the dough into 12 equal pieces and shape them into balls. Place the rolls on a greased baking sheet, making sure there’s enough space between each roll for expansion.
- Second Rise: Cover the shaped rolls with a cloth and let them rise again for about 30 minutes, or until they’ve doubled in size.
- Bake the Rolls: Preheat your oven to 375°F (190°C). Bake the rolls for 15-20 minutes, or until they’re golden brown on top. Remove them from the oven and let them cool slightly before serving.
Extra Tips:
When preparing Whole Wheat Dinner Rolls With Flaxseeds, it’s essential to ascertain that the water for the yeast is at the correct temperature. Too hot, and it will kill the yeast; too cold, and it won’t activate sufficiently.
If you find the dough too sticky, add flour gradually to achieve the right consistency, but be careful not to overdo it, as too much flour can make the rolls dense.
Finally, for a shiny finish, you can brush the tops of the rolls with a little milk or egg wash before baking. Enjoy your nutritious, homemade rolls!
Grilled Asparagus With Lemon Zest
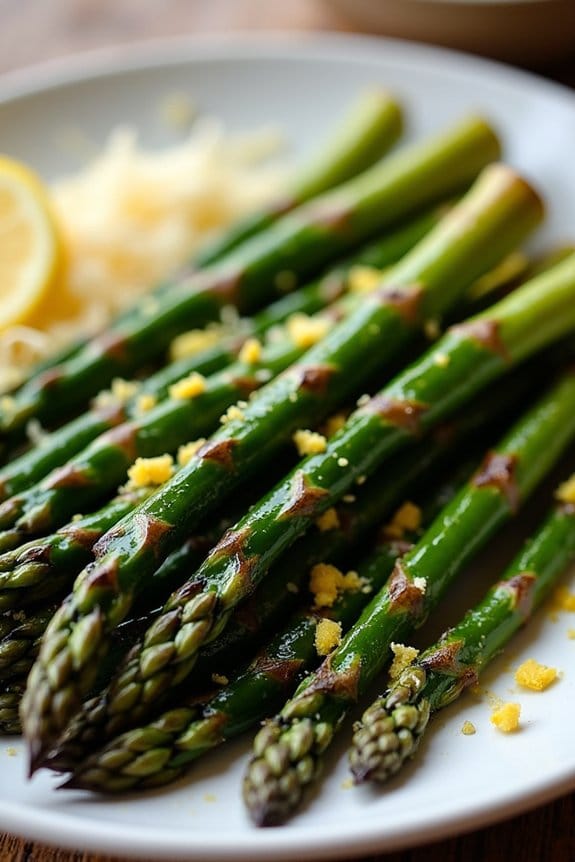
Celebrate the festive season with a heart-healthy side dish that’s both delicious and nutritious. Grilled Asparagus with Lemon Zest is a perfect addition to your Christmas dinner table, offering a vibrant green color that complements any holiday spread. Asparagus is known for its high fiber content, low calories, and rich supply of vitamins such as A, C, and K.
When grilled to perfection and topped with a hint of lemon zest, this dish not only satisfies the taste buds but also promotes heart health. This recipe is designed with simplicity in mind, allowing the natural flavors of the asparagus to shine through. The lemon zest adds a revitalizing citrus note that elevates the dish, making it an ideal complement to the richer flavors often found in holiday meals.
Whether you’re serving a roast, turkey, or a vegetarian feast, this Grilled Asparagus with Lemon Zest is sure to be a hit with family and friends. The following recipe serves 4-6 people, making it perfect for a small gathering or as part of a larger feast.
Ingredients:
- 2 pounds fresh asparagus, trimmed
- 2 tablespoons olive oil
- Salt, to taste
- Black pepper, to taste
- 1 lemon, zested and juiced
- 1 tablespoon grated Parmesan cheese (optional)
Cooking Instructions:
- Prepare the Asparagus: Begin by washing the asparagus thoroughly under cold water. Trim the woody ends by snapping or cutting them off, leaving the tender stalks intact. Pat them dry with a paper towel to promote they grill evenly.
- Season the Asparagus: Place the trimmed asparagus in a large mixing bowl. Drizzle the olive oil over the asparagus, then add a generous pinch of salt and black pepper. Toss the asparagus until each spear is evenly coated with the oil and seasoning.
- Preheat the Grill: Preheat your grill to medium-high heat. If you’re using a grill pan, place it on the stove over medium-high heat and allow it to heat up for a few minutes.
- Grill the Asparagus: Arrange the asparagus spears in a single layer on the preheated grill or grill pan. Cook them for about 3-5 minutes on each side, or until they’re tender and have beautiful grill marks. Be careful not to overcook them, as they should still have a slight crunch.
- Add Lemon Zest and Juice: Once the asparagus is grilled, transfer them to a serving platter. Sprinkle the freshly grated lemon zest over the top, and drizzle with lemon juice for a bright, tangy flavor. If desired, sprinkle a tablespoon of grated Parmesan cheese over the asparagus for an added layer of flavor.
Extra Tips:
For the best results, select asparagus spears that are uniform in thickness to promote even cooking. If you prefer a smokier flavor, you can add a pinch of smoked paprika to the seasoning.
To enhance the dish further, consider adding toasted pine nuts or slivered almonds for a crunchy texture. Grilled Asparagus with Lemon Zest can be served warm or at room temperature, making it a flexible addition to your holiday menu. Enjoy this heart-healthy dish that’s as satisfying as it’s simple to prepare.
Spiced Apple and Pear Crisp
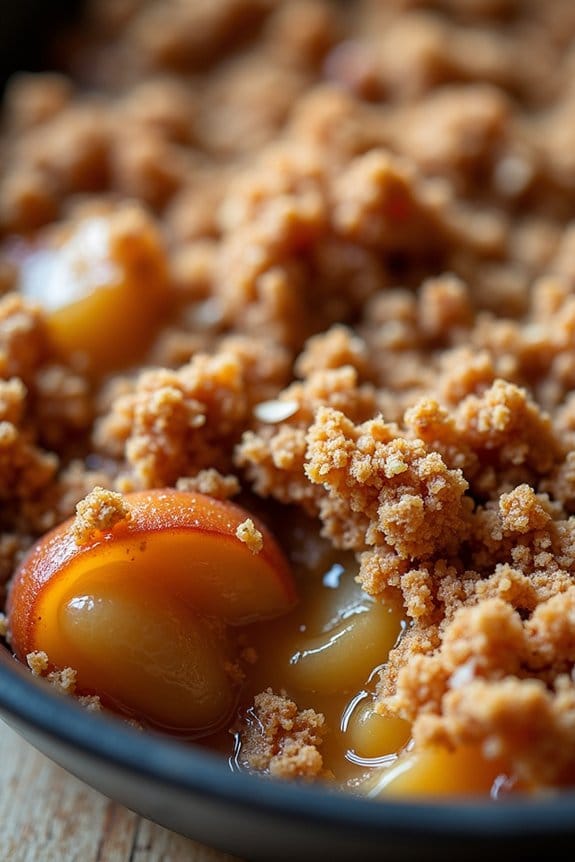
This holiday season, treat your family and friends to a delightful and heart-healthy dessert with our Spiced Apple and Pear Crisp. This comforting dish combines the natural sweetness of apples and pears with aromatic spices, providing a satisfying conclusion to your Christmas dinner.
The crisp topping, made with rolled oats and nuts, adds a crunchy texture while keeping cholesterol levels in check. Not only is this dessert delicious, but it also aligns with your heart-healthy goals by incorporating wholesome ingredients that are low in saturated fat and high in nutrients.
The combination of apples and pears creates a naturally sweet and juicy filling, while the spices such as cinnamon and nutmeg offer a festive warmth and fragrance. By using whole grain oats and nuts, the crisp topping provides fiber and healthy fats, contributing to heart health.
It’s a perfect way to enjoy a sweet treat without compromising on nutrition. This recipe is designed to serve 4-6 people, making it ideal for a small gathering or family dinner.
Ingredients (Serves 4-6):
- 3 medium apples, peeled, cored, and sliced
- 3 medium pears, peeled, cored, and sliced
- 1 tablespoon lemon juice
- 1 teaspoon vanilla extract
- 1/4 cup honey or maple syrup
- 1 teaspoon ground cinnamon
- 1/2 teaspoon ground nutmeg
- 1/4 teaspoon ground ginger
- 1 cup rolled oats
- 1/2 cup chopped nuts (such as almonds or walnuts)
- 1/4 cup whole wheat flour
- 1/4 cup coconut oil, melted
- A pinch of salt
Cooking Instructions:
- Preheat the Oven: Begin by preheating your oven to 350°F (175°C). This guarantees that the crisp will bake evenly and develop a golden topping.
- Prepare Fruit Filling: In a large mixing bowl, combine the sliced apples and pears. Add the lemon juice, vanilla extract, honey or maple syrup, cinnamon, nutmeg, and ginger. Toss everything together until the fruit is well-coated with the spices and sweetener.
- Transfer to Baking Dish: Pour the fruit mixture into a baking dish, spreading it evenly. This will guarantee that the fruit cooks uniformly and the flavors meld together beautifully.
- Make the Crisp Topping: In another bowl, mix together the rolled oats, chopped nuts, whole wheat flour, melted coconut oil, and a pinch of salt. Stir until the ingredients are well combined and form a crumbly texture.
- Assemble the Crisp: Evenly sprinkle the oat and nut mixture over the fruit in the baking dish, covering it completely. The topping should be distributed evenly to guarantee a nice crunchy layer on top of the baked fruit.
- Bake: Place the baking dish in the preheated oven and bake for about 35-40 minutes. The fruit should be bubbling, and the topping should be golden brown.
- Cool and Serve: Allow the crisp to cool slightly before serving. This will help the juices thicken and the flavors to further develop. Serve warm, possibly with a dollop of low-fat yogurt or a scoop of light ice cream.
Extra Tips:
For a more personalized touch, consider adding a handful of dried cranberries or raisins to the fruit mixture for extra sweetness and texture. If you prefer a more tart flavor, you can adjust the amount of sweetener to your liking.
Additionally, you can prepare the crisp in advance and store it in the refrigerator. Simply reheat it in the oven before serving. This Spiced Apple and Pear Crisp isn’t only a delicious dessert but also a fantastic way to showcase seasonal fruits in a heart-healthy manner.
Dark Chocolate Avocado Mousse

Indulge in a heart-healthy dessert this Christmas with our decadent Dark Chocolate Avocado Mousse. This recipe cleverly combines the rich, creamy texture of ripe avocados with the deep, satisfying taste of dark chocolate, resulting in a dessert that’s both delicious and nutritious. Not only is this mousse free from refined sugars, but it’s also packed with healthy fats and antioxidants that support cardiovascular health.
Perfect for those looking to enjoy a festive treat without compromising on their health goals, this mousse is sure to be a hit at your holiday gathering.
The use of avocados in this recipe provides a silky smooth texture while contributing essential nutrients such as potassium and fiber. Dark chocolate, particularly those with a high cocoa content, is a good source of flavonoids, which have been linked to improved heart health.
Combined with a hint of vanilla and a touch of natural sweetness, the result is a luxurious dessert that’s as guilt-free as it’s delicious. Prepare to impress your guests with a dessert that looks, tastes, and feels indulgent, yet remains perfectly aligned with heart-conscious eating.
Ingredients (Serves 4-6):
- 3 ripe avocados
- ½ cup unsweetened cocoa powder
- ½ cup pure maple syrup
- 1 teaspoon vanilla extract
- ¼ teaspoon sea salt
- ¼ cup almond milk (or milk of choice)
- ½ cup dark chocolate chips (70% cocoa or higher), melted
Instructions:
- Prepare the Avocados: Begin by cutting the avocados in half, removing the pits, and scooping the flesh into a food processor. Confirm the avocados are ripe for a smoother consistency.
- Add Dry Ingredients: To the food processor, add the unsweetened cocoa powder and sea salt. These will provide the rich chocolate flavor and enhance the sweetness of the mousse.
- Incorporate Liquid Ingredients: Add the pure maple syrup and vanilla extract. These will sweeten the mousse naturally without refined sugars. Also, pour in the almond milk to achieve the desired creamy texture.
- Blend the Mixture: Pulse the mixture in the food processor until smooth and creamy. Scrape down the sides with a spatula as needed to confirm all ingredients are well combined.
- Melt the Chocolate: In a microwave-safe bowl or using a double boiler, melt the dark chocolate chips until smooth. Be careful not to overheat to prevent burning.
- Combine Chocolate: Add the melted chocolate to the avocado mixture in the food processor. Blend again until the chocolate is fully integrated and the mousse is uniformly smooth.
- Chill the Mousse: Transfer the mousse to serving dishes and refrigerate for at least 1 hour before serving. This chilling step will help set the mousse and enhance the flavors.
Extra Tips:
For a touch of elegance, consider garnishing your Dark Chocolate Avocado Mousse with a sprinkle of cacao nibs, fresh berries, or a dollop of whipped coconut cream.
If you’re making this dessert ahead of time, it can be stored in the refrigerator for up to two days, making it a convenient option for holiday prep. To confirm the best consistency, choose avocados that are perfectly ripe — neither too firm nor overly soft.
This recipe is also versatile; feel free to adjust the sweetness to your preference or experiment with different types of milk for varying flavors.
