
Hello lovely readers!
As the holiday season approaches, I’m on the lookout for meals that are both festive and light.
Christmas lunch is just around the corner, and I’ve put together a list of 14 delightful recipes.
From a refreshing Citrus and Pomegranate Salad to a delicious Smoked Salmon and Avocado Tartine, there’s something for everyone.
These dishes are sure to bring joy and relaxation to your holiday table.
Refreshing Citrus and Pomegranate Salad
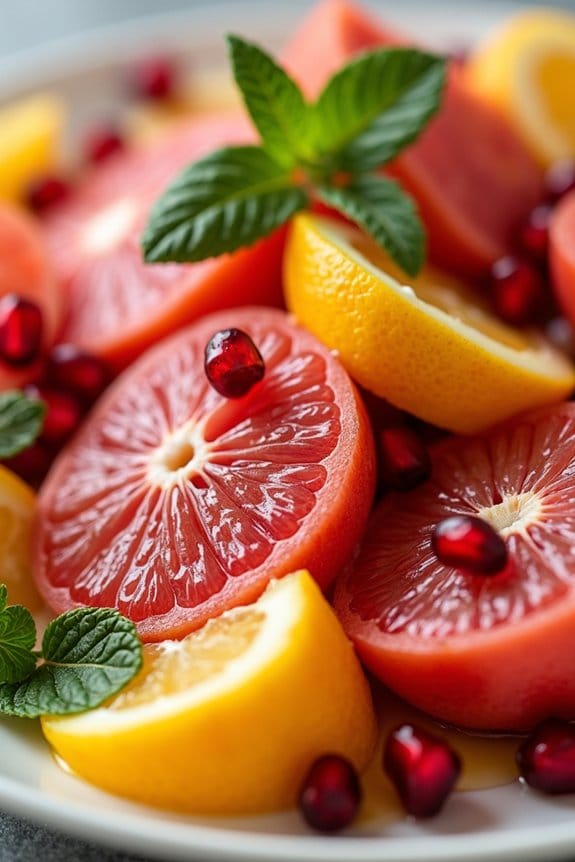
The holiday season is the perfect time to indulge in a delightful spread of festive dishes, and a Invigorating Citrus and Pomegranate Salad is a perfect addition to your Christmas lunch menu. This salad is a vibrant medley of juicy citrus fruits and jewel-like pomegranate seeds, tossed with fresh mint and a light, tangy dressing.
Not only does it add a burst of color to your table, but it also offers a rejuvenating contrast to the richer dishes typically served during holiday meals. This salad isn’t just delicious but also packed with vitamins and antioxidants, making it a healthy choice for a festive feast.
Designed to serve 4-6 people, this Invigorating Citrus and Pomegranate Salad can be prepared in just a few minutes, making it an ideal choice for hosts looking for a quick and easy-to-make dish. With its combination of sweet, tart, and minty flavors, this salad is sure to be a hit with your guests.
It’s a wonderful way to cleanse the palate between courses and adds a touch of elegance to your Christmas lunch with its bright colors and fresh taste.
Ingredients:
- 2 large oranges
- 2 grapefruits
- 1 pomegranate
- 1/4 cup fresh mint leaves
- 2 tablespoons olive oil
- 1 tablespoon honey
- 1 tablespoon lime juice
- Salt and pepper to taste
Cooking Instructions:
- Prepare the Citrus Fruits: Begin by peeling the oranges and grapefruits. Carefully remove the white pith and slice the fruits into rounds. You can also segment the fruits if preferred. Place them in a large mixing bowl.
- Extract the Pomegranate Seeds: Cut the pomegranate in half and gently tap the back of each half with a wooden spoon over a bowl to release the seeds. Remove any white membrane that may fall out with the seeds.
- Combine Ingredients: Add the pomegranate seeds to the bowl with the citrus slices. Tear the fresh mint leaves into smaller pieces and sprinkle them over the salad.
- Prepare the Dressing: In a small bowl, whisk together olive oil, honey, lime juice, salt, and pepper until well combined.
- Toss the Salad: Drizzle the dressing over the citrus and pomegranate mixture. Gently toss the salad to make sure all ingredients are evenly coated with the dressing.
- Serve: Transfer the salad to a serving platter or bowl. Garnish with a few extra mint leaves for a festive touch and serve immediately.
Extra Tips:
When preparing this salad, it’s important to use fresh, ripe citrus fruits for the best flavor. If you have time, chill the fruits before slicing them, as this will enhance their invigorating taste.
Additionally, consider using a serrated knife for slicing the citrus fruits, as it will help you achieve clean and even slices. If you’d like to add a bit of crunch, consider sprinkling some toasted nuts, such as sliced almonds or pistachios, on top of the salad before serving.
This salad can be made a few hours in advance and stored in the refrigerator; however, it’s best to dress it just before serving to maintain its vibrant appearance and fresh taste.
Herbed Goat Cheese and Fig Crostini
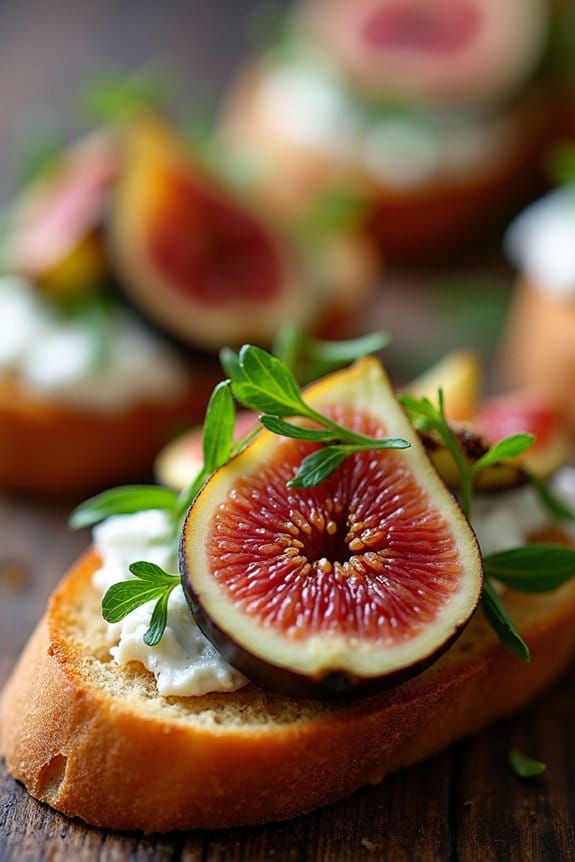
Herbed Goat Cheese and Fig Crostini is a delightful appetizer that perfectly balances the tangy creaminess of goat cheese with the sweet, rich flavor of fig. Ideal for a Christmas lunch, this dish brings a touch of elegance to the table while being relatively simple to prepare.
The crostini are crisp and crunchy, serving as the perfect vehicle for the creamy cheese and fig topping. This harmonious combination of flavors and textures is sure to impress your guests and set the tone for a festive meal.
The key to making this dish shine is using high-quality ingredients. Fresh herbs add a pop of color and aromatic depth to the goat cheese, while ripe figs lend their natural sweetness to the mix.
These crostini can be prepared in advance, making them an excellent choice for holiday gatherings where time is of the essence. With this recipe, you’ll create a dish that’s as visually appealing as it’s delicious, guaranteeing it becomes a holiday favorite for years to come.
Ingredients (Serves 4-6):
- 1 French baguette
- 8 oz goat cheese
- 1 tablespoon fresh rosemary, minced
- 1 tablespoon fresh thyme, minced
- 1 tablespoon fresh chives, minced
- 1/4 cup honey
- 6 fresh figs, sliced
- 2 tablespoons olive oil
- Salt and pepper to taste
Instructions:
1. Preparation:
Preheat your oven to 350°F (175°C). While the oven is heating, slice the baguette into 1/2-inch thick slices. You should have around 12-16 slices, depending on the length of the baguette.
2. Toasting the Bread:
Arrange the baguette slices on a baking sheet. Brush each slice with a small amount of olive oil on both sides. Place the baking sheet in the preheated oven and bake for about 10 minutes or until the slices are golden brown and crispy. Remove from the oven and let them cool slightly.
3. Making the Herbed Goat Cheese:
In a bowl, combine the goat cheese with the minced rosemary, thyme, and chives. Mix well until the herbs are evenly distributed throughout the cheese. Season the mixture with salt and pepper to taste.
4. Assembling the Crostini:
Spread a generous amount of the herbed goat cheese mixture onto each toasted baguette slice. Top each with a slice of fresh fig.
5. Finishing Touches:
Drizzle a small amount of honey over the fig-topped crostini. This adds a lovely sweetness that complements the tangy goat cheese and the natural sweetness of the figs.
6. Serving:
Arrange the crostini on a serving platter. They can be served warm or at room temperature, making them a flexible option for your holiday table.
Extra Tips:
For a more complex flavor profile, try adding a pinch of crushed red pepper flakes to the herbed goat cheese mixture for a slight kick. If fresh figs aren’t available, you can substitute with fig jam for a similar taste.
Additionally, verify the baguette is fresh for the best texture in the crostini. You can also experiment with different herbs, such as basil or parsley, to customize the flavors to your liking.
Smoked Salmon and Avocado Tartines
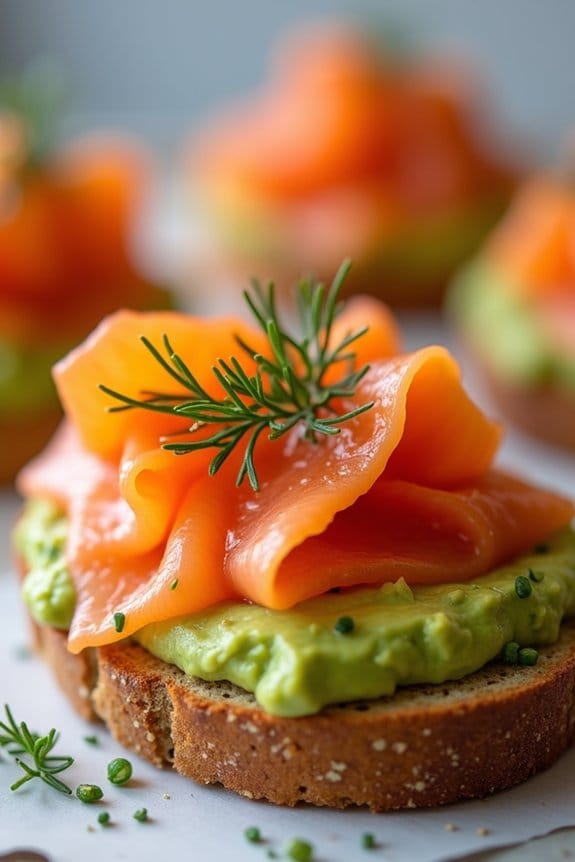
Smoked Salmon and Avocado Tartines are a delightful and elegant addition to any Christmas lunch spread. Combining the rich, smoky flavor of salmon with the creamy, smooth texture of avocado, these tartines offer a balanced and invigorating taste. The use of fresh lemon juice and herbs adds a zesty twist, making each bite an exciting experience for your palate.
Perfect for a light starter or as part of a larger buffet, these tartines are simple to assemble yet sophisticated enough to impress your guests. Ideal for serving 4-6 people, these tartines provide a vibrant contrast of colors and flavors that reflect the holiday spirit.
The foundation of crusty bread provides a satisfying crunch, while the topping of salmon and avocado is both nourishing and indulgent. With just a few quality ingredients, you can create a dish that’s as pleasing to the eye as it’s to the taste buds. Follow the instructions below to create your own Smoked Salmon and Avocado Tartines for your Christmas feast.
Ingredients (for 4-6 servings):
- 8 slices of crusty bread (like sourdough or baguette)
- 200g (about 7 oz) of smoked salmon
- 2 ripe avocados
- 1 lemon
- 2 tablespoons of cream cheese
- 1 tablespoon of olive oil
- 1/4 teaspoon of salt
- 1/4 teaspoon of black pepper
- Fresh dill or chives for garnish
Instructions:
- Prepare the Avocado Spread: Begin by cutting the avocados in half, removing the pit, and scooping the flesh into a bowl. Mash the avocado with a fork until smooth, then add the juice of half a lemon, olive oil, salt, and pepper. Mix well to combine all ingredients into a creamy spread.
- Prepare the Bread: Lightly toast the slices of bread until they’re golden brown. This can be done in a toaster or under a grill. Toasting the bread provides a nice crunchy base that contrasts well with the creamy toppings.
- Assemble the Tartines: Once the bread is toasted, spread a thin layer of cream cheese on each slice. Next, spread a generous amount of the avocado mixture on top of the cream cheese.
- Add the Smoked Salmon: Tear or slice the smoked salmon into pieces that will fit neatly on each slice of bread. Layer the salmon over the avocado spread, ensuring each tartine has an even coverage.
- Finish with Garnish: Squeeze a little more lemon juice over the top of each tartine for added freshness. Garnish with a few sprigs of fresh dill or chopped chives for a burst of color and flavor.
Extra Tips:
When selecting avocados, look for ones that are slightly soft to the touch, indicating ripeness. If you prepare the avocado spread in advance, cover it tightly with plastic wrap to prevent browning.
For an added twist, consider using different types of smoked fish, such as trout, or adding capers for a briny kick. Make sure not to over-toast the bread, as it can become too hard and difficult to bite into.
Enjoy your Smoked Salmon and Avocado Tartines as a luxurious start to your festive meal!
Zucchini Noodle Caprese
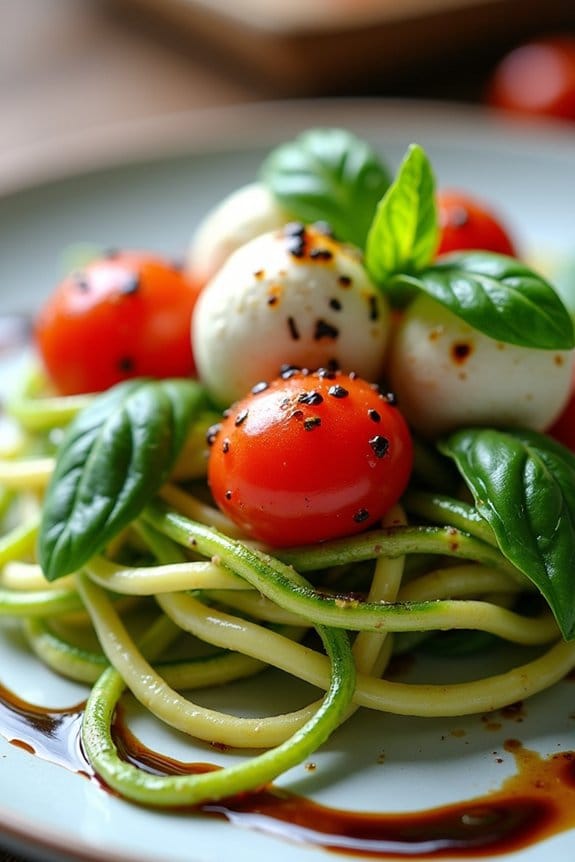
The Zucchini Noodle Caprese is a revitalizing twist on the traditional caprese salad, perfect for a light Christmas lunch. By replacing pasta with zucchini noodles, this dish offers a flavorful, low-carb option that’s both satisfying and nutritious. The freshness of the tomatoes and basil combined with the creaminess of mozzarella cheese creates a delightful balance of flavors, while a drizzle of balsamic glaze adds a touch of sweetness and tang.
Ideal for sharing, this dish serves 4-6 people and is both visually appealing and easy to prepare. The zucchini noodles provide a crisp texture, making the dish not only delicious but also appealing to the eye with its vibrant colors. This recipe is a great way to incorporate more vegetables into your Christmas lunch, and it pairs beautifully with other festive dishes on the table.
Ingredients (Serves 4-6):
- 4 medium zucchinis
- 2 cups cherry tomatoes, halved
- 8 ounces fresh mozzarella balls (bocconcini), drained
- 1/4 cup fresh basil leaves, torn
- 3 tablespoons olive oil
- 2 tablespoons balsamic glaze
- Salt and pepper to taste
Cooking Instructions:
- Prepare the Zucchini Noodles: Begin by washing the zucchinis thoroughly. Use a spiralizer to create long, noodle-like strands from the zucchini. If you don’t have a spiralizer, a julienne peeler can be used as an alternative.
- Drain Excess Moisture: Place the zucchini noodles in a colander and sprinkle with a little salt. Allow them to sit for about 10 minutes to draw out excess moisture. Then, gently pat them dry with a paper towel to verify the noodles aren’t too watery.
- Combine Ingredients: In a large mixing bowl, combine the prepared zucchini noodles, halved cherry tomatoes, and mozzarella balls. Gently toss them together to evenly distribute the ingredients.
- Season and Garnish: Drizzle the olive oil over the noodle mixture, followed by the balsamic glaze. Add salt and pepper to taste. Scatter the torn basil leaves over the top and give the salad a gentle toss to mix everything together.
- Serve Immediately: Transfer the Zucchini Noodle Caprese to a serving platter or bowl. For the best flavor and texture, serve immediately while the ingredients are fresh and vibrant.
Extra Tips:
To enhance the flavor, you may roast the cherry tomatoes briefly in the oven before adding them to the salad, which can bring out their sweetness.
If you prefer a more robust flavor, consider adding a pinch of crushed red pepper flakes for a slight kick.
Additionally, verify the mozzarella is at room temperature before mixing to allow it to blend seamlessly with the other ingredients.
For a more substantial meal, you can add grilled chicken or shrimp to the dish.
Quinoa and Roasted Vegetable Bowl
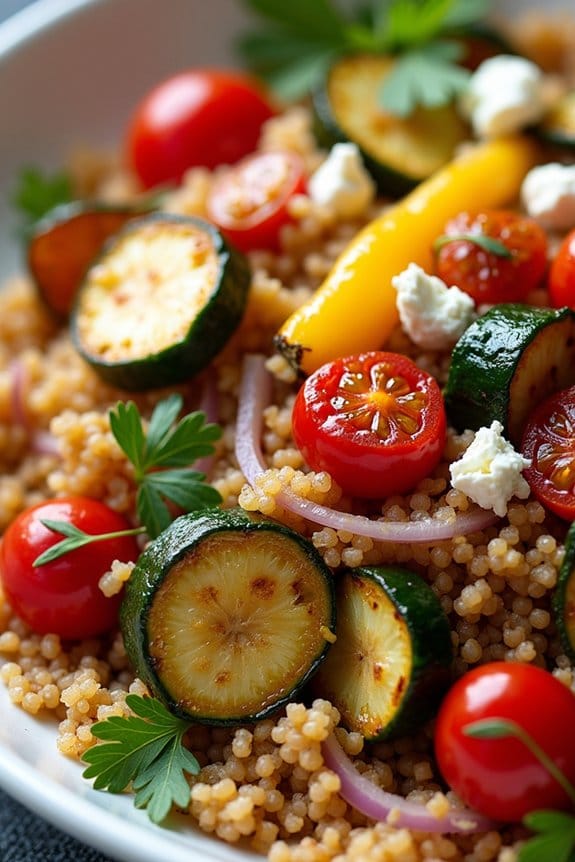
A Quinoa and Roasted Vegetable Bowl is a hearty and nutritious choice for a festive Christmas lunch. This dish combines fluffy quinoa with an assortment of colorful roasted vegetables, creating a meal that’s not only visually appealing but also packed with flavor and nutrients.
It’s a perfect option for those looking to include a healthy and filling vegetarian dish on their holiday menu. The beauty of this recipe lies in its versatility; you can tailor it to include your favorite vegetables or those that are in season.
The quinoa provides a protein-rich base, while the roasted vegetables add texture and a natural sweetness. The dish is finished with a simple dressing that ties all the flavors together, making it a delightful addition to your Christmas feast.
Ingredients (Serves 4-6):
- 1 cup quinoa
- 2 cups vegetable broth or water
- 1 large red bell pepper, chopped
- 1 large yellow bell pepper, chopped
- 1 zucchini, sliced
- 1 red onion, sliced
- 2 cups cherry tomatoes, halved
- 2 tablespoons olive oil
- Salt and pepper to taste
- 1 teaspoon dried oregano
- 1 teaspoon garlic powder
- Juice of 1 lemon
- 1/4 cup chopped fresh parsley
- Optional: crumbled feta cheese for topping
Instructions:
- Prepare the Quinoa: Rinse the quinoa under cold water. In a medium saucepan, combine the quinoa with vegetable broth or water. Bring to a boil, then reduce the heat to low, cover, and let it simmer for about 15 minutes or until the quinoa is fluffy and the liquid is absorbed. Remove from heat and set aside.
- Preheat the Oven: Preheat your oven to 425°F (220°C).
- Prepare the Vegetables: In a large bowl, combine the chopped red and yellow bell peppers, sliced zucchini, sliced red onion, and halved cherry tomatoes. Drizzle with olive oil, then season with salt, pepper, oregano, and garlic powder. Toss to make certain all the vegetables are well-coated.
- Roast the Vegetables: Spread the vegetables evenly on a baking sheet lined with parchment paper. Roast in the preheated oven for about 20-25 minutes, or until the vegetables are tender and slightly caramelized, stirring halfway through the roasting time.
- Combine Quinoa and Vegetables: In a large serving bowl, combine the cooked quinoa with the roasted vegetables. Add lemon juice and chopped fresh parsley. Toss everything together until well mixed.
- Serve: Transfer the mixture to a serving platter. If desired, top with crumbled feta cheese. Serve warm or at room temperature.
Extra Tips:
For an added layer of flavor, consider toasting the quinoa lightly in olive oil before boiling it. This can enhance its nuttiness.
You can also prepare the quinoa and vegetables a day in advance and assemble the dish just before serving. If serving this dish cold, allow the quinoa and vegetables to reach room temperature before combining them.
Adjust the seasoning to taste, and add a sprinkle of your favorite nuts or seeds for added crunch.
Spinach and Ricotta Stuffed Mushrooms

Spinach and Ricotta Stuffed Mushrooms are a delightful addition to any Christmas lunch table. These savory bites combine the earthy flavors of mushrooms with the creamy, slightly tangy richness of ricotta cheese, perfectly complemented by the subtle bitterness of fresh spinach. Not only are they delicious, but they’re also quick and easy to prepare, making them an ideal choice for a busy holiday meal.
Whether served as an appetizer or a side dish, these stuffed mushrooms are bound to impress your guests with their elegant presentation and delightful taste. Perfect for a gathering of 4-6 people, this recipe allows you to enjoy all the flavors of the season with minimal fuss.
The combination of herbs and cheeses creates a filling that’s both satisfying and comforting, while the mushrooms provide a hearty base that holds all the flavors together. Whether you’re a seasoned cook or a beginner in the kitchen, this recipe is straightforward and rewarding, guaranteeing you have more time to enjoy the festive season with family and friends.
Ingredients:
- 20 large button mushrooms
- 1 tablespoon olive oil
- 1 small onion, finely chopped
- 2 cloves garlic, minced
- 200g fresh spinach, washed and chopped
- 250g ricotta cheese
- 50g grated Parmesan cheese
- 1 teaspoon dried Italian herbs
- Salt and pepper to taste
- 2 tablespoons breadcrumbs
- 1 tablespoon butter, melted
Cooking Instructions:
- Preheat the Oven: Start by preheating your oven to 180°C (350°F). This guarantees that your oven is at the ideal temperature, allowing the mushrooms to cook evenly.
- Prepare the Mushrooms: Clean the mushrooms with a damp paper towel, removing any dirt. Carefully remove the stems and set them aside. Arrange the mushroom caps in a single layer on a baking tray, opening side up.
- Sauté the Vegetables: In a skillet over medium heat, add olive oil and sauté the chopped onion and garlic until translucent, about 3-4 minutes. Add the chopped spinach and cook until wilted, approximately 2 minutes.
- Prepare the Filling: In a mixing bowl, combine the sautéed spinach mixture, ricotta cheese, Parmesan cheese, dried Italian herbs, salt, and pepper. Mix well until all ingredients are fully incorporated.
- Stuff the Mushrooms: Spoon the ricotta mixture into each mushroom cap, mounding slightly. Guarantee each mushroom is generously filled.
- Top with Breadcrumbs: In a small bowl, mix the breadcrumbs with the melted butter. Sprinkle this mixture over the stuffed mushrooms to give them a golden, crispy topping.
- Bake: Place the baking tray in the preheated oven and bake for 20-25 minutes, or until the tops are golden brown and the mushrooms are tender.
- Serve: Once cooked, remove from the oven and let cool for a few minutes before serving. These mushrooms are best enjoyed warm.
Extra Tips: For added flavor, consider incorporating some finely chopped sun-dried tomatoes into the filling for a hint of sweetness and acidity. You can also experiment with different types of cheese, such as feta or goat cheese, to put a personal twist on the recipe.
If you prefer a spicier kick, a pinch of red pepper flakes can be added to the filling mix. Remember to taste the filling before stuffing the mushrooms to adjust the seasoning to your liking.
Lemon-Dill Shrimp Skewers
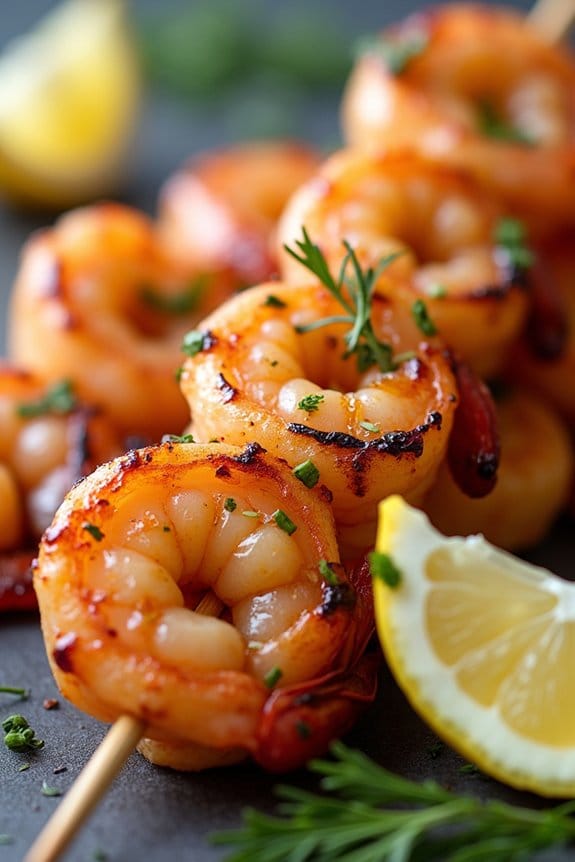
Lemon-Dill Shrimp Skewers are a delightful and invigorating dish perfect for a festive Christmas lunch. The combination of zesty lemon and aromatic dill complements the succulent shrimp beautifully, creating a light yet flavorful appetizer or main course. This dish not only looks impressive on a platter but is also incredibly easy to prepare, making it a wonderful choice for entertaining guests during the holiday season.
The skewers can be served warm or at room temperature, adding a touch of elegance to your Christmas table. The simplicity of this dish allows the fresh ingredients to shine. Using fresh shrimp is key to guaranteeing the best flavor and texture. Marinating the shrimp in a lemon-dill mixture infuses them with citrusy and herbal notes, which are then enhanced by the slight charring from grilling.
Whether you’re hosting a large gathering or an intimate family lunch, these skewers are sure to be a hit, bringing a taste of the sea to your festive celebration.
Ingredients for 4-6 servings:
- 1 1/2 pounds large shrimp, peeled and deveined
- 3 tablespoons olive oil
- 2 tablespoons fresh lemon juice
- Zest of 1 lemon
- 3 tablespoons fresh dill, chopped
- 2 cloves garlic, minced
- Salt and pepper to taste
- Lemon wedges, for serving
- Skewers (wooden or metal)
Cooking Instructions:
- Prepare the Marinade: In a large bowl, combine the olive oil, lemon juice, lemon zest, chopped dill, minced garlic, salt, and pepper. Stir well to make sure all ingredients are thoroughly mixed.
- Marinate the Shrimp: Add the peeled and deveined shrimp to the bowl with the marinade. Toss the shrimp until they’re evenly coated. Cover the bowl and refrigerate for at least 30 minutes to allow the flavors to meld. If possible, marinate for up to 1 hour for maximum flavor infusion.
- Prepare the Skewers: If you’re using wooden skewers, soak them in water for about 20 minutes to prevent them from burning on the grill. Thread the marinated shrimp onto the skewers, leaving a little space between each shrimp for even cooking.
- Preheat the Grill: Heat your grill to medium-high. If using a grill pan, heat a bit of oil in the pan over medium-high heat on the stove.
- Grill the Skewers: Place the skewers on the grill or grill pan. Cook for about 2-3 minutes on each side, or until the shrimp are opaque and have a nice char. Be careful not to overcook the shrimp, as they can become tough.
- Serve: Remove the skewers from the grill and transfer them to a serving platter. Garnish with fresh lemon wedges and additional dill if desired. Serve immediately for the best flavor and texture.
Extra Tips:
When selecting shrimp, opt for fresh or high-quality frozen shrimp for the best results. If using frozen shrimp, make sure they’re fully thawed and patted dry before marinating.
Adjust the amount of lemon juice and dill to taste, as these ingredients greatly influence the flavor profile of the dish. If you prefer, you can add a pinch of red pepper flakes for a subtle heat. These skewers pair beautifully with a light salad or crusty bread to soak up any remaining marinade.
Butternut Squash and Sage Risotto
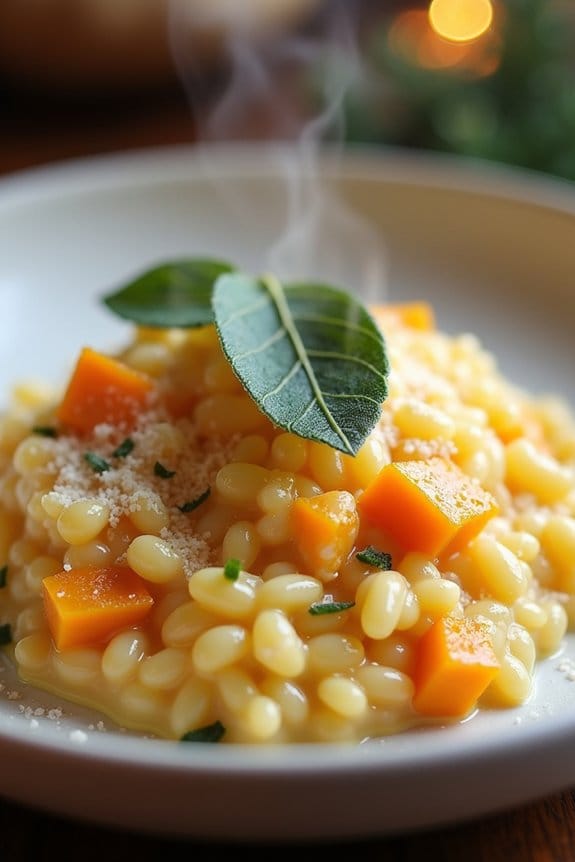
Butternut Squash and Sage Risotto is the perfect dish to elevate your Christmas lunch. This creamy and comforting risotto combines the rich flavors of roasted butternut squash with the earthy aroma of fresh sage. The dish not only looks stunning with its vibrant orange hue but also offers a delightful blend of textures and tastes, making it a wonderful vegetarian option for your holiday feast.
Whether you’re hosting a small gathering or just preparing a cozy meal for your family, this risotto will certainly be a crowd-pleaser. Incorporating seasonal ingredients, this recipe highlights the natural sweetness of butternut squash, which is perfectly complemented by the nutty and buttery flavor of Arborio rice.
The addition of sage adds a fragrant herbal note that ties all the elements together. This Butternut Squash and Sage Risotto isn’t only delicious but also satisfying and filling, making it a substantial main course or a delightful side dish. Prepare to impress your guests with this elegant and simple dish that celebrates the flavors of the season.
Ingredients for 4-6 Servings:
- 1 medium butternut squash, peeled and diced
- 2 tablespoons olive oil
- Salt and pepper to taste
- 1 tablespoon butter
- 1 small onion, finely chopped
- 2 garlic cloves, minced
- 1 1/2 cups Arborio rice
- 1 cup dry white wine
- 4 cups vegetable broth
- 1/2 cup grated Parmesan cheese
- 1/4 cup fresh sage leaves, chopped
- 1/4 teaspoon nutmeg (optional)
- Additional sage leaves for garnish
Cooking Instructions:
- Roast the Butternut Squash: Preheat your oven to 400°F (200°C). Spread the diced butternut squash on a baking sheet, drizzle with 1 tablespoon of olive oil, and season with salt and pepper. Roast for about 25-30 minutes until tender and slightly caramelized. Set aside.
- Prepare the Base: In a large pan, heat the remaining olive oil and butter over medium heat. Add the chopped onion and sauté for about 5 minutes until translucent. Stir in the garlic and cook for another minute until fragrant.
- Cook the Rice: Add the Arborio rice to the pan, stirring continuously for about 2 minutes until the grains are well-coated and slightly toasted. Pour in the white wine and continue to stir until the wine is absorbed by the rice.
- Gradually Add Broth: Begin adding the vegetable broth, one ladleful at a time, stirring frequently. Allow each addition of broth to be absorbed before adding the next. This should take about 18-20 minutes, and the rice should be creamy and al dente by the end.
- Incorporate Squash and Sage: Once the rice is cooked, stir in the roasted butternut squash, Parmesan cheese, chopped sage, and nutmeg. Mix well until everything is combined and the cheese has melted into the risotto.
- Serve: Taste and adjust seasoning with additional salt and pepper if necessary. Serve hot, garnished with fresh sage leaves and a sprinkle of extra Parmesan cheese if desired.
Extra Tips:
For the best results, use a high-quality Arborio rice as it provides the perfect creaminess for risotto. If you prefer a creamier texture, you can stir in a bit of heavy cream or mascarpone cheese at the end of cooking.
When roasting the butternut squash, make certain the pieces are evenly sized for consistent cooking. Additionally, keep the vegetable broth warm as you add it to the rice to maintain a consistent cooking temperature. Enjoy your Butternut Squash and Sage Risotto as a delightful centerpiece or an elegant accompaniment to your Christmas lunch.
Light and Creamy Cauliflower Soup
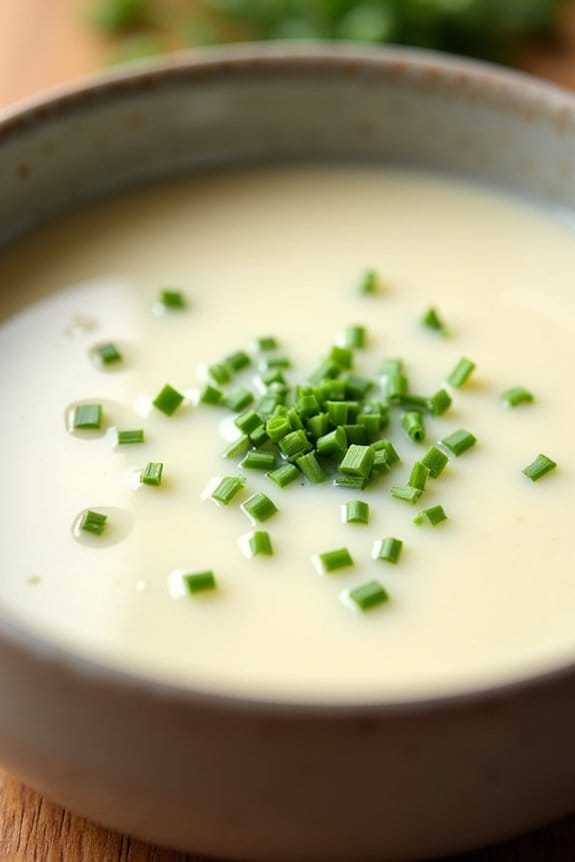
Light and Creamy Cauliflower Soup is an elegant starter perfect for a Christmas lunch. Its delicate flavors and smooth, velvety texture make it a wonderful choice for setting a festive mood. This soup combines the subtle taste of cauliflower with aromatic herbs and a touch of cream, resulting in a comforting dish that’s both satisfying and light.
The simplicity of its ingredients allows each flavor to shine, making it a crowd-pleaser for guests of all ages. Ideal for serving 4 to 6 people, this recipe isn’t only delicious but also easy to prepare. The creamy consistency is achieved by blending the cooked cauliflower with a small amount of cream, creating a luxurious mouthfeel without being overly rich.
The addition of a few select spices enhances the natural sweetness of the cauliflower, guaranteeing that each spoonful is bursting with flavor. Whether served as a first course or a light lunch, this soup is sure to impress your holiday guests.
Ingredients:
- 1 large head of cauliflower, chopped into florets
- 1 medium onion, chopped
- 2 cloves garlic, minced
- 4 cups vegetable broth
- 1 cup heavy cream
- 2 tablespoons olive oil
- 1 teaspoon salt
- 1/2 teaspoon black pepper
- 1/4 teaspoon nutmeg
- Chopped chives for garnish
Instructions:
- Prepare the Cauliflower: Begin by washing the cauliflower thoroughly and chopping it into small florets. This helps guarantee even cooking and makes the blending process easier.
- Sauté the Aromatics: In a large pot, heat the olive oil over medium heat. Add the chopped onion and garlic, sautéing until the onion becomes translucent and fragrant, about 5 minutes.
- Cook the Cauliflower: Add the cauliflower florets to the pot, stirring to coat them with the oil and onions. Season with salt, pepper, and nutmeg. Cook for another 5 minutes to allow the flavors to meld.
- Add the Broth: Pour in the vegetable broth, making sure the cauliflower is fully submerged. Bring the mixture to a gentle boil, then reduce the heat to a simmer. Cover the pot and cook for 20-25 minutes, or until the cauliflower is very tender.
- Blend the Soup: Using an immersion blender, puree the soup directly in the pot until smooth. Alternatively, transfer the soup in batches to a countertop blender and blend until silky.
- Incorporate the Cream: Return the soup to the pot if using a countertop blender. Stir in the heavy cream, and gently heat the soup over low heat, being careful it doesn’t boil. Adjust seasoning with more salt or pepper if needed.
- Serve: Ladle the soup into bowls and garnish with chopped chives for a pop of color and flavor. Serve hot and enjoy!
Extra Tips:
For an extra depth of flavor, consider roasting the cauliflower florets in the oven before adding them to the soup. This will bring out a nutty sweetness that complements the creaminess of the soup.
If you prefer a thicker soup, reduce the amount of vegetable broth slightly or add a small potato to the cooking process, which will blend into the soup for added body. Finally, always taste and adjust seasonings before serving to guarantee your soup is perfectly balanced.
Grilled Chicken and Mango Salsa Wraps

Grilled Chicken and Mango Salsa Wraps are a delightful and invigorating option for your Christmas lunch menu. This dish combines the savory flavors of grilled chicken with the sweet and tangy taste of mango salsa, all wrapped up in a soft tortilla.
It’s a perfect choice for those looking to add a tropical touch to their festive gathering, offering a balance of protein, fruit, and vegetables that’s both nutritious and delicious.
The preparation is straightforward, making it ideal for a stress-free holiday meal. The chicken is marinated and grilled to perfection, while the mango salsa is a vibrant blend of fresh mango, red onion, cilantro, lime juice, and jalapeño for a hint of heat.
These wraps aren’t only pleasing to the palate but also visually appealing, with their bright colors and appetizing aroma. Serve them as a main course or a hearty appetizer to impress your guests.
Ingredients (Serves 4-6 people):
- 4 boneless, skinless chicken breasts
- 2 tablespoons olive oil
- 1 teaspoon garlic powder
- 1 teaspoon paprika
- Salt and pepper to taste
- 2 ripe mangoes, diced
- 1 red onion, finely chopped
- 1/2 cup fresh cilantro, chopped
- 1 jalapeño, seeded and minced
- Juice of 2 limes
- 6 large flour tortillas
Cooking Instructions:
- Prepare the Chicken: Begin by marinating the chicken breasts. In a bowl, mix olive oil, garlic powder, paprika, salt, and pepper. Coat the chicken breasts with the marinade, cover, and let them sit for at least 30 minutes, or up to 2 hours in the refrigerator.
- Grill the Chicken: Preheat your grill to medium-high heat. Once heated, place the marinated chicken breasts on the grill. Cook each side for about 5-7 minutes, or until the internal temperature reaches 165°F (75°C). Remove from the grill and let them rest for a few minutes before slicing into thin strips.
- Make the Mango Salsa: While the chicken is grilling, prepare the mango salsa. In a mixing bowl, combine the diced mangoes, chopped red onion, cilantro, minced jalapeño, and lime juice. Mix well and season with salt to taste. Set aside.
- Assemble the Wraps: Warm the flour tortillas in a dry skillet or microwave for a few seconds to make them pliable. Lay each tortilla flat and place a generous amount of grilled chicken strips in the center. Top with a few spoonfuls of mango salsa.
- Wrap and Serve: Fold the sides of the tortilla over the filling, then roll it up tightly from the bottom. Slice each wrap in half and arrange on a serving platter. Serve immediately while the wraps are warm.
Extra Tips:
For an added layer of flavor, consider adding a dollop of sour cream or a sprinkle of shredded cheese inside the wraps. If you prefer a spicier kick, leave some seeds in the jalapeño or add a dash of hot sauce to the salsa.
These wraps can also be made in advance and stored in the refrigerator; simply warm them up before serving to bring back the vibrancy of the grilled chicken and salsa.
Roasted Beet and Arugula Salad
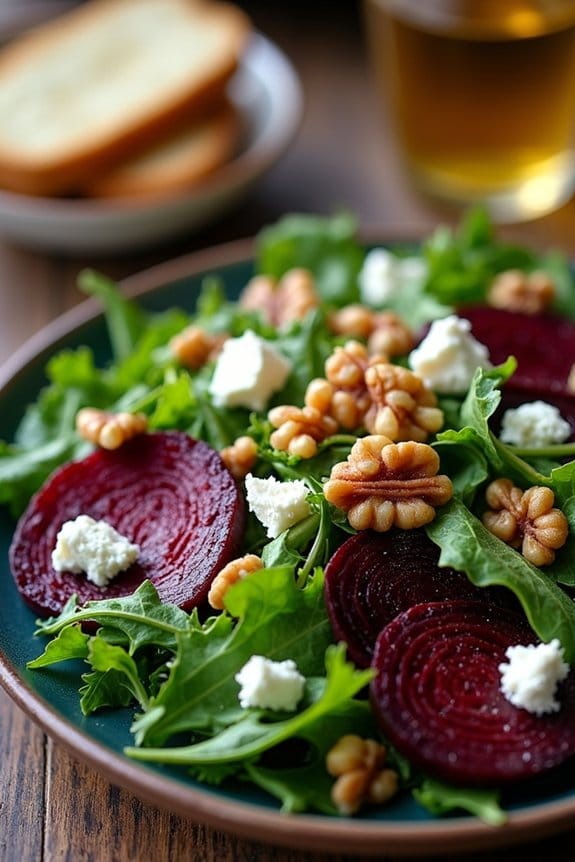
The Roasted Beet and Arugula Salad is a delightful addition to any Christmas lunch table, offering a balance of earthy, sweet, and peppery flavors. This vibrant salad combines the natural sweetness of roasted beets with the fresh, spicy notes of arugula, all tied together with a tangy vinaigrette.
It’s a dish that not only pleases the palate but also adds a splash of color to your festive spread. Perfect for serving 4-6 people, this salad is both simple to prepare and visually impressive. The roasted beets are complemented by creamy goat cheese and crunchy walnuts, creating a harmonious blend of textures and tastes.
Whether you’re hosting a large gathering or a cozy family meal, this salad is sure to be a hit.
Ingredients (serves 4-6):
- 4 medium-sized beets
- 5 cups arugula
- 1/2 cup goat cheese, crumbled
- 1/3 cup walnuts, toasted
- 1/4 cup olive oil
- 2 tablespoons balsamic vinegar
- 1 tablespoon honey
- 1 teaspoon Dijon mustard
- Salt and freshly ground black pepper, to taste
Cooking Instructions:
- Prepare the Beets: Preheat your oven to 400°F (200°C). Wash the beets thoroughly, trim the ends, and wrap each beet individually in aluminum foil. Place the wrapped beets on a baking sheet and roast in the preheated oven for about 45-60 minutes, or until they’re tender when pierced with a fork.
- Toast the Walnuts: While the beets are roasting, spread the walnuts on a baking sheet and toast them in the same oven for about 5-7 minutes, or until they’re golden brown and fragrant. Keep an eye on them to prevent burning. Once toasted, set them aside to cool.
- Make the Dressing: In a small bowl, whisk together the olive oil, balsamic vinegar, honey, and Dijon mustard until well combined. Season the dressing with salt and pepper to taste. Adjust the sweetness or acidity by adding more honey or vinegar, if desired.
- Prepare the Beets for the Salad: Once the beets are roasted, remove them from the oven and let them cool slightly. Unwrap the foil and gently peel off the skins using your fingers or a small knife. Slice the beets into wedges or cubes, depending on your preference.
- Assemble the Salad: In a large salad bowl, combine the arugula, roasted beet slices, crumbled goat cheese, and toasted walnuts. Drizzle the dressing over the salad and gently toss to combine, ensuring all ingredients are evenly coated.
- Serve: Transfer the salad to a serving platter or individual plates. For an extra touch, sprinkle some additional walnuts or a few more crumbles of goat cheese on top for garnish.
Extra Tips:
When roasting the beets, try to choose beets that are similar in size for even cooking. If you’re short on time, you can roast the beets a day in advance and store them in the refrigerator until you’re ready to assemble the salad.
For a different flavor profile, consider adding some orange segments or sliced apples to the salad. Finally, if goat cheese isn’t to your taste, feta or blue cheese work as great substitutes. Enjoy your festive meal with this beautiful and delicious salad!
Mediterranean Chickpea Salad
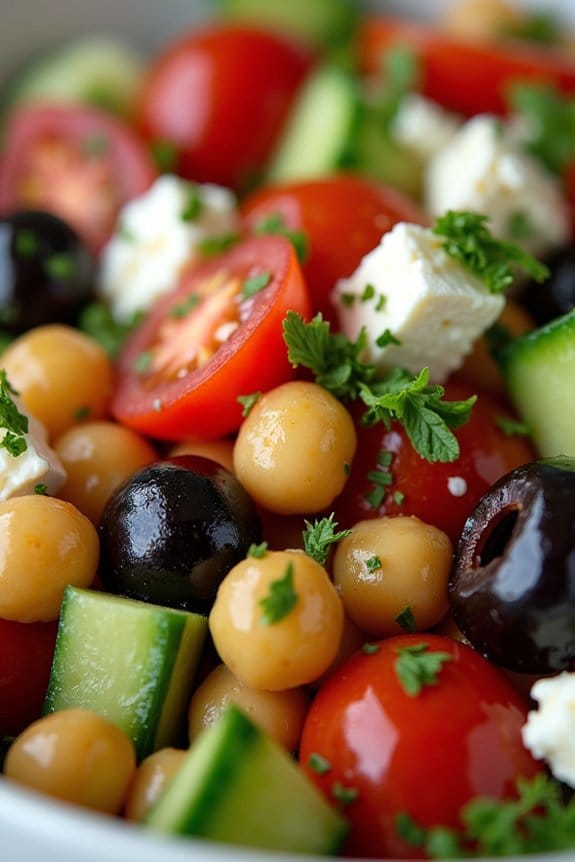
Mediterranean Chickpea Salad is a vibrant and healthy dish that’s perfect for a festive Christmas lunch. This salad isn’t only nutritious but also bursting with flavors from fresh vegetables, herbs, and a zesty dressing. It’s an ideal choice for those looking to add a Mediterranean twist to their holiday menu. The combination of chickpeas, juicy tomatoes, crisp cucumbers, and creamy feta cheese makes this salad both satisfying and invigorating.
The Mediterranean Chickpea Salad can be prepared ahead of time, making it a stress-free addition to your Christmas lunch. With its colorful presentation, it will add a delightful touch to your festive table. This recipe serves 4-6 people, making it perfect for small gatherings or as a side dish for a larger feast. The tangy lemon dressing brings all the ingredients together, guaranteeing every bite is a burst of flavor.
Ingredients for 4-6 servings:
- 2 cans (15 oz each) of chickpeas, drained and rinsed
- 1 cup cherry tomatoes, halved
- 1 cucumber, diced
- 1 red bell pepper, diced
- 1/2 red onion, finely chopped
- 1/2 cup Kalamata olives, pitted and halved
- 1/4 cup fresh parsley, chopped
- 1/4 cup fresh mint leaves, chopped
- 1/2 cup feta cheese, crumbled
- Juice of 1 large lemon
- 1/4 cup extra-virgin olive oil
- Salt and freshly ground black pepper to taste
Cooking Instructions:
- Prepare the Vegetables: Begin by washing all the fresh produce thoroughly. Halve the cherry tomatoes, dice the cucumber, red bell pepper, and finely chop the red onion. Place them into a large mixing bowl.
- Combine the Main Ingredients: Add the drained and rinsed chickpeas to the bowl with the vegetables. Then, add the halved Kalamata olives, chopped parsley, and mint leaves. Gently mix all the ingredients together.
- Add the Feta Cheese: Crumble the feta cheese over the salad, ensuring it’s evenly distributed throughout the mixture.
- Prepare the Dressing: In a small bowl, whisk together the lemon juice, extra-virgin olive oil, salt, and freshly ground black pepper. Adjust the seasoning according to your taste.
- Dress the Salad: Pour the dressing over the chickpea salad. Toss everything gently to guarantee all the ingredients are well-coated with the dressing.
- Chill and Serve: Allow the salad to chill in the refrigerator for at least 30 minutes before serving. This will help the flavors meld together beautifully. Serve chilled as an invigorating side dish or a light main course.
Extra Tips:
For an added burst of flavor, consider including a teaspoon of dried oregano or a pinch of crushed red pepper flakes in the dressing. If you prefer a bit more crunch, you can add some chopped celery or radishes to the salad.
Additionally, this salad can be made a day in advance, allowing for even deeper flavor development. Just keep the salad in an airtight container in the fridge, and add the feta cheese just before serving to maintain its texture.
Mini Caprese Phyllo Cups

Mini Caprese Phyllo Cups are a delightful appetizer that will add a touch of elegance to your Christmas lunch spread. These bite-sized wonders combine the classic flavors of a Caprese salad with the flaky, buttery goodness of phyllo pastry, creating a perfect blend of textures and tastes. Not only are they visually appealing, but they’re also incredibly easy to make, allowing you to focus on spending time with your loved ones during the holiday season.
The key to making these Mini Caprese Phyllo Cups irresistible lies in using fresh, high-quality ingredients. Juicy cherry tomatoes, creamy mozzarella balls, fragrant basil, and a drizzle of balsamic glaze come together in a crunchy phyllo cup to create a symphony of flavors. This recipe is designed to serve 4-6 people, making it an ideal choice for a small gathering or as part of a larger buffet-style meal.
Ingredients (Serves 4-6):
- 15 sheets of phyllo pastry
- 1/2 cup melted butter
- 1 pint cherry tomatoes, halved
- 8 oz fresh mozzarella balls (bocconcini), halved
- Fresh basil leaves
- Salt and freshly ground black pepper, to taste
- Balsamic glaze for drizzling
Instructions:
- Prepare the Phyllo Cups: Preheat your oven to 375°F (190°C). Take one sheet of phyllo pastry and lay it flat on a clean, dry surface. Lightly brush it with melted butter. Layer another sheet on top, brush with butter, and repeat until you have a stack of 5 sheets. Cut the stack into 12 equal squares.
- Form the Cups: Gently press each square into the cups of a mini muffin tin, making sure the edges are crinkled and form a cup shape. Repeat the process with the remaining phyllo sheets for a total of 24 cups.
- Bake the Phyllo Cups: Place the muffin tin in the preheated oven and bake for about 8-10 minutes, or until the phyllo cups are golden brown and crisp. Remove from the oven and let them cool completely.
- Assemble the Filling: In a bowl, combine the halved cherry tomatoes and mozzarella balls. Season with salt and pepper to taste. Tear a few basil leaves and mix them in.
- Fill the Cups: Once the phyllo cups have cooled, carefully spoon the tomato and mozzarella mixture into each cup. Be generous, but be certain you don’t overfill them.
- Garnish and Serve: Top each filled cup with a small basil leaf for garnish. Just before serving, lightly drizzle balsamic glaze over each cup for a touch of sweetness and acidity.
Extra Tips: For the best results, use fresh phyllo pastry rather than frozen, as it will be easier to work with and provide a better texture. When handling phyllo sheets, keep them covered with a damp towel to prevent them from drying out.
If you want to prepare these cups ahead of time, the phyllo cups can be baked and stored in an airtight container for a day or two. Fill them just before serving to maintain the crispness of the pastry. If balsamic glaze is unavailable, you can reduce balsamic vinegar over low heat until it thickens to achieve a similar effect.
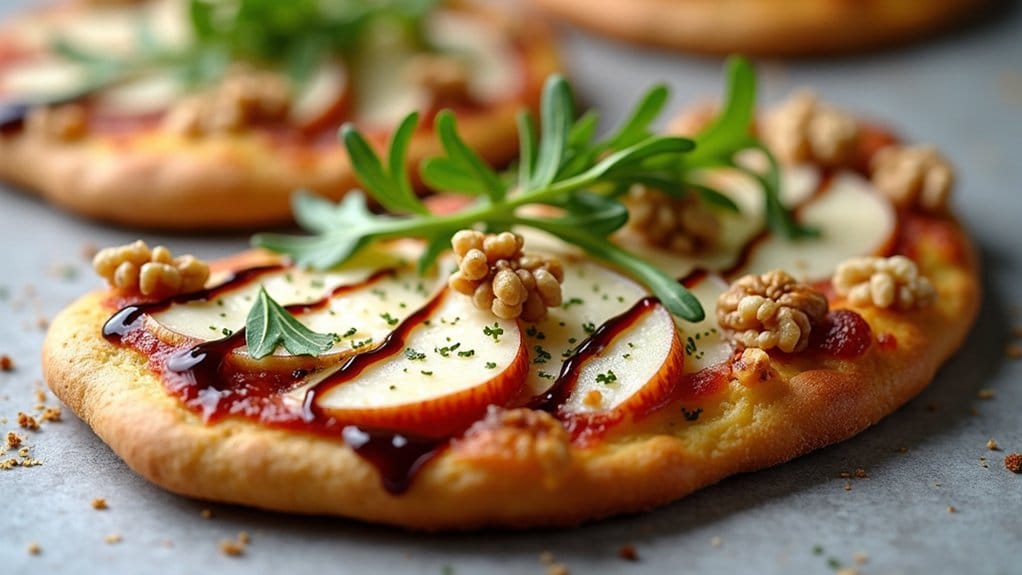
Pear and Gorgonzola Flatbread
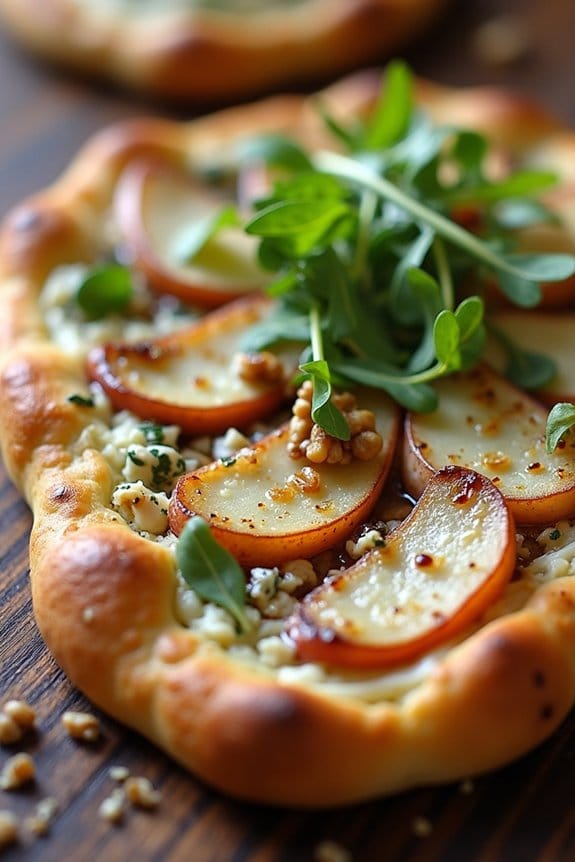
Indulge in the delicious fusion of sweet and savory flavors with this Pear and Gorgonzola Flatbread, a perfect dish for your Christmas lunch. This flatbread combines the mild sweetness of ripe pears with the bold and creamy taste of Gorgonzola cheese, creating an exquisite balance that will delight your taste buds.
The crispiness of the flatbread serves as an ideal base for this topping combination, while a touch of balsamic glaze adds a tangy finish to this holiday treat.
This recipe serves 4-6 people and isn’t just a feast for the eyes but also a symphony of flavors that will leave your guests wanting more. Easy to prepare, yet sophisticated enough to impress, the Pear and Gorgonzola Flatbread is sure to become a favorite on your holiday menu.
Whether served as an appetizer or a main dish, this flatbread is guaranteed to bring a touch of elegance to your Christmas celebration.
Ingredients (Serves 4-6):
- 1 package of store-bought flatbread or 2 large flatbread pieces
- 2 ripe pears, thinly sliced
- 1 cup of crumbled Gorgonzola cheese
- 1/2 cup of walnuts, roughly chopped
- 1 tablespoon of olive oil
- 1 teaspoon of fresh thyme leaves
- Salt and pepper to taste
- Balsamic glaze for drizzling
- Optional: 1/4 cup of arugula for garnish
Cooking Instructions:
- Preheat the Oven: Start by preheating your oven to 400°F (200°C). This guarantees that the flatbread will cook evenly and become perfectly crispy.
- Prepare the Flatbread: Place the store-bought flatbread on a baking sheet lined with parchment paper. Brush each piece of flatbread lightly with olive oil to add flavor and help the toppings adhere.
- Assemble the Flatbread: Arrange the thinly sliced pears evenly over the flatbread. Sprinkle the crumbled Gorgonzola cheese generously over the pears. Follow this by scattering the chopped walnuts across the top.
- Season and Add Herbs: Sprinkle fresh thyme leaves over the assembled flatbread, and season with a pinch of salt and pepper to enhance the flavors.
- Bake the Flatbread: Place the baking sheet in the preheated oven and bake for 12-15 minutes, or until the cheese is melted and bubbly, and the edges of the flatbread are golden brown.
- Finish with Balsamic Glaze: Once the flatbread is done baking, remove it from the oven and allow it to cool slightly. Drizzle a balsamic glaze over the top for an added tangy sweetness.
- Garnish and Serve: Optionally, add a handful of fresh arugula on top for a peppery contrast before slicing the flatbread into pieces. Serve warm to enjoy the full flavor profile.
Extra Tips:
When selecting pears for this recipe, choose ones that are ripe but still firm to maintain their shape during baking.
If you prefer a stronger flavor, switch out Gorgonzola for a more pungent blue cheese. Feel free to experiment with additional toppings, such as caramelized onions or prosciutto, to make the flatbread even more decadent.
Finally, if you don’t have balsamic glaze on hand, you can make a quick reduction by simmering balsamic vinegar until it thickens to the desired consistency.
