
Hosting a Halloween bash? I’ve got you covered with a menu that’s as festive as it is delicious. From eerie eyeball deviled eggs to creepy crescent mummy dogs, these savory treats are perfect for setting the spooky mood. How about serving frightful cheddar cauldron fondue or wickedly spiced pumpkin soup? Hungry for more ghoulishly good ideas? Let’s uncover these spine-tingling recipes that promise to make your party unforgettable.
Spooky Stuffed Bell Peppers
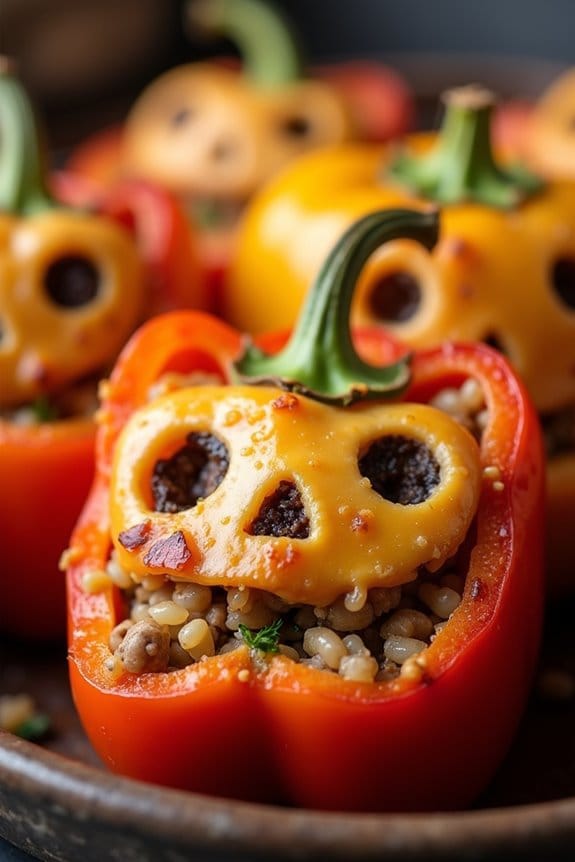
Spooky Stuffed Bell Peppers are the perfect Halloween party food to delight and entertain your guests. With their vibrant colors and eerie carved faces, these delightful peppers bring a festive and creepy touch to your table. Not only do they look fantastic, but they’re also deliciously satisfying, filled with a savory mixture of rice, meat, and spices. This dish is a great way to merge creativity with culinary excellence, making it a standout feature at any Halloween gathering.
The combination of flavors in Spooky Stuffed Bell Peppers creates a comforting and hearty meal that’s sure to please both children and adults. The peppers themselves are soft yet sturdy enough to hold the stuffing, while the filling provides a rich, flavorful bite. Whether you’re hosting a large party or a family dinner, these peppers are sure to be a hit. They cater to various dietary preferences and can easily be modified to suit vegetarians by omitting the meat or using a plant-based substitute.
Ingredients for 4-6 servings:
- 6 large bell peppers (preferably orange, yellow, or red)
- 1 pound ground beef or turkey
- 1 cup cooked rice
- 1 medium onion, finely chopped
- 2 cloves garlic, minced
- 1 can (14 oz) diced tomatoes, drained
- 1 teaspoon salt
- 1/2 teaspoon black pepper
- 1 teaspoon paprika
- 1 teaspoon dried oregano
- 1 cup shredded cheese (cheddar or mozzarella)
- Olive oil for drizzling
Cooking Instructions:
- Preheat and Prepare: Preheat your oven to 375°F (190°C). Wash the bell peppers thoroughly, then slice off the tops and remove the seeds and membranes. Use a paring knife to carve spooky faces into the front of each pepper, being careful not to cut too large holes so that the filling stays inside.
- Cook the Filling: In a large skillet over medium heat, add a drizzle of olive oil. Cook the chopped onion and minced garlic until they become translucent and fragrant. Add the ground meat and cook until browned, breaking it up with a spatula as it cooks.
- Mix the Filling: Stir in the cooked rice, drained diced tomatoes, salt, black pepper, paprika, and oregano into the skillet with the meat and onions. Allow the mixture to cook together for about 5 minutes so the flavors meld. Remove the skillet from the heat and stir in half of the shredded cheese.
- Stuff the Peppers: Place the peppers upright in a baking dish. Fill each pepper with the meat and rice mixture, packing it in tightly. Sprinkle the remaining cheese over the top of each stuffed pepper.
- Bake the Peppers: Drizzle a little olive oil over the stuffed peppers to help them roast. Cover the dish with aluminum foil and bake in the preheated oven for 30 minutes. Remove the foil and bake for an additional 10-15 minutes, or until the peppers are tender and the cheese is bubbly and golden.
Extra Tips:
For added flavor, you can incorporate different herbs such as thyme or basil into the filling. If you prefer a bit of heat, consider adding some chili flakes or using a spicy cheese. To prevent the peppers from toppling over, trim a thin slice off the bottom of each pepper to make them level.
If you’re preparing these in advance, you can assemble the peppers and refrigerate them until you’re ready to bake, just be sure to add a few extra minutes to the baking time if they’re cold from the fridge.
Creepy Crescent Mummy Dogs

Creepy Crescent Mummy Dogs are a fun and spooky treat that make the perfect addition to any Halloween party. These adorable snacks combine the savory goodness of mini sausages with the buttery flakiness of crescent roll dough, all wrapped up to resemble mummies. Not only are they easy to make, but they also add an element of playfulness to your Halloween spread. The best part? They’re just as tasty as they’re festive, making them a hit with both kids and adults.
A spooky, playful Halloween treat that’s easy to make and delights both kids and adults.
The preparation of Creepy Crescent Mummy Dogs is delightful and simple, making it a great recipe to involve the little ones in the kitchen. The process involves wrapping mini sausages in strips of crescent roll dough to mimic the look of a mummy. Once baked, these little guys take on a golden brown hue, which perfectly complements their spooky, yet cute appearance.
To complete the mummy look, edible eyes are added, giving them a charming and mischievous personality that’s sure to amuse your guests.
Ingredients (serving size: 4-6 people):
- 1 can of crescent roll dough
- 12 mini sausages (cocktail franks)
- Mustard or ketchup (for eyes)
- Optional: Small edible candy eyes
Cooking Instructions:
- Preheat Your Oven: Begin by preheating your oven to 375°F (190°C) to guarantee it reaches the right temperature for an even bake.
- Prepare the Dough: Unroll the crescent roll dough on a clean surface. Using a knife or a pizza cutter, slice the dough into thin strips, roughly 1/4 inch wide.
- Wrap the Sausages: Take one mini sausage and wrap it with a strip of dough, leaving a small gap for the eyes. Continue wrapping until you have used all the sausages and dough strips.
- Arrange on a Baking Sheet: Place the wrapped sausages on a baking sheet lined with parchment paper, leaving a bit of space between each mummy.
- Bake: Transfer the baking sheet to the preheated oven and bake for 10-12 minutes, or until the dough turns golden brown.
- Add Eyes: Once baked, remove the mummies from the oven and allow them to cool slightly. Use a small dab of mustard or ketchup to create eyes. Alternatively, you can stick on small edible candy eyes for a more dramatic effect.
- Serve: Arrange the Creepy Crescent Mummy Dogs on a platter and serve them warm.
Extra Tips:
For added flavor, consider brushing the dough strips with a bit of melted butter before baking. You can also experiment with different types of sausages, such as turkey or chicken, to cater to dietary preferences.
If you want to make the eyes more pronounced, you can use a small piping bag for more precision when applying mustard or ketchup. Finally, these mummy dogs can be prepared a few hours in advance and then baked right before your guests arrive, making party planning a breeze.
Wickedly Spiced Pumpkin Soup

Wickedly Spiced Pumpkin Soup is the perfect addition to your Halloween party menu. This delightful soup captures the essence of autumn with its rich, velvety texture and a spicy kick that will warm your guests right down to their toes. Made with seasonal ingredients, this soup isn’t only comforting but also packed with flavor, making it a crowd-pleaser at any spooky celebration.
Its vibrant orange hue will add a festive touch to your table, perfectly complementing other Halloween-themed dishes. This recipe serves 4-6 people, making it ideal for small gatherings or as a starter for a larger feast. The Wickedly Spiced Pumpkin Soup combines the earthy sweetness of pumpkin with a blend of exotic spices, creating a symphony of flavors in every spoonful.
Whether you’re hosting a haunted house party or a cozy dinner with friends, this soup will surely steal the show with its tantalizing aroma and irresistible taste.
Ingredients:
- 2 tablespoons olive oil
- 1 large onion, chopped
- 3 cloves garlic, minced
- 2 teaspoons ground cumin
- 1 teaspoon ground coriander
- 1/2 teaspoon ground cinnamon
- 1/4 teaspoon ground nutmeg
- 1/4 teaspoon cayenne pepper
- 1 can (15 ounces) pumpkin puree
- 4 cups vegetable broth
- 1 cup coconut milk
- Salt and pepper to taste
- Pumpkin seeds, toasted (for garnish)
- Fresh parsley, chopped (for garnish)
Instructions:
- Prepare the Base: In a large pot, heat the olive oil over medium heat. Add the chopped onion and sauté for about 5 minutes until it becomes translucent. Stir in the minced garlic and cook for an additional minute, ensuring it doesn’t brown.
- Add the Spices: Mix in the ground cumin, coriander, cinnamon, nutmeg, and cayenne pepper. Stir continuously for about 1 minute until the spices become fragrant, releasing their essential oils and adding depth to your soup.
- Incorporate the Pumpkin: Add the pumpkin puree to the pot and stir until well combined with the onion and spices. This will form a thick, aromatic base for the soup.
- Simmer the Soup: Pour in the vegetable broth and stir to blend all the ingredients. Bring the mixture to a boil, then reduce the heat and let it simmer for about 15-20 minutes. This allows the flavors to meld beautifully.
- Create Creaminess: Stir in the coconut milk and continue to simmer for another 5 minutes, which will add a silky texture and a subtle sweetness to the soup. Season with salt and pepper to taste.
- Blend to Perfection: Use an immersion blender directly in the pot, or carefully transfer the soup to a blender in batches, to achieve a smooth consistency. Be cautious if using a blender, as the soup will be hot.
- Serve and Garnish: Ladle the soup into bowls and garnish each with toasted pumpkin seeds and a sprinkle of fresh parsley for added crunch and color.
Extra Tips: For a more intense flavor, consider roasting fresh pumpkin instead of using canned puree, and use the roasted pumpkin flesh in the recipe. If you prefer a milder soup, adjust the cayenne pepper to your liking.
The soup can be made a day in advance, which allows the flavors to develop further. Simply reheat before serving. For a Halloween-themed presentation, serve the soup in hollowed-out mini pumpkins or orange bell peppers for a festive touch.
Monster Meatball Sliders

Monster Meatball Sliders are a perfect spooky treat for your Halloween party, offering a delicious and fun twist on the classic slider. These bite-sized sandwiches are packed with flavor and are sure to be a hit with both kids and adults alike. By using a combination of savory meatballs, tangy marinara sauce, and gooey mozzarella cheese, these sliders bring a monstrous taste sensation to your festive gathering.
The ultimate Halloween treat, these sliders combine savory meatballs, tangy sauce, and gooey cheese for a monster hit.
Plus, their playful presentation with “monster” features will add an extra element of fun to your Halloween spread.
To create these delectable Monster Meatball Sliders, you’ll need to prepare homemade meatballs, which are then nestled into soft slider buns and topped with marinara sauce and cheese. The “monster” aspect comes into play as you use olives and sliced cheese to create eyes and other features, making each slider look like a spooky creature.
This recipe is designed to serve 4-6 people, making it ideal for a small party or family gathering. Now, let’s plunge into the ingredients and cooking instructions so you can whip up these delightful sliders with ease.
Ingredients (Serves 4-6):
- 1 pound ground beef or turkey
- 1/4 cup breadcrumbs
- 1/4 cup grated Parmesan cheese
- 1 egg
- 2 cloves garlic, minced
- 1 tablespoon Italian seasoning
- Salt and pepper to taste
- 1 cup marinara sauce
- 1 cup shredded mozzarella cheese
- 12 slider buns
- 24 black or green olives (for eyes)
- 6 slices of cheese (cut into triangles for teeth)
- Toothpicks
Cooking Instructions:
- Preheat the Oven: Start by preheating your oven to 375°F (190°C). This will guarantee it’s hot and ready to bake the meatballs to perfection.
- Prepare the Meatballs: In a large mixing bowl, combine the ground beef or turkey, breadcrumbs, Parmesan cheese, egg, minced garlic, Italian seasoning, salt, and pepper. Mix everything thoroughly until all ingredients are well incorporated.
- Form the Meatballs: Using your hands, shape the mixture into approximately 24 small meatballs, about 1 inch in diameter. Place them on a baking sheet lined with parchment paper.
- Bake the Meatballs: Put the baking sheet in the preheated oven and bake for 15-20 minutes, or until the meatballs are cooked through and have a nice golden color on the outside.
- Assemble the Sliders: Once the meatballs are done, take the slider buns and place them on a separate baking tray. Spoon a little marinara sauce onto the bottom half of each bun, place a meatball on top, and then add a generous sprinkle of mozzarella cheese over each meatball.
- Melt the Cheese: Put the tray with the assembled sliders back in the oven for about 5 minutes, or until the cheese has melted and is bubbly.
- Create Monster Features: While the sliders are in the oven, slice the olives in half to make the “eyes” and cut the cheese slices into triangles to create “teeth”. Once the cheese is melted, remove the sliders from the oven and add the olives on top using toothpicks for eyes, and tuck the cheese triangles in between the top bun and meatball for teeth.
- Serve: Your Monster Meatball Sliders are now ready to be served. Arrange them on a platter and watch as your guests delight in these spooky treats.
Extra Tips:
For an even spookier presentation, consider using a combination of different colored olives, such as black and green, to create more dynamic monster faces.
If you’d like to save time, you can use pre-made meatballs and store-bought marinara sauce, but homemade versions offer the freshest taste.
To add a kick, consider mixing some crushed red pepper flakes into the meatball mixture or the marinara sauce.
Finally, experiment with different cheeses like provolone or cheddar for varied flavors in your monstrous creations.
Ghostly Garlic Breadsticks

Elevate your Halloween party with these spooky yet delicious Ghostly Garlic Breadsticks. Perfectly seasoned and shaped like haunting ghosts, these breadsticks are sure to be a hit with both kids and adults. They make an excellent appetizer and are a great way to add a touch of festive fun to your table.
Whether you’re hosting a full-blown Halloween bash or just enjoying a quiet night in, these ghostly treats are a must-have addition to your menu. Made with simple ingredients, these breadsticks aren’t only easy to prepare but also incredibly flavorful. The garlic butter adds a savory punch, while the creative ghost shapes bring the Halloween spirit to life.
They’re best served warm, straight from the oven, allowing the garlic aroma to fill the air and entice your guests. Let’s plunge into the recipe and bring these ghostly delights to your Halloween gathering.
Ingredients for Ghostly Garlic Breadsticks (Serving Size: 4-6 people)
- 1 pound pizza dough
- 4 tablespoons unsalted butter
- 3 cloves garlic, minced
- 1 tablespoon fresh parsley, chopped
- Salt, to taste
- Black sesame seeds or poppy seeds (for eyes)
Cooking Instructions
- Preheat the Oven: Preheat your oven to 375°F (190°C). Line a baking sheet with parchment paper or lightly grease it to prevent sticking.
- Prepare the Dough: Roll out the pizza dough on a lightly floured surface into a rectangle, approximately 12×10 inches.
- Cut and Shape the Dough: Use a sharp knife or pizza cutter to cut the dough into strips about 1 inch wide. Each strip will become a breadstick. To create the ghost shape, twist each strip slightly and pinch one end to form a head, flaring out the other end for the ghost’s body.
- Arrange on Baking Sheet: Place the shaped breadsticks onto the prepared baking sheet, leaving a little space between each one.
- Make the Garlic Butter: In a small saucepan, melt the butter over low heat. Add the minced garlic and sauté for about 1 minute until fragrant. Remove from heat and stir in the chopped parsley and a pinch of salt.
- Brush and Decorate: Using a pastry brush, generously coat each breadstick with the garlic butter mixture. Place two black sesame seeds or poppy seeds on each ghost head to create the eyes.
- Bake: Bake in the preheated oven for 15-18 minutes, or until golden brown and crispy.
- Serve: Remove from the oven and let cool slightly before serving. Enjoy warm for the best flavor.
Extra Tips
For an extra crispy texture, consider rolling the dough thinner and baking for a little longer while keeping an eye on them to prevent burning.
If you prefer a stronger garlic flavor, feel free to increase the amount of garlic in the butter. These breadsticks can also be customized with additional herbs or cheese sprinkled on top before baking for added flavor.
Additionally, if you want to save time, you can use store-bought pizza dough. Just make sure to let it come to room temperature for easier handling.
Vampire Bat Wings

If you’re searching to add a spooky and delicious dish to your Halloween party menu, seek no further than Vampire Bat Wings. These wings aren’t only visually enchanting with their dark, eerie appearance, but they’re also bursting with flavor that will leave your guests craving more.
The deep, dark color of the wings comes from a combination of soy sauce and balsamic vinegar, giving them a rich umami taste with a hint of tanginess. These wings are perfect for setting the mood at any Halloween gathering while providing a savory treat that will satisfy even the most discerning taste buds.
The process of making Vampire Bat Wings is fairly straightforward, making them an excellent choice for both novice and experienced cooks. With just a few ingredients and some simple steps, you can transform ordinary chicken wings into a sinister masterpiece.
Whether you’re hosting a party for kids or adults, these wings are sure to be a hit. Serve them alongside some creepy garnishes like plastic spiders or a drizzle of red sauce for added effect, and watch as your guests devour these terrifyingly tasty treats.
Ingredients (Serves 4-6):
- 3 pounds of chicken wings
- 1/2 cup soy sauce
- 1/2 cup balsamic vinegar
- 1/4 cup honey
- 2 tablespoons olive oil
- 4 cloves garlic, minced
- 1 teaspoon black pepper
- 1 teaspoon smoked paprika
- 1/2 teaspoon cayenne pepper (optional for heat)
- 1 tablespoon cornstarch
- 2 tablespoons cold water
- 1/2 teaspoon salt
Cooking Instructions:
- Prepare the Marinade: In a large bowl, mix the soy sauce, balsamic vinegar, honey, olive oil, minced garlic, black pepper, smoked paprika, and cayenne pepper. Stir the ingredients together until well combined.
- Marinate the Wings: Add the chicken wings to the marinade, guaranteeing each wing is fully coated. Cover the bowl with plastic wrap or transfer the wings to a large resealable bag. Let them marinate in the refrigerator for at least 2 hours, or overnight for best results.
- Preheat the Oven: When ready to cook, preheat your oven to 400°F (200°C). Line a baking sheet with foil and place a wire rack on top. This will allow the wings to cook evenly and become crispy.
- Arrange the Wings: Remove the wings from the marinade, allowing any excess to drip off, and place them on the wire rack. Reserve the remaining marinade for later.
- Bake the Wings: Place the baking sheet in the preheated oven and bake the wings for 30 minutes. Turn the wings over halfway through cooking to guarantee they cook evenly on both sides.
- Thicken the Marinade: While the wings are baking, pour the reserved marinade into a small saucepan. In a separate small bowl, mix the cornstarch with the cold water to create a slurry. Heat the marinade over medium heat and gradually add the slurry, stirring continuously until the sauce thickens.
- Coat the Wings: Once the wings are cooked, remove them from the oven. Using a brush or spoon, generously coat each wing with the thickened marinade. Return the wings to the oven and bake for an additional 10 minutes to allow the sauce to caramelize.
- Serve: Remove the wings from the oven and let them cool slightly before serving. Arrange them on a platter and serve with your choice of spooky garnishes.
Extra Tips:
To guarantee your Vampire Bat Wings are perfectly cooked, make sure not to overcrowd the baking sheet, as this can cause the wings to steam rather than become crispy.
If you prefer a spicier kick, feel free to adjust the amount of cayenne pepper or add a dash of hot sauce to the marinade. For an extra layer of flavor, you can also grill the wings for a few minutes after baking to achieve a charred effect.
Finally, make sure to let the wings rest for a few minutes before serving, as this will help the flavors meld together beautifully.
Eerie Eyeball Deviled Eggs
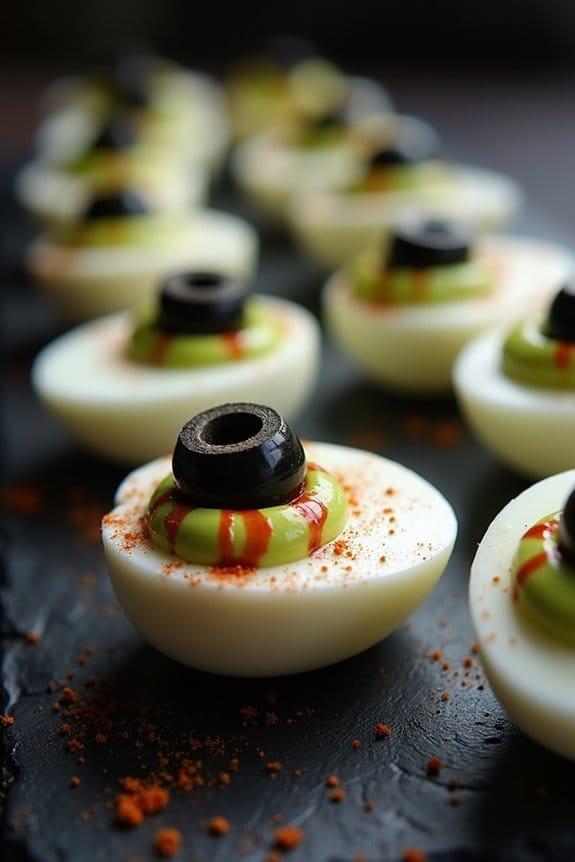
Eerie Eyeball Deviled Eggs are a spooky yet delicious addition to your Halloween party spread. These creepy treats aren’t only visually striking but also packed with flavor, making them a hit among both children and adults. The classic deviled egg is given a ghoulish twist with the addition of food coloring and creative garnishes that transform ordinary eggs into a chilling Halloween dish.
This dish is perfect for those who want to delight their guests with a fun and festive appetizer that’s as tasty as it’s terrifying. The base of the Eerie Eyeball Deviled Eggs is a traditional deviled egg recipe, featuring a creamy yolk mixture seasoned with mustard and mayonnaise. The devilish flair comes from using food coloring to create bloodshot effects and olives to mimic eerie eyeballs.
This recipe serves 4-6 people, making it ideal for a small gathering or as part of a larger buffet spread. It’s a great way to get into the Halloween spirit while also serving something nutritious and protein-packed.
Ingredients (Serves 4-6):
- 6 large eggs
- 3 tablespoons mayonnaise
- 1 teaspoon Dijon mustard
- 1/2 teaspoon salt
- 1/4 teaspoon black pepper
- Red food coloring
- 12 pitted black olives
- Green food coloring
- Paprika (optional, for garnish)
Instructions:
- Boil the Eggs: Place the eggs in a saucepan and cover them with water. Bring the water to a boil over medium-high heat. Once boiling, turn off the heat and cover the saucepan. Let the eggs sit in the hot water for 10-12 minutes.
- Cool and Peel: After the eggs have sat in the hot water, transfer them to a bowl of ice water to stop the cooking process and cool them down. Once cooled, peel the eggs carefully.
- Prepare the Filling: Slice each egg in half lengthwise and gently scoop out the yolks into a bowl. Set the egg whites aside. Mash the yolks with a fork, then mix in mayonnaise, Dijon mustard, salt, and black pepper until smooth and creamy.
- Color the Yolks: Add a few drops of green food coloring to the yolk mixture and stir until you achieve a ghastly green hue. Spoon or pipe the yolk mixture back into the hollowed egg whites.
- Create the Eyeballs: Slice the black olives crosswise to get 12 thin rings. Place one olive ring on top of each yolk-filled egg as the “pupil”. For a bloodshot effect, use a toothpick dipped in red food coloring to draw small lines radiating from the olive outward.
- Garnish and Serve: Optionally, sprinkle a little paprika over the top for added color and flavor. Arrange the eerie eyeball deviled eggs on a platter and serve.
Extra Tips:
For the best results, confirm the eggs are fresh and well-cooked to avoid any rubbery texture. When coloring the yolk mixture, start with a few drops of food coloring and add more as needed to achieve your desired color.
Use a small piping bag or a plastic sandwich bag with a corner snipped off to pipe the yolk mixture neatly into the egg whites. If you want to prepare these ahead of time, store the finished deviled eggs in the refrigerator, covered, for up to a day before serving.
Sinister Spider Pizza
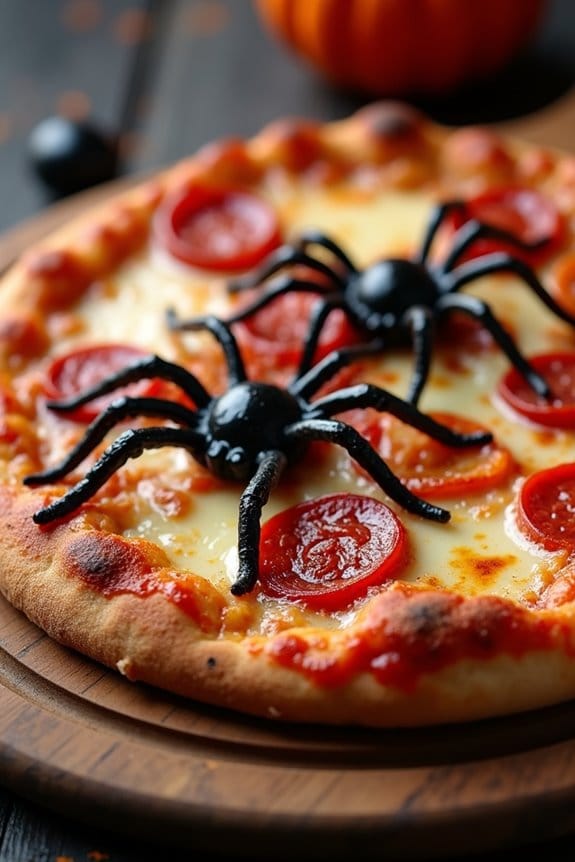
Sinister Spider Pizza is a spine-chilling yet delectable addition to any Halloween party spread. This creatively spooky dish combines the classic flavors of a pizza with the ghoulish appeal of a haunted Halloween treat. Perfect for parties, this pizza is topped with olives fashioned into creepy spiders that will delight and spook your guests in equal measure.
Whether you’re hosting a Halloween bash or just looking to add some fun to your family’s meal, Sinister Spider Pizza is guaranteed to be a hit. The base of our terrifyingly delicious pizza is a classic pizza crust, topped with a rich tomato sauce, gooey mozzarella cheese, and finished with pepperoni slices.
Sinister Spider Pizza: A ghoulishly delicious treat with mozzarella, pepperoni, and spooky olive spiders. Perfect for Halloween fun!
The real fright factor comes from the olive spiders, which are artfully arranged to look like they’re crawling across the surface of the pizza. Not only is this pizza fun to look at, but it’s also fun to eat, combining the savory taste of pepperoni with the rich flavors of olives and cheese.
Follow this simple recipe to create a Sinister Spider Pizza that serves 4-6 people and is sure to be the centerpiece of your Halloween festivities.
Ingredients
- 1 large pizza crust (store-bought or homemade)
- 1 cup pizza sauce
- 2 cups shredded mozzarella cheese
- 20 slices of pepperoni
- 1 cup black olives
- 1 tablespoon olive oil
- 1 teaspoon dried oregano
- 1 teaspoon garlic powder
Instructions
- Preheat the Oven: Start by preheating your oven to 475°F (245°C). This guarantees that the pizza will cook evenly and have a crispy crust.
- Prepare the Pizza Base: Place the pizza crust on a baking sheet or pizza stone. Brush the crust lightly with olive oil to help it crisp up and add a subtle flavor.
- Add the Sauce and Cheese: Spread the pizza sauce evenly over the crust, leaving a small border around the edges. Sprinkle the shredded mozzarella cheese over the sauce for a delicious cheesy layer.
- Arrange the Pepperoni: Evenly distribute the pepperoni slices over the cheese. You can create a pattern or scatter them randomly, depending on your preference.
- Make the Olive Spiders: Cut some of the black olives in half for the spider bodies, and slice others into thin strips to form the spider legs. Arrange the olive halves on the pizza, and use the strips to create legs extending from each body.
- Season the Pizza: Sprinkle dried oregano and garlic powder over the top of the pizza to add depth of flavor.
- Bake the Pizza: Place the pizza in the preheated oven and bake for 12-15 minutes, or until the cheese is melted and bubbly, and the crust is golden brown.
- Cool and Serve: Once baked, remove the pizza from the oven and let it cool for a few minutes before slicing. This helps the cheese set slightly and makes slicing easier. Serve warm.
Extra Tips
For an even spookier presentation, consider using a combination of green and black olives for a variety of spider colors.
Additionally, you can use a knife to carefully score the crust into cobweb patterns before baking to add an extra element of fun. If you prefer a different cheese, try mixing mozzarella with provolone or cheddar for a different flavor profile.
Frightful Cheddar Cauldron Fondue

Are you looking to add a touch of frightful fun to your Halloween party menu? The Frightful Cheddar Cauldron Fondue is the perfect dish to serve your guests. This deliciously creamy fondue, made from sharp cheddar cheese and a hint of spookiness, will have everyone gathered around your cauldron-shaped pot, keenly dipping their favorite dippers into the bubbling cheese.
Whether you’re hosting a full-blown Halloween bash or a cozy night with friends and family, this fondue is an excellent choice for a communal, interactive dining experience.
To make this dish even more thematic, consider serving it in a cauldron-like pot or a black bowl to mimic the look of a bubbling witch’s brew. Pair the fondue with a variety of colorful and eerie dippers such as black breadsticks, crunchy vegetables, and even some ghoulishly green apple slices.
This Frightful Cheddar Cauldron Fondue isn’t only a treat for the taste buds but also a feast for the eyes, making it a standout on your Halloween table.
Ingredients (serves 4-6 people):
- 1 pound sharp cheddar cheese, grated
- 2 tablespoons cornstarch
- 1 garlic clove, halved
- 1 cup dry white wine
- 1 tablespoon lemon juice
- 1 tablespoon Dijon mustard
- A pinch of cayenne pepper
- Salt to taste
- Dippers of choice (bread cubes, vegetables, apples)
Cooking Instructions:
- Prepare the Cheese: In a large bowl, toss the grated cheddar cheese with the cornstarch until well-coated. This will help thicken the fondue and guarantee a smooth texture.
- Flavor the Pot: Rub the inside of a fondue pot or a medium saucepan with the halved garlic clove. This will impart a subtle garlic flavor to the fondue without overpowering it.
- Heat the Liquid: In the prepared pot or saucepan, combine the white wine and lemon juice. Heat over medium heat until the mixture is just about to simmer.
- Melt the Cheese: Gradually add the cheese to the simmering liquid, stirring constantly with a wooden spoon or a whisk. Continue to cook and stir until the cheese is fully melted and smooth.
- Season the Fondue: Stir in the Dijon mustard, cayenne pepper, and salt to taste. Continue to stir until all ingredients are well incorporated and the fondue is smooth and creamy.
- Serve the Fondue: Transfer the fondue to a pre-warmed fondue pot and keep it warm over a low flame. Arrange an assortment of dippers around the pot and invite your guests to enjoy!
Extra Tips:
To maintain your fondue’s creamy consistency, stir it frequently while serving to prevent it from separating. If the fondue becomes too thick, you can thin it out by adding a bit more wine.
If you prefer a non-alcoholic version, substitute the wine with apple cider. For a spookier presentation, consider adding a few drops of food coloring to the cheese mixture to give it an eerie hue.
Gruesome Guacamole and Chips

Gruesome Guacamole and Chips is the perfect dish to spookify your Halloween party while satisfying your guests’ cravings. This eerie take on a classic favorite combines creamy avocados with zesty lime and a touch of spice, all served with crispy chips. Its unsettlingly green color and textured surface can be dressed up with olive “eyeballs” or carved into a brain-like shape to add to the macabre feel of your Halloween spread.
Despite its creepy appearance, this dish is full of flavor and is sure to be a hit among both adults and children. The dish isn’t only fun to present but also quick and easy to prepare, making it an excellent choice for busy hosts looking to impress without spending hours in the kitchen.
A flavorful crowd-pleaser that’s quick to prepare and perfect for busy Halloween hosts.
With a serving size that comfortably feeds 4-6 people, Gruesome Guacamole and Chips is a versatile appetizer that can easily be doubled or tripled for larger gatherings. It’s a great way to add a festive, yet ghoulish touch to your Halloween menu without sacrificing taste or quality.
Ingredients for 4-6 servings:
- 4 ripe avocados
- 1 lime, juiced
- 1 teaspoon salt
- ½ cup diced onion
- 3 tablespoons chopped fresh cilantro
- 2 roma tomatoes, diced
- 1 teaspoon minced garlic
- 1 pinch ground cayenne pepper (optional)
- Black olives for decoration
- Tortilla chips for serving
Cooking Instructions:
- Prepare the Avocados: Cut the avocados in half, remove the pits, and scoop the flesh into a mixing bowl. Use a fork to mash the avocados until you achieve your desired level of smoothness. A chunkier consistency can add to the grotesque look of your guacamole.
- Add Lime Juice and Salt: Pour the lime juice over the mashed avocados to enhance flavor and prevent browning. Stir in the salt evenly to balance the creaminess of the avocados.
- Mix in Vegetables and Herbs: Add the diced onion, chopped cilantro, diced tomatoes, and minced garlic to the avocado mixture. Stir well to combine all the ingredients, ensuring an even distribution of flavors throughout the guacamole.
- Spice It Up: If you desire a bit of heat, sprinkle in a pinch of ground cayenne pepper. Mix well, tasting as you go to adjust seasoning to your preference.
- Decorate and Serve: For a spooky touch, slice black olives into halves or slices and place them on the surface of the guacamole to resemble eyeballs. Serve immediately with a side of tortilla chips.
Extra Tips:
For a more theatrical presentation, consider serving your Gruesome Guacamole in a hollowed-out pumpkin or arranging it into a brain shape on a platter. If you’re preparing the guacamole ahead of time, cover it with plastic wrap pressed directly onto the surface to prevent oxidation and keep it fresh and green.
Additionally, experimenting with different textures by adding chopped jalapeños or red onions can enhance the flavor profile and visual appeal of your dish. Remember, the key is to have fun and let your creativity run wild for a truly unforgettable Halloween treat!
Chilling Chili Con Carne

Prepare to spook your taste buds with this Chilling Chili Con Carne, a perfect addition to your Halloween party spread. This dish combines hearty beef, beans, and a medley of spices to create a warming, flavorful chili that will delight your guests.
With its rich, meaty texture and deep, smoky flavors, this chili is both comforting and thrilling, ideally suited for a chilly October night. Serve it with crusty bread or over a bed of rice for a satisfying meal that will keep the party going.
This recipe is designed to serve 4-6 people, offering generous portions that guarantee everyone gets a taste of the deliciousness. The Chilling Chili Con Carne can be easily adjusted to suit your spice preferences, whether you like it mild or with a haunting heat.
Perfect for preparing in advance, this dish also allows you to spend more time enjoying your Halloween festivities rather than being stuck in the kitchen.
Ingredients:
- 2 tablespoons olive oil
- 1 large onion, chopped
- 3 garlic cloves, minced
- 1 red bell pepper, diced
- 2 pounds ground beef
- 2 tablespoons chili powder
- 1 tablespoon ground cumin
- 1 teaspoon smoked paprika
- 1 teaspoon dried oregano
- 1/2 teaspoon cayenne pepper (optional, for extra heat)
- Salt and pepper to taste
- 2 cans (14 oz each) diced tomatoes
- 2 tablespoons tomato paste
- 1 cup beef broth
- 2 cans (15 oz each) kidney beans, drained and rinsed
- 1 can (15 oz) black beans, drained and rinsed
- 1 tablespoon brown sugar
- 1 tablespoon Worcestershire sauce
- Optional toppings: sour cream, shredded cheese, chopped cilantro, jalapeños, tortilla chips
Cooking Instructions:
- Sauté Aromatics: In a large pot or Dutch oven, heat the olive oil over medium heat. Add the chopped onion and minced garlic, sautéing for about 5 minutes until the onion is translucent and fragrant.
- Cook the Meat: Add the diced red bell pepper and the ground beef to the pot. Cook, stirring occasionally, until the beef is browned and cooked through, about 8-10 minutes. Drain any excess fat if necessary.
- Season the Meat: Stir in the chili powder, ground cumin, smoked paprika, dried oregano, cayenne pepper (if using), salt, and pepper. Cook for another 2 minutes, allowing the spices to bloom and coat the meat thoroughly.
- Add Liquids and Simmer: Pour in the diced tomatoes with their juices, tomato paste, and beef broth. Stir to combine. Bring the mixture to a boil, then reduce the heat to low and let it simmer uncovered for 30 minutes, stirring occasionally.
- Incorporate Beans and Final Seasoning: Add the drained kidney beans, black beans, brown sugar, and Worcestershire sauce. Stir well and continue to simmer for an additional 20-30 minutes, or until the chili has thickened to your desired consistency.
- Adjust Seasoning and Serve: Taste and adjust the seasoning with more salt, pepper, or spices if needed. Serve hot with your choice of toppings such as sour cream, shredded cheese, chopped cilantro, jalapeños, or tortilla chips.
Extra Tips:
For a deeper flavor, consider making the chili a day ahead of your Halloween party. This allows the spices and ingredients to meld together beautifully, enhancing the taste.
If you prefer a vegetarian version, substitute the ground beef with a plant-based alternative or more beans and vegetables like zucchini or mushrooms.
Finally, feel free to customize the heat level by adjusting the amount of cayenne pepper or adding fresh chili peppers to the mix.
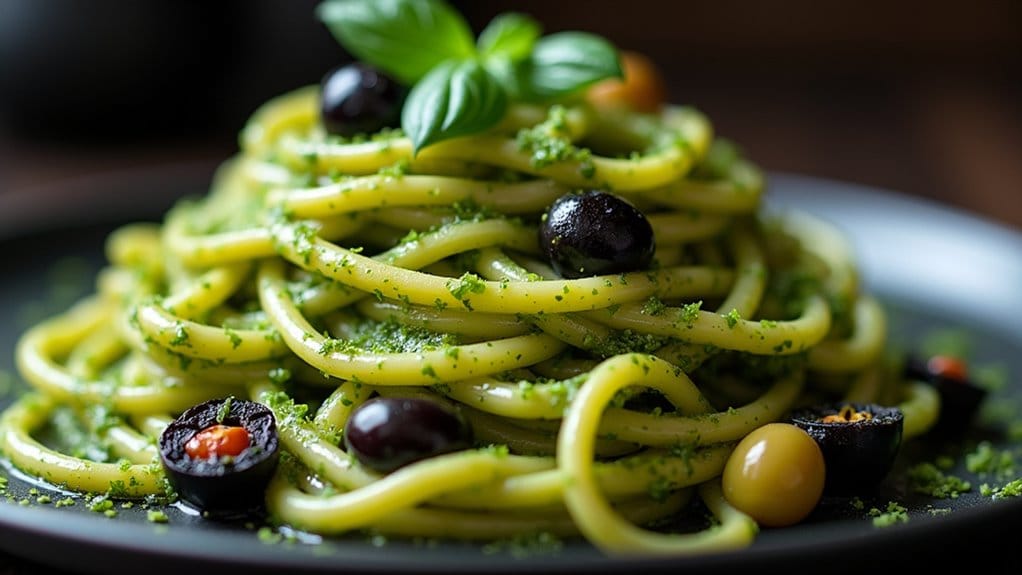
Petrifying Pesto Pasta

Transform your Halloween party into a spine-chilling affair with our Petrifying Pesto Pasta, a dish that’s as delicious as it’s hauntingly green. This eerie yet enticing pasta dish will captivate both adults and children alike, adding a touch of gourmet spookiness to your Halloween spread.
The vibrant green hue of the pesto sauce, combined with a few creative twists, makes this an unforgettable centerpiece for your holiday table. Pesto, traditionally a savory sauce made from basil, garlic, Parmesan cheese, pine nuts, and olive oil, serves as the base for this frightful dish.
This hauntingly vibrant green pesto sauce is the perfect spooky centerpiece for your Halloween feast.
For our Petrifying Pesto Pasta, we’ll be giving it a Halloween makeover with the addition of black olives and sun-dried tomatoes that mimic eyes peering out from the green depths of the dish. This recipe is designed to serve 4-6 people, making it perfect for a small gathering or as a side dish at a larger party.
Ingredients:
- 500g pasta of your choice (spaghetti or linguine work well)
- 2 cups fresh basil leaves
- 2 cloves garlic
- 1/2 cup grated Parmesan cheese
- 1/3 cup pine nuts
- 1/2 cup extra-virgin olive oil
- Salt and pepper to taste
- 1/2 cup black olives, sliced
- 1/2 cup sun-dried tomatoes, julienned
- 1/4 cup pitted green olives, sliced
Cooking Instructions:
- Prepare the Pasta: Begin by cooking the pasta according to the package instructions. Confirm the water is generously salted to add flavor to the pasta. Once cooked, drain and set aside, reserving a bit of the pasta water for later.
- Make the Pesto Sauce: In a food processor, combine the basil leaves, garlic cloves, grated Parmesan cheese, and pine nuts. Pulse until the ingredients are finely chopped. With the processor running on low speed, slowly drizzle in the olive oil until the mixture becomes a smooth sauce. Season with salt and pepper to taste.
- Combine Pasta and Pesto: In a large mixing bowl, toss the cooked pasta with the pesto sauce, confirming each strand is well-coated. If the sauce is too thick, add a splash of the reserved pasta water to reach the desired consistency.
- Add the Spooky Elements: Gently fold in the sliced black olives, sun-dried tomatoes, and green olives into the pasta. The olives and tomatoes add texture and a creepy aesthetic to the dish, resembling eerie eyeballs and otherworldly bits.
- Serve: Transfer the Petrifying Pesto Pasta to a large serving dish or individual plates. For extra creepiness, garnish with additional basil leaves or more sliced olives.
Extra Tips:
When preparing the pesto, be sure to taste and adjust the seasoning as needed; sometimes a little extra salt or Parmesan can really elevate the flavor.
If you’re preparing this dish in advance, store the pesto and pasta separately to avoid the pasta absorbing too much sauce and becoming dry. For a vegetarian version, ensure the Parmesan cheese is suitable for vegetarians, or substitute with a similar non-animal rennet cheese.
Finally, feel free to get creative with the spooky elements—consider adding edible eyes or using colored pasta for an even more ghoulish presentation.
