
I’m so excited to share my favorite healthy Christmas treats with you all. These recipes are not just delicious but also fun to make. Picture guilt-free gingerbread cookies, almond flour snowball cookies, and peppermint dark chocolate bark adorning your holiday table. Each treat is made with wholesome ingredients, letting you indulge without any guilt. Let’s explore how these delightful goodies can make your Christmas joyful and nourishing!
Guilt-Free Gingerbread Cookies

Guilt-Free Gingerbread Cookies are the perfect festive treat for those looking to enjoy the holiday season without compromising on health. Packed with the warm spices of ginger, cinnamon, and nutmeg, these cookies offer a delightful taste while being lower in sugar and fat compared to traditional recipes. Made with whole grain flour, natural sweeteners, and a hint of molasses for that classic gingerbread flavor, these cookies are certain to be a hit at your Christmas gatherings.
These cookies aren’t only delicious but also easy to make, making them an ideal activity to enjoy with family and friends. Whether you’re looking to serve them at a holiday party or simply enjoy them with a cup of hot cocoa, Guilt-Free Gingerbread Cookies are a versatile treat that fits any occasion. This recipe yields approximately 24 cookies, perfect for serving 4-6 people.
Ingredients:
- 2 cups whole wheat flour
- 1 teaspoon baking soda
- 1 1/2 teaspoons ground ginger
- 1 teaspoon ground cinnamon
- 1/2 teaspoon ground nutmeg
- 1/4 teaspoon salt
- 1/4 cup coconut oil, melted
- 2/3 cup unsweetened applesauce
- 1/4 cup molasses
- 1/3 cup coconut sugar
- 1 teaspoon vanilla extract
- 1 large egg
Cooking Instructions:
- Preheat the Oven: Begin by preheating your oven to 350°F (175°C). Line a baking sheet with parchment paper or a silicone baking mat to prevent sticking.
- Mix Dry Ingredients: In a medium-sized bowl, whisk together the whole wheat flour, baking soda, ground ginger, cinnamon, nutmeg, and salt until well combined. Set aside.
- Combine Wet Ingredients: In a separate large bowl, mix the melted coconut oil, unsweetened applesauce, molasses, coconut sugar, vanilla extract, and egg. Stir until the mixture is smooth and all ingredients are well incorporated.
- Form the Dough: Gradually add the dry ingredients to the wet ingredients, stirring until a dough forms. The dough should be slightly sticky but firm enough to roll.
- Roll and Cut: Lightly flour a clean surface and roll out the dough to about 1/4 inch thick. Use cookie cutters to cut out desired shapes and place them on the prepared baking sheet, leaving some space between each cookie.
- Bake: Place the baking sheet in the preheated oven and bake for 8-10 minutes, or until the edges of the cookies are firm. Be careful not to overbake, as they’ll continue to firm up as they cool.
- Cool: Remove the cookies from the oven and let them cool on the baking sheet for 5 minutes before transferring them to a wire rack to cool completely.
Extra Tips:
For an extra touch of festivity, consider decorating your Guilt-Free Gingerbread Cookies with a light drizzle of dark chocolate or a simple glaze made from powdered sugar and a splash of almond milk.
If you prefer a softer cookie, reduce the baking time slightly, keeping an eye on the edges to ascertain they don’t brown too quickly. Keep the dough chilled between batches to make it easier to work with.
These cookies can be stored in an airtight container for up to a week, making them a great make-ahead option for holiday gatherings.
Almond Flour Snowball Cookies
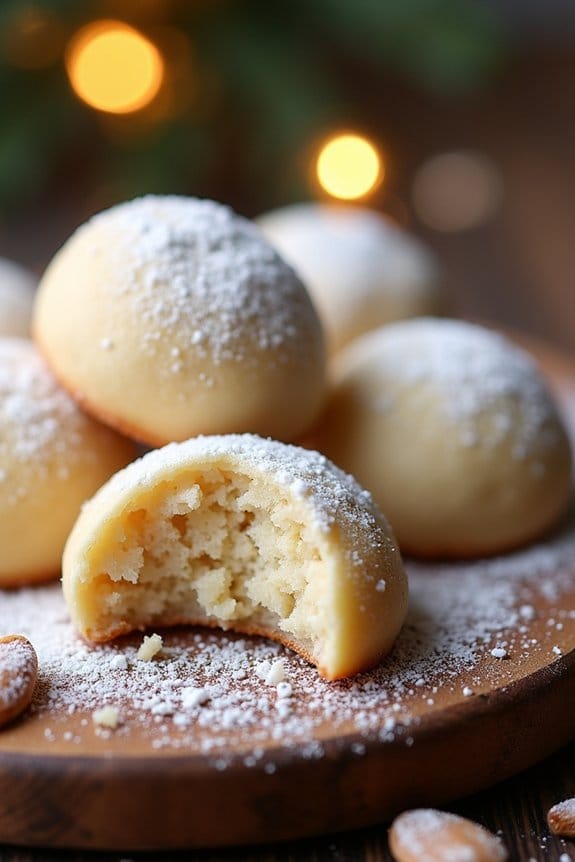
Indulge in the festive spirit with these delightful Almond Flour Snowball Cookies, a perfect addition to your roster of healthy Christmas treats. These cookies aren’t only gluten-free but also packed with the rich, nutty flavor of almonds, making them a guilt-free option for holiday indulgence. Their buttery, melt-in-your-mouth texture will have you reaching for seconds, all while maintaining your health-conscious commitments in check.
Ideal for sharing, this recipe serves 4-6 people, making it perfect for small gatherings or family get-togethers. These cookies are easy to make and require minimal ingredients, keeping the focus on wholesome, nutrient-rich components. Enjoy them with a warm beverage or as a sweet bite after your holiday feast.
Ingredients:
- 2 cups almond flour
- 1/2 cup unsalted butter, softened
- 1/4 cup powdered sugar
- 1 teaspoon vanilla extract
- 1/4 teaspoon salt
- 1/2 cup finely chopped almonds
- Additional powdered sugar for dusting
Cooking Instructions:
- Preheat the Oven: Begin by preheating your oven to 350°F (175°C). Line a baking sheet with parchment paper to prevent the cookies from sticking.
- Cream Butter and Sugar: In a large bowl, use an electric mixer to cream together the softened butter and powdered sugar until light and fluffy. This should take about 2-3 minutes.
- Add Vanilla and Dry Ingredients: Add vanilla extract and salt to the creamed mixture. Gradually incorporate the almond flour, mixing until well combined. The dough will be thick and slightly crumbly.
- Incorporate Chopped Almonds: Gently fold in the finely chopped almonds using a spatula, guaranteeing the nuts are evenly distributed throughout the dough.
- Shape the Cookies: Using your hands, roll the dough into 1-inch balls and place them on the prepared baking sheet, spacing them about an inch apart.
- Bake: Place the baking sheet in the preheated oven and bake for 15-18 minutes, or until the cookies are lightly golden. Be careful not to overbake, as they can quickly become too dry.
- Cool and Dust with Sugar: Allow the cookies to cool on the baking sheet for about 5 minutes, then transfer them to a wire rack. Once completely cool, generously dust the cookies with additional powdered sugar.
Extra Tips:
For best results, verify your butter is at room temperature to achieve a smooth and creamy texture when mixed with the sugar.
Using finely ground almond flour will give these cookies a delicate, tender crumb. If you prefer a more pronounced almond flavor, consider adding a few drops of almond extract along with the vanilla.
Store these cookies in an airtight container to keep them fresh, and consider doubling the recipe if you’re expecting more guests or want to keep some for yourself after the party.
Peppermint Dark Chocolate Bark

Indulge in a festive and healthier holiday treat with Peppermint Dark Chocolate Bark. This delightful recipe combines the rich, velvety taste of dark chocolate with the revitalizing zing of peppermint. Perfect for those looking to satisfy their sweet tooth while staying on track with their health goals, this bark makes for an excellent homemade gift or a guilt-free dessert to enjoy at your Christmas gatherings.
Not only is it simple to make, but it also captures the essence of the season in each bite. This recipe yields a serving size of 4-6 people and requires minimal ingredients, making it an excellent option for last-minute holiday preparations. The dark chocolate provides a dose of antioxidants, while the peppermint adds a burst of flavor without any added sugars or artificial additives.
With just a few steps, you can create a delicious and visually appealing treat that’s sure to impress your guests.
Ingredients (serving size: 4-6 people):
- 12 ounces of high-quality dark chocolate (70% cocoa or higher)
- 1 teaspoon peppermint extract
- 1/3 cup crushed peppermint candies or candy canes
- Optional: 1 tablespoon coconut oil for smoother melting
Cooking Instructions:
- Prepare the Chocolate: Start by chopping the dark chocolate into small, even pieces. This will help it melt more evenly and smoothly. If using, add the coconut oil to the chocolate pieces.
- Melt the Chocolate: Place the chopped chocolate (and coconut oil, if using) in a heatproof bowl. Set the bowl over a pot of gently simmering water, making certain the bottom of the bowl doesn’t touch the water. Stir continuously until the chocolate is completely melted and smooth. Alternatively, you can melt the chocolate in the microwave in 30-second increments, stirring between each session until fully melted.
- Add Peppermint Flavor: Once the chocolate is melted, remove it from the heat. Stir in the peppermint extract, mixing thoroughly to guarantee the flavor is evenly distributed throughout the chocolate.
- Prepare the Baking Sheet: Line a baking sheet with parchment paper. This will prevent the chocolate from sticking and make it easier to remove once it’s set.
- Pour and Spread the Chocolate: Pour the melted chocolate onto the prepared baking sheet. Using a spatula, spread the chocolate into an even layer, about 1/4-inch thick.
- Add Crushed Peppermint: Immediately sprinkle the crushed peppermint candies or candy canes over the top of the chocolate, pressing them gently into the surface so they adhere as the chocolate sets.
- Set the Bark: Allow the chocolate to cool and harden at room temperature, or place it in the refrigerator to speed up the process. This should take about 1-2 hours.
- Break into Pieces: Once fully set, break the chocolate bark into irregular pieces using your hands. Store the bark in an airtight container at room temperature or in the refrigerator for a longer shelf life.
Extra Tips:
For a more sophisticated appearance, consider swirling a small amount of white chocolate into the dark chocolate before it sets. This can add an attractive contrast and additional depth of flavor.
If you prefer a stronger peppermint flavor, you can increase the amount of peppermint extract slightly, but be cautious as it can quickly become overpowering. Additionally, verify your peppermint candies are crushed finely enough to easily adhere to the chocolate but still provide a satisfying crunch.
This Peppermint Dark Chocolate Bark can also be customized with other toppings like nuts or dried fruit for added texture and flavor variety.
Healthy Fruit and Nut Energy Bites
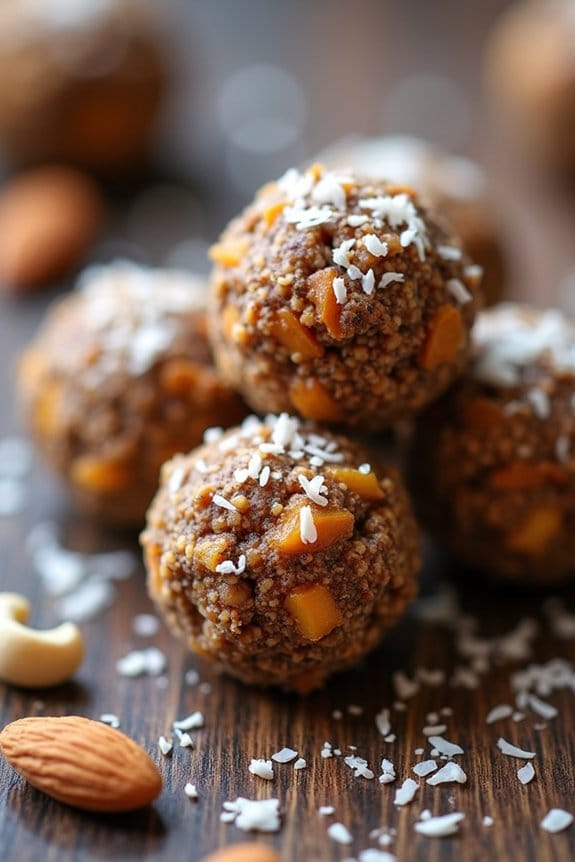
Healthy Fruit and Nut Energy Bites are a perfect way to enjoy the festive season while still keeping your health in check. These little treats are packed with natural sweetness from dried fruits and a delightful crunch from nuts. They’re not only delicious but also provide a quick energy boost, making them the perfect snack during the busy holiday season.
Whether you’re looking to satisfy a sweet craving or need a quick pick-me-up between holiday errands, these energy bites are sure to hit the spot without the guilt of traditional sugary treats.
These energy bites are super easy to make and require no baking, which is a bonus during the hectic Christmas season. They can be made in advance and stored, making them a convenient option for holiday gatherings or a quick snack on the go.
The combination of fruits and nuts provides a great mix of fiber, healthy fats, and natural sugars, offering a balanced snack that fuels your body. Plus, they’re customizable, so you can adjust the ingredients to suit your taste or dietary needs.
Ingredients (Serves 4-6):
- 1 cup pitted dates
- 1 cup dried apricots
- 1/2 cup unsweetened shredded coconut
- 1/2 cup raw almonds
- 1/2 cup raw cashews
- 1/4 cup chia seeds
- 1 tablespoon honey or maple syrup
- 1 teaspoon vanilla extract
- 1/2 teaspoon ground cinnamon
- A pinch of salt
Cooking Instructions:
- Prepare the Dates: Start by soaking the pitted dates in warm water for about 10 minutes. This softens them and makes them easier to blend.
- Blend the Ingredients: Drain the dates and add them to a food processor along with the dried apricots, almonds, and cashews. Pulse until the mixture is well combined and forms a sticky dough.
- Mix in Additional Ingredients: Add in the shredded coconut, chia seeds, honey or maple syrup, vanilla extract, ground cinnamon, and salt. Pulse again until everything is thoroughly mixed and the mixture holds together when pressed.
- Form the Bites: Using your hands, roll the mixture into small balls, about the size of a golf ball. This should yield approximately 20-24 energy bites.
- Chill the Bites: Place the energy bites on a baking sheet lined with parchment paper and refrigerate for at least 30 minutes to set.
- Store: Once set, transfer the energy bites to an airtight container and store them in the refrigerator for up to two weeks.
Extra Tips:
To guarantee your energy bites have the perfect texture, make sure not to over-process the nuts; you want some small chunks for added texture. If the mixture seems too dry, you can add a teaspoon of water or more honey/maple syrup to help it bind.
Feel free to experiment with different types of nuts or dried fruits to suit your taste preferences. If you prefer a less sweet version, reduce the amount of honey or maple syrup.
These bites also make a great gift; simply pack them in a decorative jar or box for a thoughtful homemade present.
Vegan Chocolate Truffles

Indulge in the rich and creamy decadence of these Vegan Chocolate Truffles, a perfect healthy treat for the holiday season. These truffles aren’t only irresistible but also simple to make, requiring just a few wholesome ingredients. The smooth, melt-in-your-mouth texture combined with a rich chocolate flavor makes them a delightful addition to your Christmas dessert table.
Whether you’re looking for a vegan-friendly dessert or simply wish to enjoy a guilt-free indulgence, these truffles will satisfy your sweet tooth while keeping things nutritious.
Made with high-quality dark chocolate and naturally sweetened with dates, these truffles are bound to impress both vegans and non-vegans alike. The use of coconut cream adds a luscious creaminess, while a hint of vanilla enhances the flavor profile. Rolled in your choice of cocoa powder or desiccated coconut, these truffles not only taste amazing but are also visually appealing.
Perfect for gifting or serving at your festive gatherings, this recipe makes enough for 4-6 people to enjoy.
Ingredients (Serves 4-6):
- 200g dark chocolate (70% cocoa or higher)
- 100ml coconut cream
- 8-10 Medjool dates, pitted
- 1 teaspoon vanilla extract
- Pinch of sea salt
- Cocoa powder or desiccated coconut for rolling
Cooking Instructions:
- Prepare the Dates: Begin by soaking the pitted Medjool dates in warm water for about 10 minutes to soften them. Once softened, drain the water and set the dates aside.
- Melt the Chocolate: Chop the dark chocolate into small pieces and place them in a heatproof bowl. Melt the chocolate gently over a simmering pot of water, stirring occasionally until smooth and fully melted.
- Blend the Mixture: In a food processor, combine the softened dates, melted chocolate, coconut cream, vanilla extract, and a pinch of sea salt. Blend until the mixture is smooth and well combined, making sure there are no date chunks remaining.
- Chill the Mixture: Transfer the chocolate mixture into a bowl and refrigerate for about 1-2 hours or until it’s firm enough to handle. This will make it easier to roll the truffles.
- Shape the Truffles: Once the mixture is firm, use a tablespoon to scoop out portions and roll them into small balls using your hands. Aim for uniform sizes to facilitate even enjoyment.
- Coat the Truffles: Roll each truffle in cocoa powder or desiccated coconut until fully coated. This adds an extra layer of flavor and texture to your truffles.
- Serve and Enjoy: Place the truffles in a serving dish or gift box, and enjoy immediately or store them in an airtight container in the fridge until ready to serve.
Extra Tips:
For an even richer flavor, consider adding a teaspoon of instant coffee granules to the chocolate mixture for a mocha twist. If you prefer a nuttier texture, finely chopped nuts such as almonds or hazelnuts can be added to the mixture before chilling.
When rolling the truffles, keep your hands slightly damp to prevent the mixture from sticking. Finally, get creative with the coatings by trying crushed peppermint candies or ground pistachios for a festive touch.
Cinnamon Roasted Almonds
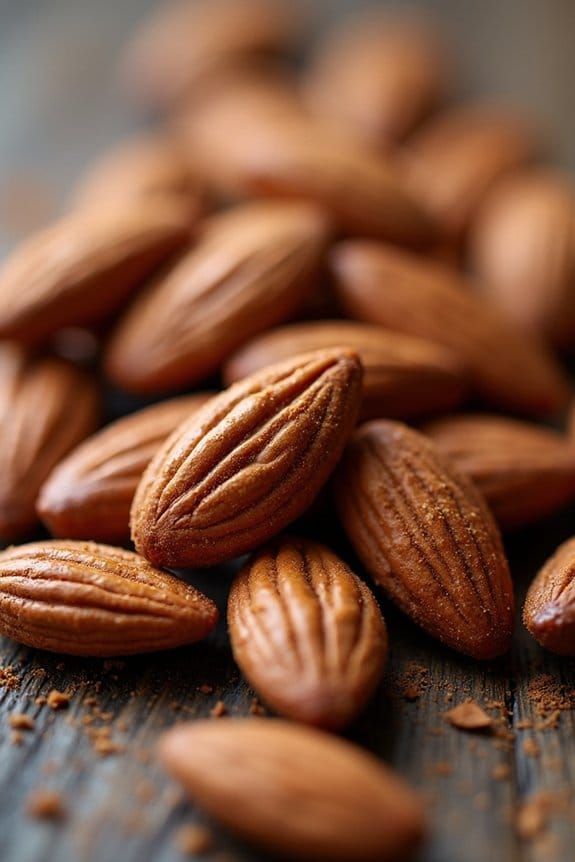
Cinnamon Roasted Almonds are a delightful and healthy treat to serve during the festive season. Not only are they easy to make, but they also fill your home with the warm, inviting aroma of cinnamon and roasted nuts. Perfect for snacking or as a thoughtful homemade gift, these almonds offer a satisfying crunch and a sweet, spicy flavor profile that embodies the spirit of Christmas.
This recipe is designed to serve 4-6 people, making it ideal for a small gathering or as a snack to enjoy throughout the week. The combination of cinnamon and almonds not only tastes delicious but also provides a nutritious snack option that’s rich in antioxidants, fiber, and healthy fats. Enjoy these Cinnamon Roasted Almonds as part of a healthy holiday spread or as a guilt-free indulgence any day of the week.
Ingredients:
- 2 cups raw almonds
- 1 tablespoon coconut oil, melted
- 1/4 cup maple syrup
- 1 teaspoon pure vanilla extract
- 1 tablespoon ground cinnamon
- 1/2 teaspoon sea salt
Instructions:
- Preheat the Oven: Start by preheating your oven to 350°F (175°C). This will guarantee that the almonds roast evenly and achieve a perfect crunch.
- Prepare the Baking Sheet: Line a large baking sheet with parchment paper or a silicone baking mat. This prevents the almonds from sticking and makes cleanup easier.
- Mix the Coating: In a large mixing bowl, combine the melted coconut oil, maple syrup, vanilla extract, ground cinnamon, and sea salt. Stir well until all the ingredients are fully integrated.
- Coat the Almonds: Add the raw almonds to the bowl with the cinnamon mixture. Toss them thoroughly to ensure each almond is evenly coated with the sweet and spicy mixture.
- Spread and Roast: Spread the coated almonds in a single layer on the prepared baking sheet. Place them in the preheated oven and roast for 20-25 minutes, stirring halfway through to guarantee even roasting.
- Cool and Store: Remove the almonds from the oven when they’re golden brown and fragrant. Allow them to cool completely on the baking sheet before transferring them to an airtight container for storage.
Extra Tips:
For an even more intense flavor, consider adding a pinch of cayenne pepper to the cinnamon mixture for an unexpected hint of heat.
Be sure to stir the almonds halfway through roasting to prevent burning and guarantee even cooking. If you prefer a sweeter treat, you can increase the amount of maple syrup, but be cautious as this may affect the roasting time.
Store the roasted almonds in a cool, dry place to keep them fresh for up to two weeks. Enjoy these delicious treats as a snack, salad topping, or festive gift.
Whole Wheat Christmas Stollen
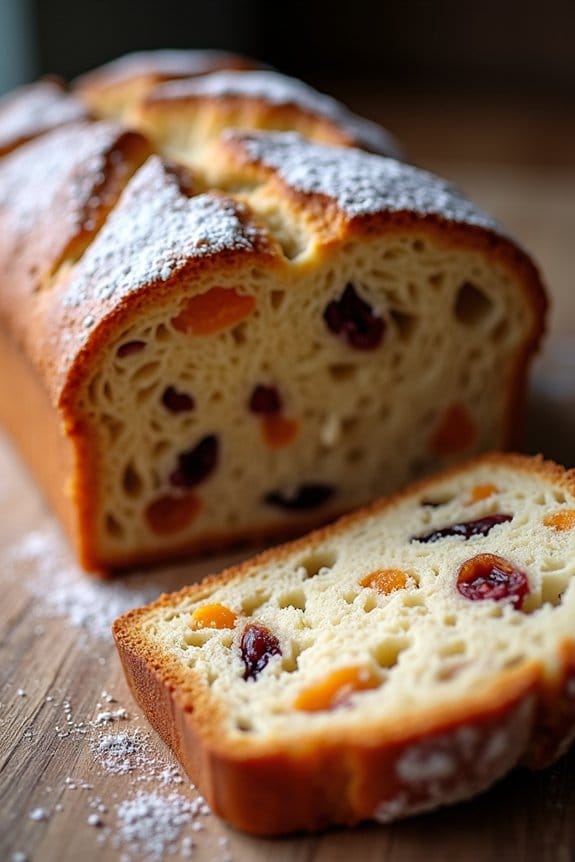
Christmas Stollen is a classic German fruit bread that’s traditionally enjoyed during the holiday season. This delightful treat is usually packed with candied fruits, nuts, and marzipan, making it a rich and festive addition to your Christmas table.
However, if you’re looking to make this delicious bread a little bit healthier, consider using whole wheat flour instead of the usual refined white flour. Whole wheat flour adds a nutty flavor and boosts the fiber content, which can help keep you fuller for longer and contribute to better digestion.
This Whole Wheat Christmas Stollen recipe doesn’t compromise on the traditional flavors but adds a wholesome twist. It’s a perfect treat to share with family and friends, whether as a breakfast delight on Christmas morning or a sweet indulgence with a cup of tea or coffee.
By incorporating whole ingredients and adjusting the sugar content, you can create a stollen that’s both nutritious and satisfying. This version serves 4-6 people and will surely bring warmth and joy to your festive celebrations.
Ingredients (serves 4-6 people):
- 3 cups whole wheat flour
- 1 packet (2 1/4 teaspoons) active dry yeast
- 1/2 cup warm milk (about 110°F)
- 1/2 cup unsalted butter, softened
- 1/4 cup granulated sugar
- 1/2 teaspoon salt
- 1 teaspoon vanilla extract
- 1 teaspoon ground cinnamon
- 1/2 teaspoon ground cardamom
- 1/2 teaspoon ground nutmeg
- 1 large egg
- 1/2 cup raisins
- 1/2 cup chopped dried apricots
- 1/4 cup chopped nuts (such as almonds or walnuts)
- Zest of 1 lemon
- 1/2 cup marzipan
- Powdered sugar for dusting
Instructions:
- Activate the Yeast: In a small bowl, dissolve the yeast in warm milk. Let it stand for about 5-10 minutes until it becomes frothy, indicating that the yeast is active.
- Prepare the Dough: In a large mixing bowl, combine whole wheat flour, sugar, salt, ground cinnamon, cardamom, and nutmeg. Add the softened butter, vanilla extract, and the egg. Pour in the yeast mixture. Mix everything together until a soft dough forms.
- Knead the Dough: Transfer the dough onto a lightly floured surface and knead it for about 8-10 minutes until it becomes smooth and elastic. If the dough is too sticky, sprinkle a little more flour as needed.
- First Rise: Place the dough in a lightly oiled bowl, cover it with a clean kitchen towel, and let it rise in a warm spot for about 1-2 hours, or until it has doubled in size.
- Add Fruits and Nuts: Once the dough has risen, punch it down and flatten it slightly. Spread the raisins, chopped dried apricots, chopped nuts, and lemon zest over the dough. Knead the dough again to incorporate the fruits and nuts evenly.
- Shape the Stollen: Roll out the dough into a rectangle. Shape the marzipan into a log and place it in the center of the rectangle. Fold the dough over the marzipan to enclose it completely, forming a loaf shape.
- Second Rise: Place the loaf onto a baking sheet lined with parchment paper. Cover it with a towel and let it rise for another 30-45 minutes.
- Bake the Stollen: Preheat your oven to 350°F (175°C). Bake the stollen for 30-35 minutes, or until it’s golden brown and sounds hollow when tapped on the bottom.
- Cool and Dust: Allow the stollen to cool on a wire rack. Once cooled, dust it generously with powdered sugar.
Extra Tips:
For best results, verify that all your ingredients are at room temperature before you begin mixing. This helps with the even incorporation of ingredients and aids in the dough’s rise.
If you don’t have marzipan, you can substitute with almond paste for a similar taste. Stollen is best when allowed to rest for a day before serving, as this enhances the flavors.
Store it wrapped in foil or plastic wrap to keep it fresh for up to a week. Enjoy your Whole Wheat Christmas Stollen with a warm beverage for a delightful holiday experience!
Low-Sugar Cranberry Orange Muffins

The festive season is the perfect time to indulge in delightful treats, but it doesn’t mean you have to stray from healthy eating. These Low-Sugar Cranberry Orange Muffins are a delicious way to enjoy Christmas flavors without the guilt. Packed with fresh cranberries and zesty orange, these muffins offer a revitalizing burst of taste, while maintaining a lower sugar content compared to traditional muffins. Perfect for a holiday breakfast or a sweet snack, they promise to be a hit with family and friends who are looking for healthier options.
This recipe is designed to serve 4-6 people, making it ideal for a small family gathering or a cozy brunch. The key to these muffins is using natural sweetness from the orange juice and a touch of honey, which pairs perfectly with the tartness of the cranberries. The ingredients are simple, and the preparation is straightforward, guaranteeing you can spend more time enjoying the holidays and less time in the kitchen.
Ingredients (Serves 4-6)
- 1 ½ cups all-purpose flour
- 1 teaspoon baking powder
- ½ teaspoon baking soda
- ¼ teaspoon salt
- 1 cup fresh cranberries, roughly chopped
- Zest of 1 large orange
- ½ cup freshly squeezed orange juice
- ¼ cup honey
- ¼ cup unsweetened applesauce
- 1 large egg
- 1 teaspoon vanilla extract
- ¼ cup vegetable oil
Instructions
- Preheat the Oven: Begin by preheating your oven to 375°F (190°C). Line a muffin tin with paper liners or spray with non-stick cooking spray to prevent sticking.
- Mix Dry Ingredients: In a large mixing bowl, combine the all-purpose flour, baking powder, baking soda, and salt. Stir until well combined and set aside.
- Prepare Wet Ingredients: In another bowl, whisk together the orange juice, honey, applesauce, egg, vanilla extract, and vegetable oil. Make sure the mixture is smooth and all ingredients are fully integrated.
- Combine the Mixtures: Gradually add the wet ingredients to the dry ingredients, stirring gently until just combined. Be careful not to overmix as this can make the muffins dense.
- Add the Cranberries and Orange Zest: Fold in the chopped cranberries and orange zest into the batter. Distribute them evenly to guarantee each muffin is packed with flavor.
- Fill the Muffin Tins: Spoon the batter into the prepared muffin tin, filling each liner about two-thirds full to allow room for rising.
- Bake: Place the muffin tin in the preheated oven and bake for 18-22 minutes, or until a toothpick inserted into the center of a muffin comes out clean.
- Cool and Serve: Once baked, remove the muffins from the oven and allow them to cool in the tin for about 5 minutes before transferring them to a wire rack to cool completely.
Extra Tips
For an added touch of sweetness and texture, consider sprinkling a little turbinado sugar on top of the muffins before baking. If fresh cranberries aren’t available, you can substitute with frozen cranberries; just verify they’re thawed and drained before adding to the batter.
To enhance the orange flavor, you could add a teaspoon of orange extract in addition to the zest. Finally, these muffins store well in an airtight container for up to three days, making them a great make-ahead option for busy holiday mornings.
Gluten-Free Peppermint Meringue Kisses

Gluten-Free Peppermint Meringue Kisses are a delightful and festive treat that brings a rejuvenating twist to your holiday dessert table. These light and airy confections are perfect for those seeking a gluten-free option during the Christmas season. With their crisp exterior and melt-in-your-mouth texture, these meringue kisses are infused with the cool, minty flavor of peppermint, making them a revitalizing addition to your holiday spread.
Not only are these meringues visually appealing with their snowy white appearance and delicate peppermint stripes, but they’re also simple to make with just a handful of ingredients. Ideal for serving a group of 4-6 people, these treats are sure to bring joy to your family and friends during the festive period. Whether you’re hosting a holiday gathering or simply looking for a sweet snack, these peppermint meringue kisses are a wonderful choice.
Ingredients (Serving Size: 4-6 people):
- 4 large egg whites
- 1 cup granulated sugar
- 1/4 teaspoon cream of tartar
- 1/2 teaspoon peppermint extract
- Red gel food coloring
Instructions:
- Preheat the Oven: Begin by preheating your oven to 200°F (93°C). Line two baking sheets with parchment paper to prevent the meringues from sticking.
- Prepare the Egg Whites: In a clean, dry mixing bowl, combine the egg whites and cream of tartar. Using an electric mixer, beat the egg whites on medium speed until they become frothy.
- Incorporate the Sugar: Gradually add the sugar, about 1 tablespoon at a time, while continuing to beat the mixture. Increase the mixer speed to high and beat until the sugar is fully dissolved and stiff peaks form. This should take about 5-7 minutes.
- Flavor the Meringue: Gently fold in the peppermint extract with a spatula, being careful not to deflate the meringue mixture.
- Add the Coloring: Using a small paintbrush, paint three or four stripes of red gel food coloring on the inside of a large piping bag fitted with a star tip. This will create the peppermint stripe effect on the meringue kisses.
- Pipe the Meringues: Carefully fill the piping bag with the meringue mixture. Pipe small, kiss-shaped mounds onto the prepared baking sheets, spacing them about 1 inch apart.
- Bake: Place the baking sheets in the preheated oven and bake the meringues for 1.5 to 2 hours, or until they’re dry to the touch. Turn off the oven and let the meringues cool completely inside the oven to prevent cracking.
- Store: Once cooled, store the meringue kisses in an airtight container at room temperature to keep them crisp.
Extra Tips:
To guarantee the best results when making meringue, it’s essential that your mixing bowl and utensils are completely clean and free of any grease, as even a small amount of fat can prevent the egg whites from whipping properly.
Be patient while adding the sugar; adding it too quickly can result in a gritty texture. If you’re in a humid environment, try to make meringues on a dry day, as humidity can affect the crispness of the final product.
Finally, don’t rush the cooling process; letting the meringues cool slowly in the oven helps maintain their delicate structure.
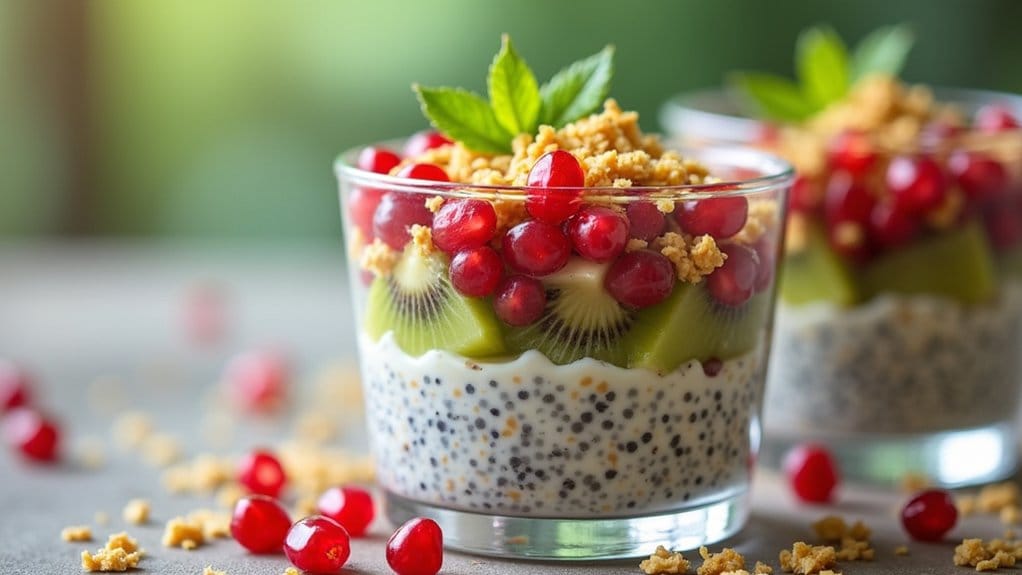
Festive Chia Seed Pudding Parfaits
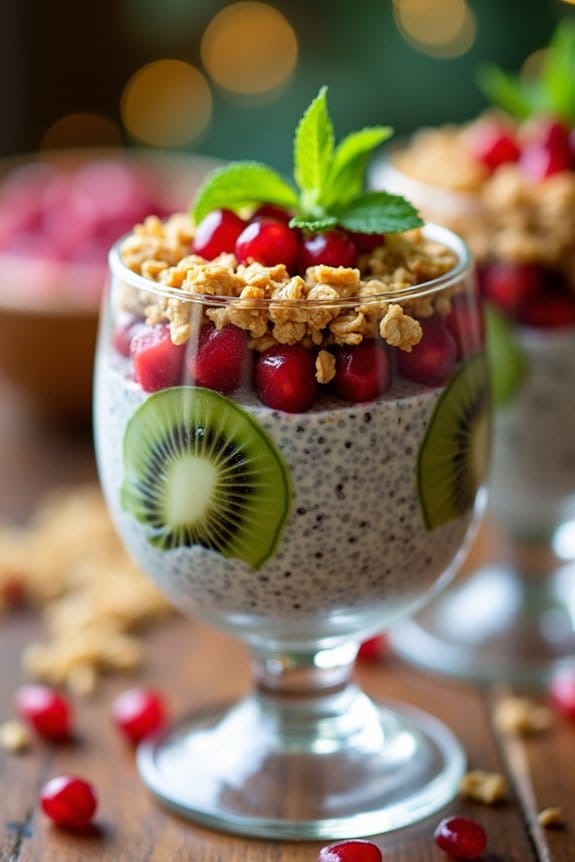
Celebrate the holiday season with a healthy twist by indulging in Festive Chia Seed Pudding Parfaits. This delightful treat combines the creamy texture of chia pudding with layers of fresh fruit and crunchy granola, making it not only nutritious but also visually appealing.
Perfect for a Christmas breakfast or a light dessert, these parfaits are packed with omega-3 fatty acids, antioxidants, and fiber, guaranteeing a guilt-free indulgence.
The beauty of this recipe lies in its simplicity and versatility. You can prepare the chia pudding base a day in advance, allowing the seeds to soak up the flavors and thicken overnight.
When ready to serve, simply layer the pudding with your choice of seasonal fruits, like pomegranate seeds or kiwi slices, and top with a sprinkle of granola for added crunch. Whether enjoyed individually or presented as part of a festive brunch, these parfaits are sure to impress your family and guests.
Ingredients (Serves 4-6):
- 1 cup chia seeds
- 4 cups almond milk (or milk of choice)
- 1/4 cup maple syrup or honey
- 1 teaspoon vanilla extract
- 1 teaspoon ground cinnamon
- 2 cups mixed fresh fruits (e.g., pomegranate seeds, kiwi, strawberries)
- 1 cup granola
- Optional: mint leaves for garnish
Cooking Instructions:
- Prepare the Chia Pudding: In a large mixing bowl, combine the chia seeds, almond milk, maple syrup (or honey), vanilla extract, and ground cinnamon. Whisk thoroughly to confirm the chia seeds are evenly distributed and not clumped together.
- Refrigerate: Cover the bowl with plastic wrap or transfer the mixture to an airtight container. Refrigerate for at least 4 hours, or preferably overnight, to allow the chia seeds to absorb the liquid and thicken into a pudding-like consistency.
- Assemble the Parfaits: Once the chia pudding is ready, give it a good stir to break up any clumps. In serving glasses or bowls, layer the chia pudding with mixed fresh fruits. Start with a layer of chia pudding, followed by a layer of fruits, and then another layer of chia pudding. Repeat the layers until the glasses are filled.
- Top with Granola: Finish each parfait with a generous sprinkle of granola on top. This adds a satisfying crunch and extra flavor to your parfait.
- Garnish and Serve: Optionally, garnish with fresh mint leaves for a festive touch. Serve immediately and enjoy the delicious and healthy treat.
Extra Tips:
For an even creamier texture, consider using coconut milk instead of almond milk. Additionally, you can customize the sweetness level by adjusting the amount of maple syrup or honey.
If serving for a larger crowd, the recipe is easily scalable. To save time, prep the chia pudding in advance so you can quickly assemble the parfaits when needed.
Finally, experiment with different fruits and toppings to suit your taste and the season—think berries, mango, or even a sprinkle of dark chocolate chips for an extra indulgence.
