
When holiday season rolls around, I get excited about sharing dishes that are both delicious and visually stunning. My go-to choices are vibrant, healthy potluck recipes that travel beautifully. Think roasted vegetable quinoa salad or a festive pomegranate and kale salad. These dishes not only impress with their flavors but also with their bright, cheerful appearance. Curious to see what else is on my list? Let’s explore together.
Roasted Vegetable Quinoa Salad
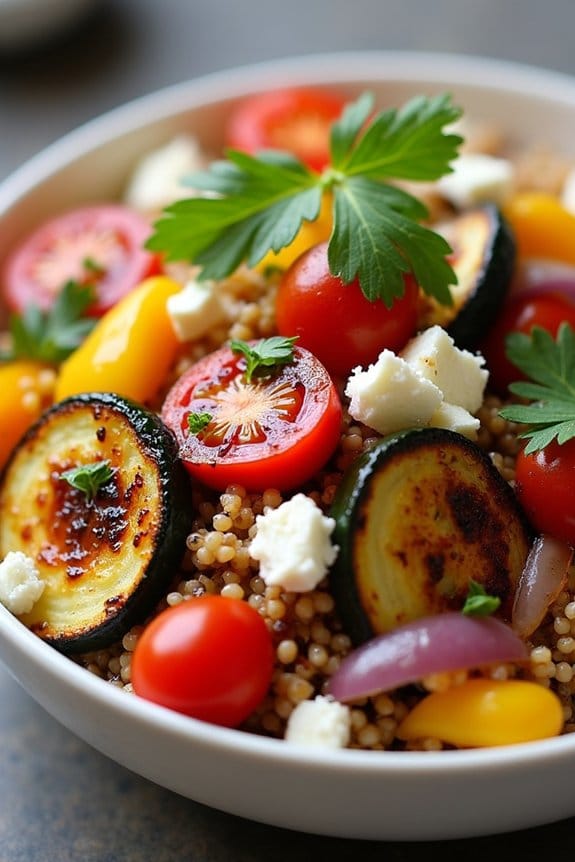
Roasted Vegetable Quinoa Salad is a vibrant and nutritious dish that’s perfect for a Christmas potluck. This salad combines the earthy flavors of roasted vegetables with the nutty taste of quinoa, resulting in a delightful balance of textures and tastes.
Whether you’re looking to lighten up your holiday spread or cater to vegetarian guests, this dish is a perfect choice. Not only is it healthy, but it’s also colorful and visually appealing, making it a welcome addition to any festive table.
This recipe is designed to serve 4-6 people, making it ideal for a small gathering. The combination of quinoa, a complete protein, and a variety of roasted vegetables guarantees that this salad is both filling and satisfying. The dish is finished with a light lemon vinaigrette, adding a fresh and tangy note that complements the roasted vegetables beautifully.
With its delightful mix of flavors and health benefits, Roasted Vegetable Quinoa Salad is sure to be a hit at your Christmas potluck.
Ingredients:
- 1 cup quinoa
- 2 cups water
- 1 red bell pepper, diced
- 1 yellow bell pepper, diced
- 1 zucchini, sliced
- 1 red onion, sliced
- 2 cups cherry tomatoes, halved
- 3 tablespoons olive oil
- Salt and pepper to taste
- 1 teaspoon garlic powder
- 1 teaspoon dried thyme
- 1 teaspoon dried oregano
- Juice of 1 lemon
- 2 tablespoons balsamic vinegar
- 1/4 cup fresh parsley, chopped
- 1/4 cup feta cheese, crumbled (optional)
Instructions:
- Prepare the Quinoa: Rinse the quinoa under cold water using a fine mesh strainer. In a medium saucepan, combine the quinoa and water. Bring to a boil, then reduce the heat to low, cover, and simmer for about 15 minutes or until the quinoa is cooked and the water is absorbed. Fluff with a fork and set aside to cool.
- Roast the Vegetables: Preheat your oven to 400°F (200°C). On a large baking sheet, spread the diced red and yellow bell peppers, sliced zucchini, sliced red onion, and halved cherry tomatoes. Drizzle with 2 tablespoons of olive oil, and season with salt, pepper, garlic powder, thyme, and oregano. Toss to coat the vegetables evenly. Roast in the oven for 20-25 minutes, or until the vegetables are tender and slightly caramelized.
- Prepare the Dressing: In a small bowl, whisk together the remaining 1 tablespoon of olive oil, lemon juice, balsamic vinegar, salt, and pepper to taste. Set aside.
- Assemble the Salad: In a large mixing bowl, combine the cooked quinoa and roasted vegetables. Pour the dressing over the top and toss gently to combine. Add the chopped parsley and gently mix again.
- Serve: Transfer the salad to a serving platter. If desired, sprinkle with crumbled feta cheese before serving. Enjoy your Roasted Vegetable Quinoa Salad warm or at room temperature.
Extra Tips:
When roasting the vegetables, make sure they’re spread out in a single layer on the baking sheet to allow even roasting and avoid steaming.
Feel free to add or substitute other vegetables like butternut squash or carrots, depending on your preference. If you’re preparing this dish in advance, you can keep the salad refrigerated and add the fresh parsley and feta cheese just before serving to maintain their vibrant color and flavor.
Festive Pomegranate and Kale Salad
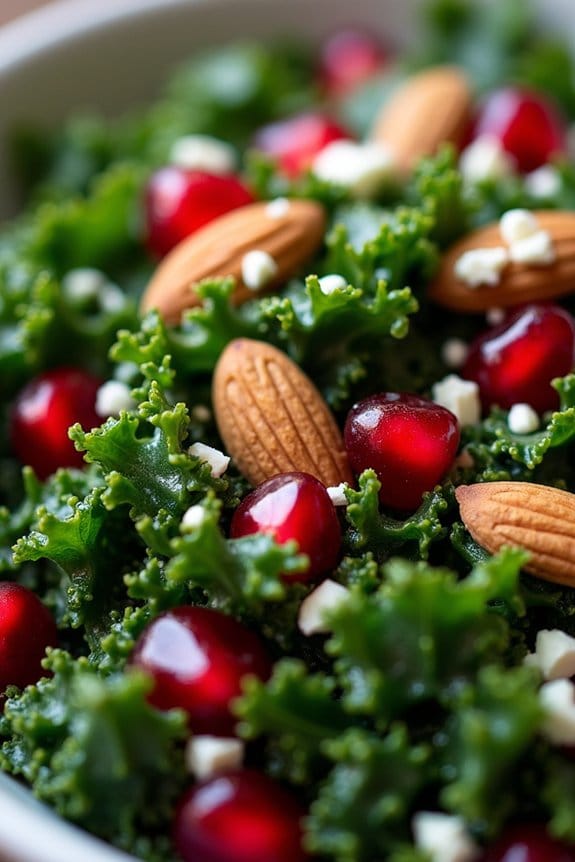
The Festive Pomegranate and Kale Salad is a vibrant and nutritious addition to any Christmas potluck. It combines the hearty texture of kale with the sweet and tart flavors of pomegranate seeds, creating a dish that’s as visually appealing as it’s delicious. This salad isn’t only healthy but also packed with antioxidants, vitamins, and minerals that will strengthen your immune system during the winter season.
It’s a perfect option for those looking to add a fresh and colorful element to their holiday spread. This salad is easy to prepare and can be made ahead of time, making it an ideal choice for any busy holiday gathering. The combination of ingredients guarantees a balance of flavors and textures, from the crunch of kale to the juicy burst of pomegranate seeds, all tied together with a tangy dressing.
Whether you’re hosting a Christmas party or attending a potluck, this Festive Pomegranate and Kale Salad will certainly impress your guests with its delightful taste and festive appearance.
Ingredients (Serving size: 4-6 people):
- 1 large bunch of kale, stems removed and leaves chopped
- Seeds from 1 large pomegranate
- 1/2 cup of sliced almonds, toasted
- 1/2 cup of crumbled feta cheese
- 1/4 cup of olive oil
- 2 tablespoons of lemon juice
- 1 tablespoon of apple cider vinegar
- 1 tablespoon of honey
- Salt and pepper to taste
Instructions:
- Prepare the Kale: Start by washing the kale thoroughly under cold water. Remove the tough stems and chop the leaves into bite-sized pieces. Place the chopped kale in a large salad bowl.
- Make the Dressing: In a small bowl, whisk together the olive oil, lemon juice, apple cider vinegar, honey, salt, and pepper until well combined. Adjust the seasoning according to your taste preference.
- Massage the Kale: Pour half of the dressing over the kale. Using your hands, massage the dressing into the kale leaves for about 2-3 minutes. This will help soften the kale and reduce its bitterness.
- Add the Toppings: Sprinkle the pomegranate seeds, toasted almonds, and crumbled feta cheese over the massaged kale.
- Mix the Salad: Drizzle the remaining dressing over the salad. Gently toss all the ingredients together until the kale is evenly coated with the dressing and the toppings are well distributed.
- Serve: Transfer the salad to a serving platter or bowl and serve immediately, or cover and refrigerate for up to 2 hours before serving to allow the flavors to meld together.
Extra Tips:
When preparing this Festive Pomegranate and Kale Salad, consider using baby kale if you prefer a milder flavor. Toasting the almonds enhances their nutty flavor, so be sure not to skip this step.
If you don’t have a pomegranate, dried cranberries can be a good substitute for a sweet-tart flavor. For a vegan version, simply omit the feta cheese or replace it with a plant-based alternative. This salad can also be paired with grilled chicken or shrimp for added protein, making it a more substantial dish.
Cranberry and Apple Farro Salad
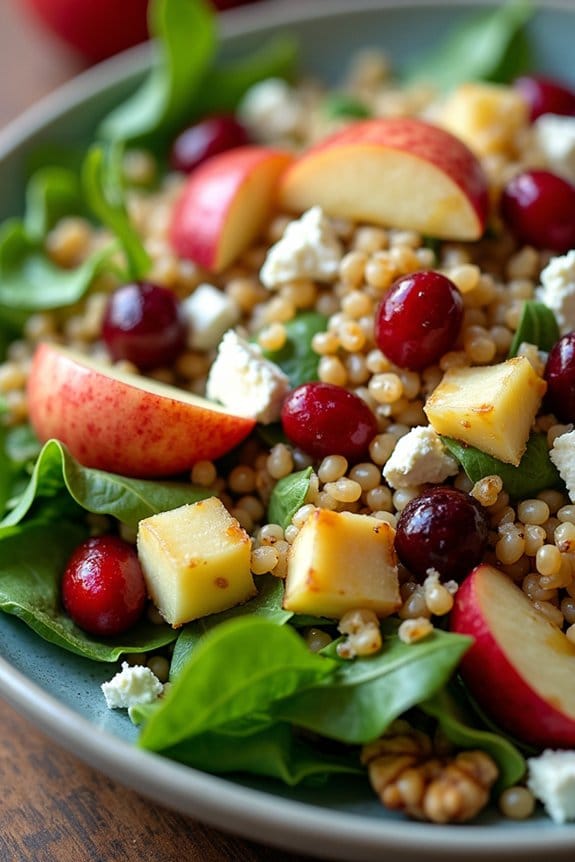
Cranberry and Apple Farro Salad is a perfect addition to your Christmas potluck menu, offering a delightful blend of flavors and textures that will impress your guests. This hearty salad features nutty farro grains combined with the tartness of cranberries and the crisp sweetness of apples, all tied together with a tangy dressing.
Not only is it a visually appealing dish with its vibrant colors, but it also provides a healthy option rich in fiber and nutrients. The salad is versatile and can be served either warm or chilled, making it a great choice for any gathering.
Its preparation is straightforward, allowing you to focus on enjoying the holiday festivities rather than spending all your time in the kitchen. With just a few fresh ingredients and minimal effort, this Cranberry and Apple Farro Salad will become a festive favorite that complements any holiday spread.
Ingredients (Serves 4-6)
- 1 cup farro
- 2 cups water
- 1/2 teaspoon salt
- 1 cup dried cranberries
- 1 large apple, diced (preferably a sweet variety like Honeycrisp or Fuji)
- 1/2 cup walnuts, toasted and roughly chopped
- 3 cups arugula or mixed greens
- 1/4 cup red onion, finely chopped
- 1/4 cup crumbled feta cheese
For the Dressing:
- 1/4 cup olive oil
- 2 tablespoons apple cider vinegar
- 1 tablespoon honey
- 1 teaspoon Dijon mustard
- Salt and pepper to taste
Cooking Instructions
- Cook the Farro: Rinse the farro under cold water. In a medium saucepan, combine the farro, 2 cups of water, and 1/2 teaspoon salt. Bring to a boil, then reduce the heat to a simmer. Cover and cook for 25-30 minutes until the farro is tender but still chewy. Drain any excess water and set aside to cool.
- Prepare the Dressing: In a small bowl, whisk together the olive oil, apple cider vinegar, honey, and Dijon mustard. Season with salt and pepper to taste. Adjust the seasoning as needed.
- Assemble the Salad: In a large mixing bowl, combine the cooked farro, dried cranberries, diced apple, toasted walnuts, arugula (or mixed greens), and red onion. Drizzle the dressing over the salad and toss gently to combine.
- Add the Cheese: Sprinkle the crumbled feta cheese over the salad and give it one final toss to incorporate the cheese evenly throughout the dish.
- Serve: Transfer the salad to a serving platter or bowl. Serve immediately or refrigerate for up to 2 hours before serving if you prefer it chilled.
Extra Tips
For the best flavor, toast the walnuts lightly in a dry skillet over medium heat for about 5 minutes, stirring frequently until they’re golden and fragrant. This enhances their natural nuttiness and adds depth to the salad.
If you prefer a vegan version, simply omit the feta cheese or substitute it with a vegan alternative. Additionally, this salad can be prepared ahead of time; just keep the dressing separate and add it just before serving to keep the greens fresh and crisp.
Spinach and Feta Stuffed Mushrooms

Spinach and Feta Stuffed Mushrooms are a delicious and healthy addition to any Christmas potluck spread. This dish combines the earthy flavor of mushrooms with the rich, creamy taste of feta cheese and the fresh, vibrant notes of spinach. The filling is enhanced with aromatic herbs and spices, making each bite a delight.
These bite-sized treats are perfect for sharing, and they offer a nutritious option that’s both satisfying and festive. This recipe is designed to serve 4-6 people, making it ideal for small gatherings or as a part of a larger potluck selection. The preparation is straightforward, allowing you to spend more time enjoying the company of your loved ones and less time in the kitchen. The result is a savory appetizer that will impress your guests with its flavors and presentation.
Ingredients:
- 20 large button mushrooms
- 2 tablespoons olive oil
- 1 small onion, finely chopped
- 3 cloves garlic, minced
- 5 ounces fresh spinach, finely chopped
- 4 ounces feta cheese, crumbled
- 1/4 cup breadcrumbs
- 1 tablespoon fresh parsley, chopped
- 1 teaspoon dried oregano
- 1/2 teaspoon salt
- 1/4 teaspoon black pepper
- 1/4 cup grated Parmesan cheese
Cooking Instructions:
- Prepare the Mushrooms: Preheat your oven to 375°F (190°C). Gently clean the mushrooms with a damp paper towel and remove the stems. Set the mushroom caps aside and finely chop the stems.
- Cook the Filling: In a skillet, heat the olive oil over medium heat. Add the chopped onion and garlic, and sauté until the onion becomes translucent, about 3-4 minutes. Add the chopped mushroom stems and cook for another 2 minutes.
- Add Spinach: Stir in the chopped spinach and cook until wilted, about 2-3 minutes. Remove the skillet from the heat and let it cool slightly.
- Mix in Cheese and Herbs: In a mixing bowl, combine the cooked spinach mixture with crumbled feta cheese, breadcrumbs, parsley, oregano, salt, and black pepper. Mix well until all ingredients are evenly incorporated.
- Stuff the Mushrooms: Spoon the filling into each mushroom cap, pressing gently to pack it in. Arrange the stuffed mushrooms on a baking sheet.
- Bake: Sprinkle the grated Parmesan cheese over the top of the stuffed mushrooms. Bake in the preheated oven for 20-25 minutes, or until the mushrooms are tender and the tops are golden brown.
- Serve: Allow the mushrooms to cool slightly before serving, as they’ll be very hot. Enjoy them warm or at room temperature.
Extra Tips:
For the best results, choose mushrooms that are roughly the same size to guarantee even cooking. You can prepare the filling a day in advance and store it in the refrigerator, which helps save time on the day of your potluck.
If you prefer a bit of spice, consider adding a pinch of red pepper flakes to the filling. Additionally, these stuffed mushrooms are versatile and can be made vegan by substituting the feta with a plant-based cheese alternative.
Balsamic Glazed Brussels Sprouts
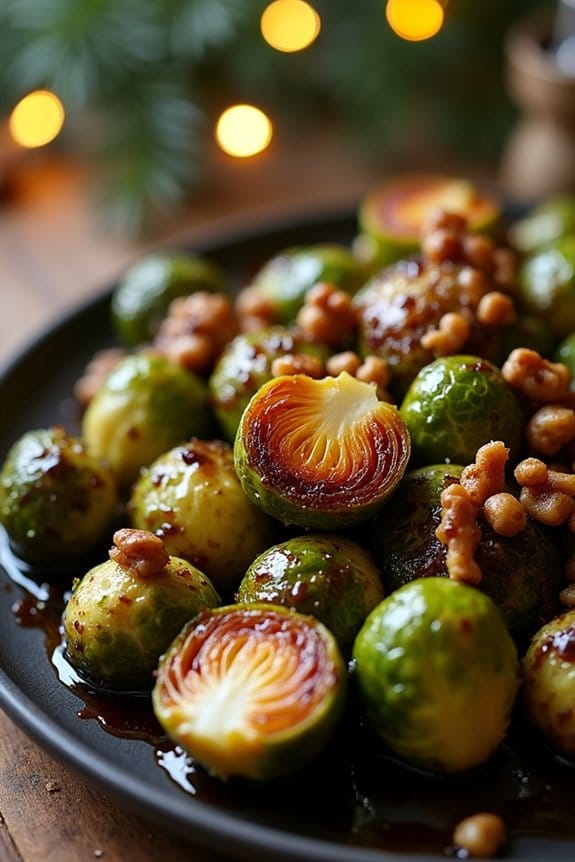
Balsamic Glazed Brussels Sprouts are a delicious and healthy addition to any Christmas potluck. These caramelized, slightly sweet Brussels sprouts are sure to convert even the most skeptical eaters into fans. The combination of roasted Brussels sprouts with a balsamic glaze creates a dish that’s full of depth and flavor, making it both a comforting and elegant side.
The glaze gives the sprouts a beautiful sheen, making them as visually appealing as they’re tasty. Perfect for a gathering of 4-6 people, this dish isn’t only easy to prepare but also allows you to showcase your culinary skills without spending too much time in the kitchen.
By roasting the Brussels sprouts, you bring out their natural sweetness, while the balsamic glaze adds a tangy contrast, creating a harmonious balance of flavors. Whether you’re looking to impress your guests or simply want to add a healthy side to your holiday feast, these Balsamic Glazed Brussels Sprouts are a must-try.
Ingredients:
- 1 1/2 pounds Brussels sprouts
- 3 tablespoons olive oil
- Salt and pepper to taste
- 1/2 cup balsamic vinegar
- 2 tablespoons honey
- 1/4 teaspoon garlic powder
- Optional: 1/4 cup toasted walnuts or pecans
Instructions:
- Prepare the Brussels Sprouts: Preheat your oven to 400°F (200°C). Trim the ends of the Brussels sprouts and remove any yellow or damaged outer leaves. Cut the larger sprouts in half to guarantee even cooking.
- Season the Brussels Sprouts: In a large bowl, toss the Brussels sprouts with olive oil, salt, and pepper until they’re evenly coated. This will help them roast nicely and develop a crispy exterior.
- Roast the Brussels Sprouts: Spread the seasoned Brussels sprouts in a single layer on a baking sheet. Roast them in the preheated oven for 20-25 minutes, or until they’re tender and golden brown, stirring halfway through for even cooking.
- Prepare the Balsamic Glaze: While the Brussels sprouts are roasting, combine the balsamic vinegar, honey, and garlic powder in a small saucepan over medium heat. Stir the mixture and bring it to a simmer. Let it cook for about 5-7 minutes, or until the glaze has reduced by half and thickened slightly.
- Combine and Serve: Once the Brussels sprouts are done roasting, transfer them to a serving dish. Drizzle the balsamic glaze over the top and toss to coat evenly. If desired, sprinkle toasted walnuts or pecans on top for added crunch and flavor.
Extra Tips:
For the best results, make sure your Brussels sprouts are fresh and firm. When roasting, verify they’re spread out in a single layer on the baking sheet to prevent steaming, which can make them soggy.
If you have time, you can prepare the balsamic glaze in advance and store it in the refrigerator; just reheat it gently before drizzling over the Brussels sprouts. Adding a sprinkle of finely grated Parmesan cheese just before serving can also enhance the flavor profile of this dish.
Sweet Potato and Black Bean Enchiladas

Sweet Potato and Black Bean Enchiladas are a delicious and nutritious option for a Christmas potluck. This dish combines the earthy sweetness of sweet potatoes with the hearty texture of black beans, all wrapped in soft tortillas and smothered in a rich enchilada sauce. Not only is it a crowd-pleaser, but it’s also vegetarian and packed with vitamins and minerals, making it a healthy choice for holiday gatherings.
The recipe provides a satisfying blend of flavors and textures, perfect for a festive occasion. The sweetness of the potatoes complements the spiciness of the enchilada sauce, while the black beans add protein and fiber. Topped with melted cheese and fresh cilantro, these enchiladas are sure to be a hit at your Christmas potluck. Let’s explore how you can prepare this delightful dish for 4-6 people.
Ingredients:
- 2 large sweet potatoes, peeled and diced
- 1 tablespoon olive oil
- 1 teaspoon ground cumin
- 1 teaspoon chili powder
- Salt and pepper to taste
- 1 can (15 oz) black beans, drained and rinsed
- 8-10 corn tortillas
- 2 cups enchilada sauce
- 1 cup shredded cheese (cheddar or Mexican blend)
- 1/4 cup chopped fresh cilantro
- Lime wedges for serving (optional)
Cooking Instructions:
- Prepare the Sweet Potatoes: Preheat your oven to 400°F (200°C). Toss the diced sweet potatoes with olive oil, cumin, chili powder, salt, and pepper. Spread them evenly on a baking sheet. Roast for 25-30 minutes until tender and slightly caramelized.
- Prepare the Filling: In a large bowl, combine the roasted sweet potatoes with the drained black beans. Toss to mix evenly.
- Warm the Tortillas: Reduce the oven temperature to 350°F (175°C). Wrap the corn tortillas in a damp paper towel and microwave for about 30 seconds to make them pliable.
- Assemble the Enchiladas: In a large baking dish, pour 1/2 cup of the enchilada sauce to coat the bottom. Fill each tortilla with about 2-3 tablespoons of the sweet potato and black bean mixture. Roll them up and place seam-side down in the baking dish.
- Add Sauce and Cheese: Pour the remaining enchilada sauce over the rolled tortillas, spreading it evenly. Sprinkle the shredded cheese over the top.
- Bake: Cover the dish with foil and bake in the oven for 20 minutes. Remove the foil and bake for an additional 10 minutes, or until the cheese is melted and bubbly.
- Garnish and Serve: Remove from the oven and let cool slightly. Sprinkle with fresh cilantro before serving. Serve with lime wedges on the side if desired.
Extra Tips:
For an extra kick, you can add diced jalapeños to the filling or top the enchiladas with sliced avocado before serving.
If you prefer a creamier texture, you can mix in a few tablespoons of cream cheese into the sweet potato and black bean filling.
To make the dish vegan, simply omit the cheese or use a plant-based cheese alternative.
This recipe can also be prepared ahead of time and stored in the fridge, making it perfect for busy holiday schedules.
Zucchini Noodles With Pesto and Cherry Tomatoes
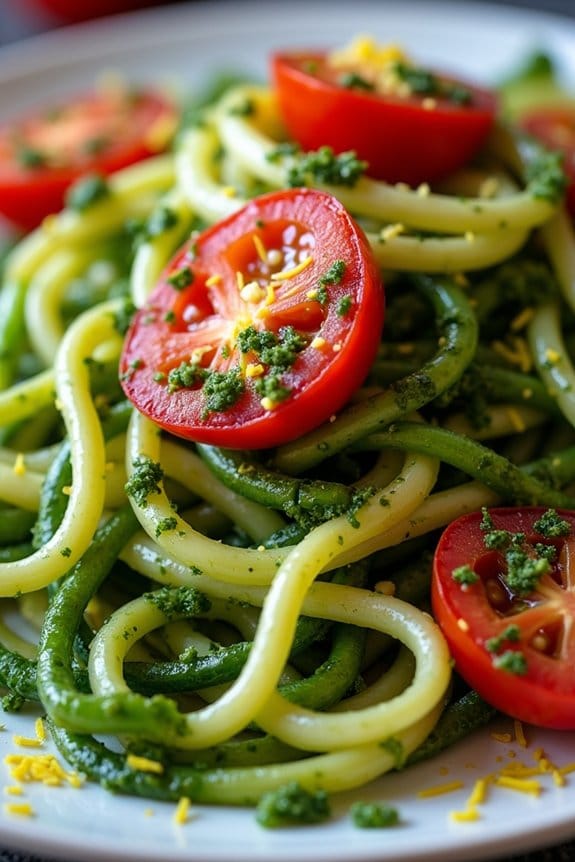
Zucchini Noodles With Pesto and Cherry Tomatoes is a delightful and healthy option for your Christmas potluck that brings an invigorating and vibrant twist to traditional dishes. This recipe combines the light and invigorating taste of zucchini noodles with the rich, herby flavors of pesto, complemented by the sweet juiciness of cherry tomatoes.
It’s perfect for those looking to provide a low-carb and gluten-free alternative, while still offering a dish that’s full of flavor and texture. The dish is quick to prepare, ensuring that you can spend more time with your loved ones during the festive season.
This recipe serves 4-6 people and is perfect as a main course or a side dish. The use of zucchini noodles not only makes the dish lighter but also adds a beautiful green color that enhances the holiday spirit on your dining table.
Pesto, made from fresh basil, olive oil, parmesan cheese, and pine nuts, coats the zucchini noodles perfectly, while cherry tomatoes add a burst of color and sweetness. This dish isn’t only healthy but also visually appealing, making it a standout on your Christmas potluck spread.
Ingredients:
- 4 medium zucchinis
- 1 cup of cherry tomatoes, halved
- 1 cup of fresh basil leaves
- 1/2 cup of grated parmesan cheese
- 1/3 cup of pine nuts
- 2 cloves of garlic
- 1/2 cup of extra virgin olive oil
- Salt and pepper to taste
- Optional: grated lemon zest for garnish
Cooking Instructions:
- Prepare the Zucchini Noodles: Use a spiralizer or a julienne peeler to create noodles from the zucchini. Set them aside in a large mixing bowl. If you don’t have a spiralizer, you can also use a vegetable peeler to create thin ribbons.
- Make the Pesto: In a food processor, combine the basil leaves, pine nuts, grated parmesan cheese, and garlic cloves. Pulse until the ingredients are well mixed. Slowly add the olive oil while the processor is running, until the mixture is smooth and creamy. Season with salt and pepper to taste.
- Combine Ingredients: Add the cherry tomatoes to the bowl with the zucchini noodles. Pour the pesto over the top and gently toss everything together until the noodles and tomatoes are well coated with the pesto.
- Serve: Transfer the zucchini noodles with pesto and cherry tomatoes to a serving platter. If desired, sprinkle with grated lemon zest for an extra burst of flavor and garnish.
Extra Tips:
For best results, make sure to use fresh and high-quality ingredients, especially for the pesto. Fresh basil and good olive oil will enhance the overall taste of the dish.
If you’re preparing this dish in advance, keep the zucchini noodles and pesto separate until just before serving to prevent the noodles from becoming soggy. Adjust the consistency of the pesto by adding more olive oil if needed.
Additionally, you can toast the pine nuts lightly before adding them to the pesto for an additional layer of flavor. Enjoy this festive and nutritious dish with friends and family!
Herb-Crusted Salmon Bites

Herb-Crusted Salmon Bites are a delightful addition to any Christmas potluck, offering a healthy yet flavorful option that’s bound to impress your guests. These bite-sized morsels are coated with a fragrant herb crust that complements the natural richness of the salmon. Perfectly portioned, they make for convenient finger food that’s both satisfying and elegant.
The combination of fresh herbs and zesty lemon creates a dish that isn’t only delicious but also nutritious, packed with omega-3 fatty acids and essential vitamins.
Preparing Herb-Crusted Salmon Bites is straightforward and can be done in advance, allowing you to focus on other festive preparations. The key to this recipe is using fresh, high-quality salmon and a vibrant mix of herbs that will infuse the fish with a burst of flavor. The dish is baked, making it a healthier alternative to fried appetizers, and it retains all the moistness and tenderness of the salmon.
Serve these bites with a light dipping sauce for an extra layer of taste.
Ingredients (Serves 4-6):
- 1.5 pounds skinless salmon fillets
- 1 cup panko breadcrumbs
- 1/4 cup fresh parsley, finely chopped
- 1/4 cup fresh dill, finely chopped
- 2 tablespoons fresh chives, finely chopped
- Zest of 1 lemon
- 2 tablespoons Dijon mustard
- Salt and pepper to taste
- 2 tablespoons olive oil
- Lemon wedges for serving
Cooking Instructions:
- Preheat the Oven: Start by preheating your oven to 400°F (200°C). This guarantees that the salmon bites cook evenly and develop a nice crust.
- Prepare the Salmon: Cut the salmon fillets into bite-sized pieces, approximately 1 to 1.5 inches in size. Pat them dry with paper towels to remove excess moisture.
- Mix the Herb Crust: In a mixing bowl, combine the panko breadcrumbs, parsley, dill, chives, and lemon zest. Mix well to guarantee the herbs are evenly distributed.
- Season the Salmon: Lightly season the salmon pieces with salt and pepper. Then, brush each piece with a thin layer of Dijon mustard. This will help the herb crust adhere to the salmon.
- Coat the Salmon: Dip each salmon piece into the herb and breadcrumb mixture, pressing gently to guarantee the crust sticks to all sides of the fish.
- Arrange on Baking Sheet: Place the coated salmon bites on a baking sheet lined with parchment paper. Drizzle the olive oil over the top to help the crust crisp up during baking.
- Bake: Put the baking sheet in the preheated oven and bake for 10-12 minutes, or until the salmon is cooked through and the crust is golden brown.
- Serve: Once cooked, remove the salmon bites from the oven and let them cool slightly before serving. Arrange them on a platter with lemon wedges on the side for a fresh, zesty finish.
Extra Tips:
For the best results, make sure to use fresh herbs as they provide a much more vibrant flavor compared to dried ones. If you prefer a spicier kick, consider adding a pinch of cayenne pepper to the breadcrumb mixture.
These salmon bites can also be prepared a few hours in advance and stored in the refrigerator; just pop them in the oven right before serving to reheat. Finally, if you’re looking to add even more variety, consider serving the bites with a light yogurt or tahini-based dipping sauce to complement the flavors.
Holiday Spiced Nuts

Holiday Spiced Nuts are a delightful and healthy addition to any Christmas potluck. They’re easy to prepare and can be made in advance, making them a perfect choice for busy holiday gatherings. The combination of savory spices and a hint of sweetness makes these nuts irresistible, and they offer a satisfying crunch that guests will love.
Whether you serve them as a snack or as part of a larger spread, these spiced nuts are bound to be a hit among friends and family.
This recipe combines a variety of nuts with a flavorful spice mix, featuring warm holiday spices like cinnamon and nutmeg. The nuts are lightly coated in a mixture of olive oil and maple syrup, which gives them a subtle sweetness and helps the spices adhere. Roasted to perfection, these nuts are golden and aromatic, filling your kitchen with a festive scent.
Serve them in a decorative bowl for a beautiful and delicious addition to your holiday table.
Ingredients (Serves 4-6)
- 1 cup raw almonds
- 1 cup raw cashews
- 1 cup raw pecans
- 2 tablespoons olive oil
- 3 tablespoons maple syrup
- 1 teaspoon ground cinnamon
- 1/2 teaspoon ground nutmeg
- 1/2 teaspoon ground ginger
- 1/4 teaspoon cayenne pepper (optional)
- 1 teaspoon salt
- 1/2 teaspoon black pepper
Cooking Instructions
- Preheat the Oven: Begin by preheating your oven to 350°F (175°C). Line a baking sheet with parchment paper for easy cleanup and to prevent the nuts from sticking.
- Mix the Nuts: In a large mixing bowl, combine the raw almonds, cashews, and pecans. Confirm they’re evenly distributed for consistent roasting.
- Prepare the Spice Coating: In a separate small bowl, whisk together the olive oil, maple syrup, ground cinnamon, nutmeg, ginger, cayenne pepper (if using), salt, and black pepper. Mix until well combined.
- Coat the Nuts: Pour the spice mixture over the nuts in the mixing bowl. Use a spatula or spoon to toss the nuts until they’re fully coated with the spice mixture.
- Spread on Baking Sheet: Evenly spread the coated nuts onto the prepared baking sheet, ensuring they’re in a single layer. This helps the nuts roast evenly.
- Roast the Nuts: Place the baking sheet in the preheated oven and roast the nuts for 15-20 minutes. Stir the nuts halfway through to confirm even roasting.
- Cool and Serve: Once the nuts are golden brown and fragrant, remove them from the oven. Allow them to cool completely on the baking sheet before transferring them to a serving bowl.
Extra Tips
To enhance the flavor profile of these Holiday Spiced Nuts, consider adding a touch of smoked paprika for a smoky kick or a sprinkle of rosemary for an aromatic twist.
Be sure to keep an eye on the nuts as they roast; they can go from perfectly golden to burnt quickly. If you prefer a sweeter nut mix, increase the maple syrup slightly.
These nuts can be stored in an airtight container for up to a week, making them a convenient make-ahead option for holiday gatherings.
Gingerbread Energy Balls
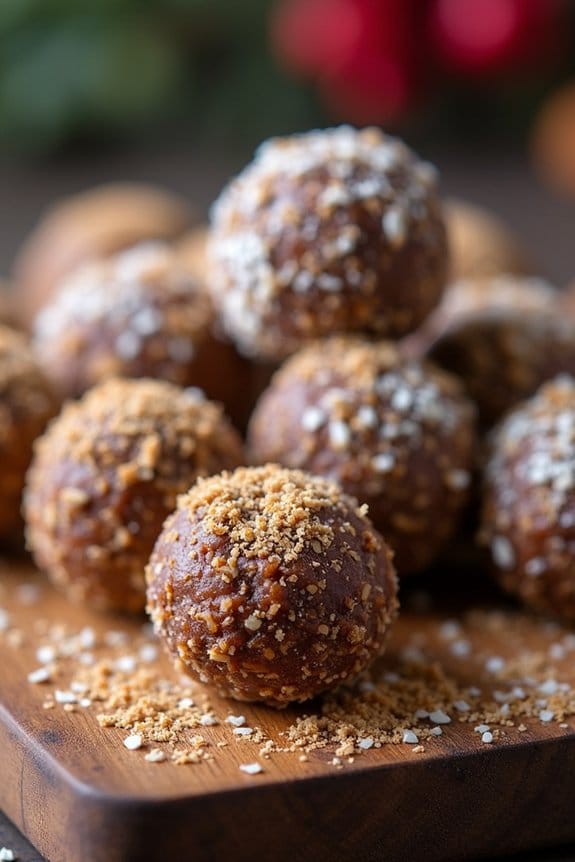
Gingerbread Energy Balls are a delightful and nutritious treat perfect for a healthy Christmas potluck. These bite-sized snacks capture the warm, spicy flavors of traditional gingerbread cookies, but with a healthier twist. Packed with wholesome ingredients like oats, almonds, and dates, these energy balls aren’t only delicious but also provide a good source of energy to keep you going through the festive season.
They’re easy to make, require no baking, and are a great option for those looking to enjoy a sweet treat without the guilt. Perfect for a serving size of 4-6 people, Gingerbread Energy Balls can be prepared in advance and are an ideal addition to any holiday gathering. Their chewy texture and rich, spiced flavor make them a crowd-pleaser among both adults and children.
Whether you’re looking for a snack to share with friends or a quick energy boost during a busy day, these energy balls are sure to satisfy your cravings.
Ingredients:
- 1 cup rolled oats
- 1 cup almonds
- 1 cup pitted dates
- 2 tablespoons molasses
- 1 teaspoon ground ginger
- 1 teaspoon ground cinnamon
- 1/2 teaspoon ground nutmeg
- 1/4 teaspoon ground cloves
- 1/4 teaspoon salt
- 2 tablespoons water
- Desiccated coconut or cocoa powder for rolling (optional)
Instructions:
- Prepare the Ingredients: Begin by gathering all the ingredients listed above. Confirm the dates are pitted and the almonds are raw and unsalted. This will help maintain the authentic flavor and texture of the energy balls.
- Blend the Dry Ingredients: In a food processor, combine the rolled oats and almonds. Pulse until they form a fine, flour-like consistency. This forms the base of your energy balls, providing both structure and a nutty flavor.
- Add the Remaining Ingredients: Add the pitted dates, molasses, ground ginger, cinnamon, nutmeg, cloves, and salt to the food processor. Blend until the mixture starts to come together and forms a sticky dough.
- Adjust Consistency: If the mixture seems too dry, add water one tablespoon at a time until the dough is sticky enough to hold together. Be careful not to add too much water, as this can make the mixture too wet.
- Form the Balls: Use your hands to roll the mixture into small, bite-sized balls, about one inch in diameter. This should yield approximately 20-24 balls, depending on the size.
- Optional Coating: For an extra touch, roll the balls in desiccated coconut or cocoa powder. This not only enhances the flavor but also gives them a festive appearance.
- Chill and Serve: Place the energy balls in an airtight container and chill in the refrigerator for at least 30 minutes before serving. This helps them firm up and enhances their flavors.
Extra Tips: When making Gingerbread Energy Balls, confirm your dates are fresh and soft; if they’re dry, soak them in warm water for 10 minutes and drain before using. If you prefer a finer texture, feel free to substitute almond flour for whole almonds.
These energy balls can be stored in the fridge for up to a week or frozen for longer storage, making them perfect for preparing in advance.
Dark Chocolate Bark With Nuts and Dried Berries

Dark Chocolate Bark With Nuts and Dried Berries is a delightful and festive treat perfect for any Christmas potluck. This recipe combines the rich, decadent flavor of dark chocolate with the satisfying crunch of nuts and the sweet-tart zing of dried berries.
It’s a simple yet elegant dessert that not only looks beautiful on your holiday table but also provides a healthier alternative to traditional holiday sweets. Dark chocolate is packed with antioxidants, while nuts and berries add a nourishing dose of healthy fats, fiber, and vitamins.
This recipe is incredibly versatile, allowing you to customize the toppings to suit your taste preferences or dietary needs. Whether you prefer almonds, walnuts, hazelnuts, or a mix, and whether you choose cranberries, cherries, or goji berries, this bark is sure to be a hit.
The best part is that it takes only a few minutes to prepare and doesn’t require any baking, making it an ideal last-minute addition to your holiday spread.
Ingredients (Serves 4-6):
- 300 grams of dark chocolate (preferably 70% cocoa)
- 1/2 cup almonds
- 1/2 cup walnuts
- 1/4 cup dried cranberries
- 1/4 cup dried cherries
- Pinch of sea salt
Instructions:
- Prepare the Baking Sheet: Line a baking sheet with parchment paper. This will prevent the chocolate from sticking and make it easier to remove the bark once it has set.
- Toast the Nuts: Preheat a pan over medium heat and add the almonds and walnuts. Toast them for about 5 minutes, stirring frequently until they’re golden and fragrant. Be careful not to burn them. Once done, set them aside to cool.
- Melt the Chocolate: Break the dark chocolate into small pieces and place them in a heatproof bowl. Set the bowl over a pot of simmering water (double boiler method) and stir occasionally until the chocolate is completely melted and smooth. Alternatively, you can melt the chocolate in the microwave in 30-second intervals, stirring in between until fully melted.
- Mix the Ingredients: Once the chocolate is melted, remove it from the heat and stir in most of the toasted nuts and dried berries, reserving a small portion for sprinkling on top.
- Spread the Chocolate: Pour the chocolate mixture onto the prepared baking sheet and spread it evenly to about 1/4-inch thickness using a spatula.
- Add Toppings: Sprinkle the reserved nuts and dried berries evenly over the top of the chocolate. Finish with a pinch of sea salt to enhance the flavors.
- Set the Bark: Allow the chocolate bark to set at room temperature for about 2 hours, or place it in the refrigerator for 30 minutes to speed up the process.
- Break into Pieces: Once the chocolate is fully set, break the bark into pieces of your desired size.
Extra Tips:
When making Dark Chocolate Bark With Nuts and Dried Berries, make certain that the chocolate doesn’t come into contact with water, as this can cause it to seize and become grainy.
If you’re using larger nuts, consider chopping them into smaller pieces for a more even distribution in each bite. Feel free to experiment with different types of nuts and dried fruits, such as pistachios or apricots, to personalize the bark to your liking.
Store any leftovers in an airtight container at room temperature for up to a week, or in the refrigerator for longer shelf life.
Mini Caprese Skewers

The holiday season is a time for gathering with friends and family, and what better way to celebrate than with a healthy and delicious appetizer? Mini Caprese Skewers are the perfect addition to your Christmas potluck spread. This classic Italian-inspired dish isn’t only visually appealing but also packed with fresh flavors. The combination of juicy cherry tomatoes, creamy mozzarella, and fragrant basil leaves drizzled with a balsamic glaze creates a delightful bite-sized treat that your guests will love.
These skewers are incredibly easy to assemble and require no cooking, making them an ideal choice for those who want to contribute a healthy dish without spending too much time in the kitchen. Plus, they’re a great option for vegetarians and are naturally gluten-free. Prepare these Mini Caprese Skewers for a serving size of 4-6 people and watch them disappear from the table in no time.
Ingredients for 4-6 people:
- 20 cherry tomatoes
- 20 small mozzarella balls (bocconcini)
- 20 fresh basil leaves
- 1 tablespoon extra virgin olive oil
- Salt and freshly ground black pepper, to taste
- 1/4 cup balsamic glaze
- 20 small skewers or toothpicks
Instructions:
- Prepare the Ingredients: Start by rinsing the cherry tomatoes and fresh basil leaves under cold water. Pat them dry using a clean kitchen towel or paper towel. Drain the mozzarella balls and set them aside.
- Assemble the Skewers: Take a skewer or toothpick and carefully thread one cherry tomato onto it. Follow this with a basil leaf, folded in half if necessary, and then a mozzarella ball. Repeat this process until all ingredients are used up, ensuring each skewer has a balanced ratio of tomato, basil, and mozzarella.
- Season the Skewers: Arrange the assembled skewers on a serving platter. Drizzle them with extra virgin olive oil, ensuring each skewer is lightly coated. Sprinkle a pinch of salt and freshly ground black pepper over them for added flavor.
- Add the Finishing Touch: Just before serving, drizzle the skewers with balsamic glaze. This will add a sweet and tangy flavor that complements the freshness of the tomatoes and basil.
Extra Tips:
To make the presentation even more festive, consider using colored skewers or adding a decorative bow to the end of each skewer. If you can’t find small mozzarella balls, you can cut larger mozzarella into bite-sized pieces.
For a more intense flavor, marinate the mozzarella balls in olive oil and herbs for a couple of hours before assembly. Additionally, if you prefer a homemade touch, you can make your own balsamic glaze by reducing balsamic vinegar with a bit of honey until it thickens.
Enjoy your flavorful and healthy Mini Caprese Skewers at your Christmas gathering!
Avocado and Black Bean Dip
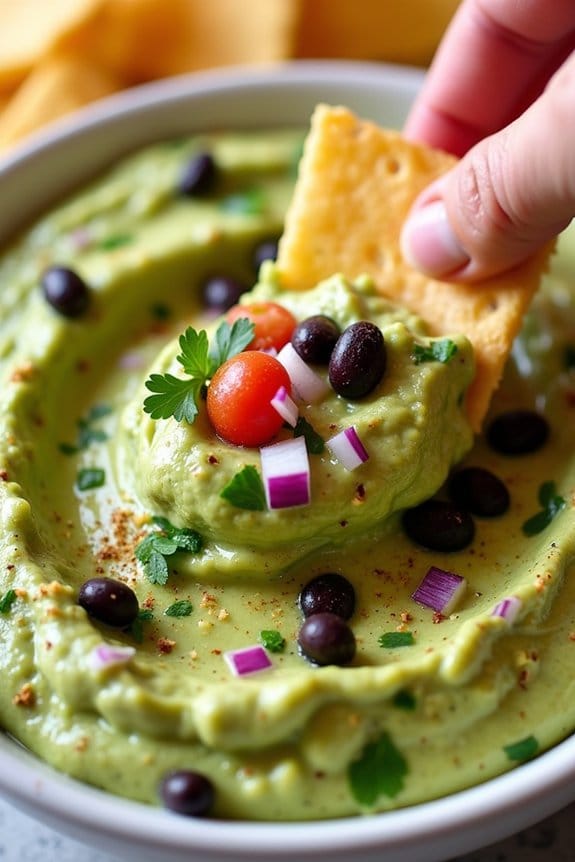
Avocado and Black Bean Dip is a delightful and nutritious dish perfect for a healthy Christmas potluck. This vibrant dip combines the creamy texture of avocados with the hearty bite of black beans, creating a rejuvenating yet filling option for your festive gathering. Not only is it rich in flavor, but it’s also packed with nutrients like fiber, healthy fats, and protein, making it a guilt-free appetizer that everyone can enjoy.
Whether served with crispy tortilla chips or fresh vegetable sticks, this dip is sure to be a crowd pleaser. The combination of fresh ingredients such as lime, cilantro, and spices brings a burst of flavor that’s both invigorating and satisfying. This simple yet delicious recipe can be whipped up in no time, making it an excellent choice for a last-minute contribution to any holiday spread.
Ingredients for 4-6 servings:
- 2 ripe avocados
- 1 can (15 oz) of black beans, drained and rinsed
- 1 small red onion, finely chopped
- 1 medium tomato, diced
- 1 jalapeño, seeded and minced
- 2 cloves of garlic, minced
- 1/4 cup fresh cilantro, chopped
- Juice of 2 limes
- Salt to taste
- Black pepper to taste
- 1 teaspoon cumin
- 1/2 teaspoon smoked paprika
Cooking Instructions:
- Prepare the Avocados: Cut the avocados in half, remove the pits, and scoop the flesh into a large mixing bowl. Use a fork to mash the avocados until you achieve a slightly chunky consistency.
- Mix in the Beans: Add the drained and rinsed black beans to the mashed avocados. Gently fold the beans into the avocado mixture to evenly distribute them without mashing the beans.
- Add Fresh Ingredients: Stir in the finely chopped red onion, diced tomato, minced jalapeño, and minced garlic. These ingredients add a fresh, zesty flavor to the dip.
- Season the Dip: Sprinkle in the chopped cilantro, lime juice, salt, black pepper, cumin, and smoked paprika. Mix everything thoroughly to guarantee the seasonings are evenly distributed.
- Taste and Adjust: Taste the dip and adjust the seasoning if needed. Add more lime juice or salt according to your preference for a brighter or saltier flavor profile.
- Chill and Serve: Transfer the dip to a serving bowl and let it chill in the refrigerator for at least 30 minutes to allow the flavors to meld. Serve with your choice of tortilla chips or vegetable sticks.
Extra Tips: For the best flavor, use ripe avocados that yield slightly to pressure when gently squeezed. If you prefer a spicier dip, leave some seeds in the jalapeño or add a pinch of cayenne pepper. To keep the avocado from browning, press plastic wrap directly onto the surface of the dip before refrigerating. This dip can be made a few hours ahead of time, but for the freshest taste, avoid making it more than a day in advance. Enjoy your healthy, festive creation!
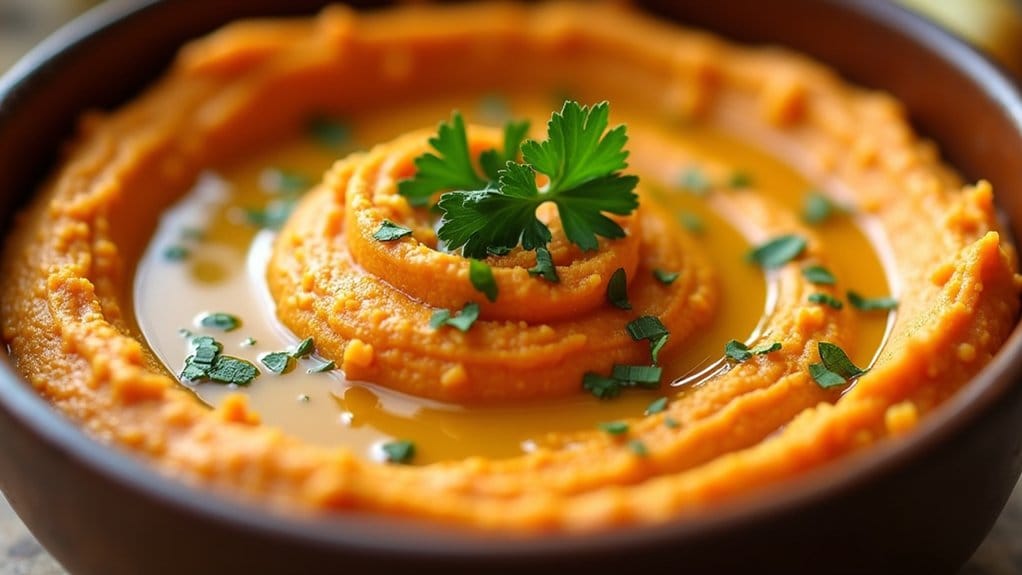
Maple Roasted Carrot Hummus
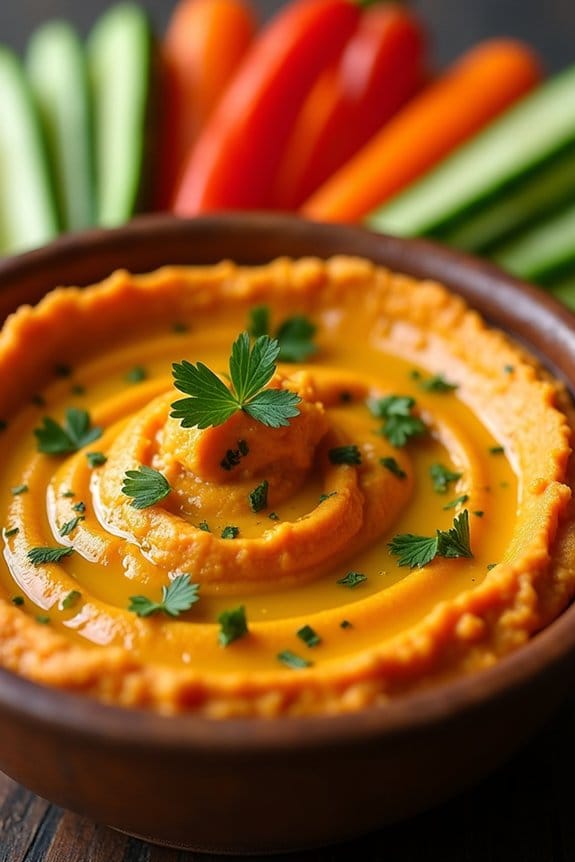
Maple Roasted Carrot Hummus is a delightful and healthy addition to any Christmas potluck. This unique hummus combines the natural sweetness of maple syrup with the earthy flavors of roasted carrots, creating a rich and vibrant dip that’s bound to be a crowd-pleaser.
Perfect for serving with fresh vegetable sticks, pita bread, or crackers, this hummus isn’t only delicious but also packed with nutrients, making it a guilt-free indulgence during the holiday season.
This recipe for Maple Roasted Carrot Hummus serves 4-6 people and can be easily doubled for larger gatherings. The roasting process enhances the sweetness of the carrots and deepens their flavor, while the addition of tahini, lemon juice, and garlic adds a creamy and tangy profile to the dish.
It’s a simple recipe that requires minimal preparation time, allowing you to focus on enjoying the festive season with family and friends.
Ingredients:
- 1 pound carrots, peeled and cut into chunks
- 2 tablespoons olive oil
- 2 tablespoons maple syrup
- Salt and pepper to taste
- 1 can (15 oz) chickpeas, drained and rinsed
- 3 tablespoons tahini
- 2 tablespoons lemon juice
- 2 cloves garlic, minced
- 1 teaspoon ground cumin
- 1/4 cup water
- Extra olive oil for garnish
- Fresh parsley, chopped, for garnish
Instructions:
- Preheat the Oven: Start by preheating your oven to 400°F (200°C). This will guarantee that the oven is hot enough to roast the carrots to perfection.
- Prepare the Carrots: Place the peeled and chopped carrots on a baking sheet. Drizzle them with olive oil and maple syrup, then season with salt and pepper. Toss the carrots to guarantee they’re evenly coated.
- Roast the Carrots: Roast the carrots in the preheated oven for about 25-30 minutes, or until they’re tender and slightly caramelized. Turn the carrots halfway through the cooking time for even roasting.
- Blend the Ingredients: Once the carrots are roasted, transfer them to a food processor. Add the chickpeas, tahini, lemon juice, minced garlic, ground cumin, and water. Blend the mixture until smooth and creamy. You may need to scrape down the sides of the food processor a few times to guarantee everything is well combined.
- Adjust Seasoning: Taste the hummus and adjust the seasoning if necessary. You can add more salt, lemon juice, or cumin according to your preference.
- Serve: Transfer the hummus to a serving bowl. Drizzle a little extra olive oil on top and garnish with fresh parsley. Serve with your choice of dippers such as pita bread, crackers, or vegetable sticks.
Extra Tips: For a smoother hummus, you can peel the chickpeas before adding them to the food processor. While this step is optional, it does make a noticeable difference in the texture.
If you prefer a spicier version, consider adding a pinch of cayenne pepper or smoked paprika for an extra kick. Additionally, this hummus can be made a day ahead and stored in the refrigerator, allowing the flavors to meld together beautifully.
