

When it comes to Christmas lunch, we all want to serve dishes that are both delightful and nourishing. Picture a tender herb-crusted turkey breast alongside vibrant quinoa-stuffed bell peppers. Add a colorful roasted root vegetable medley, and you’ve got a festive feast that impresses without sacrificing health. These recipes are crafted to wow your guests. Curious to learn more about these mouthwatering creations?
Herb-Crusted Turkey Breast
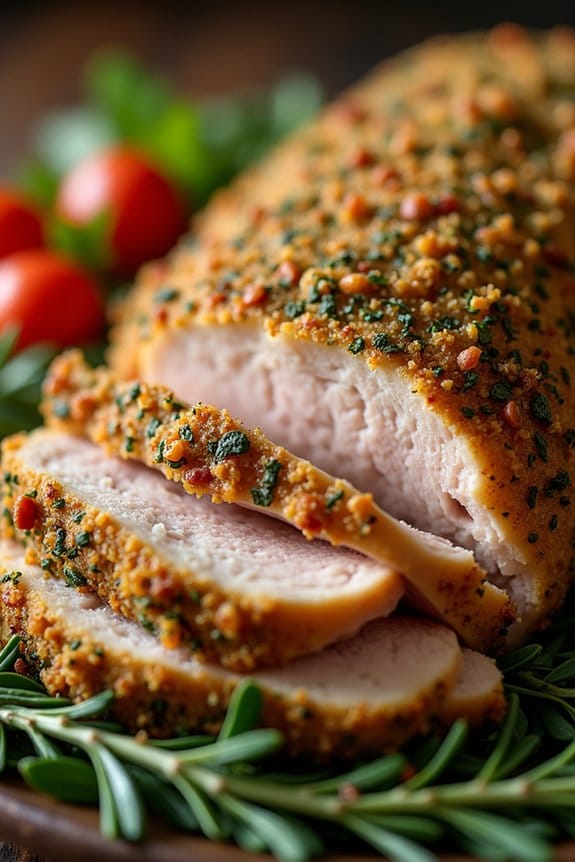
Herb-Crusted Turkey Breast is a delightful centerpiece for a healthy Christmas lunch. This dish combines the rich flavors of fresh herbs with the lean protein of turkey, creating a meal that’s both nourishing and festive. The herb crust not only adds a burst of flavor but also helps to keep the turkey breast moist and tender during cooking.
Serve this alongside your favorite seasonal vegetables for a complete and satisfying meal. This recipe is perfect for a family gathering, serving 4-6 people. The combination of herbs such as rosemary, thyme, and parsley provides an aromatic crust that elevates the turkey breast to a new level of deliciousness.
With a few simple ingredients and a straightforward preparation process, this dish is sure to impress your guests while maintaining the meal light and healthy.
Ingredients:
- 3 pounds boneless turkey breast
- 3 tablespoons olive oil
- 2 tablespoons fresh rosemary, chopped
- 2 tablespoons fresh thyme, chopped
- 2 tablespoons fresh parsley, chopped
- 4 garlic cloves, minced
- 1 teaspoon salt
- 1/2 teaspoon black pepper
- 1 lemon, zested
Instructions:
- Preheat the Oven: Preheat your oven to 375°F (190°C) to guarantee it’s ready for roasting the turkey breast.
- Prepare the Herb Mixture: In a small bowl, combine the chopped rosemary, thyme, parsley, minced garlic, lemon zest, salt, and black pepper. Add the olive oil and mix well to form a paste-like consistency.
- Season the Turkey: Place the turkey breast on a clean surface. Pat it dry with paper towels to make sure the herb mixture adheres properly. Rub the herb mixture evenly over the entire surface of the turkey breast, pressing gently to make certain it sticks.
- Roast the Turkey: Place the seasoned turkey breast on a roasting rack in a shallow roasting pan. This allows air to circulate around the meat, promoting even cooking. Insert a meat thermometer into the thickest part of the breast without touching bone.
- Cook Until Done: Roast the turkey in the preheated oven for about 1.5 to 2 hours, or until the internal temperature reaches 165°F (74°C). Basting occasionally with the pan juices will help keep the meat moist.
- Rest Before Slicing: Once cooked, remove the turkey from the oven and let it rest for at least 15 minutes. This allows the juices to redistribute throughout the meat, guaranteeing a moist and flavorful result.
Extra Tips: To enhance the flavor of your Herb-Crusted Turkey Breast, consider marinating it with the herb mixture for a few hours or overnight before cooking. This will infuse the flavors deeper into the meat.
If you prefer a crispier crust, you can broil the turkey for the last 5 minutes of cooking, but watch closely to prevent burning. Remember to slice the turkey breast against the grain for the most tender slices.
Quinoa-Stuffed Bell Peppers
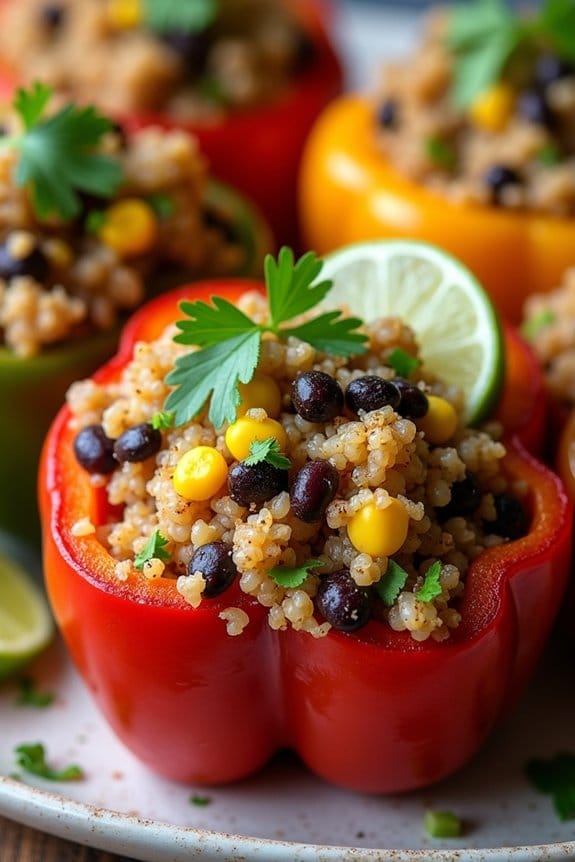
Quinoa-Stuffed Bell Peppers are a delightful and healthy option for your Christmas lunch. They not only bring vibrant colors to your holiday table but also offer a nutritious and flavorful alternative to traditional festive fare. Packed with protein-rich quinoa, fresh vegetables, and aromatic spices, these stuffed peppers are sure to please everyone, whether they’re vegetarians or simply seeking a lighter meal option amidst the holiday indulgence.
This recipe yields enough to serve 4-6 people, making it perfect for a small family gathering or a cozy Christmas lunch with friends. The combination of quinoa and vegetables guarantees a well-rounded meal that’s both filling and satisfying. Plus, these stuffed peppers can be prepared ahead of time, allowing you more time to enjoy with your loved ones. Let’s explore the ingredients and steps needed to create this delicious dish.
Ingredients for 4-6 servings:
- 6 large bell peppers (any color)
- 1 cup quinoa, rinsed
- 2 cups vegetable broth
- 1 can (15 oz) black beans, drained and rinsed
- 1 cup corn kernels (fresh, frozen, or canned)
- 1 onion, finely chopped
- 2 cloves garlic, minced
- 1 teaspoon ground cumin
- 1 teaspoon smoked paprika
- 1 teaspoon chili powder
- Salt and pepper to taste
- 1 cup shredded cheese (optional)
- 2 tablespoons olive oil
- Fresh cilantro, chopped (for garnish)
- Lime wedges (for serving)
Instructions:
- Prepare the Peppers: Preheat your oven to 375°F (190°C). Slice the tops off the bell peppers and remove the seeds and membranes. Lightly brush the exterior with olive oil and place them in a baking dish.
- Cook the Quinoa: In a medium saucepan, combine the quinoa and vegetable broth. Bring to a boil, then reduce the heat to low, cover, and simmer for about 15 minutes or until the quinoa is cooked and the liquid is absorbed. Fluff with a fork and set aside.
- Sauté Vegetables: In a large skillet, heat the olive oil over medium heat. Add the onion and garlic, and sauté until the onion becomes translucent. Add the corn, black beans, cumin, smoked paprika, chili powder, salt, and pepper. Cook for another 5 minutes, stirring frequently.
- Combine Ingredients: In a large bowl, mix the cooked quinoa with the sautéed vegetable mixture. Stir in half of the cheese if using, until everything is well combined.
- Stuff the Peppers: Spoon the quinoa mixture into each bell pepper, packing it firmly. Top with the remaining cheese if desired.
- Bake the Peppers: Cover the baking dish with aluminum foil and bake in the preheated oven for 25-30 minutes. Remove the foil and bake for an additional 10 minutes, until the peppers are tender and the cheese is melted and bubbly.
- Garnish and Serve: Remove from the oven, and let cool slightly. Garnish with fresh cilantro and serve with lime wedges on the side.
Extra Tips: For added flavor, consider mixing in a handful of chopped fresh spinach or kale into the quinoa mixture before stuffing the peppers. If you like a bit of heat, add a pinch of cayenne pepper or diced jalapeños. Additionally, these stuffed peppers can be made a day ahead and stored in the refrigerator; just reheat them in the oven before serving. Enjoy these Quinoa-Stuffed Bell Peppers as a colorful and healthy addition to your Christmas lunch spread!
Roasted Root Vegetable Medley
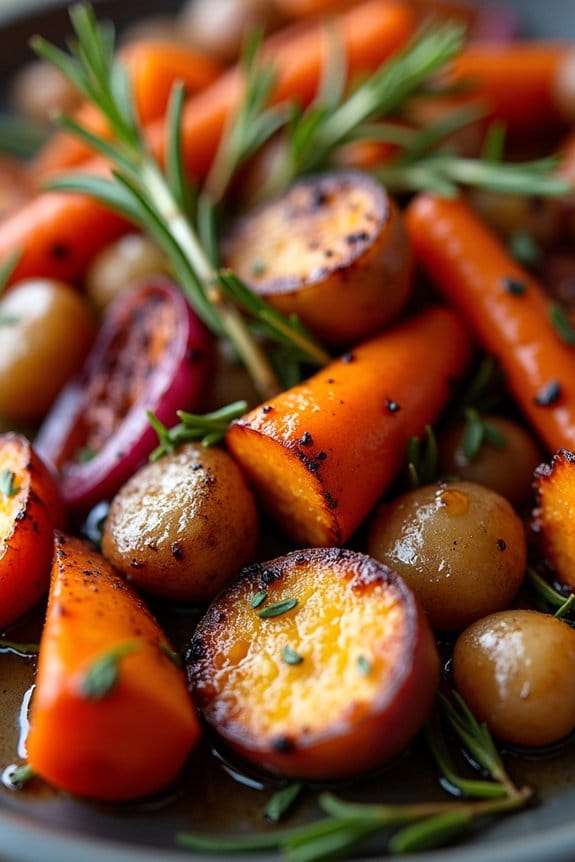
Elevate your healthy Christmas lunch with a vibrant and nutritious Roasted Root Vegetable Medley. This dish combines a variety of seasonal root vegetables, which not only offer a delightful array of colors and textures but also deliver an abundance of vitamins and minerals.
Perfect as a side dish or even a standalone entrée for those seeking a lighter meal, this medley captures the essence of winter produce. The natural sweetness of the vegetables is enhanced by roasting, creating caramelized edges and deep flavors that pair wonderfully with any holiday main course.
This recipe serves 4-6 people and is ideal for a festive gathering. The mix of earthy carrots, sweet parsnips, and hearty potatoes, accented with the aromatic notes of rosemary and thyme, makes this dish a comforting and satisfying choice.
The addition of a light drizzle of olive oil guarantees the vegetables roast to a perfect golden brown while maintaining a tender inside. Whether you’re cooking for family or friends, this Roasted Root Vegetable Medley is sure to be a hit at your Christmas table.
Ingredients (serves 4-6):
- 3 large carrots
- 2 parsnips
- 1 sweet potato
- 2 red potatoes
- 1 small red onion
- 3 tablespoons olive oil
- 2 teaspoons fresh rosemary, chopped
- 2 teaspoons fresh thyme leaves
- Salt and pepper to taste
- 1 tablespoon balsamic vinegar (optional)
- 1 tablespoon honey (optional)
Cooking Instructions:
- Preheat the Oven: Begin by preheating your oven to 400°F (200°C). This guarantees that the vegetables will roast evenly and develop a nice caramelization.
- Prepare the Vegetables: Peel the carrots and parsnips, then cut them into bite-sized pieces. Leave the skin on the sweet potato and red potatoes for added texture and nutrients, cutting them into similar-sized chunks. Slice the red onion into wedges.
- Season the Vegetables: In a large mixing bowl, combine the prepared vegetables. Drizzle with olive oil, guaranteeing they’re evenly coated. Add the fresh rosemary and thyme, along with salt and pepper to taste. Toss everything together until the vegetables are well-seasoned.
- Roast the Vegetables: Spread the vegetable mixture in a single layer on a large baking sheet. This allows for even roasting and prevents steaming. Place the baking sheet in the preheated oven and roast for 30-35 minutes, or until the vegetables are tender and golden brown, stirring halfway through to guarantee even cooking.
- Finish with Optional Ingredients: If desired, once the vegetables are roasted, drizzle with balsamic vinegar and honey for a touch of sweetness and acidity. Toss again to coat, and serve immediately.
Extra Tips:
For the best results, guarantee that the vegetable pieces are uniform in size to allow for even cooking. If you prefer a more robust flavor, consider adding a few cloves of garlic to the mix before roasting.
Additionally, feel free to experiment with other root vegetables such as turnips or beets, adjusting cooking times as necessary. This dish can be prepared a day in advance and reheated in the oven, making it a convenient option for busy holiday preparations.
Balsamic-Glazed Brussels Sprouts

Balsamic-Glazed Brussels Sprouts are a delightful and healthy addition to your Christmas lunch table. This dish features Brussels sprouts that are roasted to perfection and then coated with a tangy balsamic glaze, adding a burst of flavor. Not only do these sprouts make a great side dish, but they also offer a nutritious option that complements the heartier elements of a Christmas meal.
The caramelization from the roasting process brings out the natural sweetness of the Brussels sprouts, balancing beautifully with the acidity of the balsamic vinegar.
This recipe is designed to serve 4-6 people, making it ideal for a family gathering or a smaller festive party. The preparation is straightforward, and the end result is a dish that’s both visually appealing and deliciously satisfying.
Whether you’re a fan of Brussels sprouts or looking to introduce them in a more flavorful way, this recipe is sure to please your guests and elevate your holiday feast.
Ingredients:
- 1.5 pounds Brussels sprouts, trimmed and halved
- 3 tablespoons olive oil
- Salt and freshly ground black pepper to taste
- 1/3 cup balsamic vinegar
- 1 tablespoon honey
- 2 cloves garlic, minced
- 1/4 cup chopped walnuts (optional)
- 1/4 cup freshly grated Parmesan cheese (optional)
Instructions:
- Preheat the oven: Begin by preheating your oven to 400°F (200°C) to guarantee it’s hot enough to roast the Brussels sprouts until they’re crispy and golden brown.
- Prepare the Brussels sprouts: Wash and trim the Brussels sprouts, cutting off the ends, and then slice them in half. This will help in even cooking and allow the glaze to coat them thoroughly.
- Season the sprouts: Place the halved Brussels sprouts on a large baking sheet. Drizzle them with olive oil, and season with salt and freshly ground black pepper. Toss them well to make sure they’re evenly coated.
- Roast in the oven: Spread the Brussels sprouts in a single layer on the baking sheet. Roast them in the preheated oven for 20-25 minutes, or until they’re tender and have a nice caramelized color.
- Prepare the balsamic glaze: While the Brussels sprouts are roasting, combine balsamic vinegar, honey, and minced garlic in a small saucepan. Bring the mixture to a simmer over medium heat and let it reduce for about 5-7 minutes until it thickens slightly.
- Glaze the Brussels sprouts: Once the Brussels sprouts are roasted, remove them from the oven and drizzle the balsamic glaze over the top. Toss them gently to make sure they’re well coated with the glaze.
- Add finishing touches: For added texture and flavor, sprinkle chopped walnuts and freshly grated Parmesan cheese over the glazed Brussels sprouts. Return them to the oven for an additional 2-3 minutes to let the cheese melt slightly.
- Serve immediately: Transfer the balsamic-glazed Brussels sprouts to a serving dish and serve immediately while they’re warm and aromatic.
Extra Tips:
When selecting Brussels sprouts, look for ones that are firm and bright green, as they’ll yield the best flavor and texture. If you prefer a sweeter glaze, you can adjust the amount of honey to taste.
Additionally, to save time, you can prepare the balsamic glaze a day ahead and store it in the fridge, then gently reheat it before using. Remember that the roasting time can vary based on the size of the sprouts, so keep an eye on them to avoid overcooking.
Enjoy your healthy and delicious Christmas side dish!
Lemon-Dill Baked Salmon
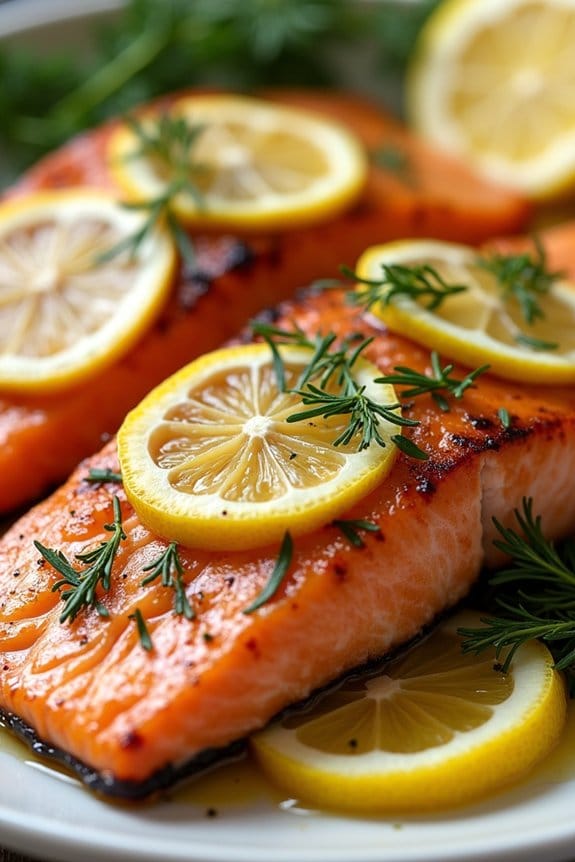
Lemon-Dill Baked Salmon is a delightful and healthy option for a Christmas lunch that brings a burst of fresh flavors to your festive table. This dish combines the rich, buttery texture of salmon with the bright, citrusy notes of lemon and the aromatic touch of dill, making it a rejuvenating yet satisfying main course.
Perfectly suited for those looking to indulge without the guilt, this recipe is both simple to prepare and guaranteed to impress your guests with its elegance and taste. Not only is Lemon-Dill Baked Salmon a nutritious choice, packed with omega-3 fatty acids and protein, but it’s also a time-efficient dish that allows you to spend more time enjoying the company of your loved ones rather than being stuck in the kitchen.
This recipe serves 4-6 people, making it an ideal choice for a small family gathering or a cozy Christmas meal with friends. With just a few ingredients and minimal prep time, you can create a dish that’s both wholesome and visually appealing, assuring that your Christmas lunch is both memorable and delicious.
Ingredients:
- 4 to 6 salmon fillets (about 6 ounces each)
- 2 tablespoons olive oil
- 2 lemons (1 sliced into thin rounds, 1 juiced)
- 3 tablespoons fresh dill, chopped
- 2 cloves garlic, minced
- Salt and pepper to taste
- Optional garnish: additional dill sprigs and lemon wedges
Cooking Instructions:
- Preheat the Oven: Begin by preheating your oven to 375°F (190°C) to make certain it’s hot and ready for baking when you’re done with the prep.
- Prepare the Baking Dish: Lightly grease a baking dish with olive oil. Arrange the salmon fillets in a single layer, ensuring they aren’t overcrowded.
- Season the Salmon: Drizzle the olive oil evenly over the salmon fillets. Sprinkle them with salt, pepper, and minced garlic to create a flavorful base.
- Add Lemon and Dill: Squeeze the juice of one lemon over the salmon fillets for a vibrant citrus taste. Place the thin lemon slices on top of the fillets. Generously sprinkle the chopped dill over the salmon.
- Bake the Salmon: Place the baking dish in the preheated oven and bake for 15-20 minutes or until the salmon is cooked through and easily flakes with a fork. The baking time may vary depending on the thickness of the fillets.
- Serve: Once done, remove the salmon from the oven and let it rest for a few minutes. Garnish with additional dill sprigs and lemon wedges if desired. Serve warm for the best flavor.
Extra Tips: When choosing salmon, opt for wild-caught varieties if possible, as they tend to have a more robust flavor and are less likely to contain additives.
If you prefer a slightly crispy texture, you can broil the salmon for the last 2-3 minutes of cooking time, but keep a close eye on it to prevent burning. Pair this dish with a simple green salad or roasted vegetables to complete your healthy Christmas lunch.
Cauliflower Mashed Potatoes

Cauliflower mashed potatoes are a delectable and healthy alternative to traditional mashed potatoes, perfect for a Christmas lunch that aims to be both satisfying and nutritious. This dish takes the classic comfort of mashed potatoes and infuses it with the subtle, nutty flavors of cauliflower, offering a lower-carb option that doesn’t skimp on taste or texture.
Whether you’re catering to dietary restrictions or simply looking to add a lighter side dish to your holiday spread, cauliflower mashed potatoes are sure to be a hit with family and friends.
The creamy and velvety texture of this dish is achieved by combining steamed cauliflower with a hint of garlic and butter, resulting in a beautifully rich taste without the heaviness of regular mashed potatoes. The addition of parmesan cheese elevates the flavor profile, adding a savory depth that pairs wonderfully with any Christmas main course.
With this recipe, you can enjoy a guilt-free side dish that complements the festive feast while keeping health in mind.
Ingredients for 4-6 servings:
- 1 large head of cauliflower
- 3 cloves garlic, minced
- 3 tablespoons unsalted butter
- 1/4 cup grated parmesan cheese
- 1/4 cup sour cream
- Salt and pepper to taste
- Fresh chives for garnish (optional)
Cooking Instructions:
- Prepare the Cauliflower: Begin by removing the leaves and core from the cauliflower. Cut the cauliflower into small florets to guarantee even cooking.
- Steam the Cauliflower: Fill a large pot with a couple of inches of water and place a steamer basket inside. Add the cauliflower florets to the basket, cover, and steam over medium-high heat for about 10-15 minutes or until the cauliflower is tender. You can test this by piercing a floret with a fork; it should easily slide through.
- Sauté the Garlic: While the cauliflower is steaming, melt the butter in a small pan over low heat. Add the minced garlic and sauté for 2-3 minutes until fragrant but not browned. Remove from heat and set aside.
- Mash the Cauliflower: Once the cauliflower is tender, remove it from the steamer and transfer it to a large mixing bowl or a food processor. Add the sautéed garlic and butter, parmesan cheese, and sour cream.
- Blend to Desired Consistency: Use an immersion blender, potato masher, or food processor to blend the mixture until smooth and creamy. If using a food processor, you may need to do this in batches. Adjust the consistency by adding a bit more sour cream if needed.
- Season and Serve: Season the mashed cauliflower with salt and pepper to taste. Transfer to a serving bowl and garnish with chopped fresh chives if desired. Serve warm alongside your Christmas main dishes.
Extra Tips:
For the creamiest texture, make sure the cauliflower is well-drained after steaming to avoid a watery mash. If you prefer a richer flavor, consider adding a splash of heavy cream along with the sour cream.
You can also experiment with different cheeses, such as cheddar or Gruyère, for a unique twist. Finally, these cauliflower mashed potatoes can be made in advance and reheated gently on the stovetop or in the microwave, making them a convenient option for your holiday meal planning.
Cranberry-Walnut Quinoa Salad
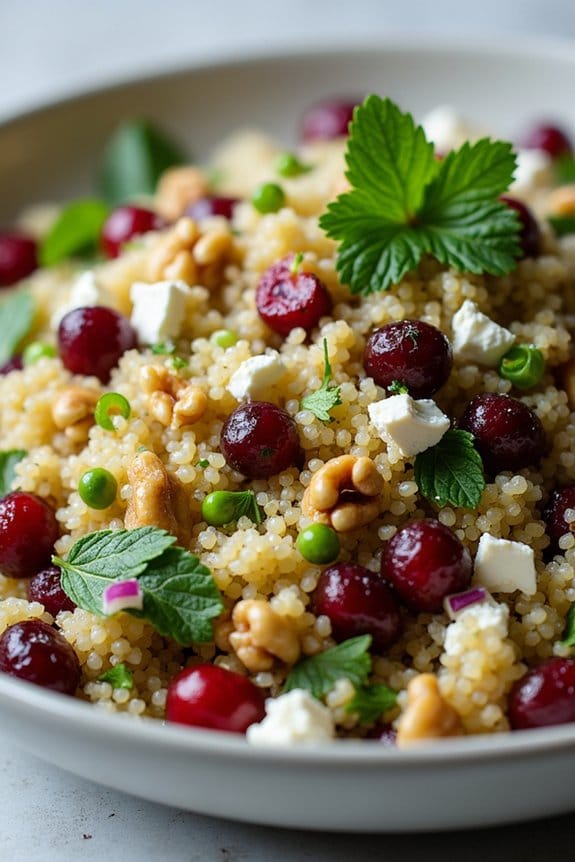
Cranberry-Walnut Quinoa Salad is a delightful and nutritious dish perfect for a healthy Christmas lunch. This vibrant salad combines the nutty flavor of quinoa with the sweet-tart taste of dried cranberries and the crunch of walnuts.
It’s a festive and colorful addition to your holiday table, offering a revitalizing contrast to heavier dishes typically served during the season. The addition of fresh herbs and a light citrus dressing brings all the flavors together, making it not only healthy but also irresistibly delicious.
Quinoa, a protein-rich grain, serves as the base of this salad, providing a satisfying and filling component. Paired with cranberries and walnuts, it creates a dish rich in antioxidants and healthy fats.
This recipe isn’t only easy to prepare but also versatile; it can be served warm or cold, making it a great option for potlucks or as a side dish for your Christmas lunch. Whether you’re catering to vegetarians, gluten-free diets, or simply looking for a wholesome addition to your feast, Cranberry-Walnut Quinoa Salad is a must-try.
Ingredients (Serves 4-6):
- 1 cup quinoa
- 2 cups water
- 1/2 cup dried cranberries
- 1/2 cup walnuts, roughly chopped
- 1/4 cup fresh parsley, chopped
- 1/4 cup fresh mint, chopped
- 1/4 cup red onion, finely chopped
- 1/4 cup feta cheese, crumbled (optional)
- 1/4 cup olive oil
- 2 tablespoons lemon juice
- 1 tablespoon honey
- Salt and pepper to taste
Cooking Instructions:
- Prepare the Quinoa: Rinse the quinoa under cold water to remove any bitterness. In a medium saucepan, add the rinsed quinoa and 2 cups of water. Bring to a boil over medium heat. Once boiling, reduce the heat to low, cover, and let it simmer for about 15 minutes, or until all the water is absorbed and the quinoa is fluffy.
- Toast the Walnuts: While the quinoa is cooking, toast the walnuts in a dry skillet over medium heat for about 5 minutes, stirring frequently, until they’re fragrant and slightly browned. Remove from heat and set aside to cool.
- Make the Dressing: In a small bowl, whisk together the olive oil, lemon juice, honey, salt, and pepper. Adjust the seasoning to taste and set aside.
- Combine Ingredients: In a large mixing bowl, combine the cooked quinoa, dried cranberries, toasted walnuts, parsley, mint, red onion, and feta cheese if using. Pour the dressing over the salad and toss well to affirm everything is evenly coated.
- Serve: Transfer the salad to a serving dish and garnish with additional parsley or walnuts if desired. Serve immediately or refrigerate for up to 2 hours before serving for a colder version.
Extra Tips:
For the best results, verify your quinoa is fully cooled before mixing it with the other ingredients to prevent the herbs from wilting.
Feel free to substitute the walnuts with pecans or almonds if preferred, and adjust the amount of cranberries to suit your taste. If preparing in advance, add the dressing just before serving to keep the salad fresh and vibrant.
This salad is versatile and can be customized with additional vegetables like diced cucumber or cherry tomatoes for extra color and nutrients.
Sautéed Green Beans With Garlic
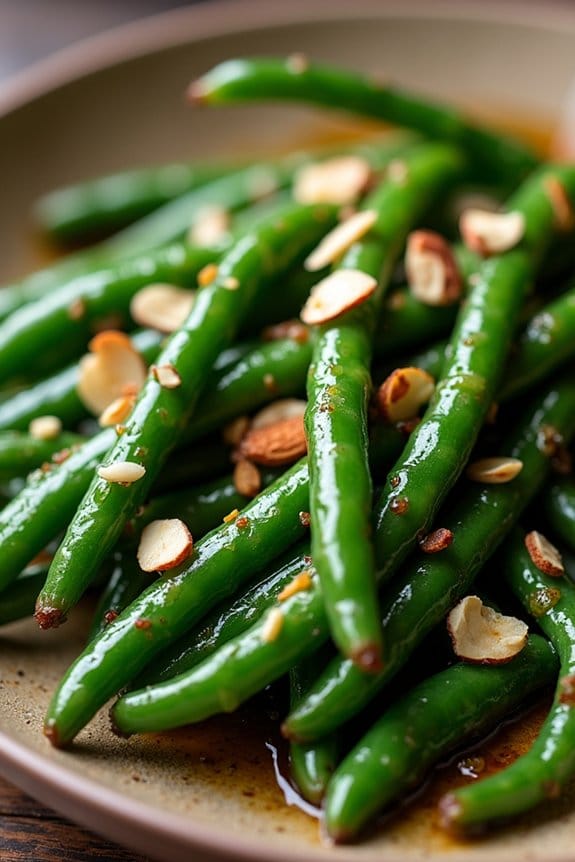
Sautéed Green Beans With Garlic is a simple yet flavorful side dish that can elevate any holiday meal, especially your Christmas lunch. This dish combines the crispiness of fresh green beans with the aromatic flavor of garlic, making it a perfect accompaniment to any main course. The vibrant green color of the beans not only adds visual appeal to your table but also brings a nutritious touch to your festive feast.
Whether you’re serving a traditional roast or a contemporary plant-based main, these garlic-infused green beans are sure to be a hit. Preparing this dish is quick and straightforward, guaranteeing you have more time to enjoy the festivities with your loved ones. The key is to cook the green beans until they reach the perfect balance of tenderness and crunch, while the garlic adds a rich depth of flavor that complements the beans beautifully.
With just a few ingredients, you can create a dish that’s both healthy and delicious, making it a great option for those aiming to maintain a balanced diet during the holiday season.
Ingredients for 4-6 servings:
- 1 1/2 pounds fresh green beans, trimmed
- 3 tablespoons olive oil
- 4 cloves garlic, minced
- Salt, to taste
- Freshly ground black pepper, to taste
- 1 tablespoon lemon juice
- Optional: 1/4 cup slivered almonds, toasted
Cooking Instructions:
- Prepare the Green Beans: Start by washing the green beans thoroughly. Trim the ends using a sharp knife or kitchen scissors. This step guarantees that the beans are clean and ready for cooking.
- Blanch the Beans: Bring a large pot of salted water to a boil. Add the green beans and blanch them for about 2-3 minutes until they’re bright green and slightly tender. Immediately transfer the beans to an ice bath to stop the cooking process. Drain and set aside.
- Sauté the Garlic: In a large skillet, heat the olive oil over medium heat. Add the minced garlic and sauté for about 30 seconds, until fragrant. Be careful not to burn the garlic, as this will impart a bitter taste to the dish.
- Cook the Green Beans: Add the blanched green beans to the skillet with the garlic. Toss the beans with the garlic and oil, guaranteeing they’re evenly coated. Sauté for about 5-7 minutes, stirring occasionally, until the beans are tender yet crisp.
- Season and Finish: Season the sautéed beans with salt and freshly ground black pepper to taste. Drizzle with lemon juice for a hint of freshness. If desired, sprinkle the toasted slivered almonds over the beans for added texture and nutty flavor.
- Serve: Transfer the sautéed green beans with garlic to a serving dish and serve immediately as part of your Christmas lunch spread.
Extra Tips:
When cooking Sautéed Green Beans With Garlic, it’s important to have all your ingredients prepped and ready before you start cooking. This guarantees a smooth cooking process and prevents the garlic from burning while you’re preparing the green beans.
Blanching the beans beforehand helps to lock in their vibrant color and guarantees they remain crisp during sautéing. If you’re looking for additional flavor, consider adding a pinch of red pepper flakes for a slight kick, or a sprinkle of Parmesan cheese for extra richness. Enjoy this delightful dish as a healthy, flavorful addition to your holiday meal.
Whole Wheat Stuffing With Apples and Pecans
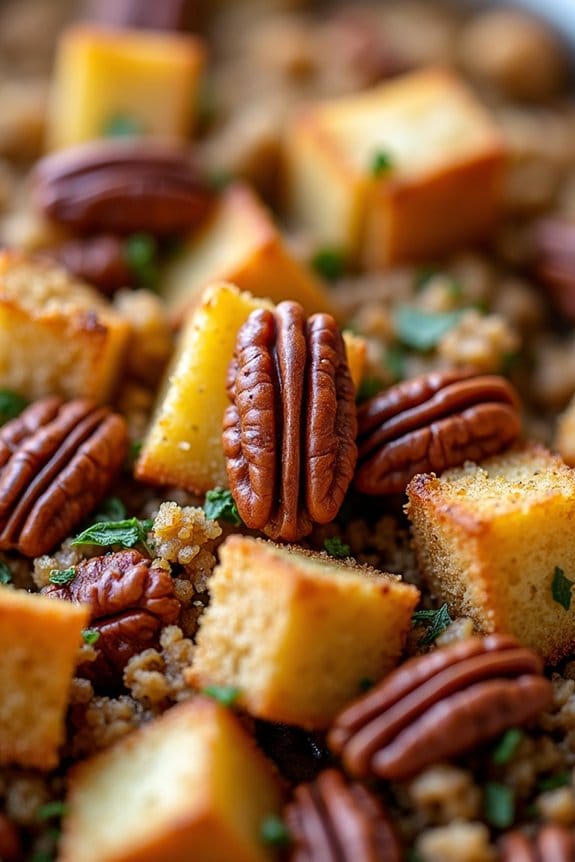
Whole Wheat Stuffing With Apples and Pecans is a delightful, healthy twist on the traditional holiday staple. This dish combines the nutty flavor of whole wheat bread with the sweet and tart taste of apples, complemented by the rich, buttery crunch of pecans. Not only is this stuffing a perfect side dish for your Christmas lunch, but it also provides a nutritious alternative to conventional stuffing, adding fiber, vitamins, and minerals to your festive meal.
The combination of aromatic herbs, sautéed vegetables, and fruit makes this stuffing a feast for the senses. The apples lend a natural sweetness, while the pecans add a satisfying texture. The earthy notes of sage and thyme bring everything together, making this dish a must-have on your holiday table. This recipe serves 4-6 people, making it ideal for a family gathering or a cozy celebration with friends.
Ingredients:
- 10 cups cubed whole wheat bread
- 2 tablespoons olive oil
- 1 cup chopped onion
- 1 cup chopped celery
- 2 apples, peeled, cored, and diced
- 1 cup chopped pecans
- 2 teaspoons chopped fresh sage
- 1 teaspoon chopped fresh thyme
- 1/2 teaspoon salt
- 1/4 teaspoon black pepper
- 2 cups low-sodium chicken or vegetable broth
- 2 tablespoons unsalted butter, melted
Cooking Instructions:
- Preheat the Oven: Begin by preheating your oven to 350°F (175°C). Spread the cubed whole wheat bread onto a baking sheet and toast in the oven for 10-15 minutes, or until the bread is golden brown and crisp. This step is crucial for guaranteeing the stuffing has a good texture.
- Sauté Vegetables: In a large skillet, heat the olive oil over medium heat. Add the onions and celery, sautéing for about 5 minutes until the onions are translucent and the celery is tender.
- Add Apples and Pecans: Stir in the diced apples and chopped pecans, cooking for an additional 3-4 minutes. This will allow the apples to soften slightly and the pecans to become fragrant.
- Mix in Herbs and Seasonings: Add the fresh sage, thyme, salt, and black pepper to the skillet. Stir for 1-2 minutes until the herbs are well distributed and aromatic.
- Combine Ingredients: In a large mixing bowl, combine the toasted bread cubes with the sautéed vegetable mixture. Toss well to confirm the bread is evenly coated with the vegetables and herbs.
- Moisten the Stuffing: Gradually pour in the chicken or vegetable broth, stirring constantly to incorporate. The bread should be moist but not soggy. Adjust the amount of broth if necessary.
- Bake the Stuffing: Transfer the stuffing mixture to a greased baking dish. Drizzle with melted butter to guarantee a golden, crispy top. Cover with aluminum foil and bake in the preheated oven for 20 minutes. Remove the foil and continue baking for another 15-20 minutes, or until the top is browned and the stuffing is heated through.
Extra Tips:
To enhance the flavor profile of this Whole Wheat Stuffing With Apples and Pecans, consider adding a splash of apple cider vinegar or a handful of dried cranberries for a tangy twist. If you prefer a more savory dish, incorporate a bit of crumbled sausage or mushrooms.
For a vegan version, substitute the butter with a plant-based alternative and confirm the broth is vegetable-based. Always taste the mixture before baking to adjust seasoning levels to your liking, as the flavors can vary depending on the freshness of the ingredients used.
Honey-Roasted Carrots
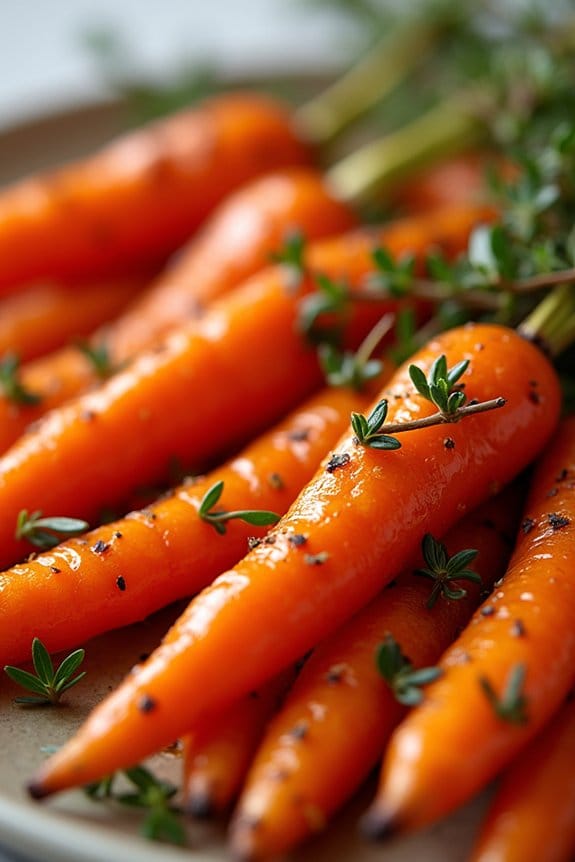
Honey-roasted carrots are a delightful addition to any Christmas lunch, offering a perfect balance of sweet and savory flavors that complement the festive spirit. The natural sweetness of the carrots is enhanced by the honey glaze, which caramelizes beautifully in the oven. This dish not only adds vibrant color to the table but also provides a nutritious side that pairs well with a variety of main courses.
Preparing honey-roasted carrots is simple, making it an ideal recipe for both novice and seasoned cooks looking to impress their guests with minimal effort. The key is to choose fresh, firm carrots and a high-quality honey to achieve the best flavor and presentation.
Whether you’re preparing a large family feast or a cozy dinner for a few, this recipe caters to a serving size of 4-6 people, guaranteeing that everyone can enjoy this delicious side dish.
Ingredients for 4-6 servings:
- 2 pounds of carrots, peeled and cut into sticks
- 3 tablespoons of olive oil
- 3 tablespoons of honey
- 1 tablespoon of balsamic vinegar
- 1 teaspoon of salt
- 1/2 teaspoon of black pepper
- 1 tablespoon of fresh thyme leaves
Cooking Instructions:
- Preheat the Oven: Start by preheating your oven to 400°F (200°C). This temperature allows the carrots to roast evenly, developing a rich, caramelized flavor.
- Prepare the Carrots: Peel the carrots and cut them into uniform sticks, approximately 2-3 inches long. This guarantees they cook evenly.
- Make the Glaze: In a large mixing bowl, combine the olive oil, honey, balsamic vinegar, salt, and black pepper. Whisk the ingredients together until you have a smooth glaze.
- Coat the Carrots: Add the carrot sticks to the bowl with the glaze. Toss them until they’re thoroughly coated with the mixture, making sure each piece is well seasoned.
- Roast the Carrots: Spread the coated carrots in a single layer on a baking sheet lined with parchment paper. This prevents sticking and makes for easy cleanup. Make sure the carrots aren’t overcrowded to allow for even roasting.
- Bake: Place the baking sheet in the preheated oven and roast the carrots for 25-30 minutes. Halfway through, stir the carrots or shake the pan to guarantee they roast evenly and are coated with the glaze.
- Add Fresh Thyme: In the final 5 minutes of roasting, sprinkle the fresh thyme leaves over the carrots. This will infuse a fresh, aromatic flavor without overwhelming the dish.
- Serve: Once the carrots are tender and caramelized, remove them from the oven. Transfer to a serving platter and serve hot.
Extra Tips:
For the best results, use carrots that are roughly the same size, which ensures they cook at the same rate. If you’re using larger carrots, consider cutting them lengthwise into quarters.
You can also experiment with different herbs like rosemary or parsley for a different flavor profile. Additionally, if you prefer a spicier dish, consider adding a pinch of red pepper flakes to the glaze.
Finally, be sure to taste the carrots before serving and adjust the seasoning if necessary.
Dark Chocolate Avocado Mousse

Dark Chocolate Avocado Mousse is a decadent yet healthy dessert option perfect for your Christmas lunch. This recipe combines the creamy texture of ripe avocados with the rich flavor of dark chocolate, offering a guilt-free indulgence. The natural sweetness of the avocados pairs beautifully with the bitterness of the chocolate, creating a silky-smooth mousse that will satisfy any sweet tooth.
Best of all, this recipe is vegan-friendly and requires no baking, making it a quick and easy addition to your holiday menu. This mousse isn’t only delicious but also packed with nutrients. Avocados are rich in healthy fats and fiber, while dark chocolate is loaded with antioxidants. Together, they create a dessert that not only tastes good but is also good for you.
Whether you’re catering to dietary restrictions or simply looking to incorporate healthier options into your holiday meals, this Dark Chocolate Avocado Mousse is sure to be a hit with your guests.
Ingredients (Serves 4-6):
- 3 ripe avocados
- 200 grams of dark chocolate (70% cocoa or higher)
- 1/4 cup unsweetened cocoa powder
- 1/4 cup maple syrup or agave nectar
- 1 tablespoon vanilla extract
- A pinch of sea salt
- Fresh berries or shaved chocolate for garnish (optional)
Cooking Instructions:
- Prepare the Chocolate: Begin by melting the dark chocolate. You can do this by breaking the chocolate into small pieces and placing it in a heatproof bowl over a pot of simmering water, stirring occasionally until fully melted. Alternatively, you can melt it in the microwave in 30-second intervals, stirring in between to guarantee it doesn’t burn.
- Prepare the Avocados: While the chocolate is melting, cut the avocados in half, remove the pits, and scoop the flesh into a food processor or blender. Make sure to use ripe avocados for the best texture.
- Blend the Ingredients: Add the melted chocolate, cocoa powder, maple syrup (or agave nectar), vanilla extract, and a pinch of sea salt to the food processor with the avocados. Blend until you achieve a smooth and creamy mixture. You may need to scrape down the sides of the processor to confirm all ingredients are evenly combined.
- Chill the Mousse: Once the mousse is smooth, spoon it into individual serving dishes or a large serving bowl. Cover with plastic wrap and chill in the refrigerator for at least 1 to 2 hours to allow the flavors to meld and the mousse to firm up.
- Serve: Before serving, you can garnish the mousse with fresh berries or a sprinkle of shaved chocolate for an extra touch of festivity. Serve chilled and enjoy!
Extra Tips: For the best results, use high-quality dark chocolate with at least 70% cocoa to guarantee a rich flavor. If you prefer a sweeter mousse, you can adjust the amount of maple syrup or agave nectar to taste. Additionally, if you want a lighter texture, you can fold in some whipped coconut cream before chilling.
This dish can be made a day in advance, making it an excellent option for reducing stress on the day of your Christmas lunch.
