
There’s just something magical about a Halloween potluck at work, don’t you think?
It’s a chance to showcase your culinary skills and charm your coworkers with deliciously spooky treats.
Have you tried whipping up Monster Mash Guacamole or crafting Spooky Spider Deviled Eggs?
These recipes are not only tasty but bring a whimsical flair to any table.
Get ready to enchant your office with a bewitching spread of festive favorites!
Monster Mash Guacamole

Looking to add a spooky twist to your Halloween office potluck? Monster Mash Guacamole is a ghoulishly delightful dish that’s certain to be a hit. This vibrant green dip isn’t only delicious but also visually perfect for the occasion with its rich color and chunky texture. The combination of creamy avocados, fresh lime juice, and a hint of garlic will make this appetizer a favorite among your colleagues.
Plus, it’s easy to make and can be prepared in advance, allowing you to focus on your costume and other party preparations.
Monster Mash Guacamole can be served with a variety of dippers like tortilla chips, veggie sticks, or even spooky bat-shaped crackers. The key to making this guacamole stand out is its monster-themed presentation. Consider adding edible eyes made from olives or use a cookie cutter to shape the guacamole into a ghost or pumpkin. This dish serves 4-6 people, making it a perfect addition to your Halloween spread.
Ingredients:
- 4 ripe avocados
- 2 limes, juiced
- 1 small red onion, finely chopped
- 2 Roma tomatoes, diced
- 1 clove garlic, minced
- 1 jalapeño, seeded and finely chopped
- 1/4 cup fresh cilantro, chopped
- Salt and pepper to taste
- Optional: black olives for decoration
Instructions:
- Prepare the Avocados: Cut the avocados in half, remove the pit, and scoop the flesh into a large mixing bowl. Use a fork or potato masher to mash the avocados until they reach your desired consistency, whether that’s chunky or smooth.
- Add Lime Juice: Immediately add the lime juice to the mashed avocados. This not only adds flavor but also helps prevent the guacamole from browning.
- Mix in Vegetables: Add the chopped red onion, diced tomatoes, minced garlic, and chopped jalapeño to the avocado mixture. Stir well to combine all the ingredients.
- Season and Garnish: Sprinkle in salt and pepper to taste. Add the chopped cilantro and give it another stir to guarantee even distribution of flavors.
- Decorate: For a Halloween touch, place black olives on top of the guacamole to resemble monster eyes. You can also shape the guacamole into a monster face or use cookie cutters to create fun shapes.
- Serve: Transfer the Monster Mash Guacamole to a serving bowl and pair with your choice of dippers. Serve immediately or refrigerate until ready to serve.
Extra Tips:
When making Monster Mash Guacamole, it’s important to use ripe avocados to achieve the best texture and flavor. To check for ripeness, gently squeeze the avocado; it should yield slightly to pressure.
If you’re preparing this dish in advance, cover the guacamole with plastic wrap, pressing it directly against the surface to minimize air contact and prevent browning. For a spicier version, leave the seeds in the jalapeño or add a dash of cayenne pepper. Enjoy your spooky creation!
Spooky Spider Deviled Eggs
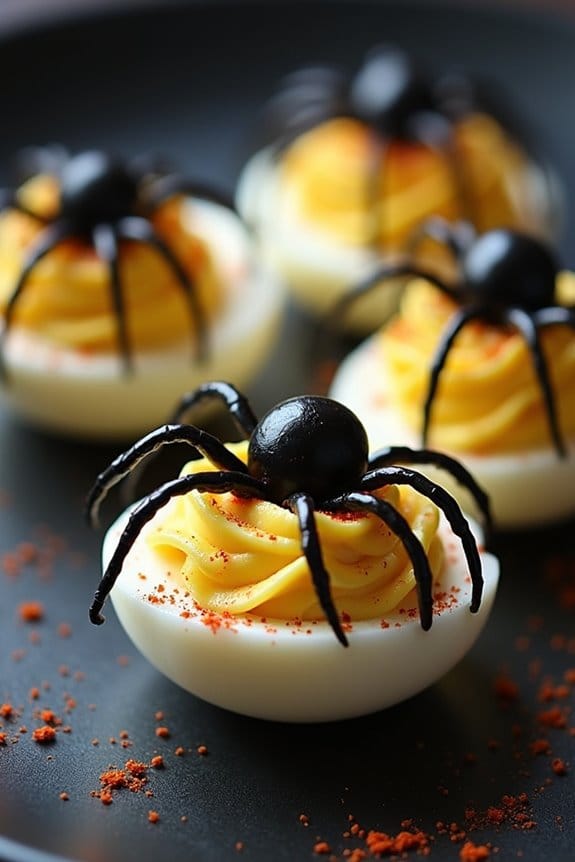
Spooky Spider Deviled Eggs are a perfect addition to your Halloween potluck at work. These creepy yet delicious bites are sure to be a hit among your colleagues, bringing a touch of eerie fun to the table. The classic deviled egg is given a spooky twist with the addition of black olive “spiders” that crawl across the creamy yolk filling, making each bite a delightful mix of flavors and textures.
Not only do they look festive, but they’re also incredibly easy to make, ensuring you can whip them up quickly even if you’re pressed for time.
The key to creating these Spooky Spider Deviled Eggs is to maintain the balance between the traditional deviled egg taste and the visual appeal of the Halloween theme. By carefully selecting and arranging the “spider” components, you can transform ordinary deviled eggs into a Halloween masterpiece.
This dish serves 4-6 people, making it ideal for a small gathering or to complement other potluck dishes. With just a few ingredients and some creativity, you can bring a touch of spookiness to your Halloween celebration.
Ingredients
- 6 large eggs
- 1/4 cup mayonnaise
- 1 teaspoon Dijon mustard
- 1 teaspoon white vinegar
- Salt and pepper to taste
- 1 can (about 6 ounces) of black olives
- Paprika for garnish (optional)
Cooking Instructions
- Boil the Eggs: Place the eggs in a medium-sized pot and cover them with water. Bring the water to a boil over medium-high heat. Once boiling, cover the pot, turn off the heat, and let the eggs sit for 10-12 minutes.
- Cool and Peel the Eggs: After the eggs are cooked, drain the hot water and transfer the eggs to a bowl of ice water. Let them sit for about 5 minutes to cool down. Once cooled, gently tap each egg on a hard surface and peel off the shells.
- Prepare the Yolks: Slice each egg in half lengthwise and carefully scoop out the yolks into a mixing bowl. Place the egg whites on a serving platter.
- Make the Filling: Add mayonnaise, Dijon mustard, white vinegar, salt, and pepper to the yolks. Mash the mixture with a fork until smooth and creamy.
- Fill the Egg Whites: Spoon the yolk mixture back into the hollows of the egg whites, dividing it evenly among them.
- Create the Spiders: Slice the black olives in half lengthwise. Use one half for the spider body and slice the other half into thin strips for the legs. Arrange the olive pieces on top of the filled eggs to resemble spiders.
- Garnish: Sprinkle a small amount of paprika over the eggs for an optional touch of color and flavor.
Extra Tips
When creating the olive spiders, take your time to arrange the legs neatly around the body to enhance the visual effect.
If you’re preparing these eggs in advance, keep them covered in the refrigerator until you’re ready to serve to maintain their freshness.
For a more pronounced flavor, you can experiment with different types of mustards or add a dash of hot sauce to the yolk mixture.
Finally, feel free to get creative with your presentation by using a Halloween-themed platter or adding edible decorations like small candy eyes to the spiders for an extra spooky touch.
Witch’s Brew Cheese Dip

Transform your office potluck into a magical gathering with this spooky yet delicious Witch’s Brew Cheese Dip. Perfect for Halloween, this savory delight is a bubbling cauldron of cheesy goodness that will cast a spell on your coworkers. Served warm, it’s the ideal accompaniment to an array of dippables, from crusty bread to crispy chips. The rich, creamy texture and bold flavors are sure to make this dish a bewitching centerpiece at your festive workplace gathering.
This Witch’s Brew Cheese Dip is both easy to make and a crowd-pleaser, guaranteeing that it will quickly disappear from the buffet table. Designed to serve 4-6 people, this recipe uses a combination of sharp cheddar and creamy cream cheese, blended with a touch of garlic and herbs to enhance the flavors. The green hue, reminiscent of a bubbling witch’s potion, adds an extra element of fun and festivity.
Whether you’re an experienced cook or a kitchen novice, this recipe is straightforward enough for anyone to master.
Ingredients:
- 2 cups sharp cheddar cheese, shredded
- 8 ounces cream cheese, softened
- 1/2 cup sour cream
- 1/4 cup milk
- 2 tablespoons butter
- 2 cloves garlic, minced
- 1 teaspoon dried oregano
- 1/2 teaspoon salt
- 1/4 teaspoon black pepper
- Green food coloring
Cooking Instructions:
- Prepare the Ingredients: Gather all the ingredients and have them ready before you start cooking. Confirm the cream cheese is softened for easy blending.
- Melt the Butter: In a medium-sized saucepan, melt the butter over medium heat. Add the minced garlic and sauté for about 1 minute, or until fragrant.
- Combine Cheeses: Lower the heat to medium-low and add the cream cheese, stirring continuously until it starts to melt. Gradually add the milk, continuing to stir until the mixture is smooth.
- Add Sour Cream and Seasonings: Stir in the sour cream, followed by the shredded cheddar cheese. Mix well until the cheddar cheese is fully melted and incorporated into the dip. Add the dried oregano, salt, and black pepper, stirring thoroughly to combine.
- Color the Dip: Add green food coloring a few drops at a time, stirring well after each addition, until the desired witchy green color is achieved.
- Serve Warm: Transfer the cheese dip to a serving bowl and keep warm. If the dip begins to cool or thicken too much during the potluck, gently reheat it on the stove or in the microwave, stirring occasionally.
Extra Tips:
For an extra kick, consider adding a dash of cayenne pepper or a teaspoon of hot sauce to the dip for those who enjoy a bit of heat.
To keep the dip warm throughout your event, consider using a small slow cooker or fondue pot. If you’re short on time, pre-shredded cheese can be used, though freshly shredded cheese typically melts more smoothly.
Finally, serving with a variety of dippers such as sliced vegetables, pretzels, or toasted baguette slices will cater to different taste preferences and enhance the potluck experience.
Mummy Hot Dogs

Embrace the spooky spirit of Halloween with Mummy Hot Dogs, a fun and creative treat for your work potluck. These delightful snacks aren’t only easy to make but are also bound to be a hit among your coworkers. Perfectly blending the savory taste of hot dogs with the buttery goodness of crescent rolls, Mummy Hot Dogs are dressed up to look like little mummies, complete with mustard or ketchup eyes.
They’re kid-friendly, adult-approved, and add a festive touch to any Halloween gathering. Whether you’re looking to whip up a quick and simple dish or contribute a themed snack to your office potluck, Mummy Hot Dogs are a fantastic choice. The preparation process is straightforward and requires minimal ingredients, making it a convenient option even for last-minute planners.
With a serving size suitable for 4-6 people, you can easily double or triple the recipe if you’re expecting a larger crowd. So, get ready to unwrap some fun with this easy-to-follow recipe.
Ingredients (Serves 4-6):
- 1 can of crescent roll dough
- 8 hot dogs
- 1 egg, beaten
- Mustard or ketchup (for decorating)
Cooking Instructions:
- Preheat the Oven: Begin by preheating your oven to 375°F (190°C). This guarantees that your Mummy Hot Dogs will cook evenly and achieve a golden-brown finish.
- Prepare the Dough: Unroll the crescent roll dough onto a clean surface. If it comes in triangles, gently press the perforations to seal them and create a single large sheet of dough.
- Slice the Dough: Using a sharp knife or a pizza cutter, cut the dough into thin, long strips, approximately 1/4 inch wide. These strips will serve as the mummy’s bandages.
- Wrap the Hot Dogs: Take each hot dog and wrap the dough strips around it, leaving a small gap near one end to create a face. Allow the dough to overlap slightly for a bandaged effect. Repeat this process with all the hot dogs.
- Place on Baking Sheet: Arrange the wrapped hot dogs on a baking sheet lined with parchment paper or a silicone mat to prevent sticking.
- Apply Egg Wash: Brush each Mummy Hot Dog with the beaten egg. This step will help them achieve a shiny, golden appearance during baking.
- Bake: Place the baking sheet in the preheated oven and bake for 12-15 minutes, or until the dough is golden brown and fully cooked.
- Decorate: Once baked, remove the Mummy Hot Dogs from the oven and allow them to cool slightly. Use mustard or ketchup to dot eyes onto the exposed area of the hot dogs, bringing your mummies to life.
Extra Tips:
For best results, verify your dough strips are evenly cut to promote consistent baking. If you prefer your mummies to have a slightly sweeter taste, consider using honey mustard for decoration.
Additionally, you can serve these with a variety of dipping sauces like ketchup, mustard, or even a spicy mayo for those who enjoy a kick. If you’re making these in advance, allow them to cool completely before storing them in an airtight container; reheat briefly in the oven before serving to maintain their delightful texture.
Ghostly Pizza Bites
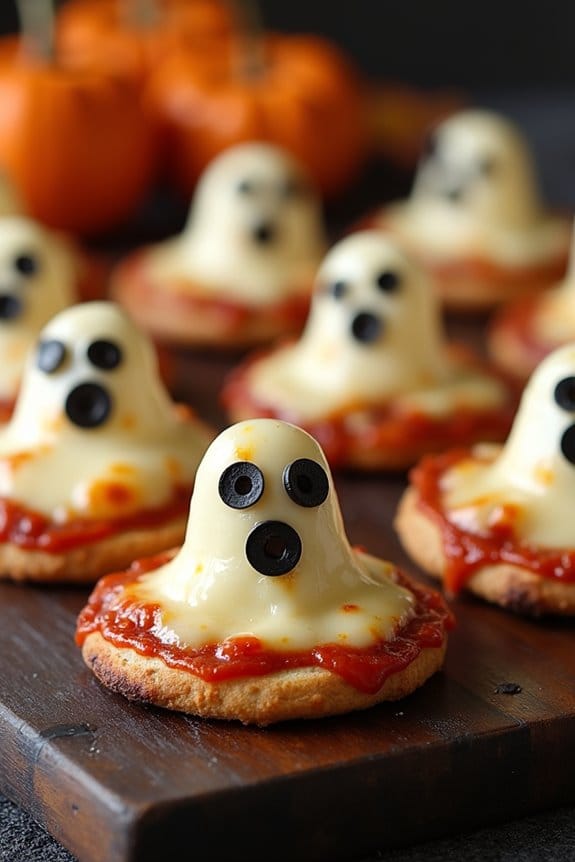
Halloween is a time for fun, spooky treats, and what better way to celebrate at work than with Ghostly Pizza Bites? These delightful mini pizzas aren’t only delicious but also come with a festive twist, making them perfect for a Halloween potluck. Shaped like little ghosts, these bites are sure to be a hit with colleagues and friends alike. Their playful appearance and savory flavor make them both an eye-catching and mouth-watering addition to any Halloween gathering.
Ghostly Pizza Bites are easy to prepare and can be customized to suit different tastes by varying the toppings. They’re made using a simple pizza dough base, topped with a tangy tomato sauce, melted mozzarella cheese, and your choice of toppings. The ghostly shapes are created by cutting the dough into ghost-like figures, adding a fun and spooky element to the dish.
Easily customized spooky bites with ghost-shaped dough and delicious toppings for Halloween fun.
Whether you’re a seasoned chef or a cooking novice, these pizza bites are straightforward to make and will bring a touch of Halloween spirit to your workplace celebration.
Ingredients for 4-6 servings:
- 1 pound pizza dough (store-bought or homemade)
- 1 cup tomato pizza sauce
- 2 cups shredded mozzarella cheese
- Black olives (for ghost eyes)
- Pepperoni slices
- Flour (for dusting)
- Olive oil
Cooking Instructions:
- Preheat the Oven: Start by preheating your oven to 450°F (230°C). Line a baking sheet with parchment paper to prevent sticking.
- Prepare the Dough: Lightly dust a clean surface with flour. Roll out the pizza dough to about 1/4-inch thickness. Use a ghost-shaped cookie cutter to cut out as many ghost figures as possible, re-rolling the dough scraps if necessary.
- Assemble the Bites: Place the ghost-shaped dough pieces onto the prepared baking sheet. Brush each piece lightly with olive oil to help achieve a golden crust when baked.
- Add the Sauce and Cheese: Spread a tablespoon of tomato pizza sauce on each ghost shape, leaving a small border around the edges. Sprinkle a generous amount of shredded mozzarella cheese over the sauce.
- Create Ghost Faces: Slice black olives into small rounds, then place two pieces on each ghost to create eyes. If desired, add a small piece of pepperoni for a mouth or other facial features.
- Bake: Place the baking sheet in the preheated oven and bake for 8-10 minutes, or until the cheese is melted and bubbly, and the edges of the dough are golden brown.
- Cool and Serve: Remove the bites from the oven and let them cool slightly before serving. Arrange them on a platter for a ghostly effect.
Extra Tips:
For an even spookier presentation, consider adding small pieces of fresh basil or arugula to give the ghosts a wispy, haunting look. You can also experiment with different toppings, such as mushrooms or bell peppers, to give each ghost a unique character.
If you don’t have a ghost-shaped cutter, you can easily use a knife to cut out ghostly shapes by hand. Remember to keep an eye on the oven while baking as cooking times may vary depending on dough thickness and toppings. Serve these Ghostly Pizza Bites warm for the best taste and texture.
Zombie Eyeball Meatballs
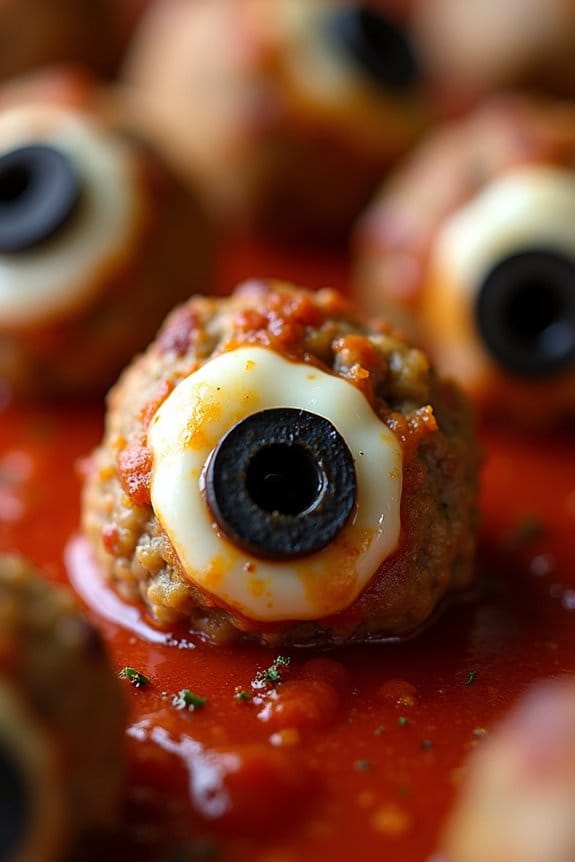
Zombie Eyeball Meatballs are a spooky and delicious addition to any Halloween potluck at work. This dish combines the savory flavors of traditional meatballs with a creepy twist, making them look like eerie eyeballs perfect for your Halloween feast. Not only are they visually striking, but they also pack a flavorful punch that will surprise and delight your colleagues.
The meatballs are made from a mixture of ground beef and pork, seasoned with a variety of spices to create a juicy and tender bite, while the “eyeball” effect is achieved with mozzarella cheese and black olives. This recipe serves 4-6 people, making it an ideal contribution for a small office gathering.
The preparation is simple, and the result is both fun and tasty. The key to creating the perfect Zombie Eyeball Meatballs is in the details – ensuring each “eyeball” is properly formed and cooked to perfection. With this recipe, you’ll be able to whip up a batch of these ghoulish treats in no time, ready to impress and entertain your coworkers.
Ingredients
- 1 pound ground beef
- 1/2 pound ground pork
- 1/2 cup breadcrumbs
- 1/4 cup grated Parmesan cheese
- 1 egg
- 2 cloves garlic, minced
- 1 teaspoon dried oregano
- 1 teaspoon salt
- 1/2 teaspoon black pepper
- 1/2 cup milk
- 8 ounces mozzarella cheese, cut into small cubes
- 1 can (3.8 ounces) black olives, sliced
- 1 jar (24 ounces) marinara sauce
Instructions
- Preheat the Oven: Preheat your oven to 375°F (190°C).
- Mix the Meatball Ingredients: In a large bowl, combine the ground beef, ground pork, breadcrumbs, Parmesan cheese, egg, minced garlic, oregano, salt, pepper, and milk. Mix until all ingredients are well combined but don’t overwork the mixture to avoid tough meatballs.
- Form the Meatballs: Take a small amount of the meat mixture and flatten it slightly in your hand. Place a cube of mozzarella cheese in the center, then cover the cheese with the meat, rolling it into a ball. Repeat until all the meat mixture is used.
- Create the Eyeballs: Press a slice of black olive into the top of each meatball to create the “eye” effect.
- Bake the Meatballs: Place the meatballs on a baking sheet lined with parchment paper. Bake in the preheated oven for 20-25 minutes, or until the meatballs are cooked through and the cheese is melted.
- Heat the Sauce: While the meatballs are baking, heat the marinara sauce in a saucepan over medium heat until warm.
- Assemble the Dish: Once the meatballs are cooked, carefully place them in a serving dish and pour the warm marinara sauce over them. Serve immediately.
Extra Tips
For an extra spooky effect, you can use food coloring to tint the mozzarella cheese red or green before placing it inside the meatballs. This will give the “eyeballs” a more dramatic appearance when bitten into.
Additionally, if you prefer a spicier version, consider adding a pinch of red pepper flakes to the meat mixture. To prevent the meatballs from sticking to your hands while forming them, lightly coat your hands with oil or water.
Finally, if you want to prepare these in advance, you can form the meatballs and refrigerate them until you’re ready to bake, making this recipe even more convenient for a busy potluck day.
Pumpkin Patch Hummus
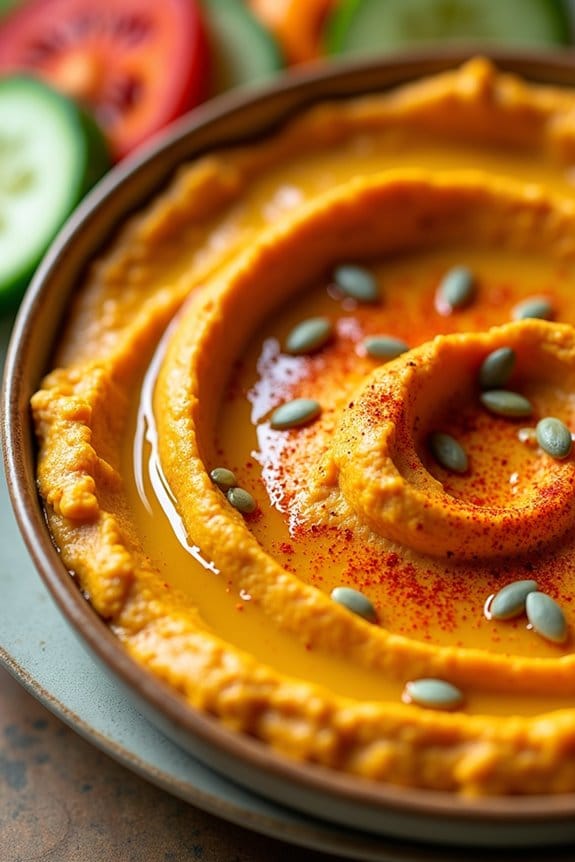
Pumpkin Patch Hummus is an exciting twist on the traditional hummus dish, adding a festive and seasonal touch perfect for a Halloween potluck at work. This delightful spread combines the creamy and nutty flavors of chickpeas with the subtle sweetness of pumpkin puree, creating a unique and tasty treat. The vibrant orange hue of the hummus resembles a pumpkin patch, making it not only delicious but visually appealing as well.
Whether served with pita chips, fresh veggies, or as part of a larger spread, this hummus is guaranteed to be a hit among your colleagues.
Preparing Pumpkin Patch Hummus is straightforward and requires minimal ingredients, most of which you probably already have in your pantry. This recipe serves 4-6 people, making it an ideal contribution to a potluck where you want to offer something both thematic and nourishing. The addition of spices such as cinnamon and nutmeg enhances the fall flavor profile, while a drizzle of olive oil and a sprinkle of paprika on top add the final touches to this crowd-pleasing dish.
Ingredients:
- 1 can (15 oz) chickpeas, drained and rinsed
- 1/2 cup pumpkin puree
- 1/4 cup tahini
- 2 tablespoons lemon juice
- 2 cloves garlic, minced
- 1 teaspoon ground cumin
- 1/2 teaspoon ground cinnamon
- 1/4 teaspoon ground nutmeg
- Salt and pepper to taste
- 2 tablespoons olive oil
- Paprika for garnish
- Optional: pumpkin seeds for garnish
Instructions:
- Prepare the Chickpeas: Start by draining and rinsing the chickpeas thoroughly. This step helps to remove any excess salt from the canned chickpeas and guarantees a smoother texture for the hummus.
- Blend Ingredients: In a food processor, combine the chickpeas, pumpkin puree, tahini, lemon juice, minced garlic, cumin, cinnamon, nutmeg, and a pinch of salt and pepper. Blend on high speed until the mixture is smooth and creamy. If the hummus is too thick, you can add a tablespoon of water or olive oil to reach your desired consistency.
- Taste and Adjust: Taste the hummus and adjust the seasoning as needed. You may want to add more salt, pepper, lemon juice, or spices according to your preference.
- Plate and Garnish: Transfer the hummus to a serving bowl. Use the back of a spoon to create a swirl pattern on the surface. Drizzle olive oil over the top and sprinkle with paprika. For an extra decorative touch, add a few pumpkin seeds on top.
- Chill Before Serving: For best results, chill the hummus in the refrigerator for at least 30 minutes before serving. This allows the flavors to meld together and enhances the overall taste.
Extra Tips:
For an even smoother texture, consider peeling the chickpeas before blending, though this is optional. To do this, gently pinch each chickpea and the skin should slide off easily.
Additionally, if you prefer a spicier version, consider adding a pinch of cayenne pepper or a dash of hot sauce to the hummus. Finally, if you want to make this dish more interactive at your potluck, serve it alongside a variety of dippers such as sliced bell peppers, cucumber rounds, or even spooky-themed crackers.
Enjoy this festive and flavorful dish that’s bound to delight your coworkers!
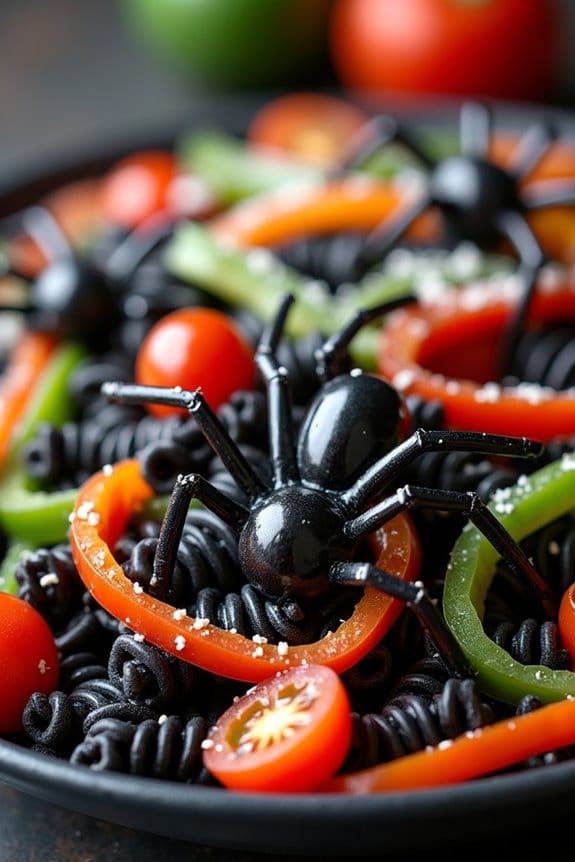
Creepy Crawly Pasta Salad
Looking to spook your coworkers with a Halloween-themed dish that’s both delicious and perfectly eerie? The Creepy Crawly Pasta Salad is sure to be a hit at your Halloween potluck. This dish combines the fun of Halloween with the savory goodness of a pasta salad, ensuring that your contribution stands out on the potluck table.
With a combination of colorful pasta, creepy-shaped veggies, and a tangy dressing, this pasta salad isn’t just a feast for the eyes, but also a delight for the taste buds. The key to this dish is in the presentation. You’ll use black olives to mimic the look of spiders, and sliced bell peppers to resemble slithering snakes.
A visually stunning and tasty Halloween pasta salad with spider-like olives and snake-like bell peppers.
The pasta itself will be dyed to enhance the Halloween theme, making the whole salad look like a delightful bowl of creepy crawlies. This is a fun dish to prepare, not just because of its theme, but also because it allows you to be creative in how you present it. Gather your ingredients, let your imagination run wild, and get ready to whip up a pasta salad that’s sure to be remembered.
Ingredients (for 4-6 people):
- 1 pound rotini or farfalle pasta
- Black food coloring
- 1 cup sliced black olives
- 1 cup cherry tomatoes, halved
- 1 cup sliced bell peppers (red, green, and yellow)
- 1/2 cup grated Parmesan cheese
- 1/2 cup Italian dressing
- 1 tablespoon olive oil
- Salt and pepper to taste
Instructions:
- Cook the Pasta: Start by boiling a large pot of salted water. Add the pasta and cook according to package instructions until al dente. Drain the pasta and rinse it under cold water to stop the cooking process.
- Color the Pasta: In a large bowl, mix a few drops of black food coloring with a tablespoon of olive oil. Toss the cooked pasta in the mixture until evenly coated. This will give your pasta a spooky, Halloween look.
- Prepare the Vegetables: While the pasta is cooling, slice the black olives into halves to resemble little spiders. Slice the bell peppers into long strips to mimic snakes. Halve the cherry tomatoes for a pop of color.
- Combine Ingredients: In a large mixing bowl, combine the colored pasta, black olives, cherry tomatoes, and bell pepper strips. Toss gently to mix all the ingredients.
- Dress the Salad: Pour the Italian dressing over the pasta salad, and sprinkle with grated Parmesan cheese. Toss until everything is well coated. Season with salt and pepper to taste.
- Chill and Serve: Cover the salad with plastic wrap and refrigerate for at least an hour before serving. This allows the flavors to meld together. Serve chilled, and enjoy your creepy creation!
Extra Tips:
For an added Halloween touch, consider using Halloween-themed pasta shapes if you can find them. Also, feel free to get creative with the vegetables you use. For example, you can carve radishes into mini pumpkins or use asparagus tips as witch fingers.
When dying the pasta, start with a little food coloring and add more if necessary to achieve your desired color. Remember, the chilling time is essential as it enhances the flavor and allows the colors to set in beautifully. Enjoy your creepy culinary creation!
Vampire Bat Wings

Sink your teeth into these deliciously spooky Vampire Bat Wings, the perfect addition to your Halloween potluck at work. These wings aren’t only fun and thematic but also packed with flavor, making them a surefire hit for your office gathering.
The wings are coated in a rich, dark glaze that gives them their eerie appearance, while the combination of spices guarantees every bite is irresistibly tasty. Ideal for serving 4-6 people, this recipe is easy to prepare and promises to add a touch of Halloween magic to any food spread.
The key to achieving the perfect “bat wing” look lies in the choice of glaze, which not only enhances the flavor but also provides that signature dark appearance. So get ready to impress your coworkers with this whimsically wicked dish that perfectly encapsulates the spirit of Halloween.
Ingredients
- 3 pounds of chicken wings
- 1/2 cup soy sauce
- 1/4 cup balsamic vinegar
- 1/4 cup honey
- 2 tablespoons olive oil
- 3 cloves garlic, minced
- 1 teaspoon smoked paprika
- 1 teaspoon ground ginger
- 1/2 teaspoon black pepper
- 1/4 teaspoon cayenne pepper
- Black food coloring (optional)
- Sesame seeds for garnish
- Fresh parsley for garnish
Cooking Instructions
- Prepare the Marinade: In a large bowl, combine the soy sauce, balsamic vinegar, honey, olive oil, minced garlic, smoked paprika, ground ginger, black pepper, and cayenne pepper. Mix well until all ingredients are thoroughly combined.
- Add Food Coloring: If you desire a darker, more “bat-like” appearance, add a few drops of black food coloring to the marinade. Stir until the color is evenly distributed.
- Marinate the Wings: Place the chicken wings in a large resealable plastic bag or a shallow dish. Pour the marinade over the wings, making sure they’re fully coated. Seal the bag or cover the dish and refrigerate for at least 2 hours, or overnight for best results.
- Preheat the Oven: Preheat your oven to 400°F (200°C). Line a baking sheet with aluminum foil and place a wire rack on top. This will allow the wings to cook evenly and become crispy without sticking.
- Arrange the Wings: Remove the wings from the marinade and arrange them in a single layer on the prepared wire rack. Reserve the marinade for basting.
- Bake the Wings: Place the baking sheet in the preheated oven and bake the wings for 35-40 minutes, basting them with the reserved marinade halfway through. This will guarantee they remain moist and flavorful.
- Garnish and Serve: Once cooked, remove the wings from the oven and let them rest for a few minutes. Transfer to a serving platter and garnish with sesame seeds and fresh parsley for a festive touch.
Extra Tips
For an even crispier finish, you can broil the wings for an additional 2-3 minutes at the end of the baking time. Keep a close eye to prevent burning.
If you’re short on time, consider using pre-cut chicken drumettes and wingettes to save on prep. When serving, provide plenty of napkins as these wings can be deliciously messy.
Ultimately, if you have guests with dietary restrictions, consider offering a gluten-free soy sauce alternative to accommodate everyone. Enjoy your Halloween potluck with these delicious Vampire Bat Wings!
Skeleton Veggie Platter
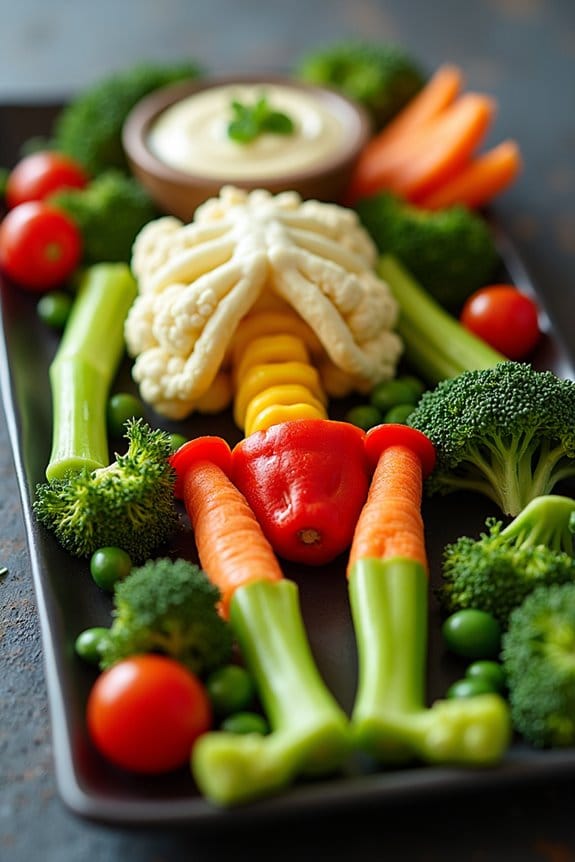
Creating a festive and health-conscious dish for a Halloween potluck at work can be both fun and rewarding. The Skeleton Veggie Platter is a creative and visually appealing way to serve vegetables, making it perfect for the spooky season. This dish not only adds a splash of color to your potluck table, but it also offers a nutritious alternative to the usual sugary treats associated with Halloween. The idea is to arrange a variety of fresh vegetables in the shape of a skeleton, complete with a bowl of delicious dip in place of the skull.
This platter is ideal for a serving size of 4-6 people and can be easily adjusted based on the number of attendees at your potluck. By using a variety of colorful vegetables, you can create an eye-catching display that’s sure to impress your coworkers. The combination of crunchy vegetables and creamy dip is both satisfying and revitalizing, offering a delightful contrast to the other heavier dishes that might be present at your gathering.
Ingredients (for 4-6 people):
- 1 head of cauliflower
- 1 bunch of celery
- 1 large cucumber
- 1 red bell pepper
- 1 yellow bell pepper
- 1 bunch of baby carrots
- 1 cup cherry tomatoes
- 1 cup sugar snap peas
- 1 small broccoli head
- 1 cup hummus or ranch dressing for dipping
Instructions:
- Prepare the Vegetables:
- Wash all the vegetables thoroughly under cold running water to remove any dirt or residues.
- Cut the cauliflower into bite-sized florets and set aside.
- Slice the celery into long sticks, about 4 inches in length.
- Peel the cucumber and slice it into rounds.
- Remove the seeds and stems from the bell peppers, then slice them into strips.
- Trim any excess stems from the broccoli and separate into small florets.
- Assemble the Skeleton:
- On a large serving platter or tray, start by placing the bowl of hummus or ranch dressing at the top of the tray to represent the skull.
- Arrange the cauliflower florets around the bowl to form the head.
- Use the celery sticks to create the spine and arms of the skeleton, placing them in a straight line down the center of the platter.
- Position the cucumber rounds along the spine to create the ribs.
- Use bell pepper strips to form the pelvis and hips.
- Arrange baby carrots at the ends of the celery arms to represent the hands and fingers.
- Use broccoli florets to form the legs, with snap peas for the feet.
- Scatter cherry tomatoes around the platter for added color and to fill in any empty spaces.
- Finishing Touches:
- Make any final adjustments to confirm the skeleton shape is clear and visually appealing.
- Cover and refrigerate the platter until it’s time to serve at the potluck.
Extra Tips:
To maintain the Skeleton Veggie Platter’s freshness and crispness, prepare and assemble it as close to serving time as possible. If you need to prepare it in advance, keep the vegetables covered with a damp paper towel and plastic wrap in the refrigerator to maintain their crunchiness.
Consider using a variety of dips to cater to different tastes; you might offer both hummus and ranch dressing for more options. Additionally, feel free to substitute any vegetables based on availability or personal preference to keep the platter exciting and varied.
Haunted Harvest Popcorn

Get into the Halloween spirit with a spooky twist on a classic snack: Haunted Harvest Popcorn. This festive treat combines the buttery crunch of popcorn with a medley of fall flavors and eerie decorations, making it an ideal addition to any work potluck.
Not only is it easy to prepare, but it also brings a delightful mix of sweet, salty, and spicy notes to your Halloween spread. Whether you’re sharing it with colleagues or enjoying it as a solo treat, Haunted Harvest Popcorn is bound to be a hit.
This recipe serves 4-6 people, making it perfect for a small gathering or office potluck. The combination of popcorn, candy, and spices creates a colorful and flavorful snack that captures the essence of Halloween.
Get ready to impress your colleagues with this ghoulishly delightful treat that’s as fun to make as it’s to eat. Gather your ingredients and follow the steps below to create your own batch of Haunted Harvest Popcorn.
Ingredients:
- 8 cups of popped popcorn
- 1 cup of candy corn
- 1 cup of mini marshmallows
- 1 cup of chocolate candies (e.g., M&M’s)
- 1/2 cup of dried cranberries
- 1/2 cup of chopped pecans
- 1/4 cup of melted butter
- 1/4 teaspoon of cinnamon
- 1/4 teaspoon of nutmeg
- 1/4 teaspoon of cayenne pepper (optional for a spicy kick)
- 1/2 teaspoon of salt
- Halloween-themed sprinkles for decoration
Cooking Instructions:
- Prepare the Popcorn Base: Begin by preparing 8 cups of popcorn. You can use store-bought popcorn or pop your own using an air popper or stovetop method. Confirm the popcorn is fully popped and place it in a large mixing bowl.
- Mix the Seasonings: In a small bowl, combine the melted butter, cinnamon, nutmeg, cayenne pepper (if using), and salt. Stir well to confirm the spices are evenly distributed in the butter.
- Coat the Popcorn: Drizzle the seasoned butter mixture over the popcorn. Use a spatula or large spoon to gently toss the popcorn until it’s evenly coated with the buttery spice mix.
- Add the Sweet Elements: Add the candy corn, mini marshmallows, chocolate candies, dried cranberries, and chopped pecans to the popcorn. Gently fold the ingredients into the popcorn to confirm even distribution.
- Decorate with Sprinkles: Sprinkle the Halloween-themed decorations over the popcorn mix. Toss lightly to incorporate the sprinkles without crushing the popcorn or candy.
- Serve and Enjoy: Transfer the Haunted Harvest Popcorn to a serving bowl or individual bags for easy serving. Enjoy this spooky snack at your Halloween potluck!
Extra Tips:
For a nut-free version, simply omit the pecans or replace them with sunflower seeds. If you prefer a sweeter mix, you can add more chocolate candies or marshmallows to suit your taste.
For added visual appeal, consider using popcorn colored with natural food dye to match the Halloween theme. This treat can be made a day in advance and stored in an airtight container to keep it fresh.
Adjust the spice level by adding more or less cayenne pepper, and feel free to customize the candy mix-ins according to your preference.
Black Cat Brownies
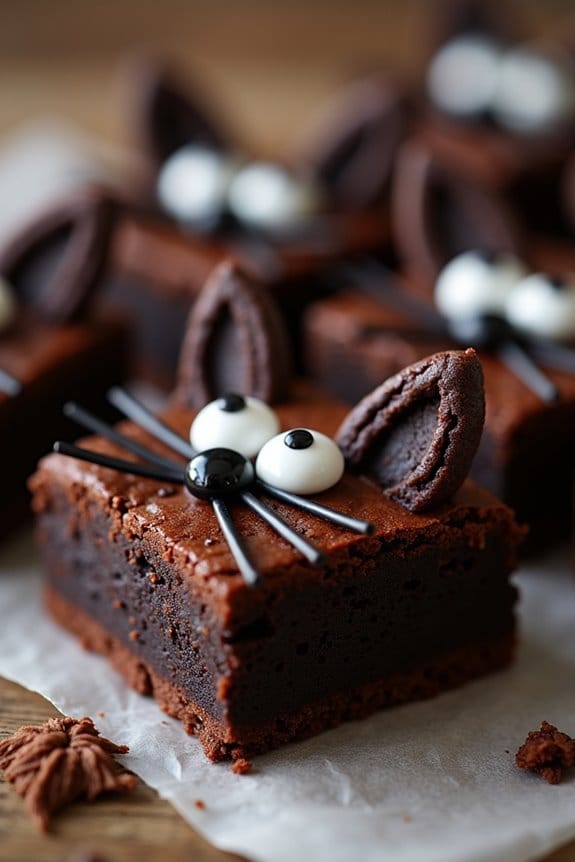
Transform your typical brownie into a spooktacular treat with these Black Cat Brownies, perfect for your Halloween potluck at work. These brownies aren’t only deliciously fudgy but also creatively decorated to resemble cute black cats, making them a hit among colleagues.
Transform ordinary brownies into magical, feline-inspired treats perfect for a Halloween potluck.
Whether you’re a seasoned baker or a novice, this recipe is simple enough to whip up in no time, yet impressive enough to stand out on the potluck table.
These brownies are designed to serve 4-6 people, offering the perfect balance of rich chocolate flavor and festive flair. The fun part about this recipe is the decoration, where you can let your creativity shine. Use candy eyes, licorice, and chocolate chips to bring your black cats to life. Immerse yourself in this fun and easy recipe to add a whimsical touch to your Halloween celebration at work.
Ingredients (Serves 4-6):
- 1/2 cup unsalted butter
- 1 cup granulated sugar
- 2 large eggs
- 1 teaspoon vanilla extract
- 1/3 cup unsweetened cocoa powder
- 1/2 cup all-purpose flour
- 1/4 teaspoon baking powder
- 1/4 teaspoon salt
- 1/2 cup semi-sweet chocolate chips
- Black food coloring
- Candy eyes
- Black licorice (cut into small strips)
- Mini chocolate chips or black candy melts (for ears)
Instructions:
- Preheat and Prepare: Preheat your oven to 350°F (175°C). Line an 8×8 inch baking pan with parchment paper or lightly grease it to prevent sticking.
- Melt Butter: In a medium microwave-safe bowl, melt the butter. This can be done by microwaving it in 30-second intervals until completely melted.
- Mix Wet Ingredients: Add the sugar to the melted butter and stir until well combined. Then, add in the eggs one at a time, beating well after each addition. Stir in the vanilla extract.
- Add Dry Ingredients: Sift in the cocoa powder, flour, baking powder, and salt. Stir until the mixture is smooth and no lumps remain. Add a few drops of black food coloring to achieve a dark, black brownie mixture.
- Incorporate Chocolate Chips: Fold in the semi-sweet chocolate chips, which will add extra gooeyness to the brownies.
- Bake: Pour the brownie batter into the prepared baking pan, spreading it evenly. Bake in the preheated oven for 20-25 minutes, or until a toothpick inserted into the center comes out with a few moist crumbs.
- Cool and Decorate: Allow the brownies to cool completely in the pan. Once cool, cut them into squares. Use candy eyes for the eyes, mini chocolate chips or black candy melts as ears, and black licorice strips for whiskers to create the cat faces.
Extra Tips:
When adding the black food coloring, start with a few drops and gradually add more until you reach the desired shade. If you don’t have candy eyes, you can use white chocolate chips with a dot of black icing for the pupils.
For a softer brownie texture, slightly underbake them, keeping a close eye on them towards the end of the baking time. Adjust decorations to match the personality of each ‘cat’ for extra fun!
Graveyard Dirt Cups

These treats are also a great way to get creative, allowing you to personalize them with additional decorations like tombstone cookies, candy bones, or even ghost-shaped marshmallows.
The base of the dessert is a rich chocolate pudding, which is layered with crushed chocolate cookies to resemble dirt. The addition of gummy worms gives it a playful twist, making it feel like a mini edible graveyard.
Whether you’re a seasoned baker or a novice in the kitchen, this recipe is simple to follow and delivers spooktacular results.
Ingredients for 4-6 servings:
- 2 cups cold milk
- 1 package (3.9 ounces) instant chocolate pudding mix
- 1 package chocolate sandwich cookies
- 1 cup whipped topping
- 1 pack gummy worms
- Optional decorations: candy tombstones, candy bones, decorative sprinkles
Instructions:
- Prepare the Pudding: Begin by pouring the cold milk into a mixing bowl. Add the instant chocolate pudding mix and whisk together until the mixture is smooth and begins to thicken. This usually takes about 2 minutes. Allow the pudding to set by placing it in the refrigerator for 5 minutes.
- Crush the Cookies: While the pudding is setting, place the chocolate sandwich cookies into a resealable plastic bag. Use a rolling pin or food processor to crush the cookies into fine crumbs. These crumbs will resemble the dirt for your graveyard cups.
- Assemble the Cups: Once the pudding has set, begin assembling the dirt cups. Start by spooning a layer of chocolate pudding into the bottom of each cup. Follow with a layer of crushed cookies. Repeat these layers until the cups are nearly full.
- Add the Toppings: Top each cup with a dollop of whipped topping. Sprinkle additional cookie crumbs over the whipped topping to cover it completely. Insert gummy worms partially into the cookie crumb layer, letting them peek out as if they’re crawling out of the dirt.
- Decorate: If desired, add any extra decorations such as candy tombstones or bones to give your dirt cups an authentic graveyard look.
Extra Tips:
For the best results, use fresh ingredients to maintain the flavor and texture of the dirt cups. If you’re preparing these in advance, keep them in the refrigerator until it’s time to serve to guarantee they remain cool and invigorating.
When crushing the cookies, make sure they’re crushed finely enough to resemble dirt, but not too fine that they turn into powder. If you’re feeling creative, you can add layers of different colored pudding for a more colorful graveyard effect.
Bewitched Caramel Apples

Bewitched Caramel Apples offer a delightful twist on the classic treat, perfect for a Halloween potluck at work. The enchanting blend of tart apples and sweet, buttery caramel is sure to cast a spell on your colleagues.
These bewitching apples aren’t only delicious but also visually stunning, making them a standout addition to any Halloween spread. With a hint of mystery and magic, these caramel apples are a must-have for your festive celebration.
The recipe combines traditional caramel with a touch of Halloween magic, using a few bewitching ingredients that add both flavor and flair. For an extra spooky touch, consider using dark chocolate drizzle or colorful sprinkles to enhance the visual appeal. This recipe is designed for a serving size of 4-6 people, guaranteeing everyone at the party gets to enjoy a taste of these enchanting treats.
Ingredients:
- 6 medium-sized tart apples (such as Granny Smith)
- 1 cup granulated sugar
- 1/2 cup unsalted butter
- 1/2 cup heavy cream
- 1/4 cup light corn syrup
- 1 teaspoon vanilla extract
- 1/4 teaspoon salt
- Wooden sticks or skewers
- Optional toppings: dark chocolate, colorful sprinkles, crushed nuts
Instructions:
- Prepare the Apples: Wash and thoroughly dry the apples. Remove the stems and insert a wooden stick or skewer into the top of each apple. Set them aside on a baking sheet lined with parchment paper.
- Make the Caramel: In a medium saucepan over medium heat, combine the granulated sugar, butter, heavy cream, and corn syrup. Stir constantly until the mixture comes to a gentle boil.
- Cook the Caramel: Once boiling, continue to cook the mixture for about 5-7 minutes, stirring occasionally, until it reaches a deep amber color and a temperature of about 240-245°F (116-118°C) on a candy thermometer.
- Add Flavorings: Remove the saucepan from heat and carefully stir in the vanilla extract and salt. Be cautious as the mixture might bubble up.
- Dip the Apples: Allow the caramel to cool slightly. Then, hold each apple by the stick and dip it into the caramel, turning to coat evenly. Let any excess caramel drip off before placing the apple back on the parchment-lined baking sheet.
- Decorate: If desired, drizzle melted dark chocolate over the caramel-coated apples or sprinkle with colorful sprinkles or crushed nuts. Allow the apples to set at room temperature for at least 30 minutes before serving.
Extra Tips:
When making Bewitched Caramel Apples, make sure your apples are completely dry before dipping them in caramel, as any moisture can cause the caramel to slide off.
If you don’t have a candy thermometer, you can test the caramel’s readiness by dropping a small amount into cold water; it should form a firm ball that holds its shape.
Additionally, feel free to experiment with different toppings to suit your Halloween theme, or add a few drops of food coloring to the caramel for a more dramatic look.
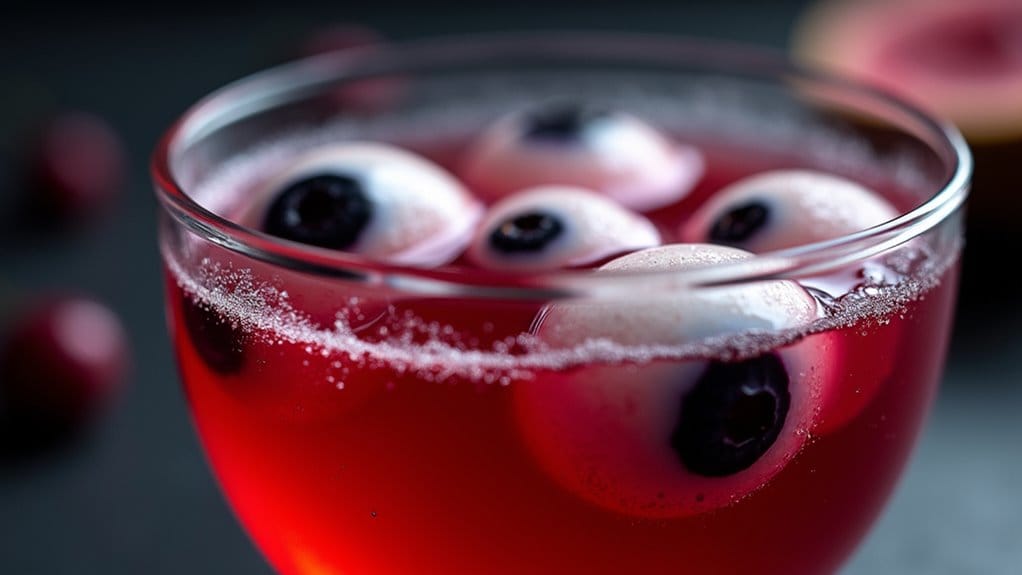
Eerie Eyeball Punch
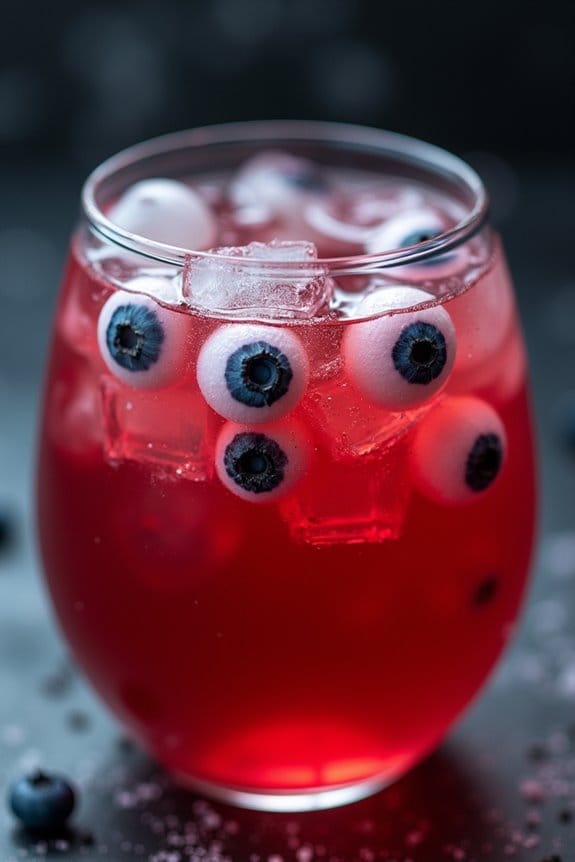
Add a spooky touch to your workplace Halloween potluck with this Eerie Eyeball Punch. This chilling beverage not only looks eerily realistic but also tastes deliciously revitalizing, making it a perfect treat for your colleagues.
The floating “eyeballs” made from lychee and blueberries create an unsettling yet fascinating effect that will surely be the talk of the party. The combination of cranberry juice, soda, and a hint of lime brings a perfect balance of sweetness and tartness to this ghoulish concoction.
This recipe serves 4-6 people and is easy to prepare, requiring only a few ingredients and some creativity. The punch can be served in a large bowl or cauldron for an extra Halloween feel. Just make sure to prepare it a few hours in advance to allow the flavors to meld together and create the perfect chilling effect.
Ingredients:
- 1 can of lychees in syrup (about 20 lychees)
- 20 fresh blueberries
- 4 cups cranberry juice
- 2 cups lemon-lime soda
- 1/4 cup freshly squeezed lime juice
- Ice cubes
- Optional: a few drops of red food coloring for an extra eerie effect
Instructions:
- Prepare the Eyeballs:
- Drain the canned lychees, reserving the syrup for another use if desired.
- Place a blueberry inside the hollow center of each lychee, making sure the blueberry’s stem end is facing outwards to mimic an eyeball pupil.
- Make the Punch:
- In a large punch bowl, combine the cranberry juice, lemon-lime soda, and freshly squeezed lime juice. Stir well to mix the ingredients thoroughly.
- Add the Eyeballs:
- Gently add the lychee “eyeballs” to the punch. They’ll float on the surface, giving the punch a spooky appearance.
- Add Ice and Optional Coloring:
- Add ice cubes to the punch to keep it chilled. If you want the punch to look even more eerie, add a few drops of red food coloring and stir gently to distribute the color evenly.
- Serve:
- Ladle the punch into glasses, making sure each serving has a few “eyeballs” for maximum effect. Serve immediately and enjoy the spooky vibes!
Extra Tips:
For an even more chilling effect, consider freezing some lychee “eyeballs” ahead of time and adding them to the punch just before serving. This will keep the punch colder for longer without diluting it.
If you prefer a less sweet punch, you can adjust the balance of soda and juice to taste. Additionally, if you want a non-alcoholic option, make sure the lemon-lime soda you choose is alcohol-free.
Enjoy your eerie creation and have a spooktacular Halloween potluck!
