

Hello lovely readers!
If you’re feeling the holiday hustle, I’ve got your back with 12 simple Christmas lunch recipes that are perfect for busy hosts.
Picture a kitchen where the aroma of honey-glazed ham meets the refreshing tang of a fresh orange and pomegranate salad.
These dishes promise to make your holiday meal both delightful and manageable.
Ready to transform your festive table with ease?
Easy Brie and Cranberry Puff Pastry Bites
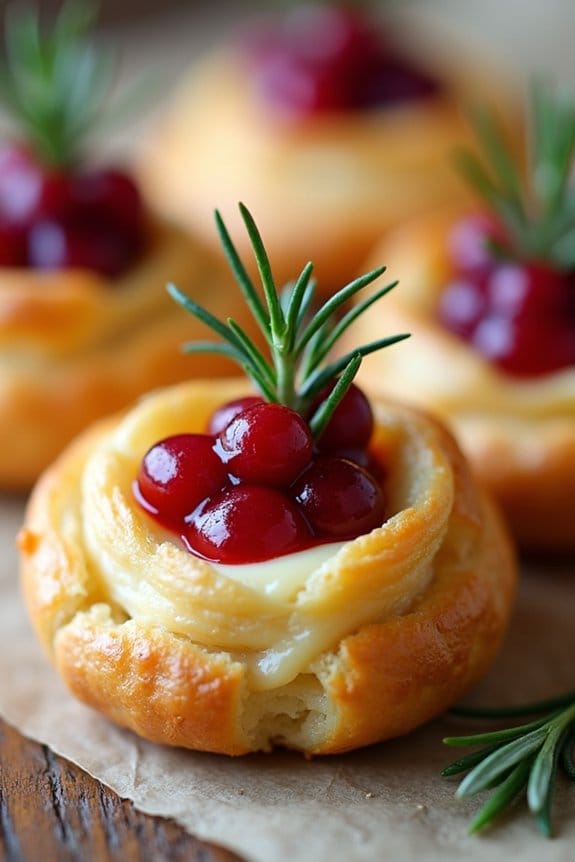
Easy Brie and Cranberry Puff Pastry Bites are a delightful and simple appetizer perfect for your Christmas lunch spread. These delicious bites combine the creamy texture of Brie cheese with the tart sweetness of cranberry sauce, all encased in a buttery puff pastry. They aren’t only easy to prepare but also incredibly satisfying, offering a gourmet touch to your festive dining experience.
These bites are great for both kids and adults alike, bringing a festive flair to your holiday table. These bite-sized appetizers are perfect for a serving size of 4-6 people, making them ideal for a small gathering or as part of a larger spread of holiday dishes.
The puff pastry creates a light and flaky base, while the Brie melts into a rich, gooey center. Topped with cranberry sauce, these bites offer a burst of flavor in every mouthful. Not only are they visually appealing with their golden-baked exterior and vibrant red topping, but they also offer a harmonious blend of textures and flavors that will surely impress your guests.
Ingredients:
- 1 sheet of frozen puff pastry, thawed
- 1 wheel (about 8 oz) of Brie cheese
- 1/2 cup of cranberry sauce (store-bought or homemade)
- 1 egg, beaten (for egg wash)
- Optional: Fresh rosemary or thyme for garnish
Instructions:
- Preheat and Prepare: Preheat your oven to 375°F (190°C). Line a baking sheet with parchment paper to prevent sticking.
- Roll and Cut Puff Pastry: On a lightly floured surface, gently roll out the puff pastry sheet to smooth out any folds. Cut the puff pastry into 12 equal squares using a sharp knife or pizza cutter.
- Prepare Brie: Cut the Brie wheel into small cubes. You’ll need one cube of Brie for each puff pastry square.
- Assemble Bites: Place a cube of Brie in the center of each puff pastry square. Top each with a small spoonful of cranberry sauce.
- Seal and Shape: Gather the corners of the puff pastry square over the filling and pinch together to seal, creating a neat parcel. Place each assembled puff pastry bite seam-side down on the prepared baking sheet.
- Egg Wash: Brush each puff pastry bite with the beaten egg. This will give them a beautiful golden color when baked.
- Bake: Transfer the baking sheet to the preheated oven and bake for 15-20 minutes, or until the puff pastry is golden brown and puffed.
- Garnish and Serve: If desired, garnish with a small sprig of fresh rosemary or thyme for a festive touch. Serve warm and enjoy!
Extra Tips:
When working with puff pastry, always keep it cold until you’re ready to use it. This helps the pastry to rise better and become flakier. If you find your pastry becoming too warm while assembling the bites, place it back in the refrigerator for a few minutes.
Additionally, you can experiment with different types of cheese or topping variations, such as using a fig jam or a sprinkle of chopped nuts for added texture and flavor. These pastry bites can also be prepared ahead of time and stored in the refrigerator, then baked fresh just before serving.
Quick Smoked Salmon and Cream Cheese Canapés

Quick Smoked Salmon and Cream Cheese Canapés are the perfect starter for your Christmas lunch. These delightful bites aren’t only elegant and flavorful but also incredibly easy to prepare, making them an ideal choice for a holiday gathering.
The combination of rich cream cheese and savory smoked salmon, complemented by a hint of fresh herbs and the slight crunch of a base, creates a harmonious blend of textures and flavors that will impress your guests without keeping you away from your main course preparations for too long.
Whether you’re hosting a formal Christmas lunch or a casual get-together, these canapés will add a touch of sophistication to your menu. They can be prepared ahead of time, allowing you to focus on enjoying the festive spirit with your loved ones.
Plus, with a serving size of 4-6 people, they’re perfect for a small gathering. Follow this simple recipe to create a batch of these delectable canapés that will surely be a hit at your holiday table.
Ingredients for 4-6 People:
- 150g smoked salmon, thinly sliced
- 200g cream cheese, softened
- 1 tablespoon lemon juice
- 1 teaspoon fresh dill, finely chopped
- 1 teaspoon fresh chives, finely chopped
- Black pepper to taste
- 1 French baguette or a pack of blinis (about 12-18 pieces)
- Lemon zest for garnish (optional)
Cooking Instructions:
1. Prepare the Base: If using a French baguette, slice it into 12-18 thin rounds. Lightly toast the slices in a preheated oven at 180°C (350°F) for about 5-7 minutes until they’re crisp and golden.
Alternatively, if you’re using blinis, you can lightly heat them according to package instructions.
2. Make the Cream Cheese Mixture: In a medium-sized bowl, combine the softened cream cheese, lemon juice, chopped dill, chopped chives, and a pinch of black pepper. Mix well until all the ingredients are fully incorporated and the mixture is smooth and creamy.
3. Assemble the Canapés: Spread a generous layer of the cream cheese mixture onto each toasted baguette slice or blini. Confirm that the mixture is evenly distributed for a balanced flavor in every bite.
4. Add the Smoked Salmon: Carefully place a slice of smoked salmon on top of the cream cheese layer. You can lightly fold or drape the salmon to create an elegant presentation.
5. Garnish and Serve: Garnish each canapé with a small sprig of dill or a pinch of lemon zest for an extra pop of color and flavor. Serve immediately or refrigerate until ready to serve.
Extra Tips:
For an added twist, consider incorporating some capers into the cream cheese mixture for a briny contrast to the rich salmon.
If preparing in advance, keep the assembled canapés covered in the fridge and add the garnishes just before serving to maintain their freshness and vibrant appearance.
Additionally, using high-quality smoked salmon will greatly enhance the overall flavor of the canapés, guaranteeing they’re as delightful as they’re beautiful.
Simple Spinach and Ricotta Stuffed Mushrooms

If you’re looking for a delightful appetizer or side dish to add to your Christmas lunch menu, these Simple Spinach and Ricotta Stuffed Mushrooms are the perfect choice. This dish combines earthy mushroom caps with creamy ricotta cheese and fresh spinach, resulting in a deliciously savory bite. The combination isn’t only flavorful but also provides a touch of elegance to your holiday spread.
Best of all, these stuffed mushrooms are incredibly easy to prepare, making them a stress-free addition to your festive meal. The beauty of this recipe lies in its simplicity and the harmonious blend of flavors. The rich ricotta cheese complements the spinach’s freshness, while the mushrooms provide a sturdy base and a deep umami taste.
Whether you’re serving a large crowd or enjoying a more intimate gathering, this dish can be easily scaled to meet your needs. With just a few ingredients and minimal prep time, these stuffed mushrooms will surely become a holiday favorite.
Ingredients for 4-6 servings:
- 18-24 large button mushrooms
- 1 cup ricotta cheese
- 2 cups fresh spinach, chopped
- 1/2 cup grated Parmesan cheese
- 2 cloves garlic, minced
- 1 tablespoon olive oil
- 1 teaspoon lemon zest
- Salt and pepper to taste
- Fresh parsley, chopped (for garnish)
Cooking Instructions:
- Preheat the Oven: Begin by preheating your oven to 375°F (190°C). This guarantees that it’s at the right temperature for baking the stuffed mushrooms to perfection.
- Prepare the Mushrooms: Carefully clean the mushrooms with a damp cloth to remove any dirt. Gently remove the stems and set them aside. You can chop the stems finely and add them to the filling if desired.
- Cook the Spinach: In a medium skillet, heat the olive oil over medium heat. Add the minced garlic and sauté for about 1 minute until fragrant. Add the chopped spinach and cook for 2-3 minutes, until wilted. Remove from heat and let it cool slightly.
- Make the Filling: In a mixing bowl, combine the ricotta cheese, cooked spinach, grated Parmesan cheese, lemon zest, and chopped mushroom stems (if using). Season with salt and pepper to taste. Mix everything until well combined.
- Stuff the Mushrooms: Take each mushroom cap and spoon the ricotta-spinach mixture generously into the cavity, mounding it slightly.
- Bake the Mushrooms: Arrange the stuffed mushrooms on a baking sheet lined with parchment paper. Bake in the preheated oven for 15-20 minutes, or until the mushrooms are tender and the tops are lightly golden.
- Garnish and Serve: Once baked, remove the mushrooms from the oven and let them cool slightly. Garnish with freshly chopped parsley before serving.
Extra Tips:
For an added layer of flavor, consider mixing in some sautéed onions or sun-dried tomatoes into the ricotta and spinach filling. If you prefer a bit of a kick, a pinch of red pepper flakes can add a nice touch of heat.
Confirm that the mushrooms are similar in size for even cooking. These stuffed mushrooms can be prepared ahead of time and stored in the refrigerator until you’re ready to bake them, making them a convenient option for your holiday meal planning.
One-Pan Herb-Roasted Chicken Thighs
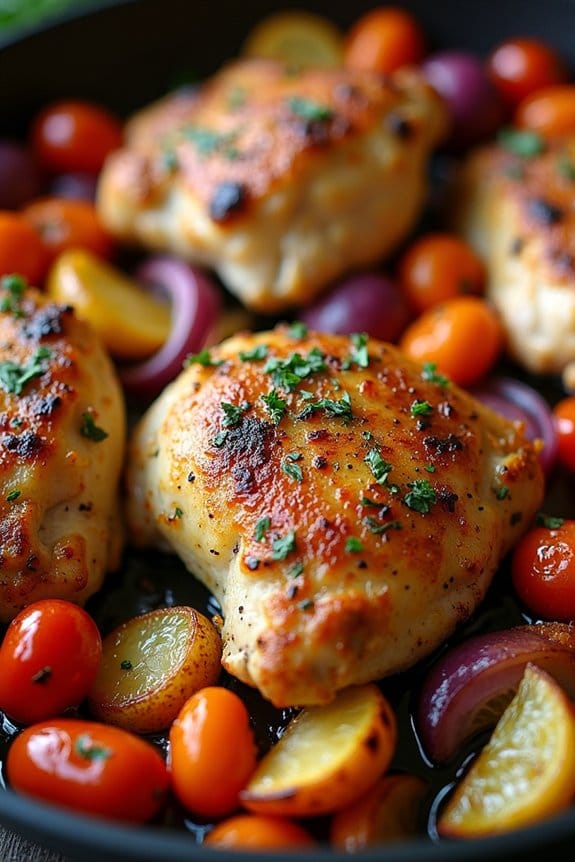
Celebrate the festive season with the comforting and aromatic flavors of One-Pan Herb-Roasted Chicken Thighs. This delightful dish is perfect for a Christmas lunch, combining tender, juicy chicken with a medley of herbs and vegetables, all roasted together to create a harmonious blend of tastes and textures.
The beauty of this recipe lies in its simplicity and convenience, allowing you to prepare a satisfying and impressive meal with minimal cleanup. As the chicken roasts, the herbs infuse every bite with a burst of flavor, making it a surefire hit at your holiday table.
This recipe serves 4-6 people, making it an excellent choice for a family gathering or a smaller festive celebration. The chicken thighs are seasoned generously with a mix of fresh herbs and spices, then roasted alongside a colorful array of vegetables. The result is a beautifully golden and fragrant dish that not only looks stunning but also tastes divine.
This one-pan wonder allows you to spend more time with your loved ones and less time in the kitchen, making it an ideal choice for a stress-free Christmas lunch.
Ingredients:
- 8 chicken thighs, bone-in, skin-on
- 3 tablespoons olive oil
- 1 tablespoon fresh rosemary, chopped
- 1 tablespoon fresh thyme, chopped
- 1 tablespoon fresh parsley, chopped
- 1 teaspoon garlic powder
- 1 teaspoon onion powder
- Salt and pepper to taste
- 1 lemon, cut into wedges
- 4 large carrots, peeled and cut into chunks
- 2 large potatoes, cut into chunks
- 1 large red onion, cut into wedges
- 1 cup cherry tomatoes
- 2 cloves garlic, minced
Cooking Instructions:
- Preheat the Oven: Start by preheating your oven to 400°F (200°C). This guarantees the chicken and vegetables roast evenly and develop a nice, crispy exterior.
- Prepare the Chicken: Pat the chicken thighs dry with paper towels to guarantee the skin becomes crispy during roasting. In a large bowl, combine the chicken thighs with olive oil, rosemary, thyme, parsley, garlic powder, onion powder, salt, and pepper. Toss until the chicken is well coated with the herb mixture.
- Arrange the Ingredients: In a large roasting pan, arrange the seasoned chicken thighs skin-side up. Surround them with the carrot chunks, potato chunks, red onion wedges, cherry tomatoes, and minced garlic. Nestle the lemon wedges among the chicken and vegetables for added flavor.
- Roast the Dish: Place the roasting pan in the preheated oven and roast for approximately 35-45 minutes, or until the chicken reaches an internal temperature of 165°F (74°C) and the vegetables are tender.
- Serve and Enjoy: Once the chicken is cooked through and the vegetables are golden and tender, remove the pan from the oven. Allow it to rest for a few minutes before serving.
Extra Tips:
For the best results, verify the chicken thighs are similar in size for even cooking. You can switch up the vegetables based on what you have on hand or your personal preferences—sweet potatoes or parsnips make excellent additions.
If you prefer your chicken with extra crispiness, broil the dish for the last 2-3 minutes of roasting. Remember to taste and adjust seasoning before serving, and consider garnishing with additional fresh herbs for a burst of color and flavor.
Honey-Glazed Ham With Mustard Sauce

Honey-Glazed Ham With Mustard Sauce is a delightful centerpiece for any Christmas lunch, offering a perfect balance of sweetness and savory flavors. The succulent ham is glazed with a luscious honey mixture, then paired with a tangy mustard sauce that complements its rich taste.
This dish not only brings festive cheer to your table but also allows you to enjoy a gourmet meal with your loved ones. This recipe provides a serving size suitable for 4-6 people, making it ideal for an intimate holiday gathering. Whether you’re hosting a family lunch or a small get-together with friends, this Honey-Glazed Ham With Mustard Sauce is sure to impress your guests with its appealing aroma and mouthwatering taste.
Ingredients:
- 1 bone-in half ham (about 5-6 pounds)
- 1 cup honey
- 1/2 cup brown sugar
- 1/4 cup apple cider vinegar
- 1 tablespoon Dijon mustard
- 1 tablespoon whole-grain mustard
- 1/2 teaspoon ground cloves
- 1/4 teaspoon ground cinnamon
- 1/2 cup water
- Salt and pepper to taste
Cooking Instructions:
- Prepare the Ham: Preheat your oven to 325°F (165°C). Place the ham on a roasting rack in a large roasting pan. Score the surface of the ham in a diamond pattern, being careful not to cut too deep.
- Make the Glaze: In a medium saucepan, combine honey, brown sugar, apple cider vinegar, Dijon mustard, whole-grain mustard, ground cloves, and ground cinnamon. Cook over medium heat until the sugar dissolves and the mixture is well blended, approximately 5 minutes.
- Apply the Glaze: Brush the glaze generously over the entire surface of the ham. Pour 1/2 cup of water into the bottom of the roasting pan to prevent the ham from drying out during cooking.
- Roast the Ham: Cover the ham loosely with foil and transfer to the preheated oven. Roast for about 1.5 to 2 hours, or until the internal temperature reaches 140°F (60°C). Baste the ham with the glaze every 30 minutes for a rich, flavorful crust.
- Prepare the Mustard Sauce: While the ham is roasting, whisk together the remaining glaze with a bit of salt and pepper to taste. Heat gently and serve warm as a dipping sauce alongside the sliced ham.
- Rest and Serve: Once the ham is cooked, remove it from the oven and let it rest for 10-15 minutes before carving. This allows the juices to redistribute, ensuring moist, tender slices. Serve the ham with the mustard sauce on the side.
Extra Tips:
When selecting a ham, look for one that’s pre-cooked for convenience, but make sure it’s not flavored or smoked to avoid conflicting tastes with the glaze.
If you prefer a thicker glaze, simmer it longer to reduce and thicken before applying. Additionally, avoid overcooking the ham, as this can lead to dryness. Use a meat thermometer to check the internal temperature accurately.
For a beautiful presentation, garnish the serving platter with fresh herbs, like rosemary or thyme, for an added touch of color and aroma.
Garlic and Herb Buttered Green Beans
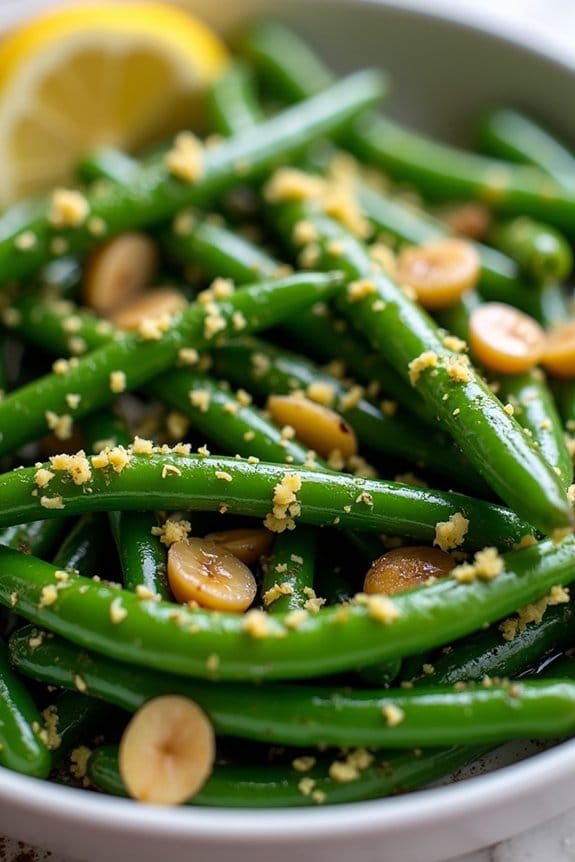
For a festive touch to your Christmas lunch, consider adding Garlic and Herb Buttered Green Beans to your menu. This dish is simple yet elegant, offering a vibrant splash of color and a burst of flavor to complement the heavier components of your holiday spread. The green beans are perfectly cooked to maintain their crisp-tender texture, while the rich butter infused with garlic and fresh herbs elevates them to a crowd-pleaser.
Whether you’re hosting a large gathering or a cozy family meal, this recipe is versatile enough to fit any occasion. The fresh herbs add a fragrant aroma that fills your kitchen with the scents of the season, while the garlic provides a savory depth. Paired with the creamy richness of butter, these green beans become a standout side dish that will have your guests reaching for seconds.
Ingredients for 4-6 servings:
- 1 pound fresh green beans, trimmed
- 3 tablespoons unsalted butter
- 3 cloves garlic, minced
- 1 tablespoon fresh parsley, chopped
- 1 tablespoon fresh thyme, chopped
- Salt and pepper to taste
- Zest of 1 lemon (optional)
Cooking Instructions:
- Prepare the Green Beans: Start by bringing a large pot of salted water to a boil. While waiting, trim the ends of the green beans and rinse them under cold water.
- Blanch the Green Beans: Once the water is boiling, add the green beans and cook for about 3-4 minutes until they turn bright green and are just tender. Immediately drain the beans and plunge them into a bowl of ice water to stop the cooking process and maintain their vibrant color.
- Prepare the Garlic and Herb Butter: In a large skillet, melt the butter over medium heat. Add the minced garlic and sauté for about 1 minute until fragrant. Be careful not to burn the garlic.
- Add the Green Beans: Drain the green beans from the ice water and add them to the skillet. Toss the beans in the garlic butter to coat them evenly.
- Season and Serve: Add the chopped parsley, thyme, salt, and pepper to the skillet. Toss everything together until the herbs are well distributed and the beans are warmed through. For an extra zing, sprinkle lemon zest over the top before serving.
Extra Tips:
To guarantee your green beans maintain their bright color and crisp texture, don’t skip the ice bath; it halts the cooking process effectively. Fresh herbs are recommended for the best flavor, but dried herbs can be used if fresh ones aren’t available—just use half the amount.
If you like a bit of a kick, add a pinch of red pepper flakes during the butter sauté. Finally, make sure your garlic doesn’t burn as it will turn bitter, so keep a close eye when sautéing.
Creamy Mashed Potatoes With Chives

Creamy Mashed Potatoes With Chives is a classic side dish that’s perfect for your Christmas lunch spread. This comforting dish features rich and buttery potatoes mashed to a smooth consistency, enhanced with the subtle flavor of freshly chopped chives. The chives add a touch of freshness and a slight onion-like flavor that complements the creamy texture of the potatoes beautifully.
It’s a simple yet elegant dish that pairs well with any main course, making it a staple for festive gatherings. Whether you’re a seasoned cook or a beginner in the kitchen, this recipe is straightforward and easy to follow. The key to achieving the perfect creamy texture is selecting the right kind of potatoes and guaranteeing they’re cooked to just the right level of tenderness.
Once mashed, the addition of butter, cream, and chives transforms the potatoes into a luxurious side dish that will leave your guests asking for seconds. Prepare to impress your family and friends with this delightful addition to your holiday meal.
Ingredients (Serves 4-6):
- 2 pounds of Yukon Gold potatoes
- 1/2 cup of heavy cream
- 1/4 cup of unsalted butter
- 1/4 cup of chopped fresh chives
- Salt to taste
- Freshly ground black pepper to taste
Cooking Instructions:
- Prepare the Potatoes: Begin by peeling the Yukon Gold potatoes and cutting them into evenly sized chunks. This guarantees that they cook evenly. Place the potato chunks into a large pot and cover them with cold water. Add a generous pinch of salt to the water.
- Cook the Potatoes: Bring the water to a boil over medium-high heat, then reduce the heat to a simmer. Cook the potatoes for about 15-20 minutes, or until they’re fork-tender. You should be able to easily pierce them with a fork without resistance.
- Drain and Steam Dry: Once the potatoes are cooked, drain them in a colander and return them to the hot pot. Let them sit for a few minutes to allow any excess moisture to evaporate. This step helps in achieving a creamier texture.
- Mash the Potatoes: Add the unsalted butter to the hot potatoes and begin mashing them using a potato masher or a ricer for a smoother consistency. Gradually pour in the heavy cream while continuing to mash until you achieve the desired creaminess.
- Season and Add Chives: Season the mashed potatoes with salt and freshly ground black pepper to taste. Gently fold in the chopped fresh chives until they’re evenly distributed throughout the mash.
- Serve: Transfer the creamy mashed potatoes with chives to a serving dish. Garnish with an extra sprinkle of chives on top for a fresh, vibrant touch. Serve hot alongside your Christmas main course.
Extra Tips:
For the best texture, use Yukon Gold potatoes, as they provide a naturally buttery flavor and smooth texture when mashed. Be sure to start with cold water when boiling the potatoes to guarantee even cooking.
If you prefer a richer mash, you can substitute part of the heavy cream with sour cream for a tangy flavor. Additionally, if you don’t have fresh chives, you can use dried chives, but use them sparingly as they’ve a more concentrated flavor.
Easy Sausage and Sage Stuffing

Stuffing is a quintessential part of any Christmas lunch, and this Easy Sausage and Sage Stuffing is sure to delight your guests with its mouthwatering flavors and comforting aroma. Combining the savory richness of sausage with the earthy fragrance of sage, this dish is both satisfying and simple to prepare. Perfectly complementing roast turkey or ham, this stuffing is a versatile side that brings warmth and festive cheer to any holiday table.
This recipe is designed to serve 4-6 people, making it an ideal option for family gatherings or smaller holiday celebrations. With a straightforward list of ingredients and easy-to-follow instructions, even novice cooks can whip up this delectable dish with confidence. Whether you’re an experienced chef or a beginner in the kitchen, this stuffing will elevate your Christmas lunch to new heights of deliciousness.
Ingredients:
- 1 pound ground pork sausage
- 1 large onion, finely chopped
- 2 celery stalks, chopped
- 1 tablespoon fresh sage, chopped (or 1 teaspoon dried sage)
- 1 tablespoon fresh parsley, chopped
- 8 cups cubed day-old bread (preferably rustic or sourdough)
- 2 cups chicken or vegetable broth
- 2 tablespoons unsalted butter, melted
- Salt and pepper to taste
Cooking Instructions:
- Preheat the Oven: Start by preheating your oven to 350°F (175°C). This will guarantee that your stuffing cooks evenly and develops a golden, crispy top.
- Cook the Sausage: In a large skillet over medium heat, cook the ground pork sausage until it’s fully browned. Use a wooden spoon to break up the sausage into small pieces as it cooks. Once done, remove the sausage from the pan and set it aside, retaining the flavorful drippings in the skillet.
- Sauté Vegetables: In the same skillet, add the chopped onion and celery. Sauté until the onions are translucent and the celery is tender, about 5-7 minutes. Stir in the chopped sage and parsley, allowing the herbs to release their aroma and blend with the vegetables.
- Combine Ingredients: In a large mixing bowl, combine the sautéed vegetables, cooked sausage, and bread cubes. Pour in the chicken or vegetable broth and melted butter. Stir gently to combine, making sure that the bread absorbs the liquid and the ingredients are evenly distributed.
- Season and Transfer: Season the mixture with salt and pepper to taste. Transfer the stuffing to a greased baking dish, spreading it out evenly.
- Bake the Stuffing: Place the baking dish in the preheated oven and bake for 30-40 minutes, or until the top is golden brown and the stuffing is heated through. If you prefer a moister stuffing, cover the dish with foil for the first 20 minutes of baking, then remove the foil to allow the top to crisp up.
Extra Tips:
For added flavor, consider incorporating additional ingredients such as dried cranberries, chopped apples, or toasted nuts into the stuffing mixture.
If you like your stuffing extra crispy, spread it out in a thin layer on a large baking sheet rather than a deep dish.
Additionally, using day-old bread is essential as it better absorbs the flavors and moisture from the broth. If your bread is too fresh, you can cube it and dry it out in the oven at a low temperature for a few minutes before using it in the recipe.
Enjoy your festive feast!
Fresh Orange and Pomegranate Salad
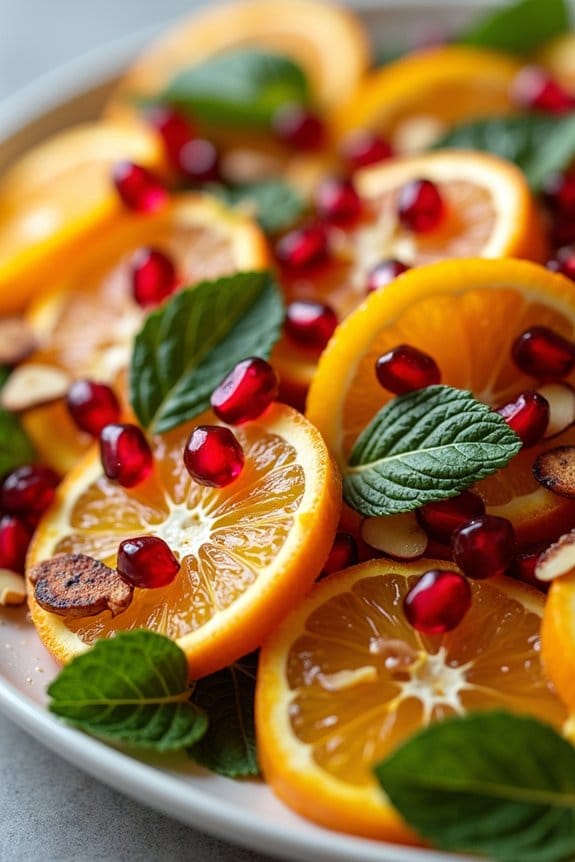
Fresh Orange and Pomegranate Salad is a vibrant and invigorating dish, perfect for adding a burst of color and flavor to your Christmas lunch table. This salad combines juicy oranges and tart pomegranate seeds, offering a delightful balance of sweet and tangy that will tantalize your taste buds.
It’s not only a feast for the palate but also a visual treat, with its bright hues and elegant presentation. The salad is simple to prepare, making it an ideal choice for those who want to spend less time in the kitchen and more time enjoying the festive season with family and friends.
It’s a versatile dish that can be served as an appetizer or a light side dish, complementing a variety of main courses. The combination of fresh citrus and pomegranate isn’t only delicious but also packed with vitamins and antioxidants, making it a healthy addition to your holiday menu.
Ingredients for 4-6 servings:
- 4 large oranges
- 1 cup pomegranate seeds
- 1/4 cup fresh mint leaves
- 1/4 cup sliced almonds
- 2 tablespoons honey
- 1 tablespoon fresh lemon juice
- Pinch of salt
- Pinch of ground cinnamon
Cooking Instructions:
- Prepare the Oranges: Begin by peeling the oranges. Use a sharp knife to carefully remove the peel and all the white pith. Once peeled, slice the oranges crosswise into thin rounds and arrange them on a large serving platter.
- Extract Pomegranate Seeds: Cut the pomegranate in half. Holding each half over a bowl, tap the back with a wooden spoon to release the seeds. Confirm no white pith is mixed with the seeds. You can also purchase pomegranate seeds pre-extracted to save time.
- Assemble the Salad: Evenly scatter the pomegranate seeds over the arranged orange slices. This will add a burst of color and a delightful crunch to each bite.
- Add Fresh Mint and Almonds: Tear the fresh mint leaves by hand and sprinkle them over the salad. Follow this by scattering the sliced almonds over the top for an additional layer of texture and flavor.
- Prepare the Dressing: In a small bowl, whisk together the honey, fresh lemon juice, a pinch of salt, and ground cinnamon until well combined. This dressing will enhance the natural sweetness of the fruit while adding a hint of spice.
- Dress the Salad: Drizzle the honey-lemon dressing evenly over the salad. Confirm that each component of the salad is lightly coated in the dressing to allow the flavors to meld together.
- Serve: Let the salad sit for a few minutes to allow the flavors to develop, then serve it fresh as a beautiful and delicious addition to your Christmas lunch.
Extra Tips:
For the best flavor, use ripe and juicy oranges such as navel or blood oranges. If pomegranates aren’t in season, you can substitute them with dried cranberries or even raspberries for a similar tartness.
Toast the sliced almonds slightly before adding them to the salad to enhance their nuttiness and crunch. This salad can be prepared a few hours in advance; just add the dressing right before serving to keep it fresh and vibrant.
Enjoy this delightful dish as part of your festive spread, and watch it become a new holiday favorite!
No-Bake Eggnog Cheesecake
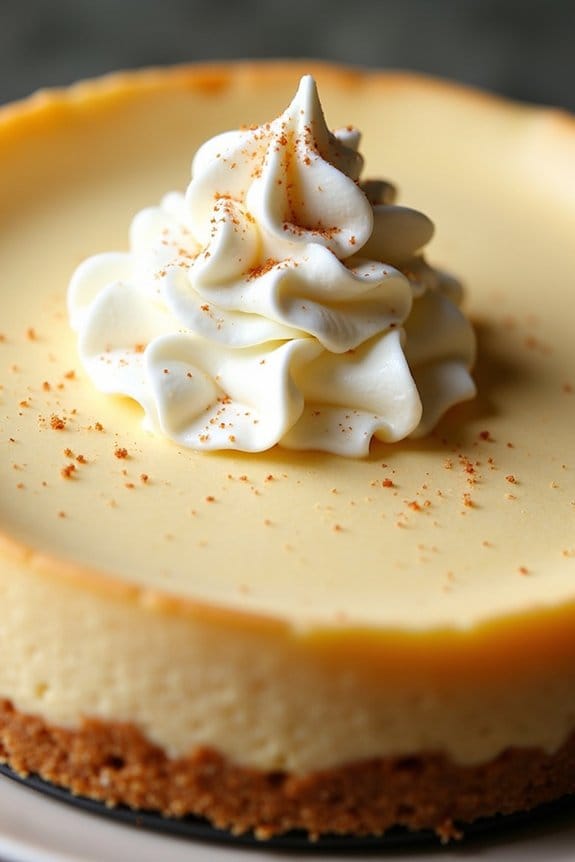
No-Bake Eggnog Cheesecake is a delightful and festive dessert that perfectly captures the essence of the holiday season. This creamy, rich cheesecake is infused with the classic flavors of eggnog, providing a nostalgic taste that will have your guests reminiscing about their favorite Christmas memories. The best part? There’s no need to turn on the oven, making it a simple yet impressive dish to add to your Christmas lunch table.
This cheesecake features a buttery graham cracker crust that provides the perfect foundation for the luscious eggnog-flavored filling. The filling is made with cream cheese, eggnog, and warm spices like nutmeg and cinnamon, creating a perfectly smooth and flavorful dessert. With its velvety texture and festive taste, this No-Bake Eggnog Cheesecake is sure to become a new holiday favorite.
Ingredients (Serves 4-6):
- 1 1/2 cups graham cracker crumbs
- 1/3 cup unsalted butter, melted
- 1/4 cup granulated sugar
- 16 oz cream cheese, softened
- 1 cup eggnog
- 1 cup powdered sugar
- 1 teaspoon vanilla extract
- 1/2 teaspoon ground nutmeg
- 1/4 teaspoon ground cinnamon
- 1 tablespoon unflavored gelatin
- 1/4 cup cold water
- Whipped cream, for garnish
- Additional nutmeg, for garnish
Cooking Instructions:
- Prepare the crust: In a medium bowl, combine the graham cracker crumbs, melted butter, and granulated sugar. Mix until the crumbs are evenly coated with butter. Press the mixture firmly into the bottom of a 9-inch springform pan to form an even crust. Place the crust in the refrigerator to chill while you prepare the filling.
- Dissolve the gelatin: In a small bowl, sprinkle the unflavored gelatin over the cold water. Let it sit for 5 minutes to bloom. Then, microwave the gelatin for about 10-15 seconds until completely dissolved. Set aside to cool slightly.
- Mix the filling: In a large mixing bowl, beat the softened cream cheese with an electric mixer on medium speed until smooth and creamy. Gradually add the eggnog, powdered sugar, vanilla extract, ground nutmeg, and ground cinnamon. Beat until the mixture is well combined and smooth.
- Incorporate the gelatin: Slowly pour the dissolved gelatin into the cream cheese mixture while continuing to beat on low speed. Confirm the gelatin is fully incorporated to help the cheesecake set properly.
- Assemble the cheesecake: Pour the eggnog cheesecake filling over the chilled crust in the springform pan. Smooth the top with a spatula to create an even layer. Cover the pan with plastic wrap and refrigerate for at least 4 hours, or until the cheesecake is set.
- Serve: Once set, remove the cheesecake from the refrigerator. Gently release the springform pan and transfer the cheesecake to a serving platter. Garnish with whipped cream and a sprinkle of additional nutmeg before serving.
Extra Tips:
For the best results, confirm that all your ingredients, especially the cream cheese, are at room temperature before you begin. This will help the mixture blend smoothly without any lumps.
If you prefer a stronger eggnog flavor, you can adjust the amount of nutmeg and cinnamon to your liking. Additionally, if you don’t have a springform pan, use a pie dish or any similar-sized dish, but note that serving might be a bit trickier.
Enjoy your festive creation, and watch it become a hit at your Christmas lunch!
Classic Gingerbread Cookies

Gingerbread cookies are a quintessential treat during the Christmas season, bringing warmth and spice to your holiday celebrations. These classic cookies are perfect for baking with family, decorating with loved ones, or simply enjoying with a hot cup of cocoa. Their delightful combination of molasses, ginger, and cinnamon creates a fragrant aroma that fills the house, inviting festive cheer.
Whether you prefer them soft or with a gentle crunch, gingerbread cookies can be tailored to your liking with this versatile recipe. This recipe yields approximately 24-30 cookies, making it ideal for serving 4-6 people, allowing everyone to indulge in this seasonal favorite. With simple ingredients and straightforward instructions, you can whip up these delicious treats in no time. Get ready to experience the joy of baking and savor the rich flavors that only come from homemade gingerbread cookies.
Ingredients:
- 3 cups all-purpose flour
- 3/4 cup light brown sugar
- 3/4 teaspoon baking soda
- 1 tablespoon ground ginger
- 1 tablespoon ground cinnamon
- 1/2 teaspoon ground cloves
- 1/2 teaspoon salt
- 12 tablespoons (1 1/2 sticks) unsalted butter, softened
- 3/4 cup molasses
- 2 tablespoons milk
- 1 large egg
- 1 teaspoon vanilla extract
Instructions:
- Prepare the Dry Ingredients: In a large mixing bowl, whisk together the flour, brown sugar, baking soda, ground ginger, ground cinnamon, ground cloves, and salt. Confirm the dry ingredients are well combined to distribute the spices evenly throughout the dough.
- Cream the Butter and Molasses: In a separate bowl, using an electric mixer, cream the softened butter and molasses until smooth and creamy. This process helps to incorporate air into the mixture, resulting in a lighter texture for your cookies.
- Combine Wet and Dry Ingredients: Gradually add the dry ingredient mixture to the creamed butter and molasses, mixing on low speed. Once it begins to come together, add the milk, egg, and vanilla extract. Continue mixing until a dough forms.
- Chill the Dough: Divide the dough into two portions, flatten each into a disk, and wrap them in plastic wrap. Chill in the refrigerator for at least 1 hour. Chilling is essential to make the dough easier to roll and cut, and it helps the cookies maintain their shape while baking.
- Preheat the Oven: Preheat your oven to 350°F (175°C). Line two baking sheets with parchment paper to prevent sticking and confirm even baking.
- Roll and Cut the Dough: Remove one disk of dough from the refrigerator. On a lightly floured surface, roll the dough to about 1/4-inch thickness. Use cookie cutters to cut out desired shapes and transfer them to the prepared baking sheets, spacing them about 1 inch apart.
- Bake the Cookies: Bake in the preheated oven for 8-10 minutes, or until the edges are firm and the centers are just set. Be careful not to overbake, as this can result in overly hard cookies.
- Cool and Decorate: Allow the cookies to cool on the baking sheets for a few minutes before transferring them to a wire rack to cool completely. Once cooled, they can be decorated with icing, sprinkles, or left plain for a classic look.
Extra Tips:
For the best results, use fresh spices to confirm your gingerbread cookies have a vibrant and robust flavor. If you prefer softer cookies, slightly underbake them and let them cool on the baking sheet. For crisper cookies, roll the dough a bit thinner and bake for an additional minute.
When cutting out shapes, dip the cookie cutters in flour to prevent sticking. If you plan on decorating with icing, make sure the cookies are completely cooled to prevent the icing from melting. Enjoy the process of baking and decorating these lovely cookies, and don’t hesitate to experiment with different shapes and designs!
Quick Peppermint Chocolate Bark

Quick Peppermint Chocolate Bark is a delightful holiday treat that combines the rich, velvety taste of chocolate with the invigorating zing of peppermint. Perfect for Christmas lunch or as a festive gift, this recipe is both simple and fun to make. The contrasting colors and flavors create a stunning visual and taste experience that will surely impress your guests.
With minimal ingredients and preparation time, this is an ideal recipe for those looking to add a touch of homemade charm to their holiday celebrations. This recipe yields enough bark to serve 4-6 people, making it a great option for a small gathering or as a delicious addition to your holiday dessert table. The peppermint chocolate bark can be enjoyed on its own or paired with other sweet treats for a complete dessert experience.
It’s also a fantastic way to involve kids in the kitchen, as they can help crush the peppermint candies and sprinkle them on top of the chocolate.
Ingredients:
- 12 ounces semisweet chocolate chips
- 12 ounces white chocolate chips
- 1 teaspoon peppermint extract
- 1/2 cup crushed candy canes or peppermint candies
Instructions:
- Prepare the Baking Sheet: Line a baking sheet with parchment paper or a silicone baking mat. This will prevent the chocolate from sticking and make it easy to remove once set.
- Melt the Semisweet Chocolate: In a microwave-safe bowl, melt the semisweet chocolate chips in 30-second intervals, stirring after each interval, until smooth and completely melted. This usually takes about 1 to 1.5 minutes depending on your microwave.
- Spread the Chocolate: Pour the melted semisweet chocolate onto the prepared baking sheet. Use a spatula to spread it evenly to about 1/4 inch thick. Set aside to cool slightly while you prepare the white chocolate.
- Melt the White Chocolate: In another microwave-safe bowl, melt the white chocolate chips in 30-second intervals, stirring after each one, until smooth and fully melted.
- Add Peppermint Flavor: Stir the peppermint extract into the melted white chocolate until well combined.
- Layer the White Chocolate: Drizzle the peppermint-infused white chocolate over the semisweet chocolate layer. Use a toothpick or a knife to swirl the two chocolates together, creating a marbled effect.
- Top with Candy Canes: Immediately sprinkle the crushed candy canes or peppermint candies over the chocolate before it sets. Press slightly with your hands to confirm they stick to the chocolate.
- Set the Bark: Allow the chocolate bark to cool completely at room temperature, or place it in the refrigerator for about 30 minutes to speed up the process.
- Break and Serve: Once set, break the bark into pieces and serve. Enjoy your homemade peppermint chocolate bark!
Extra Tips:
For the best results, confirm that all bowls and utensils are completely dry before melting the chocolate, as even a small drop of water can cause the chocolate to seize.
To achieve a more uniform look, crush the peppermint candies finely, but feel free to leave some larger chunks for added texture.
If you prefer a more intense peppermint flavor, you can increase the peppermint extract slightly—just be cautious, as it can quickly become overpowering.
Store any leftover bark in an airtight container at room temperature for up to two weeks, or freeze for longer storage.
