

Halloween baking does not have to take all day to turn out looking good. These recipes stick to simple steps and ingredients you can find at any store. You will find a mix of cookies, cupcakes, and other treats that fit the season. Each one includes notes on how to keep things quick if you are short on time. They work for school parties, family nights, or just making something fun at home.
Helpful Tips Before You Start
A little prep makes these Halloween recipes easier to pull off.
Measure Everything First
Set out your ingredients before you start mixing. This keeps the process moving without stops.
Use Simple Decorations
Candy eyes, colored sprinkles, and melted chocolate create a festive look fast. They work on cookies, brownies, and cupcakes alike.
Chill the Dough
Many cutout cookie recipes hold their shape better after 30 minutes in the fridge. Skip this step and the edges can blur.
Bake in Batches
Space out your baking over a day or two if the list feels long. Most items store well in airtight containers until the party.
Pumpkin Cheesecake Swirl Brownies
These brownies bring together fudgy chocolate with a creamy pumpkin cheesecake layer that swirls through each square. They make a simple yet eye-catching treat for Halloween gatherings or fall baking days when you want something easy but still special.
The texture stays moist from the pumpkin while the cheesecake adds a light tang that balances the rich cocoa. A small batch keeps things manageable without extra leftovers.
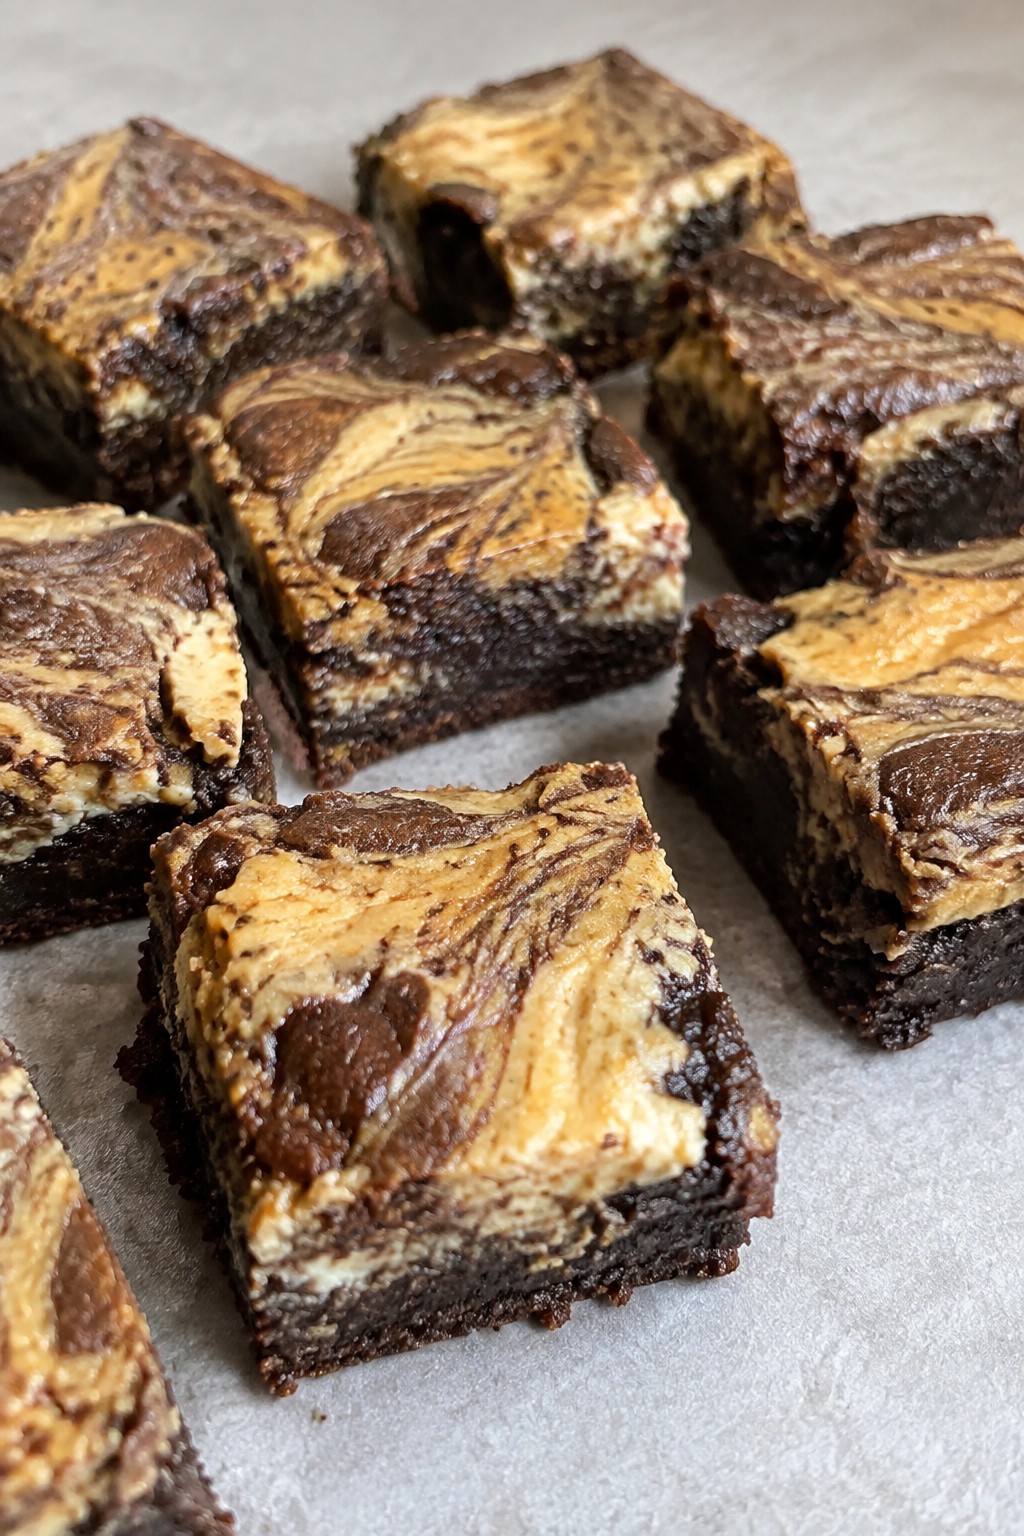
Serves 4 people.
Ingredients
- 4 tablespoons unsalted butter
- 1/2 cup granulated sugar
- 1/4 cup unsweetened cocoa powder
- 1 large egg
- 1/4 cup all-purpose flour
- 1 teaspoon vanilla extract
- 1/4 teaspoon salt
- 1/3 cup pumpkin puree
- 4 ounces cream cheese, softened
- 2 tablespoons powdered sugar
- 1/2 teaspoon pumpkin pie spice
Instructions
- Preheat the oven to 350 degrees and line a small baking pan with parchment paper.
- Melt the butter in a mixing bowl, then stir in the granulated sugar and cocoa powder until smooth.
- Add the egg and vanilla extract, mixing well until combined.
- Stir in the flour and salt to form the brownie batter.
- In a separate bowl, beat the cream cheese with the powdered sugar and pumpkin pie spice until creamy.
- Fold the pumpkin puree into the cream cheese mixture.
- Spread the brownie batter into the prepared pan, then dollop the pumpkin cheesecake mixture on top.
- Use a knife to swirl the two mixtures together gently.
- Bake for 25 to 30 minutes until the edges look set.
- Cool completely before slicing.
Extra Tips
Swirl just enough to create visible streaks without blending the layers fully, which keeps the cheesecake distinct. Store leftovers in the refrigerator to maintain the creamy texture. These brownies travel well if you need a make-ahead option for a party.Course: Dessert Cuisine: American Equipment: Mixing bowls, Whisk, Baking pan
Ghostly Meringue Kisses
These light meringue cookies are shaped into small ghosts and make a fun addition to any Halloween spread. They come together with basic pantry staples and bake into crisp, airy bites that feel festive without much effort. Kids enjoy helping pipe the shapes and add the eyes.
The finished cookies have a delicate crunch on the outside and a soft center that melts quickly. They pair well with other treats on a dessert table or as a simple after-dinner bite.
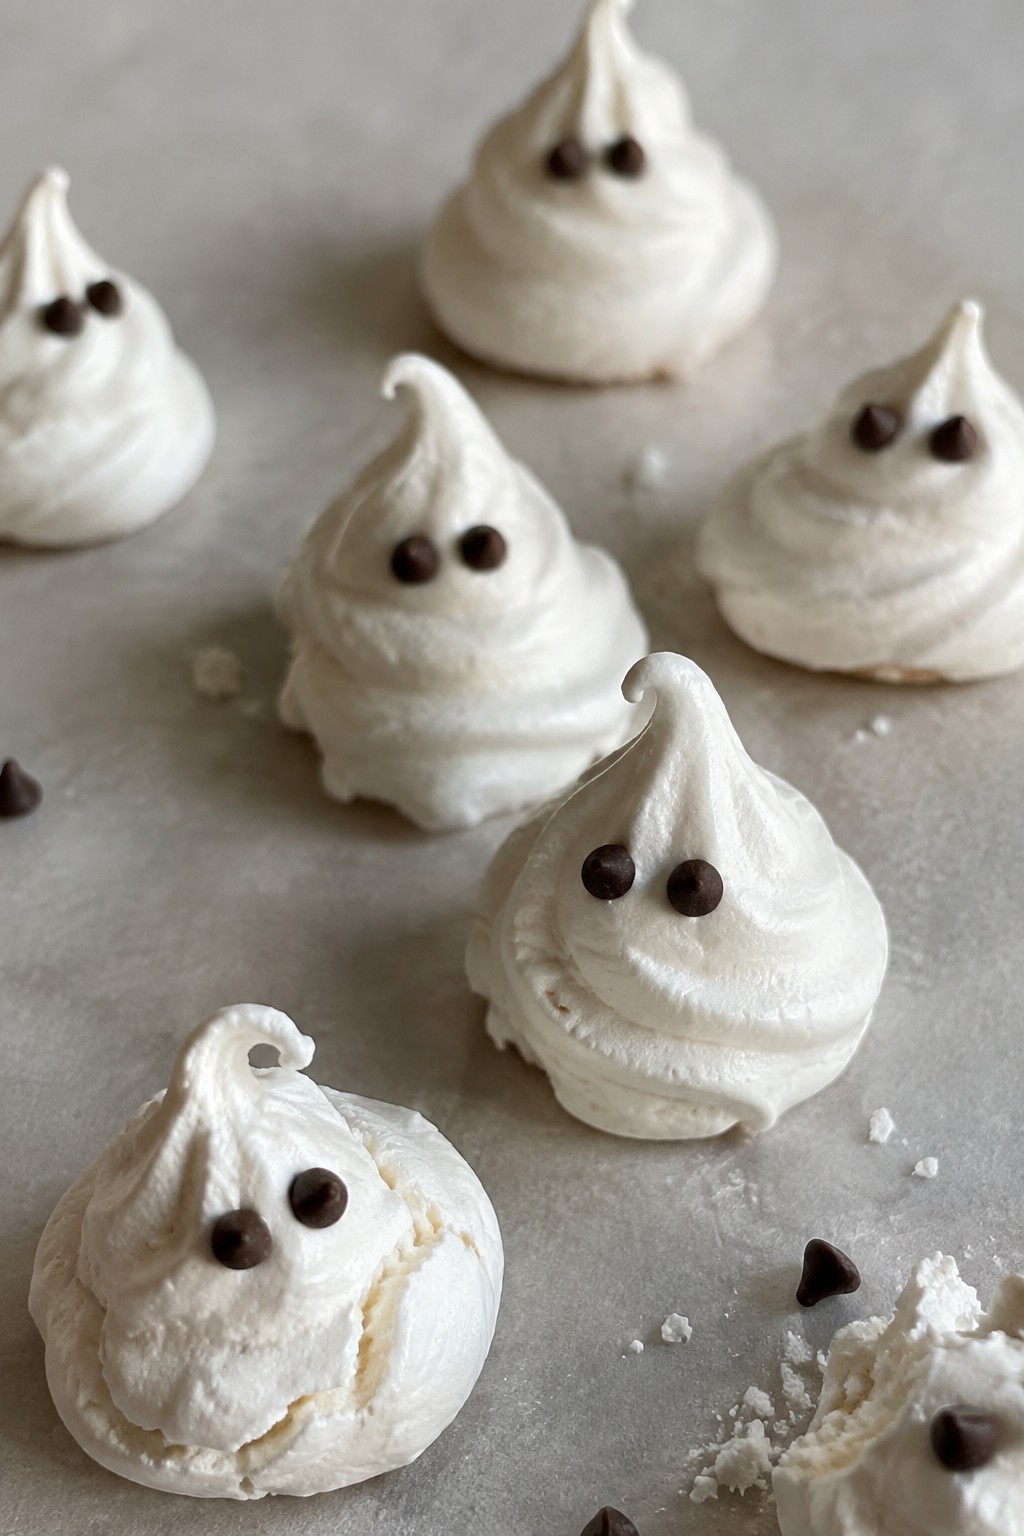
Serves 4 people.
Ingredients
- 2 large egg whites
- 1/2 cup granulated sugar
- 1/4 teaspoon cream of tartar
- 1/2 teaspoon vanilla extract
- 2 tablespoons mini chocolate chips
Instructions
- Preheat the oven to 200 degrees Fahrenheit and line a baking sheet with parchment paper.
- Place the egg whites and cream of tartar in a clean mixing bowl. Beat with an electric mixer on medium speed until soft peaks form.
- Add the sugar one tablespoon at a time while beating on high speed. Continue until the mixture is glossy and holds stiff peaks.
- Mix in the vanilla extract on low speed until just combined.
- Spoon the meringue into a piping bag fitted with a round tip. Pipe small ghost shapes onto the prepared baking sheet.
- Press two mini chocolate chips into each ghost to form eyes.
- Bake for 90 minutes. Turn off the oven and leave the meringues inside to cool completely with the door closed.
Extra Tips
Store the cooled ghosts in an airtight container at room temperature for up to three days. If the meringue feels too soft after piping, let the shapes sit for five minutes before baking to help them hold their form. Avoid making these on humid days, as moisture can soften the crisp texture.Course: Dessert Cuisine: American Equipment: Electric mixer, Piping bag, Baking sheet, Mixing bowl
Witch Finger Almond Biscotti
These witch finger biscotti bring a fun shape to a classic twice-baked cookie. They work well for Halloween parties or as a make-ahead treat you can set out with coffee or hot chocolate. The cookies turn out crisp with a light almond flavor and a satisfying crunch from the nuts.
The dough comes together quickly and gets shaped into individual fingers before the first bake. A second bake crisps them up without much hands-on time.
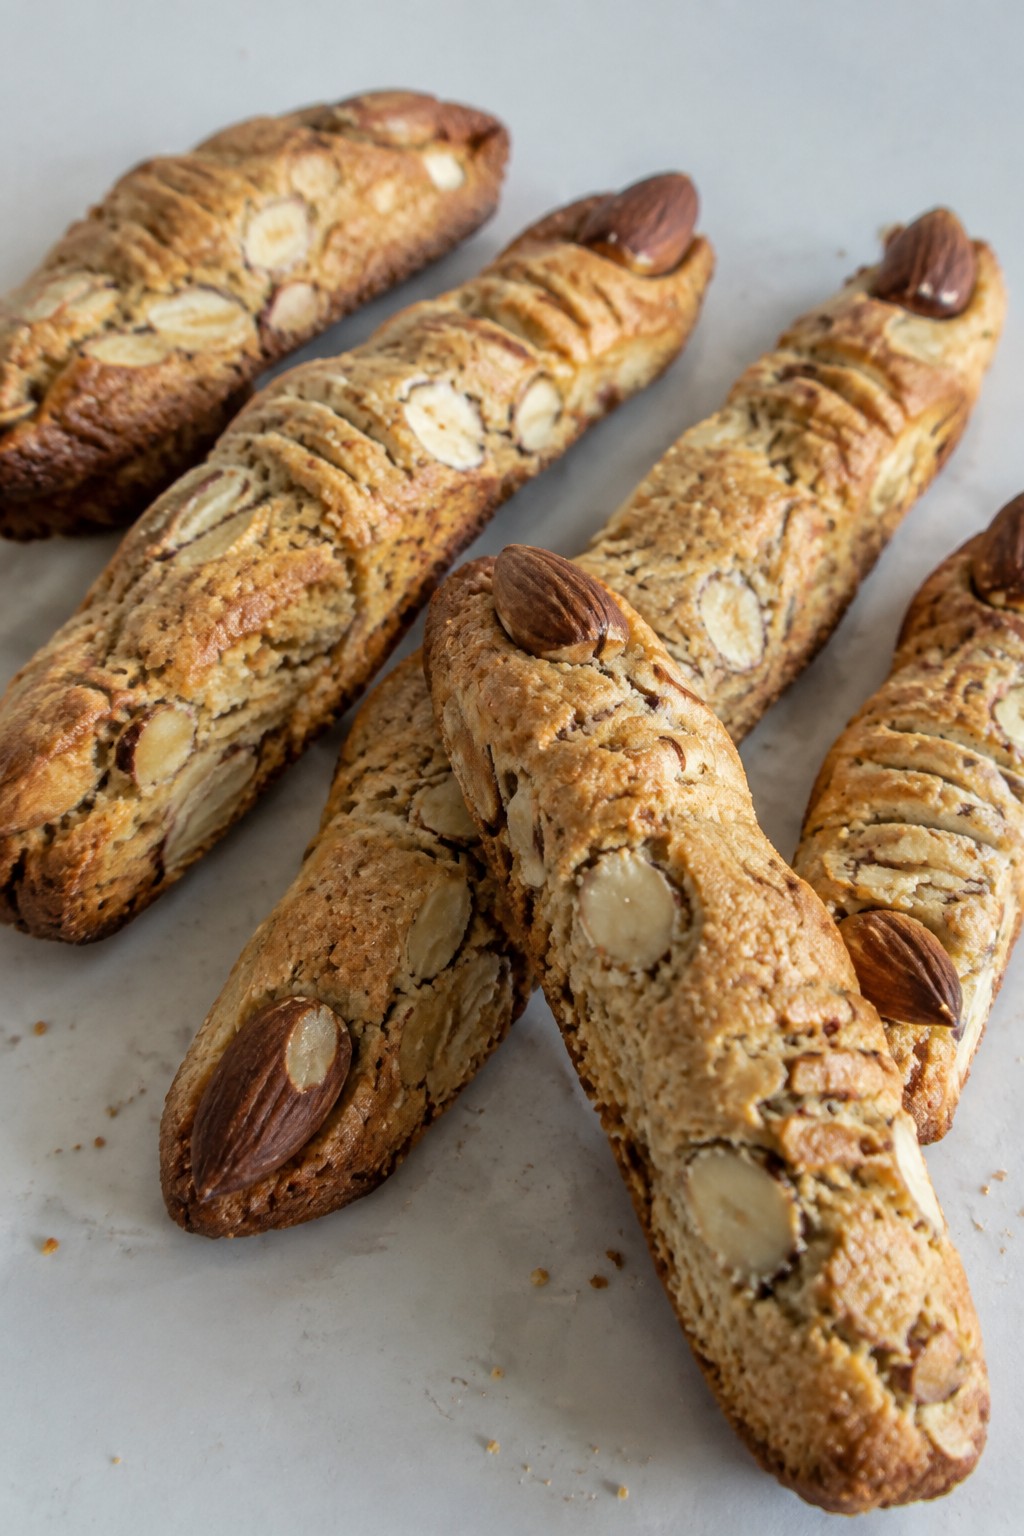
Serves 4 people.
Ingredients
- 1 3/4 cups all-purpose flour
- 3/4 cup granulated sugar
- 1 teaspoon baking powder
- 1/4 teaspoon salt
- 2 large eggs
- 1 teaspoon vanilla extract
- 1/2 teaspoon almond extract
- 1/2 cup sliced almonds
Instructions
- Preheat the oven to 350 degrees and line a baking sheet with parchment paper.
- In a large bowl, stir together the flour, sugar, baking powder, and salt.
- In a separate bowl, whisk the eggs with the vanilla extract and almond extract.
- Pour the wet mixture into the dry ingredients and stir until a stiff dough forms.
- Divide the dough into 12 equal pieces and roll each into a thin finger shape on the baking sheet.
- Press a sliced almond onto the tip of each finger to create a nail.
- Bake for 20 minutes until the fingers are lightly golden.
- Remove the sheet from the oven, let the fingers cool for 5 minutes, then slice them in half if needed for smaller portions.
- Return the pieces to the oven and bake for another 10 minutes to crisp them fully.
- Cool completely on a wire rack before serving.
Extra Tips
Shape the dough while it is still soft so the fingers hold their form without cracking. Store cooled biscotti in an airtight container at room temperature for up to a week. If the dough feels too sticky to roll, lightly flour your hands rather than adding more flour to the mix.Course: Dessert Cuisine: Italian Equipment: Mixing Bowl, Baking Sheet, Parchment Paper, Wire Rack
Spiced Pumpkin Roll Cake
This spiced pumpkin roll cake brings warm fall flavors to any Halloween gathering. The soft pumpkin sponge wraps around a creamy filling for a dessert that looks impressive without much fuss. It works well for a casual party or a quiet night in when you want something seasonal and homemade.
The cake has a tender texture with balanced spices that pair nicely with the sweet cream cheese center. It slices cleanly after a quick chill and holds up well for sharing.
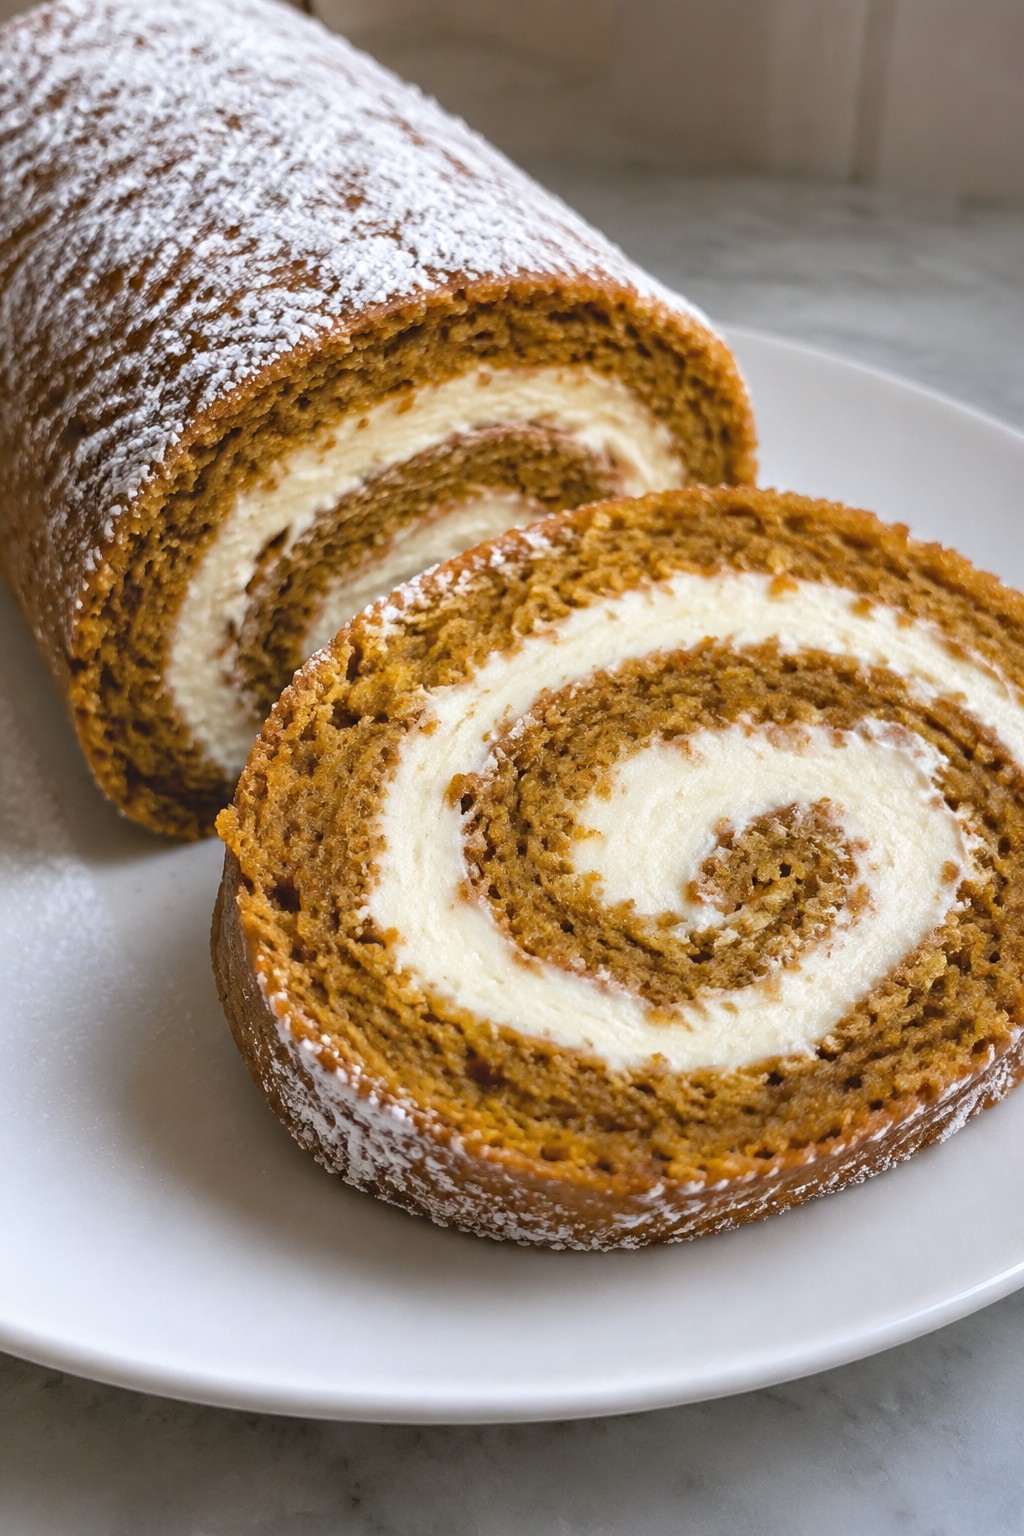
Serves 4 people.
Ingredients
- 1/2 cup pumpkin puree
- 3 large eggs
- 3/4 cup granulated sugar
- 3/4 cup all-purpose flour
- 1 teaspoon baking powder
- 1 teaspoon ground cinnamon
- 1/2 teaspoon ground nutmeg
- 1/4 teaspoon ground ginger
- 1/4 teaspoon ground cloves
- 1/4 teaspoon salt
- 4 ounces cream cheese, softened
- 1/4 cup unsalted butter, softened
- 1 cup powdered sugar
- 1 teaspoon vanilla extract
- 2 tablespoons powdered sugar for dusting
Instructions
- Preheat the oven to 375 degrees and line a baking sheet with parchment paper. In a large bowl, beat the eggs and granulated sugar until light and thick. Stir in the pumpkin puree until smooth.
- In a separate bowl, whisk together the flour, baking powder, cinnamon, nutmeg, ginger, cloves, and salt. Fold the dry ingredients into the pumpkin mixture until just combined.
- Spread the batter evenly onto the prepared baking sheet. Bake for 12 to 14 minutes until the cake springs back when touched.
- While the cake bakes, lay a clean kitchen towel on the counter and dust it with 1 tablespoon of powdered sugar. Turn the hot cake out onto the towel, peel off the parchment, and roll the cake up in the towel from the short end. Let it cool completely.
- Beat the cream cheese, butter, remaining powdered sugar, and vanilla until smooth and fluffy. Unroll the cooled cake, spread the filling evenly over the surface, and roll it back up without the towel.
- Wrap the roll in plastic and chill for at least 30 minutes before slicing. Dust the top with the remaining powdered sugar just before serving.
Extra Tips
Chill the rolled cake fully before slicing to keep the filling from shifting. If the cake cracks slightly during rolling, the filling covers it well once reassembled. Store leftovers wrapped in the fridge for up to two days. For a stronger spice note, add an extra pinch of cinnamon to the filling.Course: Dessert Cuisine: American Equipment: Baking sheet, Parchment paper, Mixing bowls, Electric mixer, Wire rack
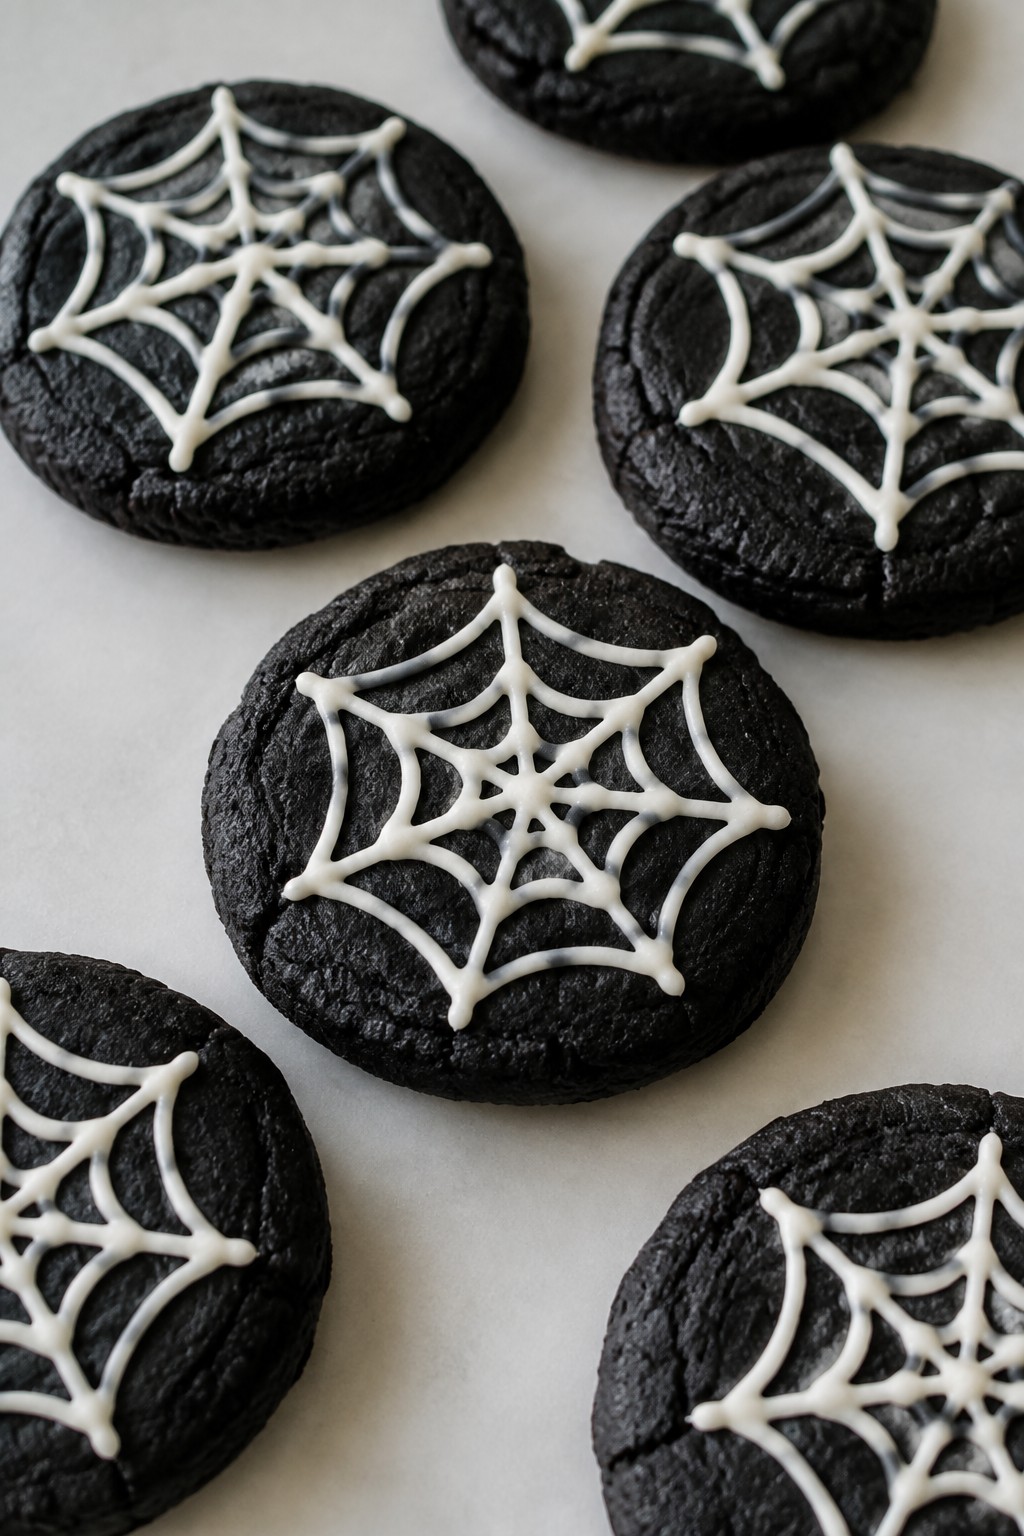
Black Cocoa Spiderweb Cookies
These black cocoa spiderweb cookies stand out on any Halloween dessert table with their deep dark color and simple piped design. They deliver a rich chocolate taste and a crisp edge that softens slightly in the center, making them easy to serve at parties or pack for school events.
The recipe keeps the process straightforward so you can bake a small batch without much fuss. The white icing creates the web effect right on the cooled cookies for a clean finish.
Serves 4 people.
Ingredients
- 1 cup all-purpose flour
- 1/2 cup black cocoa powder
- 1/2 teaspoon baking powder
- 1/4 teaspoon salt
- 1/2 cup unsalted butter, softened
- 1/2 cup granulated sugar
- 1 large egg
- 1 teaspoon vanilla extract
- 1 cup powdered sugar
- 3 tablespoons milk
Instructions
- Preheat the oven to 350 degrees and line a baking sheet with parchment paper.
- Whisk together the flour, black cocoa powder, baking powder, and salt in a mixing bowl.
- In a separate bowl, cream the softened butter and granulated sugar until light. Add the egg and vanilla extract, then mix until smooth.
- Stir the dry ingredients into the wet mixture until a dough forms.
- Roll the dough into small balls, place them on the baking sheet, and flatten each slightly with your hand.
- Bake for 10 to 12 minutes until the edges set. Let the cookies cool completely on the sheet.
- Mix the powdered sugar and milk in a bowl until the icing reaches a pipeable consistency.
- Transfer the icing to a piping bag and pipe concentric circles on each cookie. Drag a toothpick from the center outward to form the web pattern.
Extra Tips
Pipe the icing only after the cookies reach room temperature so the lines stay sharp against the dark surface. Thin the icing with an extra splash of milk if it feels too thick to flow smoothly from the bag. Store cooled cookies in an airtight container at room temperature to keep the crisp edges intact for up to three days.Course: Dessert Cuisine: American Equipment: Mixing Bowl, Baking Sheet, Piping Bag
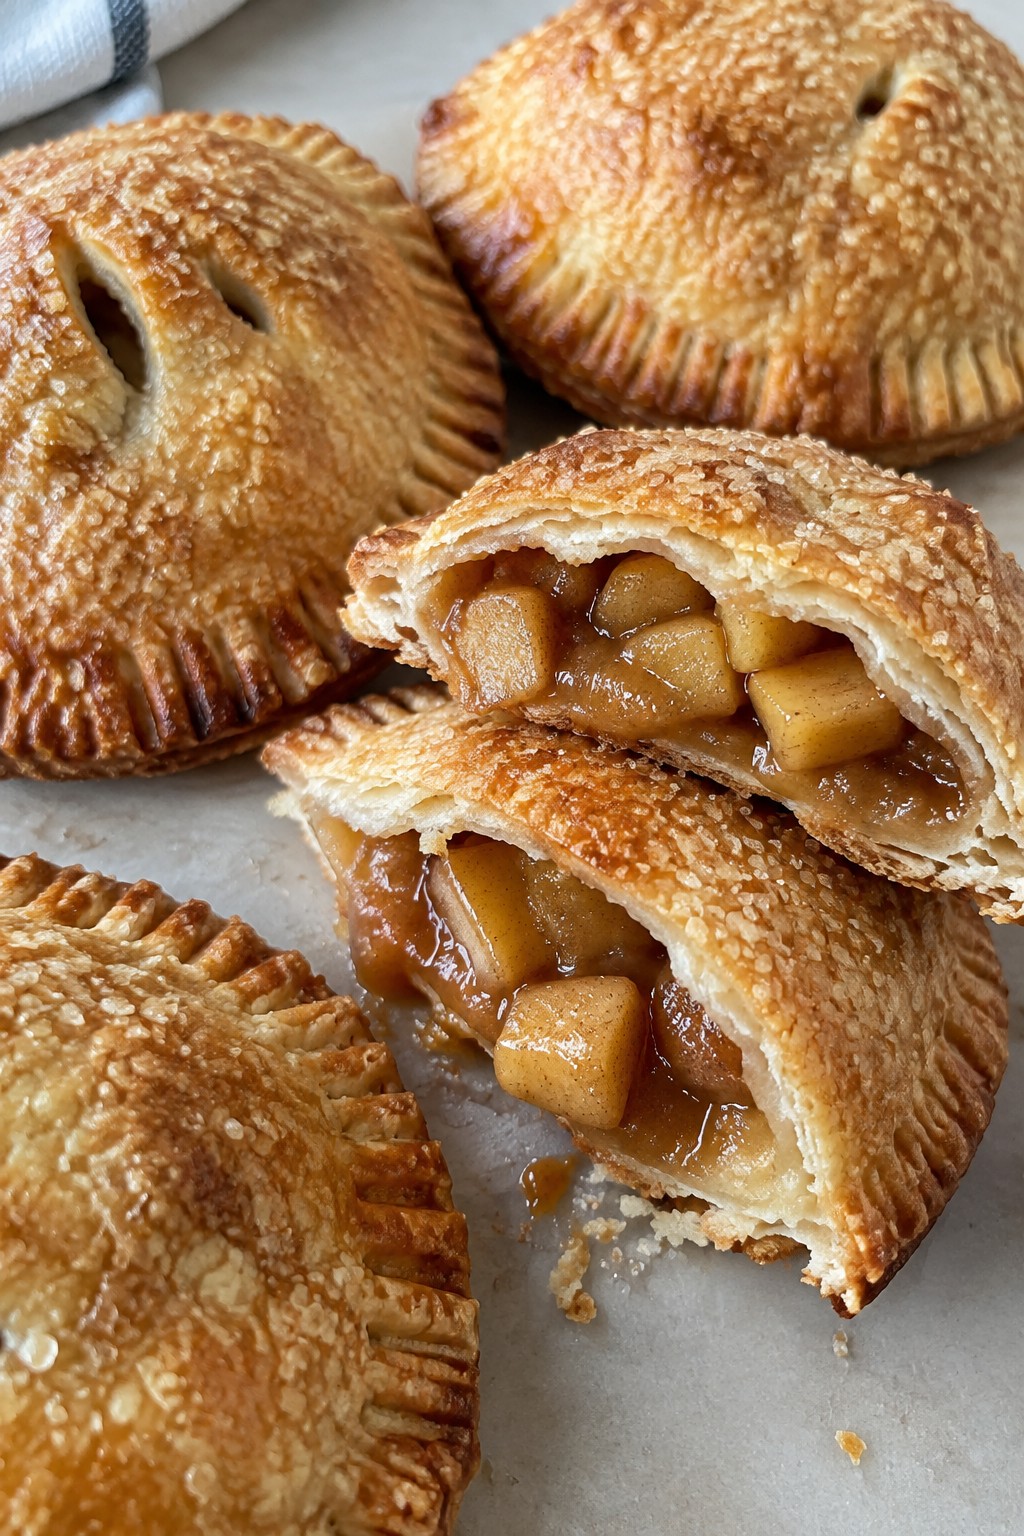
Caramel Apple Hand Pies
These caramel apple hand pies pack the classic fall flavors of sweet apples and rich caramel into a flaky, portable crust. They work well for Halloween gatherings or a simple weekend bake that still feels special. Each bite gives a crisp exterior with a warm, gooey filling that balances tart apple and buttery caramel.
Serves 4 people.
Ingredients
- 1 box refrigerated pie crusts (2 crusts)
- 2 medium apples, peeled, cored, and diced
- 1/4 cup caramel sauce
- 1 teaspoon ground cinnamon
- 2 tablespoons granulated sugar
- 1 large egg
- 1 tablespoon coarse sugar
Instructions
- Preheat the oven to 400 degrees and line a baking sheet with parchment paper.
- Unroll both pie crusts on a lightly floured surface and cut each into two 6-inch circles or squares.
- In a mixing bowl, stir together the diced apples, caramel sauce, cinnamon, and granulated sugar until the apples are evenly coated.
- Place about 1/4 cup of the apple mixture in the center of each crust piece.
- Fold the crust over the filling to form a half-moon or rectangle, then crimp the edges with a fork to seal.
- Beat the egg with 1 tablespoon water and brush the tops of the hand pies.
- Sprinkle coarse sugar over the egg-washed tops.
- Cut a small slit in the top of each pie and bake for 18 to 20 minutes until golden brown.
Extra Tips
Use a firm apple variety so the pieces stay intact after baking. If the caramel sauce is thick, warm it slightly before mixing so it spreads evenly through the filling. These hand pies reheat well in a 350-degree oven for five minutes to restore crispness.Course: Dessert Cuisine: American Equipment: Baking Sheet, Mixing Bowl, Rolling Pin
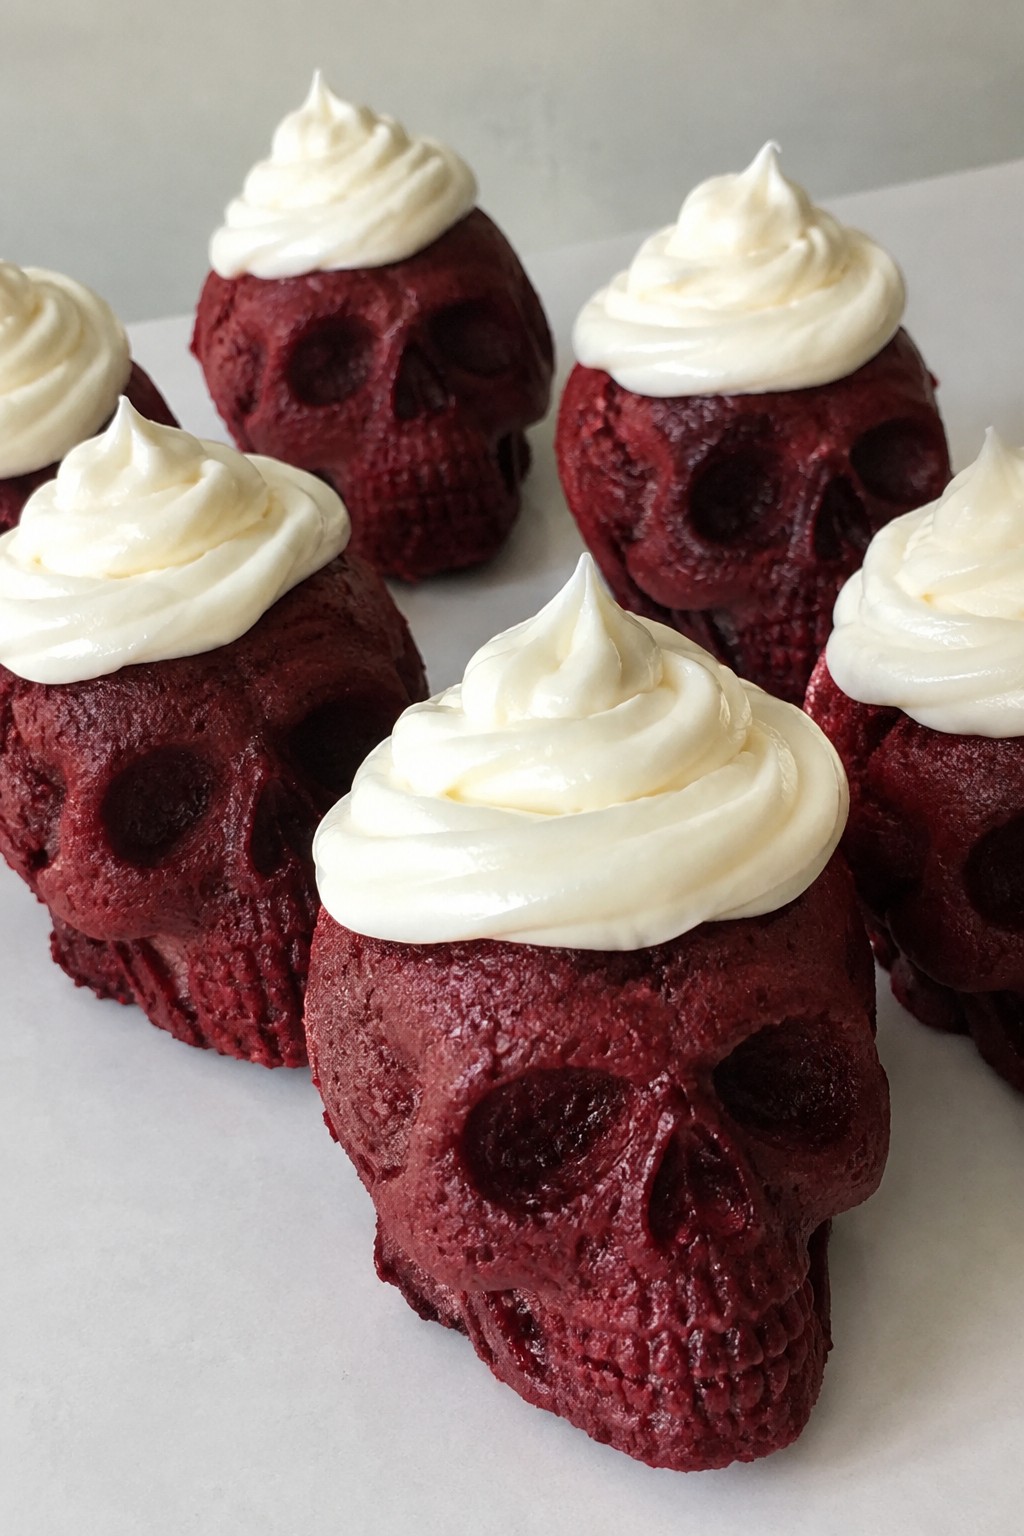
Red Velvet Skull Cupcakes
These cupcakes add a festive Halloween touch with their bold red color and simple cream cheese topping. They suit casual parties or an afternoon baking project with kids. The texture stays moist from the buttermilk while the cocoa gives a mild chocolate note that pairs well with the tangy frosting.
Serves 4 people.
Ingredients
- ½ cup all-purpose flour
- 1 tablespoon unsweetened cocoa powder
- ¼ cup granulated sugar
- ¼ teaspoon salt
- ¼ cup buttermilk
- 1 tablespoon red food coloring
- 2 tablespoons unsalted butter, softened
- 1 large egg yolk
- ½ teaspoon baking soda
- ½ teaspoon white vinegar
- ½ teaspoon vanilla extract
- 4 ounces cream cheese, softened
- 2 tablespoons unsalted butter, softened
- ½ cup powdered sugar
Instructions
- Preheat the oven to 350 degrees and line a cupcake tin with four paper liners.
- In a small bowl, whisk together the flour, cocoa powder, sugar, and salt.
- In another bowl, stir the buttermilk, red food coloring, 2 tablespoons softened butter, egg yolk, and vanilla extract until smooth.
- Add the dry mixture to the wet mixture and stir just until combined.
- In a separate small cup, mix the baking soda and vinegar, then fold this into the batter right away.
- Divide the batter evenly among the four liners and bake for 18 minutes, or until a toothpick comes out clean. Let the cupcakes cool completely on a wire rack.
- While the cupcakes cool, beat the cream cheese, remaining 2 tablespoons butter, powdered sugar, and vanilla extract together until smooth and creamy.
- Spread or pipe the frosting over each cooled cupcake.
Extra Tips
For the skull look, pipe the frosting in simple face shapes using a small round tip or even a zip-top bag with one corner snipped. If the frosting feels too soft, chill it for 10 minutes before decorating. Store leftovers in the fridge in an airtight container for up to two days and let them sit at room temperature for 15 minutes before serving.
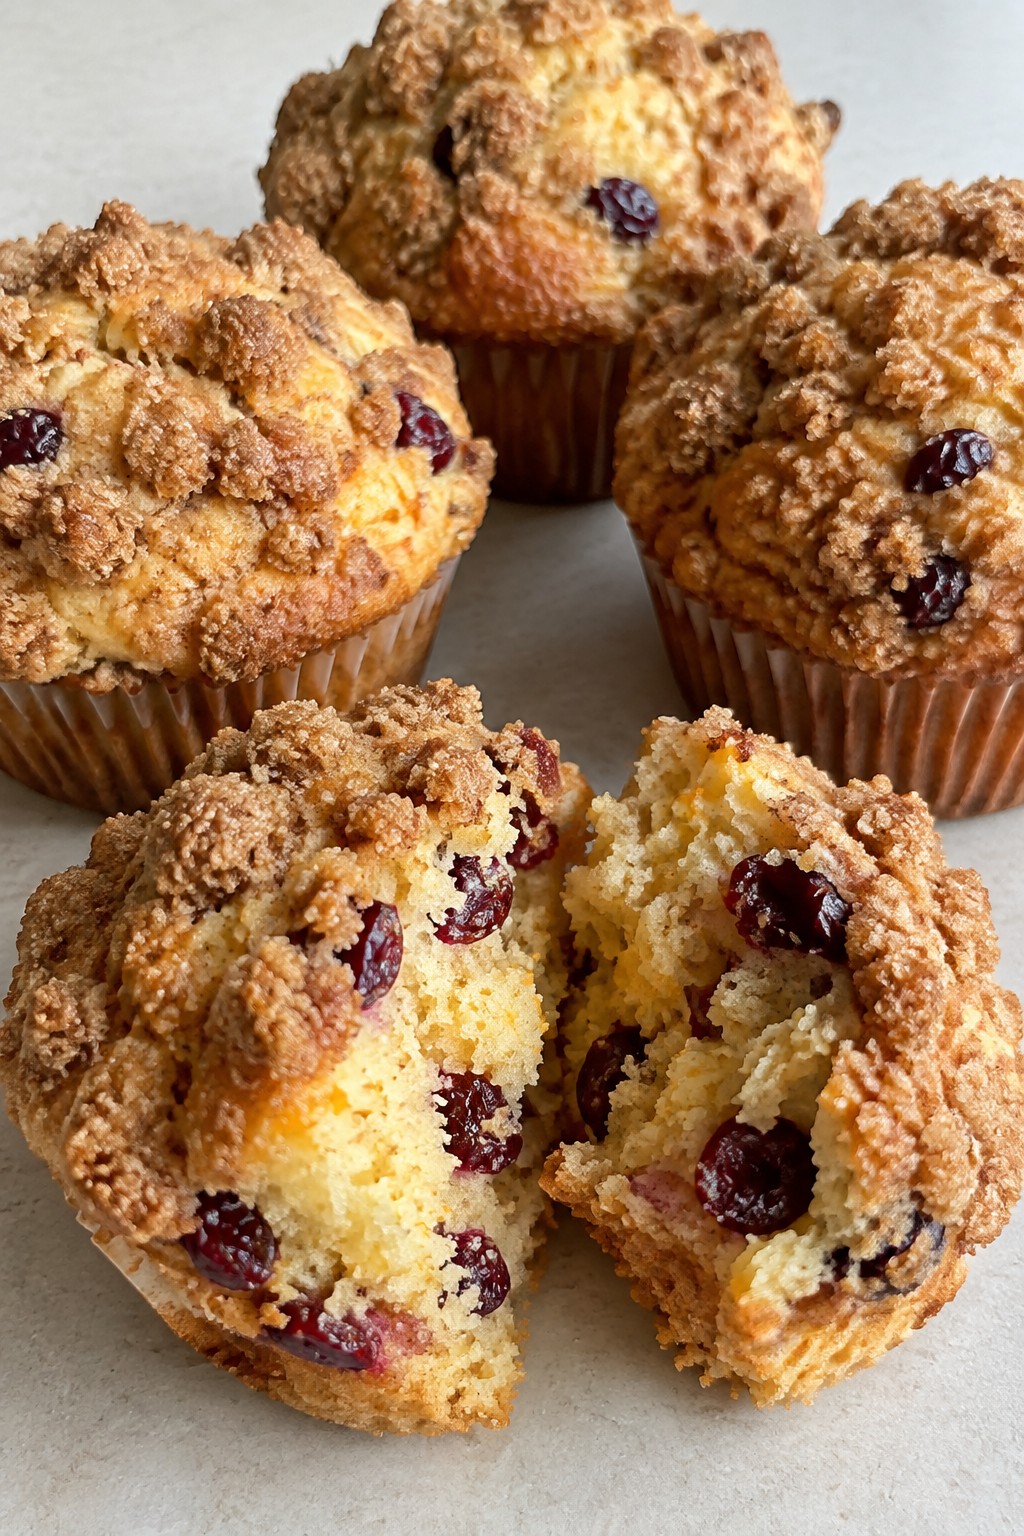
Course: Dessert Cuisine: American Equipment: Mixing bowls, cupcake tin, whisk, wire rackOrange Cranberry Streusel Muffins
These muffins bring bright citrus and tart berries together under a crisp, buttery topping. They work well for Halloween morning gatherings or as a festive addition to a treat table. The orange zest gives a fresh scent while the cranberries add a pleasant chew and the streusel creates a golden crunch on top.
The texture stays moist inside with a slightly crisp edge from the oven. Cranberries and orange balance sweet and tangy notes without needing extra frosting or glaze.
Serves 4 people.
Ingredients
- 1 cup all-purpose flour
- 1/4 cup granulated sugar
- 1 teaspoon baking powder
- 1/4 teaspoon salt
- Zest of 1 orange
- 1/4 cup fresh orange juice
- 1/2 cup dried cranberries
- 1 large egg
- 1/4 cup milk
- 1/4 cup unsalted butter, melted and divided
- 2 tablespoons brown sugar
- 2 tablespoons all-purpose flour (for streusel)
- 1/4 teaspoon ground cinnamon
Instructions
- Preheat the oven to 375°F and line a muffin tin with 4 paper liners.
- In a medium bowl, whisk together 1 cup flour, granulated sugar, baking powder, and salt.
- Stir the orange zest, orange juice, cranberries, egg, milk, and 2 tablespoons of the melted butter into the dry mixture until just combined. Do not overmix.
- In a small bowl, combine the remaining 2 tablespoons melted butter with brown sugar, 2 tablespoons flour, and cinnamon to form the streusel.
- Divide the batter evenly among the 4 muffin liners.
- Sprinkle the streusel mixture over the top of each muffin.
- Bake for 18 to 20 minutes until a toothpick inserted in the center comes out clean.
- Cool the muffins in the tin for 5 minutes before transferring to a rack.
Extra Tips
Use room-temperature egg and milk so the batter mixes smoothly without curdling the butter. If you prefer a stronger orange flavor, add an extra teaspoon of zest to the streusel. These muffins keep in an airtight container at room temperature for two days or freeze well for up to a month.Course: Breakfast Cuisine: American Equipment: Mixing Bowls, Muffin Tin, Whisk, Oven
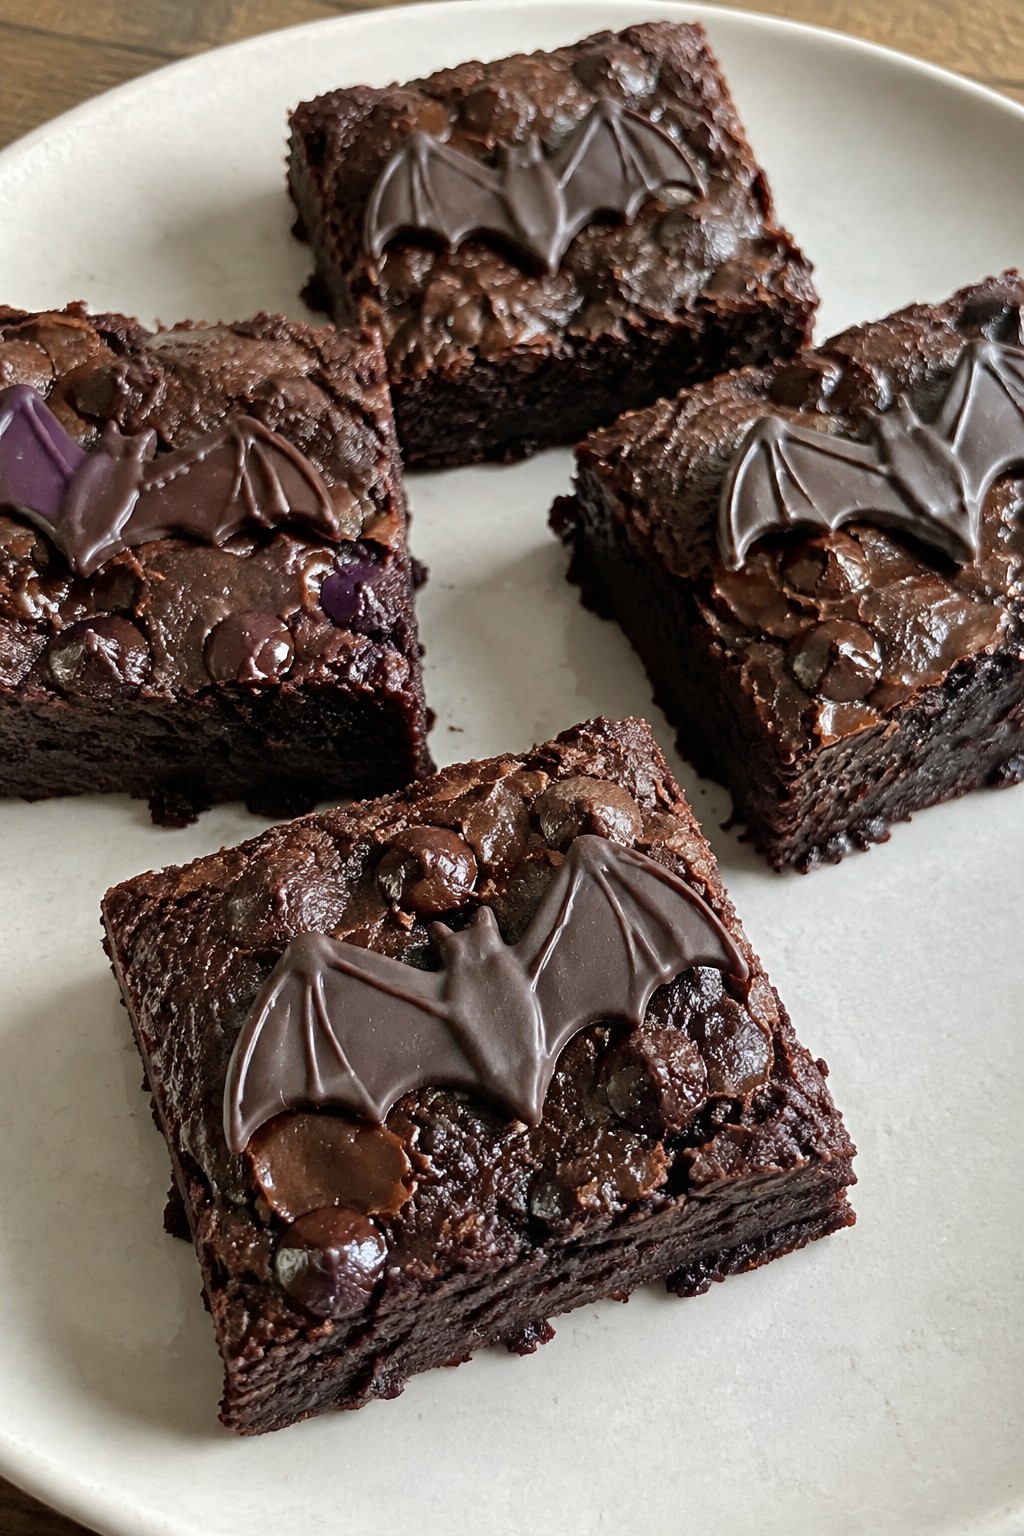
Double Chocolate Bat Wing Brownies
These brownies bring a fun Halloween touch with their double chocolate base and simple bat wing decorations on top. They work well for a small gathering or as a treat to share with family. The texture stays fudgy inside with a slight chew at the edges, and the flavor stays rich from both cocoa and chocolate chips.
They fit easily into a Halloween baking session because the decorations use the same chocolate already in the recipe. No special tools are needed beyond basic kitchen items.
Serves 4 people.
Ingredients
- 1/2 cup unsalted butter
- 1 cup granulated sugar
- 2 large eggs
- 1 teaspoon vanilla extract
- 1/3 cup unsweetened cocoa powder
- 1/2 cup all-purpose flour
- 1/4 teaspoon salt
- 3/4 cup semisweet chocolate chips, divided
Instructions
- Preheat the oven to 350 degrees F and line a small square baking pan with parchment paper.
- Melt the butter in a mixing bowl in the microwave or over low heat on the stove.
- Stir the sugar into the melted butter until combined, then add the eggs and vanilla extract and mix well.
- Add the cocoa powder, flour, and salt to the bowl and stir until the batter is smooth.
- Fold in 1/2 cup of the chocolate chips, then spread the batter evenly in the prepared pan.
- Bake for 20 to 25 minutes until a toothpick comes out with a few moist crumbs.
- Let the brownies cool completely in the pan.
- Melt the remaining 1/4 cup chocolate chips in the microwave in short bursts, stirring until smooth.
- Use a spoon or piping bag to draw small bat wing shapes on top of the cooled brownies with the melted chocolate.
Extra Tips
Cool the brownies fully before adding the chocolate wings so they hold their shape. If the chocolate thickens while piping, warm it for a few seconds to loosen it again. Store leftovers in an airtight container at room temperature for up to three days.Course: Dessert Cuisine: American Equipment: Mixing Bowl, Baking Pan, Microwave
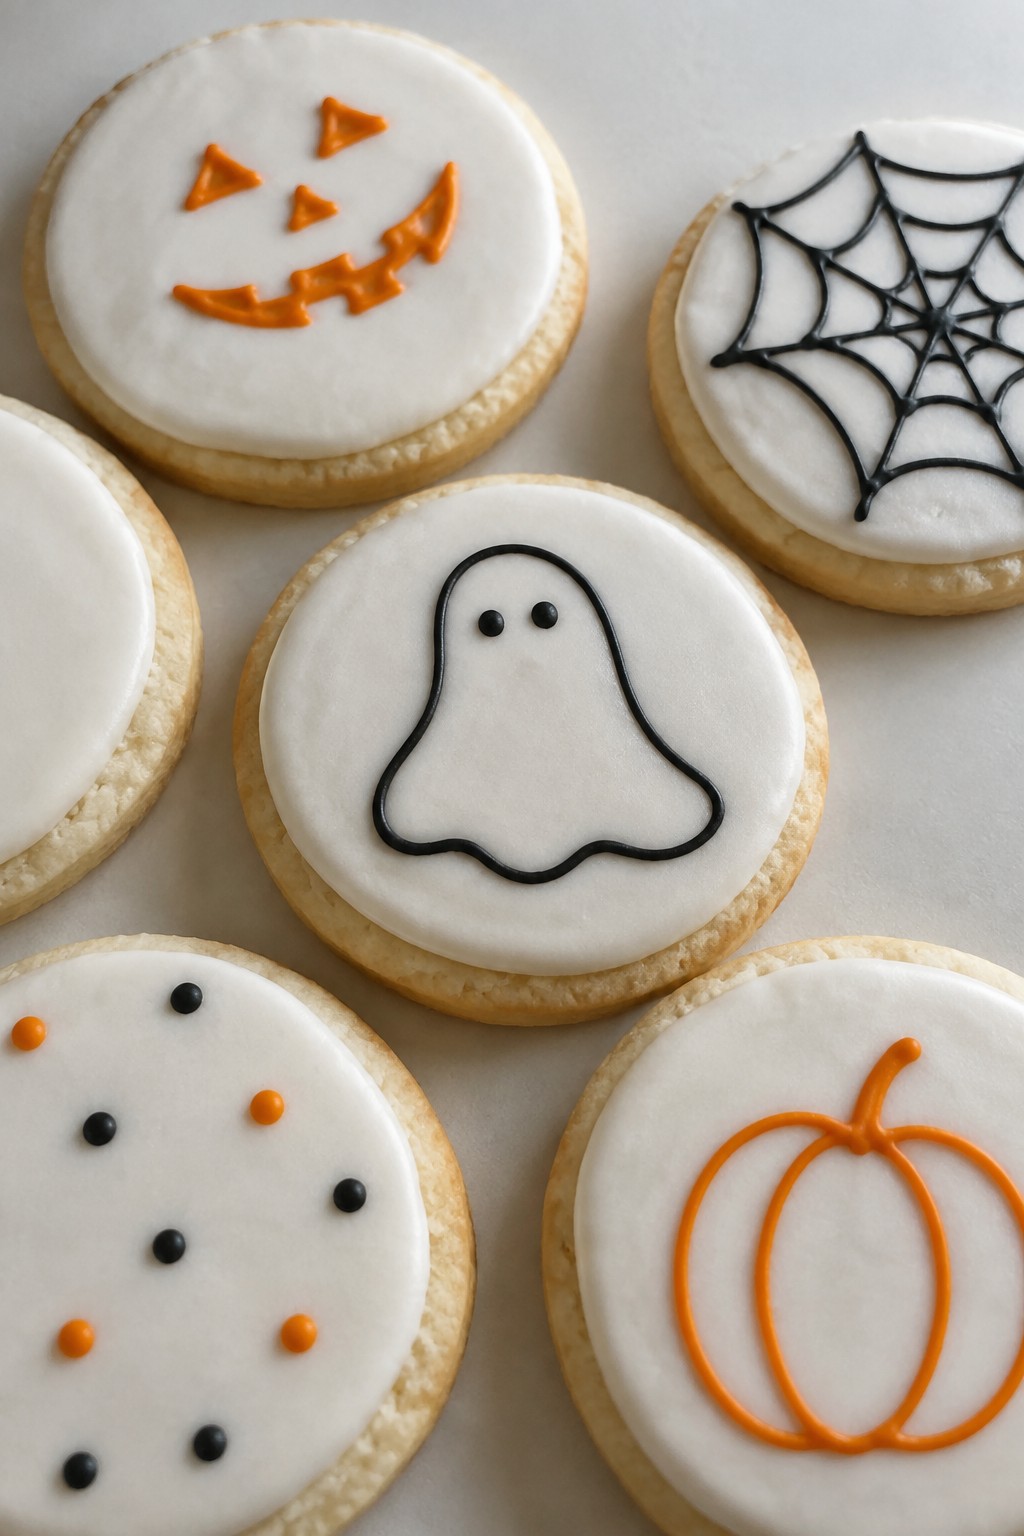
Vanilla Sugar Cookies with Royal Icing
These vanilla sugar cookies with royal icing give you a simple way to make Halloween treats that still look polished. The cookies bake up with a light vanilla taste and a texture that holds its shape after decorating. They fit well for parties or as small gifts when you want something homemade but not too fussy.
The royal icing dries to a firm surface so the cookies stack or travel without smearing. You can keep the designs basic or add a few Halloween touches with color.
Serves 4 people.
Ingredients
- 1/2 cup unsalted butter, softened
- 3/4 cup granulated sugar
- 1 large egg
- 2 teaspoons vanilla extract
- 2 cups all-purpose flour
- 1 teaspoon baking powder
- 1/4 teaspoon salt
- 1 1/2 cups powdered sugar
- 3 tablespoons milk
Instructions
- Heat the oven to 350 degrees and line a baking sheet with parchment paper.
- In a mixing bowl, beat the butter and granulated sugar until light and creamy.
- Add the egg and 1 teaspoon of the vanilla extract, then mix until combined.
- Stir in the flour, baking powder, and salt until a soft dough forms.
- Roll the dough to about 1/4 inch thick on a lightly floured surface and cut into shapes.
- Place the cut cookies on the baking sheet and bake for 8 to 10 minutes until the edges are lightly golden.
- Let the cookies cool completely on a wire rack.
- In a clean bowl, whisk the powdered sugar, milk, and remaining teaspoon of vanilla extract until smooth.
- Spread or pipe the icing over the cooled cookies and let it set before serving.
Extra Tips
Keep the icing thick enough to hold lines but thin enough to spread smoothly. If it feels too loose, add a little more powdered sugar one tablespoon at a time. Store finished cookies in a single layer in an airtight container so the icing stays intact.Course: Dessert Cuisine: American Equipment: Mixing Bowl, Baking Sheet, Oven
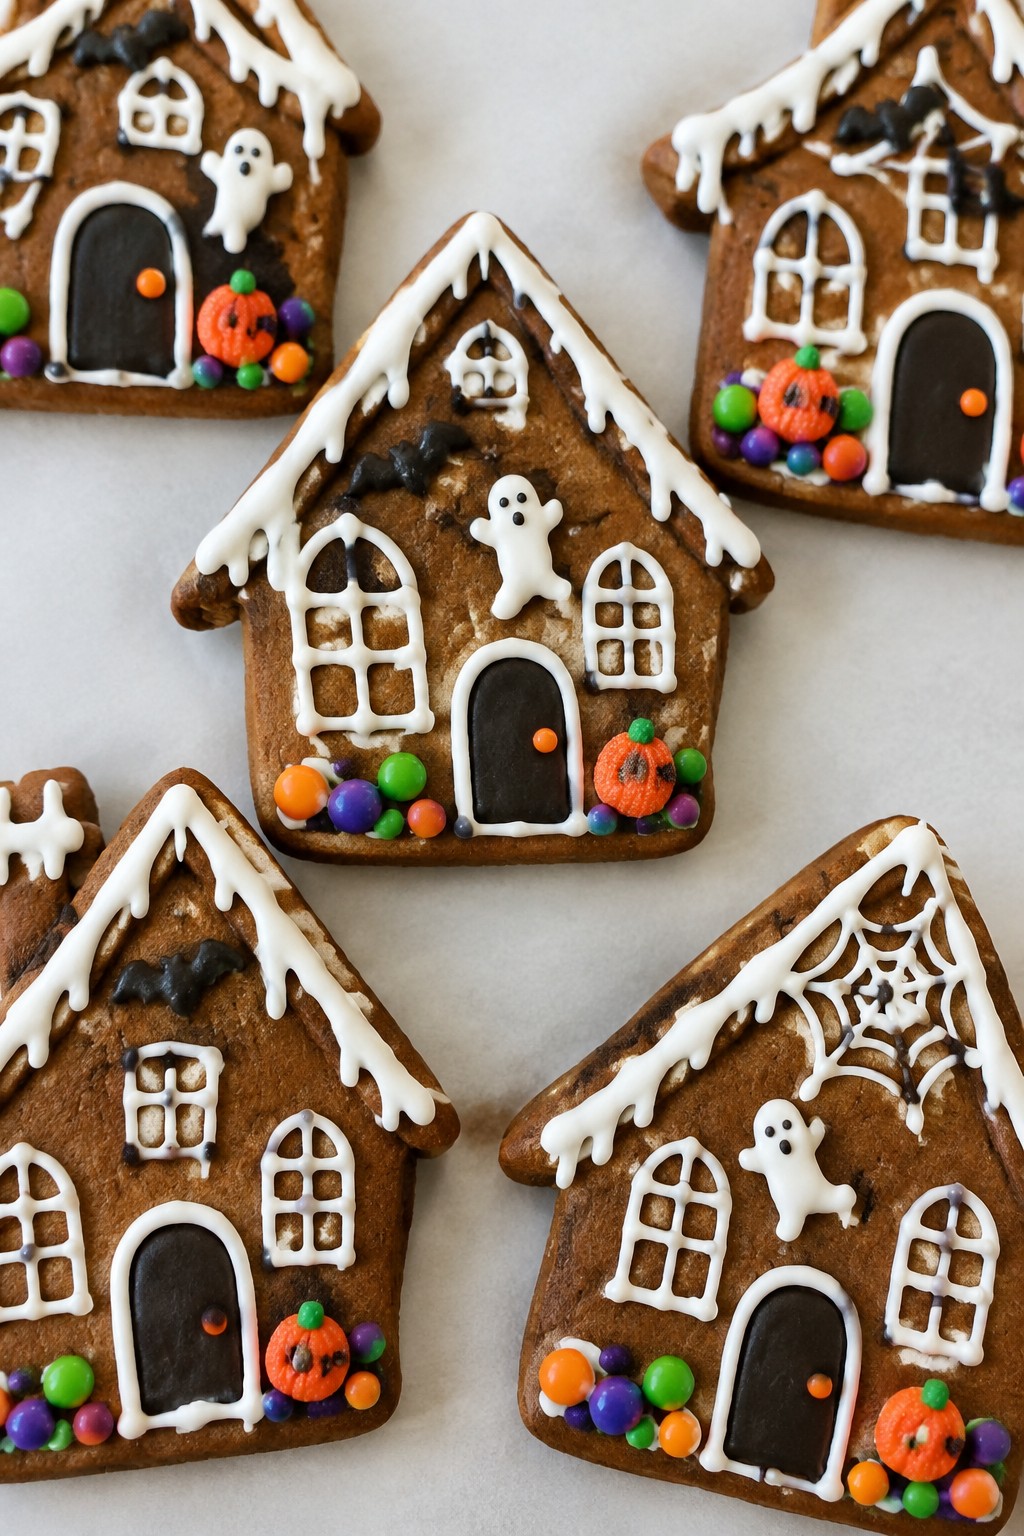
Gingerbread Haunted House Cookies
These gingerbread haunted house cookies turn a classic spiced dough into a fun Halloween project. The shapes and decorations make them stand out at parties or as a weekend bake with kids.
The cookies come out crisp on the edges with a chewy center and warm notes of ginger and molasses. Simple royal icing lets you create windows, doors, and spooky details with ease.
Serves 4 people.
Ingredients
- 2 cups all-purpose flour
- 2 teaspoons ground ginger
- 1 teaspoon ground cinnamon
- 1/2 teaspoon baking soda
- 1/4 teaspoon salt
- 1/2 cup unsalted butter, softened
- 3/4 cup brown sugar
- 1/3 cup molasses
- 1 large egg
- 1 teaspoon vanilla extract
- 1 1/2 cups powdered sugar
- 2 tablespoons water
- Assorted Halloween candies
Instructions
- Whisk the flour, ginger, cinnamon, baking soda, and salt in a bowl until evenly combined.
- In a separate bowl, beat the softened butter and brown sugar until light and fluffy.
- Add the molasses, egg, and vanilla extract to the butter mixture and mix until smooth.
- Gradually stir the dry ingredients into the wet ingredients until a dough forms.
- Divide the dough in half, wrap each portion, and chill for 30 minutes.
- Roll one portion of dough to 1/4-inch thickness on a floured surface and cut into house shapes.
- Place the shapes on a baking sheet and bake at 350°F for 10 to 12 minutes until the edges are firm.
- Cool the cookies completely on a wire rack.
- Stir the powdered sugar and water together until the icing reaches a pipeable consistency.
- Pipe outlines and details on each cookie to form haunted house features, then press candies into the icing while it is still wet.
Extra Tips
Chill the dough a little longer if your kitchen is warm to keep the house shapes sharp during cutting. Adjust the icing with a few drops of extra water if it feels too thick for fine lines like window frames.Course: Dessert Cuisine: American Equipment: Mixing bowls, Baking sheet, Rolling pin, Wire rack
Blood Orange Olive Oil Loaf Cake
This loaf cake brings a bright citrus note to Halloween baking with its deep red-orange hue from blood oranges. The olive oil keeps the crumb moist and tender without any heaviness. It works well as a simple dessert for parties or a treat to share with friends during the fall season.
The flavor balances sweet sugar with tangy juice and a light olive oil finish. Blood oranges give it a striking color that fits the holiday without extra dyes or decorations.

Serves 4 people.
Ingredients
- 1 1/2 cups all-purpose flour
- 1 teaspoon baking powder
- 1/2 teaspoon salt
- 3/4 cup granulated sugar
- 2 large eggs
- 1/2 cup extra virgin olive oil
- Zest and juice from 2 blood oranges
- 1 teaspoon vanilla extract
- 1/4 cup powdered sugar
Instructions
- Preheat the oven to 350 degrees Fahrenheit and line a small loaf pan with parchment paper.
- In a mixing bowl, whisk together the flour, baking powder, and salt until evenly combined.
- In a second bowl, beat the eggs with the granulated sugar until smooth and slightly pale.
- Slowly pour the olive oil into the egg mixture while whisking to keep it emulsified.
- Add the blood orange zest, juice, and vanilla extract to the wet ingredients and stir until incorporated.
- Fold the dry ingredients into the wet mixture in two additions, stirring just until no flour streaks remain.
- Pour the batter into the prepared loaf pan and smooth the top.
- Bake for 40 to 45 minutes until a toothpick inserted in the center comes out clean.
- Let the cake cool in the pan for 15 minutes, then lift it out to cool fully on a wire rack.
- Dust the cooled cake with powdered sugar before slicing.
Extra Tips
Use room temperature eggs to help the batter come together smoothly. Blood orange juice can vary in sweetness, so taste a drop before adding it and adjust the sugar slightly if needed. Store leftovers wrapped at room temperature for up to two days to keep the olive oil texture intact.Course: Dessert Cuisine: Mediterranean Equipment: Loaf pan, Mixing bowls, Whisk, Oven
Monster Green Velvet Whoopie Pies
These whoopie pies bring a fun twist to classic velvet cake with a bright green hue that fits right into Halloween spreads. They work well for parties or after-school treats because they come together quickly and look playful without much extra effort. The texture stays soft and cake-like with a tangy cream cheese filling that balances the mild cocoa flavor.

Serves 4 people.
Ingredients
- 1 cup all-purpose flour
- 1/4 cup unsweetened cocoa powder
- 1/2 teaspoon baking soda
- 1/4 teaspoon salt
- 1/2 cup granulated sugar
- 1/4 cup vegetable oil
- 1 large egg
- 1/4 cup buttermilk
- 2 teaspoons vanilla extract
- 1 tablespoon green food coloring
- 4 ounces cream cheese, softened
- 2 tablespoons unsalted butter, softened
- 1 cup powdered sugar
- Candy eyes for decoration
Instructions
- Preheat the oven to 350 degrees and line a baking sheet with parchment paper. Whisk the flour, cocoa powder, baking soda, and salt in a medium bowl.
- In a separate bowl, mix the granulated sugar, vegetable oil, egg, buttermilk, 1 teaspoon vanilla, and green food coloring until smooth. Add the dry ingredients and stir until just combined.
- Drop rounded tablespoons of batter onto the baking sheet, spacing them 2 inches apart. Bake for 10 to 12 minutes until the tops spring back when touched. Cool completely on a wire rack.
- Beat the cream cheese, butter, powdered sugar, and remaining teaspoon of vanilla until light and fluffy. Spread the filling on the flat side of half the cookies.
- Top each with a second cookie and press gently. Add candy eyes to the tops while the filling is still soft.
Extra Tips
Use gel food coloring for a deeper green without thinning the batter. Store assembled whoopie pies in an airtight container in the fridge for up to two days. Let them sit at room temperature for 10 minutes before serving so the filling softens.Course: Dessert Cuisine: American Equipment: Mixing Bowls, Baking Sheet, Electric Mixer
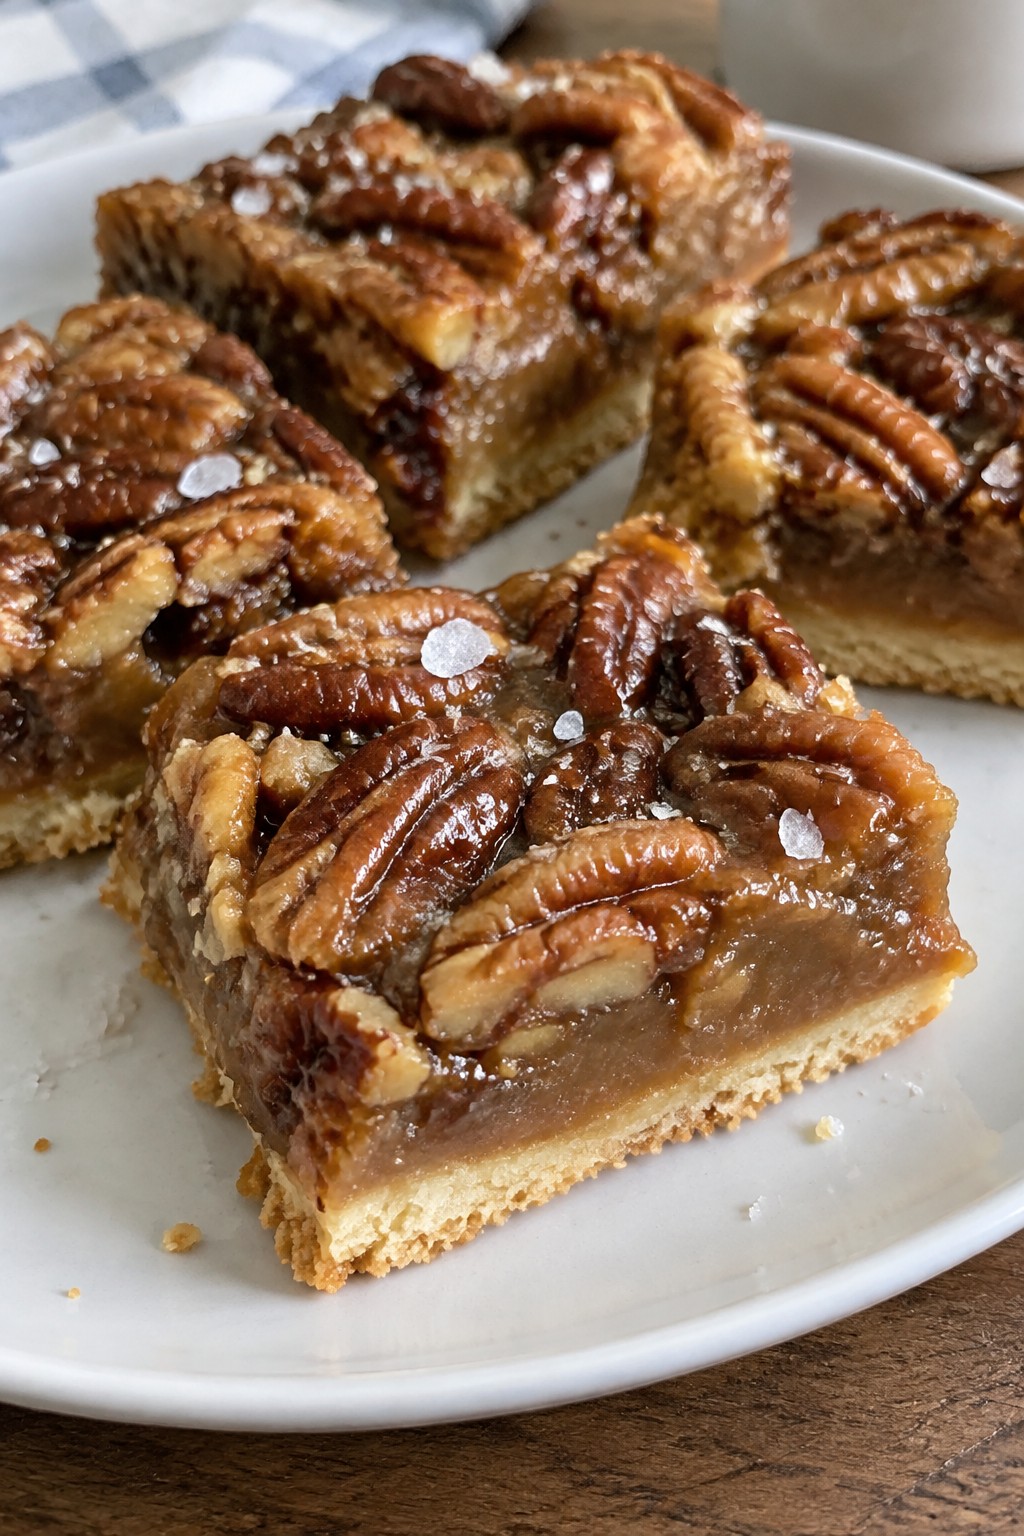
Salted Caramel Pecan Pie Bars
These Salted Caramel Pecan Pie Bars offer a sweet and salty take on pecan pie in easy bar form. They suit Halloween parties or fall gatherings when you want something that looks special but stays simple to make. The buttery crust supports a sticky caramel layer filled with toasted pecans and finished with a light sea salt sprinkle.
The result gives a crisp base, chewy caramel, and plenty of nut crunch in each bite. They travel well to events and hold up nicely on a dessert table.
Serves 4 people.
Ingredients
- 1 cup all-purpose flour
- ½ cup unsalted butter, softened
- ¼ cup brown sugar
- ¼ teaspoon salt
- ¾ cup pecan halves
- ½ cup granulated sugar
- 3 tablespoons heavy cream
- 2 tablespoons unsalted butter
- ½ teaspoon vanilla extract
- Flaky sea salt for topping
Instructions
- Heat the oven to 350°F and line an 8×8 baking pan with parchment paper.
- Mix the flour, ½ cup softened butter, brown sugar, and ¼ teaspoon salt in a bowl until a crumbly dough forms.
- Press the dough evenly into the bottom of the prepared pan and bake for 15 minutes until the edges turn light golden.
- While the crust bakes, spread the pecan halves on a baking sheet and toast them in the oven for 8 minutes, then set aside.
- In a small saucepan, combine the granulated sugar with 2 tablespoons butter over medium heat, stirring until the mixture turns amber and smooth.
- Remove the pan from heat and carefully stir in the heavy cream and vanilla extract until the caramel thickens slightly.
- Fold the toasted pecans into the caramel, then pour the mixture over the warm crust and spread it evenly.
- Return the pan to the oven and bake for 20 minutes until the filling bubbles at the edges.
- Remove from the oven, sprinkle with flaky sea salt, and let the bars cool completely in the pan before cutting.
Extra Tips
Cool the bars fully before slicing to keep the caramel layer from sticking to the knife. Store leftovers in an airtight container at room temperature for up to three days. For a stronger salt contrast, add an extra pinch of flaky sea salt right before serving.Course: Dessert Cuisine: American Equipment: Mixing bowl, Saucepan, 8×8 baking pan, Parchment paper, Oven
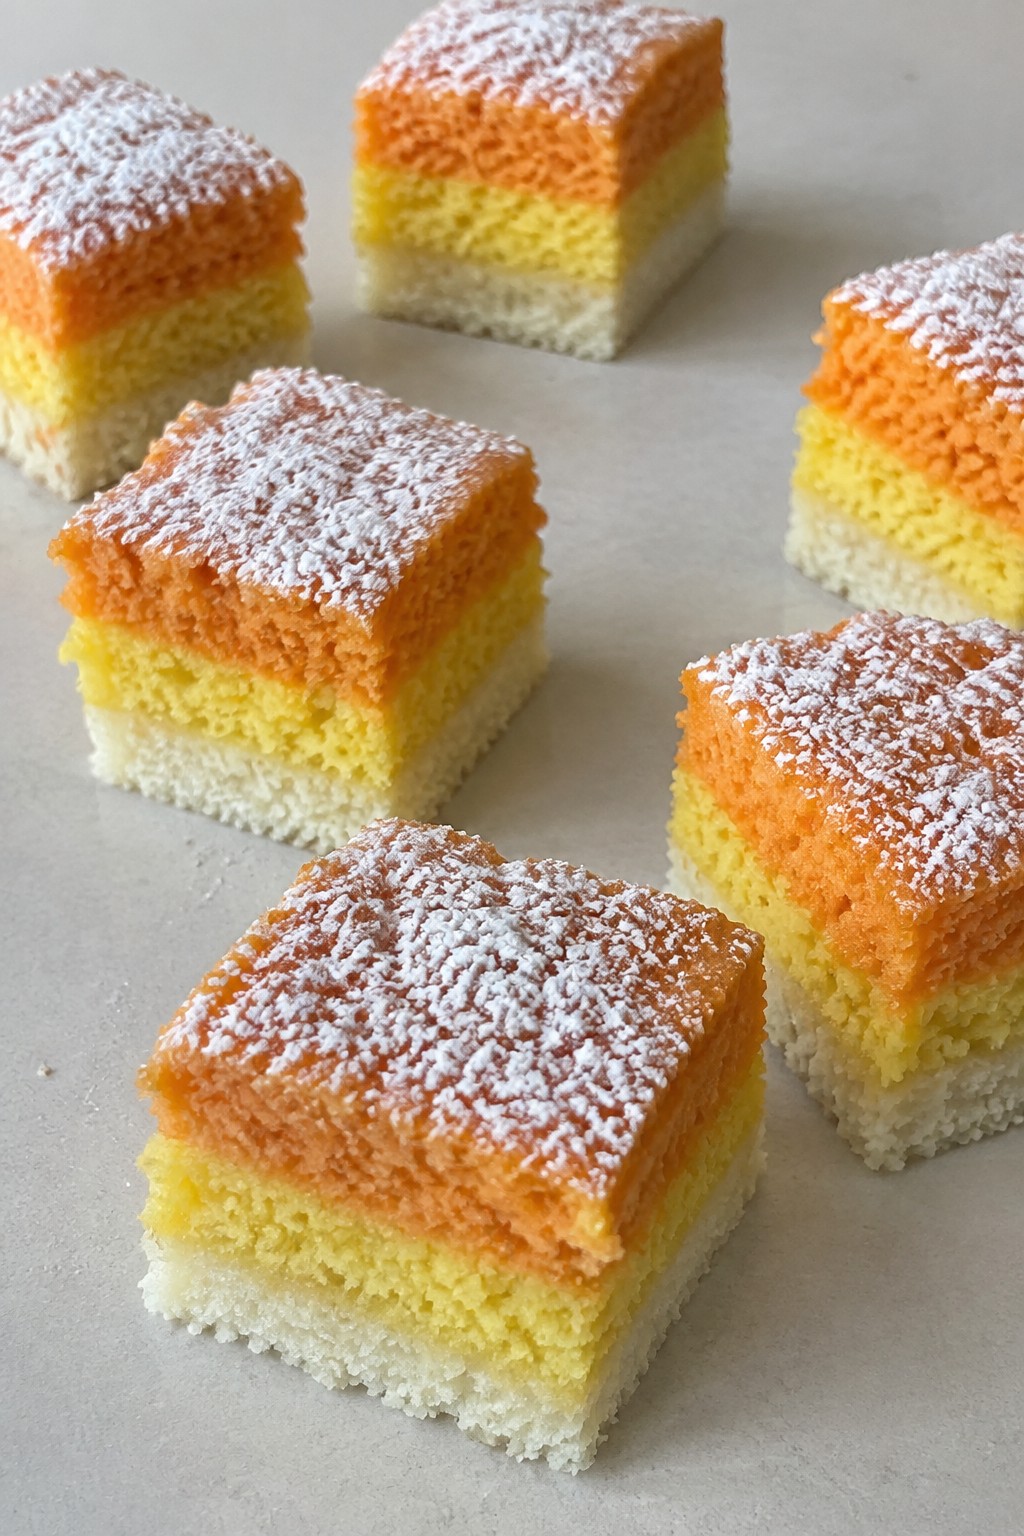
Candy Corn Layer Cake Squares
This recipe creates neat little squares with three colored layers that copy the look of candy corn. The vanilla cake stays light and tender, making it a simple way to add a seasonal touch to any fall gathering without extra fuss.
It comes together quickly with basic pantry items and works well for small get-togethers or as a make-ahead dessert for the week. The colors stay distinct after baking, so each square shows clear stripes when sliced.
Serves 4 people.
Ingredients
- 1 cup all-purpose flour
- 3/4 cup granulated sugar
- 1/2 cup unsalted butter, softened
- 2 large eggs
- 1/4 cup milk
- 1 teaspoon vanilla extract
- 1 teaspoon baking powder
- Yellow food coloring
- Orange food coloring
- Powdered sugar for dusting
Instructions
- Preheat the oven to 350 degrees and line a small square baking pan with parchment paper.
- In a mixing bowl, cream the softened butter and granulated sugar until light and fluffy.
- Add the eggs one at a time, beating well after each addition, then stir in the vanilla extract.
- In a separate bowl, whisk together the flour and baking powder.
- Alternate adding the dry mixture and milk to the butter mixture, stirring until the batter is smooth.
- Divide the batter evenly into three bowls. Leave one bowl plain, stir yellow food coloring into the second bowl, and stir orange food coloring into the third bowl.
- Spread the yellow batter into the prepared pan first, followed by the orange batter, then finish with the plain batter on top.
- Bake for 25 to 30 minutes until a toothpick inserted in the center comes out clean.
- Cool the cake completely in the pan before lifting it out and cutting it into four squares.
- Dust the tops lightly with powdered sugar before serving.
Extra Tips
For the cleanest layers, spread each colored batter gently without swirling the colors together. If the cake feels slightly dry the next day, a quick warm-up in the microwave for 10 seconds softens the texture again. Skip the powdered sugar if you prefer a plainer finish, or add it just before serving to keep the surface dry.Course: Dessert Cuisine: American Equipment: Mixing Bowls, Square Baking Pan, Oven
