
Halloween parties need snacks that do not take all day to make. These appetizers use simple ingredients and basic steps. They come together quickly but still look nice on a table. You can make most of them ahead of time if that helps your schedule. Here are 12 options that fit the season.
Helpful Tips Before You Start
These ideas will help your Halloween appetizers turn out easy to make and fun to serve.
Prep Components Ahead
Chop vegetables, mix dips, and slice bread the day before. This leaves only assembly for the day of the party.
Use Simple Shapes for Decoration
Cut cheese or tortillas with cookie cutters to create ghosts or pumpkins. Basic forms add visual interest without extra time.
Rely on Store Bought Bases
Start with crackers, mini tortillas, or premade dough for many recipes. They speed up prep while leaving room for spooky toppings.
Make Extras of the Easiest Items
Double a no-cook option like stuffed cherry tomatoes. You will have backup if guests eat more than expected.
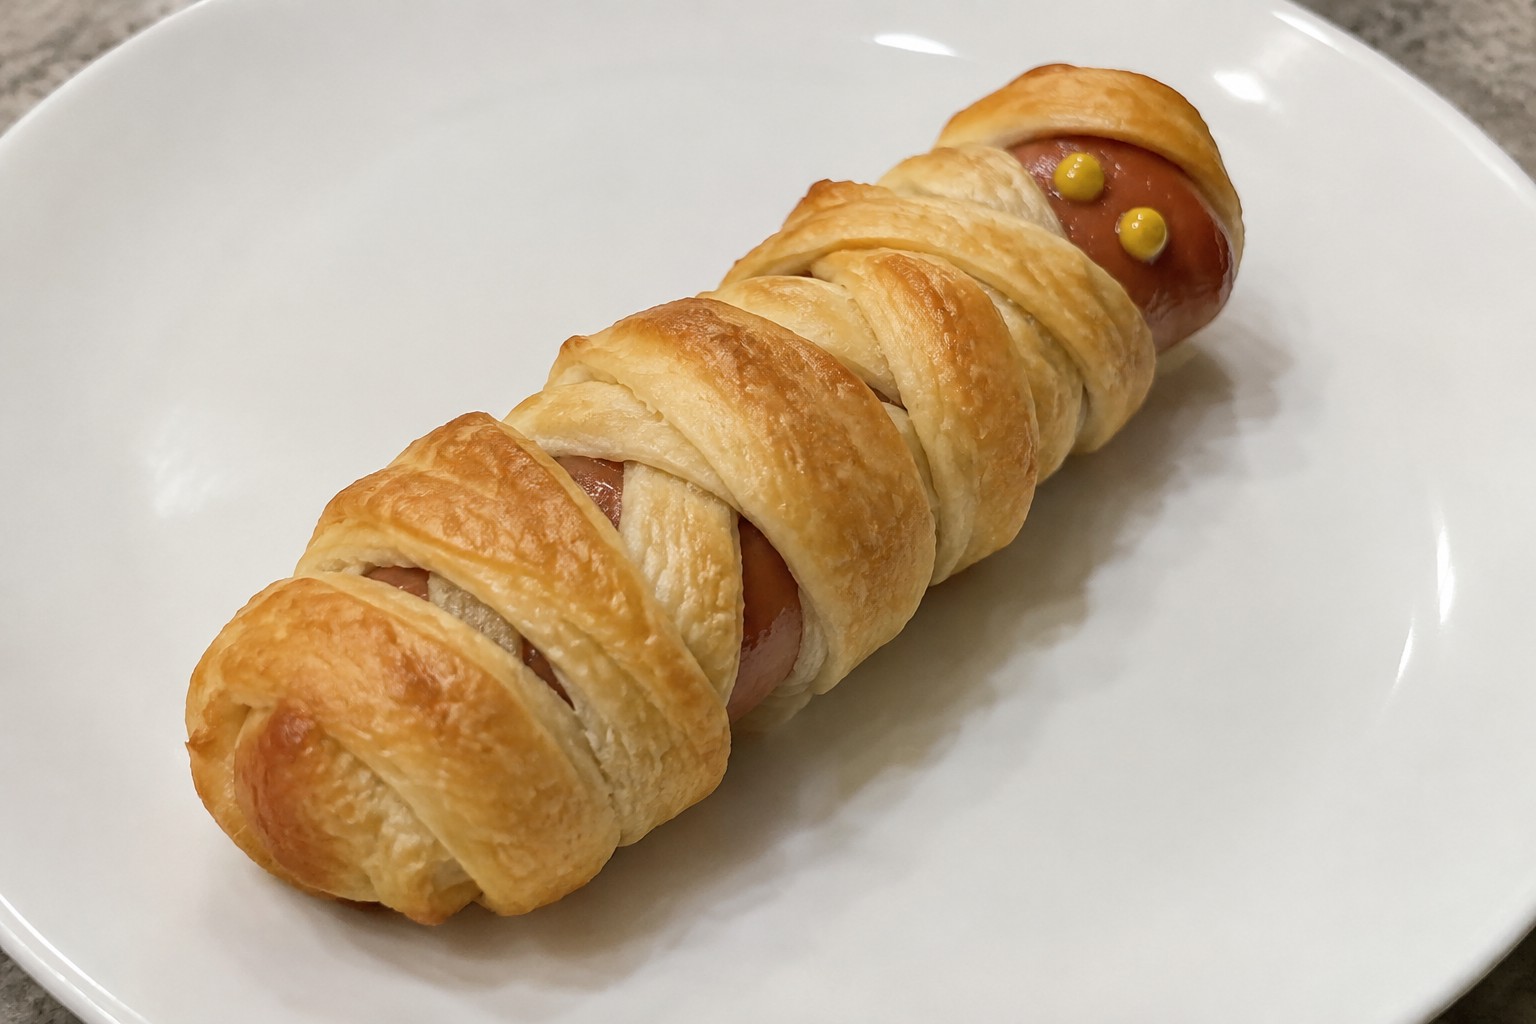
Mummy-Wrapped Sausage Bites with Mustard Eyes
These sausage bites wrap up quickly and bake into a fun finger food that fits right into a Halloween spread. The dough forms a simple mummy wrap around each piece, while the mustard adds a pop of color and a bit of tang. They work well for parties because they stay warm on a tray and pair easily with other snacks.
The finished bites have a crisp outside from the baked dough and a juicy center from the sausage. The mustard gives a sharp note that balances the richness without overpowering the flavor.

Serves 4 people.
Ingredients
- 12 cocktail sausages
- 1 can crescent roll dough
- 2 tablespoons yellow mustard
Instructions
- Preheat the oven to 375 degrees and line a baking sheet with parchment paper.
- Unroll the crescent roll dough on a cutting board and cut it into thin strips about half an inch wide.
- Wrap each cocktail sausage with one or two dough strips, leaving small gaps near the top for the eyes.
- Place the wrapped sausages on the baking sheet with space between them.
- Bake for 12 to 15 minutes until the dough turns golden brown.
- Remove the baking sheet from the oven and let the bites cool for two minutes.
- Use a small spoon or squeeze bottle to dot yellow mustard in the gaps to form eyes on each bite.
Extra Tips
Make the bites ahead by wrapping the sausages in dough and storing them covered in the fridge for up to four hours before baking. If the dough feels too soft while wrapping, chill it for five minutes to make handling easier. Serve them warm on a platter with extra mustard on the side for dipping.Course: Appetizer Cuisine: American Equipment: Baking sheet, Oven, Parchment paper
Spooky Eyeball Deviled Eggs with Olive Pupils
These deviled eggs turn a classic appetizer into a fun Halloween option. The white egg halves act as the base for the eyeball look, while the olive pupils add a simple spooky detail that stands out on a snack table. They work well for parties or family gatherings because they come together with basic ingredients and require no special skills.
The filling stays creamy with a light tang from mustard and vinegar. Paprika adds a touch of color and mild flavor that balances the richness of the mayonnaise. Each bite gives a smooth texture from the yolk mixture against the firm egg white.

Serves 4 people.
Ingredients
- 6 large eggs
- 1/4 cup mayonnaise
- 1 teaspoon Dijon mustard
- 1 teaspoon white vinegar
- 1/4 teaspoon salt
- 1/8 teaspoon black pepper
- 1/2 teaspoon paprika
- 12 pitted black olives
Instructions
- Place the eggs in a large pot and cover them with water. Bring the water to a boil over medium-high heat, then reduce to a simmer and cook for 10 minutes.
- Drain the hot water and transfer the eggs to a bowl of ice water. Let them cool for 5 minutes before peeling.
- Slice each egg in half lengthwise and scoop the yolks into a mixing bowl. Arrange the egg white halves on a serving plate.
- Add the mayonnaise, Dijon mustard, white vinegar, salt, and black pepper to the yolks. Mash and stir until the mixture is smooth.
- Spoon or pipe the yolk mixture back into the centers of the egg white halves.
- Slice each black olive into thin rounds. Place one olive slice in the center of each filled egg half to create the pupil. Sprinkle paprika lightly over the tops.
Extra Tips
Use a small spoon to press the olive slice gently into the filling so it stays in place. If the yolk mixture feels too thick after mashing, add a tiny splash of vinegar to loosen it without changing the flavor much. These eggs taste best when assembled shortly before serving so the olives stay fresh and the paprika color stays bright.
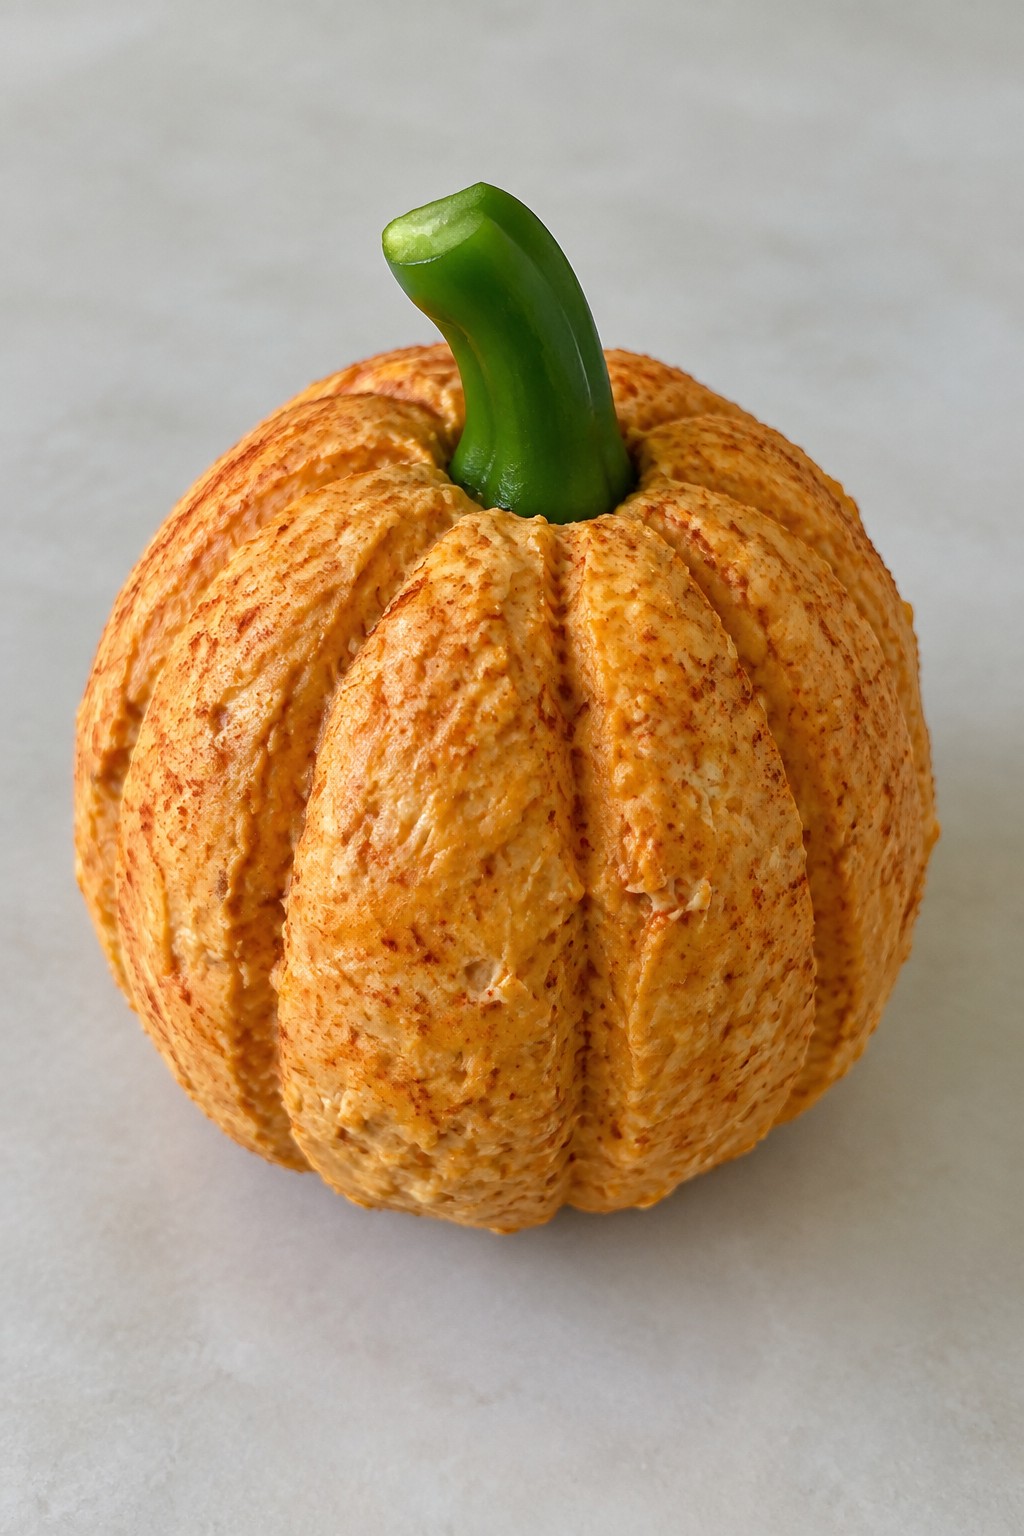
Course: Appetizer Cuisine: American Equipment: Large pot, Mixing bowl, KnifePumpkin-Shaped Cheddar Cheese Ball with Bell Pepper Stem
This cheese ball brings a simple Halloween touch to any snack table. The orange color and ridged shape give it a pumpkin look without extra tools or fuss. It works well for small gatherings where you want something easy that still stands out.
The flavor is creamy and sharp from the cheddar, with a light smoky note from paprika. The texture stays smooth and spreadable, making it easy to pair with crackers or vegetables.
Serves 4 people.
Ingredients
- 8 oz cream cheese, softened
- 2 cups shredded cheddar cheese
- 1 teaspoon paprika
- 1/2 teaspoon garlic powder
- 1 green bell pepper
- Crackers, for serving
Instructions
- Place the softened cream cheese, shredded cheddar cheese, paprika, and garlic powder in a mixing bowl. Stir until the mixture is evenly combined and forms a thick, orange-tinted mass.
- Lay a sheet of plastic wrap on the counter and scoop the cheese mixture onto it. Gather the edges of the wrap and shape the mixture into a round ball, then gently press ridges around the sides to suggest pumpkin segments.
- Cut the top off the green bell pepper and trim a small piece from the stem end to use as the pumpkin stem. Set the stem piece aside.
- Unwrap the shaped cheese ball and press the bell pepper stem into the top center. Place the finished cheese ball on a serving plate with crackers arranged around it.
Extra Tips
Chill the shaped cheese ball for at least 30 minutes before adding the stem so it holds its ridges better. If the mixture feels too soft while shaping, add a tablespoon more shredded cheddar. Leftovers keep in an airtight container in the refrigerator for up to three days. Serve with sturdy crackers that can hold the thick spread.Course: Appetizer Cuisine: American Equipment: Mixing Bowl, Plastic Wrap, Knife
Spider Web Guacamole Served with Black Tortilla Chips
This guacamole gets a simple Halloween twist with a sour cream web piped right on top. It works well for parties because it comes together quickly and still tastes like classic fresh guacamole. The creamy texture pairs nicely with the crisp black tortilla chips for dipping.

Serves 4 people.
Ingredients
- 3 ripe avocados
- 1 lime, juiced
- 1/2 teaspoon salt
- 1/4 cup finely chopped red onion
- 1 small tomato, diced
- 2 tablespoons chopped cilantro
- 1/4 cup sour cream
- 2 black olives
- Black tortilla chips, for serving
Instructions
- Cut the avocados in half, remove the pits, and scoop the flesh into a mixing bowl. Mash with a fork until mostly smooth but still a little chunky.
- Stir in the lime juice and salt until evenly combined.
- Add the red onion, tomato, and cilantro. Mix gently so the pieces stay visible.
- Spoon the guacamole into a shallow serving bowl and smooth the top with the back of a spoon.
- Place the sour cream in a small zip-top bag and snip off one corner. Pipe the sour cream in a spiral pattern starting from the center and working outward.
- Drag a toothpick from the center through the sour cream lines to create a web design.
- Slice one olive in half for the spider body and cut thin strips from the second olive for legs. Place them in the center of the web.
- Serve right away with black tortilla chips on the side.
Extra Tips
Make the guacamole base a few hours ahead and keep it covered in the fridge, but pipe the sour cream web and add the olive spider just before guests arrive so the design stays sharp. If you want a milder onion flavor, soak the chopped red onion in cold water for ten minutes and drain it well before mixing it in. Course: Appetizer Cuisine: Mexican Equipment: Mixing Bowl, Fork, Knife, Small zip-top bag, Toothpick
Ghost-Shaped Mini Caprese Skewers
These Ghost-Shaped Mini Caprese Skewers turn a classic fresh appetizer into a fun Halloween option. They come together quickly with simple ingredients and add a playful touch to any party spread without much effort. The mozzarella ghosts pair with juicy tomatoes and basil for a light, fresh bite that balances creamy and tangy flavors.
They work well for kids parties or adult gatherings where you want something easy yet themed. The neutral white cheese stands out against the red tomatoes, making the ghosts easy to spot on the platter.

Serves 4 people.
Ingredients
- 8 ounces fresh mozzarella cheese
- 12 cherry tomatoes
- 12 fresh basil leaves
- 12 small wooden skewers
- 4 black olives
- 1 tablespoon olive oil
- 1 teaspoon balsamic vinegar
- Salt and black pepper to taste
Instructions
- Slice the mozzarella into 1/2-inch thick pieces. Use a small ghost-shaped cookie cutter to cut out 12 ghost shapes from the cheese.
- Slice the black olives into small pieces to create eyes and mouths. Press two or three pieces onto each mozzarella ghost to form a face.
- Thread one ghost-shaped mozzarella onto each skewer, followed by one cherry tomato and one basil leaf.
- Arrange the skewers on a serving platter. Drizzle the olive oil and balsamic vinegar over the top.
- Sprinkle lightly with salt and black pepper before serving.
Extra Tips
Make the mozzarella ghosts ahead and store them in the fridge on a covered plate for up to a few hours. Add the tomato and basil right before serving so the basil stays bright. If you cannot find a ghost cutter, slice the mozzarella into small rounds and trim the edges by hand for a similar look.Course: Appetizer Cuisine: Italian Equipment: Ghost-shaped cookie cutter, Wooden skewers, Knife, Cutting board, Serving platter
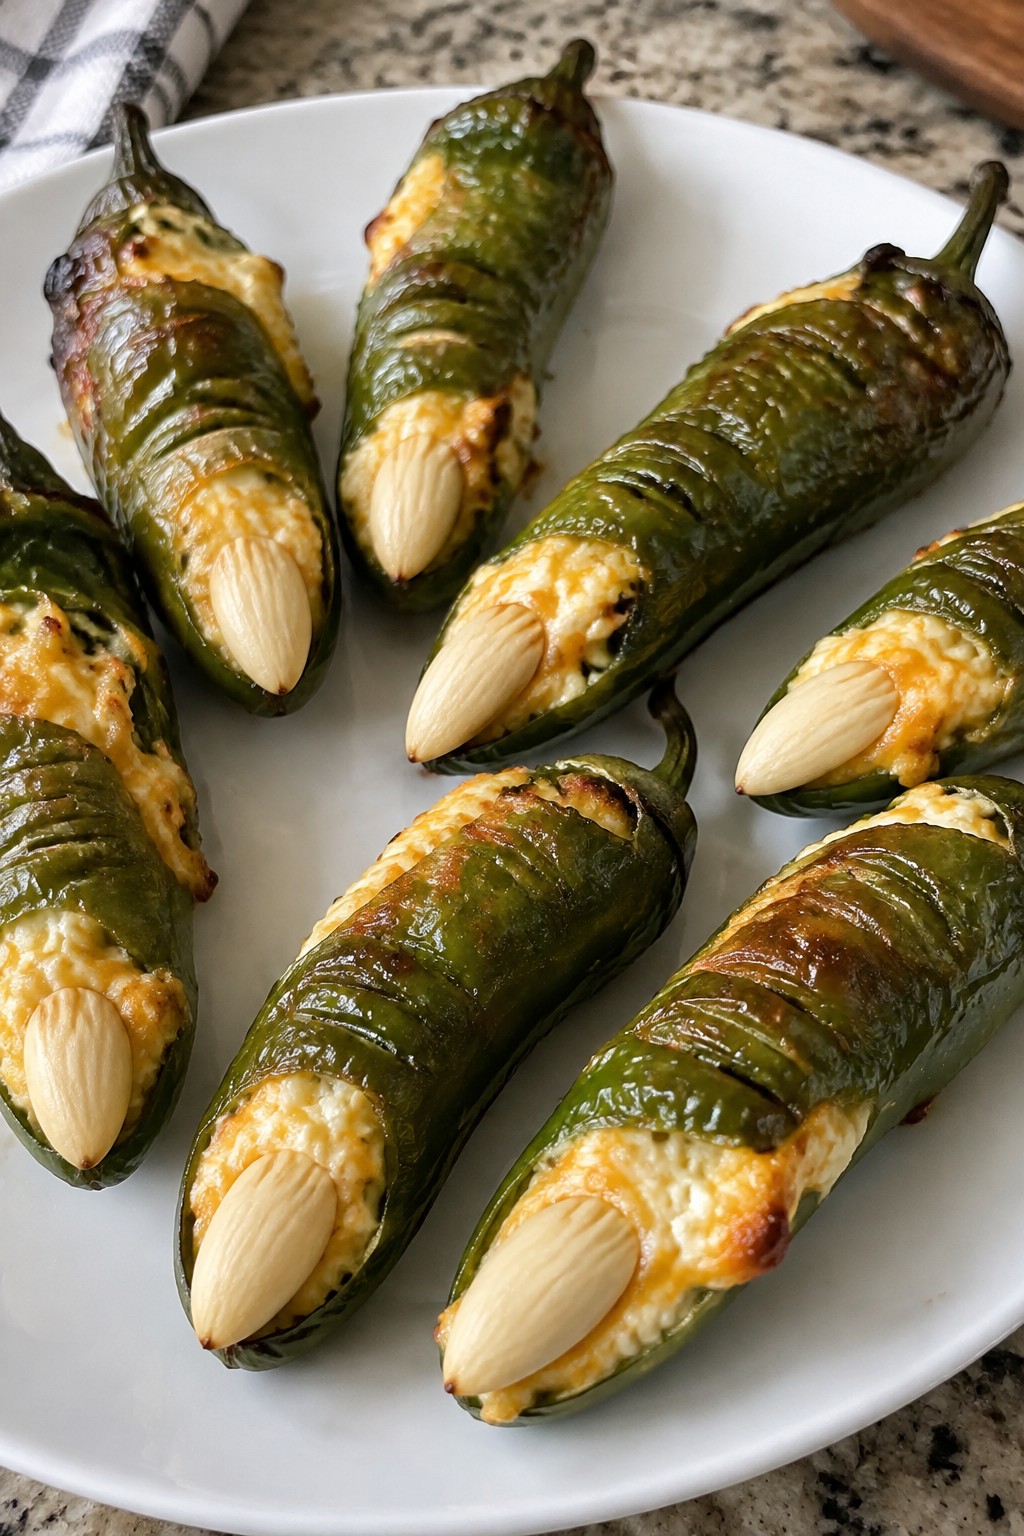
Witch Finger Jalapeño Poppers Stuffed with Cream Cheese
These jalapeño poppers stand out at any Halloween gathering because the whole peppers are shaped to look like witch fingers. They work well for parties since they are simple to assemble ahead and bake just before guests arrive. The result is a creamy, cheesy filling inside a spicy pepper with a crisp edge from baking.
Serves 4 people.
Ingredients
- 8 large jalapeño peppers
- 8 ounces cream cheese, softened
- 1/2 cup shredded cheddar cheese
- 1 teaspoon garlic powder
- 1/2 teaspoon salt
- 8 blanched almonds
Instructions
- Preheat the oven to 375 degrees and line a baking sheet with parchment paper.
- Use a paring knife to cut a small slit near the tip of each jalapeño for the fingernail area and make two shallow horizontal cuts along the side to suggest knuckles. Slice off the stem end and remove the seeds and membranes while keeping the pepper intact.
- In a mixing bowl, combine the softened cream cheese, shredded cheddar cheese, garlic powder, and salt until smooth.
- Spoon the cheese mixture into each prepared jalapeño, filling them evenly without overstuffing.
- Press one blanched almond into the tip of each jalapeño to form the fingernail.
- Place the filled peppers on the baking sheet and bake for 18 to 20 minutes until the peppers soften and the filling is hot and lightly browned.
Extra Tips
Make the cheese filling a day ahead and store it covered in the fridge so assembly goes faster on the day of the party. If you want less heat, soak the cleaned peppers in cold water for 10 minutes before stuffing. Leftovers reheat well in a 350-degree oven for 8 minutes to restore crispness without making the filling oily.Course: Appetizer Cuisine: American Equipment: Baking Sheet, Mixing Bowl, Paring Knife
Layered Candy Corn Taco Dip with Tri-Color Chips
This dip brings a fun candy corn look to the table with its clean yellow, orange, and white layers. It works well for Halloween parties because it comes together fast and gives guests a familiar taco flavor in a festive package.
The bottom corn layer stays crisp, the middle salsa mix adds a little heat and cheese, and the sour cream top keeps things cool and creamy. Serve it with tri-color chips so the colors tie in with the dip.

Serves 4 people.
Ingredients
- 1 cup frozen corn, thawed
- 1 cup salsa
- 1 packet taco seasoning
- 1 cup shredded cheddar cheese
- 1 cup sour cream
- 1 bag tri-color tortilla chips
Instructions
- Spread the thawed corn in an even layer across the bottom of a clear serving dish to create the yellow base.
- In a small bowl, stir together the salsa, taco seasoning, and shredded cheddar cheese until the cheese is evenly distributed.
- Spoon the salsa mixture over the corn layer and smooth it out to form the orange middle.
- In another small bowl, mix the sour cream until it is smooth, then spread it gently over the salsa layer to create the white top.
- Cover the dish and chill for at least 30 minutes so the layers set.
- Serve with tri-color tortilla chips for dipping.
Extra Tips
Keep the sour cream layer thin so the orange salsa shows through for the best candy corn effect. If you want a bit more spice, add a pinch of chili powder to the salsa mix before layering. Leftovers can be stored covered in the fridge for one day, though the corn may soften slightly.Course: Appetizer Cuisine: American Equipment: Mixing Bowl, Serving Dish, Spoon
Bat-Winged Black Bean Sliders on Slider Buns
These sliders bring a fun Halloween touch to any party spread. The black bean patties turn dark and hearty, while blue corn tortilla chips stand in as bat wings tucked into each bun. They come together quickly and work well for a casual gathering or a themed appetizer table.
The flavor stays savory with warm spices and a bit of crunch from the chips. The texture balances soft patties with toasted buns, making them easy to eat in a couple of bites.

Serves 4 people.
Ingredients
- 2 cans (15 oz each) black beans, drained and rinsed
- 1/2 cup breadcrumbs
- 1 large egg
- 1 teaspoon ground cumin
- 1/2 teaspoon chili powder
- 1/4 teaspoon salt
- 2 tablespoons olive oil
- 8 slider buns
- 16 blue corn tortilla chips
Instructions
- Place the black beans in a large bowl and mash them with a fork or potato masher until most are broken down but some chunks remain.
- Add the breadcrumbs, egg, cumin, chili powder, and salt to the mashed beans. Stir until the mixture holds together.
- Divide the mixture into 8 equal portions and shape each into a small patty.
- Heat the olive oil in a large skillet over medium heat. Cook the patties for 3 to 4 minutes per side until they firm up and develop a slight crust.
- Place one cooked patty on the bottom half of each slider bun. Insert two blue corn tortilla chips into the sides of each patty so they stick out like wings, then add the top bun.
Extra Tips
Form the patties ahead of time and keep them in the fridge until you are ready to cook. If the chips feel loose after assembly, press them gently into the patty while it is still warm. These sliders taste best right after cooking, but you can reheat leftover patties in a skillet for a minute or two to restore the texture.Course: Appetizer Cuisine: American Equipment: Mixing Bowl, Large Skillet
Skeleton Bone Breadsticks with Bloody Marinara Dip
These breadsticks bring a playful Halloween touch to any appetizer table. They use simple dough that you shape into bone forms and bake until golden. The marinara dip adds a bright red contrast that fits the theme without extra effort.
The finished breadsticks have a crisp exterior from the garlic butter and a soft, chewy center. They work well for parties because they require little hands-on time once the dough is shaped.

Serves 4 people.
Ingredients
- 1 pound pizza dough
- 3 tablespoons butter, melted
- 2 cloves garlic, minced
- 1/2 teaspoon dried oregano
- 1 cup marinara sauce
- 1 tablespoon grated Parmesan cheese
Instructions
- Preheat the oven to 400°F and line a baking sheet with parchment paper.
- Divide the pizza dough into 8 pieces. Roll each piece into a rope about 8 inches long, then tie a loose knot at both ends to create a bone shape. Place the shaped pieces on the baking sheet.
- Stir the melted butter, minced garlic, and dried oregano together in a small bowl. Brush this mixture over the top of each breadstick.
- Bake for 12 to 15 minutes until the breadsticks turn light golden brown.
- Warm the marinara sauce in a small saucepan over low heat while the breadsticks bake. Transfer the sauce to a serving bowl and sprinkle the grated Parmesan cheese on top before serving alongside the warm breadsticks.
Extra Tips
Shape the dough ends slightly thicker than the middle so the bone look stays clear after baking. Serve the breadsticks right after they come out of the oven for the best texture, and keep any leftovers in an airtight container at room temperature for up to one day before reheating briefly in a 350°F oven.Course: Appetizer Cuisine: Italian Equipment: Baking sheet, Oven, Small bowl, Saucepan
Frankenstein Avocado Toast Bites on Rye Rounds
These bites turn classic avocado toast into a quick Halloween snack. The green avocado mash stands out against dark rye rounds, giving each piece a playful monster look that fits right into a party spread. They come together fast and work well as finger food before a meal or at a casual gathering.
The flavor is creamy and mild with a bit of brightness from lemon, balanced by the earthy rye and salty olive accents. Texture stays simple with crisp toast underneath and smooth topping on top.

Serves 4 people.
Ingredients
- 4 slices rye bread
- 2 ripe avocados
- 1 tablespoon lemon juice
- 1/2 teaspoon salt
- 1/4 teaspoon black pepper
- 8 black olives, sliced
- 4 cherry tomatoes, halved
Instructions
- Toast the rye bread slices until they are crisp and lightly browned. Use a round cutter or knife to cut two circles from each slice, making eight rounds total.
- Cut the avocados in half, remove the pits, and scoop the flesh into a mixing bowl. Add the lemon juice, salt, and black pepper, then mash with a fork until the mixture is mostly smooth with a few small chunks remaining.
- Spread the mashed avocado evenly over each rye round, covering the surface but leaving a small border around the edge.
- Arrange two olive slices on each bite to form eyes and add a few more slices near the sides to suggest bolts. Place one cherry tomato half below the eyes to form a mouth.
Extra Tips
Make the avocado mash right before assembling so it keeps its bright color. If you need to prep ahead, press plastic wrap directly on the surface of the mash and store it in the fridge for up to two hours. Swap the olives for thin strips of nori if you want a milder topping.Course: Appetizer Cuisine: American Equipment: Toaster, Mixing bowl, Knife
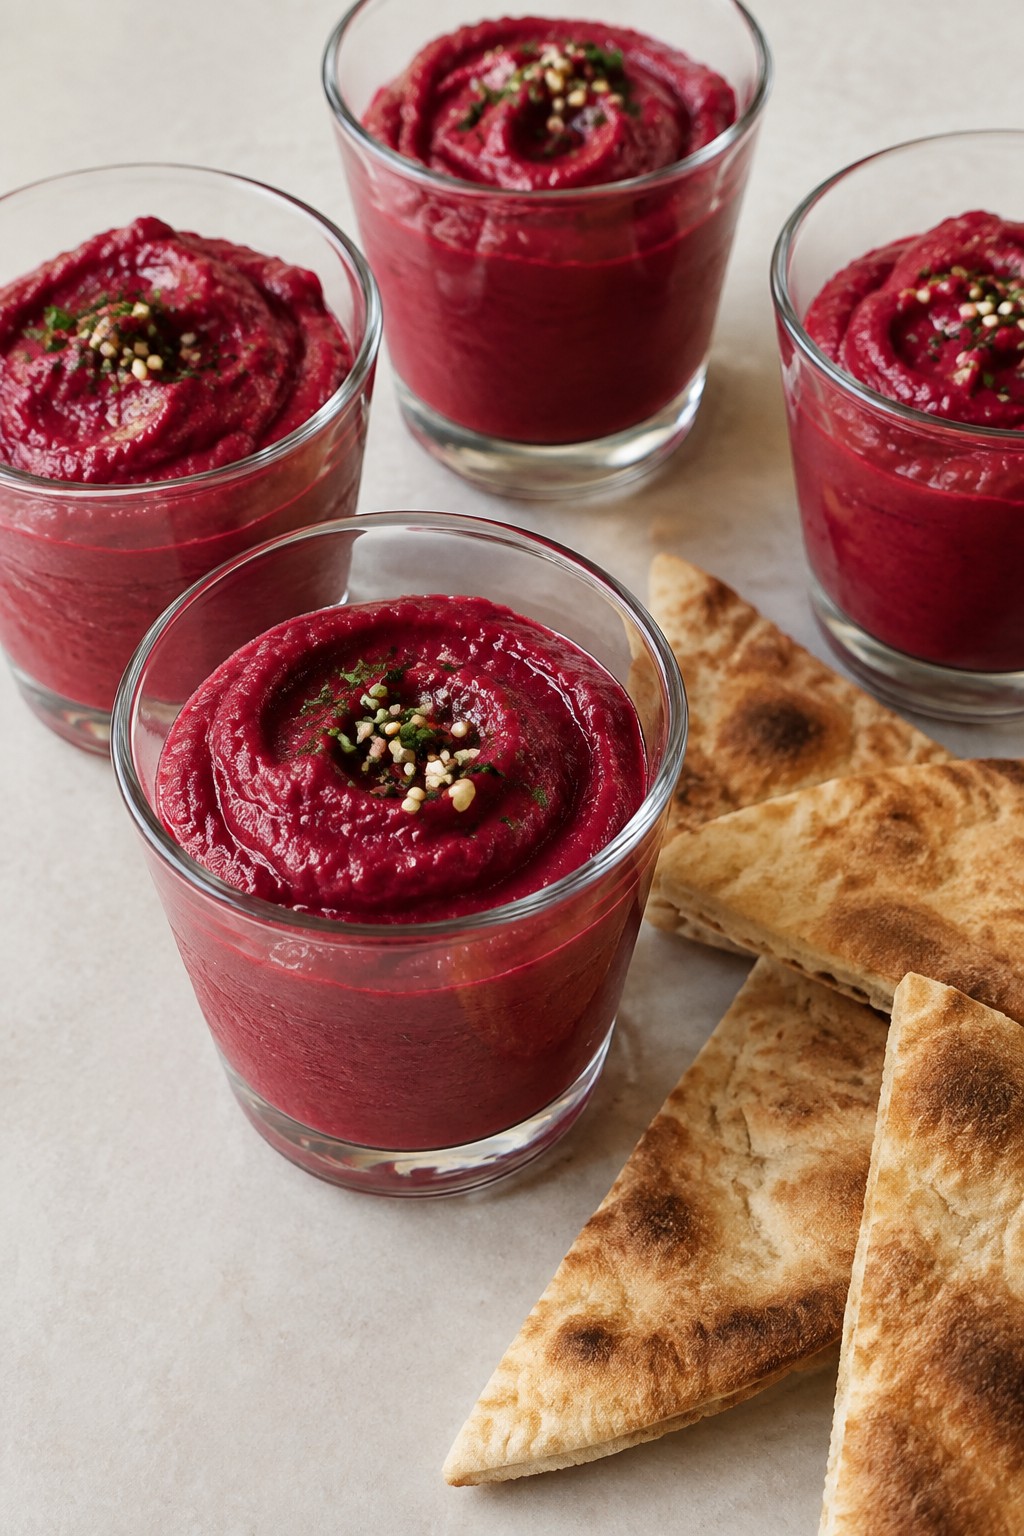
Bloody Beet Hummus Shooters with Pita Wedges
This bright red beet hummus stands out at any Halloween gathering. The deep color comes naturally from roasted beets, and the creamy dip pairs well with warm, crisp pita wedges for easy dipping or scooping.
It suits a party table because the shooters can be filled ahead of time and the pita stays fresh when toasted just before guests arrive. The flavor is earthy and slightly sweet from the beets, with a bright lemon finish and smooth tahini base.
Serves 4 people.
Ingredients
- 2 medium cooked beets, peeled and chopped
- 1 (15-ounce) can chickpeas, drained and rinsed
- 2 tablespoons tahini
- 1 garlic clove
- 2 tablespoons lemon juice
- 3 tablespoons olive oil
- 1/2 teaspoon salt
- 2 whole pitas
Instructions
- Add the beets, chickpeas, tahini, garlic, lemon juice, olive oil, and salt to a food processor. Blend until the mixture is completely smooth and creamy.
- Cut each pita into 8 wedges using a sharp knife.
- Toast the pita wedges in a 375-degree oven or toaster oven for 6 to 8 minutes until they are lightly crisp and golden at the edges.
- Divide the beet hummus evenly among 4 small shooter glasses, filling each about three-quarters full.
- Arrange the toasted pita wedges on a serving plate or tuck a few into each glass for individual portions.
Extra Tips
Make the hummus a day ahead and store it in the refrigerator to let the flavors meld. If the texture seems thick after chilling, stir in a teaspoon of water before spooning it into the glasses. Skip extra garnishes so the natural red color stays the focus.Course: Appetizer Cuisine: Mediterranean Equipment: Food processor, Oven, Baking sheet, Knife
Jack-O’-Lantern Stuffed Mini Peppers with Herbed Cream Cheese
These mini peppers turn into tiny jack-o’-lanterns with simple carved faces. They make a colorful addition to any Halloween spread and work well for parties or casual get-togethers with friends.
The filling combines creamy cheese with fresh herbs for a light, savory taste that contrasts the sweet crunch of the peppers. No baking is required, so the peppers stay crisp.

Serves 4 people.
Ingredients
- 12 mini sweet peppers
- 8 ounces cream cheese, softened
- 2 tablespoons chopped fresh chives
- 1 tablespoon chopped fresh parsley
- 1 teaspoon minced garlic
- 1/2 teaspoon salt
- 1/4 teaspoon black pepper
Instructions
- Rinse the mini peppers and pat them dry. Use a small sharp knife to cut jack-o’-lantern faces into one side of each pepper, removing the seeds and membranes through the openings.
- Place the softened cream cheese in a mixing bowl. Add the chopped chives, chopped parsley, minced garlic, salt, and black pepper.
- Stir the mixture until the herbs and garlic are evenly distributed throughout the cream cheese.
- Spoon or pipe the herbed cream cheese into each carved pepper, filling them until the mixture reaches the top of the openings.
- Arrange the filled peppers on a serving plate and chill for 15 minutes before serving to firm the filling.
Extra Tips
Carve the faces a few hours ahead and store the empty peppers in the fridge so assembly stays quick on the day of the event. If the cream cheese feels too stiff after mixing, let it sit at room temperature for a few minutes before filling.Course: Appetizer Cuisine: American Equipment: Mixing Bowl, Sharp Knife
