
Hey there, lovely friends! 🎃
Hosting a Halloween bash soon? I’ve got some spine-chilling snack ideas that will make your party a hit.
From Spooky Spider Deviled Eggs to Mummy Hot Dogs, these treats will vanish faster than you can say “boo.”
Let’s get ready to make this Halloween unforgettable with snacks that are as enchanting as they are delicious!
Spooky Spider Deviled Eggs

Transform your Halloween spread into a frightful feast with Spooky Spider Deviled Eggs. This ghoulish twist on the classic appetizer will captivate and delight guests of all ages. With creamy yolks enhanced by a hint of mustard and mayonnaise, and topped with olive spiders, these deviled eggs are certain to be a hit at your Halloween party. Not only do they taste delectable, but their eerie appearance adds a touch of macabre fun to your festive table setting.
Spooky Spider Deviled Eggs aren’t only visually fun, but they’re also incredibly easy to make. In just a few simple steps, you can create these creepy-crawly treats that will leave your guests both impressed and satisfied. Whether you’re planning a large Halloween bash or a smaller gathering, this recipe serves 4-6 people, making it perfect for any occasion. So gather your ingredients, put on your apron, and get ready to craft these devilishly good snacks.
Craft creepy-crawly treats effortlessly; impress guests at any Halloween gathering with these devilishly good snacks.
Ingredients (Serves 4-6):
- 6 large eggs
- 3 tablespoons mayonnaise
- 1 teaspoon yellow mustard
- Salt and pepper to taste
- 12 whole black olives
Cooking Instructions:
- Boil the Eggs: Place the eggs in a pot and cover them with cold water. Bring the water to a boil over medium-high heat. Once boiling, cover the pot, remove it from the heat, and let it sit for 12 minutes. This method guarantees perfectly boiled eggs every time.
- Cool and Peel: After 12 minutes, transfer the eggs to a bowl of ice water and let them cool for at least 5 minutes. This will make peeling easier and prevent the yolks from overcooking. Once cooled, peel the eggs carefully.
- Prepare the Filling: Slice each egg in half lengthwise and gently scoop out the yolks into a mixing bowl. Add mayonnaise, mustard, salt, and pepper to the yolks. Mash the mixture with a fork until smooth and creamy.
- Fill the Egg Whites: Spoon or pipe the yolk mixture back into the egg white halves. Try to create a slight dome shape to give the spiders a good base to sit on.
- Make the Olive Spiders: Slice the olives in half. Use one half as the spider’s body and cut the other half into thin strips to create legs. Arrange the olive halves and strips on top of the filled eggs to resemble spiders.
- Chill and Serve: Place the completed deviled eggs on a serving platter. Refrigerate for at least 30 minutes before serving to allow the flavors to meld together. Serve chilled and watch the delight on your guests’ faces.
Extra Tips:
For an extra spooky effect, consider using a small amount of paprika or smoked paprika on the yolk mixture before placing the spiders. This adds a subtle pop of color and an additional layer of flavor.
If you’re short on time, you can prepare the eggs and yolk filling a day in advance; just assemble the spiders shortly before serving to keep them fresh.
Monster Mouth Apple Bites

Monster Mouth Apple Bites are a fun and spooky Halloween snack that will delight both kids and adults alike. These creative treats aren’t only visually appealing but also pack a nutritious punch, thanks to the fresh apples and almonds used to create the “monster” mouths.
Perfect for a Halloween party, these apple bites are easy to make and can be assembled in just a few minutes, making them an ideal choice for busy hosts looking to create a memorable spread. The combination of tart apples, creamy peanut butter, and crunchy almonds creates a delicious texture that’s both satisfying and eerie.
These Monster Mouth Apple Bites are a great way to add a healthy option to your Halloween festivities, and they can be easily customized with different fillings or decorations to suit any dietary preferences or themes. Whether you’re hosting a large gathering or a small get-together, these spooky snacks are sure to be a hit.
Ingredients for 4-6 servings:
- 3 medium-sized apples (Granny Smith or any variety of your choice)
- 1/4 cup of smooth peanut butter (or any nut/seed butter preference)
- 1/4 cup of slivered almonds
- 1/4 cup of mini marshmallows
- Lemon juice (optional, to prevent browning)
Instructions:
- Prepare the Apples: Wash the apples thoroughly under running water. Cut each apple into quarters and remove the core and seeds. Then, slice each quarter into 2 or 3 wedges, depending on the size of the apple. If desired, lightly brush the cut sides with lemon juice to prevent browning.
- Assemble the Monster Mouths: Take one apple wedge and spread a thin layer of peanut butter on one side. This will act as the “glue” to hold the decorations in place. Place a few slivered almonds into the peanut butter along one edge of the apple slice to resemble teeth.
- Add the Finishing Touches: On the opposite side of the almonds, place a mini marshmallow to serve as the “tongue”. Press gently to verify the marshmallow sticks to the peanut butter. Repeat these steps with the remaining apple slices until all are assembled.
- Serve and Enjoy: Arrange the Monster Mouth Apple Bites on a platter or serving tray. If making ahead, cover with plastic wrap and store in the refrigerator until ready to serve. Enjoy your spooky and healthy Halloween treat!
Extra Tips:
If you’re preparing these Monster Mouth Apple Bites in advance, consider using a splash of lemon juice on the apples to keep them from browning. For a nut-free version, substitute the peanut butter with sunflower seed butter or any other allergy-friendly spread.
Additionally, get creative with the decorations: you can use candy eyes or raisins for added detail or replace the marshmallows with other small candies or fruits to fit different themes or preferences.
Witch’s Broomstick Pretzel Sticks

Transform your Halloween party into a spellbinding event with these delightful Witch’s Broomstick Pretzel Sticks. These charming snacks aren’t only fun to make but also a hit with both kids and adults. The combination of salty pretzels and creamy cheese is irresistible, and the playful presentation adds a magical touch to any Halloween celebration.
Imagine a platter filled with these edible broomsticks, ready to sweep your guests off their feet! Perfect for a serving size of 4-6 people, these Witch’s Broomstick Pretzel Sticks are quick to prepare and require minimal ingredients. You’ll love how easily these can be assembled, leaving you plenty of time to enjoy the festivities.
Edible broomsticks that enchant your guests, easy to make, and perfect for Halloween fun. Enjoy the festivities!
Whether you’re hosting a party or just looking for a fun snack to enjoy while watching Halloween movies, these broomstick pretzels are sure to become a holiday favorite.
Ingredients:
- 24 pretzel sticks
- 6 string cheese sticks
- 24 fresh chives
Instructions:
- Prepare the String Cheese: Begin by unwrapping the string cheese sticks. Cut each stick into four equal pieces, totaling 24 small cheese pieces. These will form the broom bristles.
- Create the Broom Bristles: Take each cheese piece and carefully use a small knife to make several lengthwise cuts about halfway up the cheese, creating the appearance of broom bristles. Be gentle to avoid breaking the cheese.
- Assemble the Broomsticks: Insert a pretzel stick into the uncut end of each cheese piece, pressing gently but firmly to guarantee it holds without breaking the cheese.
- Tie the Chives: To complete the broomstick look, take a chive and wrap it around the top end of the cheese where it meets the pretzel stick. Tie the chive in a small knot or bow to secure it in place. Trim any excess chive for neatness.
- Arrange and Serve: Place the completed Witch’s Broomstick Pretzel Sticks on a serving platter. For an extra festive touch, arrange them in a cauldron or on a Halloween-themed plate.
Extra Tips:
To make the process smoother, verify the chives are fresh and pliable; if they’re too stiff, soak them briefly in warm water to make them easier to tie. If you’re preparing these snacks ahead of time, store them in an airtight container in the refrigerator to keep the cheese fresh.
When ready to serve, let them sit at room temperature for a few minutes to enhance the flavor. These broomsticks can also be customized with different cheese flavors or by adding a small piece of ham or prosciutto between the cheese and the pretzel for an extra savory touch. Enjoy your enchanting treat!
Mummy Hot Dogs

Mummy Hot Dogs are a delightful and spooky treat, perfect for Halloween parties. These fun snacks aren’t only easy to make but also a hit with both kids and adults. The combination of savory hot dogs wrapped in golden, flaky crescent dough provides a delicious bite that’s certain to bring a ghoulish charm to your festive gathering.
Plus, they can be customized with your favorite dipping sauces, making them a versatile choice for any Halloween spread.
These Mummy Hot Dogs are simple to prepare and can be whipped up in no time, making them an ideal choice for busy hosts looking to add some themed treats to their party menu. The playful appearance of these mummies, complete with little mustard or ketchup eyes, adds a whimsical touch that will capture the spirit of Halloween.
The recipe below serves 4-6 people, making it perfect for a small gathering or as a part of a larger assortment of party snacks.
Ingredients:
- 8 hot dogs
- 1 (8-ounce) package of refrigerated crescent roll dough
- 2 tablespoons of mustard or ketchup (for eyes)
- Optional: cheese slices
Cooking Instructions:
- Preheat the Oven: Start by preheating your oven to 375°F (190°C). This guarantees that the crescent dough will bake evenly and become golden brown.
- Prepare the Dough: Unroll the crescent roll dough and separate it into 8 triangles. Use a knife or a pizza cutter to slice each triangle into long, thin strips. These strips will become the mummy’s “bandages.”
- Wrap the Hot Dogs: Take one hot dog and begin wrapping it with strips of dough, leaving a small space at one end for the “face.” Overlap the strips slightly to create the appearance of bandages. Repeat this process for all the hot dogs.
- Add Cheese (Optional): If using cheese, place a small slice under the dough strips for a cheesy surprise inside your mummies.
- Bake: Place the wrapped hot dogs on a baking sheet lined with parchment paper. Bake in the preheated oven for about 12-15 minutes, or until the dough is golden brown.
- Create the Eyes: Once baked, remove the mummies from the oven and allow them to cool slightly. Use a toothpick or a small piping bag to dot mustard or ketchup “eyes” on the exposed part of the hot dogs.
- Serve: Arrange the Mummy Hot Dogs on a platter and serve them with your choice of dipping sauces, such as ketchup, mustard, or cheese dip.
Extra Tips:
To add a bit more flavor, consider brushing the dough with a little melted butter before baking and sprinkling with garlic powder or sesame seeds.
You can also experiment with different types of sausages or even vegetarian options to cater to diverse dietary preferences. For a fun twist, try using different colored dough or adding food coloring to the dough to make your mummies even more festive.
Ghostly Cheese and Crackers
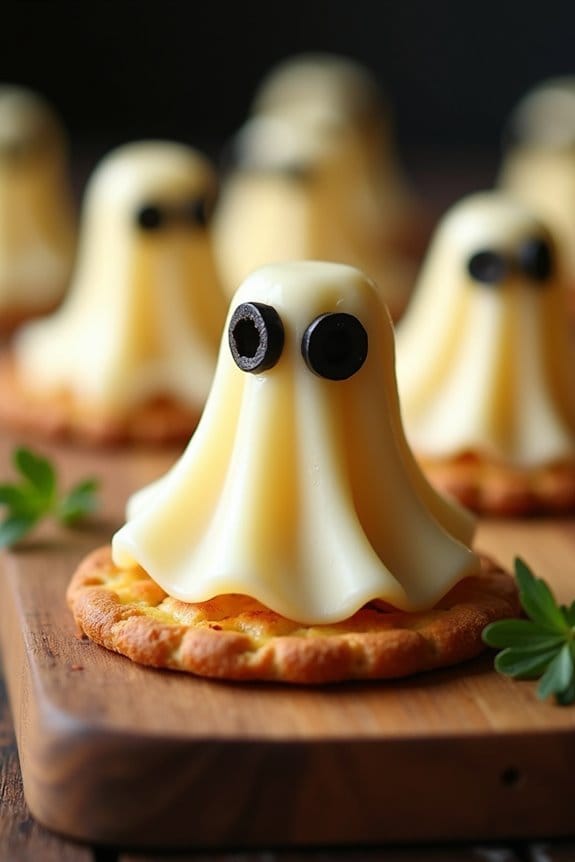
Halloween is the perfect time to get creative with your snacks, and Ghostly Cheese and Crackers are a fun and spooky treat that’s easy to make and sure to impress your guests. This delightful appetizer combines the simplicity of crackers and cheese with a touch of Halloween spirit. The ghostly shapes add a playful element that kids and adults alike will enjoy at your Halloween party.
Ghostly Cheese and Crackers make for a spooky, creative snack that delights Halloween party guests.
This recipe is designed to serve 4-6 people, making it ideal for a small gathering or as part of a larger buffet spread. The key to this dish is using a ghost-shaped cookie cutter to transform ordinary cheese slices into hauntingly cute ghosts, which are then placed on crackers for a crunchy, savory bite. Follow the steps below to create this spooky snack.
Ingredients (Serves 4-6):
- 8 ounces of your favorite cheese (e.g., cheddar, mozzarella, or Monterey Jack)
- 24 round crackers
- 1 tablespoon of cream cheese
- Black olive slices (for eyes)
- Optional: fresh herbs for garnish
Cooking Instructions:
- Prepare the Cheese: Begin by slicing your chosen cheese into thin, even slices, approximately 1/8 inch thick. This will make it easier to cut into shapes and allow the cheese to sit nicely on the crackers.
- Cut Out the Ghosts: Using a small ghost-shaped cookie cutter, press down firmly onto each cheese slice to cut out ghost shapes. If you don’t have a ghost-shaped cutter, you can use a knife to carefully cut out ghost-like figures.
- Create the Ghost Faces: Take a small dab of cream cheese and use it to attach black olive slices onto the cheese ghosts to create eyes. This gives your ghosts a fun and spooky appearance.
- Assemble the Snacks: Place each ghost cheese slice onto a round cracker. If you like, you can add a small amount of cream cheese on the cracker first to help secure the cheese ghost.
- Add Garnish (Optional): For an added touch, you can place a small sprig of fresh herbs, such as parsley or chive, alongside each cracker for a pop of color and flavor.
Extra Tips:
To prevent the cheese from sticking to the cutter, lightly oil the cutter before using it. If you find the cheese is too soft to work with, you can chill it in the refrigerator for 10-15 minutes to firm it up, making it easier to cut.
Additionally, consider using a variety of cheeses for different flavors and colors, which will add more interest to your platter. Finally, you can prepare these snacks a few hours in advance and store them in the refrigerator until you’re ready to serve, ensuring that the cheese remains fresh and the crackers stay crisp.
Pumpkin Patch Dirt Cups

Pumpkin Patch Dirt Cups are a delightful treat that perfectly captures the spirit of Halloween. This recipe is an imaginative spin on the classic dirt cup dessert, featuring a delicious combination of chocolate pudding, crushed cookies, and candy pumpkins. These cups aren’t only scrumptious but also a fun and festive way to celebrate Halloween at any party.
Children and adults alike will love digging into these cups that resemble a miniature pumpkin patch, complete with “dirt” made from crushed cookies and “pumpkins” made from candy.
The best part about Pumpkin Patch Dirt Cups is how easy they’re to prepare. They require no baking, making them a quick and simple option for a Halloween party snack. You can even get creative with the ingredients, adding gummy worms or other Halloween-themed candies to surprise your guests.
The recipe yields about 4-6 servings, making it perfect for a small gathering or as part of a larger spread of Halloween treats.
Ingredients for 4-6 servings:
- 2 cups of cold milk
- 1 package (3.9 ounces) instant chocolate pudding mix
- 15 chocolate sandwich cookies, crushed
- 1 cup of whipped topping
- 1 package of candy pumpkins
- 1/2 cup of gummy worms (optional)
Cooking Instructions:
- Prepare the Pudding: In a medium-sized mixing bowl, pour in the cold milk and add the instant chocolate pudding mix. Whisk the mixture together for about 2 minutes or until it thickens. Let it set for 5 minutes to achieve the desired consistency.
- Crush the Cookies: Place the chocolate sandwich cookies in a resealable plastic bag. Use a rolling pin or the bottom of a heavy cup to crush the cookies into fine crumbs that resemble dirt.
- Assemble the Cups: Start by layering the bottom of each cup with a spoonful of the crushed cookies. Next, add a layer of chocolate pudding, followed by a layer of whipped topping. Repeat the layers until the cups are filled, finishing with a layer of crushed cookies on top to resemble dirt.
- Decorate with Candy: Place candy pumpkins on top of the dirt to create a pumpkin patch effect. You can also add gummy worms for extra fun.
- Chill and Serve: Refrigerate the assembled cups for at least 30 minutes before serving, allowing the flavors to meld together and the pudding to set completely.
Extra Tips: For an added touch of Halloween flair, consider serving the Pumpkin Patch Dirt Cups in clear plastic cups to showcase the layers. You can also get creative with your decorations by using different types of Halloween-themed candies or sprinkles.
If you’re preparing these with kids, let them get involved by crushing the cookies or adding the candy decorations. These cups are easily customizable, so feel free to adjust the ingredients and quantities based on your preferences and the size of your party.
Batty Brownie Bites
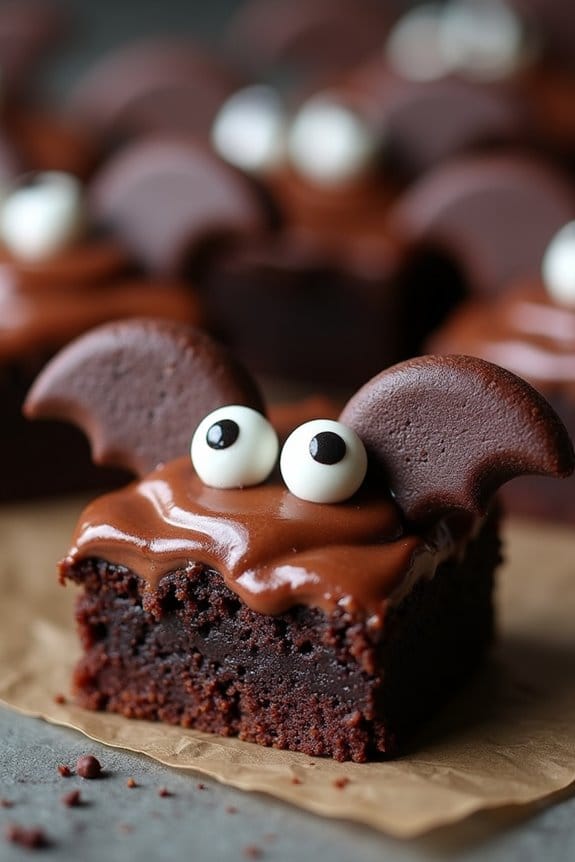
Batty Brownie Bites are a spooktacular treat perfect for any Halloween party. These bite-sized brownies aren’t only deliciously fudgy but also creatively decorated to resemble cute little bats. They’re sure to be a hit with both kids and adults, adding a touch of whimsy to your spooky festivities. The combination of rich chocolate flavor and playful presentation makes them an irresistible dessert option.
Deliciously fudgy bat-shaped brownies add whimsy to Halloween parties, delighting kids and adults alike.
These Batty Brownie Bites are easy to make and can be prepared in advance, giving you more time to enjoy the party. The recipe uses simple ingredients that you probably already have in your pantry, and the decoration process is a fun activity that can involve the whole family. With a serving size for 4-6 people, this recipe guarantees everyone can enjoy a sweet Halloween treat.
Ingredients (Serving Size: 4-6 people):
- 1/2 cup unsalted butter
- 1 cup granulated sugar
- 2 large eggs
- 1 teaspoon vanilla extract
- 1/3 cup unsweetened cocoa powder
- 1/2 cup all-purpose flour
- 1/4 teaspoon salt
- 1/4 teaspoon baking powder
- 12 chocolate sandwich cookies (for wings)
- 1/2 cup chocolate frosting
- 12 edible candy eyes
Instructions:
- Preheat the Oven: Start by preheating your oven to 350°F (175°C). This guarantees the oven is ready for the brownies, providing an even bake.
- Prepare the Batter: In a medium microwave-safe bowl, melt the butter. Stir in the sugar, eggs, and vanilla extract until smooth. Gradually add the cocoa powder, flour, salt, and baking powder, mixing until just combined.
- Bake the Brownies: Pour the brownie batter into a greased or lined 8×8 inch baking pan. Spread it evenly with a spatula. Bake in the preheated oven for 20-25 minutes or until a toothpick inserted in the center comes out with a few moist crumbs.
- Cool and Cut: Allow the brownies to cool completely in the pan on a wire rack. Once cooled, cut the brownies into bite-sized squares.
- Prepare the Bat Wings: Twist apart the chocolate sandwich cookies and remove the cream filling. Cut each cookie half into two, creating crescent shapes for the bat wings.
- Assemble the Batty Brownie Bites: Spread a small dollop of chocolate frosting on top of each brownie square. Attach two cookie wing halves on each side of the frosting, slightly angled to resemble outstretched wings.
- Add the Eyes: Use a bit of frosting as glue to attach the edible candy eyes onto the brownie, completing the bat face.
Extra Tips:
For an extra chocolatey flavor, consider adding chocolate chips to the brownie batter before baking. If you prefer a more cake-like texture, reduce the baking time slightly and check for doneness a few minutes earlier.
To make the decoration process more fun, involve kids or guests in assembling the bats. They can add their own creative twists with additional decorations like edible glitter or colored icing.
Make sure to store the Batty Brownie Bites in an airtight container if you’re making them ahead of time, to keep them fresh and delicious for the party.
Eyeball Caprese Skewers
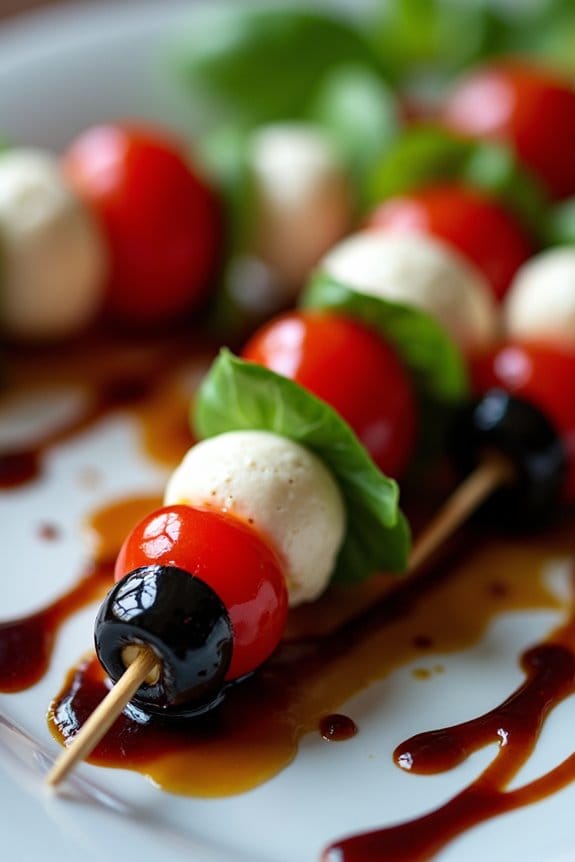
If you’re searching for a fun and spooky appetizer for your Halloween party, search no further than Eyeball Caprese Skewers. These skewers aren’t only delicious but also cleverly designed to resemble eerie eyeballs, making them the perfect addition to your festive spread.
The classic flavors of a traditional caprese salad are transformed into a whimsical treat that both kids and adults will love. The combination of fresh mozzarella, juicy tomatoes, and fragrant basil, drizzled with balsamic glaze, makes this dish as tasty as it’s visually appealing.
The Eyeball Caprese Skewers are an easy and quick dish to prepare, requiring minimal ingredients and effort. The key is to select the freshest ingredients to guarantee the best flavor and presentation. Each skewer is topped with a sliced olive to create the “pupil” of the eyeball, adding a touch of spookiness to your Halloween buffet.
Serve these skewers as a starter or as part of a larger spread, and watch them disappear as your guests rave about your creativity and culinary skills.
Ingredients for 4-6 servings:
- 12 cherry tomatoes
- 12 fresh mozzarella balls (bocconcini)
- 12 fresh basil leaves
- 12 pitted black olives
- 12 wooden skewers
- Balsamic glaze
- Salt and pepper to taste
Cooking Instructions:
- Prepare the Ingredients: Begin by washing the cherry tomatoes and basil leaves. Pat them dry with a paper towel to remove excess moisture. Verify the fresh mozzarella balls are drained from any liquid.
- Assemble the Skewers: Take a wooden skewer and start by threading a cherry tomato onto it. Follow with a fresh mozzarella ball, then a basil leaf. Repeat this sequence until you have three sets of tomato, mozzarella, and basil on each skewer.
- Create the Eyeball Effect: Slice the black olives into thin rounds. Place one olive slice onto the mozzarella ball on each skewer to resemble a pupil. This will give your skewers the “eyeball” appearance.
- Season and Drizzle: Lightly sprinkle salt and pepper over the skewers to taste. Finish by drizzling balsamic glaze over the top, adding a sweet and tangy flavor that complements the fresh ingredients.
- Serve and Enjoy: Arrange the skewers on a platter for serving. These are best enjoyed fresh, so prepare them just before your guests arrive.
Extra Tips:
When making Eyeball Caprese Skewers, it’s important to use fresh and high-quality ingredients for the best flavor. If you can’t find bocconcini, you can substitute with regular mozzarella cut into bite-sized pieces.
For a more dramatic effect, try using heirloom cherry tomatoes in various colors. If you prefer a touch of heat, consider adding a small slice of jalapeño between the layers.
Finally, if you don’t have balsamic glaze, you can easily reduce balsamic vinegar over low heat until thickened, creating a homemade version.
Creepy Carrot Fingers

Creepy Carrot Fingers are a spook-tacular addition to any Halloween party spread. These eerie snacks aren’t only easy to make, but they also add a healthy twist to the usual sugary treats served during the festive season. With just a few simple ingredients, you can create a platter of sinister-looking carrot fingers that will have your guests both intrigued and delighted.
The natural orange hue of the carrots adds to the Halloween theme, while the almond “fingernails” give these snacks a truly chilling look. Perfect for a serving size of 4-6 people, Creepy Carrot Fingers are both nutritious and delicious. They’re a fun way to encourage kids and adults alike to munch on vegetables amidst the candy-filled festivities.
Whether you’re hosting a costume party or just looking to add a creative dish to your Halloween table, these carrot fingers are sure to be a hit. Pair them with your favorite dip, and you’ll have a hauntingly good appetizer ready in no time.
Ingredients:
- 6 large carrots
- 12 whole almonds
- 1/2 cup of cream cheese or hummus
- 1 teaspoon of Dijon mustard (optional, for flavor)
- Salt and pepper to taste
Instructions:
- Prepare the Carrots: Begin by washing and peeling the carrots thoroughly. Cut each carrot into halves, making sure they’re approximately 3-4 inches long to mimic the size of fingers.
- Shape the Fingers: Using a small paring knife, carefully carve out shallow horizontal lines on each carrot piece to resemble knuckles. Be cautious during this step to avoid cutting too deep into the carrot.
- Create Nail Beds: At the thinner end of each carrot piece, use the paring knife to make a small, shallow cut to create a flat surface for the almond “fingernail.”
- Attach the Almonds: Take the cream cheese or hummus and spread a small dab onto the flat end of the carrot. Press an almond onto the spread to secure it, creating the appearance of a fingernail. For added flavor, mix a bit of Dijon mustard into the cream cheese or hummus before using it as the adhesive.
- Season and Serve: Arrange the completed Creepy Carrot Fingers on a platter. Sprinkle a little salt and pepper over them for additional flavor. Serve with your choice of dip, such as hummus or ranch dressing, which can be placed in a small bowl on the side.
Extra Tips:
For an extra spooky effect, add a few drops of red food coloring to the cream cheese or hummus before attaching the almonds, giving the appearance of bloody fingernails.
If you prefer a more savory flavor, consider adding herbs like dill or chives to the cream cheese or hummus mixture. Additionally, you can use bell pepper strips for a “bloody” look alongside the carrot fingers.
Remember to keep the carrot pieces similar in size for a uniform appearance and to guarantee they stand up well on the platter. Enjoy your creepy creation!
Dracula’s Dentures Cookies

Making Dracula’s Dentures Cookies is simple, requiring minimal baking skills and just a few ingredients. They’re an excellent choice for a party treat or a fun activity to do with children. The process involves assembling the cookies with sweet fillings and toppings to mimic Dracula’s iconic grin. Here’s how you can prepare these cookies for a serving size of 4-6 people:
Ingredients:
- 12 large chocolate chip cookies (store-bought or homemade)
- 1 cup of red or pink frosting
- 1 cup of mini marshmallows
- 12 slivered almonds
Instructions:
- Prepare the Cookies: If you’re using homemade cookies, make certain they’re completely cooled before starting. If store-bought, you can proceed immediately.
- Cut the Cookies: Take each chocolate chip cookie and carefully cut it in half to make two semi-circles. These will form the top and bottom of Dracula’s mouth.
- Apply the Frosting: Spread a generous amount of red or pink frosting along the cut side of each cookie half. This frosting acts as the “gums” for the dentures.
- Add the Marshmallow Teeth: On one cookie half, place mini marshmallows evenly along the frosted edge to resemble teeth. Make sure they’re slightly spaced to give a realistic appearance.
- Assemble the Cookies: Place the other half of the cookie on top, frosting side down, to sandwich the marshmallow teeth in between. Gently press them together to secure the marshmallows in place.
- Insert the Almond Fangs: For the final touch, insert a slivered almond on each end of the assembled cookie to represent Dracula’s sharp fangs.
- Serve and Enjoy: Arrange the cookies on a platter and watch your guests’ faces light up with delight and perhaps a little fright!
Extra Tips:
For an added spooky effect, you can use food coloring to tint the frosting a deeper shade of red for a more blood-like appearance. If you’re making these with children, supervise the almond insertion as it requires a bit of precision.
To save time, you can prepare the cookies and frosting in advance, leaving only the assembly for the day of the party. Enjoy these chillingly fun treats at your Halloween bash!
Frankenstein Rice Krispie Treats
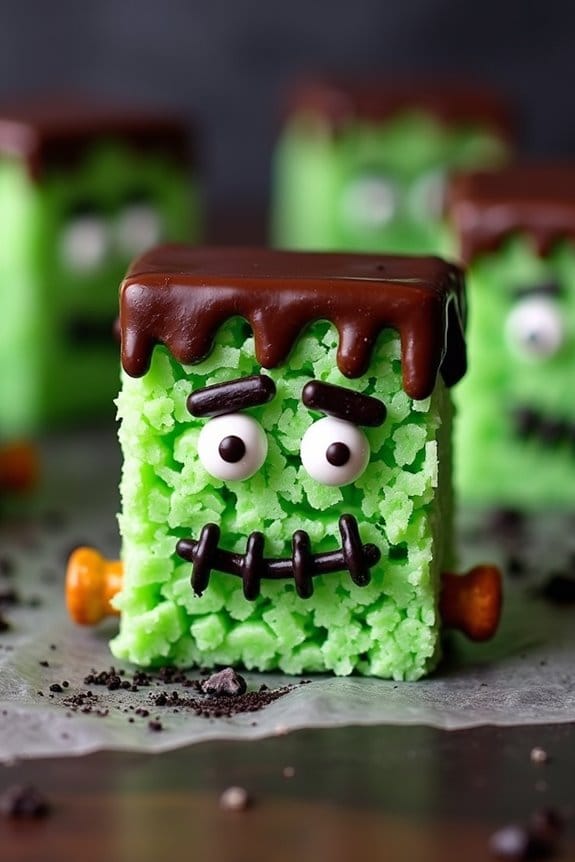
Frankenstein Rice Krispie Treats are a fun and festive addition to any Halloween party. These treats aren’t only delicious but also a great activity to involve children in the kitchen. With their bright green color and adorable candy eyes, these themed snacks will surely capture the imagination and appetite of both adults and kids alike.
A delightful treat that entertains and enchants both kids and adults at Halloween gatherings.
Perfectly chewy and marshmallowy, these Rice Krispie Treats are transformed into spooky yet charming Frankensteins that will serve as a delightful centerpiece at your Halloween gathering. Ideal for serving 4-6 people, this recipe takes the classic Rice Krispie Treats to a whole new level.
Not only are they simple to make, but they’re also easy to customize with your own creative flair. Whether you want to add extra decorations or change up the flavor, these Frankenstein Rice Krispie Treats offer a versatile canvas for your culinary creativity. Gather your ingredients and get ready to brew up some Halloween magic in your kitchen!
Ingredients:
- 3 tablespoons unsalted butter
- 1 package (10 oz) mini marshmallows
- 6 cups Rice Krispies cereal
- Green food coloring
- 1 cup chocolate candy melts
- Black decorating gel
- Candy eyes
- Pretzel sticks
Instructions:
- Prepare the Pan: Start by lining a 9×13 inch baking pan with parchment paper or lightly greasing it with butter. This will prevent the treats from sticking.
- Melt the Butter and Marshmallows: In a large pot, melt 3 tablespoons of unsalted butter over low heat. Once melted, add the mini marshmallows and stir continuously until they’re fully melted and smooth.
- Add Food Coloring: Remove the pot from the heat and add green food coloring to the melted marshmallow mixture. Stir until you achieve your desired shade of green, which will be the base color for your Frankenstein treats.
- Mix in the Cereal: Gradually add the Rice Krispies cereal to the marshmallow mixture, stirring until the cereal is evenly coated.
- Transfer to Pan: Pour the mixture into the prepared pan. Use a buttered spatula or a piece of wax paper to gently press the mixture evenly into the pan. Allow it to cool completely.
- Cut and Decorate: Once cooled, cut the treats into rectangular shapes. Melt the chocolate candy melts according to the package instructions. Dip the top of each rectangle into the chocolate to create Frankenstein’s hair.
Add candy eyes and use the black decorating gel to draw a mouth and stitches. Insert pretzel sticks into the sides of each treat to resemble bolts.
Extra Tips: To guarantee your Frankenstein Rice Krispie Treats are a hit, be mindful of the consistency of your marshmallow mixture; it should be smooth and not overly hot when adding the food coloring.
If the mixture is too hot, it may cause the food coloring to spread unevenly. Additionally, when decorating, patience is key. Allow the chocolate to set before adding the gel and candy eyes to prevent any smudging.
Finally, feel free to experiment with different decorations or colors to personalize your treats to your liking. Enjoy these ghoulish goodies at your next Halloween bash!
Bloody Popcorn Brains
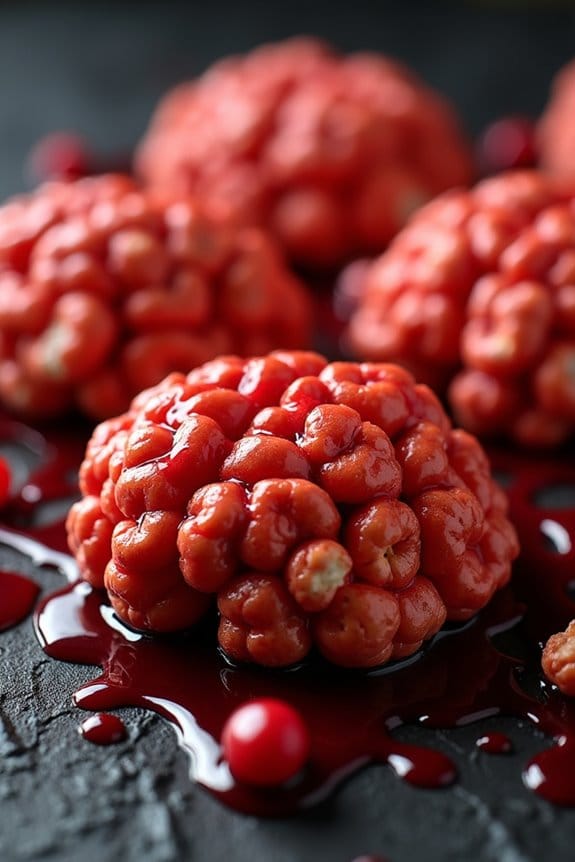
Halloween is a time for spooky fun, and nothing sets the stage better than themed snacks that are both delicious and visually enchanting. Enter “Bloody Popcorn Brains,” a gory yet delightful treat perfect for your Halloween party spread. This creative concoction takes ordinary popcorn and transforms it into a creepy, edible brain, drizzled with a sweet and sticky “bloody” syrup.
It’s an easy-to-make recipe that will surely be a hit among both kids and adults looking to get into the Halloween spirit. This recipe is designed to serve 4-6 people, making it ideal for a small gathering or as part of a larger array of Halloween-themed snacks. The combination of airy popcorn with the rich sweetness of the syrup creates an irresistible treat.
Whether you’re hosting a party or just enjoying a spooky movie night at home, Bloody Popcorn Brains will add a touch of eerie charm to any event.
Ingredients (Serving Size: 4-6 people):
- 8 cups of popped popcorn
- 1 cup of granulated sugar
- 1/2 cup of light corn syrup
- 1/4 cup of unsalted butter
- 1/2 teaspoon of salt
- 1/4 teaspoon of red food coloring
- 1 teaspoon of vanilla extract
Cooking Instructions:
- Pop the Popcorn: Begin by popping the popcorn using your preferred method, whether it’s using a stovetop, air popper, or microwave. Once popped, place the popcorn in a large mixing bowl and set aside.
- Prepare the Syrup: In a medium-sized saucepan over medium heat, combine the granulated sugar, light corn syrup, unsalted butter, and salt. Stir the mixture continuously until the butter has melted and the sugar has completely dissolved.
- Add Color and Flavor: Once the mixture is smooth, remove it from the heat. Add the red food coloring and vanilla extract to the syrup, stirring well until fully combined. Adjust the red food coloring to achieve the desired shade of “bloody” red.
- Coat the Popcorn: Carefully pour the syrup over the popped popcorn in the large mixing bowl. Use a spatula to gently toss the popcorn, ensuring each piece is coated evenly with the syrup.
- Shape the Brains: With clean hands, take portions of the coated popcorn and mold them into brain-like mounds. Place each formed popcorn brain onto a lined baking sheet.
- Let It Set: Allow the popcorn brains to cool and set at room temperature for about 20-30 minutes. The syrup will harden slightly, giving the popcorn brains a firm texture.
Extra Tips:
For an extra touch of authenticity, consider using a few marshmallows in the syrup mixture to create a gooey texture reminiscent of brain matter. Additionally, if you prefer a darker shade of red, gradually add more food coloring until you achieve the perfect level of “bloody” horror.
When shaping the popcorn brains, lightly coat your hands with butter or non-stick spray to prevent sticking. Finally, store any leftover popcorn brains in an airtight container to keep them fresh and crunchy until the next frightful occasion.
Skeleton Bones Breadsticks

Skeleton Bones Breadsticks are the perfect spooky snack to add a touch of eerie fun to your Halloween party spread. These deliciously crispy breadsticks aren’t only shaped like bones but also infused with a delightful flavor that both kids and adults will enjoy.
Made with simple ingredients, this recipe is easy to follow, making it an ideal choice for a festive gathering. Whether you’re hosting a monster bash or a haunted house party, these Skeleton Bones Breadsticks will surely be a hit with your guests.
These breadsticks aren’t just visually appealing but also scrumptiously tasty. The dough is seasoned and shaped to resemble creepy bones, then baked to golden perfection. Serve them with a side of marinara sauce or a spicy garlic dip to enhance the flavor, and watch as your guests devour these fun and festive treats.
With a serving size suitable for 4-6 people, this recipe guarantees that you have enough bone-chilling snacks for everyone at your celebration.
Ingredients (Serving Size: 4-6 people):
- 1 package of refrigerated pizza dough
- 2 tablespoons olive oil
- 1 tablespoon garlic powder
- 1 tablespoon Italian seasoning
- 1 teaspoon salt
- 1/2 cup grated Parmesan cheese
- Marinara sauce, for dipping
Cooking Instructions:
- Preheat Oven: Begin by preheating your oven to 375°F (190°C). This guarantees your oven is at the right temperature for baking the breadsticks to a perfect golden brown.
- Prepare Dough: Roll out the refrigerated pizza dough on a lightly floured surface to about 1/4-inch thickness. Using a knife or pizza cutter, cut the dough into strips approximately 6-8 inches long and 1/2 inch wide.
- Shape the Bones: To create the bone shape, gently tie a small knot at each end of the dough strips. Pull and stretch the dough slightly if needed to form a bone-like appearance.
- Season the Breadsticks: Place the shaped dough strips onto a baking sheet lined with parchment paper. Brush each breadstick with olive oil, ensuring they’re evenly coated. Sprinkle garlic powder, Italian seasoning, salt, and grated Parmesan cheese over the top.
- Bake: Place the baking sheet in the preheated oven and bake for 12-15 minutes or until the breadsticks are golden brown and crispy.
- Serve: Once baked, remove the breadsticks from the oven and let them cool slightly. Serve warm with a side of marinara sauce for dipping.
Extra Tips: For extra flavor, consider adding a little crushed red pepper to the seasoning mix for a spicy kick. If the dough is too sticky, dust it with a little more flour to make it easier to handle.
You can also experiment with different cheeses or seasonings to suit your taste preferences. Remember, the key to achieving the perfect bone shape is in the knotting, so take your time to guarantee each breadstick looks just right. Enjoy these spooky treats fresh out of the oven for the best taste and texture.
Ghoulish Guacamole Dip
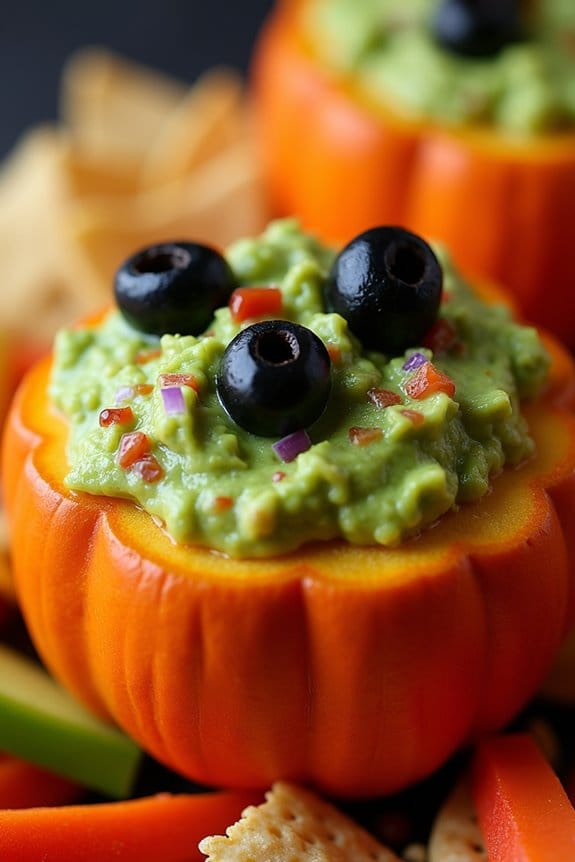
Halloween is the perfect time to get creative with your party snacks, and what better way to do so than with a spooky twist on a classic favorite? Introducing the Ghoulish Guacamole Dip, a delicious and frightfully fun dish that will delight your guests. This vibrant green dip, with its rich and creamy texture, can be transformed into a ghoulish centerpiece for your Halloween buffet.
With a few simple ingredients and a touch of creativity, you can whip up a dish that not only tastes great but also adds a festive flair to your spooky celebrations. The Ghoulish Guacamole Dip is perfect for serving 4-6 people and can be paired with tortilla chips, veggie sticks, or even spread on top of toast for a hauntingly good snack.
Whip up a festive Ghoulish Guacamole Dip for a hauntingly delicious Halloween treat!
The key to achieving the perfect flavor and consistency lies in using ripe avocados and fresh ingredients, ensuring that each bite is bursting with flavor. Whether you’re hosting a monster bash or just want to add a touch of Halloween spirit to your snacks, this dip is sure to be a crowd-pleaser.
Ingredients (serving size: 4-6 people):
- 3 ripe avocados
- 1 medium lime, juiced
- 1 small red onion, finely chopped
- 2 Roma tomatoes, diced
- 1 jalapeño, seeded and minced
- 2 tablespoons fresh cilantro, chopped
- Salt, to taste
- Black olives, for garnish (optional)
- Tortilla chips or veggie sticks, for serving
Cooking Instructions:
- Prepare the Avocados: Start by cutting the avocados in half and removing the pits. Scoop the flesh into a mixing bowl using a spoon.
- Mash the Avocados: Using a fork or a potato masher, mash the avocados until you reach your desired consistency. Some people prefer their guacamole chunky, while others like it smooth.
- Add Lime Juice: Squeeze the juice of one lime over the mashed avocados. This not only adds flavor but also helps prevent the avocados from browning.
- Mix in Vegetables: Add the finely chopped red onion, diced tomatoes, and minced jalapeño to the bowl. Gently mix to combine all the ingredients.
- Season and Garnish: Stir in the chopped cilantro and add salt to taste. If desired, add black olives on top to give your guacamole a spooky appearance, such as spider shapes or eyes.
- Serve: Transfer the guacamole to a serving dish and surround with tortilla chips or veggie sticks. Encourage guests to indulge and enjoy!
Extra Tips: To keep your Ghoulish Guacamole Dip fresh and green longer, press a piece of plastic wrap directly onto the surface of the dip to minimize air exposure before chilling.
Additionally, if you want to enhance the spookiness of your presentation, consider carving a small pumpkin or bell pepper to use as a serving bowl. You can also experiment with adding other ingredients like roasted garlic or a pinch of cumin for an extra flavor twist. Enjoy your Halloween festivities with this fun and delicious treat!
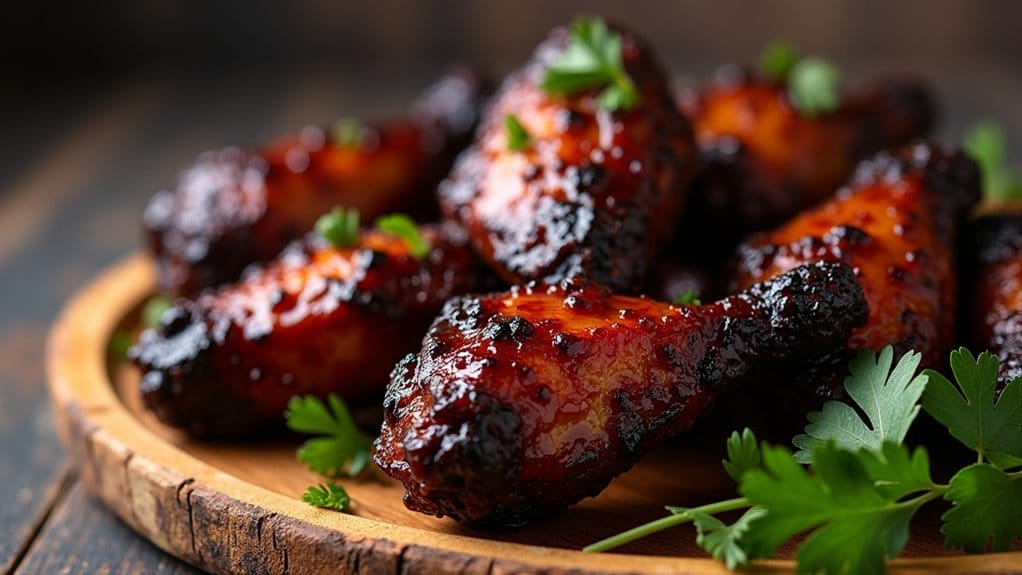
Vampire Bat Wings

If you’re looking to add a spooky and delicious touch to your Halloween party, Vampire Bat Wings are the perfect dish. These wings aren’t only flavorful but also visually striking, making them a great centerpiece for your party spread. They’re seasoned with a blend of spices and coated in a dark, savory glaze that will have both kids and adults reaching for seconds. Paired with a side of your choice, they promise to be a hit at any gathering.
The key to making these Vampire Bat Wings irresistible lies in the marinade and cooking technique. By marinating the wings in a rich combination of soy sauce, garlic, and other spices, the flavors are deeply infused. The dark glaze, achieved with the use of molasses and balsamic vinegar, gives the wings their iconic dark appearance, perfect for the eerie theme of Halloween.
Here’s how you can make this ghoulishly good dish for a serving size of 4-6 people:
Ingredients
- 2 pounds chicken wings
- 1/2 cup soy sauce
- 1/4 cup balsamic vinegar
- 1/4 cup molasses
- 3 tablespoons olive oil
- 4 cloves garlic, minced
- 1 tablespoon smoked paprika
- 1 teaspoon ground black pepper
- 1 teaspoon salt
- 1 teaspoon cayenne pepper
- 2 tablespoons honey
- Fresh parsley for garnish (optional)
Cooking Instructions
- Prepare the Marinade: In a large mixing bowl, combine the soy sauce, balsamic vinegar, molasses, olive oil, minced garlic, smoked paprika, black pepper, salt, and cayenne pepper. Whisk together until well mixed.
- Marinate the Wings: Add the chicken wings to the marinade, ensuring each wing is fully coated. Cover the bowl with plastic wrap and refrigerate for at least 2 hours, preferably overnight, to allow the flavors to infuse.
- Preheat the Oven: When ready to cook, preheat your oven to 400°F (200°C). Line a baking sheet with aluminum foil and place a wire rack on top. This will help the wings cook evenly.
- Bake the Wings: Arrange the marinated wings on the wire rack, making sure they aren’t touching each other. Bake in the preheated oven for 40-45 minutes, turning them halfway through, until they’re crispy and cooked through.
- Prepare the Glaze: While the wings are baking, take a small saucepan and combine the honey and remaining marinade from the bowl. Heat over medium heat until it thickens slightly, about 5-7 minutes.
- Glaze the Wings: Once the wings are cooked, remove them from the oven and brush the prepared glaze generously over each wing. Return them to the oven for an additional 5 minutes to allow the glaze to set.
- Serve: Transfer the wings to a serving platter, sprinkle with fresh parsley if desired, and serve immediately.
Extra Tips
For an extra crispy texture, you can increase the oven temperature to 425°F (220°C) for the last 10 minutes of baking. If you prefer a spicier kick, adjust the amount of cayenne pepper to taste.
These Vampire Bat Wings can also be prepared on a grill for a smoky flavor profile, just be sure to monitor closely to prevent burning. Serve them with a side of chilling blue cheese or ranch dressing to balance the heat, and watch your guests devour these deliciously dark treats.
