
Creating a Christmas dinner that’s both delicious and guilt-free is easier than you might think. Picture your table adorned with vibrant dishes like herb-crusted turkey and maple-glazed salmon. Every recipe combines fresh ingredients and wholesome flavors, perfect for celebrating without compromise. I’ll guide you through these mouth-watering creations. Let’s explore this flavorful journey together.
Herb-Crusted Turkey Breast With Garlic and Lemon
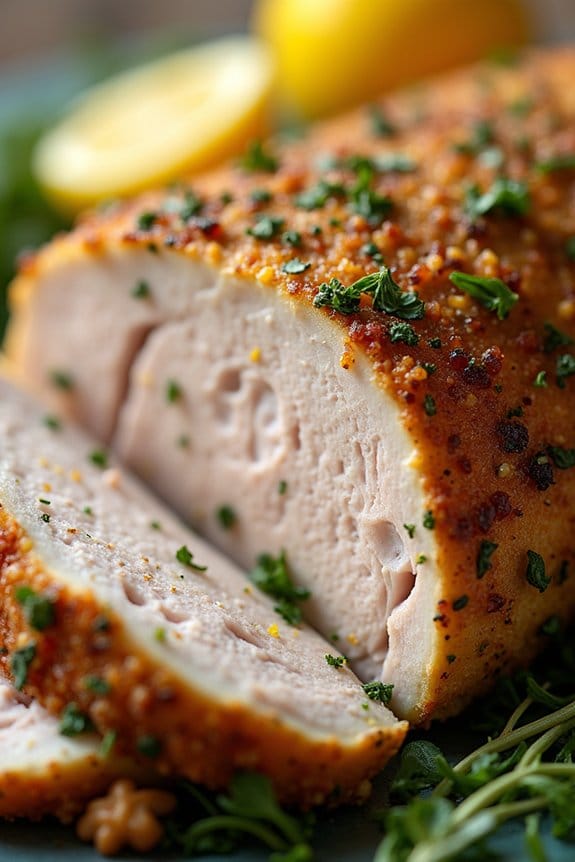
Herb-Crusted Turkey Breast With Garlic and Lemon is a delightful and healthier alternative to the traditional holiday turkey. This dish perfectly combines the aromatic flavors of fresh herbs with the zest of lemon and the robust flavor of garlic, creating a succulent and flavorful turkey breast that will be the star of your Christmas dinner.
It’s an excellent choice for those who want to enjoy a festive meal without the extra calories and fat that often come with holiday feasts.
This recipe features a simple yet tasty herb crust made from fresh rosemary, thyme, and parsley, which envelops the turkey breast in a fragrant coating. The addition of lemon not only brightens the flavors but also helps to tenderize the meat, guaranteeing each slice is juicy and tender.
Perfect for serving 4-6 people, this dish is sure to impress your family and friends with its delicious taste and inviting aroma.
Ingredients (Serves 4-6):
- 1 whole turkey breast (about 3-4 pounds)
- 2 tablespoons olive oil
- 3 cloves garlic, minced
- Zest of 1 lemon
- Juice of 1 lemon
- 1 tablespoon fresh rosemary, chopped
- 1 tablespoon fresh thyme, chopped
- 1 tablespoon fresh parsley, chopped
- Salt and pepper to taste
Cooking Instructions:
- Preheat the Oven: Begin by preheating your oven to 375°F (190°C). This guarantees that your turkey breast will cook evenly and develop a nice crust.
- Prepare the Herb Mixture: In a small bowl, combine the minced garlic, lemon zest, lemon juice, chopped rosemary, thyme, parsley, salt, and pepper. Mix well to create a fragrant herb paste.
- Season the Turkey Breast: Place the turkey breast on a clean cutting board. Pat it dry with paper towels to remove any excess moisture. Rub the olive oil all over the turkey breast, then apply the herb mixture, making sure to coat the entire surface evenly.
- Roast the Turkey Breast: Transfer the seasoned turkey breast to a roasting pan or a baking dish. Place it in the preheated oven and roast for about 1 to 1.5 hours, or until the internal temperature reaches 165°F (74°C). Baste the turkey occasionally with the juices from the pan to keep it moist.
- Rest Before Slicing: Once cooked, remove the turkey breast from the oven and let it rest for at least 10 minutes before slicing. This allows the juices to redistribute, guaranteeing each slice stays juicy.
Extra Tips:
When preparing Herb-Crusted Turkey Breast With Garlic and Lemon, make sure to use fresh herbs for the best flavor. If fresh herbs aren’t available, you can use dried herbs, but reduce the amount by half because they’re more concentrated.
Confirm you don’t overcook the turkey breast by using a meat thermometer to get an accurate reading of the internal temperature. Additionally, you can prepare the herb mixture ahead of time and store it in the refrigerator for up to a day, saving you some time on the day of cooking.
Maple Glazed Salmon With Roasted Brussels Sprouts
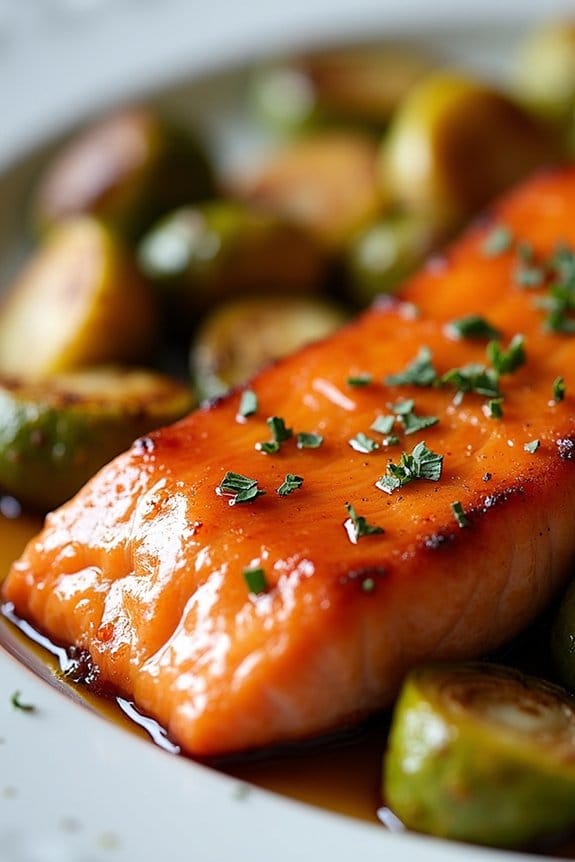
Maple Glazed Salmon With Roasted Brussels Sprouts is a perfect festive dish that combines the rich, sweet flavors of maple syrup with the savory taste of salmon. This dish not only looks beautiful on the Christmas dinner table, but it’s also packed with nutrients and omega-3 fatty acids, making it a healthy option for the holiday season.
The roasted Brussels sprouts add a delightful crunch and earthiness to the meal, complementing the tender, flaky salmon beautifully.
Preparing this dish is a simple yet rewarding process that can be accomplished in under an hour, making it ideal for busy holiday schedules. The sweet glaze caramelizes on the salmon, creating a glossy finish that’s as appealing to the eyes as it’s to the palate. Paired with the Brussels sprouts that have been roasted to perfection, this dish is bound to be a crowd-pleaser among your family and friends.
Here’s how you can create this delicious meal for 4-6 people.
Ingredients:
- 4-6 salmon fillets (approximately 6 ounces each)
- 1/3 cup maple syrup
- 2 tablespoons soy sauce
- 1 tablespoon Dijon mustard
- 1 tablespoon olive oil
- 1 1/2 pounds Brussels sprouts, trimmed and halved
- Salt and pepper to taste
- 1 tablespoon balsamic vinegar
- 2 cloves garlic, minced
Cooking Instructions:
- Prepare the Glaze: In a small bowl, whisk together the maple syrup, soy sauce, and Dijon mustard until well combined. Set aside to allow the flavors to meld together.
- Preheat the Oven: Preheat your oven to 400°F (200°C). Line a baking sheet with parchment paper or lightly grease it with cooking spray to prevent sticking.
- Prepare the Brussels Sprouts: In a large bowl, toss the halved Brussels sprouts with olive oil, minced garlic, balsamic vinegar, salt, and pepper. Spread them evenly on one half of the prepared baking sheet.
- Glaze the Salmon: Place the salmon fillets on the other half of the baking sheet. Brush each fillet generously with the maple glaze. Reserve any leftover glaze for basting during cooking.
- Roast the Dish: Place the baking sheet in the preheated oven and roast for 20-25 minutes, or until the salmon is cooked through and flakes easily with a fork, and the Brussels sprouts are tender and golden brown.
- Baste and Serve: During the last 5 minutes of cooking, brush the salmon with any remaining glaze. Once cooked, remove from the oven and let rest for a few minutes. Serve the salmon and Brussels sprouts warm, garnished with additional salt and pepper if desired.
Extra Tips: To guarantee even cooking, try to select salmon fillets that are of similar thickness. You can also add a sprinkle of fresh herbs such as thyme or rosemary to the Brussels sprouts before roasting for an extra burst of flavor.
If you prefer a little heat, consider adding a pinch of red pepper flakes to the glaze. Additionally, using fresh Brussels sprouts instead of frozen will yield a better texture and flavor in the final dish.
Enjoy your healthy Christmas dinner with this delightful combination of maple-glazed salmon and roasted Brussels sprouts!
Quinoa-Stuffed Bell Peppers With Cranberries and Walnuts
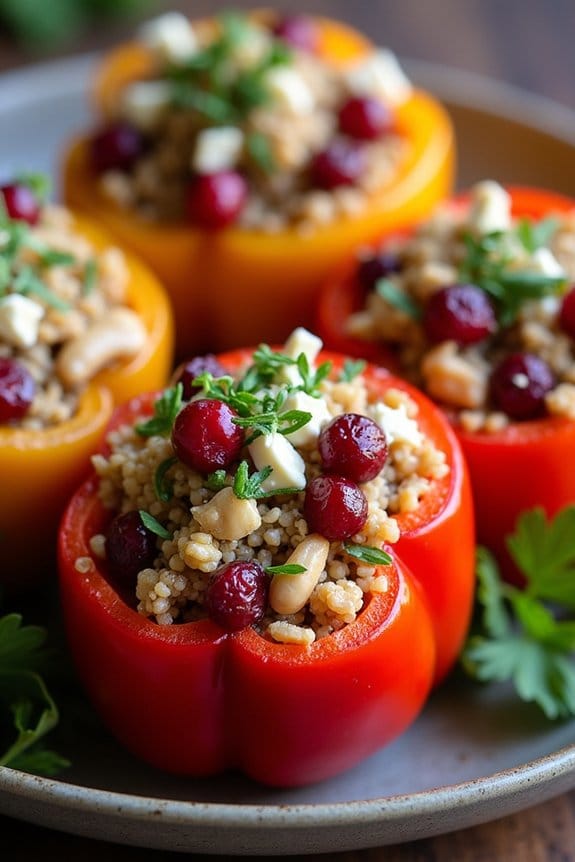
Indulge in a festive and nutritious treat this holiday season with Quinoa-Stuffed Bell Peppers With Cranberries and Walnuts. This delightful dish combines the earthy flavors of quinoa with the tartness of cranberries and the crunch of walnuts, all encased in vibrant bell peppers.
It’s a perfect choice for those looking to enjoy a healthy yet flavorful meal amidst the holiday feasting. Packed with proteins and healthy fats, this recipe won’t only satisfy your taste buds but also nourish your body.
Ideal for a gathering of family and friends, this recipe serves 4-6 people. The quinoa stuffing is seasoned with aromatic herbs and spices, creating a symphony of flavors that complement the sweetness of the roasted bell peppers.
Whether you’re hosting a holiday dinner or simply want to surprise your loved ones with a wholesome meal, these quinoa-stuffed bell peppers are sure to impress and become a cherished addition to your festive menu.
Ingredients (serves 4-6):
- 6 large bell peppers (any color)
- 1 cup quinoa, rinsed
- 2 cups vegetable broth or water
- 1 cup fresh or dried cranberries
- 1 cup walnuts, roughly chopped
- 1 small red onion, finely chopped
- 2 cloves garlic, minced
- 1 tablespoon olive oil
- 1 teaspoon dried thyme
- 1 teaspoon dried oregano
- Salt and pepper to taste
- 1 cup feta cheese, crumbled (optional)
- Fresh parsley, chopped for garnish
Cooking Instructions:
- Preheat the Oven: Begin by preheating your oven to 375°F (190°C). This guarantees it reaches the right temperature by the time you’re ready to bake the stuffed peppers.
- Prepare the Quinoa: In a medium saucepan, combine the rinsed quinoa and vegetable broth (or water). Bring to a boil, then reduce the heat to low, cover, and simmer for about 15 minutes or until the quinoa is fluffy and the liquid is absorbed. Remove from heat and let it cool slightly.
- Prepare the Bell Peppers: While the quinoa is cooking, cut the tops off the bell peppers and remove the seeds and membranes. Lightly brush the outside of the peppers with olive oil and place them in a baking dish.
- Sauté the Aromatics: In a skillet, heat the olive oil over medium heat. Add the chopped red onion and garlic, sautéing until they become translucent and fragrant, about 3-4 minutes.
- Mix the Stuffing: In a large bowl, combine the cooked quinoa, sautéed onion and garlic, cranberries, walnuts, dried thyme, dried oregano, salt, and pepper. Mix well to guarantee all ingredients are evenly distributed.
- Stuff the Peppers: Spoon the quinoa mixture into each bell pepper, pressing down gently to pack the stuffing. If using, sprinkle crumbled feta cheese over the top of the stuffing.
- Bake the Peppers: Cover the baking dish with aluminum foil and bake in the preheated oven for 25-30 minutes. Remove the foil and bake for an additional 10 minutes or until the peppers are tender and slightly charred on the edges.
- Garnish and Serve: Remove from the oven and let the peppers cool slightly before garnishing with fresh chopped parsley. Serve warm and enjoy!
Extra Tips: When preparing the bell peppers, try to choose ones that can stand upright in the baking dish to prevent the stuffing from spilling out.
If you prefer a vegan version, simply omit the feta cheese or substitute it with a plant-based alternative. Additionally, feel free to experiment with different herbs and spices to suit your personal taste.
Leftovers can be stored in an airtight container in the refrigerator for up to three days, making them a great option for meal prep during the holiday season.
Rosemary and Thyme Roasted Vegetables
Celebrate the festive season with a vibrant and healthy dish that adds a burst of color and flavor to your Christmas dinner table. Rosemary and Thyme Roasted Vegetables are a delightful and nutritious side dish that complements any holiday spread. This recipe isn’t only simple to prepare but also allows you to enjoy the natural sweetness of root vegetables enhanced by the earthy aroma of fresh herbs.
Whether you’re hosting a family gathering or an intimate dinner, these roasted vegetables are sure to impress your guests and add a wholesome touch to your meal. The combination of rosemary and thyme infuses the vegetables with a fragrant and savory flavor, while roasting brings out their natural sweetness, creating a perfect balance of taste.
By choosing a variety of colorful vegetables, you not only make the dish visually appealing but also pack it with a range of nutrients. This recipe serves 4-6 people, making it ideal for a small gathering or as a side dish to accompany the main course. Let’s plunge into the ingredients and steps to create this delicious and festive dish.
Ingredients (Serves 4-6):
- 2 large carrots, peeled and sliced
- 2 parsnips, peeled and sliced
- 1 red bell pepper, chopped
- 1 yellow bell pepper, chopped
- 1 zucchini, sliced
- 1 red onion, cut into wedges
- 2 tablespoons olive oil
- 2 teaspoons fresh rosemary, chopped
- 2 teaspoons fresh thyme, chopped
- Salt and pepper to taste
- 1 tablespoon balsamic vinegar (optional)
Cooking Instructions:
- Preheat the Oven: Start by preheating your oven to 400°F (200°C). This guarantees the oven is hot enough to roast the vegetables evenly.
- Prepare the Vegetables: Wash all the vegetables thoroughly. Peel the carrots and parsnips, then slice them into equal-sized pieces to ensure even cooking. Chop the bell peppers and slice the zucchini. Cut the red onion into wedges.
- Season the Vegetables: In a large mixing bowl, combine all the prepared vegetables. Drizzle the olive oil over the vegetables and sprinkle with chopped rosemary, thyme, salt, and pepper. Toss the vegetables well to make sure they’re evenly coated with the oil and seasonings.
- Arrange on a Baking Sheet: Spread the seasoned vegetables in a single layer on a large baking sheet. Confirm they aren’t overcrowded to allow proper roasting. You may need to use two baking sheets if necessary.
- Roast the Vegetables: Place the baking sheet into the preheated oven and roast for 25-30 minutes. Halfway through the roasting time, stir the vegetables to promote even cooking. They should be tender and slightly caramelized when done.
- Add Balsamic Vinegar (Optional): If using balsamic vinegar, drizzle it over the vegetables during the last 5 minutes of roasting for a touch of sweetness and acidity.
- Serve Warm: Once roasted to perfection, remove the vegetables from the oven and transfer them to a serving platter. Serve warm as a delicious side dish to your Christmas meal.
Extra Tips:
To guarantee your Rosemary and Thyme Roasted Vegetables have the best texture and flavor, make sure all the vegetables are cut to a uniform size. This will help them cook evenly and prevent any from being under or overcooked.
If you prefer a little extra crispiness, broil the vegetables for the last 2-3 minutes of cooking, keeping a close eye to avoid burning. Feel free to experiment with other seasonal vegetables such as Brussels sprouts or sweet potatoes for added variety and nutrition. Enjoy these roasted vegetables as a versatile and healthy addition to your holiday feast!
Cauliflower Mash With Chives and Greek Yogurt
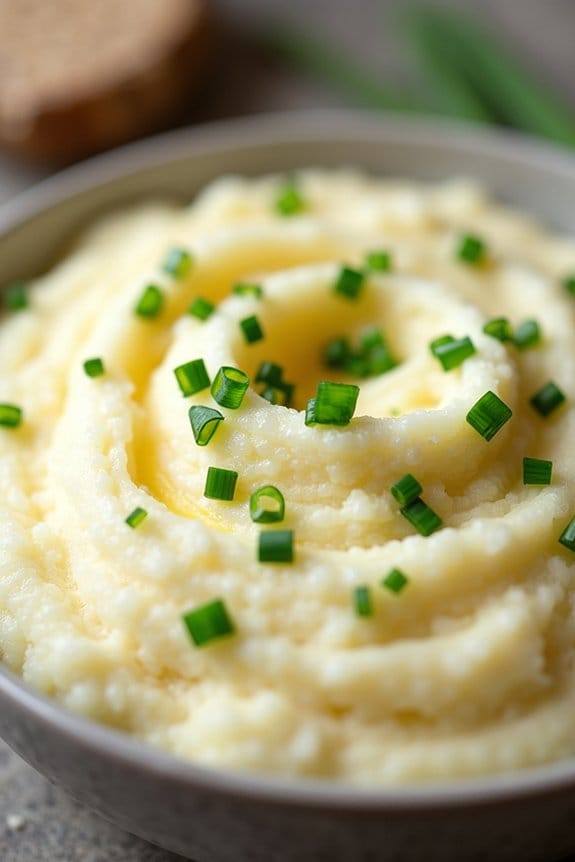
Cauliflower Mash With Chives and Greek Yogurt is a delightful and healthy alternative to traditional mashed potatoes, perfect for your Christmas dinner table. This dish offers a creamy texture and a subtle flavor profile, thanks to the combination of cauliflower, Greek yogurt, and fresh chives.
It’s a lighter option that doesn’t compromise on taste, making it a great addition for those looking to enjoy a festive meal without the heaviness of regular mashed potatoes.
The use of Greek yogurt not only makes the cauliflower mash creamy but also adds a tangy flavor and a boost of protein. Fresh chives bring a hint of onion-like sharpness, balancing the rich taste of the mash.
This dish isn’t only nutritious but also easy to prepare, guaranteeing you spend more time enjoying your holiday celebrations and less time in the kitchen.
Ingredients (serves 4-6):
- 1 large head of cauliflower
- 1/2 cup plain Greek yogurt
- 2 tablespoons unsalted butter
- 1/4 cup fresh chives, chopped
- 1 clove garlic, minced
- Salt and pepper to taste
Cooking Instructions:
- Prepare the Cauliflower: Begin by removing the leaves and stem from the cauliflower. Chop it into florets to guarantee even cooking. Rinse thoroughly under cold water.
- Cook the Cauliflower: Bring a large pot of water to a boil and add a pinch of salt. Add the cauliflower florets and cook them for about 10-15 minutes, or until they’re tender and can be easily pierced with a fork.
- Drain and Dry: Once cooked, drain the cauliflower well and let it sit in the colander for a few minutes to allow excess moisture to evaporate. This step is essential to avoid a watery mash.
- Mash the Cauliflower: Transfer the cauliflower to a large bowl or back into the pot. Add the Greek yogurt, unsalted butter, and minced garlic. Use an immersion blender or a potato masher to blend everything until smooth and creamy.
- Season and Flavor: Add salt and pepper to taste. Stir in the chopped chives, reserving a few for garnish.
- Serve: Transfer the cauliflower mash to a serving bowl, garnish with the remaining chives, and serve warm.
Extra Tips: To enhance the flavor, consider roasting the cauliflower instead of boiling it to add a subtle, nutty taste. If you prefer a thicker texture, reduce the amount of Greek yogurt or let the cooked cauliflower sit longer to drain more water.
For a dairy-free version, substitute the Greek yogurt with a dairy-free alternative like almond or coconut yogurt, and use plant-based butter. Enjoy this healthy side dish as part of your festive feast!
Spinach and Feta Stuffed Chicken Breast

Spinach and Feta Stuffed Chicken Breast is a delicious and healthy option for a Christmas dinner that offers a flavorful twist on the traditional holiday fare. This dish combines tender chicken breast with a savory mixture of spinach, feta cheese, and herbs, creating a mouthwatering filling that’s both nutritious and satisfying. The combination of creamy feta and fresh spinach provides the perfect balance of flavors, while the chicken remains juicy and tender, making it a crowd-pleaser at any festive gathering.
This recipe isn’t only packed with flavor but is also relatively simple to prepare, making it an ideal choice for those looking to create a memorable meal without spending hours in the kitchen. As the chicken bakes, the filling melds together, infusing the meat with a rich, savory essence. Serve this entrée alongside your favorite holiday sides for a complete Christmas dinner that’s sure to impress family and friends.
Ingredients (serves 4-6 people):
- 4-6 boneless, skinless chicken breasts
- 1 cup fresh spinach, chopped
- 1 cup crumbled feta cheese
- 2 cloves garlic, minced
- 1 tablespoon olive oil
- 1 teaspoon dried oregano
- 1 teaspoon dried basil
- Salt and pepper to taste
- Toothpicks or kitchen twine
Cooking Instructions:
- Preheat the Oven: Start by preheating your oven to 375°F (190°C) to guarantee it’s ready for baking once the chicken is prepared.
- Prepare the Filling: In a medium bowl, combine the chopped spinach, crumbled feta cheese, minced garlic, olive oil, dried oregano, dried basil, salt, and pepper. Mix well until all the ingredients are evenly distributed.
- Butterfly the Chicken: Using a sharp knife, carefully butterfly each chicken breast by slicing it horizontally, ensuring not to cut all the way through, to create a pocket for the filling.
- Stuff the Chicken: Spoon a generous amount of the spinach and feta mixture into each chicken breast’s pocket. Be sure to distribute the filling evenly among all the breasts.
- Secure the Filling: Use toothpicks or kitchen twine to secure the chicken breasts, guaranteeing the filling stays intact during cooking.
- Season the Chicken: Lightly season the outside of the chicken breasts with additional salt, pepper, and a drizzle of olive oil to enhance the flavor and help achieve a golden-brown finish.
- Bake the Chicken: Place the stuffed chicken breasts on a baking sheet lined with parchment paper or a lightly greased baking dish. Bake in the preheated oven for 25-30 minutes, or until the chicken is cooked through and reaches an internal temperature of 165°F (74°C).
- Rest and Serve: Once done, remove the chicken from the oven and let it rest for a few minutes before removing the toothpicks or twine. Serve hot alongside your favorite holiday sides.
Extra Tips:
When preparing Spinach and Feta Stuffed Chicken Breast, consider using fresh baby spinach for a milder flavor and tender texture. If you prefer a creamier filling, try mixing a small amount of cream cheese with the feta.
Additionally, keep an eye on the baking time, as overcooking the chicken can cause it to become dry. If you want a bit of added crunch, you can also top the stuffed chicken with breadcrumbs before baking. Enjoy your festive meal!
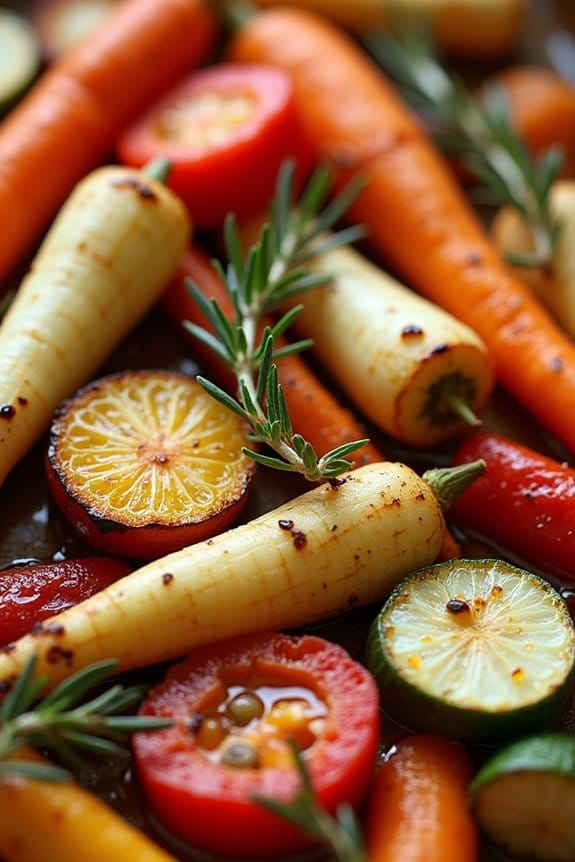
Balsamic Glazed Roasted Carrots

Elevate your Christmas dinner with these delightful Balsamic Glazed Roasted Carrots. This side dish combines the natural sweetness of carrots with the rich, tangy flavor of balsamic glaze, creating a perfect balance that complements any holiday spread.
Not only is this recipe visually appealing with its vibrant color, but it also guarantees that you and your guests enjoy a healthy, flavorful dish that doesn’t compromise on taste.
The key to this dish lies in the roasting process, which enhances the natural flavors of the carrots while adding a caramelized touch. The balsamic glaze, infused with a hint of honey and herbs, adds depth and complexity to the dish.
Serve it alongside your main course to bring a touch of elegance and nutrition to your festive meal. This recipe is designed to serve 4-6 people, making it ideal for a family gathering or a small holiday celebration.
Ingredients:
- 2 pounds of carrots, peeled and cut into uniform sticks
- 3 tablespoons olive oil
- Salt and freshly ground black pepper, to taste
- 1/4 cup balsamic vinegar
- 2 tablespoons honey
- 1 teaspoon fresh thyme leaves, plus more for garnish
- 1 tablespoon chopped fresh parsley, for garnish
Cooking Instructions:
- Preheat the Oven: Preheat your oven to 400°F (200°C). This temperature is perfect for roasting and will help achieve a nice caramelization on the carrots.
- Prepare the Carrots: In a large mixing bowl, toss the peeled and cut carrots with olive oil, salt, and freshly ground black pepper. Confirm that the carrots are evenly coated, which will help them roast evenly.
- Roast the Carrots: Spread the coated carrots in a single layer on a baking sheet. Place the sheet in the preheated oven and roast for 25-30 minutes, or until the carrots are tender and slightly caramelized, turning them halfway through the cooking time for even roasting.
- Make the Balsamic Glaze: While the carrots are roasting, prepare the balsamic glaze. In a small saucepan, combine the balsamic vinegar, honey, and thyme leaves. Bring the mixture to a simmer over medium heat and let it reduce until it thickens slightly, about 5-7 minutes.
- Glaze the Carrots: Once the carrots are roasted, remove them from the oven and transfer them to a serving dish. Drizzle the balsamic glaze over the carrots, ensuring they’re evenly coated. Toss them gently to combine.
- Garnish and Serve: Sprinkle the chopped parsley and additional thyme leaves over the glazed carrots for a fresh, aromatic touch. Serve immediately while warm.
Extra Tips:
When selecting carrots, opt for those that are firm and bright in color, as they tend to have the best flavor and texture.
If you prefer a slightly sweeter glaze, you can add more honey to the balsamic reduction. For a more robust flavor, consider using aged balsamic vinegar, which is thicker and richer.
Additionally, this dish can be prepared in advance up to the roasting stage and then finished with the glaze just before serving, making it a convenient yet impressive addition to your holiday menu.
Lentil and Mushroom Shepherd’s Pie

Lentil and Mushroom Shepherd’s Pie is a delicious and hearty dish that perfectly fits into a healthy Christmas dinner. This plant-based version of the traditional shepherd’s pie is full of flavor and packed with nutrients, making it an excellent choice for those looking to enjoy a comforting meal without compromising on health. The combination of lentils and mushrooms provides a rich, savory base, while a creamy mashed potato topping adds the perfect finishing touch.
This dish isn’t only full of flavor, but it’s also easy to prepare and can be made ahead of time, making it ideal for a holiday gathering. The lentils offer plenty of protein and fiber, while mushrooms add a depth of umami flavor that will satisfy even the most ardent meat lovers. Combined with aromatic herbs and spices, this Lentil and Mushroom Shepherd’s Pie is sure to be a hit on your Christmas dinner table.
Ingredients for 4-6 servings:
- 1 cup green or brown lentils, rinsed
- 2 1/2 cups vegetable broth
- 2 tablespoons olive oil
- 1 large onion, finely chopped
- 3 cloves garlic, minced
- 2 cups mushrooms, diced
- 2 carrots, diced
- 1 teaspoon thyme
- 1 teaspoon rosemary
- 2 tablespoons tomato paste
- 1 tablespoon soy sauce
- Salt and black pepper, to taste
- 4 cups mashed potatoes (prepared with milk and butter)
- 1/4 cup grated Parmesan cheese (optional)
- Fresh parsley, chopped (for garnish)
Cooking Instructions:
- Cook the Lentils: In a medium saucepan, combine the lentils and vegetable broth. Bring to a boil, then reduce the heat to low and simmer for about 25-30 minutes, or until the lentils are tender. Drain any excess liquid and set aside.
- Prepare the Vegetable Filling: In a large skillet, heat the olive oil over medium heat. Add the onion and garlic, sautéing until the onion becomes translucent, about 5 minutes. Stir in the mushrooms and carrots, and cook for an additional 8-10 minutes, until the vegetables are softened.
- Season the Filling: Add the thyme, rosemary, tomato paste, and soy sauce to the skillet, stirring well to combine. Cook for 2 more minutes to allow the flavors to meld together. Add the cooked lentils to the mixture, season with salt and black pepper to taste, and stir until everything is well incorporated.
- Assemble the Pie: Preheat your oven to 400°F (200°C). Transfer the lentil and mushroom mixture to a baking dish, spreading it out evenly. Top with the prepared mashed potatoes, smoothing the surface with a spatula. Sprinkle the grated Parmesan cheese on top, if using.
- Bake: Place the dish in the preheated oven and bake for 20-25 minutes, or until the top is golden brown and the filling is bubbling around the edges.
- Garnish and Serve: Remove the Shepherd’s Pie from the oven and let it cool for a few minutes before serving. Garnish with chopped parsley for a fresh touch.
Extra Tips:
For a smoother mashed potato topping, make sure your potatoes are fully cooked before mashing and add warm milk and butter for creaminess. If you prefer a vegan version, you can use plant-based milk and omit the Parmesan cheese. This dish can be prepared a day in advance; simply assemble and store it in the refrigerator, then bake it fresh on the day of serving.
Additionally, you can customize the pie by adding other vegetables like peas or corn for extra color and nutrition.
Zucchini Noodles With Pesto and Cherry Tomatoes
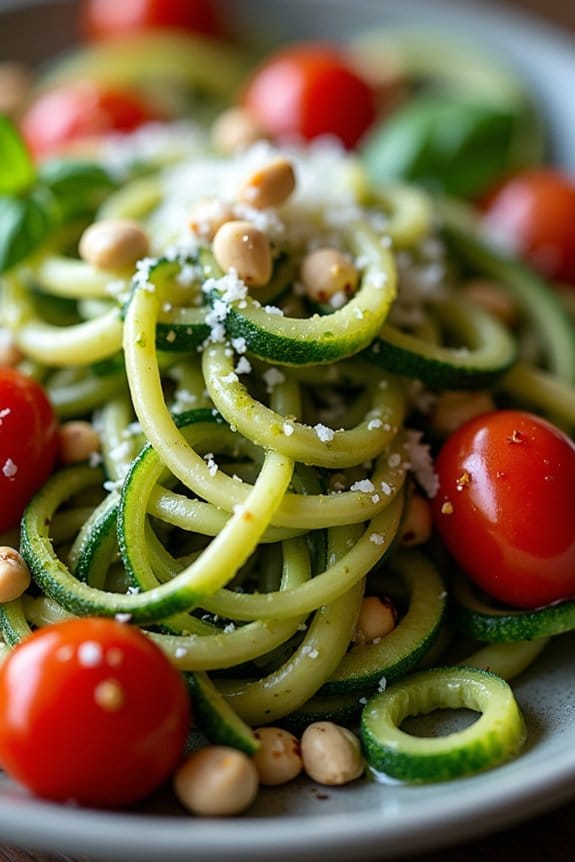
Zucchini Noodles With Pesto and Cherry Tomatoes is a delightful and healthy dish that brings a touch of freshness to your Christmas dinner. This vibrant dish replaces traditional pasta with spiralized zucchini noodles, offering a lower-calorie and gluten-free option that still satisfies the craving for a comforting meal. The fresh basil pesto adds a burst of flavor, while the juicy cherry tomatoes provide a sweet and tangy contrast, creating a balanced and colorful plate that will impress your guests.
Perfect for those looking to maintain a healthier lifestyle during the holiday season, Zucchini Noodles With Pesto and Cherry Tomatoes can be served as a light main course or as a side dish to complement your festive spread. This dish isn’t only easy to prepare but also quick to cook, ensuring you have more time to enjoy the company of your loved ones.
Let’s explore the ingredients you’ll need for serving 4-6 people.
Ingredients:
- 4 medium zucchini
- 1 cup cherry tomatoes, halved
- 1 cup fresh basil leaves
- 1/4 cup pine nuts
- 1/2 cup grated Parmesan cheese
- 2 cloves garlic
- 1/2 cup extra virgin olive oil
- Salt and pepper to taste
- Optional: red pepper flakes for garnish
Cooking Instructions:
- Prepare the Pesto: In a food processor, combine basil leaves, pine nuts, Parmesan cheese, and garlic. Pulse until the mixture is finely chopped. With the processor running, slowly add the olive oil until the pesto is smooth and emulsified. Season with salt and pepper to taste.
- Spiralize the Zucchini: Using a spiralizer, create noodles from the zucchini. If you don’t have a spiralizer, you can use a julienne peeler or a mandoline slicer to achieve similar results.
- Cook the Zucchini Noodles: Heat a large skillet over medium heat. Add a splash of olive oil and then the zucchini noodles. Cook for about 3-4 minutes, stirring occasionally, until the noodles are just tender. Be careful not to overcook them, as they can become mushy.
- Combine the Ingredients: Add the cherry tomatoes to the skillet and cook for another 1-2 minutes until they’re slightly softened. Remove the skillet from the heat and stir in the pesto until the noodles and tomatoes are evenly coated.
- Serve: Transfer the zucchini noodles to serving plates and garnish with additional Parmesan cheese and a sprinkle of red pepper flakes if desired. Serve immediately.
Extra Tips:
For the best flavor, use fresh and high-quality ingredients, especially when making the pesto. You can toast the pine nuts slightly before adding them to the food processor to enhance their nutty flavor.
If you prefer a creamier pesto, consider adding a small amount of ricotta cheese. Additionally, experiment with different herbs, such as parsley or mint, to create your own signature pesto variation.
Enjoy your healthy and delicious Zucchini Noodles With Pesto and Cherry Tomatoes at your festive table!
Almond-Crusted Pork Tenderloin
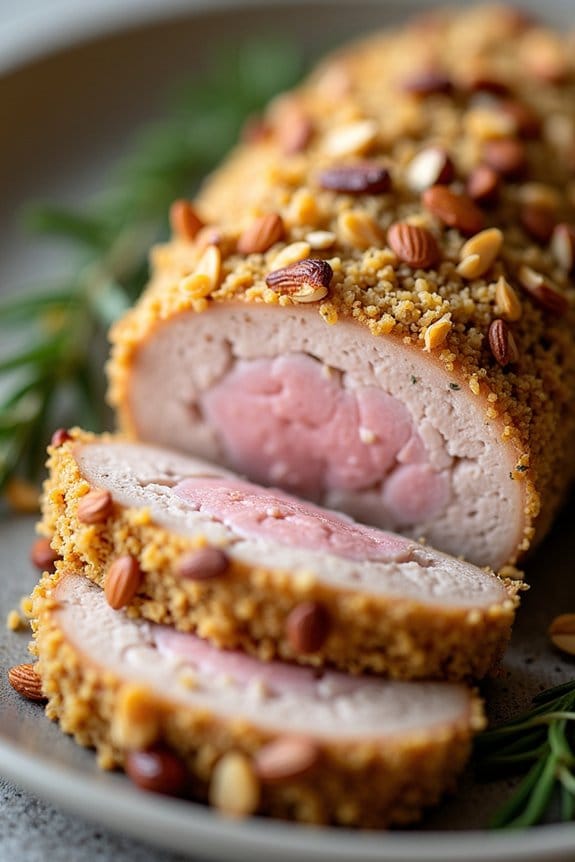
Almond-Crusted Pork Tenderloin is a delightful addition to your healthy Christmas dinner spread. This dish combines the tender, juicy flavors of pork with a crunchy, nutty almond crust, creating a delectable contrast in textures. It’s a perfect choice for those who want to indulge in a festive meal while keeping it on the healthier side.
The almond crust not only adds a wonderful flavor but also provides a boost of protein and healthy fats, making this dish both satisfying and nutritious.
The preparation of Almond-Crusted Pork Tenderloin is straightforward, making it an ideal recipe for holiday gatherings. With a few simple ingredients and a bit of time, you can create a main course that will impress your guests.
The key to success with this recipe is guaranteeing that the pork is cooked to perfection—moist on the inside with a golden, crispy crust on the outside. This dish serves 4-6 people, making it a great option for a family dinner or a small holiday party.
Ingredients (Serves 4-6):
- 2 pork tenderloins (about 1 pound each)
- 1 cup almonds, finely chopped
- 1/2 cup whole wheat breadcrumbs
- 2 tablespoons Dijon mustard
- 1 tablespoon honey
- 2 cloves garlic, minced
- 2 tablespoons olive oil
- Salt and pepper to taste
- 1 teaspoon dried thyme
- 1 teaspoon dried rosemary
Cooking Instructions:
- Preheat the Oven: Preheat your oven to 400°F (200°C). This guarantees an even cooking temperature for your pork tenderloin.
- Prepare the Almond Crust: In a bowl, combine the chopped almonds, whole wheat breadcrumbs, minced garlic, dried thyme, dried rosemary, salt, and pepper. This mixture will form the flavorful crust for your tenderloin.
- Prepare the Pork: Pat the pork tenderloins dry with paper towels to remove any excess moisture. This will help the crust adhere better.
- Coat with Mustard Mixture: In a small bowl, mix the Dijon mustard and honey together. Brush this mixture evenly over the entire surface of the pork tenderloins. The mustard will act as a binding agent for the almond crust.
- Apply the Almond Crust: Roll the pork tenderloins in the almond mixture, pressing gently to guarantee the crust adheres well to the mustard-coated surface.
- Sear the Tenderloin: Heat the olive oil in a large oven-safe skillet over medium-high heat. Sear the pork tenderloins on all sides until the crust is golden brown, about 3-4 minutes per side.
- Bake the Tenderloin: Transfer the skillet to the preheated oven. Bake for about 20-25 minutes, or until the internal temperature of the pork reaches 145°F (63°C).
- Rest and Serve: Remove the pork from the oven and let it rest for 5-10 minutes before slicing. This allows the juices to redistribute, resulting in a juicier tenderloin. Slice and serve the pork with your favorite sides.
Extra Tips:
For an extra boost of flavor, consider marinating the pork tenderloins in the mustard and honey mixture for a few hours or overnight before applying the almond crust. This will enhance the depth of flavor.
Additionally, you can toast the almonds lightly before chopping to enhance their nutty flavor. Guarantee your skillet is oven-safe to avoid transferring the tenderloin to another dish before baking, which helps retain the crust.
Sweet Potato and Black Bean Casserole
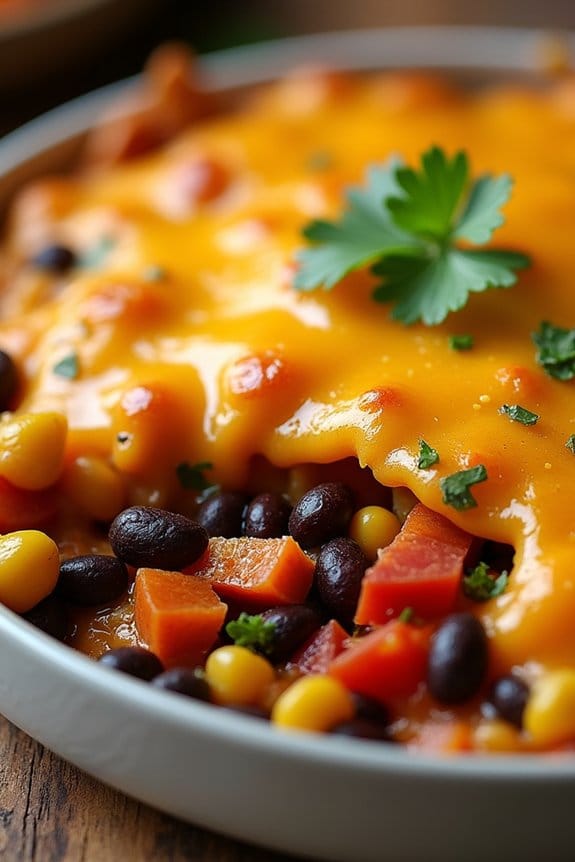
Sweet Potato and Black Bean Casserole is a delightful and nutritious choice for a healthy Christmas dinner. This delicious casserole combines the natural sweetness of sweet potatoes with the hearty texture of black beans, making it a perfect main dish or side dish for your festive feast.
The combination of flavors and textures is enhanced with a blend of spices and a topping of melted cheese, creating a satisfying and wholesome meal that everyone will love. This recipe serves 4-6 people, making it ideal for a small family gathering or as part of a larger spread of dishes.
The preparation and cooking process is straightforward, allowing you to spend more time enjoying the holiday with your loved ones. Packed with vitamins, fiber, and plant-based protein, this casserole is a healthy addition to any holiday menu.
Ingredients:
- 4 medium sweet potatoes, peeled and cubed
- 2 tablespoons olive oil
- 1 teaspoon ground cumin
- 1 teaspoon smoked paprika
- Salt and pepper to taste
- 1 medium onion, chopped
- 3 cloves garlic, minced
- 2 (15-ounce) cans black beans, drained and rinsed
- 1 (15-ounce) can diced tomatoes
- 1 cup corn kernels (fresh, canned, or frozen)
- 1 cup shredded cheddar cheese
- 1/4 cup fresh cilantro, chopped (optional)
Cooking Instructions:
- Preheat and Prepare Sweet Potatoes: Preheat your oven to 400°F (200°C). Spread the cubed sweet potatoes on a baking sheet, drizzle with 1 tablespoon of olive oil, and sprinkle with cumin, smoked paprika, salt, and pepper. Toss to coat evenly. Roast in the oven for 20-25 minutes or until tender.
- Sauté Aromatics: In a large skillet, heat the remaining 1 tablespoon of olive oil over medium heat. Add the chopped onion and sauté for about 5 minutes until translucent. Stir in the minced garlic and cook for an additional minute until fragrant.
- Combine Ingredients: Add the black beans, diced tomatoes, and corn to the skillet with the onions and garlic. Stir to combine and let the mixture simmer for about 5 minutes, allowing the flavors to meld together.
- Assemble Casserole: In a large casserole dish, layer half of the roasted sweet potatoes. Spread the black bean mixture over the sweet potatoes. Top with the remaining roasted sweet potatoes.
- Add Cheese and Bake: Sprinkle the shredded cheddar cheese evenly over the top of the casserole. Cover the dish with aluminum foil and bake in the preheated oven for 20 minutes. Remove the foil and bake for an additional 10 minutes, or until the cheese is bubbly and golden.
- Serve: Let the casserole cool slightly before serving. Garnish with freshly chopped cilantro if desired.
Extra Tips: For an extra kick of flavor, consider adding a diced jalapeño or a pinch of cayenne pepper to the black bean mixture. If you prefer a vegan version, simply omit the cheese or use a plant-based cheese alternative.
This casserole can also be prepared a day ahead; just cover and refrigerate it before the final baking step, then bake as directed on Christmas day. Enjoy the vibrant colors and delicious flavors that will surely impress your holiday guests!
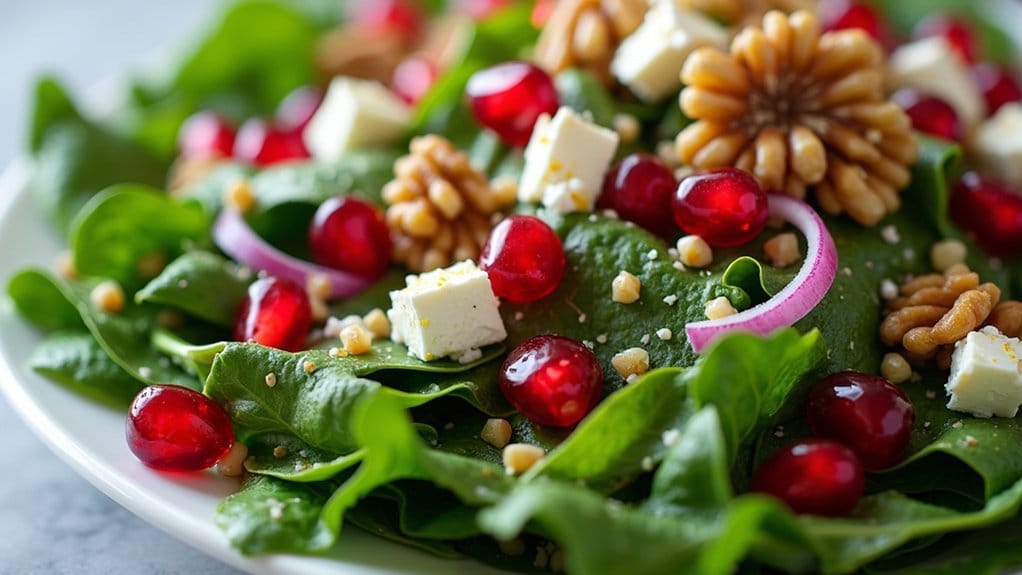
Mixed Greens Salad With Pomegranate and Citrus Vinaigrette

Mixed Greens Salad With Pomegranate and Citrus Vinaigrette is a vibrant and invigorating dish that’s perfect for a healthy Christmas dinner. The salad combines a variety of fresh greens with the juicy sweetness of pomegranate seeds and the tangy zest of a citrus vinaigrette, creating a perfect balance of flavors and textures.
This dish not only adds a pop of color to your holiday table but also provides a nutritious option that complements the richer, heartier dishes typically served during the festive season.
The citrus vinaigrette, made with freshly squeezed orange and lemon juice, olive oil, and a touch of honey, enhances the natural sweetness of the pomegranate seeds while providing a light and invigorating dressing for the salad.
Mixed greens such as arugula, spinach, and baby kale create a diverse base that’s both tender and slightly peppery, pairing beautifully with the other ingredients. This salad isn’t only delicious but also quick and easy to prepare, making it an ideal choice for holiday gatherings.
Ingredients (Serves 4-6)
- 5 cups mixed greens (arugula, spinach, baby kale)
- 1 cup pomegranate seeds
- 1/2 cup thinly sliced red onion
- 1/2 cup crumbled feta cheese
- 1/4 cup chopped walnuts or pecans
- 1/4 cup freshly squeezed orange juice
- 2 tablespoons freshly squeezed lemon juice
- 1 tablespoon honey
- 1/3 cup extra-virgin olive oil
- Salt and pepper to taste
Cooking Instructions
- Prepare the Vinaigrette: In a small bowl, whisk together the orange juice, lemon juice, and honey until well combined. Slowly drizzle in the olive oil while continuously whisking until the dressing is emulsified. Season with salt and pepper to taste. Set aside.
- Assemble the Salad: In a large salad bowl, combine the mixed greens, pomegranate seeds, sliced red onion, crumbled feta cheese, and chopped walnuts.
- Dress the Salad: Just before serving, pour the citrus vinaigrette over the salad. Gently toss the ingredients together to guarantee they’re evenly coated with the dressing.
- Serve: Transfer the salad to a serving dish or individual plates. Garnish with additional pomegranate seeds or feta cheese if desired.
Extra Tips
To save time, you can prepare the vinaigrette up to a day in advance and store it in the refrigerator. Just give it a good whisk before using.
If you prefer a sweeter salad, increase the amount of honey in the vinaigrette. For added crunch, consider toasting the walnuts or pecans lightly before adding them to the salad.
Finally, feel free to customize the salad with your favorite greens or additional toppings such as sliced avocado or dried cranberries for an extra festive touch.
