
Halloween is almost here, and I am so excited to share some spooktacular brownie recipes with you! These 15 Halloween brownies are just the treat you need to add a touch of fun and flair to your festivities. Each brownie is a deliciously chocolatey creation with a unique twist, from spooky spider webs to eerie eyeballs. They’re not only mouthwatering but will also make your Halloween gatherings extra special. Ready to whip up some wickedly good treats? Let’s get baking!
Spooky Spider Web Brownies

Spooky Spider Web Brownies are a delightful treat to add a touch of Halloween magic to your dessert table. These brownies aren’t only delicious but are also visually engaging with their intricate spider web design. Perfect for Halloween parties or a cozy night in, these brownies combine rich, chocolaty goodness with a playful, spooky presentation that’s sure to impress both kids and adults alike.
Rich, chocolaty treats with a playful, spooky twist, perfect for Halloween gatherings.
The base of these brownies is a dense and fudgy chocolate brownie, topped with a silky white chocolate or cream cheese spider web design. The contrast between the dark brownie and the white spider web creates an eye-catching effect that captures the Halloween spirit. They’re relatively simple to make, yet the outcome is both festive and fun. Let’s plunge into how you can create these Spooky Spider Web Brownies for 4-6 people.
Ingredients:
- 1 cup unsalted butter
- 1 cup granulated sugar
- 1 cup brown sugar
- 4 large eggs
- 1 teaspoon vanilla extract
- 1 cup all-purpose flour
- 1 cup unsweetened cocoa powder
- 1/2 teaspoon salt
- 1/2 teaspoon baking powder
- 1 cup dark chocolate chips
- 4 ounces white chocolate or cream cheese (for the web design)
Instructions:
- Preheat the Oven: Preheat your oven to 350°F (175°C) and line a 9×13 inch baking pan with parchment paper or lightly grease it to prevent sticking.
- Prepare the Brownie Batter: In a large bowl, melt the unsalted butter. Once melted, add the granulated sugar and brown sugar, mixing until smooth. Incorporate the eggs one at a time, beating well after each addition. Stir in the vanilla extract.
- Combine Dry Ingredients: In a separate bowl, whisk together the all-purpose flour, unsweetened cocoa powder, salt, and baking powder. Gradually add this dry mixture to the wet ingredients, stirring until just combined. Fold in the dark chocolate chips to add extra chocolaty texture.
- Bake the Brownies: Pour the batter into the prepared baking pan, spreading it evenly. Bake in the preheated oven for 25-30 minutes, or until a toothpick inserted in the center comes out with a few moist crumbs. Avoid overbaking to keep the brownies fudgy.
- Create the Spider Web: While the brownies are cooling, melt the white chocolate (or soften the cream cheese) until smooth. Transfer it to a piping bag or a plastic bag with a small corner cut off. Once the brownies are cool, pipe concentric circles onto the surface.
- Design the Web: Using a toothpick or a skewer, start from the center of the circles and gently drag lines outward to the edge, repeating to create a spider web effect. Allow the design to set before slicing.
Extra Tips: For the best results, make sure the brownies are completely cool before attempting to decorate them with the spider web design. This will prevent the white chocolate or cream cheese from melting and losing its shape. If you’re using cream cheese for the web, make certain it’s at room temperature for easier piping.
Feel free to get creative with the web design, and consider adding candy spiders or sprinkles for an extra spooky touch.
Ghostly Meringue Brownies

Get ready to spook your taste buds with these delightfully eerie Ghostly Meringue Brownies. A perfect treat for Halloween gatherings, these brownies combine rich, fudgy chocolate with light, airy meringue ghosts that seem to float atop each bite.
Whether you’re looking for a fun baking project or simply want to impress your guests with a festive dessert, these brownies are certain to satisfy both the eyes and the palate. With a serving size of 4-6 people, this recipe is ideal for a small party or a family night of Halloween fun.
The base of this dessert is a classic, gooey brownie that complements the sweetness of the meringue topping. The meringue ghosts are piped onto the brownies and baked until they’re just firm enough to hold their shape, giving you a combination of textures that’s as delightful as it’s delicious.
Follow the simple steps below to conjure up your own batch of Ghostly Meringue Brownies and make this Halloween a hauntingly delicious one.
Ingredients (Serving Size: 4-6 people):
*For the Brownies:*
- 1 cup unsalted butter
- 1 cup granulated sugar
- 1 cup brown sugar, packed
- 1 cup all-purpose flour
- 1 cup unsweetened cocoa powder
- 4 large eggs
- 1 teaspoon vanilla extract
- 1/2 teaspoon salt
- 1/2 teaspoon baking powder
For the Meringue Ghosts:
- 4 large egg whites
- 1 cup granulated sugar
- 1/4 teaspoon cream of tartar
- 1/2 teaspoon vanilla extract
- Mini chocolate chips (for eyes)
Cooking Instructions:
- Preheat and Prepare: Preheat your oven to 350°F (175°C). Grease a 9×13-inch baking pan or line it with parchment paper for easy removal.
- Make the Brownie Batter: In a large saucepan over low heat, melt the butter. Remove from heat and stir in both sugars until smooth. Add the eggs one at a time, mixing well after each addition. Stir in the vanilla extract.
- Combine Dry Ingredients: In a separate bowl, sift together the flour, cocoa powder, salt, and baking powder. Gradually add this dry mixture to the wet mixture, stirring until just combined. Be careful not to overmix.
- Bake the Brownies: Pour the batter into the prepared baking pan and spread evenly. Bake in the preheated oven for 25-30 minutes, or until a toothpick inserted into the center comes out with a few moist crumbs. Allow the brownies to cool completely.
- Prepare the Meringue: In a clean, dry mixing bowl, beat the egg whites on medium speed until foamy. Add the cream of tartar and increase the speed to high. Gradually add the sugar, a tablespoon at a time, beating until stiff peaks form. Stir in the vanilla extract.
- Pipe the Ghosts: Fill a piping bag fitted with a round tip with the meringue. Pipe ghost shapes onto the cooled brownies. Add two mini chocolate chips to each ghost as eyes.
- Bake the Meringue: Return the brownies with the meringue ghosts to the oven. Bake at 200°F (93°C) for about 1 hour, or until the meringue is firm and dry to the touch. Allow to cool before cutting into squares.
Extra Tips:
When making the meringue, verify that your mixing bowl and beaters are completely clean and free of any fat or grease, as this can prevent the egg whites from reaching full volume.
Also, make sure the brownies are completely cool before piping the meringue on top to avoid melting. For added spookiness, consider adding a touch of black food coloring to the meringue for darker ghostly effects.
Enjoy your Ghostly Meringue Brownies with a glass of milk or a scoop of ice cream for a truly haunting dessert experience!
Pumpkin Patch Brownies
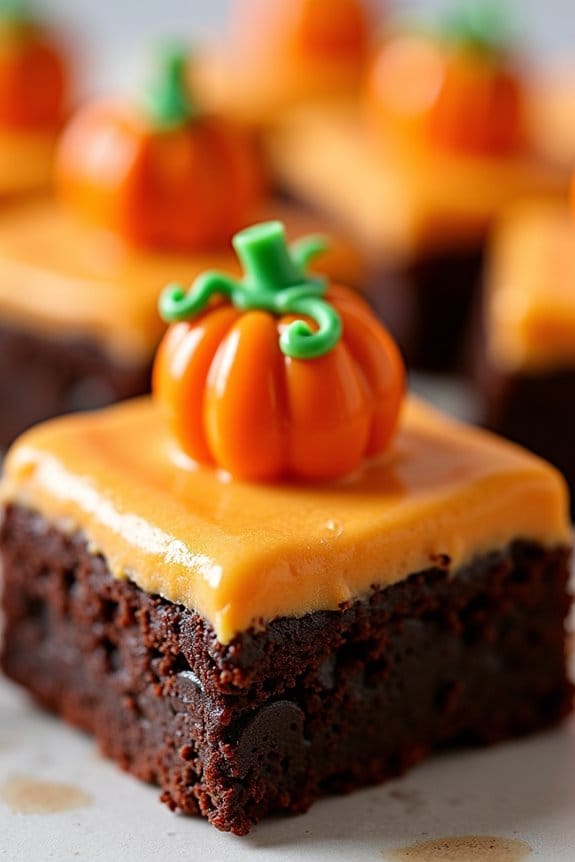
Pumpkin Patch Brownies are a delightful twist on classic brownies, perfect for adding a touch of Halloween spirit to your dessert table. These brownies combine the rich, chocolaty goodness we all love with a playful and festive pumpkin patch decoration on top. Not only do they taste amazing, but they also make a visually appealing treat that can be the centerpiece of your Halloween gathering.
The combination of fudgy brownies and the vibrant, orange pumpkin toppings will surely captivate both children and adults alike. This recipe is designed to serve 4-6 people, making it ideal for a small gathering or family dinner. The preparation involves baking a batch of brownies from scratch, which are then topped with a creamy orange frosting and decorated with candy pumpkins to resemble a tiny pumpkin patch.
These Pumpkin Patch Brownies aren’t only fun to make but also create a delightful experience for anyone who gets to enjoy them. Let’s plunge into the ingredients and steps needed to create this spooky yet delicious treat.
Ingredients (Serves 4-6 people):
- 1 cup unsalted butter
- 2 cups granulated sugar
- 4 large eggs
- 1 cup all-purpose flour
- 1 cup unsweetened cocoa powder
- 1/2 teaspoon salt
- 1 teaspoon vanilla extract
- 1 cup semi-sweet chocolate chips
- 1 cup powdered sugar
- 2 tablespoons milk
- Orange food coloring
- Candy pumpkins (about 12-18 pieces)
- Green icing or gel for decorating
Instructions:
- Preheat and Prepare Pan: Preheat your oven to 350°F (175°C). Grease a 9×13-inch baking pan with butter or non-stick spray and line it with parchment paper, leaving some overhang for easy removal.
- Mix Wet Ingredients: In a large microwave-safe bowl, melt the butter. Stir in the granulated sugar and mix until well combined. Add the eggs one at a time, beating well after each addition. Mix in the vanilla extract until smooth.
- Combine Dry Ingredients: In a separate bowl, sift together the flour, cocoa powder, and salt. Gradually add the dry ingredients to the wet mixture, stirring until just combined. Fold in the semi-sweet chocolate chips.
- Bake the Brownies: Pour the batter into the prepared baking pan, spreading it evenly. Bake in the preheated oven for 25-30 minutes, or until a toothpick inserted into the center comes out with a few moist crumbs. Allow to cool completely in the pan on a wire rack.
- Prepare Frosting: In a small bowl, combine the powdered sugar and milk. Stir until smooth and add orange food coloring until the desired shade is achieved.
- Decorate: Once the brownies have cooled, spread the orange frosting over the entire surface. Place the candy pumpkins on top, pressing gently to adhere. Use the green icing or gel to add vines and leaves around the pumpkins, creating a pumpkin patch design.
- Serve: Carefully lift the brownies out of the pan using the parchment overhang. Cut into squares and serve.
Extra Tips:
For the richest and most flavorful brownies, use high-quality cocoa powder and chocolate chips. If you prefer a thicker layer of frosting, simply double the frosting ingredients.
When decorating, encourage creativity by experimenting with different colors and designs for the pumpkin patch using various candies and icing tips. Confirm the brownies are completely cool before frosting to prevent the frosting from melting.
If you’re making these in advance, store them in an airtight container for up to three days to maintain freshness. Enjoy your festive Halloween treat!
Witch’s Hat Brownies
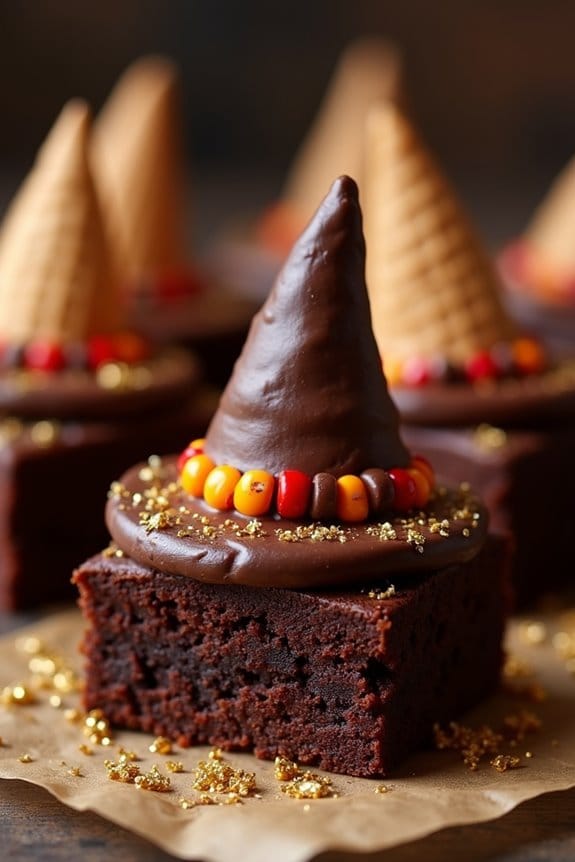
Witch’s Hat Brownies are a delightful and spooky treat perfect for your Halloween festivities. These whimsical desserts combine the rich, fudgy goodness of brownies with the playful design of a witch’s hat, making them a hit with both kids and adults.
Whether you’re hosting a Halloween party or just want to surprise your family with a themed dessert, these brownies are guaranteed to cast a delicious spell on everyone who tries them.
The base of these magical treats is a classic brownie recipe, baked to chewy perfection. The witch’s hat is crafted using a combination of chocolate frosting, ice cream cones, and a touch of creativity. Each brownie is topped with an ice cream cone, decorated to resemble a witch’s hat, complete with a candy band and buckle.
Not only are they fun to make, but these Witch’s Hat Brownies also add a festive flair to your Halloween spread!
Ingredients (Serves 4-6):
- 1 cup unsalted butter
- 2 cups granulated sugar
- 4 large eggs
- 1 teaspoon vanilla extract
- 1 cup all-purpose flour
- 1 cup unsweetened cocoa powder
- 1/2 teaspoon salt
- 1 teaspoon baking powder
- 6 ice cream cones
- 1 cup chocolate frosting
- 12 chocolate candies (like M&Ms or Reese’s Pieces)
- 6 candy belts or strips (for hat bands)
- Edible gold glitter or gold sprinkles (optional)
Instructions:
- Preheat and Prepare: Preheat your oven to 350°F (175°C). Grease a 9×13 inch baking dish or line it with parchment paper to prevent the brownies from sticking.
- Make the Brownie Batter: In a large saucepan, melt the butter over low heat. Remove from heat and stir in the sugar, eggs, and vanilla extract until well combined.
- Combine Dry Ingredients: In a separate bowl, whisk together the flour, cocoa powder, salt, and baking powder. Gradually add this dry mixture to the wet ingredients, stirring until smooth and lump-free.
- Bake the Brownies: Pour the batter into the prepared baking dish and spread it evenly. Bake in the preheated oven for 25-30 minutes, or until a toothpick inserted into the center comes out with a few moist crumbs.
- Cool and Cut: Allow the brownies to cool completely in the pan on a wire rack. Once cooled, cut the brownies into squares.
- Prepare the Witch’s Hat: Using a spatula, cover the top of each ice cream cone with chocolate frosting. Attach a chocolate candy to the top of each cone for the hat’s tip.
- Decorate the Hat: Wrap a candy belt or strip around the base of each cone to create a hat band. Place the decorated cones upside down on each brownie square.
- Add Finishing Touches: If using, sprinkle edible gold glitter or gold sprinkles around the base of the cone for a magical effect.
Extra Tips:
When making Witch’s Hat Brownies, verify the brownies are completely cooled before decorating with the ice cream cones, as the heat can cause the frosting to melt.
For a more festive look, consider using different colored candy belts and candies to personalize each hat. If you’re short on time, store-bought brownie mix can be used as a quick alternative to homemade brownies.
Finally, these brownies can be made a day in advance; just keep them in an airtight container until you’re ready to serve.
Monster Eye Brownies

Halloween is the perfect time to get creative with your baking, and Monster Eye Brownies are a spooktacular treat that’s sure to impress both kids and adults alike.
These brownies aren’t only deliciously fudgy and rich but also feature a fun and eerie design that will make them the star of your Halloween table. With just a few ingredients and some simple decorating techniques, you can transform ordinary brownies into a creepy yet delightful dessert that your guests will love.
To make Monster Eye Brownies, you’ll start with a classic brownie base, which provides the perfect canvas for your ghastly creations. Once baked, these brownies are topped with a layer of gooey marshmallow and adorned with candy eyes to give them their signature monster appearance.
This recipe is designed to serve 4-6 people, making it ideal for a small gathering or family celebration. Now, let’s explore the ingredient list needed to bring these monstrous treats to life.
Ingredients:
- 1 cup all-purpose flour
- 1 cup granulated sugar
- 1/2 cup unsweetened cocoa powder
- 1/2 teaspoon baking powder
- 1/4 teaspoon salt
- 1/2 cup unsalted butter, melted
- 2 large eggs
- 1 teaspoon vanilla extract
- 1 cup mini marshmallows
- Candy eyeballs for decoration
Cooking Instructions:
- Preheat the Oven: Start by preheating your oven to 350°F (175°C). Grease a 9×9-inch baking pan with non-stick spray or line it with parchment paper for easy removal of the brownies.
- Mix Dry Ingredients: In a medium bowl, whisk together the flour, sugar, cocoa powder, baking powder, and salt until well combined.
- Combine Wet Ingredients: In a separate large bowl, beat together the melted butter, eggs, and vanilla extract until smooth.
- Create Brownie Batter: Gradually add the dry ingredients to the wet ingredients, mixing until just combined. Don’t overmix, as this will result in tough brownies.
- Bake the Brownies: Pour the batter into the prepared baking pan and spread it evenly. Bake in the preheated oven for 20-25 minutes, or until a toothpick inserted into the center comes out with a few moist crumbs.
- Add Marshmallows: Remove the brownies from the oven, and immediately sprinkle the mini marshmallows evenly over the top. Return the pan to the oven for an additional 2-3 minutes, or until the marshmallows are puffy and slightly golden.
- Decorate with Candy Eyes: While the marshmallows are still warm, gently press candy eyeballs into the marshmallow layer to create the monster eyes effect. Allow the brownies to cool completely in the pan on a wire rack.
- Slice and Serve: Once cooled, slice the brownies into squares and serve to your guests, who’ll be delighted by their monstrous appearance.
Extra Tips:
For the best results, verify that the brownies are completely cooled before cutting them into squares, as this will help maintain their structure.
If you’re making these brownies in advance, store them in an airtight container at room temperature for up to three days.
If you want to add an extra element of spookiness, consider using colored marshmallows or adding a few drops of food coloring to the marshmallow layer before adding the candy eyes.
Enjoy your Monster Eye Brownies and have a fang-tastic Halloween!
Candy Corn Swirl Brownies
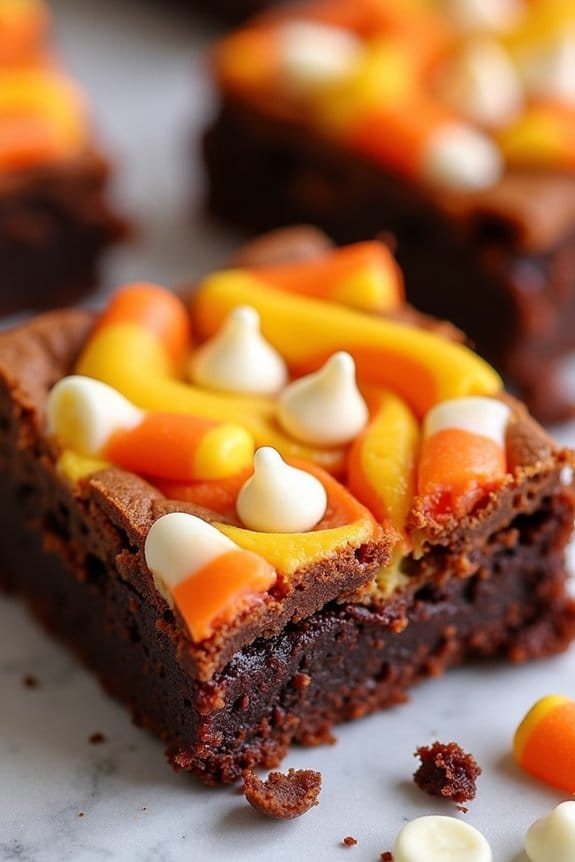
Halloween is the perfect time to indulge in festive treats, and Candy Corn Swirl Brownies are the ideal dessert to satisfy your sweet tooth while celebrating the spooky season. These rich, chocolatey brownies are elevated with a whimsical swirl of candy corn, making them not only delicious but also visually striking.
Perfect for a Halloween party or a cozy night in, these brownies combine the classic chewiness of a brownie with the playful sweetness of candy corn, making them a hit with both kids and adults alike.
Making Candy Corn Swirl Brownies is a delightful and straightforward process that will have you enjoying warm, gooey brownies in no time. This recipe serves 4-6 people, making it great for sharing with friends and family. The combination of chocolate and candy corn creates a unique flavor profile that’s both nostalgic and innovative.
Gather your ingredients, and let’s get started on creating this Halloween treat that will surely become a seasonal favorite.
Ingredients (Serving size: 4-6 people):
- 1 cup unsalted butter
- 2 cups granulated sugar
- 4 large eggs
- 1 teaspoon vanilla extract
- 1 cup all-purpose flour
- 1/2 cup unsweetened cocoa powder
- 1/2 teaspoon salt
- 1 cup candy corn
- 1/2 cup white chocolate chips
Cooking Instructions:
- Preheat the Oven: Start by preheating your oven to 350°F (175°C). This guarantees that your brownies bake evenly and develop a nice crust.
- Prepare the Baking Pan: Line a 9×9 inch baking pan with parchment paper, allowing some excess paper to hang over the sides for easy removal later. This will prevent the brownies from sticking to the pan.
- Melt the Butter: In a medium saucepan, melt the butter over low heat. Once melted, remove from heat and stir in the sugar until well combined.
- Mix the Wet Ingredients: Allow the butter and sugar mixture to cool slightly, then whisk in the eggs one at a time, ensuring each is fully incorporated before adding the next. Stir in the vanilla extract.
- Combine Dry Ingredients: In a separate bowl, sift together the flour, cocoa powder, and salt. This will help eliminate any lumps and ensure even distribution.
- Create the Brownie Batter: Gradually add the dry ingredients to the wet mixture, stirring until just combined. Be careful not to overmix, as this can result in tough brownies.
- Add Candy Corn and White Chocolate: Gently fold in the candy corn and white chocolate chips, distributing them evenly throughout the batter.
- Swirl the Candy Corn: Pour the batter into the prepared baking pan. Use a spatula or a butter knife to create gentle swirls in the batter, incorporating the candy corn and white chocolate.
- Bake the Brownies: Place the pan in the preheated oven and bake for 25-30 minutes, or until a toothpick inserted into the center comes out with a few moist crumbs.
- Cool and Serve: Allow the brownies to cool in the pan for at least 15 minutes before using the parchment paper to lift them out. Cut into squares and serve.
Extra Tips: For a more pronounced candy corn effect, you can reserve a handful of candy corn to sprinkle on top of the batter before baking. If you prefer a more gooey brownie, underbake them slightly as they’ll continue to cook as they cool.
To enhance the chocolate flavor, consider adding a pinch of espresso powder to the dry ingredients. Store any leftovers in an airtight container to maintain freshness.
Bloodshot Eyeball Brownies
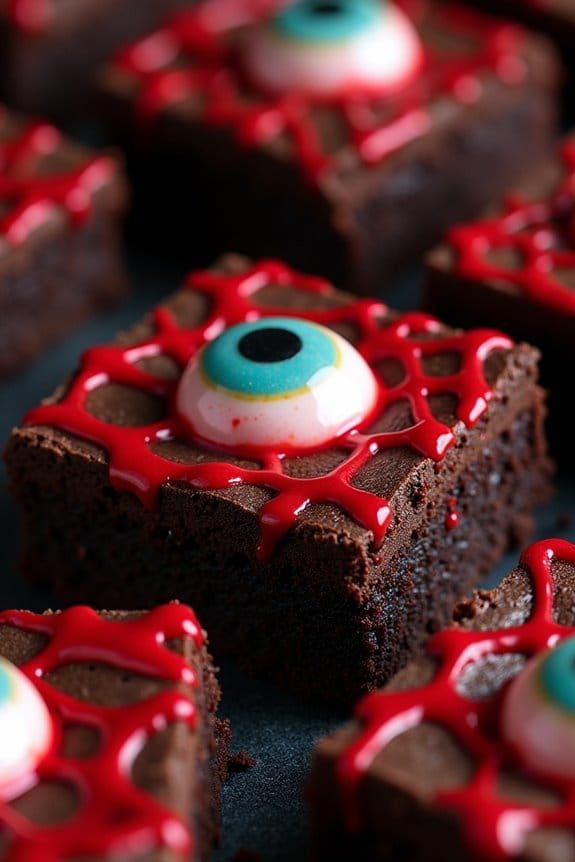
Halloween is the perfect time to get creative in the kitchen, and these Bloodshot Eyeball Brownies are sure to be a hit at your spooky celebration. Combining the rich, fudgy goodness of brownies with a creepy twist, these treats are both delicious and delightfully eerie.
Whether you’re hosting a Halloween party or just looking for a fun activity to do with the family, these brownies are sure to impress.
These brownies aren’t only visually striking with their bloodshot eyeball design, but they also pack a flavorful punch. The base is a classic chocolate brownie, but the addition of candy decorations turns an everyday treat into something truly special.
When it comes to serving size, this recipe yields enough to satisfy 4-6 people, making it ideal for small gatherings or family fun nights.
Ingredients:
- 1 cup unsalted butter
- 2 cups granulated sugar
- 4 large eggs
- 1 teaspoon vanilla extract
- 1 cup all-purpose flour
- 1 cup unsweetened cocoa powder
- 1/2 teaspoon salt
- 1/2 teaspoon baking powder
- 1 cup white chocolate chips
- Red food coloring
- Candy eyeballs
Instructions:
- Preheat and Prepare Pan: Preheat your oven to 350°F (175°C). Grease a 9×13 inch baking pan or line it with parchment paper for easy removal of the brownies.
- Melt Butter and Mix with Sugar: In a medium saucepan, melt the butter over low heat. Remove from heat and stir in the granulated sugar until the mixture is smooth.
- Combine Wet Ingredients: Add the eggs, one at a time, to the butter and sugar mixture, stirring well after each addition. Stir in the vanilla extract.
- Mix Dry Ingredients: In a separate bowl, whisk together the flour, cocoa powder, salt, and baking powder.
- Combine Wet and Dry Ingredients: Gradually add the dry ingredients to the wet ingredients, stirring until just combined. Be careful not to overmix.
- Fold in White Chocolate Chips: Gently fold in the white chocolate chips, distributing them evenly throughout the batter.
- Bake the Brownies: Pour the batter into the prepared pan, spreading it evenly. Bake in the preheated oven for 25-30 minutes, or until a toothpick inserted into the center comes out with a few moist crumbs.
- Cool and Decorate: Allow the brownies to cool completely in the pan. Once cooled, cut the brownies into squares. Use red food coloring to create bloodshot veins on the top of each brownie. Add candy eyeballs on top to complete the bloodshot eyeball effect.
Extra Tips:
For an even spookier effect, consider using different colored candy eyeballs or adding a touch of edible glitter for a magical touch.
Make sure to let the brownies cool completely before decorating to prevent the candy eyeballs from melting or sliding off. If you find the brownies are too gooey for your liking, try refrigerating them for a bit to firm up before cutting and serving.
Enjoy your creepy creation and have a hauntingly good Halloween!
Graveyard Brownies
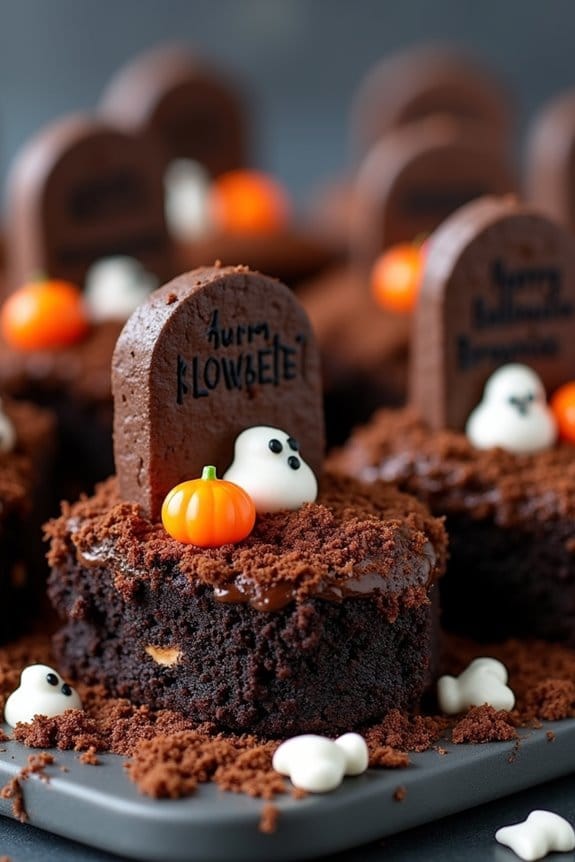
Graveyard Brownies are a spooky and delicious treat perfect for any Halloween celebration. These brownies aren’t just about taste; they also serve as a fun and creative activity as you decorate them to resemble a haunted graveyard. With a rich chocolate base and eerie decorations, they’re sure to be a hit among both kids and adults. The combination of fudgy brownies and Halloween-themed toppings makes them an ideal dessert for any party or gathering during the Halloween season.
Crafting these Graveyard Brownies isn’t only enjoyable but also quite simple. You start by preparing a classic brownie mix, either from scratch or using a store-bought mix. Once baked and cooled, the brownies become the canvas for your creative graveyard scene. Toppings like crushed chocolate cookies, candy pumpkins, and marshmallow ghosts bring the graveyard to life, while chocolate frosting serves as the rich, dark soil. This recipe is designed for a serving size of 4-6 people, making it an excellent choice for a small gathering or family dessert.
Ingredients:
- 1 box of brownie mix (for a 9×13 inch pan) or ingredients for homemade brownies
- 1/2 cup vegetable oil
- 2 large eggs
- 1/4 cup water
- 1 cup chocolate frosting
- 8-10 chocolate sandwich cookies
- 8-10 rectangular-shaped cookies (like Milano or graham crackers)
- Assorted Halloween candies (candy pumpkins, marshmallow ghosts, bone-shaped candies)
- Black or dark gel icing
Cooking Instructions:
- Prepare the Brownie Mix: Preheat your oven to 350°F (175°C). In a large mixing bowl, combine the brownie mix, vegetable oil, eggs, and water. Stir until the mixture is smooth and well-blended.
- Bake the Brownies: Pour the brownie batter into a greased 9×13 inch baking pan. Spread evenly and bake in the preheated oven for 25-30 minutes, or until a toothpick inserted into the center comes out with a few moist crumbs. Remove from the oven and allow to cool completely.
- Create the Graveyard Base: Once the brownies are completely cooled, spread a layer of chocolate frosting evenly over the top. This will serve as the soil for your graveyard.
- Make the Dirt: Crush the chocolate sandwich cookies in a plastic bag using a rolling pin or in a food processor. Sprinkle the crushed cookies over the frosted brownies to create the appearance of dirt.
- Add Tombstones and Decorations: Use the rectangular-shaped cookies to create tombstones by writing spooky sayings or RIP with black or dark gel icing. Insert the decorated cookies vertically into the brownie surface.
- Decorate with Candies: Arrange the Halloween candies around the tombstones to complete the graveyard look. Add candy pumpkins, marshmallow ghosts, and bone-shaped candies to enhance the eerie effect.
Extra Tips:
When preparing Graveyard Brownies, feel free to get creative with your decorations. You can use additional items like candy spiders, edible glitter, or colored frosting to add more detail to your graveyard scene.
For an extra spooky effect, consider using a small amount of green icing to simulate moss on the tombstones or around the base of the graveyard. Remember to allow the brownies to cool completely before decorating to guarantee the frosting sets properly. Enjoy the fun of both baking and decorating this delightful Halloween treat!
Zombie Brain Brownies
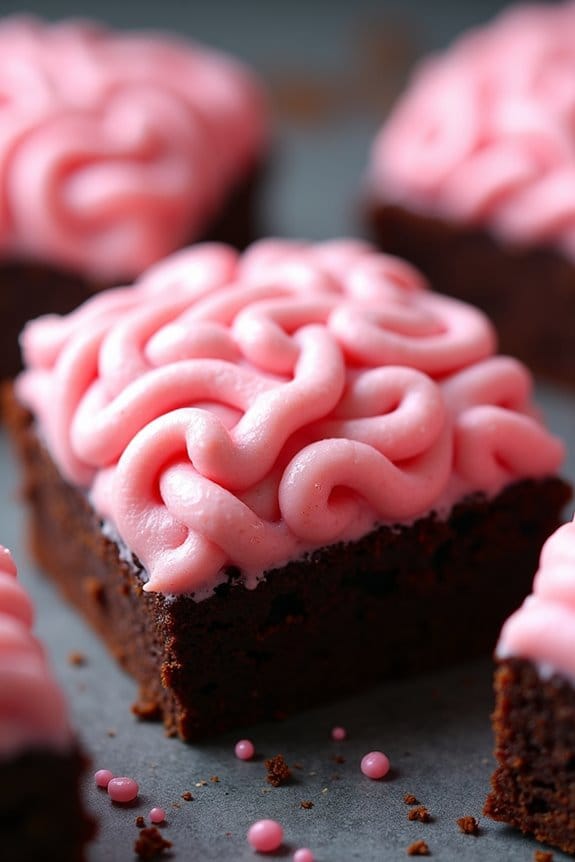
Zombie Brain Brownies are a spooky and delicious treat perfect for Halloween festivities. These brownies are rich, fudgy, and topped with a hauntingly realistic brain-like design made from a special frosting. Not only are they a delight to eat, but they also serve as an eye-catching centerpiece for any Halloween party.
Rich, fudgy brownies with spooky brain-like frosting—perfectly eerie for your Halloween party centerpiece.
Whether you’re entertaining kids or adults, these brownies are sure to be a hit with their eerie appearance and delectable taste. Crafting these terrifyingly tasty treats requires a bit of creativity and a few simple ingredients. The base is a classic chocolate brownie, providing a rich and satisfying foundation.
On top, a white chocolate frosting is colored and sculpted to mimic the appearance of a brain, complete with ridges and grooves. The success of this recipe lies in balancing the spooky aesthetics with the irresistible flavor of homemade brownies.
Ingredients (Serves 4-6 people):
- 1 cup (2 sticks) unsalted butter, melted
- 2 cups granulated sugar
- 4 large eggs
- 1 teaspoon vanilla extract
- 1 cup all-purpose flour
- 1/2 cup unsweetened cocoa powder
- 1/4 teaspoon salt
- 1 cup white chocolate chips
- Red and blue food coloring
Cooking Instructions:
- Preheat the Oven: Begin by preheating your oven to 350°F (175°C). Prepare an 8×8-inch baking pan by lining it with parchment paper or greasing it with a non-stick spray.
- Mix the Wet Ingredients: In a large mixing bowl, combine the melted butter and sugar. Whisk until smooth, then add the eggs one at a time, beating well after each addition. Stir in the vanilla extract.
- Combine the Dry Ingredients: In a separate bowl, sift together the flour, cocoa powder, and salt. Gradually add the dry ingredients to the wet ingredients, stirring until just combined to avoid overmixing.
- Bake the Brownies: Pour the brownie batter into the prepared baking pan, spreading it evenly. Bake in the preheated oven for 25-30 minutes, or until a toothpick inserted into the center comes out with a few moist crumbs attached. Allow the brownies to cool completely in the pan.
- Prepare the Brain Frosting: While the brownies are cooling, melt the white chocolate chips in a microwave-safe bowl, heating in 30-second intervals and stirring in between until smooth. Add a few drops of red and blue food coloring to achieve a brain-like pink hue.
- Decorate the Brownies: Once the brownies are cooled, spread a thin layer of the colored white chocolate over the top. Use a piping bag fitted with a small round tip to pipe lines and curves resembling brain folds on the surface.
- Set the Frosting: Allow the frosting to set for about 15-20 minutes at room temperature or place them in the refrigerator for quicker setting.
Extra Tips:
To make the Zombie Brain Brownies even more realistic, consider adding a touch of green food coloring to the frosting to simulate decay. If you prefer a less sweet frosting, you can mix the melted white chocolate with a bit of cream cheese for a tangy contrast.
When cutting the brownies, use a sharp knife and clean it between cuts to guarantee neat squares. These brownies are best served at room temperature for greatest texture, but can also be stored in the refrigerator if you plan to keep them for a few days.
Black Cat Brownies
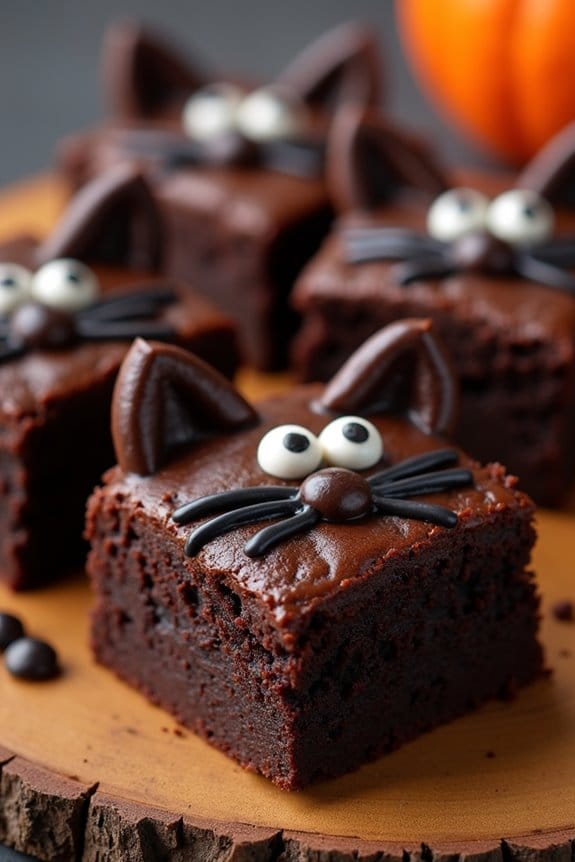
Halloween is the perfect time to indulge in some spooky treats, and Black Cat Brownies are a delightful way to celebrate the season. These deliciously dark, fudgy brownies are adorned with playful black cat faces, making them a hit at any Halloween gathering. Not only are they visually striking, but they’re also rich in chocolate flavor, providing the perfect balance of sweetness and fun.
Whether you’re hosting a party or just looking to enjoy a themed dessert with family, Black Cat Brownies will add a touch of whimsy to your Halloween festivities.
Creating these brownies is a fairly simple process, requiring basic baking skills and a little creativity. The base is made from a classic brownie recipe, guaranteeing a dense and chewy texture that chocolate lovers will appreciate. Once baked, the fun begins as you decorate each brownie with cute cat faces using icing and candies. This recipe serves 4-6 people, making it ideal for small gatherings or family desserts.
Ingredients:
- 1/2 cup unsalted butter
- 1 cup granulated sugar
- 2 large eggs
- 1 teaspoon vanilla extract
- 1/3 cup unsweetened cocoa powder
- 1/2 cup all-purpose flour
- 1/4 teaspoon salt
- 1/4 teaspoon baking powder
- Black icing gel
- Candy eyes
- Chocolate chips or black jelly beans (for ears)
Instructions:
- Preheat and Prepare: Preheat your oven to 350°F (175°C). Grease a 9×9 inch baking pan or line it with parchment paper for easy removal of the brownies.
- Mix Wet Ingredients: In a medium saucepan over low heat, melt the butter. Remove from heat and stir in the sugar, eggs, and vanilla extract until well combined.
- Combine Dry Ingredients: In a separate bowl, sift together the cocoa powder, flour, salt, and baking powder. Gradually add this dry mixture to the wet mixture, stirring until smooth and fully incorporated.
- Bake the Brownies: Pour the brownie batter into the prepared baking pan, spreading it evenly. Bake for 20-25 minutes or until a toothpick inserted into the center comes out with a few moist crumbs.
- Cool and Cut: Allow the brownies to cool in the pan for about 10 minutes, then transfer them to a wire rack to cool completely. Once cooled, cut into squares.
- Decorate: Use the black icing gel to draw cat faces on each brownie square. Place candy eyes on the icing to form eyes, and use chocolate chips or black jelly beans to create ears at the top of each brownie.
Extra Tips:
For the best results, make sure to not overbake the brownies, as this will guarantee they remain fudgy and moist.
Feel free to get creative with the decoration; you can use different types of candies or sprinkles to add extra flair to your black cat faces. If you’re short on time, store-bought brownie mix can be used as a quick alternative, allowing you to focus on the decorating process.
Remember to let the brownies cool completely before decorating to prevent the icing from melting.
Vampire Bite Brownies

Looking to create a spooky and delicious treat for your Halloween festivities? These Vampire Bite Brownies are perfect for the occasion! Combining the rich, chocolatey goodness of brownies with a fun and eerie twist, they’re bound to be a hit with kids and adults alike.
The secret lies in the “vampire bites” — little pockets of raspberry coulis that mimic blood, making each bite both a visual and tasty delight. These brownies aren’t only an excellent addition to any Halloween party spread, but they also offer a unique opportunity to get creative in the kitchen.
The recipe is simple enough for even novice bakers to handle, yet it allows room for more experienced cooks to add their own spooky touches. Perfect for serving 4-6 people, these Vampire Bite Brownies will leave your guests enchanted and enthusiastic for more.
Ingredients:
- 1 cup (2 sticks) unsalted butter
- 2 cups granulated sugar
- 1 cup unsweetened cocoa powder
- 1 teaspoon vanilla extract
- 4 large eggs
- 1 cup all-purpose flour
- 1/2 teaspoon salt
- 1/2 cup raspberry jam (or fresh raspberry coulis)
- Red food coloring (optional)
- 1/2 cup semi-sweet chocolate chips
- Powdered sugar (for dusting, optional)
Instructions:
- Preheat and Prepare the Pan: Preheat your oven to 350°F (175°C). Grease a 9×13 inch baking pan or line it with parchment paper, leaving some overhang to easily lift the brownies out later.
- Melt Butter and Mix: In a medium saucepan over low heat, melt the butter. Remove from heat and stir in the sugar and cocoa powder until smooth. Add the vanilla extract.
- Add Eggs: Allow the mixture to cool slightly, then add the eggs one at a time, beating well after each addition to guarantee a smooth batter.
- Combine Dry Ingredients: In a separate bowl, whisk together the flour and salt. Gradually add the dry ingredients to the wet mixture, stirring until just combined.
- Add Chocolate Chips: Fold in the semi-sweet chocolate chips until evenly distributed throughout the batter.
- Prepare Raspberry Filling: In a small bowl, mix the raspberry jam or coulis with a few drops of red food coloring if you want a more vibrant “blood” effect.
- Assemble Brownies: Pour half of the brownie batter into the prepared pan. Drop spoonfuls of the raspberry mixture over the batter, then pour the remaining brownie batter on top, smoothing it out with a spatula.
- Bake: Bake in the preheated oven for 25-30 minutes, or until a toothpick inserted into the center comes out with a few moist crumbs. Be careful not to overbake.
- Cool and Serve: Allow the brownies to cool completely in the pan on a wire rack. Once cooled, lift them out using the parchment overhang and dust with powdered sugar if desired before cutting into squares.
Extra Tips:
To enhance the spooky effect, you can use a toothpick to swirl the raspberry mixture into the batter, creating a marbled look.
If you prefer a more intense raspberry flavor, feel free to increase the amount of raspberry jam or coulis. You can also substitute the raspberry with other red fruit preserves, like strawberry or cherry, depending on your preference.
For added texture and flavor, consider sprinkling chopped nuts or additional chocolate chips on top before baking. Enjoy your hauntingly delicious Vampire Bite Brownies!
Mummy Wrapped Brownies
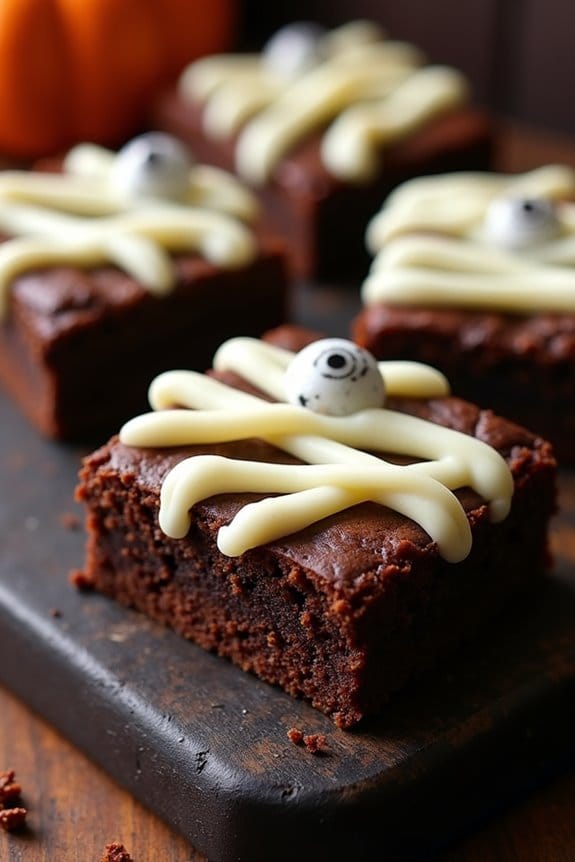
Halloween is the perfect time to get creative in the kitchen, and what better way to celebrate than with some spooky Mummy Wrapped Brownies? These delightful treats aren’t only delicious but also bring a fun, festive twist to your usual brownie recipe. Perfect for a Halloween party or a cozy night in, these brownies are wrapped in a sweet, creamy “bandage” that will make them the star of any dessert table.
The Mummy Wrapped Brownies combine rich, fudgy chocolate decadence with a hint of eerie charm. The brownies serve as the perfect base, offering a moist and dense texture that’s heightened by the sweet, creamy icing piped on top to mimic mummy bandages. With just a few ingredients and some simple decorating tricks, you can transform ordinary brownies into delightful mummies that are both fun to make and to eat.
Ingredients (serves 4-6):
- 1 cup unsalted butter
- 2 cups granulated sugar
- 1 cup all-purpose flour
- 1 cup unsweetened cocoa powder
- 4 large eggs
- 1 teaspoon vanilla extract
- 1/2 teaspoon salt
- 1 cup semi-sweet chocolate chips
- 1 cup white chocolate chips (for melting)
- Candy eyes for decoration
Instructions:
- Preheat the Oven: Start by preheating your oven to 350°F (175°C). Line a 9×13 inch baking dish with parchment paper or lightly grease it with butter to prevent sticking.
- Mix the Wet Ingredients: In a large saucepan over low heat, melt the butter. Once melted, remove from heat and add the sugar. Stir until well combined. Allow the mixture to cool slightly before adding the eggs one at a time, stirring well after each addition. Mix in the vanilla extract.
- Combine Dry Ingredients: In a separate bowl, sift together the flour, cocoa powder, and salt. Gradually add the dry mixture to the wet ingredients, stirring until just combined.
- Add Chocolate Chips: Fold in the semi-sweet chocolate chips until evenly distributed throughout the batter.
- Bake the Brownies: Pour the brownie batter into the prepared baking dish and spread it evenly. Bake in the preheated oven for 25-30 minutes, or until a toothpick inserted into the center comes out with only a few moist crumbs attached.
- Cool and Cut: Allow the brownies to cool completely in the pan on a wire rack. Once cooled, lift the brownies out using the parchment paper and cut them into rectangles or squares.
- Decorate the Mummies: Melt the white chocolate chips in a microwave-safe bowl in 30-second intervals, stirring in between until smooth. Transfer the melted white chocolate to a piping bag fitted with a small tip, or use a plastic sandwich bag with a small corner snipped off. Pipe the white chocolate over the brownies in a zigzag pattern to mimic mummy bandages. Add candy eyes to each brownie for a spooky effect.
Extra Tips:
When making Mummy Wrapped Brownies, make sure to allow the brownies to cool completely before cutting and decorating them; this will help maintain their shape and prevent the chocolate from melting too quickly.
If you don’t have a piping bag, a simple plastic sandwich bag will work just as well for the white chocolate decoration. Feel free to get creative with the candy eyes and bandage patterns to give each mummy its unique personality.
For an extra festive touch, you can add a dash of edible glitter or colored sprinkles to your mummies. Enjoy your Halloween treat!
Haunted House Brownies

These Haunted House Brownies are a spooky twist on a classic treat, perfect for adding a touch of Halloween fun to your dessert table. Rich, fudgy, and adorned with eerie decorations, they’re sure to be a hit with both kids and adults alike.
Rich, fudgy, and spookily decorated, these Haunted House Brownies enchant kids and adults alike.
The brownies serve as a delightful canvas for your creativity, allowing you to decorate them with ghostly figures, candy corn, or creepy spider webs. Whether you’re hosting a haunted house party or simply enjoying a cozy night in, these brownies will add a bit of magic and mystery to your festivities.
The recipe yields a serving size of 4-6 people, making it ideal for a small gathering or a family dessert. To achieve the haunted house theme, you’ll use classic brownie ingredients along with some fun Halloween candies and decorations. Prepare to be enchanted by the delightful combination of rich chocolate flavor and spooky charm.
Gather your ingredients, preheat your oven, and let’s plunge into the world of Halloween brownies!
Ingredients (Serves 4-6):
- 1 cup unsalted butter
- 2 cups granulated sugar
- 4 large eggs
- 1 teaspoon vanilla extract
- 1 cup all-purpose flour
- 1 cup unsweetened cocoa powder
- 1/2 teaspoon salt
- 1/2 teaspoon baking powder
- 1 cup semi-sweet chocolate chips
- Halloween-themed candies (e.g., candy corn, gummy worms, mini marshmallows)
- Decorative icing or frosting in assorted colors (e.g., black, orange, white)
Cooking Instructions:
- Preheat the Oven: Begin by preheating your oven to 350°F (175°C). Grease a 9×13-inch baking pan or line it with parchment paper to prevent sticking.
- Prepare the Batter: In a large microwave-safe bowl, melt the unsalted butter. Mix in the granulated sugar and stir until well combined. Allow to cool slightly before adding the eggs, one at a time, mixing well after each addition. Stir in the vanilla extract.
- Combine Dry Ingredients: In a separate bowl, whisk together the all-purpose flour, unsweetened cocoa powder, salt, and baking powder. Gradually add this dry mixture to the wet ingredients, stirring until just combined.
- Add Chocolate Chips: Fold in the semi-sweet chocolate chips, ensuring they’re evenly distributed throughout the batter.
- Bake the Brownies: Pour the batter into the prepared baking pan, spreading it evenly with a spatula. Bake in the preheated oven for 25-30 minutes, or until a toothpick inserted into the center comes out with just a few moist crumbs.
- Cool and Decorate: Allow the brownies to cool in the pan for about 10 minutes, then transfer to a wire rack to cool completely. Once cooled, use the decorative icing to create spooky designs such as spider webs, ghosts, or haunted houses. Add Halloween-themed candies to enhance the eerie effect.
Extra Tips:
For an extra fudgy texture, avoid overbaking the brownies; a slightly underdone center will set as they cool.
Be creative with your decorations—use different colored icings and candies to bring your haunted house theme to life. If you’re short on time, store-bought brownie mix can be a convenient alternative, allowing you to focus more on the decorating process.
Enjoy the process and let your imagination run wild with spooky designs!
Creepy Crawly Brownies
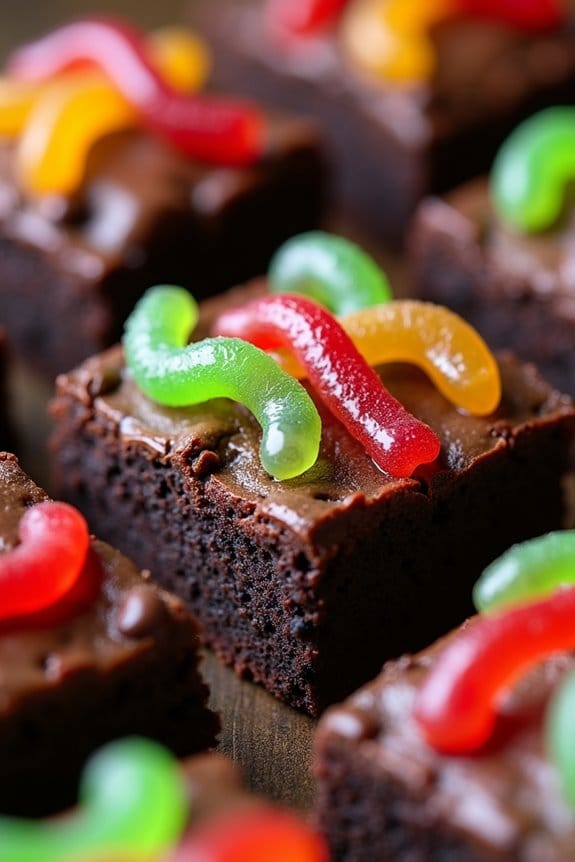
Embrace the Halloween spirit with these delightfully eerie Creepy Crawly Brownies. Perfect for a spooky gathering or a fun treat for the kids, these brownies combine rich chocolate flavor with a touch of Halloween magic.
Each brownie is topped with a ghoulish array of gummy worms and other creepy crawlies, sure to send a shiver down your spine while delighting your taste buds.
These Creepy Crawly Brownies aren’t only a visual delight but also a culinary treat. The moist and fudgy brownie base provides a perfect contrast to the chewy and sugary gummy decorations.
Whether you’re hosting a Halloween party or simply indulging in a festive treat, this recipe serves 4-6 people and promises to add a spine-tingling touch to your celebrations.
Ingredients:
- 1 cup (2 sticks) unsalted butter
- 2 cups granulated sugar
- 4 large eggs
- 1 cup all-purpose flour
- 1 cup unsweetened cocoa powder
- 1 teaspoon vanilla extract
- ½ teaspoon salt
- 1 cup semi-sweet chocolate chips
- 1 cup gummy worms
- ½ cup assorted gummy insects (like spiders and bugs)
Instructions:
- Preheat and Prepare: Preheat your oven to 350°F (175°C). Line a 9×13 inch baking pan with parchment paper, leaving a slight overhang on the sides for easy removal, and lightly grease it.
- Melt the Butter: In a medium saucepan over low heat, melt the butter. Once melted, remove from heat and stir in the sugar until well combined.
- Mix the Wet Ingredients: Allow the butter and sugar mixture to cool slightly, then add the eggs one at a time, stirring well after each addition. Stir in the vanilla extract.
- Combine Dry Ingredients: In a separate bowl, sift together the flour, cocoa powder, and salt. Gradually add the dry mixture to the wet mixture, stirring until just combined.
- Add Chocolate Chips: Fold in the semi-sweet chocolate chips, ensuring they’re evenly distributed throughout the batter.
- Bake the Brownies: Pour the batter into the prepared baking pan, spreading it evenly. Bake in the preheated oven for 25-30 minutes or until a toothpick inserted in the center comes out with a few moist crumbs.
- Cool and Decorate: Allow the brownies to cool completely in the pan on a wire rack. Once cooled, gently lift the brownies out of the pan using the overhang of parchment paper.
- Add the Creepy Crawlies: Cut the brownies into squares. Decorate each square with gummy worms and assorted gummy insects, pressing them slightly into the top of the brownies to adhere.
Extra Tips:
For an extra gooey texture, slightly underbake your brownies by a couple of minutes.
Make sure to let the brownies cool completely before cutting them to avoid breaking apart.
You can switch up the gummy decorations based on availability or personal preference—consider using gummy eyes or bones for an added spooky effect.
If you prefer, you can even dust the brownies with a light sprinkling of powdered sugar to mimic a dusting of “spooky” cobwebs!
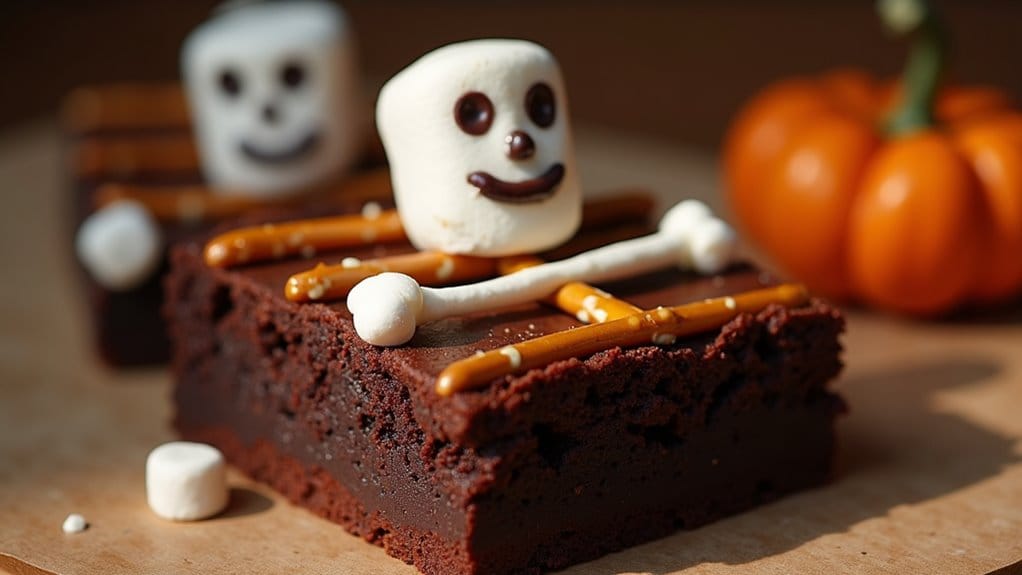
Skeleton Brownies

Skeleton Brownies are the perfect spooky treat for Halloween gatherings or any autumn celebration. These delightful, chocolatey brownies aren’t only delicious but also fun to make, thanks to their whimsical skeleton decoration.
Skeleton Brownies bring delicious fun to Halloween with their whimsical skeleton decoration, perfect for autumn celebrations.
With a rich, fudgy base and a playful design on top, these brownies are sure to be a hit with both kids and adults alike. The skeleton design is created using pretzel sticks and mini marshmallows, making it simple yet effective for a Halloween-themed dessert.
The recipe is straightforward enough for bakers of all skill levels. The key is in the decoration process, where creativity can truly shine. The brownies themselves are dense and moist, with a deep chocolate flavor that pairs wonderfully with a glass of milk or a scoop of vanilla ice cream.
Whether you’re hosting a Halloween party or simply want to treat your family to a festive dessert, Skeleton Brownies are a fantastic choice that combines the joy of baking with the fun of Halloween.
Ingredients (Serves 4-6):
- 1/2 cup unsalted butter
- 1 cup granulated sugar
- 2 large eggs
- 1 teaspoon vanilla extract
- 1/3 cup unsweetened cocoa powder
- 1/2 cup all-purpose flour
- 1/4 teaspoon salt
- 1/4 teaspoon baking powder
- 12 pretzel sticks
- 24 mini marshmallows
- 1/4 cup white chocolate chips
Cooking Instructions:
- Prepare the Baking Dish: Preheat your oven to 350°F (175°C). Grease an 8×8 inch baking dish or line it with parchment paper for easy removal of the brownies.
- Melt the Butter: In a medium saucepan, melt the butter over low heat. Once melted, remove from heat and stir in the sugar, eggs, and vanilla extract until well combined.
- Mix Dry Ingredients: In a separate bowl, whisk together the cocoa powder, flour, salt, and baking powder. Gradually add the dry mixture to the wet mixture, stirring until just combined.
- Bake the Brownies: Pour the brownie batter into the prepared baking dish, smoothing the top with a spatula. Bake in the preheated oven for 20-25 minutes, or until a toothpick inserted into the center comes out with a few moist crumbs.
- Cool and Decorate: Allow the brownies to cool completely in the pan on a wire rack. Once cooled, cut the brownies into 12 squares.
- Create Skeletons: For each brownie square, place two pretzel sticks parallel to each other to form the skeleton’s backbone and legs. Use mini marshmallows to create the skull and bones, placing them strategically at the top and down the sides of the pretzel sticks.
- Melt White Chocolate: In a microwave-safe bowl, melt the white chocolate chips in 15-second intervals, stirring in between until smooth. Use a toothpick or small piping bag to draw facial features on the marshmallow skulls.
Extra Tips:
For best results, make sure the brownies are completely cooled before attempting to decorate, as warm brownies can cause the marshmallows to melt.
If you prefer a darker chocolate flavor, consider using dark cocoa powder instead of regular cocoa powder. Additionally, feel free to get creative with the skeleton design—add candy eyes or use different types of pretzels for variety.
If you want to make the brownies in advance, they can be stored in an airtight container at room temperature for up to three days.
