
Planning an adults-only Halloween bash? Let’s elevate your spooky soirée with some enchanting and sophisticated food ideas. Picture your guests sipping on Vampire Blood Sangria and nibbling on a Ghostly Cheese Board. Watch their delight as they discover Witch’s Brew Soup and savor a slice of Gory Red Velvet Cake. Ready to create a hauntingly delicious feast?
Witch’s Brew Soup
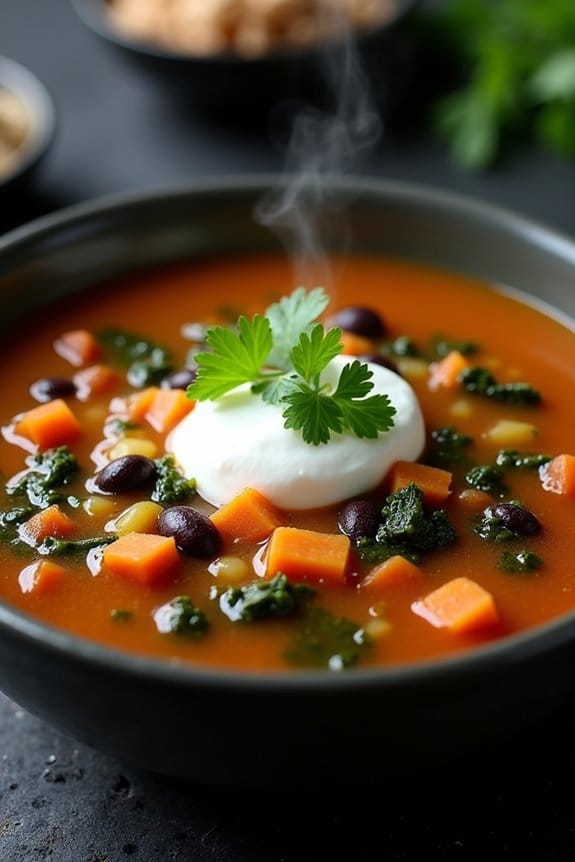
Witch’s Brew Soup is the perfect dish for an adult Halloween gathering, as it combines hearty ingredients with a spooky presentation. This soup will delight your guests with its rich flavors and eerie appearance, becoming a memorable addition to your Halloween festivities. Serve it in cauldron-like bowls, and perhaps even garnish with a few eye-catching toppings to enhance its magical allure.
This recipe brings together an assortment of ingredients that blend seamlessly into a comforting and delicious soup. The combination of fresh vegetables, savory broth, and tender proteins creates a meal that’s both satisfying and visually appealing. With a serving size suitable for 4-6 people, this Witch’s Brew Soup is sure to become a staple for your Halloween celebrations.
Ingredients (for 4-6 servings):
- 2 tablespoons olive oil
- 1 medium onion, finely chopped
- 2 cloves garlic, minced
- 2 medium carrots, diced
- 2 celery stalks, diced
- 1 large zucchini, diced
- 1 cup mushrooms, sliced
- 1 teaspoon dried thyme
- 1 teaspoon dried rosemary
- 1 teaspoon smoked paprika
- Salt and pepper to taste
- 6 cups vegetable or chicken broth
- 1 can (15 oz) diced tomatoes
- 1 cup cooked shredded chicken (optional)
- 1 can (15 oz) black beans, drained and rinsed
- 1 cup kale or spinach, chopped
- 1/4 cup fresh parsley, chopped
- 1/4 cup sour cream or Greek yogurt, for garnish
Cooking Instructions:
- Prepare the Base: In a large pot, heat the olive oil over medium heat. Add the chopped onion and cook until it becomes translucent, about 5 minutes. Then, add the minced garlic and sauté for another minute until fragrant.
- Add Vegetables: Stir in the diced carrots and celery, cooking for about 5 minutes until they begin to soften. Next, add the diced zucchini and sliced mushrooms, continuing to cook for another 5 minutes to allow the vegetables to release their juices.
- Season the Soup: Sprinkle in the dried thyme, rosemary, smoked paprika, salt, and pepper. Stir well to coat the vegetables with the spices, enhancing the soup’s depth of flavor.
- Simmer the Broth: Pour in the vegetable or chicken broth and the can of diced tomatoes. Bring the mixture to a boil, then reduce the heat to low and let it simmer for about 20 minutes, allowing all the flavors to meld together.
- Add Proteins and Greens: If using, stir in the cooked shredded chicken and black beans, simmering for an additional 10 minutes. Finally, add the kale or spinach and cook until wilted, about 3 minutes.
- Finish and Serve: Taste the soup and adjust the seasoning if necessary. Stir in the chopped parsley just before serving for a fresh burst of flavor. Ladle the soup into bowls, and top with a dollop of sour cream or Greek yogurt for a creamy finish.
Extra Tips:
For an extra spooky touch, consider serving the Witch’s Brew Soup in mini cauldrons or black bowls to maintain the Halloween theme. You can also add edible decorations such as pitted black olives (representing eyes) or whole cherry tomatoes (as blood-red orbs) floating on top.
This soup can be prepared a day in advance, as the flavors tend to deepen with time. Simply reheat before serving, and enjoy the warm, comforting taste of this bewitching dish.
Vampire Blood Sangria

Vampire Blood Sangria is the perfect spooky cocktail to serve at your Halloween gathering. This deep red drink, reminiscent of vampire blood, is both delicious and visually striking. The combination of red wine, fresh fruits, and a splash of brandy creates a sweet and tangy flavor profile that will captivate your guests. With just the right amount of sweetness and a hint of spice, this sangria will have everyone coming back for more. Serve it in a large punch bowl or in individual glasses with fruit garnish for a festive touch.
A spooky, deep red cocktail that captivates guests with its sweet, tangy flavor profile.
This Vampire Blood Sangria isn’t only easy to make but also allows for some creativity with the choice of fruits and spices. The dark, rich color comes from the blend of red wine and pomegranate juice, while the fresh fruits add a revitalizing twist. This recipe is designed for a serving size of 4-6 people, but you can easily adjust the quantities to suit a larger crowd. Be sure to prepare it in advance, as allowing the mixture to sit for a few hours enhances the flavors.
Ingredients for 4-6 people:
- 1 bottle (750ml) of red wine (such as Merlot or Cabernet Sauvignon)
- 1 cup of pomegranate juice
- 1/2 cup of brandy
- 1/4 cup of orange liqueur (such as Triple Sec or Cointreau)
- 2 tablespoons of sugar
- 1 orange, sliced
- 1 lemon, sliced
- 1 lime, sliced
- 1 cup of fresh pomegranate seeds
- 1 cinnamon stick
- 2 cups of club soda, chilled
- Ice cubes
Cooking Instructions:
- Combine the Liquids: In a large pitcher or bowl, pour the red wine, pomegranate juice, brandy, and orange liqueur. Stir well to combine all the liquids.
- Add Sugar and Fruits: Add the sugar to the mixture and stir until it has completely dissolved. Then, add the sliced orange, lemon, lime, and pomegranate seeds to the pitcher. Stir gently to incorporate the fruits.
- Infuse the Flavors: Drop the cinnamon stick into the mixture, which will add a subtle spice to the sangria. Cover the pitcher with plastic wrap or a lid and refrigerate for at least 2 hours, or overnight if possible, to let the flavors meld together.
- Add Club Soda: Just before serving, gently stir in the club soda to add a bit of fizz to the sangria. Taste and adjust the sweetness if necessary by adding a bit more sugar.
- Serve: Fill individual glasses with ice cubes and pour the Vampire Blood Sangria over the ice. Garnish each glass with a slice of fruit from the pitcher for a festive look.
Extra Tips:
For the best flavor, it’s important to let the sangria sit in the refrigerator for a few hours or overnight. This allows the fruits to infuse the liquid with their flavors fully.
If you prefer a sweeter sangria, consider adding a little more sugar or a sweetener of your choice. Additionally, you can experiment with different types of fruits, such as apples or berries, to personalize the drink.
Always chill the club soda separately and add it at the last minute to maintain its effervescence.
Ghostly Cheese Board
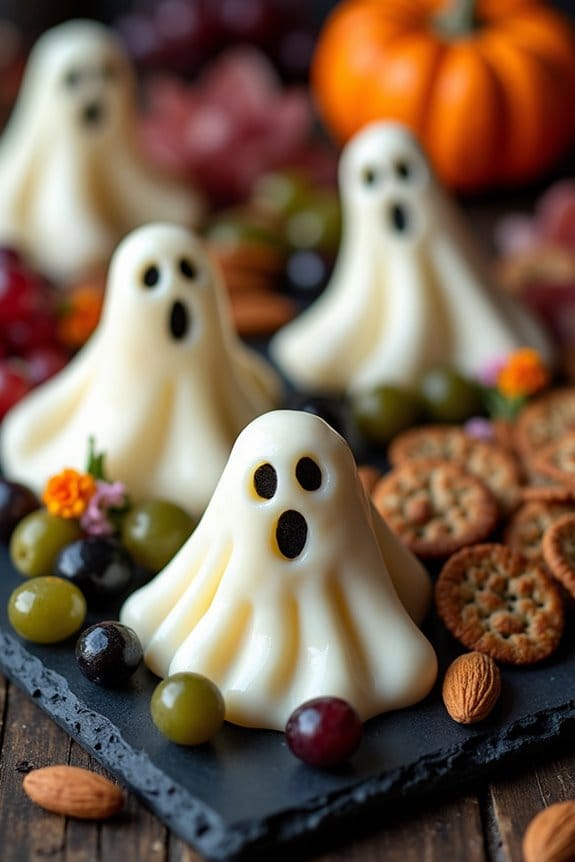
Elevate your Halloween party with a sophisticated yet spooky Ghostly Cheese Board. This hauntingly delightful spread combines an array of cheeses, fruits, meats, and artisanal crackers, all artfully arranged to enthrall your adult guests. The key to creating this enchanting centerpiece is to choose a variety of textures and flavors that not only complement each other but also bring a touch of the eerie to your Halloween festivities.
From soft, creamy cheeses shaped into ghostly forms to strategically placed olives resembling creepy eyeballs, this cheese board will be the talk of the night.
To guarantee your Ghostly Cheese Board is a frightful success, focus on presentation and creativity. Use tiny cookie cutters to shape slices of cheese into ghost figures or bats, and arrange them amidst an assortment of dark berries and nuts. Incorporating themed elements like a small pumpkin or a faux spider web can enhance the spooky ambiance.
This cheese board isn’t only a treat for the taste buds but also a feast for the eyes, making it an ideal choice for a Halloween gathering that caters to adults who appreciate fine food and festive flair.
Ingredients for 4-6 People:
- 200g Brie cheese
- 200g aged cheddar cheese
- 150g blue cheese
- 150g goat cheese
- 100g prosciutto
- 100g salami
- 100g black olives
- 100g green olives
- 200g assorted crackers
- 150g grapes (preferably dark varieties)
- 100g dried apricots
- 100g roasted almonds
- 1 small decorative pumpkin
- Edible flowers or herbs for garnish
- Optional: small Halloween-themed cookie cutters
Instructions:
1. Prepare the Cheeses:
Start by cutting the brie, cheddar, and goat cheese into ghostly shapes using the small Halloween-themed cookie cutters. Arrange the blue cheese in a way that shows off its veining, enhancing the eerie effect.
2. Assemble the Meats:
Roll the prosciutto and salami into small rosettes or fold them for easy picking. Place them strategically on the board, ensuring they’re accessible while adding to the board’s aesthetic.
3. Add Olives and Fruits:
Scatter the black and green olives around the board, creating clusters that resemble eyes peeking through the spread. Fill any gaps with bunches of grapes and dried apricots, adding color and texture.
4. Incorporate Crackers and Nuts:
Place the assorted crackers in several sections around the board, ensuring each type of cracker is easy to reach. Sprinkle roasted almonds throughout for an added crunch.
5. Decorate and Garnish:
Position the small decorative pumpkin in the center or a corner of the board. Use edible flowers or herbs to fill in any remaining spaces, providing a finishing touch that ties the theme together.
6. Final Touches:
Once everything is arranged, take a step back and adjust any items to improve balance and presentation. Guarantee there are no empty spaces and that the board looks full and inviting.
Extra Tips:
To maximize the visual appeal of your Ghostly Cheese Board, consider using a dark-colored board or slate as the base; this will contrast beautifully with the cheeses and garnishes. If possible, chill the cheeses slightly before cutting them into shapes to avoid crumbling.
Additionally, label the cheeses and meats with small tags or toothpicks to help guests easily identify the different flavors. Finally, remember that while aesthetics are important, the flavors should harmonize, so choose accompaniments that complement the cheeses and meats well.
Mummy Brie
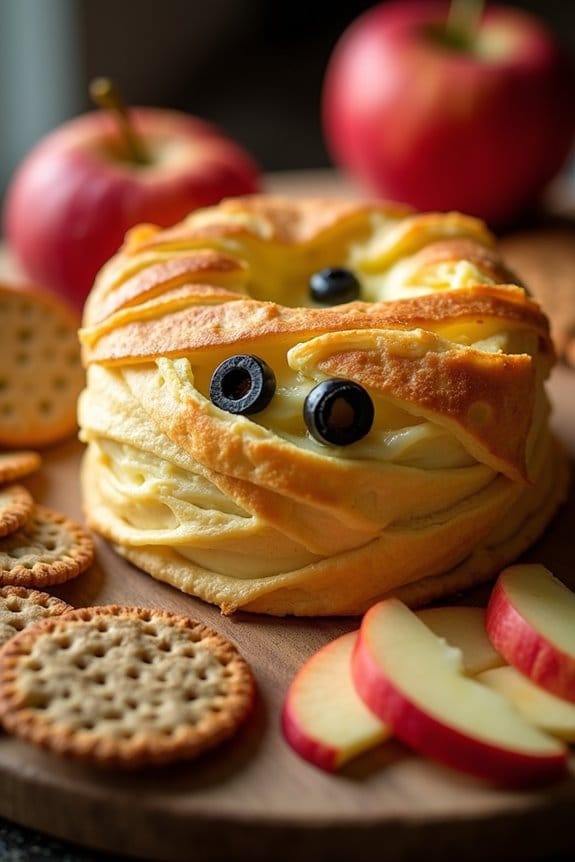
Mummy Brie is a delightful and spooktacular addition to your Halloween festivities, perfect for adult gatherings. This dish combines the creamy richness of Brie cheese with the buttery flakiness of puff pastry, wrapped up to resemble a mummy. It’s both a visual treat and a savory delight, making it a conversation starter and a crowd-pleaser at any Halloween party. The melted Brie oozes out as you cut into the pastry, offering a flavorful experience that pairs well with a variety of accompaniments such as crackers, apple slices, or a tangy chutney.
Mummy Brie: a creamy, flaky Halloween treat that dazzles and delights adult party guests with every bite.
This dish isn’t only fun to make but also incredibly easy, requiring just a few simple ingredients. The Mummy Brie can be prepared ahead of time and baked just before serving, guaranteeing it’s warm and gooey when it hits the table. Whether you’re hosting a small gathering or a larger event, this recipe serves 4-6 people, making it ideal for sharing among friends and family. The whimsical appearance of the mummy adds a touch of Halloween spirit to your spread, while the taste leaves a lasting impression.
Ingredients for 4-6 people:
- 1 round of Brie cheese (approximately 8 oz)
- 1 sheet of puff pastry (thawed)
- 1 egg
- 2 black olives (for eyes)
- Flour (for dusting the surface)
- Optional: apple slices, crackers, or chutney for serving
Cooking Instructions:
- Preheat and Prepare: Preheat your oven to 375°F (190°C). Lightly dust a clean surface with flour to prevent sticking, then roll out the puff pastry sheet until it’s large enough to fully wrap the Brie.
- Wrap the Brie: Place the Brie cheese in the center of the puff pastry. Cut the pastry into thin strips, about 1/2 inch wide, and start wrapping them around the Brie, leaving small gaps to resemble a mummy’s bandages. Confirm that the pastry covers the sides and top of the Brie completely.
- Create Mummy Features: For the mummy’s eyes, cut small circles from the black olives and place them on the wrapped Brie where you want the eyes to be. You can use a little bit of egg wash to help them stick.
- Egg Wash: Beat the egg in a small bowl and use a pastry brush to lightly coat the puff pastry with the egg wash. This will give the mummy a golden, shiny appearance as it bakes.
- Bake: Place the wrapped Brie on a baking sheet lined with parchment paper. Bake in the preheated oven for 20-25 minutes, or until the pastry is golden brown and crispy.
- Serve: Remove the Mummy Brie from the oven and let it cool for a few minutes before transferring it to a serving platter. Accompany with apple slices, crackers, or chutney for dipping or spreading.
Extra Tips:
For best results, confirm the puff pastry is completely thawed before using; otherwise, it may crack when wrapping the Brie. If you prefer a more pronounced flavor, consider adding a layer of your favorite jam or preserves, such as apricot or raspberry, on top of the Brie before wrapping it with the pastry.
Additionally, you can prepare the Mummy Brie in advance and store it in the refrigerator until ready to bake. Just remember to adjust the baking time slightly if it’s chilled. Enjoy the blend of textures and flavors that make this Halloween treat a hit among adults!
Spooky Stuffed Peppers
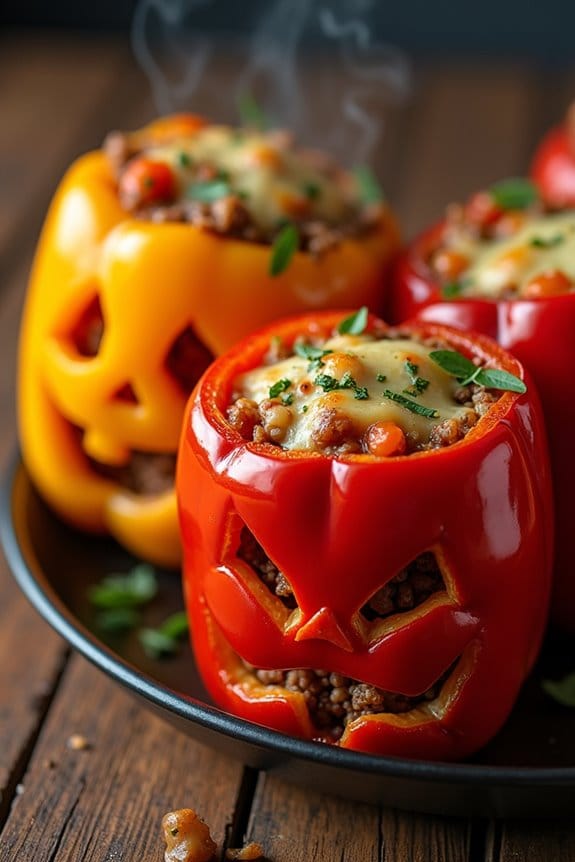
Transform your Halloween dinner into a ghoulishly delightful experience with these Spooky Stuffed Peppers. Perfect for adults who want to enjoy a festive meal without the sugar overload, these peppers are both delicious and eerie. By carving faces into orange and red bell peppers, you can create edible jack-o’-lanterns that are sure to be the highlight of your Halloween spread. Filled with a savory mixture of ground beef, rice, and spices, they offer a satisfying and nourishing meal that balances the indulgent treats of the season.
These Spooky Stuffed Peppers aren’t only visually appealing but also pack a punch of flavor. The tender bell peppers encase a hearty filling that’s seasoned to perfection. As they roast in the oven, the flavors meld together, resulting in a dish that’s both comforting and festive. This recipe serves 4-6 people, making it ideal for a small Halloween gathering or a family dinner. Gather your ingredients and get ready to create a dish that’s sure to impress your guests with both its taste and its playful presentation.
Ingredients for Spooky Stuffed Peppers (Serves 4-6):
- 6 medium bell peppers (preferably orange, red, or yellow)
- 1 pound ground beef
- 1 cup cooked rice
- 1 small onion, diced
- 2 cloves garlic, minced
- 1 can (14 oz) diced tomatoes, drained
- 1 teaspoon paprika
- 1 teaspoon dried oregano
- 1/2 teaspoon salt
- 1/4 teaspoon black pepper
- 1 cup shredded mozzarella cheese
- 2 tablespoons olive oil
Cooking Instructions:
- Prepare the Peppers: Preheat your oven to 375°F (190°C). Wash the bell peppers thoroughly and slice off the tops. Remove the seeds and membranes from the inside. Using a small paring knife, carefully carve out faces on one side of each pepper to resemble jack-o’-lanterns. Be gentle to avoid breaking the pepper.
- Cook the Filling: In a large skillet over medium heat, add the olive oil. Once hot, sauté the diced onion and minced garlic until they become translucent, about 3-4 minutes. Add the ground beef, breaking it apart with a spatula, and cook until browned and cooked through.
- Mix the Filling: Drain any excess fat from the skillet. Stir in the cooked rice, drained diced tomatoes, paprika, oregano, salt, and black pepper. Allow the mixture to simmer for 5 minutes, allowing the flavors to meld together. Remove from heat and stir in half of the shredded mozzarella cheese.
- Stuff the Peppers: Place the peppers upright in a baking dish. Fill each pepper with the beef and rice mixture, pressing down gently to pack it in. Sprinkle the remaining mozzarella cheese on top of each stuffed pepper.
- Bake the Peppers: Cover the baking dish with aluminum foil and bake in the preheated oven for 30 minutes. Remove the foil and bake for an additional 10-15 minutes, or until the peppers are tender and the cheese is bubbly and golden.
- Serve: Let the stuffed peppers cool for a few minutes before serving. Arrange them on a platter for a spook-tacular presentation that will delight your guests.
Extra Tips:
To add a touch of heat, consider adding a pinch of cayenne pepper or a finely chopped jalapeño to the filling mixture. If you prefer a vegetarian version, substitute the ground beef with plant-based meat or omit it entirely and increase the amount of rice and vegetables. For an extra cheesy topping, you can add a sprinkle of Parmesan cheese along with the mozzarella.
Finally, when carving the faces, be sure to work slowly and use a small, sharp knife to achieve the best results without damaging the peppers.
Black Magic Pasta
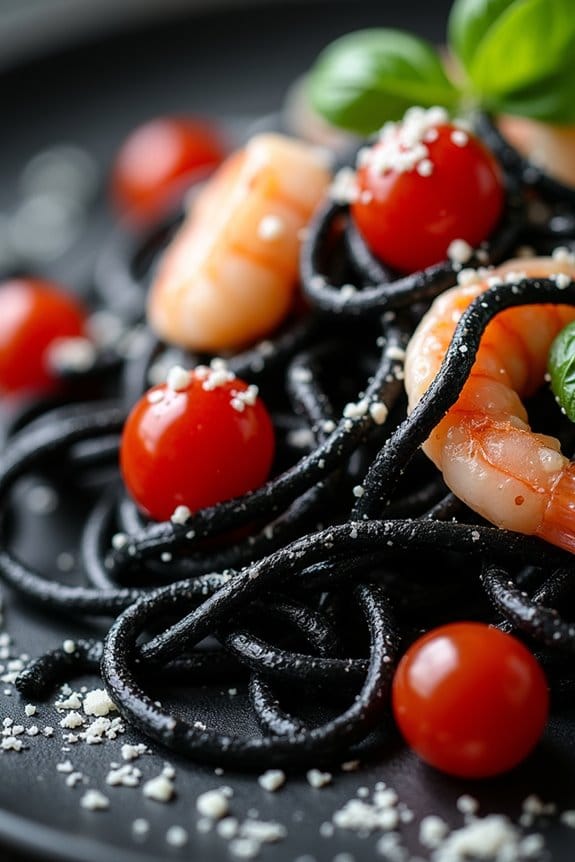
Transform a simple pasta dish into a bewitching culinary experience with Black Magic Pasta. This Halloween-inspired recipe combines the dramatic appearance of squid ink pasta with rich, savory flavors that are sure to captivate your dinner guests. The deep black hue of the squid ink pasta sets the stage for an elegant yet spooky meal, perfect for a grown-up Halloween gathering.
Pair it with a luscious garlic white wine sauce, and you’ll have a dish that’s as delicious as it’s visually striking. The Black Magic Pasta isn’t just about its enchanting look; it’s about creating a delightful harmony of flavors. With ingredients like garlic, cherry tomatoes, and shrimp, this dish balances taste and texture beautifully.
The addition of fresh basil and a sprinkle of Parmesan cheese enhance the overall flavor profile, making this pasta a sophisticated choice for adults looking to indulge in festive fun. Serve this magical meal alongside a glass of your favorite white wine, and you have a Halloween dinner that’s both impressive and effortlessly enchanting.
Ingredients (serving size: 4-6 people):
- 1 lb squid ink pasta
- 3 tablespoons olive oil
- 4 cloves garlic, minced
- 1 pound shrimp, peeled and deveined
- 1 cup cherry tomatoes, halved
- 1/2 cup dry white wine
- 1/2 cup chicken broth
- Salt and pepper, to taste
- 1/4 cup fresh basil, chopped
- 1/4 cup Parmesan cheese, grated
Cooking Instructions:
- Cook the Pasta: Bring a large pot of salted water to a boil. Add the squid ink pasta and cook according to the package instructions until al dente. Drain the pasta and set aside, reserving about 1/2 cup of the pasta water.
- Sauté the Garlic: In a large skillet, heat the olive oil over medium heat. Add the minced garlic and sauté for about 1 minute, or until fragrant and slightly golden.
- Cook the Shrimp: Add the shrimp to the skillet with the garlic. Cook for 3-4 minutes, or until the shrimp are pink and opaque. Be careful not to overcook them.
- Add Tomatoes and Deglaze: Stir in the cherry tomatoes and cook for another 2 minutes. Pour in the white wine, scraping up any browned bits from the bottom of the pan. Allow the wine to simmer and reduce by half.
- Create the Sauce: Add the chicken broth to the skillet and bring to a simmer. Season the sauce with salt and pepper to taste. Let it cook for about 3 minutes to allow the flavors to meld together.
- Combine Pasta and Sauce: Add the cooked pasta to the skillet, tossing it in the sauce to coat evenly. If the sauce is too thick, add a little of the reserved pasta water to achieve your desired consistency.
- Finish the Dish: Remove the skillet from the heat and stir in the fresh basil. Sprinkle with Parmesan cheese before serving.
Extra Tips:
For an added layer of flavor, consider cooking the shrimp with a pinch of red pepper flakes for a subtle kick. If you can’t find squid ink pasta, you can substitute with regular pasta and add a teaspoon of squid ink to the sauce for color.
Make sure not to skimp on the fresh basil as it adds a revitalizing contrast to the rich sauce. Finally, always taste and adjust the seasoning before serving, as the quality and saltiness of ingredients can vary. Enjoy your hauntingly delicious Black Magic Pasta!
Bat Wings With Spicy Dip

Halloween is the perfect time to serve up some deliciously spooky treats, and Bat Wings with Spicy Dip is an ideal dish to add a touch of fright to your adult Halloween party. This dish takes the classic chicken wing and elevates it with a dark, smoky flavor and a fiery dip that will keep your guests coming back for more.
The wings are coated with a combination of spices and sauces that turn them into a deep, eerie color, perfect for the Halloween theme. Paired with a spicy dip that tantalizes the taste buds, this dish is sure to be a crowd-pleaser.
Not only are these bat wings packed with flavor, but they’re also easy to make, requiring just a few simple steps to put together. The spicy dip can be adjusted to suit your preferred level of heat, making this dish customizable and perfect for everyone’s palate.
Whether you’re hosting a large Halloween bash or having a small gathering of friends, these bat wings are a must-have for any Halloween menu. Below is the recipe to make enough bat wings and spicy dip to serve 4-6 people.
Ingredients:
- 2 pounds chicken wings
- 1/4 cup soy sauce
- 1/4 cup balsamic vinegar
- 1 tablespoon olive oil
- 2 tablespoons honey
- 2 teaspoons garlic powder
- 2 teaspoons onion powder
- 1 teaspoon smoked paprika
- 1 teaspoon black pepper
- 1 teaspoon salt
- 1/2 teaspoon cayenne pepper
- 1/2 cup sour cream
- 1/4 cup mayonnaise
- 2 tablespoons hot sauce
- 1 tablespoon lemon juice
- 1 teaspoon garlic powder
- 1/2 teaspoon salt
Cooking Instructions:
- Prepare the Marinade: In a large bowl, combine soy sauce, balsamic vinegar, olive oil, honey, garlic powder, onion powder, smoked paprika, black pepper, salt, and cayenne pepper. Mix well to create a marinade.
- Marinate the Wings: Add the chicken wings to the marinade, ensuring each wing is well coated. Cover the bowl with plastic wrap and let the wings marinate in the refrigerator for at least 2 hours, or overnight for more intense flavor.
- Preheat the Oven: Preheat your oven to 400°F (200°C). Line a baking sheet with aluminum foil and place a wire rack on top. This setup will allow the wings to cook evenly and crisp up nicely.
- Bake the Wings: Arrange the marinated wings on the wire rack. Bake in the preheated oven for 35-40 minutes, flipping halfway through, until the wings are cooked through and have a deep, rich color.
- Prepare the Spicy Dip: While the wings are baking, prepare the spicy dip by combining sour cream, mayonnaise, hot sauce, lemon juice, garlic powder, and salt in a small bowl. Mix until smooth and well combined.
- Serve: Once the wings are done, remove them from the oven and let them cool slightly. Serve the bat wings warm with the spicy dip on the side for dipping.
Extra Tips:
For an extra smoky flavor, consider grilling the wings instead of baking them. This will add a nice char to the wings, enhancing their appearance and taste.
If you prefer a milder dip, reduce the amount of hot sauce or substitute with a milder sauce. For a more dramatic presentation, consider adding a few drops of black food coloring to the marinade to darken the wings even further.
Be sure to have plenty of napkins on hand, as these bat wings are deliciously messy!
Pumpkin Risotto With Sage
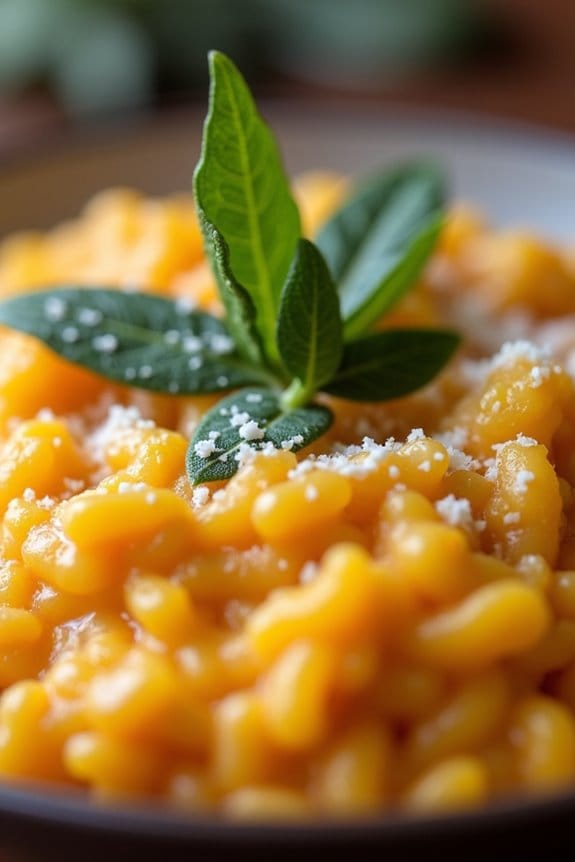
Pumpkin Risotto With Sage is a delightful dish perfect for an adult Halloween gathering. The creamy texture of the risotto paired with the earthy taste of pumpkin and the aromatic flavor of sage creates a comforting and sophisticated meal. This dish not only captures the essence of fall with its vibrant colors and seasonal ingredients but also elevates your Halloween menu with its gourmet presentation.
Risotto can seem intimidating to make, but with a little patience and attention to detail, you can achieve a restaurant-quality dish at home. The key to this Pumpkin Risotto is to slowly incorporate the broth into the rice, allowing it to absorb gradually and create a creamy consistency. The addition of pumpkin puree enhances the creaminess, while the sage adds a fragrant touch that complements the nutty Parmesan cheese. This recipe serves 4-6 people, making it an ideal choice for a small dinner party or family meal.
With patience and care, create a creamy, restaurant-quality Pumpkin Risotto for your next cozy gathering.
Ingredients:
- 2 cups Arborio rice
- 1 cup pumpkin puree
- 1/2 cup dry white wine
- 5 cups chicken or vegetable broth
- 1/2 cup grated Parmesan cheese
- 1 small onion, finely chopped
- 2 cloves garlic, minced
- 2 tablespoons olive oil
- 2 tablespoons unsalted butter
- 8-10 fresh sage leaves
- Salt and pepper to taste
- Optional: additional Parmesan and sage leaves for garnish
Instructions:
- Prepare the Broth: In a medium saucepan, warm the chicken or vegetable broth over low heat. Keep it warm but not boiling, as you’ll add it gradually to the risotto.
- Cook the Aromatics: In a large pan, heat the olive oil and one tablespoon of butter over medium heat. Add the chopped onion and minced garlic, cooking until the onion becomes translucent and soft, about 5 minutes.
- Toast the Rice: Add the Arborio rice to the pan, stirring continuously for about 2 minutes. This step toasts the rice and helps it absorb the flavors of the onion and garlic.
- Deglaze with Wine: Pour in the dry white wine, stirring until it’s mostly absorbed by the rice. This adds a depth of flavor to the risotto.
- Incorporate the Broth: Begin adding the warm broth one ladle at a time, stirring frequently. Wait until most of the liquid is absorbed before adding the next ladle. Continue this process for about 18-20 minutes, until the rice is tender and creamy.
- Add Pumpkin and Sage: Stir in the pumpkin puree and half of the fresh sage leaves. Cook for an additional 5 minutes, allowing the flavors to meld together.
- Finish the Risotto: Turn off the heat and add the remaining tablespoon of butter and the grated Parmesan cheese. Stir until the butter and cheese are melted and the risotto is creamy. Season with salt and pepper to taste.
- Garnish and Serve: Serve the risotto hot, garnished with additional Parmesan and fresh sage leaves if desired.
Extra Tips: When making risotto, patience is key. Stir continuously to avoid the rice sticking to the pan, and make sure each addition of broth is mostly absorbed before adding more. If you find the risotto becoming too thick, you can always add a bit more broth or even a splash of water to reach your desired consistency.
For an extra layer of flavor, try gently frying the sage leaves in a bit of olive oil before using them as a garnish; this will make them crispy and enhance their aroma. Enjoy your Pumpkin Risotto With Sage as a standalone dish or pair it with a simple green salad for a complete meal.
Deviled Spider Eggs
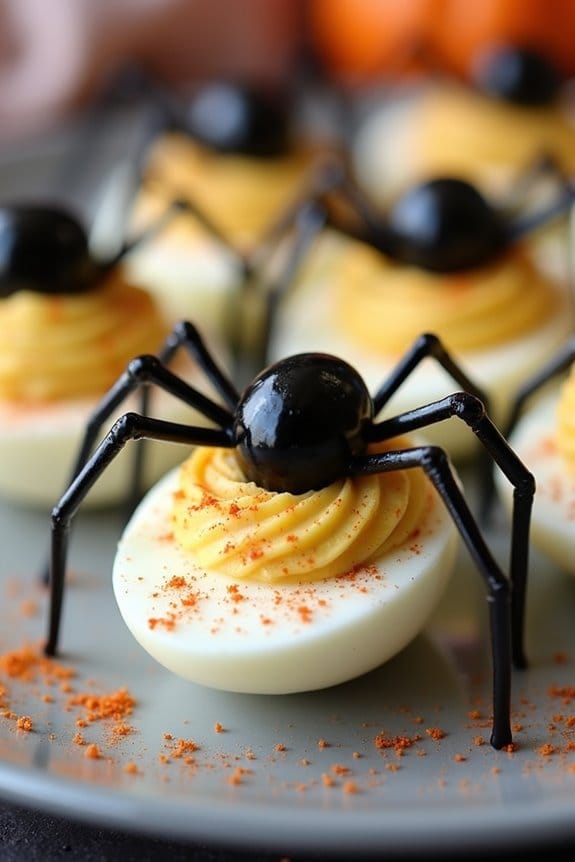
Looking to add a spooky yet delicious touch to your Halloween gathering? Deviled Spider Eggs are just the treat for adults who appreciate a bit of culinary creativity.
These eerie appetizers are a playful twist on the classic deviled eggs, enhanced with a creepy crawly presentation that will both intrigue and delight your guests. The rich and creamy filling, paired with the visual of “spiders” crawling on top, makes these eggs a standout dish for any Halloween celebration.
Perfect for a serving size of 4-6 people, Deviled Spider Eggs are surprisingly easy to make and can be prepared in advance, allowing you to focus on other aspects of your party. Whether you’re hosting a full-blown Halloween bash or simply enjoying a themed dinner with friends, this recipe is sure to be a hit.
Get ready to impress with a dish that marries flavor with fright, all while staying true to the sophisticated tastes of adult palates.
Ingredients (for 4-6 servings):
- 6 large eggs
- 3 tablespoons mayonnaise
- 1 teaspoon Dijon mustard
- 1 teaspoon white vinegar
- Salt and pepper to taste
- Paprika for garnish
- 12 black olives
Instructions:
- Boil the Eggs: Place the eggs in a single layer in a saucepan and cover them with water by about an inch. Bring to a boil over medium-high heat. Once boiling, remove the saucepan from the heat, cover, and let the eggs sit for about 10-12 minutes.
- Prepare Ice Bath: While the eggs are cooking, prepare an ice bath by filling a large bowl with ice and water. Once the eggs are done cooking, transfer them to the ice bath to cool for at least 5 minutes. This makes peeling easier.
- Peel and Halve the Eggs: Gently crack the cooled eggs and peel them under running water. Slice each egg in half lengthwise and carefully remove the yolks, placing them in a separate bowl.
- Make the Filling: Mash the yolks with a fork until smooth. Add mayonnaise, Dijon mustard, white vinegar, salt, and pepper, mixing until the filling is creamy. Adjust the seasoning to taste.
- Fill the Egg Whites: Use a spoon or a piping bag to fill each egg white half with the yolk mixture. Make sure to mound the filling slightly above the edge of the egg white for a better presentation.
- Create the Spider Decorations: Cut the black olives in half; use one half for the spider body. Slice the other half into thin strips to form the legs. Place one olive half on top of each filled egg, then arrange the olive slices around it to create the spider legs.
- Garnish and Serve: Lightly dust the eggs with paprika for a touch of color. Arrange the Deviled Spider Eggs on a serving platter and refrigerate until ready to serve.
Extra Tips:
For an extra touch of fun, consider adding food coloring to the yolk filling to create an even more vibrant Halloween look.
You can also experiment with different types of olives or garnishes to customize the spiders to your liking. If you want to prepare these in advance, keep the decorated eggs in an airtight container in the refrigerator, and they’ll stay fresh for up to one day.
Creepy Crawly Charcuterie

Halloween isn’t just for the kids; adults can get in on the spooky fun too! One way to add an eerie yet sophisticated touch to your Halloween party is with a Creepy Crawly Charcuterie board. This dish elevates the traditional meat and cheese platter by incorporating thematic elements that are both delicious and delightfully ghoulish.
Imagine a beautifully arranged board featuring a mix of savory meats, cheeses, and unexpected creepy additions like edible insects or creatively crafted food items that resemble creepy crawlies. This unique presentation is sure to be a conversation starter and an Instagram-worthy centerpiece for your Halloween festivities.
The beauty of the Creepy Crawly Charcuterie board lies in its versatility. You can customize it to suit any palate, including a wide range of flavors and textures that cater to the adventurous eater or those who prefer something more traditional.
Whether you’re a fan of bold, spicy meats or prefer creamy, mild cheeses, there’s something for everyone on this board. The key is in the arrangement and the use of creatively crafted elements, such as olives turned into spiders or salami fashioned into mummy wraps. This dish serves 4-6 people, making it perfect for an intimate gathering or as part of a larger spread.
Ingredients for Creepy Crawly Charcuterie:
- 10 slices of prosciutto
- 10 slices of salami
- 8 ounces of assorted cheeses (cheddar, brie, gouda)
- 1 cup of olives (black and green)
- 1/2 cup of pickles
- 1/2 cup of roasted nuts (almonds, walnuts)
- 1/2 cup of dried fruits (apricots, cranberries)
- 1/4 cup of edible insects (crickets or mealworms)
- 1 cup of assorted crackers
- Fresh rosemary sprigs for garnish
Cooking Instructions:
- Prepare the Base: Begin by selecting a large wooden or slate board as the base for your charcuterie. This provides an attractive and sturdy foundation for arranging your ingredients.
- Arrange the Meats: Fold the prosciutto and salami into loose ribbons and place them in separate sections on the board. You can also creatively shape the salami into mummies or other spooky designs if desired.
- Add the Cheeses: Cut the cheeses into cubes or slices and place them in different sections around the board. Consider using a small cheese knife to add texture to the cheese edges for a rustic appearance.
- Incorporate the Creepy Elements: Use the olives to create spider shapes by cutting slivers for legs and placing them around whole olives. Scatter the edible insects across the board for an adventurous touch.
- Add Additional Components: Scatter the pickles, roasted nuts, and dried fruits in small piles or bowls around the board to add variety and color.
- Include the Crackers: Arrange the assorted crackers in clusters around the board, ensuring easy access for guests to pair with the meats and cheeses.
- Garnish for Effect: Finish the board by tucking fresh rosemary sprigs among the ingredients to add a touch of green and enhance the presentation with a forest-like appearance.
Extra Tips:
When creating your Creepy Crawly Charcuterie board, consider the balance of flavors and textures. Pair strong-flavored cheeses with milder meats to guarantee a harmonious taste experience.
Don’t be afraid to get creative with your presentation; the more whimsical and spooky the better. If edible insects are too adventurous for your guests, substitute with candy spiders or plastic critters for a similar visual effect without the shock factor.
Finally, guarantee you have a variety of small serving utensils available, such as toothpicks or forks, to allow for easy serving and hygiene.
Gory Red Velvet Cake

Get ready to spook your guests with a terrifyingly tasty treat, perfect for your Halloween gathering: the Gory Red Velvet Cake. This cake combines the classic charm of a red velvet sponge with a gruesome, bloody twist that will both delight and horrify your guests. Its rich, velvety texture paired with a slightly tangy cream cheese frosting creates a decadent dessert that will satisfy the sweet tooth of every adult at your party.
The secret to its gory appearance lies in the vibrant red coloring and a special raspberry sauce that mimics dripping blood, adding a truly spine-chilling effect.
This Gory Red Velvet Cake is designed to serve 4-6 people, making it an ideal treat for a small Halloween get-together. Whether you’re hosting a spooky soiree or just want to indulge in something seasonally sinister, this cake is sure to be the centerpiece of your Halloween dessert table. With its dramatic appearance and irresistible flavor, it’ll be the talk of the party long after the final slice is devoured.
Ingredients:
- 2 1/2 cups all-purpose flour
- 1 1/2 cups granulated sugar
- 1 teaspoon baking soda
- 1 teaspoon salt
- 1 teaspoon cocoa powder
- 1 1/2 cups vegetable oil
- 1 cup buttermilk, room temperature
- 2 large eggs, room temperature
- 2 tablespoons red food coloring
- 1 teaspoon white vinegar
- 2 teaspoons vanilla extract
For the Cream Cheese Frosting:
- 16 ounces cream cheese, softened
- 1 cup unsalted butter, softened
- 4 cups powdered sugar
- 1 teaspoon vanilla extract
For the Raspberry “Blood” Sauce:
- 2 cups fresh or frozen raspberries
- 1/2 cup granulated sugar
- 1 tablespoon lemon juice
Instructions:
- Preheat the Oven: Preheat your oven to 350°F (175°C). Grease and flour two 9-inch round baking pans and set aside.
- Mix Dry Ingredients: In a large bowl, sift together the flour, sugar, baking soda, salt, and cocoa powder. Mix well to combine.
- Prepare Wet Mixture: In another bowl, whisk together the vegetable oil, buttermilk, eggs, red food coloring, vinegar, and vanilla extract until smooth and well combined.
- Combine Ingredients: Gradually add the dry ingredients to the wet mixture, mixing on low speed until just combined. Be careful not to overmix to guarantee a tender cake.
- Bake the Cakes: Divide the batter evenly between the prepared baking pans. Bake for 25-30 minutes, or until a toothpick inserted into the center comes out clean. Allow cakes to cool in the pans for 10 minutes before transferring to wire racks to cool completely.
- Make the Frosting: In a large bowl, beat the cream cheese and butter together until smooth. Gradually add the powdered sugar and vanilla extract, beating until light and fluffy.
- Assemble the Cake: Once the cakes are completely cool, place one layer on a serving platter. Spread a generous amount of cream cheese frosting on top, then place the second cake layer over it. Frost the top and sides of the cake with the remaining cream cheese frosting.
- Prepare the Raspberry Sauce: In a small saucepan, combine raspberries, sugar, and lemon juice. Cook over medium heat, stirring occasionally, until the raspberries break down and the mixture thickens, about 10 minutes. Strain through a fine mesh sieve to remove seeds and let it cool.
- Decorate the Cake: Drizzle the cooled raspberry sauce over the top of the frosted cake, allowing it to drip down the sides for a “bloody” effect. Use a spoon to create blood splatters for added drama.
Extra Tips:
For a more vibrant red color, consider using gel food coloring, as it provides a more intense hue than liquid coloring.
When making the raspberry sauce, adjust the sugar to taste if you prefer a sweeter or more tart flavor.
To guarantee your cake layers are perfectly flat, you can trim the top of each cake layer before assembling.
Finally, for a truly horrifying presentation, consider adding Halloween-themed decorations like edible eyeballs or gummy worms on top of the cake.
Toxic Waste Punch

Get ready to spook your guests with a ghoulishly delicious drink that will leave them intrigued and delighted. Toxic Waste Punch is the perfect addition to your Halloween party, bringing both visual appeal and a tantalizing taste to your festive spread. This eerie-looking concoction isn’t only easy to make but also allows you to release your creativity with its vibrant, swampy appearance and delightful flavor.
Serve it in a punch bowl surrounded by eerie decorations, and watch as your adult guests gather around to enjoy this wickedly fun beverage.
This punch combines flavors of citrus and melon with a hint of bubbly soda, creating a revitalizing yet mysterious drink that’s perfect for any Halloween gathering. The green hue, reminiscent of toxic waste, is achieved naturally with melon-flavored liqueur, while the addition of lime sherbet adds a creamy, frothy texture that resembles bubbling cauldrons.
Make certain to have your cauldron or punch bowl ready, and let’s get started!
Ingredients (serving size: 4-6 people):
- 2 cups melon-flavored liqueur (such as Midori)
- 1 cup vodka
- 4 cups lemon-lime soda
- 2 cups pineapple juice
- 1 quart lime sherbet
- 1 lime, sliced
- 1/2 cup gummy worms (optional, for garnish)
- Ice cubes
Instructions:
- Prepare the Base Liquid: In a large punch bowl or cauldron, combine the melon-flavored liqueur and vodka. Stir the mixture gently to blend the alcohols together.
- Add the Soda and Juice: Pour in the lemon-lime soda and pineapple juice into the liqueur mixture. Stir carefully to make sure all the ingredients are well mixed without losing too much carbonation from the soda.
- Add the Lime Sherbet: Using a large spoon, scoop the lime sherbet into the punch bowl. The sherbet will start to melt and create a frothy, bubbling effect on top of the punch, enhancing its creepy appearance.
- Garnish for Effect: Float lime slices on the surface of the punch for an added pop of color and citrus flavor. For a fun, spooky touch, add gummy worms as garnish, allowing them to hang over the sides of the bowl or float in the punch.
- Serve: Add ice cubes to the punch to keep it chilled. Use a ladle to serve the punch into individual glasses, making sure each glass gets a bit of the frothy top.
Extra Tips: When preparing the Toxic Waste Punch, consider adjusting the amount of vodka to suit the preferences of your guests; you may want a milder or stronger punch depending on the crowd.
If you prefer a non-alcoholic version, simply omit the vodka and replace the melon-flavored liqueur with a non-alcoholic melon syrup. For an extra spooky presentation, serve the punch in a cauldron placed on a table covered with dry ice for a misty, mysterious effect.
Always remember to enjoy responsibly, especially during festive gatherings!
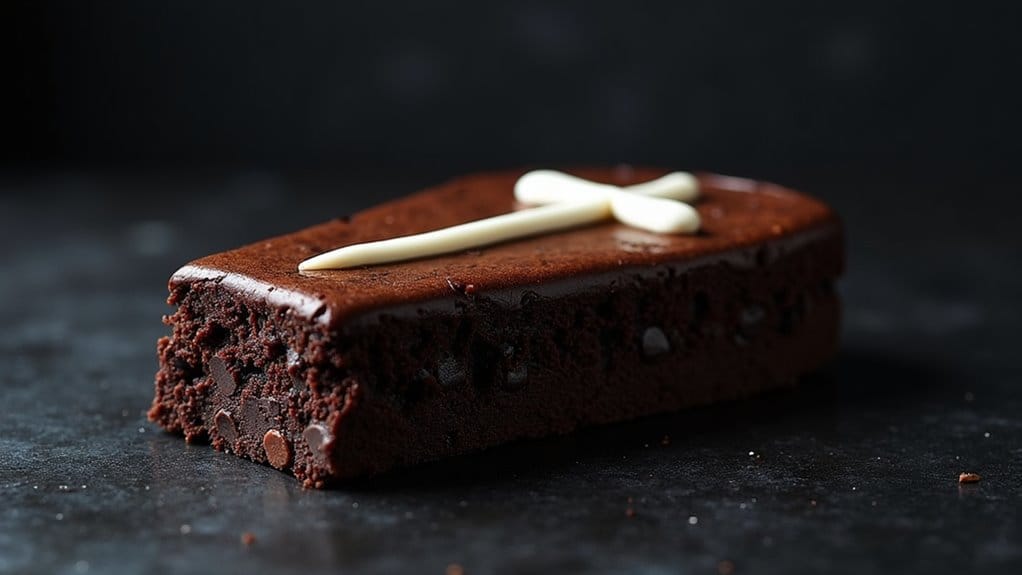
Coffin-Shaped Brownies
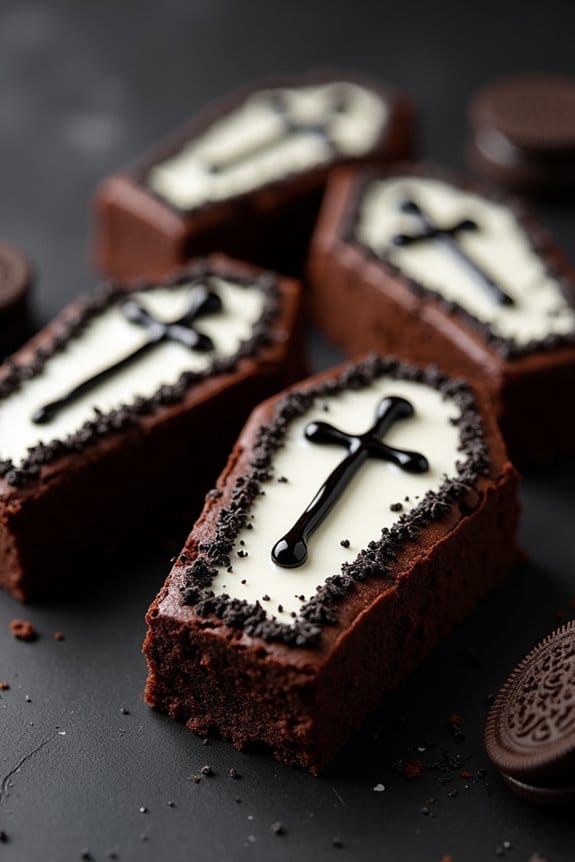
Halloween is the perfect time to release your culinary creativity, especially when it comes to desserts. Coffin-Shaped Brownies are a spooky yet delightful treat that adds a touch of macabre charm to any adult Halloween gathering.
These rich, fudgy brownies are cut into coffin shapes and can be decorated with eerie icing to give them a hauntingly delicious look. They’re not only visually appealing but also a sweet indulgence that pairs perfectly with a Halloween-themed cocktail.
Creating these Coffin-Shaped Brownies is easier than it seems and requires just a few simple ingredients that you might already have in your pantry. The key to achieving the perfect brownie lies in the balance between cakey and fudgy, resulting in a texture that’s moist and dense.
Whether you’re hosting a Halloween party or just want to treat yourself and a few friends, this recipe serves 4-6 people, making it an ideal choice for a small gathering.
Ingredients (Serves 4-6):
- 1 cup unsalted butter
- 2 cups granulated sugar
- 4 large eggs
- 1 teaspoon vanilla extract
- 1 cup all-purpose flour
- 3/4 cup unsweetened cocoa powder
- 1/2 teaspoon salt
- 1/2 teaspoon baking powder
- 1/2 cup semi-sweet chocolate chips
- Black decorating gel or icing
- White icing for decoration (optional)
Instructions:
- Preheat and Prepare: Preheat your oven to 350°F (175°C). Grease a 9×13 inch baking pan with butter or non-stick spray and line it with parchment paper, leaving some overhang to easily lift the brownies out later.
- Mix Wet Ingredients: In a medium saucepan, melt the butter over low heat. Once melted, remove from heat and stir in the sugar until well combined. Allow the mixture to cool slightly before adding the eggs, one at a time, beating well after each addition. Stir in the vanilla extract.
- Combine Dry Ingredients: In a separate bowl, sift together the flour, cocoa powder, salt, and baking powder. Gradually add the dry ingredients to the wet mixture, stirring until just combined. Be careful not to overmix.
- Add Chocolate Chips: Fold in the semi-sweet chocolate chips, making sure they’re evenly distributed throughout the batter.
- Bake the Brownies: Pour the brownie batter into the prepared baking pan, smoothing the top with a spatula. Bake in the preheated oven for 25-30 minutes, or until a toothpick inserted into the center comes out with a few moist crumbs.
- Cool and Cut: Allow the brownies to cool in the pan for about 10 minutes before lifting them out using the parchment paper overhang. Once completely cool, use a coffin-shaped cookie cutter to cut out the shapes.
- Decorate: Use black decorating gel or icing to outline the coffin shapes and add any desired details. You can also use white icing to create a cross or RIP inscription for an extra spooky touch.
Extra Tips:
For the best coffin shapes, make sure your brownies are completely cool before cutting. If you don’t have a coffin-shaped cookie cutter, you can make a stencil out of cardboard or parchment paper and use a sharp knife to cut around it.
When decorating, have fun with the designs and let your creativity flow. If you want to add some texture, consider sprinkling crushed Oreos or chocolate sprinkles on top for a graveyard effect.
Finally, these brownies can be made a day ahead and stored in an airtight container to save time on the day of your event.
