
As Halloween approaches, it’s the perfect time to transform your snack table into a chilling yet delightful spectacle. From Spooky Spider Deviled Eggs to Witch’s Finger Pretzels, each treat is a culinary trick that promises to enchant your guests. These tantalizing flavors mingle with eerie aesthetics, creating a feast for the senses. Are you ready to explore these spooky creations and impress your friends with a hauntingly delicious spread?
Spooky Spider Deviled Eggs
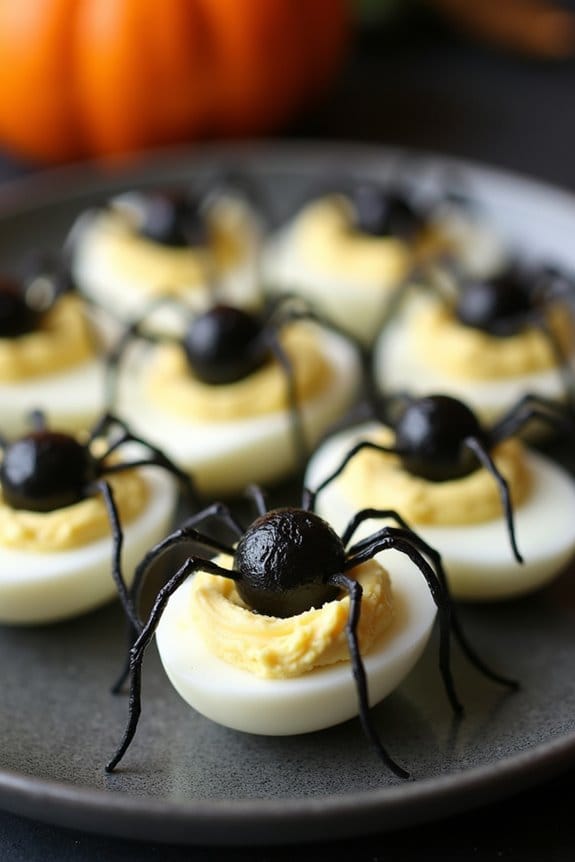
Spooky Spider Deviled Eggs are a fantastic addition to any Halloween spread, combining the classic taste of deviled eggs with a creepy, festive twist. This dish not only delights taste buds but also adds a playful element to your Halloween table. The eerie look of the “spiders” perched atop each egg is achieved using black olives, creating an eye-catching appetizer that’s sure to be a hit with both kids and adults alike.
A spooktacular twist on deviled eggs, perfect for delighting taste buds and adding Halloween fun!
Perfect for a gathering of 4-6 people, these deviled eggs are as delicious as they’re fun to make. The creamy yolk mixture is seasoned just right, providing a perfect balance of tang and spice, while the black olive spiders add a salty bite. Whether you’re hosting a Halloween party or simply want to surprise your family with a spooky treat, these Spooky Spider Deviled Eggs are a must-try.
Ingredients:
- 6 large eggs
- 1/4 cup mayonnaise
- 1 teaspoon Dijon mustard
- 1 teaspoon white vinegar
- Salt and pepper to taste
- 12 black olives
Cooking Instructions:
- Boil the Eggs: Place the eggs in a single layer in a saucepan and cover them with water. Bring the water to a boil over medium-high heat, then remove the pan from heat and cover it with a lid. Let the eggs sit in the hot water for about 12 minutes.
- Cool and Peel: After the eggs are cooked, transfer them to a bowl of ice water to cool for about 5 minutes. Once cooled, gently peel the eggs and set them aside.
- Prepare the Filling: Cut each egg in half lengthwise and carefully remove the yolks. Place the yolks in a small mixing bowl. Add mayonnaise, Dijon mustard, white vinegar, salt, and pepper to the yolks, and mash together until smooth and creamy.
- Fill the Eggs: Spoon or pipe the yolk mixture back into the hollowed egg whites, filling each egg half generously.
- Create the Spiders: Cut the black olives in half. Use one half for the spider’s body, and slice the other half into thin strips to create the spider legs. Arrange the olive pieces on top of each deviled egg to resemble a spider.
- Serve: Arrange the Spooky Spider Deviled Eggs on a serving platter and enjoy your spooky creation.
Extra Tips:
When boiling eggs, adding a pinch of salt to the water can help prevent the shells from cracking and make them easier to peel.
If you’re making these eggs ahead of time, you can prepare the yolk mixture and chill it separately. Just fill the egg whites and assemble the spiders shortly before serving to keep them looking fresh and neat.
For an extra festive touch, consider using food coloring to dye the egg whites a spooky color, or sprinkle some paprika over the top for added flavor and color contrast.
Mummy Jalapeño Poppers
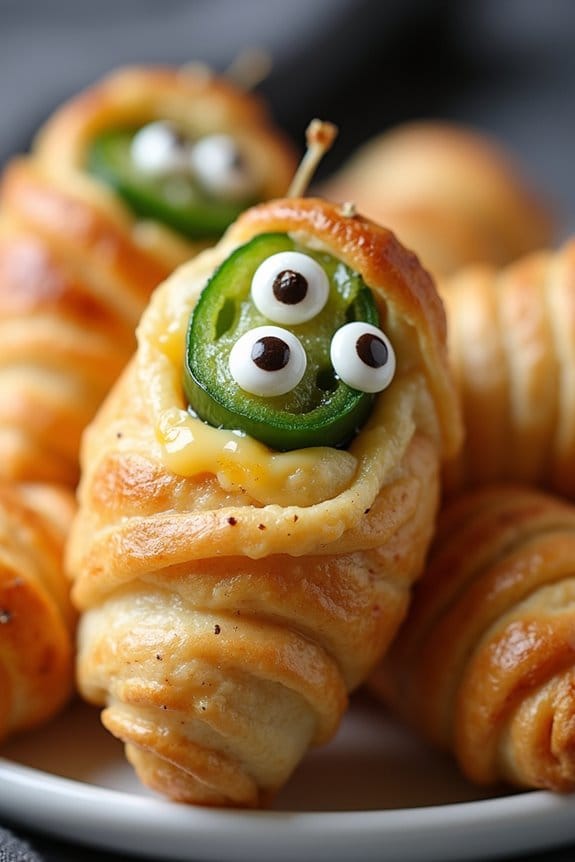
Mummy Jalapeño Poppers are a spooky and delicious addition to your Halloween snack menu. These tasty treats are made by wrapping jalapeños stuffed with a creamy cheese mixture in strips of crescent roll dough, giving them a fun mummy-like appearance. Perfect for parties or just a family gathering, these poppers offer a delightful mix of spice, creaminess, and flaky pastry, making them a crowd-pleaser for both kids and adults.
Not only are Mummy Jalapeño Poppers visually entertaining, but they’re also surprisingly easy to make. The combination of spicy jalapeños, smooth cream cheese, and the buttery goodness of crescent rolls creates a flavor explosion. They can be prepared ahead of time and baked just before serving, allowing you to enjoy the festivities without being stuck in the kitchen. With this recipe, you can prepare enough poppers to serve 4-6 people, guaranteeing everyone gets a taste of this frightfully fun snack.
Ingredients:
- 12 large jalapeño peppers
- 8 oz cream cheese, softened
- 1 cup shredded cheddar cheese
- 1/2 teaspoon garlic powder
- 1/2 teaspoon onion powder
- 1/4 teaspoon smoked paprika
- 1 package crescent roll dough
- 1 egg, beaten
- Candy eyes or small pieces of olives for decoration
Cooking Instructions:
- Preheat the Oven: Begin by preheating your oven to 400°F (200°C). This guarantees that it’s hot enough to bake the poppers evenly.
- Prepare the Jalapeños: Slice each jalapeño in half lengthwise, and carefully remove the seeds and membranes with a small spoon or knife. Be cautious as the seeds can be spicy.
- Make the Cheese Filling: In a mixing bowl, combine the softened cream cheese, shredded cheddar cheese, garlic powder, onion powder, and smoked paprika. Mix until well combined and creamy.
- Stuff the Jalapeños: Using a small spoon, fill each jalapeño half with the cheese mixture, pressing it down slightly so it’s compact.
- Wrap the Jalapeños: Unroll the crescent roll dough and cut it into thin strips. Wrap each stuffed jalapeño with the dough strips, leaving small gaps to mimic a mummy’s bandages.
- Add the Eyes: Gently press candy eyes or small pieces of olives onto the top of each wrapped jalapeño to give them a face.
- Bake the Poppers: Place the wrapped jalapeños on a baking sheet lined with parchment paper. Brush each with the beaten egg to give them a golden finish, then bake in the preheated oven for 15-20 minutes, or until the dough is golden brown and cooked through.
- Cool and Serve: Remove from the oven and let them cool slightly before serving. Enjoy your mummy poppers warm for the best taste.
Extra Tips: When handling jalapeños, consider wearing gloves to avoid irritation from the oils in the peppers. If you prefer a milder heat, soak the halved jalapeños in cold water for 15 minutes after deseeding them. For a more festive touch, you can use food coloring to dye the crescent roll dough strips different colors before wrapping. This recipe can also be easily doubled if you’re expecting more guests.
Witch’s Finger Pretzels
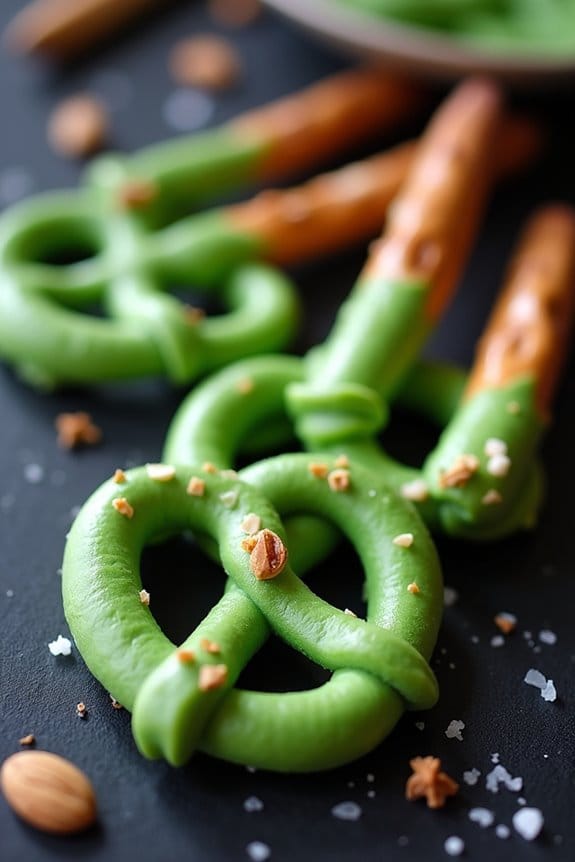
Crafting these Witch’s Finger Pretzels is a fantastic activity for both kids and adults, allowing everyone to get into the Halloween spirit. The recipe involves forming pretzel dough into finger-like shapes, adding almond slices as nails, and baking until golden. A touch of green food coloring completes the look, making these tasty fingers a perfect combination of spooky and scrumptious.
A delightful Halloween treat, Witch’s Finger Pretzels blend spooky fun with scrumptious flavor.
Let’s explore the ingredients and steps to create this eerie yet delightful snack.
Ingredients for Witch’s Finger Pretzels (serving size: 4-6 people):
- 1 1/2 cups warm water (110°F)
- 1 packet (2 1/4 teaspoons) active dry yeast
- 1 tablespoon granulated sugar
- 4 cups all-purpose flour
- 1 teaspoon salt
- 2/3 cup baking soda
- 10 cups water
- Green food coloring
- 1/4 cup melted butter
- 24 whole blanched almonds
- Coarse sea salt
Cooking Instructions:
- Prepare the Dough: In a large mixing bowl, combine the warm water, yeast, and sugar. Stir gently and let it sit for about 5 minutes, or until the mixture becomes frothy, indicating the yeast is active.
- Mix the Dough: Add the flour and salt to the yeast mixture. Mix until the dough begins to come together. Knead on a lightly floured surface for about 5-7 minutes until the dough is smooth and elastic.
- Shape the Fingers: Divide the dough into 24 equal pieces. Roll each piece into an elongated finger shape, about 4-5 inches long. Make sure to slightly taper one end to resemble a fingertip.
- Boil the Pretzels: Preheat your oven to 450°F (232°C). In a large pot, bring the 10 cups of water and baking soda to a boil. Working in batches, gently drop the shaped pretzels into the boiling water for about 30 seconds. Remove and place on a baking sheet lined with parchment paper.
- Decorate: Using a small brush, lightly coat each finger with melted butter. Tint the surface of each pretzel with green food coloring for a ghastly hue. Press an almond at the tapered end of each pretzel to form a witch’s nail.
- Bake: Sprinkle the pretzels with coarse sea salt. Bake in the preheated oven for 12-15 minutes, or until they’re golden brown and cooked through.
- Cool and Serve: Allow the pretzels to cool slightly on a wire rack before serving. Enjoy them warm or at room temperature.
Extra Tips:
For a more authentic look, you can use a knife to lightly score the dough before boiling to create knuckle-like ridges.
You can also experiment with different shades of green food coloring to achieve the desired level of spookiness. If you prefer a sweeter version, consider sprinkling the fingers with cinnamon sugar instead of salt for a unique twist.
These pretzels are best enjoyed fresh but can be stored in an airtight container for up to two days.
Pumpkin Patch Cheese Ball

The Pumpkin Patch Cheese Ball is a delightful and festive snack perfect for Halloween gatherings. This charming appetizer isn’t only visually appealing but also packed with flavor. The cheese ball mimics the look of a pumpkin, making it a great centerpiece for your holiday table. Made with a creamy mixture of cheeses and coated in a crunchy layer, it’s certain to be a hit with both kids and adults alike.
This recipe combines savory and spicy elements, creating a harmonious blend that complements the cheesy goodness. Whether you’re hosting a Halloween party or simply looking to enjoy a themed snack, the Pumpkin Patch Cheese Ball is easy to prepare. With just a few simple steps, you can create a delicious and eye-catching dish that will impress your guests.
Ingredients (Serves 4-6):
- 16 oz cream cheese, softened
- 2 cups shredded sharp cheddar cheese
- 1 tablespoon Worcestershire sauce
- 1 teaspoon garlic powder
- 1 teaspoon onion powder
- 1/2 teaspoon smoked paprika
- 1/2 teaspoon cayenne pepper (optional for heat)
- 1/4 cup chopped green onions
- 1 cup crushed pretzels
- 1 bell pepper stem (for decoration)
Instructions:
- Combine Cheeses: In a large mixing bowl, combine the softened cream cheese and shredded sharp cheddar cheese. Use a hand mixer or a sturdy spatula to mix them until smooth and well-blended.
- Add Flavorings: Add the Worcestershire sauce, garlic powder, onion powder, smoked paprika, and cayenne pepper to the cheese mixture. Stir well until all the ingredients are evenly distributed.
- Incorporate Green Onions: Fold in the chopped green onions to add a fresh, mild onion flavor to the cheese ball. Mix until the green onions are evenly spread throughout the mixture.
- Shape the Cheese Ball: Transfer the cheese mixture onto a piece of plastic wrap. Gather the wrap around the cheese and shape it into a ball, making sure it’s tightly packed. Refrigerate for at least 2 hours, or until firm.
- Coat with Pretzels: Spread the crushed pretzels on a plate. Unwrap the chilled cheese ball and roll it in the pretzels until completely coated, pressing gently to assure the pretzels adhere well.
- Decorate: Place the cheese ball on a serving platter. Insert the bell pepper stem on top to create the appearance of a pumpkin. Adjust as needed for a realistic look.
- Serve: Allow the cheese ball to sit at room temperature for about 15 minutes before serving, making it easier to spread. Pair with crackers, vegetable sticks, or pretzels for dipping.
Extra Tips:
For an extra burst of flavor, consider adding finely chopped sun-dried tomatoes or bacon bits to the cheese mixture. Confirm the cheese ball is well-chilled before rolling in the pretzels to maintain its shape. If you’re short on time, you can prepare the cheese ball a day in advance and store it in the refrigerator, adding the pretzel coating just before serving to keep it crunchy.
Ghostly Popcorn Mix
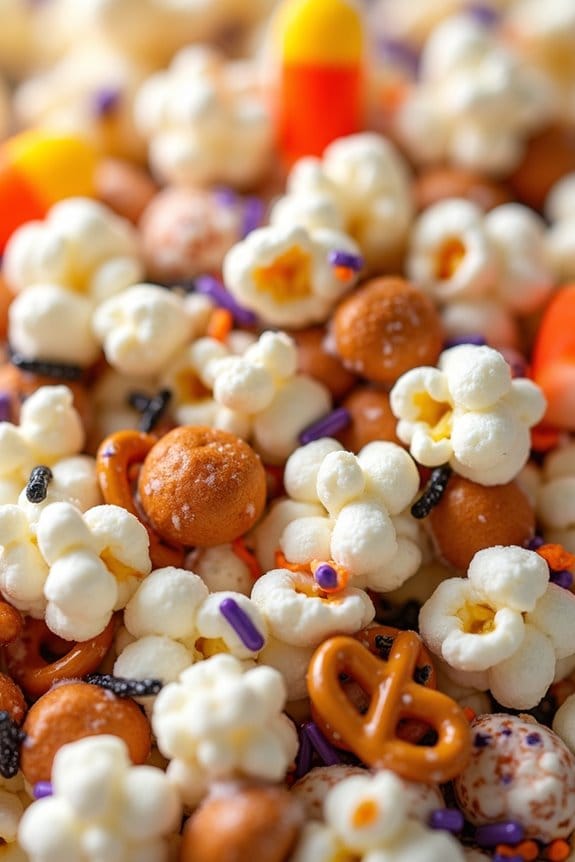
If you’re looking to add a spooky touch to your Halloween festivities, this Ghostly Popcorn Mix is the perfect treat. It’s a delightful combination of sweet and salty flavors, with a hint of Halloween magic thrown in for good measure. The mix is both easy to make and fun to eat, making it an ideal snack for parties or a cozy night in with a scary movie.
Plus, it’s customizable, so you can get creative with your favorite spooky add-ins.
This recipe serves 4-6 people and requires just a few simple ingredients. The base of the mix is freshly popped popcorn, which is coated in a sweet, buttery glaze and mixed with an assortment of Halloween-themed candies and pretzels. The result is a crunchy, chewy, and colorful snack that’s sure to be a hit with ghosts and goblins of all ages.
Ingredients:
- 10 cups popped popcorn
- 1 cup candy corn
- 1 cup mini pretzels
- 1 cup white chocolate chips
- 1/2 cup unsalted butter
- 1/2 cup light brown sugar
- 1/4 teaspoon salt
- 1/4 teaspoon vanilla extract
- 1/2 teaspoon orange food coloring (optional)
- Halloween-themed sprinkles
Cooking Instructions:
- Pop the Popcorn: Start by popping about 10 cups of popcorn using your preferred method. This could be an air popper, stovetop, or microwave. Verify all kernels are popped and remove any unpopped kernels.
- Prepare the Glaze: In a medium saucepan, melt the unsalted butter over medium heat. Once melted, add the light brown sugar and salt. Stir continuously until the mixture begins to bubble. Allow it to boil for 2 minutes without stirring.
- Add Flavor and Color: Remove the saucepan from heat and stir in the vanilla extract and orange food coloring, if using. Mix well until the color is evenly distributed.
- Coat the Popcorn: Place the popped popcorn into a large mixing bowl. Pour the hot glaze over the popcorn and gently toss to coat all pieces evenly.
- Mix in the Extras: Quickly add the candy corn, mini pretzels, and white chocolate chips to the glazed popcorn. Stir gently to combine, making sure everything is evenly distributed.
- Add Sprinkles: Spread the popcorn mix onto a large baking sheet lined with parchment paper. Sprinkle the Halloween-themed sprinkles over the top while the mix is still warm.
- Cool and Serve: Allow the Ghostly Popcorn Mix to cool completely at room temperature. Once cooled, break it into clusters and serve in a large bowl.
Extra Tips:
For an extra festive touch, consider adding mini marshmallows or chocolate-covered sunflower seeds to the mix.
If you want to make this recipe ahead of time, store the cooled popcorn mix in an airtight container to keep it fresh and crunchy.
Additionally, feel free to adjust the sweetness by experimenting with different types of candy or by using dark chocolate chips instead of white chocolate.
This versatile recipe can be easily adapted to cater to different tastes and dietary preferences, guaranteeing that your Halloween snacks are both delicious and inclusive.
Monster Eyeball Cookies
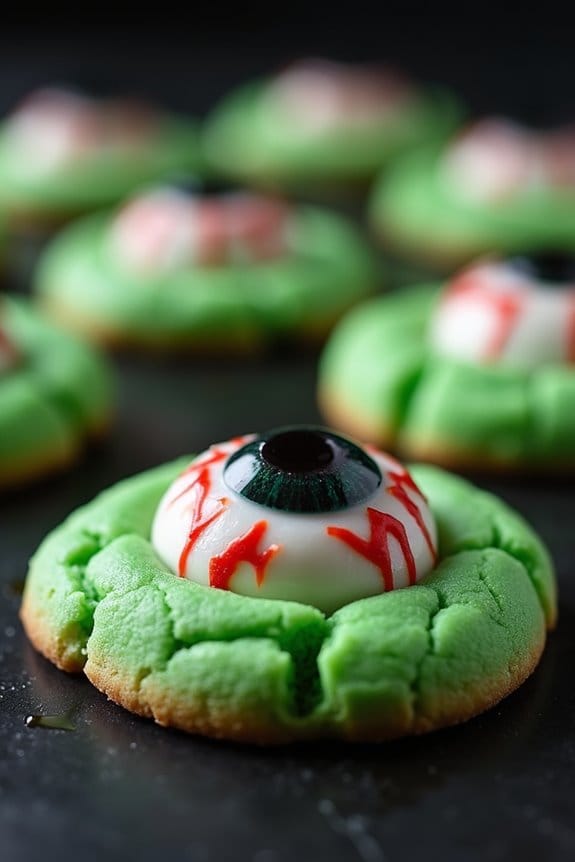
Monster Eyeball Cookies are the perfect Halloween treat to spook and delight your guests. These ghoulish goodies aren’t only fun to look at, but they’re also delicious to eat! With a soft cookie base and a spooky candy eyeball staring up at you, these cookies are certain to be a hit at any Halloween gathering.
Delightfully spooky cookies that are both a visual treat and a tasty Halloween hit!
Each bite delivers a melt-in-your-mouth texture with just the right amount of sweetness, and the eerie appearance makes them an exciting addition to any Halloween snack table.
These cookies are simple to make, requiring just a few ingredients that you may already have in your pantry. The recipe yields enough cookies to serve 4-6 people, making it ideal for a small party or family gathering. With a bit of creativity, you can even customize these cookies to fit other themes or holidays by changing the colors of the icing and decorations.
Let’s get started on crafting these deliciously terrifying Monster Eyeball Cookies!
Ingredients (Serves 4-6):
- 1 cup unsalted butter, softened
- 1 cup granulated sugar
- 1 large egg
- 1 teaspoon vanilla extract
- 2 cups all-purpose flour
- 1/2 teaspoon baking powder
- 1/4 teaspoon salt
- Green food coloring
- 24 candy eyeballs
- 1/2 cup powdered sugar
- 1-2 tablespoons milk
- Red and black gel icing
Instructions:
- Preheat the Oven: Start by preheating your oven to 350°F (175°C). Line two baking sheets with parchment paper or silicone baking mats.
- Cream Butter and Sugar: In a large mixing bowl, cream together the softened butter and granulated sugar using an electric mixer on medium speed until light and fluffy, about 2-3 minutes.
- Add Egg and Vanilla: Add the egg and vanilla extract to the creamed mixture, and continue beating until combined.
- Mix Dry Ingredients: In a separate bowl, whisk together the all-purpose flour, baking powder, and salt. Gradually add the dry ingredients to the wet mixture, mixing on low speed until a dough forms.
- Color the Dough: Add a few drops of green food coloring to the dough and mix until the color is evenly distributed.
- Shape the Cookies: Roll the dough into 1-inch balls and place them on the prepared baking sheets about 2 inches apart. Gently flatten each ball slightly with the palm of your hand.
- Bake: Bake the cookies in the preheated oven for 10-12 minutes or until the edges are lightly golden. Remove from the oven and let cool on the baking sheets for 5 minutes, then transfer to a wire rack to cool completely.
- Prepare Icing: While the cookies cool, mix the powdered sugar with 1-2 tablespoons of milk to create a thick icing. Adjust the consistency by adding more powdered sugar or milk as needed.
- Decorate: Once the cookies are cooled, use the icing to attach a candy eyeball to the center of each cookie. Use red and black gel icing to add veins and details around the eyeball for a spooky effect.
- Set: Allow the icing to set completely before serving.
Extra Tips:
To guarantee your Monster Eyeball Cookies look their best, make sure the cookies are completely cooled before adding the icing and candy eyeballs. This prevents the icing from melting or sliding off.
If you want to get creative, use different colors of food coloring for the dough or additional candy decorations to create unique monster faces.
Store any leftover cookies in an airtight container at room temperature for up to one week to maintain freshness. Enjoy spooking your guests with these delightful Halloween treats!
Bat Wings Chicken Drumettes
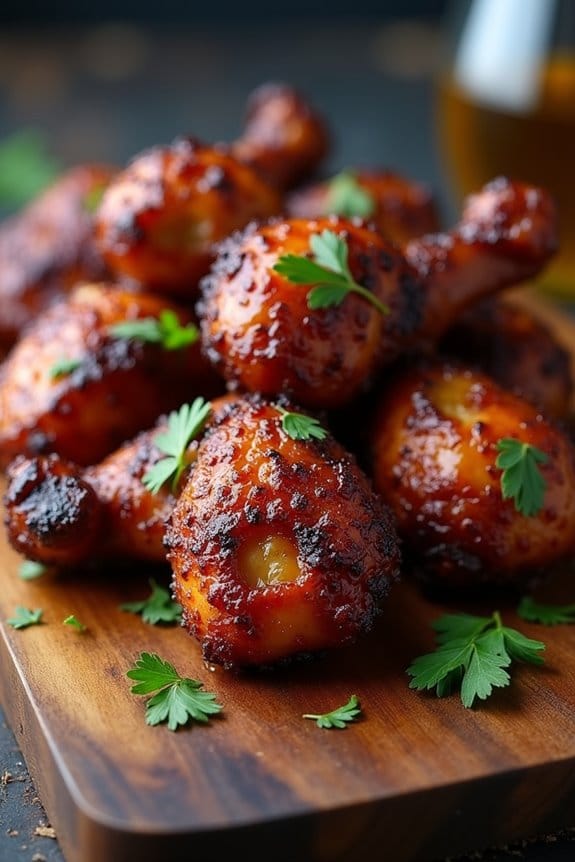
Halloween is the perfect time to get creative with your dishes, and what better way to celebrate than with some spooky Bat Wings Chicken Drumettes? This delicious dish transforms ordinary chicken drumettes into a fun and eerie treat that your family and guests will love.
The deep, dark marinade gives the wings a bat-like appearance, perfect for a Halloween-themed party or dinner. Not only do they look festive, but they also pack a punch of flavor, making them a hit among both kids and adults.
These Bat Wings Chicken Drumettes are easy to prepare, requiring only a few key ingredients to achieve their signature dark color and savory taste. The drumettes are marinated in a rich blend of soy sauce, balsamic vinegar, and spices, then baked to crispy perfection.
They’re not only a visual delight but also a mouthwatering treat, making them an excellent addition to your Halloween snacks lineup. Whether you’re hosting a party or just want a spooky snack, these drumettes are sure to be a crowd-pleaser.
Ingredients (Serves 4-6):
- 2 pounds chicken drumettes
- 1/2 cup soy sauce
- 1/4 cup balsamic vinegar
- 2 tablespoons honey
- 1 tablespoon olive oil
- 1 tablespoon smoked paprika
- 1 teaspoon garlic powder
- 1/2 teaspoon onion powder
- 1/2 teaspoon black pepper
- 1/4 teaspoon cayenne pepper (optional for heat)
- 1/4 cup chopped fresh parsley (for garnish)
Instructions:
- Prepare the Marinade: In a large mixing bowl, combine the soy sauce, balsamic vinegar, honey, olive oil, smoked paprika, garlic powder, onion powder, black pepper, and cayenne pepper. Whisk the ingredients together until well combined to create a dark, flavorful marinade.
- Marinate the Chicken: Add the chicken drumettes to the bowl containing the marinade. Toss the drumettes until they’re thoroughly coated with the marinade. Cover the bowl with plastic wrap or transfer the drumettes and marinade to a large resealable plastic bag. Refrigerate for at least 2 hours, or ideally overnight, to allow the flavors to fully penetrate the chicken.
- Preheat the Oven: When ready to cook, preheat your oven to 400°F (200°C). Line a baking sheet with aluminum foil or parchment paper for easy cleanup.
- Arrange and Bake: Remove the drumettes from the marinade and arrange them in a single layer on the prepared baking sheet. Reserve the marinade for later use. Bake in the preheated oven for 35-40 minutes, flipping the drumettes halfway through, until they’re cooked through and have a crispy exterior.
- Simmer the Marinade: While the drumettes are baking, pour the reserved marinade into a small saucepan. Bring it to a boil over medium heat, then reduce the heat and let it simmer for about 5 minutes until it slightly thickens. This will be used as a glaze.
- Glaze and Serve: Once the drumettes are done baking, remove them from the oven and brush them with the thickened marinade to add an extra layer of flavor and shine. Garnish with chopped fresh parsley before serving.
Extra Tips:
- For an even darker appearance, you can add a few drops of black food coloring to the marinade. This will enhance the bat-like look of the drumettes but is entirely optional.
- Make sure the drumettes are spaced out on the baking sheet to allow for even cooking and crispiness.
- If you prefer a smokier flavor, consider adding a splash of liquid smoke to the marinade.
- Leftover drumettes can be stored in an airtight container in the refrigerator for up to 3 days. Reheat them in the oven to retain their crispiness.
Graveyard Dirt Cups
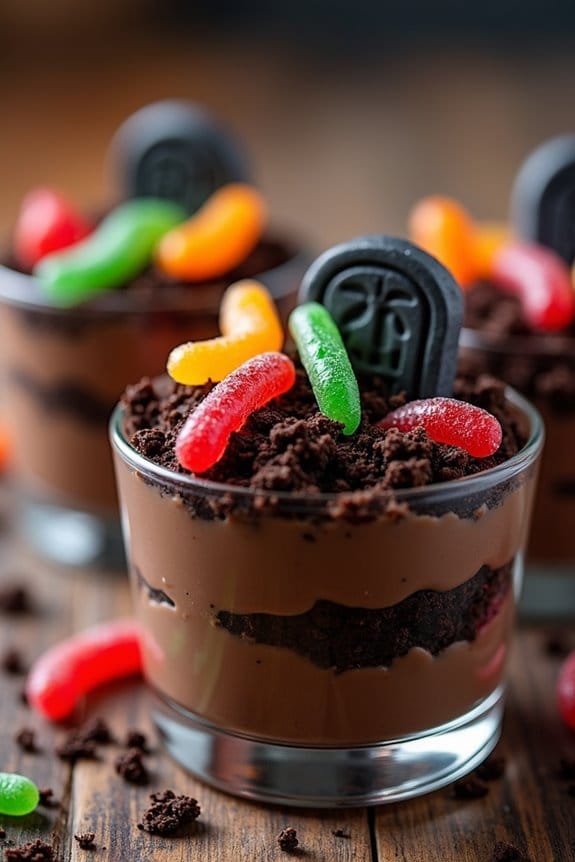
Graveyard Dirt Cups are a spooky and delicious treat perfect for Halloween festivities. These layered desserts aren’t only fun to make but also to eat, featuring a combination of rich chocolate pudding, crumbled cookies, and gummy worms to create a “dirt” look that resembles a graveyard.
This no-bake recipe is great for both kids and adults, offering a creative twist on a classic dessert that can be customized with different toppings to suit your Halloween theme. This recipe is ideal for serving 4-6 people and requires minimal ingredients and effort.
The Graveyard Dirt Cups can be prepared in advance, making them an excellent choice for parties or family gatherings. With a bit of imagination, you can enhance the visual appeal of these treats by adding decorative elements like edible tombstones or ghost-shaped candies.
Let’s plunge into the ingredients and instructions to create this creepy yet delightful dessert!
Ingredients (for 4-6 servings):
- 2 cups of cold milk
- 1 package (3.9 ounces) of instant chocolate pudding mix
- 1 package (14.3 ounces) of chocolate sandwich cookies
- 1 tub (8 ounces) of whipped topping
- Gummy worms
- Optional: Edible tombstones or ghost-shaped candies for decoration
Instructions:
- Prepare the Pudding: In a large mixing bowl, whisk together the cold milk and instant chocolate pudding mix. Continue whisking for about 2 minutes until the mixture is smooth and begins to thicken. Let the pudding set for 5 minutes.
- Crush the Cookies: While the pudding is setting, place the chocolate sandwich cookies in a sealable plastic bag. Use a rolling pin or a heavy object to crush the cookies into fine crumbs, resembling dirt.
- Layer the Dessert: Once the pudding is set, begin layering the dessert in clear cups or bowls. Start by adding a spoonful of cookie crumbs at the bottom of each cup, followed by a layer of chocolate pudding. Repeat the layers, ending with a generous layer of cookie crumbs on top.
- Add the Toppings: Insert gummy worms into the top layer of “dirt,” allowing them to peek out. If desired, place edible tombstones or ghost-shaped candies to enhance the graveyard theme.
- Chill the Cups: Cover the cups with plastic wrap and refrigerate for at least 30 minutes to allow the flavors to meld and the dessert to firm up.
Extra Tips: For the best results, use a clear cup or glass to showcase the layered effect of the dirt cups. If you’re making this dessert ahead of time, add the gummy worms and decorations just before serving to keep them fresh and vibrant.
Feel free to experiment with different flavored puddings or add other candy decorations to fit your Halloween theme. Enjoy the process and have fun creating these Graveyard Dirt Cups with your family or guests!
Creepy Crawly Crudités
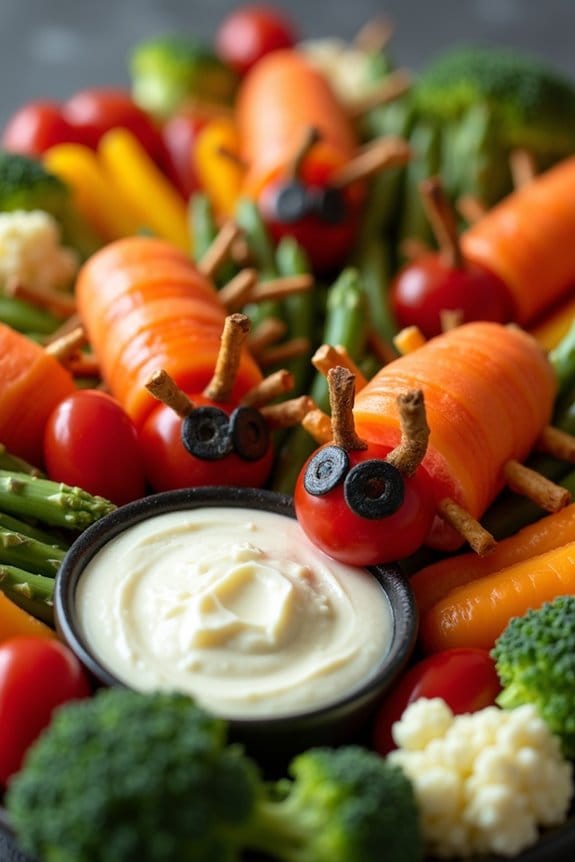
Creepy Crawly Crudités is the perfect Halloween-themed snack that combines the fun of the spooky holiday with a healthy twist. This dish transforms ordinary vegetables into an eye-catching platter of delightfully eerie creatures that both kids and adults will enjoy. The key to Creepy Crawly Crudités lies in the presentation, where various vegetables are cleverly arranged to resemble bugs and creepy crawlers, adding a playful touch to your Halloween festivities.
Not only is this dish visually appealing, but it also offers a nutritious alternative to the typical sugary treats associated with Halloween. By using fresh, crisp vegetables and a flavorful dip, Creepy Crawly Crudités provides a revitalizing contrast to the indulgent sweets of the season. This dish is versatile and can easily be customized with your favorite vegetables and dips, making it a crowd-pleaser at any Halloween gathering.
Ingredients (serving size: 4-6 people):
- 2 large carrots
- 1 cucumber
- 1 red bell pepper
- 1 yellow bell pepper
- 1 small head of broccoli
- 1 small head of cauliflower
- 1 bunch of asparagus
- 1 cup cherry tomatoes
- 1/2 cup black olives
- 1 cup hummus or your favorite vegetable dip
- Pretzel sticks (for legs)
- Cream cheese (optional, for decoration)
Cooking Instructions:
- Prepare the Vegetables: Wash all the vegetables thoroughly. Peel the carrots and cut them into thin sticks. Slice the cucumber into round discs. Cut the bell peppers into strips, removing the seeds and white membranes. Break the broccoli and cauliflower into small florets.
- Create the Creepy Crawlers: On a large serving platter, start by arranging the carrot sticks and cucumber discs to form the bodies of various bugs. Use cherry tomatoes for heads and black olives for eyes, attaching them with small dabs of cream cheese if needed.
- Add Legs and Antennae: Insert pretzel sticks into the sides of the vegetable bodies to create legs and antennae. Use bell pepper strips and asparagus spears to add additional features like wings or tails, enhancing the appearance of each creature.
- Assemble the Platter: Once all the creatures are assembled, arrange them on the platter around a bowl of hummus or your chosen dip, creating a garden-like scene with the broccoli and cauliflower florets as bushes.
- Final Touches: Use any remaining vegetables to fill in gaps on the platter, ensuring it looks full and vibrant. Make sure each creepy crawler is clearly distinguishable and surrounded by the colorful veggies.
Extra Tips:
For an added touch of fun, use cookie cutters to shape some of the vegetables into Halloween-themed designs like bats or pumpkins. Additionally, you can incorporate different types of dips such as ranch or guacamole to offer variety.
To maintain freshness, prepare the vegetables shortly before serving and cover them with a damp paper towel until ready to serve. Adjust the vegetable choices according to the preferences of your guests, and feel free to experiment with different shapes and designs to make your Creepy Crawly Crudités truly unique!
Vampire Bite Cupcakes
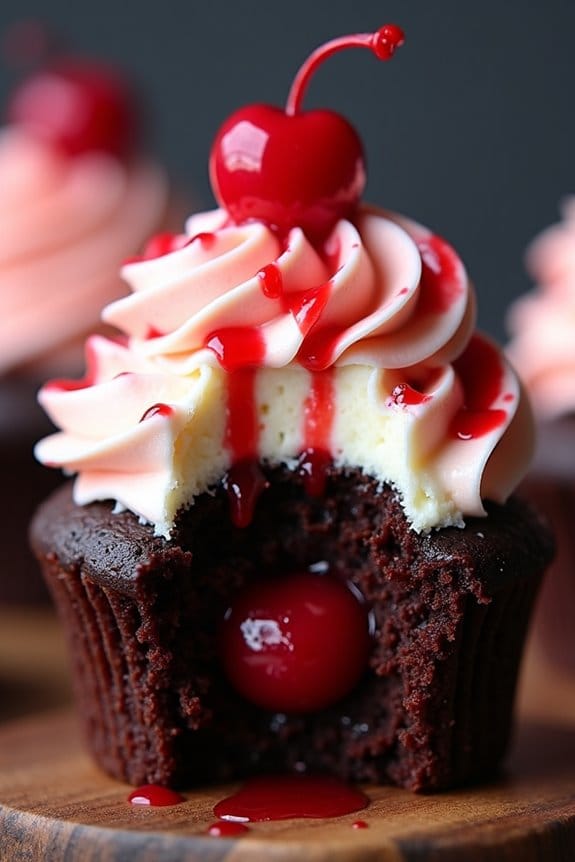
Vampire Bite Cupcakes are a spooky and delicious treat, perfect for Halloween festivities. These delightful cupcakes aren’t only visually striking with their blood-red filling and fang marks, but they also offer a burst of flavors that will satisfy any sweet tooth.
Whether you’re hosting a Halloween party or simply want to surprise your family with a creative dessert, these cupcakes are guaranteed to impress.
These cupcakes are made with a moist chocolate base and are filled with a cherry or raspberry filling to mimic the look of vampire bites. Topped with a rich cream cheese frosting and finished with a drizzle of “blood” and candy fangs, they’re as fun to make as they’re to eat.
This recipe serves 4-6 people, making it perfect for a small gathering or a family treat.
Ingredients:
- 1 cup all-purpose flour
- 1 cup granulated sugar
- 1/2 cup unsweetened cocoa powder
- 1 teaspoon baking powder
- 1/2 teaspoon baking soda
- 1/4 teaspoon salt
- 1/2 cup buttermilk
- 1/4 cup vegetable oil
- 1 large egg
- 1 teaspoon vanilla extract
- 1/2 cup boiling water
- 1 cup cherry or raspberry jam (for filling)
- 1/2 cup unsalted butter, softened
- 8 oz cream cheese, softened
- 4 cups powdered sugar
- Red food coloring
- Candy fangs (optional)
Cooking Instructions:
- Preheat and Prepare: Preheat your oven to 350°F (175°C) and line a muffin tin with cupcake liners. This will prevent the cupcakes from sticking and make for easy removal.
- Mix Dry Ingredients: In a large mixing bowl, combine the flour, sugar, cocoa powder, baking powder, baking soda, and salt. Whisk together until well combined.
- Combine Wet Ingredients: In another bowl, whisk together the buttermilk, vegetable oil, egg, and vanilla extract. Once mixed, slowly add the boiling water, making sure that the mixture becomes smooth and slightly runny.
- Create Batter: Gradually add the wet ingredients to the dry ingredients, stirring gently until just combined. Be cautious not to overmix, as this can lead to dense cupcakes.
- Bake Cupcakes: Divide the batter evenly among the prepared liners, filling each about two-thirds full. Bake for 18-20 minutes or until a toothpick inserted into the center comes out clean. Allow them to cool completely on a wire rack.
- Prepare Filling: Once the cupcakes are cooled, use a small knife or a cupcake corer to remove the center of each cupcake. Fill each cavity with the cherry or raspberry jam to mimic the “blood” from vampire bites.
- Make Frosting: In a large bowl, beat the softened butter and cream cheese until creamy. Gradually add the powdered sugar, beating until smooth. Add a few drops of red food coloring to tint the frosting pink or light red.
- Decorate Cupcakes: Frost each cupcake with the cream cheese frosting. Use a spoon to drizzle a small amount of leftover jam on top for a “bloody” effect. Finally, place candy fangs on each cupcake for a spooky touch.
Extra Tips: For a more dramatic look, consider using a piping bag to apply the frosting in swirls. If you prefer a more liquid “blood,” you can thin the jam with a tablespoon of water or a splash of lemon juice.
Additionally, verify the cupcakes are completely cool before filling and frosting to prevent the filling from melting. These cupcakes are best served on the day they’re made but can be stored in an airtight container in the refrigerator for up to two days.
Zombie Brain Guacamole
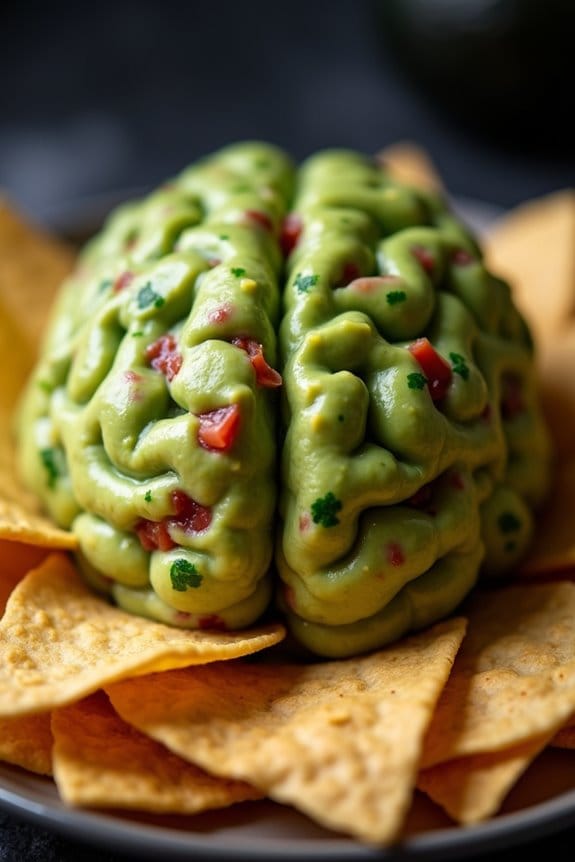
Zombie Brain Guacamole is the perfect Halloween snack to spook your friends and family with its eerie appearance and delicious taste. This dish is a fun twist on the classic guacamole, crafted to look like a zombie brain. It’s not just a visual treat but a flavorful blend of ripe avocados, zesty lime, and a kick of spice that’s certain to be a hit at any Halloween gathering.
A spooky, delicious twist on guacamole, sure to thrill at any Halloween gathering!
Easy to prepare and customize, this dish will bring a festive and creepy touch to your Halloween party spread. The key to achieving the “brain” look is in the presentation, using the right ingredients and tools to sculpt your guacamole into an impressive centerpiece.
Despite its creepy appearance, the taste remains a familiar favorite that combines the creaminess of avocados with the freshness of cilantro and a hint of heat from jalapeños. This recipe makes enough to serve 4-6 people, perfect for a small gathering or as part of a larger Halloween feast.
Ingredients:
- 4 ripe avocados
- 1 lime, juiced
- 1 teaspoon salt
- ½ cup diced onion
- 3 tablespoons chopped fresh cilantro
- 2 roma tomatoes, diced
- 1 teaspoon minced garlic
- 1 jalapeño pepper, seeded and minced
- 1 brain mold (or a small bowl for shaping)
- Tortilla chips for serving
Instructions:
1. Prepare the Avocados:
Cut the avocados in half, remove the pits, and scoop the flesh into a mixing bowl. Using a fork or potato masher, mash the avocados to your desired consistency, whether you like it chunky or smooth.
2. Mix the Ingredients:
Add lime juice and salt to the mashed avocados and mix well to combine. This won’t only flavor the guacamole but also help prevent the avocados from browning.
3. Add Fresh Ingredients:
Stir in the diced onion, chopped cilantro, diced tomatoes, minced garlic, and minced jalapeño. Mix everything thoroughly to ascertain the flavors are evenly distributed throughout the guacamole.
4. Shape the Guacamole:
To create the “zombie brain” look, place the guacamole into a brain mold, pressing it down to fill all the spaces. If you don’t have a brain mold, shape the guacamole into a dome on a serving platter and use a knife to create grooves that resemble brain folds.
5. Chill and Serve:
Refrigerate the shaped guacamole for at least 30 minutes to let the flavors meld and the shape set. Serve with tortilla chips around the “brain” for a complete spooky presentation.
Extra Tips:
For a more intense “brain” effect, consider adding a few drops of food coloring to the guacamole before shaping it. Keep the guacamole covered tightly with plastic wrap to prevent oxidation and browning if you’re preparing it in advance.
You can also adjust the level of spiciness by either increasing or reducing the amount of jalapeño, or by adding a few drops of hot sauce to taste.
Haunted Haystack Treats
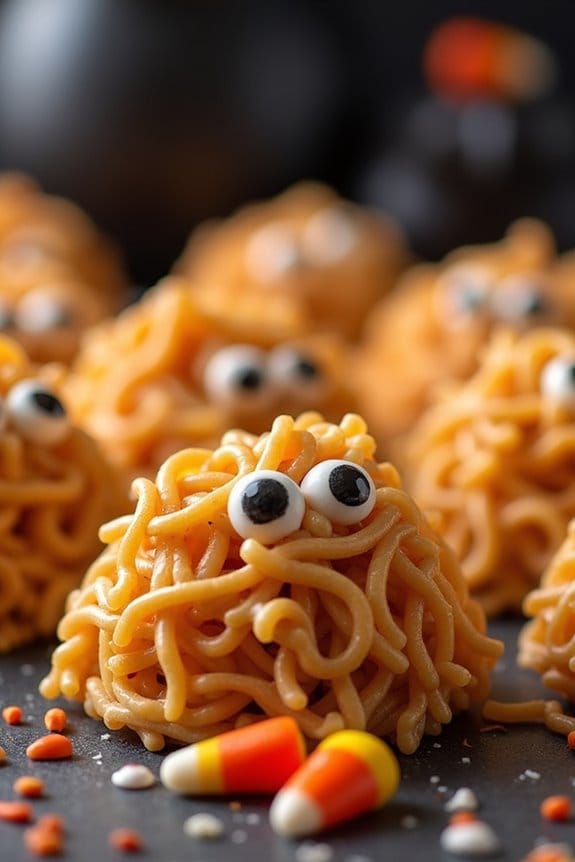
These delightful Haunted Haystack Treats are the perfect addition to your Halloween snack table. Easy to make and irresistibly tasty, these treats are a fun twist on the classic haystack snack. Imagine sweet, crunchy noodles covered in a creamy, peanut buttery blend, and decorated with spooky Halloween candies.
These haystacks not only taste amazing, but they also celebrate the spirit of Halloween with their eerie appearance. Whether you’re hosting a Halloween party or simply want to surprise your family with a festive treat, these Haunted Haystack Treats will be a hit.
The treats are shaped into small mounds to resemble haunted haystacks and are decorated with candy eyes and other spooky treats to give them a fun, ghostly look. They’re simple to prepare and require minimal ingredients, making them an excellent choice for a last-minute Halloween treat.
The combination of crunchy chow mein noodles, creamy peanut butter, and sweet butterscotch chips creates a perfect blend of textures and flavors that everyone will love. Serve them to 4-6 people and watch them disappear faster than a ghost in the night!
Ingredients for Haunted Haystack Treats (Serving Size: 4-6 people):
- 2 cups chow mein noodles
- 1 cup butterscotch chips
- 1/2 cup creamy peanut butter
- 1/2 cup candy corn
- 1/4 cup mini candy eyes
- Optional: Halloween-themed sprinkles or small candies for decoration
Cooking Instructions:
- Prepare the Work Area: Begin by lining a baking sheet with parchment paper. This will prevent the haystacks from sticking and make it easy to transfer them to the refrigerator later.
- Melt the Ingredients: In a medium-sized microwave-safe bowl, combine the butterscotch chips and peanut butter. Microwave the mixture in 30-second increments, stirring in between, until it’s completely melted and smooth. This usually takes about 1-2 minutes.
- Combine with Noodles: Add the chow mein noodles to the melted mixture. Gently stir until the noodles are evenly coated with the butterscotch and peanut butter blend. Confirm each noodle is well-covered for the best taste and texture.
- Shape the Haystacks: Using a spoon, drop small mounds of the coated noodles onto the prepared baking sheet. Each mound should be about 2-3 tablespoons, resembling small haystacks.
- Decorate: Quickly press candy eyes, candy corn, and any additional decorations onto each haystack while the mixture is still warm. This will confirm they stick properly.
- Chill: Once decorated, place the baking sheet in the refrigerator for at least 30 minutes. This will allow the haystacks to firm up and hold their shape.
- Serve and Enjoy: After chilling, remove the haystacks from the refrigerator. They’re now ready to be served as a spooky Halloween treat!
Extra Tips:
For a fun variation, you can substitute the butterscotch chips with white chocolate chips or add a splash of vanilla extract for extra flavor. If you want to make the treats even spookier, consider using black or orange food coloring in the melted mixture.
Additionally, these treats can be stored in an airtight container in the refrigerator for up to a week, so feel free to make them ahead of your Halloween festivities. Adjust the decorations based on your preference to create a unique and festive look for your Haunted Haystack Treats.
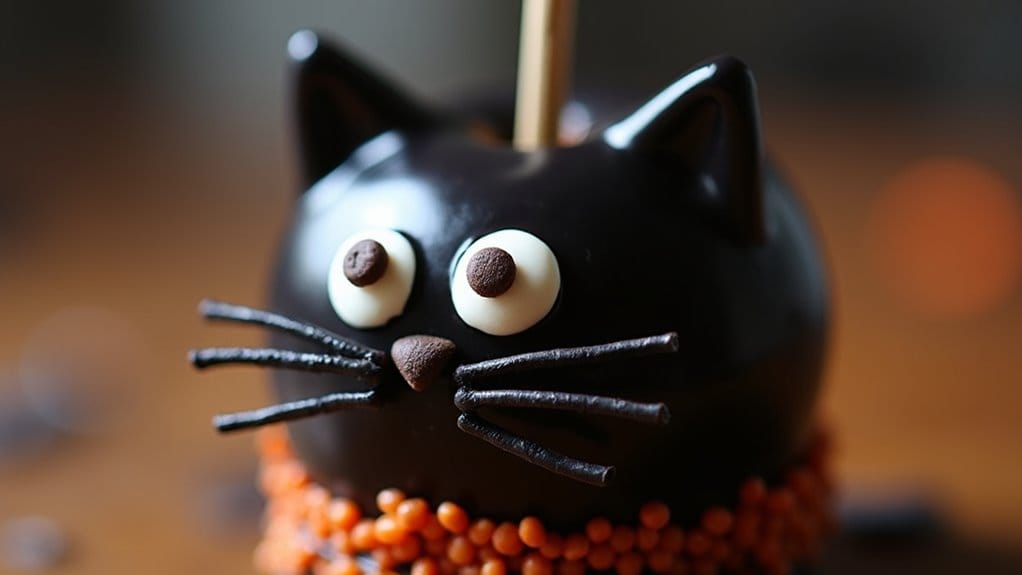
Black Cat Caramel Apples

Black Cat Caramel Apples are a delightful treat that perfectly combine the sweet, chewy texture of caramel with the crispness of fresh apples. This Halloween-themed snack not only looks festive but also delivers a satisfying crunch with every bite. Ideal for Halloween parties or a fun family cooking project, these caramel apples are dressed up to resemble mysterious black cats, making them an instant hit with both kids and adults alike.
The preparation of Black Cat Caramel Apples is straightforward and fun, requiring only a few steps and ingredients. The apples are first coated with a luscious layer of homemade or store-bought caramel, then adorned with edible decorations to resemble a black cat’s face. This delicious snack isn’t only visually appealing but also provides a creative way to enjoy the classic caramel apple with a Halloween twist. Here is how you can make a batch for 4-6 people:
Ingredients:
- 6 medium-sized apples (Granny Smith or Honeycrisp work well)
- 1 package (14 ounces) of individually wrapped caramel candies
- 2 tablespoons of water
- 6 wooden popsicle sticks
- 1 cup of black candy melts
- Edible candy eyes
- Black licorice strings (for whiskers)
- Mini chocolate chips (for nose)
- Black sprinkles (optional, for extra texture on ‘fur’)
Instructions:
- Prepare the Apples: Wash and thoroughly dry the apples to remove any waxy coating, which helps the caramel adhere better. Insert a wooden popsicle stick into the top of each apple.
- Melt the Caramel: In a medium saucepan, combine the unwrapped caramel candies and 2 tablespoons of water. Melt them over low heat, stirring constantly until the caramel is smooth and fully melted.
- Dip the Apples: Carefully dip each apple into the melted caramel, turning to coat it evenly. Allow the excess caramel to drip back into the saucepan, then place each apple on a baking sheet lined with parchment paper. Let the caramel set for about 15 minutes.
- Melt the Candy Melts: While the caramel is setting, melt the black candy melts according to package instructions, usually by microwaving in 30-second intervals, stirring in between.
- Coat with Candy Melts: Once the caramel is set, dip the caramel-coated apples into the melted black candy, ensuring an even coat. Again, allow any excess to drip off before placing back onto the lined baking sheet.
- Decorate: Before the candy coating hardens, press two edible candy eyes onto each apple. Add a mini chocolate chip for the nose and arrange small pieces of black licorice as whiskers. If desired, sprinkle some black sprinkles onto the candy coating for a textured look.
- Set the Decorations: Let the decorated apples sit at room temperature until the candy coating is completely set.
Extra Tips: To guarantee the caramel adheres well, make sure the apples are completely dry before dipping. You can also lightly score the skin of the apple with a fork to help the caramel stick better. If the caramel or candy coating becomes too thick while working, gently reheat it to regain a fluid consistency. Use a toothpick to help place small decorations like the chocolate chip nose and licorice whiskers precisely. Finally, for an added spooky effect, consider using glow-in-the-dark edible decorations or adding a hint of edible glitter to the final presentation.
