

Halloween is a good time to bake sugar cookies with the kids. These recipes focus on simple doughs that hold their shape during baking. You will find options that use common ingredients and basic decorating tools. Some are plain while others add color or texture without extra steps. They are all easy to make in batches for parties or gifts.
Helpful Tips Before You Start
These tips will help you cut clean shapes and decorate without smudges or spreading.
Chill the Dough
Place the dough in the fridge for at least one hour before rolling and cutting. Cold dough holds Halloween shapes like bats and pumpkins better during baking.
Cool Cookies Completely
Set baked cookies on a wire rack until they reach room temperature. Icing applied to warm cookies will run and lose detail.
Mix Icing Colors First
Prepare small batches of royal icing in orange, black, and green before you start decorating. Gel colors give brighter shades without thinning the icing too much.
Use a Piping Bag for Outlines
Pipe a thin border around each cookie first, then fill the center with a slightly looser icing. This keeps edges neat on detailed designs.
Jack-o’-Lantern Sugar Cookies with Royal Icing Faces
These cookies bring a simple Halloween touch to any gathering. Cut them into pumpkin shapes and add expressive faces with royal icing. The result is a batch of buttery cookies with a light crunch that holds up well to decorating.
They work nicely for an afternoon activity with kids or as a make-ahead treat for parties. The sugar cookie base stays tender inside with crisp edges, while the icing sets to a smooth finish that shows off the jack-o’-lantern details.

Serves 4 people.
Ingredients
- 1 1/2 cups all-purpose flour
- 1/2 cup unsalted butter, softened
- 1/2 cup granulated sugar
- 1 large egg
- 1 teaspoon vanilla extract
- 1/2 teaspoon baking powder
- 1/4 teaspoon salt
- 2 cups powdered sugar
- 2 tablespoons meringue powder
- 1/4 cup water
- Orange food coloring
- Black food coloring
Instructions
- Heat the oven to 350 degrees and line a baking sheet with parchment paper.
- In a mixing bowl, beat the softened butter and granulated sugar until light. Add the egg and vanilla extract, then mix until combined.
- In a separate bowl, whisk together the flour, baking powder, and salt. Gradually add this to the butter mixture and stir until a dough forms.
- Roll the dough to 1/4-inch thickness on a lightly floured surface. Use a jack-o’-lantern cookie cutter to cut out shapes and place them on the prepared baking sheet.
- Bake for 10 to 12 minutes until the edges turn lightly golden. Cool the cookies completely on a wire rack.
- In a clean mixing bowl, combine the powdered sugar, meringue powder, and water. Beat until the icing reaches a stiff peak consistency.
- Divide the icing into two portions. Tint one portion orange and the other black. Transfer each color to a piping bag fitted with a small tip.
- Pipe an orange base layer over each cookie to cover the pumpkin shape. Let it set for a few minutes, then pipe black icing to create eyes, noses, and mouths.
Extra Tips
Pipe the black details after the orange layer has set for 10 minutes to keep the lines sharp. Store finished cookies in a single layer in an airtight container at room temperature for up to three days. If the royal icing feels too thick for piping, add water one drop at a time until it flows smoothly from the bag.Course: Dessert Cuisine: American Equipment: Mixing Bowl, Baking Sheet, Piping Bag
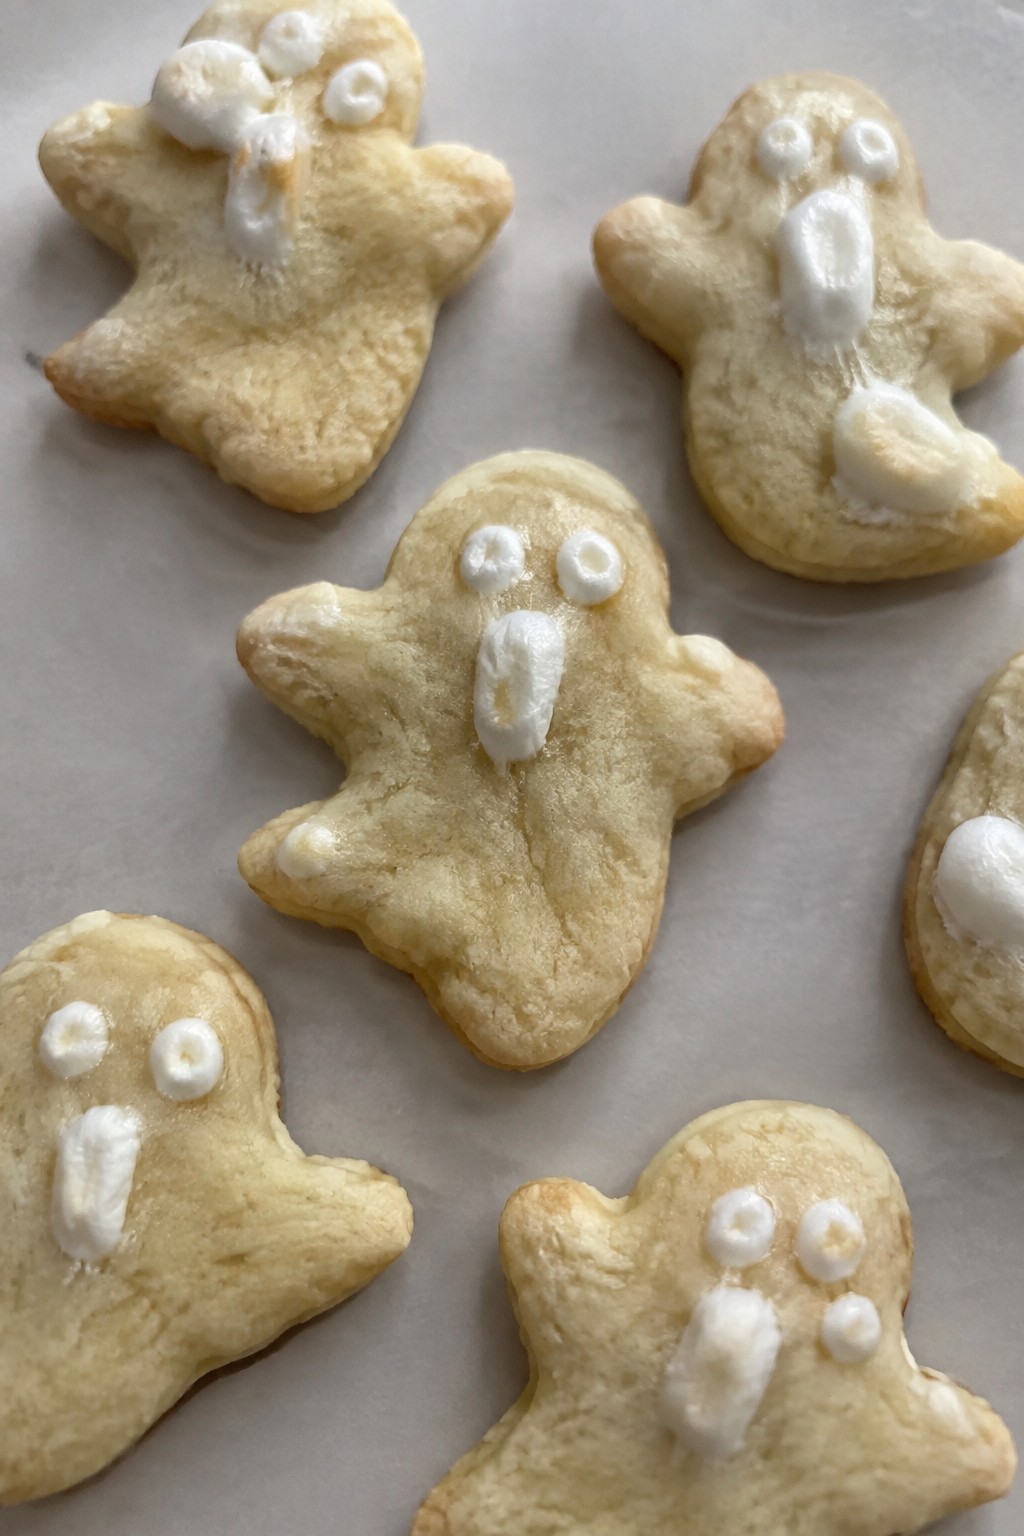
Ghostly Apparition Sugar Cookies with Marshmallow Details
These cookies bring a simple ghost theme to any Halloween gathering. The soft vanilla base pairs with chewy marshmallow pieces that melt slightly during baking, creating subtle raised details that look like floating apparitions. They work well for an afternoon baking session with kids or as a last-minute treat for a party table.
This recipe serves 4 people. – 1 1/4 cups all-purpose flour – 1/2 cup unsalted butter, softened – 1/3 cup granulated sugar – 1 large egg yolk – 1 teaspoon vanilla extract – 1/2 teaspoon baking powder – 1/4 teaspoon salt – 1 cup mini marshmallows – 1/2 cup powdered sugar – 2 tablespoons milk
### Instructions 1. Heat the oven to 350 degrees and line a baking sheet with parchment paper. 2. In a mixing bowl, cream the butter and granulated sugar until light. Add the egg yolk and vanilla extract, then mix until combined. 3. Stir in the flour, baking powder, and salt until a soft dough forms. 4. Roll the dough to 1/4-inch thickness on a lightly floured surface and cut into ghost shapes with a cookie cutter. 5. Place the cutouts on the prepared baking sheet and gently press 4 to 5 mini marshmallows onto each cookie to form the ghostly details. 6. Bake for 10 to 12 minutes until the edges turn lightly golden. Cool completely on the sheet. 7. Whisk the powdered sugar with the milk to make a thin icing. Drizzle lightly over the cooled cookies for extra white ghost highlights.
### Extra Tips Press the marshmallows firmly so they stay in place while baking. If the icing feels too thick, add a drop more milk. Store cooled cookies in an airtight container at room temperature for up to three days. For make-ahead prep, shape the dough and freeze the cutouts on a tray before transferring to a bag.
Course: Dessert Cuisine: American Equipment: Mixing Bowl, Baking Sheet, Parchment Paper, Rolling Pin, Cookie Cutters
Serves 4 people.
Instructions
- Heat the oven to 350 degrees and line a baking sheet with parchment paper.
- In a mixing bowl, cream the butter and granulated sugar until light. Add the egg yolk and vanilla extract, then mix until combined.
- Stir in the flour, baking powder, and salt until a soft dough forms.
- Roll the dough to 1/4-inch thickness on a lightly floured surface and cut into ghost shapes with a cookie cutter.
- Place the cutouts on the prepared baking sheet and gently press 4 to 5 mini marshmallows onto each cookie to form the ghostly details.
- Bake for 10 to 12 minutes until the edges turn lightly golden. Cool completely on the sheet.
- Whisk the powdered sugar with the milk to make a thin icing. Drizzle lightly over the cooled cookies for extra white ghost highlights.
Extra Tips
Press the marshmallows firmly so they stay in place while baking. If the icing feels too thick, add a drop more milk. Store cooled cookies in an airtight container at room temperature for up to three days. For make-ahead prep, shape the dough and freeze the cutouts on a tray before transferring to a bag.
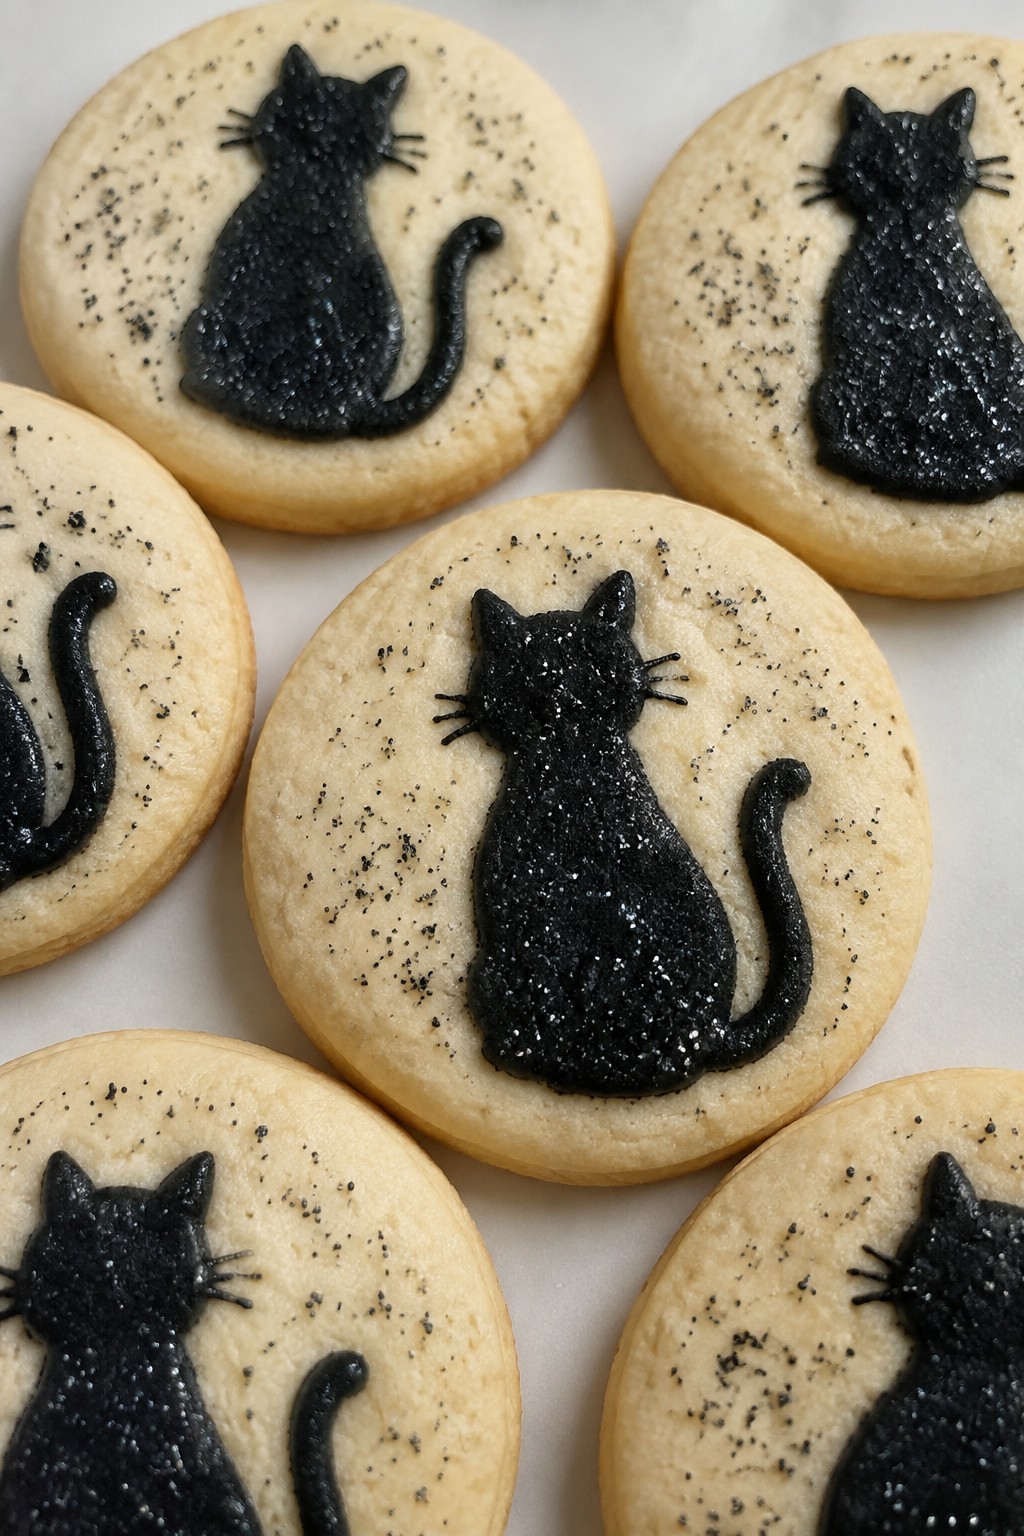
Course: Dessert Cuisine: American Equipment: Mixing Bowl, Baking Sheet, Parchment Paper, Rolling Pin, Cookie CuttersBlack Cat Silhouette Sugar Cookies with Sparkle Accents
These cookies work well for Halloween gatherings or school parties. The black cat silhouette stands out against the light cookie base, while the sparkle accents add a bit of shine that catches the light.
The base has a classic vanilla flavor with a tender crumb and slight crisp at the edges. The icing sets firm enough to stack or pack without smearing.
Serves 4 people.
Ingredients
- 1¼ cups all-purpose flour
- ½ cup unsalted butter, softened
- ½ cup granulated sugar
- 1 large egg
- 1 tsp vanilla extract
- ¼ tsp baking powder
- ¼ tsp salt
- 2 cups powdered sugar
- 3 tbsp milk
- Black food coloring
- 2 tbsp edible black glitter
Instructions
- Heat the oven to 350°F and line a baking sheet with parchment paper.
- Cream the butter and granulated sugar in a mixing bowl until light. Add the egg and vanilla extract, then mix until combined.
- Stir in the flour, baking powder, and salt until a soft dough forms.
- Roll the dough to ¼-inch thickness on a lightly floured surface. Cut out cat shapes with a cookie cutter and place them on the prepared sheet.
- Bake for 10 to 12 minutes until the edges are lightly golden. Cool completely on a wire rack.
- Whisk the powdered sugar with the milk until smooth. Add black food coloring a drop at a time until the icing reaches a deep black.
- Pipe or spread the black icing over each cookie to create a solid cat silhouette. While the icing is still wet, sprinkle the edible black glitter along the edges or on the tail for accent.
Extra Tips
Make the dough a day ahead and keep it wrapped in the fridge so it stays firm for clean cuts. If the icing thickens while you work, add a teaspoon of milk at a time to loosen it. Store finished cookies in a single layer in an airtight container at room temperature for up to four days.Course: Dessert Cuisine: American Equipment: Mixing Bowl, Baking Sheet, Rolling Pin, Cookie Cutters, Piping Bag
Bat Wing Sugar Cookies with Dark Cocoa Swirls
These cookies combine a simple sugar cookie dough with streaks of dark cocoa for a marbled look that suits Halloween gatherings. They come together quickly and hold their shape well after baking, making them a good choice for decorating sessions or party trays. The finished cookies offer a crisp edge and tender center with a mild chocolate taste that pairs nicely with the vanilla base.

Serves 4 people.
Ingredients
- 1 1/2 cups all-purpose flour
- 1/2 cup unsalted butter, softened
- 1/2 cup granulated sugar
- 1 large egg
- 1 teaspoon vanilla extract
- 1/4 cup dark cocoa powder
- 1/2 teaspoon baking powder
- 1/4 teaspoon salt
- 2 tablespoons black sanding sugar
Instructions
- Cream the softened butter and granulated sugar in a mixing bowl until light and fluffy.
- Add the egg and vanilla extract, then stir until fully combined.
- In a separate bowl, whisk together the flour, baking powder, and salt.
- Gradually mix the dry ingredients into the wet ingredients until a soft dough forms.
- Divide the dough in half. Stir the dark cocoa powder into one half until evenly colored.
- Press the plain dough and cocoa dough together, then gently fold a few times to create swirls without fully blending the colors.
- Roll the swirled dough to about 1/4-inch thickness on a lightly floured surface.
- Cut out bat wing shapes using a cookie cutter and place them on a baking sheet lined with parchment paper.
- Sprinkle black sanding sugar over the tops of the cookies.
- Bake at 350°F for 10 to 12 minutes until the edges are lightly golden. Cool on the sheet for 5 minutes before transferring to a wire rack.
Extra Tips
Work the cocoa dough into the plain dough just enough to form visible streaks, or the swirls will disappear. If the dough feels sticky after mixing, chill it for 15 minutes before rolling. These cookies stay crisp for several days when stored in an airtight container at room temperature.Course: Dessert Cuisine: American Equipment: Mixing Bowl, Baking Sheet, Rolling Pin, Cookie Cutter
Spiderweb Lace Sugar Cookies with White Icing Threads
These cookies stand out with fine white icing piped into delicate web patterns across each round. They suit Halloween gatherings or fall baking sessions when you want something light yet themed without heavy colors or flavors.
The base tastes like a classic buttery sugar cookie with crisp edges and a tender middle. The white icing threads add a subtle sweetness and a crisp finish once set.

Serves 4 people.
Ingredients
- 1 cup all-purpose flour
- 1/2 cup unsalted butter, softened
- 1/4 cup granulated sugar
- 1 egg yolk
- 1 teaspoon vanilla extract
- 1/4 teaspoon salt
- 1/2 teaspoon baking powder
- 1 cup powdered sugar
- 3 tablespoons milk
- 1/2 teaspoon vanilla extract
Instructions
- Preheat the oven to 350 degrees F and line a baking sheet with parchment paper.
- In a mixing bowl, cream the butter and granulated sugar until light and fluffy.
- Add the egg yolk and 1 teaspoon vanilla extract, then stir until combined.
- In a separate bowl, whisk together the flour, baking powder, and salt.
- Gradually mix the dry ingredients into the wet mixture until a soft dough forms.
- Roll the dough to 1/4-inch thickness on a lightly floured surface and cut into 3-inch rounds.
- Place the rounds on the prepared baking sheet and bake for 10 to 12 minutes until the edges turn lightly golden.
- Remove the cookies from the oven and let them cool completely on a wire rack.
- In a clean bowl, stir the powdered sugar, milk, and remaining 1/2 teaspoon vanilla extract until smooth and pipeable.
- Transfer the icing to a piping bag fitted with a small round tip and pipe thin intersecting lines to form spiderweb patterns on each cooled cookie.
Extra Tips
Pipe the icing threads while holding the bag close to the cookie surface for the finest lace effect. Let the iced cookies sit at room temperature for 30 minutes so the threads firm up before stacking. If the icing thickens while you work, add a few drops of milk to loosen it again.Course: Dessert Cuisine: American Equipment: Mixing Bowl, Baking Sheet, Piping Bag
Witch Hat Sugar Cookies with Purple Glaze Trim
These witch hat sugar cookies bring a simple Halloween touch to any cookie platter. The buttery base holds its shape well after baking, making it easy to add the purple glaze trim that stands out against the cookie.
The finished cookies taste lightly sweet with a soft crumb and a thin, shiny glaze layer. They work well for a small gathering or as part of a larger dessert spread.

Serves 4 people.
Ingredients
- 1 cup all-purpose flour
- 1/4 cup granulated sugar
- 4 tablespoons unsalted butter, softened
- 1 large egg yolk
- 1 teaspoon vanilla extract
- 1/2 teaspoon baking powder
- 1/4 teaspoon salt
- 1/2 cup powdered sugar
- 2 tablespoons milk
- Purple food coloring
- Black sanding sugar
Instructions
- Heat the oven to 350 degrees and line a baking sheet with parchment paper.
- In a mixing bowl, beat the softened butter and granulated sugar until smooth.
- Add the egg yolk and vanilla extract, then mix until combined.
- Stir in the flour, baking powder, and salt until a dough forms.
- Roll the dough to 1/4-inch thickness on a lightly floured surface.
- Cut the dough into witch hat shapes using a cookie cutter and place the shapes on the baking sheet.
- Sprinkle black sanding sugar over the top of each hat before baking.
- Bake for 8 to 10 minutes until the edges turn light golden.
- Let the cookies cool completely on a wire rack.
- In a small bowl, stir the powdered sugar with milk until smooth, then add purple food coloring a drop at a time until the glaze reaches the desired shade.
- Pipe or brush the purple glaze as trim along the edges of each cooled cookie.
Extra Tips
Roll the dough evenly so the hats keep their shape during baking. If the glaze thickens while you work, add a few drops of milk to loosen it. Store cooled cookies in an airtight container at room temperature for up to three days.Course: Dessert Cuisine: American Equipment: Mixing bowl, baking sheet, rolling pin, witch hat cookie cutter
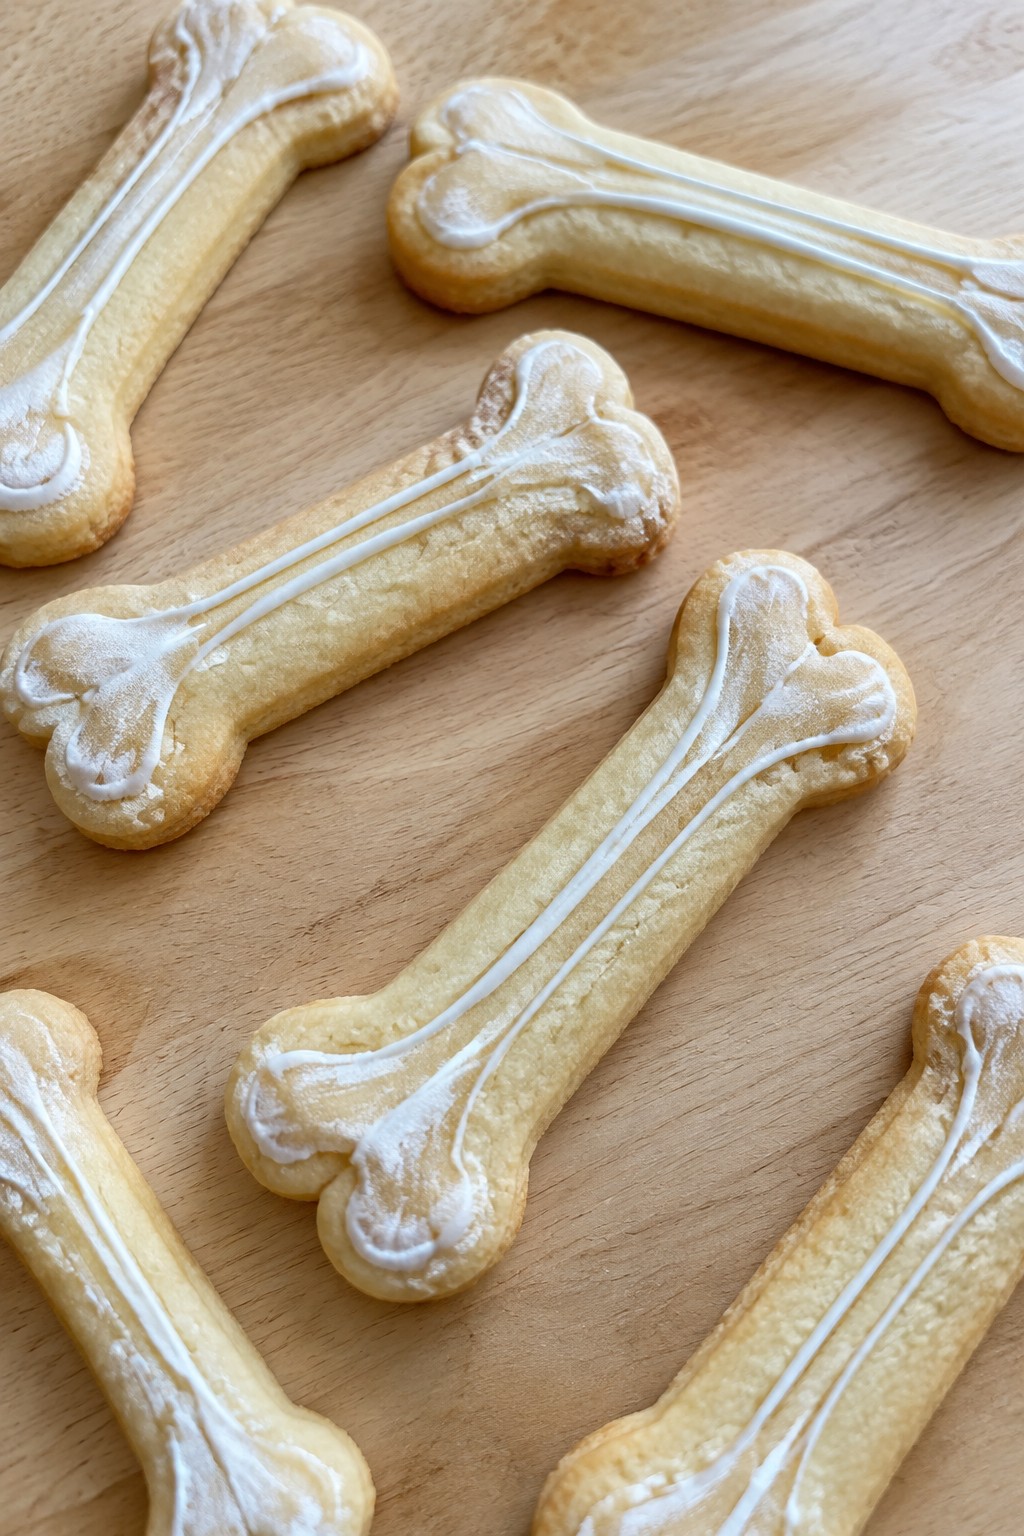
Skeleton Bone Sugar Cookies with Intricate Linework
These cookies stand out at Halloween gatherings because their bone shape and fine icing lines give them a detailed look without much fuss. They work well for an afternoon baking session with friends or as a make-ahead treat for parties. The cookies have a crisp edge and soft center with a light vanilla taste that pairs nicely with the sweet icing.
Serves 4 people.
Ingredients
- 1 1/4 cups all-purpose flour
- 1/2 cup unsalted butter, softened
- 1/4 cup granulated sugar
- 1 large egg yolk
- 1 teaspoon vanilla extract
- 1/4 teaspoon baking powder
- 1/4 teaspoon salt
- 1 cup powdered sugar
- 2 tablespoons milk
Instructions
- Preheat the oven to 350 degrees and line a baking sheet with parchment paper.
- In a mixing bowl, cream the softened butter and granulated sugar until light. Add the egg yolk and vanilla extract, then mix until combined.
- Stir in the flour, baking powder, and salt until a dough forms. Shape the dough into a disk, wrap it, and chill for 20 minutes.
- Roll the dough into 12 small logs about 4 inches long. Pinch the ends of each log to create a bone shape and place them on the baking sheet.
- Bake for 10 to 12 minutes until the edges turn lightly golden. Let the cookies cool completely on the sheet.
- In a clean bowl, whisk the powdered sugar with the milk until smooth. Spoon the icing into a piping bag fitted with a small tip.
- Pipe thin, detailed lines along each cooled cookie to form the bone structure and joints.
Extra Tips
Chill the dough a bit longer if your kitchen is warm so the bone shapes hold their form during baking. Use the thinnest piping tip you have for the lines to keep the design neat and avoid thick icing that can crack. Store the finished cookies in an airtight container at room temperature for up to three days to maintain their crisp texture.Course: Dessert Cuisine: American Equipment: Mixing Bowl, Baking Sheet, Piping Bag
Mummy Wrap Sugar Cookies with Bandage-Style Icing
These cookies turn classic sugar cookie dough into a fun Halloween treat. The soft, buttery base holds up well under a layer of white icing piped in overlapping strips that look like bandages. A pair of dark eyes peeks out from the wrapping for a simple but striking finish.
The recipe makes a small batch that works for an afternoon baking session with kids or as part of a larger cookie platter. The texture stays tender inside with a light snap at the edges, and the sweet vanilla flavor pairs easily with the smooth icing.

Serves 4 people.
Ingredients
- 1 1/2 cups all-purpose flour
- 1/2 cup unsalted butter, softened
- 1/2 cup granulated sugar
- 1 large egg
- 1 teaspoon vanilla extract
- 1/4 teaspoon salt
- 1 1/2 cups powdered sugar
- 3 tablespoons milk
- Black gel food coloring
Instructions
- Heat the oven to 350 degrees and line a baking sheet with parchment paper.
- In a mixing bowl, beat the softened butter and granulated sugar until light and fluffy.
- Add the egg and vanilla extract, then mix until combined.
- Stir in the flour and salt until a soft dough forms.
- Roll the dough to 1/4-inch thickness on a lightly floured surface and cut into rectangles or ovals.
- Place the shapes on the prepared baking sheet and bake for 8 to 10 minutes until the edges are lightly golden.
- Let the cookies cool completely on the sheet.
- In a clean bowl, whisk the powdered sugar with milk until the icing reaches a pipeable consistency.
- Transfer the icing to a piping bag fitted with a small round tip and pipe overlapping horizontal and vertical strips across each cookie to create the bandage look.
- Add two small dots of black gel food coloring for eyes on each cookie and let the icing set.
Extra Tips
Pipe the icing strips while the cookies are fully cool so the lines stay defined instead of melting. If the icing feels too thick, add milk one teaspoon at a time until it flows smoothly from the bag. Store finished cookies in a single layer in an airtight container at room temperature for up to three days.Course: Dessert Cuisine: American Equipment: Mixing Bowl, Baking Sheet, Piping Bag
Frankenstein Monster Sugar Cookies with Bolt Details
These cookies turn classic sugar dough into a fun Halloween project. The bright green color and simple bolt accents make them stand out on a dessert table without much fuss. They bake up with a tender center and light snap at the edges, so they hold their shape well during decorating.
The recipe works well for small gatherings or an afternoon activity with kids. The flavor stays mild and sweet, letting the decorations take center stage.

Serves 4 people.
Ingredients
- 1 cup all-purpose flour
- 1/2 teaspoon baking powder
- 1/4 teaspoon salt
- 1/2 cup unsalted butter, softened
- 1/2 cup granulated sugar
- 1 large egg
- 1 teaspoon vanilla extract
- Green food coloring
- 1 cup powdered sugar
- 2 tablespoons milk
- 1/4 cup mini chocolate chips
Instructions
- Whisk the flour, baking powder, and salt in a bowl and set it aside.
- Beat the butter and granulated sugar until light and fluffy. Add the egg and vanilla, then mix until smooth.
- Stir in green food coloring a few drops at a time until the dough reaches a bright green shade.
- Add the dry ingredients and mix just until a soft dough forms. Cover and chill for 30 minutes.
- Heat the oven to 350 degrees and line a baking sheet with parchment.
- Roll the dough to 1/4-inch thickness, cut into rectangles, and place them on the sheet. Bake for 8 to 10 minutes until the edges are lightly golden.
- Cool the cookies completely on a wire rack.
- Stir the powdered sugar and milk together until smooth, adding more milk if needed for a spreadable consistency. Tint with green food coloring.
- Spread the green icing over each cookie. Press mini chocolate chips into the sides to create bolt details and use a few more for eyes and a mouth.
Extra Tips
Chill the dough a little longer if your kitchen is warm so the rectangles keep clean edges. The mini chocolate chips stay in place best once the icing has set for five minutes. Store leftovers in an airtight container at room temperature for up to three days.Course: Dessert Cuisine: American Equipment: Mixing Bowl, Electric Mixer, Baking Sheet, Wire Rack
Candy Corn Layered Sugar Cookies with Tri-Color Icing
These cookies stack three colored dough layers to create a candy corn look inside each cutout. They bake up soft with a slight crisp edge and take well to bright icing details for Halloween parties or school treats.
The tri-color icing adds the finishing striped effect without much extra work. Yellow, orange, and white sections on top match the layers inside for a fun visual match.

Serves 4 people.
Ingredients
- 2 cups all-purpose flour
- 1/2 cup unsalted butter, softened
- 3/4 cup granulated sugar
- 1 large egg
- 1 teaspoon vanilla extract
- 1/2 teaspoon baking powder
- 1/4 teaspoon salt
- Yellow food coloring
- Orange food coloring
- 1 cup powdered sugar
- 2 tablespoons milk
Instructions
- Cream the butter and granulated sugar in a bowl until light. Add the egg and vanilla extract and mix until smooth.
- Stir in the flour, baking powder, and salt until a dough forms. Divide the dough into three equal parts.
- Leave one part plain, tint the second part yellow, and tint the third part orange. Wrap each part and chill for 30 minutes.
- Roll out each colored dough to the same thickness. Stack the layers with the orange on the bottom, yellow in the middle, and plain on top. Gently press to seal.
- Cut shapes from the stacked dough and place them on a baking sheet. Bake at 350°F for 10 to 12 minutes until the edges are lightly golden. Cool completely.
- Whisk the powdered sugar and milk until smooth. Divide the icing into three small bowls and tint one yellow and one orange, leaving the third white.
- Pipe or spread the three icing colors in stripes across each cooled cookie to finish.
Extra Tips
Chill the stacked dough an extra 15 minutes before cutting if the colors start to blend at the edges. Use a small offset spatula to keep icing lines clean and distinct. Store finished cookies in a single layer so the icing sets without smearing.Course: Dessert Cuisine: American Equipment: Mixing Bowl, Baking Sheet, Rolling Pin, Cookie Cutters
Haunted House Sugar Cookies with Window Light Accents
These cookies turn basic sugar dough into small haunted houses that stand out on a dessert table. The buttery base holds its shape well during baking, which makes it easy to add sharp outlines and bright window details with icing. They work well for Halloween gatherings or as a hands-on activity with kids.
The finished cookies taste lightly sweet with a crisp edge and soft center. Yellow icing accents give the windows a warm glow against the darker house outlines.

Serves 4 people.
Ingredients
- 1 cup all-purpose flour
- 1/2 cup unsalted butter, softened
- 1/4 cup granulated sugar
- 1 egg yolk
- 1 teaspoon vanilla extract
- 1/4 teaspoon baking powder
- 1/4 teaspoon salt
- 1 cup powdered sugar
- 2 tablespoons milk
- Yellow food coloring
- Black food coloring
Instructions
- Preheat the oven to 350 degrees and line a baking sheet with parchment paper.
- In a mixing bowl, cream the softened butter and granulated sugar until smooth.
- Add the egg yolk and vanilla extract, then mix until combined.
- Stir in the flour, baking powder, and salt until a dough forms.
- Roll the dough to 1/4 inch thickness on a lightly floured surface.
- Cut the dough into haunted house shapes using a cookie cutter or template.
- Place the shapes on the prepared baking sheet and bake for 10 to 12 minutes until the edges turn lightly golden.
- Remove the cookies from the oven and let them cool completely on a wire rack.
- In a small bowl, whisk the powdered sugar with milk until smooth to make the base icing.
- Divide the icing into two portions. Tint one portion yellow and the other black.
- Pipe black icing around the edges and roof lines of each house to create outlines.
- Pipe yellow icing inside the window areas to form the light accents.
- Allow the icing to set for 30 minutes before serving.
Extra Tips
Use a slightly thicker yellow icing for the windows so the color stays bright and does not bleed into the black outlines. Store the decorated cookies in a single layer in an airtight container at room temperature for up to three days. If the dough feels too soft to cut, chill it for 15 minutes before rolling.Course: Dessert Cuisine: American Equipment: Mixing Bowl, Baking Sheet, Piping Bags
Vampire Fang Sugar Cookies with Red Drizzle Fangs
These cookies work well for Halloween gatherings where guests want something simple to make and easy to share. The triangular shapes give a clear fang look, and the red drizzle creates a striking contrast without requiring advanced decorating skills.
The sugar cookie base stays crisp at the edges with a soft center. A light vanilla flavor pairs with the sweet, slightly tangy red drizzle for balanced taste.

Serves 4 people.
Ingredients
- 1 1/4 cups all-purpose flour
- 1/2 cup unsalted butter, softened
- 1/2 cup granulated sugar
- 1 large egg
- 1 teaspoon vanilla extract
- 1/2 teaspoon baking powder
- 1/4 teaspoon salt
- 1 cup powdered sugar
- 2 tablespoons milk
- Red food coloring
Instructions
- Beat the softened butter and granulated sugar in a mixing bowl until light and fluffy.
- Add the egg and vanilla extract, then mix until fully combined.
- Stir in the flour, baking powder, and salt until a dough forms.
- Shape the dough into a disk, wrap it, and chill for 30 minutes.
- Roll the chilled dough to 1/4-inch thickness on a lightly floured surface.
- Cut the dough into long, pointed triangles to form fang shapes and place them on a baking sheet.
- Bake at 350°F for 10 to 12 minutes until the edges turn lightly golden.
- Cool the cookies completely on a wire rack.
- Whisk the powdered sugar and milk in a small bowl until smooth, then add red food coloring a drop at a time until the mixture reaches a bright red shade.
- Drizzle the red icing over the cooled cookies in thin lines to create the fang effect.
Extra Tips
Chill the dough thoroughly before cutting to keep the fang points sharp. Use gel food coloring for stronger red color with less liquid. Store finished cookies in a single layer in an airtight container to maintain crisp edges.Course: Dessert Cuisine: American Equipment: Mixing Bowl, Baking Sheet, Wire Rack
Pumpkin Patch Sugar Cookies with Mini Leaf Decorations
These cookies bring a simple pumpkin patch scene to your Halloween spread. The round bases get covered in bright orange icing while small green leaf accents add the finishing touch. They hold their shape well after baking and offer a soft, buttery bite under sweet frosting.
They work nicely for an afternoon baking session with family or as a make-ahead treat for a party table. The vanilla flavor stays mild so the decorations stand out without competing.

Serves 4 people.
Ingredients
- 1 1/2 cups all-purpose flour
- 1/2 teaspoon baking powder
- 1/4 teaspoon salt
- 1/2 cup unsalted butter, softened
- 3/4 cup granulated sugar
- 1 large egg
- 1 teaspoon vanilla extract
- 2 cups powdered sugar
- 3 tablespoons milk
- Orange food coloring
- Green food coloring
Instructions
- Whisk the flour, baking powder, and salt in a bowl until evenly combined.
- In a second bowl, beat the softened butter and granulated sugar until light and creamy.
- Add the egg and vanilla extract to the butter mixture and mix until smooth.
- Stir the dry ingredients into the wet mixture until a soft dough forms.
- Divide the dough in half, wrap each portion, and chill for 30 minutes.
- Heat the oven to 350°F and line a baking sheet with parchment paper.
- Roll one portion of dough to 1/4-inch thickness and cut into 3-inch rounds. Use leftover scraps to cut small leaf shapes.
- Place the rounds and leaves on the baking sheet and bake for 8 to 10 minutes until the edges turn lightly golden.
- Cool the cookies completely on a wire rack.
- Stir the powdered sugar and milk together until smooth, then divide the icing into two bowls.
- Tint one bowl orange and the other green with the food colorings.
- Spread orange icing over each round cookie and pipe small green leaves on top or attach the baked leaf cutouts.
Extra Tips
Chill the cut leaf shapes a few extra minutes before baking so they keep their edges sharp. If the orange icing sets too quickly, add a drop more milk to keep it spreadable for the leaf piping.Course: Dessert Cuisine: American Equipment: Mixing Bowl, Baking Sheet, Wire Rack
