

Hey lovely readers!
As Halloween approaches, it’s time to get creative in the kitchen.
Picture the crunchy joy of mummy-wrapped sausages or the spooky charm of ghostly pretzel sticks.
Each mouthwatering bite is a delightful adventure.
Get ready to thrill your taste buds with these savory sensations!
Spooky Spider Crackers

If you’re looking to add a touch of eerie fun to your Halloween snack spread, these Spooky Spider Crackers are the perfect choice. Not only do they look delightfully creepy, but they’re also incredibly tasty and easy to make. The combination of savory crackers, creamy cheese, and the slight crunch of pretzel sticks makes for a perfect spooky treat that both kids and adults will love.
Whether you’re hosting a Halloween party or just getting into the spirit of the season, these crackers are sure to be a hit. The best part about this recipe is how versatile it can be. You can customize the flavors to your liking by choosing different types of cheese spreads and crackers.
Customize these Spooky Spider Crackers with your favorite cheese and cracker combinations for a unique Halloween treat.
This recipe serves 4-6 people, making it ideal for small gatherings or family snacks. The assembly process is straightforward and can even be a fun activity to do with kids. Let’s explore the ingredients you’ll need to create these spooky delights.
Ingredients (Serves 4-6):
- 24 round crackers
- 1 cup cream cheese spread
- 12 black olives, sliced
- 48 small pretzel sticks
- 24 mini chocolate chips
Cooking Instructions:
- Prepare the Crackers: Lay out all 24 round crackers on a clean, flat surface. These will serve as the base for your spider bodies.
- Spread the Cheese: Using a butter knife or small spoon, spread a generous amount of cream cheese onto each cracker. Make sure the cheese is spread evenly across the surface to act as the adhesive for the other ingredients.
- Add the Legs: Carefully insert four pretzel sticks into the cream cheese on each side of the cracker, creating the spider’s legs. Ensure the pretzel sticks are securely placed so they don’t fall out.
- Create the Spider Body: Place a slice of black olive on top of the cream cheese in the center of each cracker. This represents the main body of the spider and should be pressed gently into the cheese.
- Add the Eyes: For the final touch, press two mini chocolate chips into the cream cheese just above the olive slice to form the spider’s eyes. Ensure they’re positioned close to each other for the best visual effect.
- Chill Before Serving: Once assembled, place the spider crackers in the refrigerator for at least 15 minutes to allow the cheese to set slightly. This step helps to keep all the components in place when serving.
Extra Tips:
For an extra layer of flavor, consider using flavored cream cheese such as garlic and herb or jalapeño. If you’re serving these at a party, assemble them shortly before guests arrive to make sure they remain fresh and crunchy.
These Spooky Spider Crackers aren’t only a treat for the taste buds but also a feast for the eyes, adding a playful and thematic touch to any Halloween celebration.
Ghostly Pretzel Sticks

Ghostly Pretzel Sticks are a delightfully spooky addition to any Halloween party spread. These fun and easy-to-make snacks are perfect for kids and adults alike, providing a salty crunch with a hint of sweetness.
By using simple ingredients and a touch of creativity, you can transform ordinary pretzel rods into ghostly figures that will surely impress your guests. Their eerie appearance is sure to make them a standout feature on your festive table, adding a whimsical and tasty element to your Halloween celebrations.
This recipe yields enough Ghostly Pretzel Sticks to serve 4-6 people, making it an ideal choice for small gatherings or as part of a larger array of Halloween-themed dishes. The combination of salty pretzels and sweet white chocolate creates a balanced flavor profile that everyone will enjoy.
With just a few steps, you’ll have a batch of these hauntingly delicious treats ready to delight your friends and family. Let’s jump into the ingredients and method for creating these spooky snacks.
Ingredients (Serving Size: 4-6 People)
- 12 large pretzel rods
- 12 oz white chocolate chips or candy melts
- 24 mini chocolate chips (for eyes)
- 24 black sugar pearls or black decorating gel (for mouths)
- Wax or parchment paper
Cooking Instructions
- Prepare the Workspace: Line a baking sheet with wax or parchment paper. This will be where you place your dipped pretzel rods to set.
- Melt the Chocolate: In a microwave-safe bowl, melt the white chocolate chips or candy melts. Heat in 30-second intervals, stirring in between, until the chocolate is smooth and fully melted.
- Dip the Pretzels: Take each pretzel rod and dip it into the melted white chocolate, covering about two-thirds of the rod. Allow excess chocolate to drip off before placing it on the prepared baking sheet.
- Add Eyes and Mouth: While the chocolate is still soft, press two mini chocolate chips onto the white chocolate as eyes for each ghost. Below the eyes, add a black sugar pearl or a small dot of black decorating gel to create the mouth.
- Set and Serve: Allow the Ghostly Pretzel Sticks to set completely at room temperature, or speed up the process by placing them in the refrigerator for about 15 minutes. Once set, they’re ready to be served.
Extra Tips
For a smoother finish on your Ghostly Pretzel Sticks, make sure that the melted chocolate isn’t too thick. You can achieve the perfect consistency by adding a teaspoon of vegetable oil to the chocolate while melting.
If you don’t have mini chocolate chips or black sugar pearls, feel free to get creative with other edible decorations you have on hand. When storing the pretzel sticks, keep them in an airtight container to maintain their crunch and freshness for up to 3 days.
Bewitched Popcorn Mix

Bewitched Popcorn Mix is a delightful treat that blends the light, airy crunch of popcorn with the savory flavors of various seasonings and nuts. This perfect Halloween snack is both easy to prepare and incredibly satisfying, making it an excellent choice for parties or a spooky movie night.
The harmonious combination of salty and savory ingredients guarantees that every bite is a tantalizing experience, while the ease of preparation leaves you more time to enjoy the festivities.
This recipe yields enough to serve 4-6 people, making it ideal for a small gathering. The Bewitched Popcorn Mix can be customized with your favorite nuts and seasonings, allowing you to create a unique snack tailored to your taste preferences. The following ingredients will provide a balanced mix of flavors and textures that are sure to enchant your guests.
Ingredients:
- 8 cups of popped popcorn
- 1 cup of pretzel sticks
- 1 cup of mixed nuts (such as almonds, cashews, and peanuts)
- 1/2 cup of candy-coated chocolates (like M&M’s)
- 1/4 cup of dried cranberries
- 1/3 cup of butter, melted
- 1 tablespoon of Worcestershire sauce
- 1 teaspoon of garlic powder
- 1 teaspoon of onion powder
- 1 teaspoon of smoked paprika
- Salt to taste
Instructions:
- Preheat the Oven: Begin by preheating your oven to 300°F (150°C). This low temperature will gently toast the mix, enhancing flavors without burning.
- Mix the Base Ingredients: In a large mixing bowl, combine the popped popcorn, pretzel sticks, mixed nuts, candy-coated chocolates, and dried cranberries. Toss them together until evenly distributed.
- Prepare the Seasoning: In a smaller bowl, whisk together the melted butter, Worcestershire sauce, garlic powder, onion powder, smoked paprika, and a pinch of salt. Verify that the ingredients are well combined for a uniform flavor.
- Coat the Popcorn Mix: Pour the butter seasoning mixture over the popcorn mix. Use a large spoon or spatula to gently toss everything together, making sure the seasoning coats all the ingredients evenly.
- Bake the Mix: Spread the seasoned popcorn mixture on a large baking sheet lined with parchment paper. Place it in the preheated oven and bake for 15-20 minutes. Stir the mixture halfway through to guarantee even cooking.
- Cool and Serve: Once baked, remove the popcorn mix from the oven and let it cool completely on the baking sheet. This will allow the flavors to meld and the mix to crisp up further. Once cooled, serve it in a large bowl or store in an airtight container until ready to enjoy.
Extra Tips:
For an added kick, consider adding a dash of cayenne pepper to the seasoning mix for a spicy twist. If you prefer a sweeter version, include a drizzle of melted white or dark chocolate over the cooled mix.
To achieve maximum freshness, store any leftovers in an airtight container for up to a week. Adjust the seasonings to suit your taste preferences, and feel free to experiment with other nuts or sweet elements to make this Bewitched Popcorn Mix your own unique creation.
Monster Munch Trail Mix

Monster Munch Trail Mix is the perfect salty snack to whip up for Halloween festivities. Combining a variety of crunchy and savory ingredients, this trail mix isn’t only delicious but also visually appealing, making it a hit with both kids and adults.
Its vibrant colors and interesting textures capture the spirit of Halloween, offering a delightful mix of flavors that are both satisfying and fun to eat. Whether you’re hosting a Halloween party or simply looking to enjoy a themed snack, Monster Munch Trail Mix is sure to be a crowd-pleaser.
This trail mix is incredibly easy to prepare, requiring no cooking and minimal prep time. It’s versatile enough to allow for substitutions based on personal preferences or dietary restrictions. The key to a perfect Monster Munch Trail Mix is to balance the salty with a hint of sweetness, achieving a delightful contrast that keeps everyone reaching for more.
With a serving size fit for 4-6 people, this recipe guarantees there’s enough to go around, whether you’re serving it at a gathering or packing it for a spooky movie night at home.
Ingredients (serving size of 4-6 people):
- 2 cups pretzel twists
- 1 cup roasted salted peanuts
- 1 cup mini cheese crackers
- 1 cup roasted pumpkin seeds
- 1 cup candy corn
- 1 cup dark chocolate chips
- 1 cup dried cranberries
Cooking Instructions:
- Preparation: Begin by verifying all your ingredients are measured and ready to combine. This will streamline the process and make mixing easier.
- Mix Dry Ingredients: In a large bowl, combine 2 cups of pretzel twists, 1 cup of roasted salted peanuts, 1 cup of mini cheese crackers, and 1 cup of roasted pumpkin seeds. Stir gently to guarantee even distribution.
- Add Sweet Elements: Add 1 cup of candy corn, 1 cup of dark chocolate chips, and 1 cup of dried cranberries to the bowl. These ingredients will add a sweet touch to the otherwise salty mix.
- Combine Mix Thoroughly: Using a large spoon or your clean hands, mix all the ingredients thoroughly. Make sure each ingredient is well distributed to guarantee every scoop gets a taste of everything.
- Serve and Enjoy: Once combined, your Monster Munch Trail Mix is ready to serve. You can pour it into a festive bowl for immediate enjoyment, or pack it into individual baggies for easy snacking.
Extra Tips:
To enhance the Halloween spirit, consider using themed bowls or containers for serving the trail mix. If you or your guests have nut allergies, you can substitute the peanuts with more pumpkin seeds or another nut-free crunchy element.
For a healthier version, swap the candy corn for more dried fruits or opt for dark chocolate with a higher cocoa content for additional health benefits. Finally, verify the trail mix is stored in an airtight container if not consumed immediately, to keep it fresh and crunchy for several days.
Witch’s Fingers Breadsticks

Witch’s Fingers Breadsticks are a spooky yet delicious addition to your Halloween snack table. These eerie breadsticks are shaped like creepy fingers, complete with almond nails and a sprinkling of sea salt to give them a delightfully salty crunch. They’re perfect for dipping in your favorite sauces, such as marinara or a rich cheese dip, making them a hit with both kids and adults alike.
The key to making these breadsticks look convincingly like witch’s fingers is in the shaping and the careful placement of the almond “nails.” You can even add a touch of red food coloring for a blood-curdling effect. Whether you’re hosting a Halloween party or just want to add a festive twist to your dinner table, these breadsticks are bound to be a conversation starter.
Ingredients (Serves 4-6 people):
- 1 package of refrigerated pizza dough
- 1/2 cup whole almonds
- 1 egg, beaten
- 1 tablespoon water
- Coarse sea salt
- Red food coloring (optional)
- 1 tablespoon olive oil
- Fresh rosemary sprigs (optional, for garnish)
Cooking Instructions:
- Preheat the Oven: Start by preheating your oven to 375°F (190°C) to make sure it’s hot enough to bake the breadsticks evenly.
- Prepare the Dough: Roll out the refrigerated pizza dough on a lightly floured surface until it’s about 1/4 inch thick. Use a knife or pizza cutter to cut the dough into strips approximately 4-5 inches long and 1 inch wide.
- Shape the Fingers: Roll each strip slightly to round the edges and make them look more finger-like. Pinch one end of each strip to form a fingertip shape. Use a knife to create knuckle lines by gently pressing into the dough without cutting through.
- Add the Nails: Press a whole almond into the fingertip of each strip to resemble a fingernail. For an extra creepy touch, add a small drop of red food coloring around the almond to mimic blood.
- Egg Wash: In a small bowl, beat the egg with a tablespoon of water to create an egg wash. Brush each breadstick with the egg wash to give them a golden-brown finish when baked.
- Sprinkle with Salt: Lightly sprinkle coarse sea salt over the breadsticks for added flavor and texture.
- Bake the Breadsticks: Place the breadsticks on a baking sheet lined with parchment paper, ensuring they’re spaced apart to prevent sticking. Bake in the preheated oven for 15-20 minutes or until golden brown.
- Cool and Garnish: Remove the breadsticks from the oven and let them cool for a few minutes. If desired, garnish with fresh rosemary sprigs for a spooky presentation.
Extra Tips:
For an even more realistic look, consider using a small amount of green food coloring in the dough to give the fingers a more witch-like hue. If you prefer a different flavor, you can add garlic powder or Italian seasoning to the dough before shaping.
Additionally, if you don’t have almonds, you can substitute with pumpkin seeds for a similar effect. Remember to keep an eye on the breadsticks while baking, as ovens may vary, and you don’t want them to burn. Enjoy your spooky creation!
Creepy Cheese Crisps
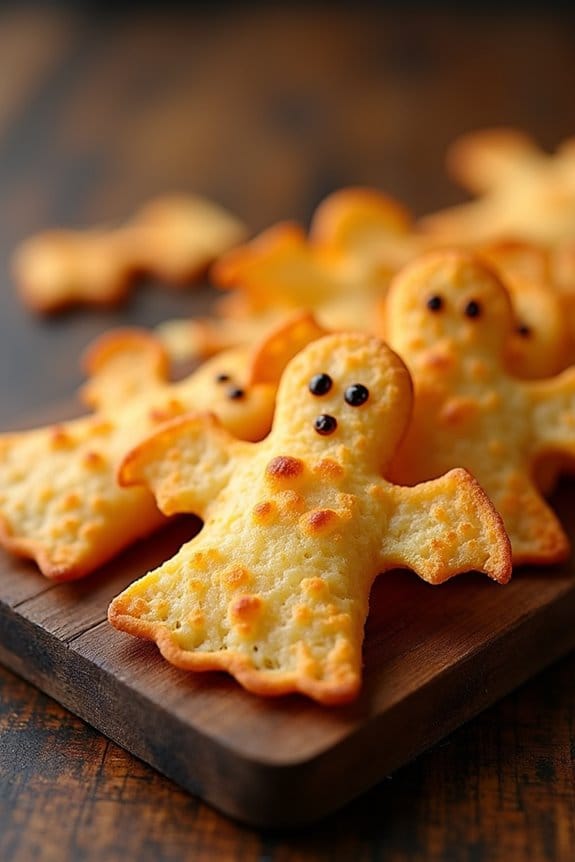
Transform your Halloween snacks into a spooky delight with these Creepy Cheese Crisps. They’re a perfect blend of savory flavors and a fun, eerie appearance, making them a hit at any Halloween party.
These crisps aren’t only a treat for the taste buds but also a feast for the eyes, as their ghostly shapes and golden hue add a unique twist to your festive spread. Plus, they’re quick and easy to make, guaranteeing you spend more time enjoying the festivities rather than laboring in the kitchen.
Ideal for a serving size of 4-6 people, Creepy Cheese Crisps are crafted from simple ingredients that come together to create a deliciously crunchy texture that pairs well with dips or enjoyed on their own.
Whether you’re hosting a gathering or simply looking to add a thematic flair to your snack repertoire, these crisps are sure to impress both kids and adults alike. So, let’s jump into the recipe and bring a little frightful fun to your table!
Ingredients:
- 2 cups shredded sharp cheddar cheese
- 1 cup grated Parmesan cheese
- 1 teaspoon garlic powder
- 1 teaspoon onion powder
- 1/2 teaspoon smoked paprika
- 1/4 teaspoon cayenne pepper
- Plastic or cookie cutters in Halloween shapes (ghosts, bats, etc.)
Instructions:
- Preheat the Oven: Preheat your oven to 350°F (175°C) and line two baking sheets with parchment paper. This guarantees that the cheese crisps won’t stick to the pan and will come off easily after baking.
- Mix the Cheese and Spices: In a large bowl, combine the shredded cheddar and grated Parmesan cheese. Add the garlic powder, onion powder, smoked paprika, and cayenne pepper. Stir the mixture until all the ingredients are evenly distributed.
- Create Halloween Shapes: On a clean surface, spread the cheese mixture out to about 1/4 inch thick. Use Halloween-shaped cookie cutters to cut out the cheese into spooky shapes like ghosts and bats. Carefully transfer the shapes to the prepared baking sheets.
- Bake the Crisps: Place the baking sheets in the oven and bake for about 10-12 minutes, or until the cheese is golden brown and crispy. Keep an eye on them to prevent burning.
- Cool and Serve: Once baked, remove the crisps from the oven and let them cool on the baking sheets for a few minutes. They’ll continue to crisp up as they cool. Once cooled, serve them as is or with your favorite dip.
Extra Tips:
When making Creepy Cheese Crisps, it’s important to use cheese that has been freshly shredded, as pre-packaged shredded cheese often contains anti-caking agents that can affect the texture of the crisps.
Additionally, for an extra spooky touch, you can experiment with different types of cheese or add a pinch of black food coloring to the cheese mixture to create darker, more ominous crisps.
If you find that the crisps aren’t holding their shape well, try chilling the cut shapes in the refrigerator for a few minutes before baking to help them maintain their form. Enjoy your creepy creations!
Vampire Bat Wings
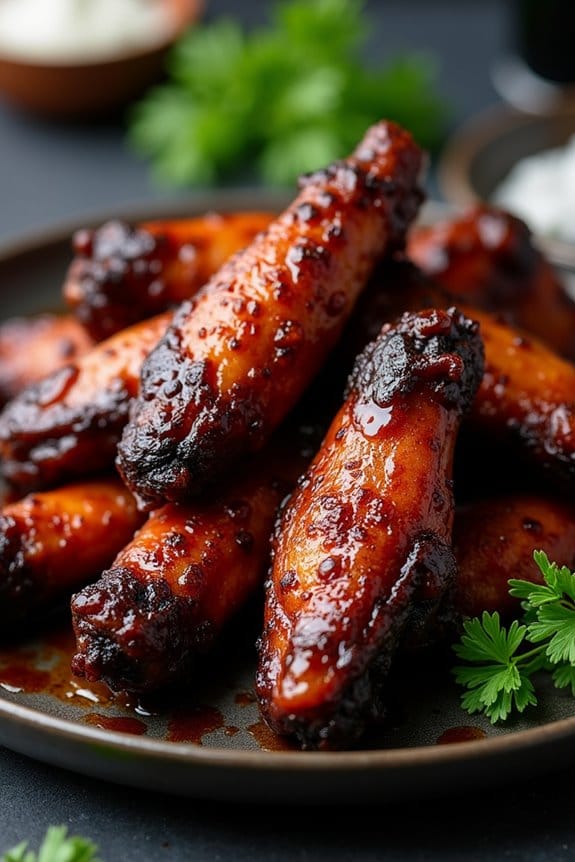
Transform your Halloween spread into a ghastly feast with these tantalizing Vampire Bat Wings. Perfect for spooking your guests, these wings are marinated in a savory blend and cooked to crispy perfection, making them a surefire hit among adults and kids alike.
This recipe not only surprises with its unique presentation but also impresses with its rich flavors, combining elements of salt, spice, and umami. Serve them as a standout appetizer or a fun main dish, and watch as your guests sink their teeth into these deliciously sinister snacks.
The secret to these Vampire Bat Wings lies in the marinade, which infuses each wing with a deep, smoky taste complemented by hints of garlic, soy, and a touch of heat. The cooking process guarantees they’re crispy on the outside and juicy on the inside, making each bite a delightful experience.
Not only are these wings easy to prepare, but they also add an exciting visual element to your Halloween party, with their dark, eerie appearance reminiscent of bat wings.
Ingredients (Serves 4-6):
- 3 lbs chicken wings
- 1/2 cup soy sauce
- 1/4 cup balsamic vinegar
- 2 tablespoons Worcestershire sauce
- 1 tablespoon smoked paprika
- 1 tablespoon garlic powder
- 2 teaspoons onion powder
- 1 teaspoon cayenne pepper
- 1 teaspoon black pepper
- 1 tablespoon olive oil
- Fresh parsley for garnish (optional)
Cooking Instructions:
- Prepare the Marinade: In a large mixing bowl, combine the soy sauce, balsamic vinegar, Worcestershire sauce, smoked paprika, garlic powder, onion powder, cayenne pepper, and black pepper. Whisk these ingredients together until well blended.
- Marinate the Wings: Add the chicken wings to the bowl of marinade, making certain each wing is thoroughly coated. Cover the bowl with plastic wrap and refrigerate for at least 2 hours, or overnight for a more intense flavor.
- Preheat the Oven: Preheat your oven to 400°F (200°C). Line a baking sheet with aluminum foil and place a wire rack on top. This will help the wings cook evenly and become crispy.
- Arrange the Wings: Remove the wings from the marinade and shake off any excess liquid. Arrange them in a single layer on the wire rack, making sure they aren’t touching.
- Bake the Wings: Place the baking sheet in the preheated oven. Bake the wings for 45-50 minutes, turning them halfway through, until they’re cooked through and crispy.
- Serve: Once cooked, remove the wings from the oven and let them cool for a few minutes. Arrange them on a serving platter and garnish with fresh parsley if desired. Serve immediately for best results.
Extra Tips:
For those who prefer a little extra heat, consider adding a dash more cayenne pepper or even a squirt of your favorite hot sauce to the marinade.
If you’re looking for a deeper color that mimics bat wings even more closely, you might experiment with a small amount of black food coloring in the marinade.
Frighteningly Flavored Chips

As All Hallows’ Eve approaches, there’s no better way to spice up your snack table than with a bowl of Spooky Ghost Pepper and Black Garlic Chips. These uniquely flavored chips aren’t only delightfully crunchy, but they also bring a hauntingly delicious twist with the fiery heat of ghost peppers and the rich, umami depth of black garlic. Perfect for a Halloween party or a cozy night in watching horror movies, these chips will surely leave your guests craving more.
The intimidating heat of the ghost pepper is balanced beautifully by the mellow, sweet notes of black garlic, creating an addictive snack that’s sure to be the talk of the night. The preparation is simple, and the result is a batch of chips that not only taste amazing but are also a visual treat with their dark, mysterious appearance. Let’s plunge into this eerily enticing recipe for a serving size of 4-6 people.
Ingredients:
- 6 medium-sized potatoes
- 2 tablespoons vegetable oil
- 1 teaspoon ghost pepper powder
- 2 tablespoons black garlic powder
- 1 teaspoon smoked paprika
- Sea salt to taste
- Freshly ground black pepper to taste
- 1 tablespoon fresh chives, finely chopped (optional for garnish)
Cooking Instructions:
- Prepare the Potatoes: Begin by washing and scrubbing the potatoes thoroughly to remove all dirt. Using a mandolin slicer, slice the potatoes thinly to achieve an even thickness for each chip.
- Preheat Oven: Preheat your oven to 375°F (190°C) and line two baking sheets with parchment paper or a silicone baking mat to prevent sticking.
- Season the Chips: In a large bowl, combine the potato slices with vegetable oil, ensuring each slice is well coated. Add the ghost pepper powder, black garlic powder, smoked paprika, sea salt, and black pepper. Toss the slices until they’re evenly coated with the spices.
- Arrange and Bake: Spread the seasoned potato slices in a single layer on the prepared baking sheets, making sure they don’t overlap. Place the sheets in the preheated oven and bake for 15-20 minutes, flipping halfway through, until the chips are golden brown and crispy.
- Cool and Serve: Once baked, remove the chips from the oven and let them cool on a wire rack. This will help them retain their crispiness. Garnish with finely chopped chives, if desired, and serve your Spooky Ghost Pepper and Black Garlic Chips immediately for the best flavor and crunch.
Extra Tips:
When working with ghost pepper powder, be cautious as it’s extremely spicy. You may want to wear gloves to avoid irritation and be sure to wash your hands thoroughly after handling.
Adjust the amount of ghost pepper powder to suit your heat tolerance, and consider offering a milder dip on the side for those who prefer less heat. If you can’t find black garlic powder, you can substitute it with roasted garlic powder for a similar flavor profile.
Enjoy your frightfully flavorful snack, and have a happy Halloween!
Haunted Jalapeño Poppers
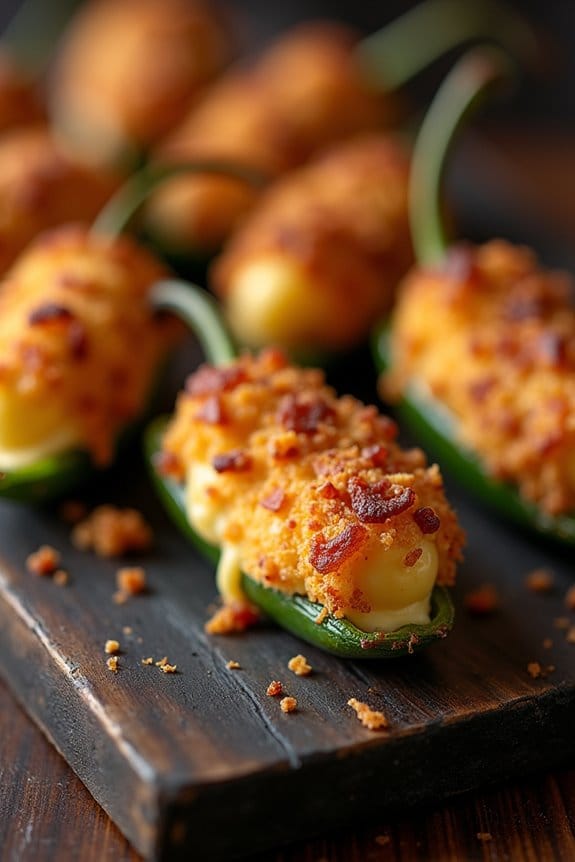
Transform your Halloween gathering into a night of spine-tingling delight with these Haunted Jalapeño Poppers. Perfectly balancing the fiery kick of jalapeños with the creamy richness of cheese, these poppers are a ghoulishly good treat that promises to tantalize the taste buds.
This recipe takes the classic jalapeño popper and gives it a spooky twist, making it an ideal addition to your spread of salty Halloween snacks. Whether you’re hosting a monster bash or simply want to enjoy a frightfully flavorful snack, these jalapeño poppers are bound to be a hit.
Each bite delivers a satisfying crunch followed by a creamy, cheesy center, all wrapped in a flavorful, crispy coating. The combination of textures and flavors makes them an irresistible appetizer. With a serving size of 4-6 people, this recipe guarantees everyone at your event can indulge in the hauntingly delicious taste of these poppers.
Gather your ingredients, don your witch’s hat, and let’s get started on creating these devilishly delightful snacks!
Ingredients:
- 12 fresh jalapeño peppers
- 8 ounces cream cheese, softened
- 1 cup shredded cheddar cheese
- 1 teaspoon garlic powder
- 1 teaspoon onion powder
- 1/2 teaspoon smoked paprika
- 1/4 teaspoon salt
- 1/4 teaspoon black pepper
- 12 strips of bacon
- 1 cup all-purpose flour
- 2 large eggs
- 2 cups panko bread crumbs
- Vegetable oil for frying
Cooking Instructions:
- Prepare the Jalapeños: Wash and dry the jalapeños. Carefully slice each jalapeño in half lengthwise. Using a small spoon, scoop out the seeds and membranes to reduce the heat level. Set the prepared jalapeño halves aside.
- Make the Filling: In a mixing bowl, combine the softened cream cheese, shredded cheddar cheese, garlic powder, onion powder, smoked paprika, salt, and black pepper. Mix until smooth and well combined.
- Stuff the Jalapeños: Using a small spoon or a piping bag, fill each jalapeño half with the cheese mixture. Confirm the filling is slightly heaped to create a generous portion in each half.
- Wrap with Bacon: Cut each bacon strip in half, then wrap one half around each stuffed jalapeño. Secure the bacon in place with a toothpick if necessary.
- Breading the Poppers: Place the flour in one bowl, beat the eggs in a second bowl, and place the panko bread crumbs in a third bowl. Dredge each bacon-wrapped jalapeño in flour, dip it into the beaten eggs, and then coat it with panko breadcrumbs, ensuring even coverage.
- Heat the Oil: In a large pot or deep fryer, heat vegetable oil to 350°F (175°C).
- Fry the Poppers: Fry the jalapeño poppers in batches for about 3-4 minutes each, or until the bacon is crispy and the coating is golden brown. Use a slotted spoon to transfer the poppers to a paper-towel-lined plate to drain excess oil.
- Serve: Allow the poppers to cool slightly before serving. Arrange them on a platter for a spooky presentation and enjoy!
Extra Tips:
For an added layer of spookiness, consider using colored breadcrumbs or adding a bit of food coloring to the cheese filling to give the poppers a Halloween-themed appearance.
When selecting jalapeños, look for peppers that are similar in size to ensure even cooking. If you’d like a milder popper, make sure to remove all seeds and membranes from the jalapeños.
Leftover poppers can be stored in an airtight container in the refrigerator and reheated in the oven to retain their crispiness. Enjoy these Haunted Jalapeño Poppers as a frightfully fun addition to your Halloween festivities!
Zombie Zucchini Fries

Ready to creep out your guests this Halloween with a savory twist? Zombie Zucchini Fries are the perfect eerie yet delicious snack for your holiday gathering.
These crispy, spiced zucchini sticks aren’t only easy to make but also add a fun and spooky element to your spread of salty Halloween snacks. With their crunchy coating and ghoulish green hue, they’re bound to become a favorite among both the young and the undead.
Whether you’re hosting a haunted house party or just looking for a festive way to enjoy your veggies, Zombie Zucchini Fries are a thrilling choice. This recipe serves 4-6 people, making it ideal for a small group of ghouls.
So, roll up your sleeves and get ready to create a dish that’s both frightfully fun and finger-licking good!
Ingredients:
- 4 medium zucchinis
- 1 cup all-purpose flour
- 3 large eggs
- 1 cup breadcrumbs
- 1/2 cup grated Parmesan cheese
- 1 teaspoon garlic powder
- 1 teaspoon onion powder
- 1/2 teaspoon paprika
- Salt and pepper to taste
- Cooking spray or vegetable oil for baking
Cooking Instructions:
- Preheat the Oven: Start by preheating your oven to 425°F (220°C). This will guarantee your fries bake evenly and become crispy.
- Prepare the Zucchini: Wash the zucchinis thoroughly, then cut them into sticks about 3-4 inches long and 1/2 inch thick. Aim for uniform sizes to guarantee even cooking.
- Set Up the Coating Station: Arrange three shallow dishes for the coating process. In the first dish, place the all-purpose flour. In the second dish, beat the eggs until smooth. In the third dish, combine the breadcrumbs, grated Parmesan cheese, garlic powder, onion powder, paprika, salt, and pepper.
- Coat the Zucchini: Take each zucchini stick and coat it lightly in flour. Shake off any excess flour before dipping it into the beaten eggs. Finally, roll the stick in the breadcrumb mixture, ensuring it’s fully covered. Repeat this process with all the zucchini sticks.
- Arrange on a Baking Sheet: Line a baking sheet with parchment paper or lightly grease it with cooking spray. Arrange the coated zucchini sticks in a single layer, ensuring they don’t touch.
- Bake the Fries: Place the baking sheet in the preheated oven and bake for 20-25 minutes, flipping the fries halfway through. They should be golden brown and crispy.
- Serve: Once baked, remove the fries from the oven and let them cool slightly before serving. They’re best enjoyed warm and can be paired with your favorite dipping sauce.
Extra Tips:
For an extra crispy texture, consider using panko breadcrumbs instead of regular breadcrumbs. If you prefer a spicier kick, add a pinch of cayenne pepper to the breadcrumb mixture.
Additionally, for those who are health-conscious, these fries can be made using an air fryer. Simply follow the same coating steps and air-fry at 400°F (200°C) for around 15 minutes, shaking the basket halfway through for even cooking.
Ghoulish Garlic Knots

Ghoulish Garlic Knots are the perfect salty snack to add a spooky touch to your Halloween festivities. These delightfully twisted bites combine the irresistible flavors of garlic and butter, with a hint of Parmesan, to create a treat that’s both delicious and eerily festive. The knots can easily be shaped into little ghostly figures or kept in their traditional knot form, making them a versatile addition to any Halloween spread.
These garlic knots aren’t only tasty but also relatively simple to prepare, ensuring you spend less time in the kitchen and more time enjoying the festivities with family and friends. Whether you’re planning a Halloween party or simply want a fun snack to enjoy at home, these Ghoulish Garlic Knots will surely be a hit. Serving size for this recipe is designed for 4-6 people, making it perfect for a small gathering or family meal.
Ingredients:
- 1 pound pizza dough
- 1/4 cup unsalted butter
- 4 cloves garlic, minced
- 1/4 cup freshly grated Parmesan cheese
- 1 tablespoon chopped fresh parsley
- 1 teaspoon dried Italian seasoning
- 1/2 teaspoon salt
- 1/4 teaspoon cracked black pepper
- Optional: red chili flakes for a spicy kick
Instructions:
- Preheat the Oven: Begin by preheating your oven to 400°F (200°C). Line a baking sheet with parchment paper or lightly grease it to prevent sticking.
- Prepare the Dough: Roll out the pizza dough on a lightly floured surface to a thickness of about 1/4 inch. Cut the dough into strips that are approximately 6 inches long and 1 inch wide.
- Shape the Knots: Take each strip of dough and tie it into a loose knot. If you wish to create a more ghostly appearance, you can stretch and shape the ends to resemble ghost tails.
- Make the Garlic Butter: In a small saucepan, melt the butter over medium heat. Add the minced garlic and sauté for about 1-2 minutes until fragrant. Remove from heat and stir in the Italian seasoning, salt, and pepper.
- Coat the Knots: Using a pastry brush, generously coat each knot with the garlic butter mixture, ensuring they’re well covered to enhance flavor.
- Bake: Place the knots on the prepared baking sheet and bake in the preheated oven for 12-15 minutes, or until they’re golden brown and cooked through.
- Finish with Toppings: Once baked, remove the knots from the oven and immediately sprinkle them with Parmesan cheese and chopped parsley. For an extra pop of flavor, add a sprinkle of red chili flakes if desired.
- Serve: Allow the knots to cool slightly before serving warm. They can be enjoyed on their own or with a side of marinara sauce for dipping.
Extra Tips:
For the best results, make sure your pizza dough is at room temperature before you start working with it, as this will make it easier to roll out and shape. If you’re short on time, you can use store-bought pizza dough.
Additionally, feel free to experiment with different herbs and spices in the garlic butter to suit your taste preferences. These knots are also great for freezing; simply bake them, let them cool completely, then store in an airtight container in the freezer. When ready to serve, reheat in the oven until warmed through.
Devilish Deviled Eggs
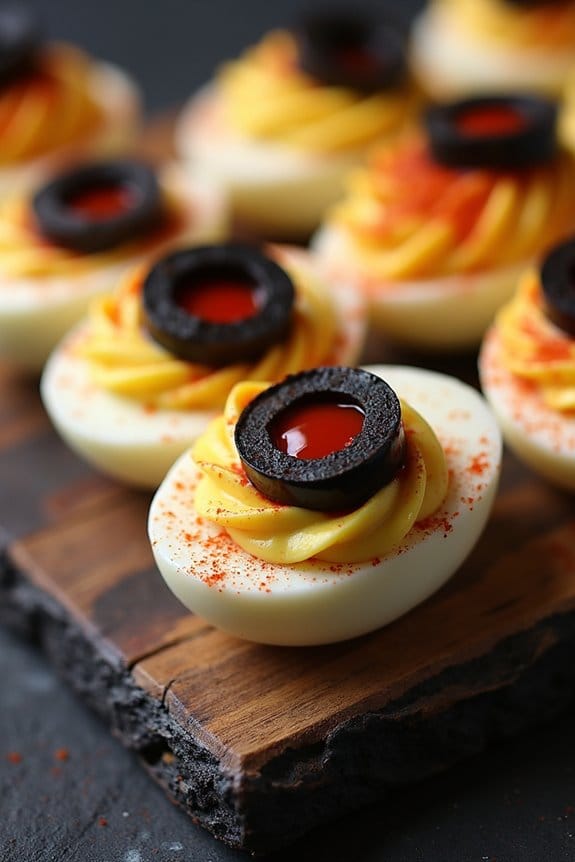
Devilish Deviled Eggs are a spooky twist on the classic deviled egg, perfect for adding some eerie fun to your Halloween spread. These flavorful bites combine traditional ingredients with a touch of heat and creativity to make them both a treat for the palate and a visual centerpiece on your party table.
The devilishly spicy filling, contrasted with the smooth texture of the eggs, creates a delightful experience that’s sure to enchant your guests as they indulge in these savory delights.
Preparing Devilish Deviled Eggs is simple and requires minimal ingredients, making it a go-to recipe for any festive gathering. With a few easy steps, you can transform ordinary deviled eggs into a Halloween-themed snack that stands out. The following recipe will guide you through the process of creating these ghoulish goodies, ensuring your party guests are both impressed and satisfied.
Ingredients (serving size: 4-6 people):
- 12 large eggs
- 1/2 cup mayonnaise
- 2 teaspoons Dijon mustard
- 1 teaspoon white vinegar
- Salt and pepper to taste
- 1/4 teaspoon cayenne pepper (optional for extra spice)
- Paprika for garnish
- Black olives (for decoration)
- Red food coloring or hot sauce (for decoration)
Instructions:
- Boil the Eggs: Start by placing the eggs in a large pot. Cover them with cold water until the water is about an inch above the eggs. Bring the water to a boil over medium-high heat. Once boiling, cover the pot, turn off the heat, and let the eggs sit for 10-12 minutes.
- Cool and Peel the Eggs: After the eggs have finished cooking, transfer them to an ice bath to cool for about 5 minutes. This will stop the cooking process and make peeling easier. Once cooled, gently tap the eggs on a hard surface and peel off the shells.
- Prepare the Filling: Slice each egg in half lengthwise and carefully scoop out the yolks into a mixing bowl. Place the egg whites on a serving platter. Mash the yolks with a fork, then add the mayonnaise, Dijon mustard, vinegar, salt, pepper, and cayenne pepper (if using). Mix until smooth and creamy.
- Fill the Egg Whites: Spoon or pipe the yolk mixture back into the egg white halves. Use a piping bag or a plastic bag with the corner cut off for a neat presentation.
- Decorate the Eggs: Slice black olives into thin rings and place on top of the yolk mixture to resemble eyes. Use a drop of red food coloring or hot sauce in the center of each olive ring for a bloodshot effect. Dust the eggs with paprika for added color and flavor.
Extra Tips:
- For a more intense flavor, prepare the filling a day in advance and refrigerate it overnight. This allows the flavors to meld together.
- If you don’t have a piping bag, a plastic sandwich bag with a small corner cut off works perfectly for filling the egg whites.
- To make peeling easier, use eggs that are at least a week old. Older eggs tend to peel more easily after boiling.
- Experiment with different decorations, such as using thin strips of bell pepper or pimento for horns or mouths, to give your deviled eggs more character and spookiness.
Mummy Wrapped Sausages
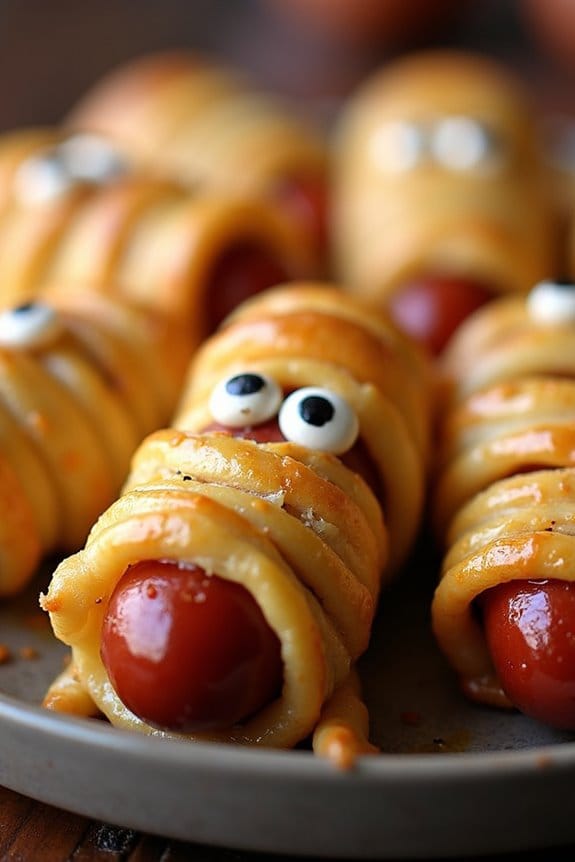
Mummy Wrapped Sausages are a fun and spooky addition to your Halloween snack table. These little treats aren’t only delicious but also visually entertaining, as they resemble little mummies wrapped in pastry bandages. They’re perfect for serving at a party or for a themed family dinner. The combination of savory sausages and buttery, flaky pastry makes them an irresistible snack that both kids and adults will love.
This recipe is easy to follow and requires only a few simple ingredients. The preparation time is minimal, making it a convenient option for busy hosts who want to offer something special for the occasion. Once baked, these Mummy Wrapped Sausages come out golden brown, with the sausages perfectly cooked inside their whimsical pastry wrapping. Serve them with a side of mustard or ketchup for dipping to complete the Halloween-themed snack.
Ingredients (serving size: 4-6 people):
- 1 package of puff pastry sheets (thawed)
- 12 cocktail sausages or mini hot dogs
- 1 egg (beaten)
- 1 tablespoon of water
- Ketchup or mustard (for serving)
- Black sesame seeds or edible eyes (for decoration)
Cooking Instructions:
- Preheat the Oven: Start by preheating your oven to 375°F (190°C). This will guarantee that your pastries bake evenly and are ready to go as soon as you’re done with the preparation.
- Prepare the Puff Pastry: Unroll the thawed puff pastry sheets on a lightly floured surface. Using a sharp knife or a pizza cutter, slice the pastry into thin strips about 1/4 inch wide. These strips will serve as the mummy bandages.
- Wrap the Sausages: Take one cocktail sausage and begin wrapping it with a strip of pastry, starting from one end and spiraling toward the other. Leave a small gap at one end for the face. Repeat this process until all sausages are wrapped.
- Decorate the Mummies: If you’re using sesame seeds or edible eyes, gently press them into the pastry near the top to create eyes for your mummies. This will add extra character to your snacks.
- Prepare the Egg Wash: In a small bowl, whisk together the beaten egg and water to make an egg wash. This will give your mummies a beautiful golden color.
- Brush and Bake: Place the wrapped sausages on a baking sheet lined with parchment paper. Using a pastry brush, lightly coat each mummy with the egg wash. Bake for 15-20 minutes, or until the pastry is golden brown and puffed.
- Serve and Enjoy: Allow the Mummy Wrapped Sausages to cool slightly before serving. Offer them with small bowls of ketchup or mustard for dipping.
Extra Tips:
For an added spooky touch, consider using food coloring to tint your pastry bandages different hues, like green or purple. If you’re pressed for time, crescent roll dough can be substituted for puff pastry, though the texture will be slightly different.
Remember to keep the pastry strips thin so they bake evenly and don’t overpower the sausages. Enjoy these Mummy Wrapped Sausages while they’re warm for the best flavor and texture.
Skeleton Bone Breadsticks

Skeleton Bone Breadsticks are the perfect spooky snack to serve at your Halloween gathering, adding a touch of eerie charm to your table. These breadsticks not only look like creepy bones but are also deliciously savory and crunchy, making them an irresistible treat for your guests.
Whether you’re hosting a party for kids or adults, these bone-shaped breadsticks are sure to be a hit, combining fun aesthetics with a tasty, homemade flavor. Serve them alongside a rich marinara sauce for dipping, or simply enjoy them on their own.
Making Skeleton Bone Breadsticks at home is easier than you might think. This recipe yields a batch perfect for 4-6 people, guaranteeing everyone gets their fill of this ghoulish delight. With a few simple ingredients and a little creativity, you can craft these breadsticks to satisfy both your eyes and your taste buds.
Follow the instructions below to create your own batch of these bone-chilling breadsticks that are sure to be the talk of your Halloween party.
Ingredients (Serves 4-6 people):
- 1 package (13.8 oz) refrigerated pizza dough
- 1/4 cup olive oil
- 1 teaspoon garlic powder
- 1 teaspoon salt
- 1 tablespoon grated Parmesan cheese
- 1 tablespoon sesame seeds (optional)
Instructions:
- Preheat the Oven: Start by preheating your oven to 375°F (190°C). This guarantees that your breadsticks will bake evenly and develop a nice crunchy exterior.
- Prepare the Baking Sheet: Line a large baking sheet with parchment paper. This helps prevent the breadsticks from sticking and makes cleanup easier.
- Roll Out the Dough: On a lightly floured surface, roll out the refrigerated pizza dough into a rectangular shape, about 1/4 inch thick. Make sure the dough is evenly flattened for consistent baking.
- Shape the Breadsticks: Use a pizza cutter or sharp knife to cut the dough into strips approximately 1 inch wide and 6 inches long. To create the bone shape, gently tie a small knot at each end of the strip. This will form the “knobs” at the ends of the bones.
- Season the Breadsticks: In a small bowl, mix together the olive oil, garlic powder, and salt. Using a pastry brush, coat each breadstick with the olive oil mixture. This adds flavor and helps the breadsticks become golden brown.
- Add Toppings: Sprinkle the breadsticks with Parmesan cheese and sesame seeds if desired. These add an extra layer of flavor and a bit of crunch.
- Bake: Place the prepared breadsticks on the lined baking sheet, leaving space between them. Bake in the preheated oven for 12-15 minutes, or until the breadsticks are golden brown and crispy.
- Cool and Serve: Allow the breadsticks to cool slightly on a wire rack before serving. They can be enjoyed warm or at room temperature.
Extra Tips: When shaping the breadsticks, be gentle to avoid tearing the dough. If you find the dough too sticky, sprinkle a little more flour on your working surface and hands.
