

Gather ’round, my fellow Halloween enthusiasts! 🎃 If you’re dreaming of a party that’s as enchanting as it is spooky, then you’re in for a treat. I’ve curated a list of 13 Halloween desserts that are sure to mystify and delight all your guests. From Creepy Crawly Cupcakes with gummy worms to a Spooky Spiderweb Cheesecake, these delicious creations will add a magical, festive touch to your gathering. Let’s embark on this enchanting culinary adventure together!
Creepy Crawly Cupcakes
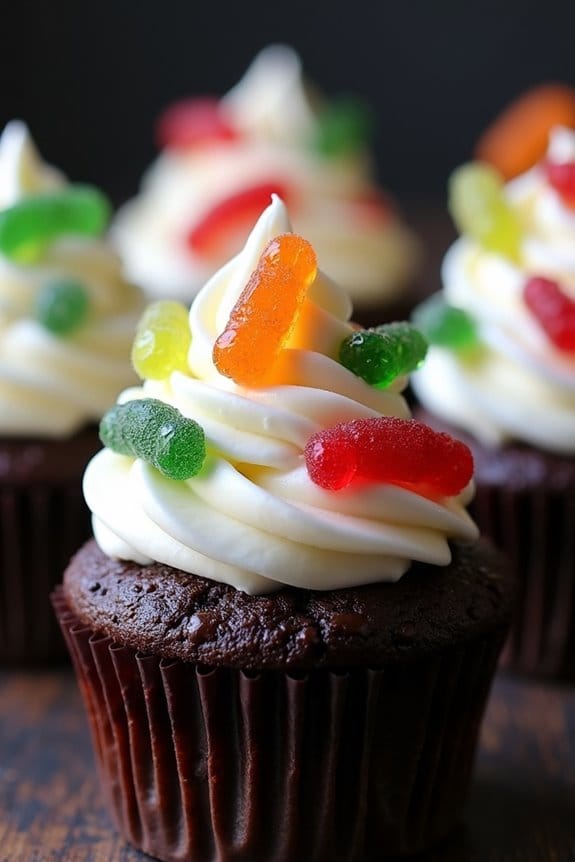
These Creepy Crawly Cupcakes are bound to give your Halloween party guests a delightful scare! Perfectly themed for the spooky season, these cupcakes not only taste delicious but also add a fun and eerie element to your dessert table. The cupcakes feature a rich chocolate base, topped with a fluffy, ghostly white frosting. The creepy crawly effect comes from the addition of gummy worms and spiders, creating a spine-chilling appearance that’s sure to captivate both kids and adults alike.
This recipe makes 12 to 18 cupcakes, ideal for a party serving 4-6 people. The cupcakes are easy to make and can be prepared in advance, allowing you to focus on other party preparations. Whether you’re hosting a haunted house or a family-friendly gathering, these Creepy Crawly Cupcakes will be a highlight, guaranteed to delight and spook in equal measure.
Ingredients:
- 1 ½ cups all-purpose flour
- 1 cup granulated sugar
- ½ cup unsweetened cocoa powder
- 1 teaspoon baking soda
- ½ teaspoon salt
- 1 cup buttermilk
- ½ cup vegetable oil
- 1 teaspoon vanilla extract
- 1 large egg
- 1 cup boiling water
- 1 cup heavy whipping cream
- 2 tablespoons powdered sugar
- 1 teaspoon vanilla extract
- Assorted gummy worms and gummy spiders
Instructions:
- Preheat and Prepare: Preheat your oven to 350°F (175°C). Line a muffin tin with cupcake liners to guarantee your cupcakes don’t stick and bake evenly.
- Mix Dry Ingredients: In a large mixing bowl, combine the all-purpose flour, granulated sugar, unsweetened cocoa powder, baking soda, and salt. Whisk them together until well blended.
- Add Wet Ingredients: In a separate bowl, mix the buttermilk, vegetable oil, vanilla extract, and egg. Gradually pour this mixture into the dry ingredients, stirring until just combined. Be careful not to overmix, as this can result in dense cupcakes.
- Incorporate Boiling Water: Carefully add the boiling water to the batter, mixing slowly. The batter will be quite thin, but this is expected and results in moist cupcakes.
- Bake the Cupcakes: Pour the batter into the prepared muffin tin, filling each liner about two-thirds full. Bake in the preheated oven for 18-20 minutes, or until a toothpick inserted into the center of a cupcake comes out clean. Allow to cool completely on a wire rack before frosting.
- Prepare the Frosting: In a chilled bowl, whip the heavy cream with powdered sugar and vanilla extract until stiff peaks form. This will create a light and airy whipped cream frosting.
- Decorate the Cupcakes: Once the cupcakes have cooled, pipe or spread the whipped cream frosting on top. Decorate each cupcake with gummy worms and spiders, arranging them in a way that creates a creepy crawly effect.
Extra Tips:
To enhance the flavor of the cupcakes, you can add a teaspoon of espresso powder to the dry ingredients, which will intensify the chocolate taste. If you’re short on time, you can use a store-bought frosting, but homemade whipped cream gives a fresher taste.
Confirm your cupcakes are completely cool before frosting to avoid melting the whipped cream. For an extra spooky touch, consider adding a drizzle of red icing to mimic “blood” on the cupcakes. Enjoy your festive and frightfully fun Creepy Crawly Cupcakes!
Witch’s Brew Brownies

Witch’s Brew Brownies are the perfect Halloween dessert to captivate your party guests. These decadent brownies are infused with a spooky charm that will leave everyone spellbound. With a rich, chocolatey base and a swirl of green minty goodness, these brownies not only taste delicious but also bring a touch of magic to your Halloween spread.
Decadent, spellbinding brownies with a chocolatey base and minty swirl for a magical Halloween treat.
Whether you’re hosting a haunted house party or a casual get-together, Witch’s Brew Brownies will surely be a hit.
The secret to these brownies lies in the combination of classic brownie ingredients with a mystic twist, thanks to the addition of mint extract and green food coloring. The result is a delightful blend of flavors and colors that perfectly fit the Halloween theme.
The recipe serves 4-6 people, making it ideal for a small gathering or for adding variety to a larger dessert table. So, gather your ingredients, don your witch’s hat, and let’s brew up some magical brownies!
Ingredients for 4-6 servings:
- 1 cup unsalted butter
- 2 cups granulated sugar
- 4 large eggs
- 1 teaspoon vanilla extract
- 1 cup all-purpose flour
- 1 cup unsweetened cocoa powder
- 1/2 teaspoon salt
- 1 teaspoon mint extract
- 5-7 drops green food coloring
- 1/2 cup chocolate chips (optional)
Cooking Instructions:
- Preheat your oven: Begin by preheating your oven to 350°F (175°C). This guarantees that the brownies will cook evenly.
- Prepare your baking dish: Grease a 9×13-inch baking dish or line it with parchment paper. This will prevent the brownies from sticking and make them easier to remove once baked.
- Melt the butter: In a medium-sized saucepan over low heat, melt the butter completely. Remove from heat and allow it to cool slightly.
- Mix wet ingredients: In a large mixing bowl, combine the melted butter, granulated sugar, eggs, and vanilla extract. Whisk until the mixture is smooth and well combined.
- Combine dry ingredients: In a separate bowl, sift together the flour, cocoa powder, and salt. This will help prevent lumps in your brownie batter.
- Create the brownie batter: Gradually add the dry ingredients to the wet ingredients, stirring until just combined. Be careful not to overmix, as this can make the brownies tough.
- Add the magical touch: Divide the batter into two bowls. In one bowl, stir in the mint extract and green food coloring until the color is evenly distributed. If using, fold the chocolate chips into the plain batter.
- Layer the brownie batter: Pour the plain brownie batter into the prepared baking dish, spreading it evenly. Next, spoon the green mint batter over the top. Use a knife or skewer to swirl the two batters together, creating a marbled effect.
- Bake the brownies: Place the baking dish in the preheated oven and bake for 25-30 minutes, or until a toothpick inserted into the center comes out with a few moist crumbs attached.
- Cool and serve: Allow the brownies to cool completely in the pan before cutting into squares. Serve and watch your guests enjoy the magical flavors!
Extra Tips:
For extra gooey brownies, slightly underbake them by a minute or two. Remember that the brownies will continue to cook slightly after being removed from the oven due to residual heat.
If you prefer a more intense mint flavor, feel free to add a bit more mint extract to the batter.
And for a truly eerie touch, consider sprinkling crushed green candies or edible glitter on top of the brownies before baking. This will add an extra layer of spookiness to your Witch’s Brew Brownies and make them stand out even more on your Halloween dessert table.
Spooky Spiderweb Cheesecake

Transform your Halloween party into a hauntingly delicious affair with this Spooky Spiderweb Cheesecake. This dessert is perfect for those who want to add a touch of eerie elegance to their sweet table. The cheesecake boasts a rich, creamy filling atop a crumbly chocolate crust, all crowned with a spooky spiderweb design that’s sure to captivate your guests. Not only is this dessert visually striking, but it also delivers on flavor, making it a must-have for any Halloween gathering.
Creating the Spooky Spiderweb Cheesecake is easier than you might think, even for novice bakers. The secret to achieving the perfect spiderweb design lies in a simple yet effective technique involving melted chocolate. This recipe serves 4-6 people, making it an ideal choice for intimate gatherings. So, gather your ingredients and prepare to impress your guests with a cheesecake that’s as delightful to eat as it’s to behold.
Ingredients for 4-6 servings:
- 1 1/2 cups chocolate cookie crumbs
- 1/4 cup unsalted butter, melted
- 3 (8 oz) packages cream cheese, softened
- 1 cup granulated sugar
- 3 large eggs
- 1 teaspoon vanilla extract
- 1/4 cup sour cream
- 1/4 cup all-purpose flour
- 1/4 cup cocoa powder
- 1/2 cup dark chocolate, melted (for the spiderweb design)
- Whipped cream (optional, for serving)
Cooking Instructions:
- Prepare the Crust: Preheat your oven to 325°F (163°C). In a medium bowl, combine the chocolate cookie crumbs and melted butter. Mix until the crumbs are fully coated. Press this mixture firmly into the bottom of a 9-inch springform pan to form an even crust.
- Make the Filling: In a large mixing bowl, beat the softened cream cheese until smooth and creamy. Gradually add the granulated sugar and continue beating until well combined. Add the eggs one at a time, mixing well after each addition. Stir in the vanilla extract and sour cream.
- Add Dry Ingredients: Sift the all-purpose flour and cocoa powder into the cream cheese mixture. Gently fold in the dry ingredients until fully incorporated, making sure there are no lumps.
- Bake the Cheesecake: Pour the cream cheese mixture over the prepared crust in the springform pan. Smooth the top with a spatula. Place the pan in the preheated oven and bake for 55-60 minutes, or until the center is set but slightly jiggly.
- Create the Spiderweb Design: Once the cheesecake has cooled to room temperature, melt the dark chocolate in a microwave or double boiler. Transfer the melted chocolate to a piping bag or a resealable plastic bag with a small corner snipped off. Starting from the center of the cheesecake, pipe concentric circles of chocolate. Use a toothpick to drag lines from the center to the edges of the cheesecake to create a spiderweb effect.
- Chill and Serve: Refrigerate the cheesecake for at least 4 hours or overnight to set. Before serving, gently remove the sides of the springform pan. Serve with whipped cream, if desired.
Extra Tips:
To guarantee the cheesecake doesn’t crack, allow it to cool gradually in the oven with the door slightly ajar after baking. This will help it settle evenly.
If you don’t have a springform pan, a regular cake pan can be used; however, lining it with parchment paper will make it easier to remove the cheesecake.
For a more intense chocolate flavor, consider using bittersweet chocolate for the spiderweb design.
Finally, while the spiderweb effect is best achieved with a piping bag, a simple zip-top bag with a corner cut off can work in a pinch.
Ghostly Meringue Pops

Ghostly Meringue Pops are a delightful addition to any Halloween party, adding both charm and a touch of whimsy to your dessert spread. These airy, ghost-shaped confections aren’t only visually appealing but also melt in your mouth with their light, crisp texture. Perfect for a serving size of 4-6 people, these pops are easy to make and are bound to be a hit with both children and adults alike.
With just a few simple ingredients, you can create these spooky treats that will leave your guests enchanted. The key to perfect meringues lies in achieving the right consistency and baking them at a low temperature to maintain their shape. By following this recipe, you can create meringue pops that aren’t only ghostly in appearance but also deliciously sweet.
With Halloween around the corner, these Ghostly Meringue Pops are a must-try for any party host looking to impress their guests with a festive and fun dessert.
Ghostly Meringue Pops are the perfect spooky treat to delight your Halloween guests.
Ingredients (Serves 4-6 people):
- 4 large egg whites
- 1 cup granulated sugar
- 1/4 teaspoon cream of tartar
- 1 teaspoon vanilla extract
- Black edible marker or black gel icing for decorating
- Lollipop sticks
Cooking Instructions:
- Preheat the Oven: Begin by preheating your oven to 200°F (93°C). Line a baking sheet with parchment paper to prevent the meringues from sticking.
- Prepare the Meringue: In a clean, dry mixing bowl, beat the egg whites on medium speed using an electric mixer until they become frothy. Add the cream of tartar and continue to beat until soft peaks form.
- Add Sugar Gradually: With the mixer running, gradually add the granulated sugar, a tablespoon at a time, making sure it fully dissolves before adding more. Continue to beat the mixture on high speed until stiff, glossy peaks form. This usually takes about 5-7 minutes.
- Incorporate Vanilla: Gently fold in the vanilla extract with a spatula, being careful not to deflate the meringue mixture.
- Pipe the Ghosts: Transfer the meringue to a piping bag fitted with a large round tip. Pipe ghost shapes onto the prepared baking sheet, ensuring they’re spaced apart. Insert a lollipop stick into the base of each ghost, approximately halfway through.
- Bake the Meringues: Place the baking sheet in the preheated oven. Bake for 1.5 to 2 hours or until the meringues are dry to the touch and easily lift off the parchment paper.
- Cool and Decorate: Once baked, remove the meringues from the oven and allow them to cool completely. Use a black edible marker or black gel icing to draw eyes and mouths on each ghost to give them personality.
Extra Tips:
To guarantee your meringue pops turn out perfectly, make sure your mixing bowl and beaters are completely clean and free of any grease, as this can prevent the egg whites from whipping properly.
It’s also important to bake the meringues at a low temperature to prevent them from browning. If you live in a humid area, consider storing the finished meringue pops in an airtight container to keep them crisp.
If you don’t have a piping bag, a plastic sandwich bag with a corner snipped off can serve as a great alternative.
Monster Eyeball Truffles
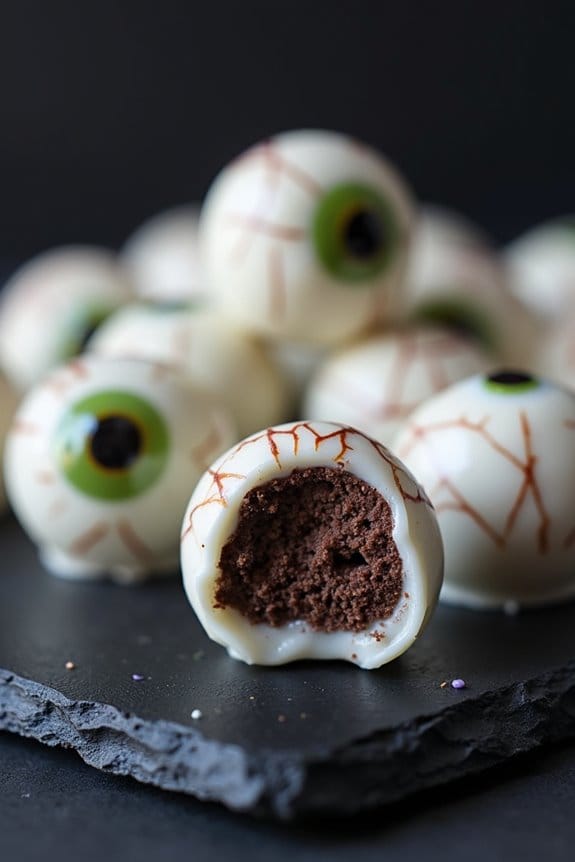
Monster Eyeball Truffles are the perfect spine-chilling treat for your Halloween party. These bite-sized delights aren’t only delicious but also strikingly spooky with their eerie eyeball design. Made with a rich chocolate filling and coated in a white candy shell, these truffles will be the highlight of any Halloween spread.
Whether you’re hosting a party or simply want to surprise your family with a fun dessert, Monster Eyeball Truffles are easy to make and sure to impress.
Begin your Halloween culinary adventure with this recipe that yields 4-6 servings, ideal for a small gathering. The combination of creamy chocolate and the chilling appearance of the eyeballs will make your guests shiver with delight. With just a few ingredients and some creative decorating, you’ll have a batch of Monster Eyeball Truffles ready to haunt your dessert table.
Ingredients:
- 1 cup semi-sweet chocolate chips
- 1/2 cup heavy cream
- 1 teaspoon vanilla extract
- 1/4 teaspoon salt
- 12 oz white candy melts
- Gel food coloring (red, black, and green)
- 1/4 cup mini chocolate chips
- 1 tablespoon coconut oil
- Edible candy eyes
Cooking Instructions:
1. Prepare the Chocolate Ganache: In a medium saucepan, heat the heavy cream over medium heat until it begins to simmer. Remove from heat and pour over the semi-sweet chocolate chips in a heatproof bowl. Let it sit for 2 minutes, then whisk together until smooth and shiny.
Add in the vanilla extract and salt, mixing well. Allow the ganache to cool slightly, then refrigerate for about 1-2 hours until firm enough to scoop.
2. Shape the Truffles: Once the ganache is firm, use a small ice cream scoop or a tablespoon to scoop out portions of the mixture. Roll each portion into a ball between your palms. Place the balls onto a baking sheet lined with parchment paper. Chill in the refrigerator for about 30 minutes.
3. Melt the Candy Coating: In a microwave-safe bowl, combine the white candy melts and coconut oil. Microwave in 30-second intervals, stirring in between, until the mixture is completely smooth.
4. Coat the Truffles: Using a fork or a candy dipping tool, dip each truffle into the melted candy coating, allowing the excess to drip off before placing it back on the parchment-lined sheet.
5. Decorate the Truffles: While the coating is still soft, press a mini chocolate chip (pointy side down) into the center of each truffle to form the ‘pupil’. Use gel food coloring to create veins around the pupil, using a toothpick or fine brush for precise lines.
Finally, attach an edible candy eye on top of the chocolate chip.
6. Set the Decorations: Allow the truffles to set completely at room temperature or refrigerate for quicker results.
Extra Tips:
For a more vibrant and spooky presentation, consider using different colors of candy melts for the coating, such as green or purple. If the candy coating begins to harden while you’re working, gently reheat it in the microwave for a few seconds to return it to a smooth consistency.
When working with gel food coloring, a light hand is key to creating realistic vein details. These truffles can be made a day in advance and stored in an airtight container in the refrigerator, making them a convenient option for party planning.
Haunted Graveyard Pudding Cups

These pudding cups provide the perfect opportunity to let your creativity run wild as you transform simple ingredients into a ghoulishly themed dessert. With a little bit of imagination, each cup can become a mini graveyard scene, complete with cookie tombstones and gummy worms creeping out of the “soil.” This recipe serves 4-6 people, ensuring there’s enough spooky goodness to go around.
Ingredients for Haunted Graveyard Pudding Cups:
- 2 cups of chocolate pudding (store-bought or homemade)
- 1 cup of crushed chocolate sandwich cookies
- 6-8 oval-shaped cookies (e.g., Milano or Vienna fingers)
- Black decorating gel or edible marker
- Gummy worms
- Candy pumpkins
- Whipped cream (optional)
Cooking Instructions:
- Prepare the Pudding: Begin by preparing your chocolate pudding. If you’re using store-bought pudding, simply open the container. For homemade pudding, follow the instructions on your preferred recipe, allowing the pudding to cool completely before assembling the cups.
- Crush the Cookies: Place the chocolate sandwich cookies in a resealable plastic bag and crush them using a rolling pin until they resemble soil. This will serve as the “dirt” layer in your graveyard cups.
- Decorate the Tombstones: Use the black decorating gel or edible marker to write spooky inscriptions like “RIP” on the oval-shaped cookies. These will act as the tombstones for your graveyard.
- Assemble the Pudding Cups: Distribute the chocolate pudding evenly into clear cups or dessert bowls. Sprinkle a generous layer of the crushed cookie “dirt” over the pudding.
- Create the Graveyard Scene: Insert the decorated cookie tombstones into the pudding, standing them upright. Add gummy worms crawling out of the “dirt” for an extra eerie effect. Place candy pumpkins around the tombstones to enhance the graveyard theme.
- Add Finishing Touches: If desired, top each pudding cup with a dollop of whipped cream to give the appearance of ghostly fog. Serve immediately or refrigerate until ready to serve.
Extra Tips:
To make your Haunted Graveyard Pudding Cups even more convincing, try experimenting with different types of candies and decorations. Use green sprinkles or shredded coconut dyed with green food coloring to mimic grass.
Consider adding chocolate chips as rocks or candy bones for an extra touch of macabre. Adjust the sweetness and texture by choosing different brands of cookies or pudding. With these creepy creations, the only limit is your imagination!
Jack-o’-Lantern Cake Pops

Jack-o’-Lantern Cake Pops are a delightful and festive treat perfect for any Halloween party. These charming little desserts aren’t only visually appealing but also a hit among both children and adults. Made with moist cake crumbs and frosting, these pops are shaped into adorable pumpkin faces and coated with a smooth layer of orange candy melts, making them the perfect addition to your Halloween dessert spread.
Whether you’re hosting a spooky gathering or just want to treat your loved ones to a fun dessert, these cake pops are a great choice.
Making Jack-o’-Lantern Cake Pops involves a bit of crafting, but the end result is well worth the effort. First, you’ll bake your favorite cake and crumble it into a bowl. By mixing the crumbs with frosting, you’ll create a pliable mixture that can be shaped into small balls. Once rolled, the balls are coated in candy melts and decorated with chocolate to create the classic jack-o’-lantern faces.
This recipe yields about 20-24 cake pops, making it perfect for a gathering of 4-6 people.
Ingredients:
- 1 box of cake mix (any flavor)
- Ingredients required for the cake mix (usually eggs, oil, and water)
- 1 cup of frosting (store-bought or homemade)
- 2 ½ cups of orange candy melts
- 1 cup of chocolate candy melts
- 20-24 cake pop sticks
- Green fondant or candy for stems
- Styrofoam block or cake pop stand
Instructions:
- Bake the Cake: Begin by preparing the cake mix according to the package instructions. Bake it in a 9×13 inch pan and allow it to cool completely.
- Prepare the Cake Balls: Once the cake has cooled, crumble it into a large bowl until you get fine crumbs. Add the frosting to the crumbs and mix until well combined and the mixture holds together when pressed.
- Shape the Cake Balls: Roll the mixture into small balls, about 1 inch in diameter, and place them on a baking sheet lined with parchment paper. Chill in the refrigerator for about 1 hour or until firm.
- Melt the Candy Melts: In a microwave-safe bowl, melt the orange candy melts according to the package instructions, stirring frequently to avoid overheating.
- Insert the Sticks: Dip the tip of each cake pop stick into the melted candy and insert it halfway into each chilled cake ball. This helps secure the stick in place. Allow the candy to set.
- Coat the Cake Pops: Dip each cake pop into the melted orange candy, ensuring it’s completely covered. Gently tap off any excess and stick the pop into a Styrofoam block or cake pop stand to dry completely.
- Decorate the Faces: Melt the chocolate candy melts and use a toothpick or small piping bag to draw jack-o’-lantern faces on each cake pop. Add green fondant or candy at the top for the stem.
- Let Them Set: Allow all the cake pops to set completely before serving.
Extra Tips:
For best results, make sure your cake pops are thoroughly chilled before dipping them into the candy melts. This helps them stay on the stick and maintain their shape. If the candy melts are too thick, add a teaspoon of vegetable oil to thin it out for smoother coating.
You can also experiment with different cake and frosting flavors to suit your taste. Finally, store the cake pops in an airtight container in a cool place to keep them fresh and delicious for your Halloween party.
Vampire Bite Red Velvet Cupcakes

Vampire Bite Red Velvet Cupcakes are a perfect addition to your Halloween party menu. These cupcakes aren’t only delicious but also add a spooky touch with their eerie red coloring and “bloody” appearance. The combination of moist red velvet cake and creamy frosting makes them irresistible to both kids and adults alike.
With just a little creativity, you can transform these classic cupcakes into a hauntingly delightful treat. These cupcakes are inspired by the classic red velvet cake, known for its rich cocoa flavor and vibrant red hue. The “vampire bite” effect is achieved using a simple technique to simulate blood dripping from a vampire bite.
This Halloween dessert will surely be the star of your party, bringing both fright and delight to your guests. Easy to make, these cupcakes are perfect for bakers of any skill level.
Ingredients for Vampire Bite Red Velvet Cupcakes (serves 4-6 people):
- 1 1/4 cups all-purpose flour
- 1 cup granulated sugar
- 1/2 teaspoon baking soda
- 1/2 teaspoon salt
- 1 tablespoon cocoa powder
- 3/4 cup vegetable oil
- 1/2 cup buttermilk, room temperature
- 1 large egg
- 1 tablespoon red food coloring
- 1/2 teaspoon vanilla extract
- 1/2 teaspoon white vinegar
- 1/2 cup unsalted butter, softened
- 2 cups powdered sugar
- 1 teaspoon vanilla extract
- 2 tablespoons milk
- 3 tablespoons red fruit jam or syrup (e.g., raspberry or strawberry)
Cooking Instructions:
- Preheat the Oven: Begin by preheating your oven to 350°F (175°C) and line a cupcake pan with paper liners.
- Mix Dry Ingredients: In a medium bowl, whisk together the flour, sugar, baking soda, salt, and cocoa powder until well combined.
- Combine Wet Ingredients: In a large mixing bowl, combine the vegetable oil, buttermilk, egg, red food coloring, vanilla extract, and white vinegar. Mix until smooth.
- Incorporate Dry Ingredients: Gradually add the dry ingredients to the wet ingredients, mixing on low speed until just combined. Be careful not to overmix.
- Fill Cupcake Liners: Spoon the batter into the prepared cupcake liners, filling each about two-thirds full.
- Bake: Place the cupcakes in the preheated oven and bake for 18-20 minutes or until a toothpick inserted into the center comes out clean. Allow them to cool completely on a wire rack.
- Prepare Frosting: In a large bowl, beat the softened butter until creamy. Gradually add the powdered sugar, vanilla extract, and milk, beating until fluffy and smooth.
- Frost the Cupcakes: Once the cupcakes are completely cooled, spread or pipe the frosting onto each cupcake.
- Create Vampire Bite Effect: Using a small spoon or squeeze bottle, carefully drip the red fruit jam or syrup onto two spots on each frosted cupcake to simulate vampire bites.
Extra Tips:
For the best results, verify that all your ingredients are at room temperature before you start baking. This helps the batter mix more evenly and results in a smoother texture.
When adding the red food coloring, start with a small amount and adjust as needed to achieve your desired shade of red. If you prefer a less sweet frosting, you can reduce the amount of powdered sugar slightly.
Finally, for a more realistic “blood” effect, use a jam or syrup that’s slightly thicker in consistency. Enjoy your spooky creation!
Skeleton Sugar Cookies

Skeleton Sugar Cookies are a spooky and delightful treat perfect for any Halloween party. These cookies aren’t only fun to decorate but also delicious to eat, with a buttery, sweet flavor that will be a hit with both kids and adults.
The skeleton designs offer a great opportunity for creativity, allowing you to customize each cookie with unique skeletal patterns. Whether you’re hosting a Halloween bash or just want to enjoy a festive treat, these cookies are a must-have for your celebration.
The process of making Skeleton Sugar Cookies involves preparing a classic sugar cookie dough, cutting it into shapes, baking, and then decorating with royal icing to create the skeleton effect. These cookies can be made in advance and stored, making them a convenient option for party planning.
The recipe below provides enough ingredients to serve 4 to 6 people, guaranteeing you have plenty to go around.
Ingredients (Servings: 4-6 people)
- 2 ¾ cups all-purpose flour
- 1 teaspoon baking powder
- ½ teaspoon salt
- 1 cup unsalted butter, softened
- 1 cup granulated sugar
- 1 large egg
- 1 teaspoon vanilla extract
- ½ teaspoon almond extract (optional)
- Royal icing (for decoration)
- Black food coloring gel
Cooking Instructions
- Prepare the Dough: In a medium bowl, whisk together the flour, baking powder, and salt. In a separate large bowl, cream the butter and sugar together until light and fluffy. Beat in the egg, vanilla extract, and almond extract (if using) until combined.
- Combine Ingredients: Gradually add the dry ingredients to the wet ingredients, mixing until just combined. Make sure the dough is smooth and holds together well.
- Chill the Dough: Divide the dough in half, wrap each portion in plastic wrap, and refrigerate for at least 1 hour. Chilling the dough helps it firm up, making it easier to roll out and cut.
- Preheat and Roll Out: Preheat your oven to 350°F (175°C). On a lightly floured surface, roll out the dough to about ¼-inch thickness.
- Cut the Cookies: Use cookie cutters to cut out desired shapes (like gingerbread men or bone shapes), and place them on a baking sheet lined with parchment paper.
- Bake the Cookies: Bake in the preheated oven for 8-10 minutes or until the edges are just starting to turn golden. Let the cookies cool on the baking sheet for a few minutes before transferring them to a wire rack to cool completely.
- Decorate: While the cookies cool, prepare the royal icing according to package or recipe instructions. Tint a portion of the icing black using the food coloring gel. Use the black icing to pipe skeleton patterns onto the cooled cookies. Let the icing set before serving.
Extra Tips
For the best results, make sure your butter is at room temperature before you start, as this will help create a smoother dough.
Chilling the dough is vital for maintaining the shapes during baking, so don’t skip this step. When decorating, let your creativity shine by experimenting with different skeleton designs.
If you’re new to using royal icing, practice on parchment paper first to get the hang of it. Finally, store any leftover cookies in an airtight container to keep them fresh for several days.
Black Cat Macarons

Black Cat Macarons are a spooktacular treat perfect for any Halloween party. These delightful French confections are transformed into cute and eerie black cats using a rich black cocoa powder to achieve their deep color. The outer shell offers a crisp bite while the interior remains chewy, and they’re filled with a luscious dark chocolate ganache. Not only do they look festive and fun, but they also provide a deliciously decadent experience for the taste buds.
Creating these macarons takes a bit of precision and patience, but the end result is worth the effort. The secret to a successful macaron is in the technique: properly folding the batter to achieve the right consistency and allowing the shells to rest before baking. This recipe yields approximately 24 macarons, perfect for serving 4-6 people and guaranteeing each of your guests gets a taste of these hauntingly delicious treats.
Precision and patience transform these macarons into hauntingly delicious treats, perfect for 4-6 guests at any festive gathering.
Ingredients:
- 1 3/4 cups powdered sugar
- 1 cup almond flour
- 3 tablespoons black cocoa powder
- 3 large egg whites (room temperature)
- 1/4 cup granulated sugar
- 1/2 teaspoon vanilla extract
- Edible black gel food coloring
- 1/2 cup heavy cream
- 4 ounces dark chocolate, chopped
- Edible eyes or white icing for decoration
Cooking Instructions:
- Prepare the Dry Ingredients: Sift together the powdered sugar, almond flour, and black cocoa powder in a medium bowl. This guarantees a smooth batter without any lumps.
- Whip the Egg Whites: In a large mixing bowl, beat the egg whites on medium speed until foamy. Gradually add the granulated sugar, one tablespoon at a time, and continue to beat until stiff peaks form. Add the vanilla extract and black gel food coloring, mixing until fully incorporated and the color is uniform.
- Combine the Mixtures: Gently fold the dry ingredients into the egg whites in three parts, using a spatula. Carefully fold until the mixture falls in a ribbon-like consistency from the spatula, being cautious not to overmix.
- Pipe the Macarons: Transfer the batter to a piping bag fitted with a round tip. Pipe small rounds (about 1.5 inches in diameter) onto a baking sheet lined with parchment paper or a silicone mat. Tap the baking sheet on the counter to release any air bubbles.
- Rest the Shells: Allow the piped macarons to sit at room temperature for 30-60 minutes, or until a skin forms on the surface and they’re no longer sticky to the touch.
- Bake the Macarons: Preheat the oven to 300°F (150°C). Bake the macarons for 15-18 minutes, rotating the tray halfway through. They’re done when they can be lifted off the parchment paper without sticking.
- Prepare the Ganache: While the macarons are cooling, heat the heavy cream in a small saucepan until it just begins to simmer. Pour over the chopped dark chocolate in a heatproof bowl. Let it sit for a minute, then stir until smooth and glossy. Allow the ganache to cool and thicken slightly.
- Assemble the Macarons: Once the shells have cooled, pair them by size. Pipe a small amount of ganache onto the flat side of one shell and sandwich with another shell. Decorate with edible eyes or draw faces using white icing to create the black cat appearance.
Extra Tips:
To achieve perfectly smooth macaron shells, guarantee all ingredients are at room temperature before starting. The resting time before baking is essential for forming the characteristic “feet” of the macaron, so be patient and allow them to dry adequately.
If you don’t have black cocoa powder, you can use regular cocoa powder with a bit more black food coloring. Finally, macarons are best enjoyed after being refrigerated for 24 hours, which allows the flavors to meld beautifully.
Zombie Brain Jelly
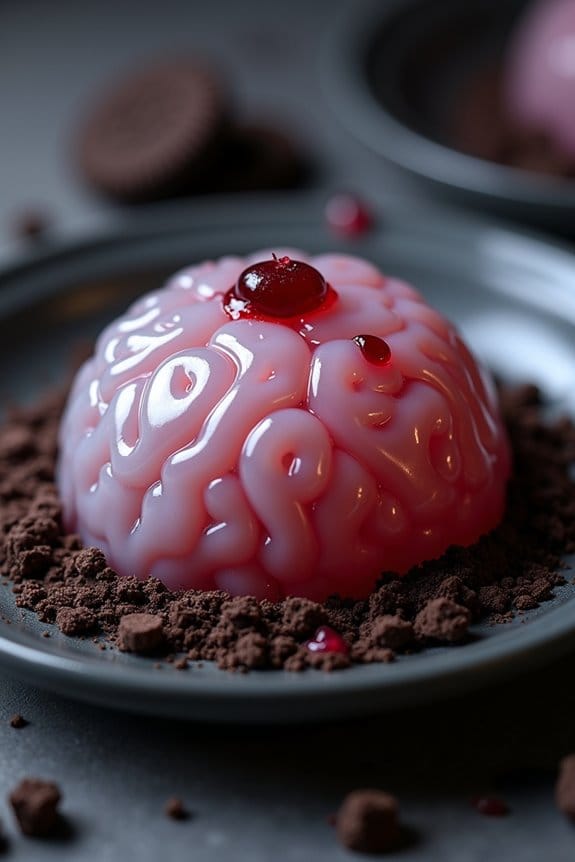
Zombie Brain Jelly is a spooky and delicious addition to any Halloween party, sure to delight and frighten your guests. This eerie dessert mimics the appearance of a brain, making it a fun centerpiece for your Halloween table. The jelly is made using gelatin, flavored with a blend of fruity juices and complemented by a touch of creaminess for that brainy texture. The result is a wobbly, creepy treat that’s both visually impressive and delicious to eat.
Perfect for serving 4-6 people, this recipe isn’t only easy to make but also allows you to release your creative skills in the kitchen. Using a brain-shaped mold, you can bring this chilling dessert to life. The combination of flavors and textures will have your guests intrigued and coming back for more. Whether it’s for a children’s party or a grown-up Halloween bash, Zombie Brain Jelly is a sure way to make your celebration unforgettable.
Ingredients for Zombie Brain Jelly (serving size: 4-6 people):
- 2 packets (about 6 oz) of flavored gelatin (strawberry or raspberry)
- 1 packet (about 3 oz) of unflavored gelatin
- 2 cups boiling water
- 1 cup cold water
- 1 cup heavy cream
- 2 tablespoons sweetened condensed milk
- Red food coloring
- Green food coloring
- Cooking spray (for mold)
- 1 brain-shaped mold
Cooking Instructions:
- Prepare the Mold: Lightly spray the brain-shaped mold with cooking spray to guarantee easy removal of the jelly later. Set aside.
- Dissolve Gelatin: In a large mixing bowl, combine the flavored gelatin packets with the unflavored gelatin. Pour in 2 cups of boiling water and stir until all the gelatin is fully dissolved.
- Add Cold Water: Once the gelatin is dissolved, add 1 cup of cold water to the mixture and stir well to combine.
- Create Creamy Mixture: In a separate bowl, mix the heavy cream with the sweetened condensed milk until well combined. Add a few drops of red and green food coloring to achieve a pale pinkish-grey color, reminiscent of brain matter.
- Combine Mixtures: Slowly pour the creamy mixture into the gelatin mixture, stirring continuously to guarantee even incorporation.
- Flavor and Color: Adjust the food coloring as needed to achieve the desired brain color. Stir until the color is uniform throughout the mixture.
- Pour into Mold: Carefully pour the gelatin mixture into the prepared brain-shaped mold, ensuring it fills all the crevices.
- Chill: Place the mold into the refrigerator and allow it to set for at least 4 hours, or until completely firm.
- Unmold: Once set, gently invert the mold onto a serving platter and carefully remove it, revealing your Zombie Brain Jelly.
Extra Tips:
To enhance the visual impact, consider placing the Zombie Brain Jelly on a bed of crushed cookies or chocolate “dirt” for an added eerie effect. You can also experiment with different gelatin flavors for a unique taste.
If you’re having trouble removing the jelly from the mold, try dipping the mold briefly in warm water to loosen the edges. Be patient and gentle to maintain the brain shape.
For added spookiness, serve with a “bloody” fruit sauce made from pureed berries or pomegranate seeds. Enjoy watching your guests delight in this creepy and tasty Halloween treat!
Pumpkin Patch Rice Krispie Treats
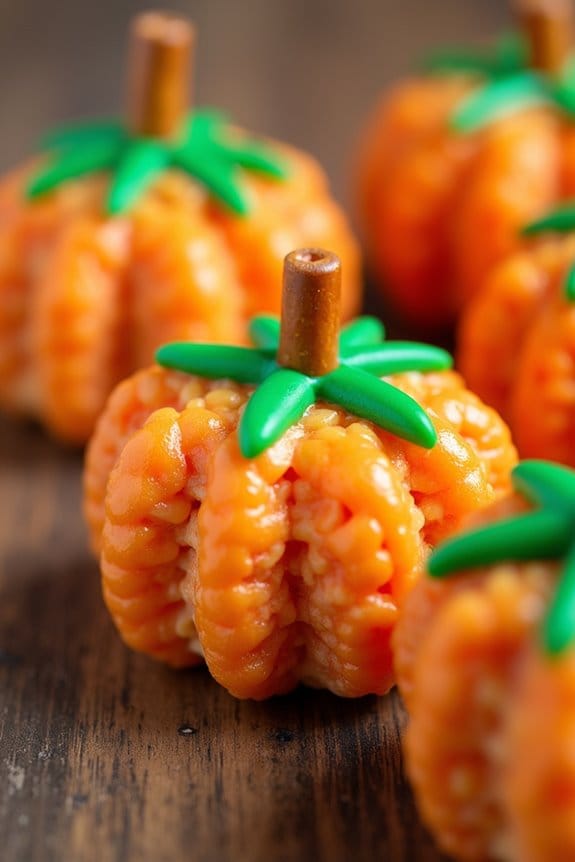
Pumpkin Patch Rice Krispie Treats are a delightful addition to any Halloween party spread, sure to charm both kids and adults alike. These festive treats combine the classic, gooey goodness of Rice Krispie squares with a fun, pumpkin-themed twist. The bright orange color, along with some creative decoration, turns these simple snacks into miniature pumpkin patches, making them both a delectable and visually appealing treat.
Perfect for serving 4-6 people, this recipe is straightforward and quick, making it ideal for busy party hosts. With just a few ingredients and some creativity, you can whip up these fun treats in no time. They’re not only great for Halloween, but can also be adapted for autumn-themed gatherings, adding a sweet touch to any event.
Ingredients:
- 4 cups Rice Krispies cereal
- 10 oz marshmallows (about 40 regular-sized or 4 cups mini-marshmallows)
- 3 tablespoons unsalted butter
- Orange food coloring
- 12-16 green candy melts or green icing
- 12-16 pretzel sticks
- Cooking spray or butter for greasing
Instructions:
- Prepare the Pan: Start by lightly greasing a 9×13-inch baking dish with cooking spray or butter. This will prevent the Rice Krispie mixture from sticking to the pan.
- Melt the Butter and Marshmallows: In a large pot, melt the butter over low heat. Add the marshmallows and stir continuously until they’re completely melted and smooth. Be careful not to let the mixture burn.
- Color the Mixture: Once the marshmallows are melted, remove the pot from the heat. Add several drops of orange food coloring to the mixture, stirring until the color is evenly distributed. Adjust the amount of food coloring to achieve your desired shade of orange.
- Mix in the Cereal: Gradually add the Rice Krispies cereal to the melted marshmallow mixture. Stir until all the cereal is evenly coated with the marshmallow mixture.
- Shape the Pumpkins: While the mixture is still warm, use your hands to form small pumpkin shapes. You may want to lightly butter your hands to prevent sticking. Each pumpkin should be about the size of a small apple.
- Add the Stems and Leaves: Insert a pretzel stick into the top of each Rice Krispie pumpkin to serve as the stem. Then, use the green candy melts or icing to create leaves next to the stem.
- Let Them Set: Allow the treats to cool and set completely at room temperature before serving.
Extra Tips:
Make sure to work quickly once you’ve added the food coloring and cereal to the melted marshmallows, as the mixture can harden as it cools. If you find the mixture sticking to your hands, lightly coat your hands with butter or cooking spray.
For an extra touch, you can add a touch of cinnamon or pumpkin spice to the marshmallow mixture for a seasonal flavor boost. Additionally, these treats can be prepared a day in advance, making party prep a little less hectic.
Bloody Finger Eclairs

Bloody Finger Eclairs are the perfect spooky treat for any Halloween party. With a deliciously creepy appearance and a sweet, creamy filling, these eclairs are sure to impress your guests. Inspired by classic French pastries, these finger-shaped delights are adorned with a blood-red glaze and almond “nails” that give them a ghastly yet appetizing look. The combination of choux pastry, rich chocolate filling, and raspberry glaze makes these eclairs a must-have for your Halloween dessert table.
Making Bloody Finger Eclairs is a fun and rewarding process that requires some patience and attention to detail. The key to achieving the perfect finger shape is to pipe out the choux pastry into long, slender tubes, which are then baked until golden brown. The chocolate filling is made from a rich pastry cream that complements the tangy raspberry glaze. By following the steps outlined in this recipe, you’ll create a batch of eclairs that are both visually stunning and deliciously haunting.
Crafting Bloody Finger Eclairs is a delightful blend of artistry and culinary skill, resulting in hauntingly delicious treats.
Ingredients (Serves 4-6):
- 1 cup water
- 1/2 cup unsalted butter
- 1 cup all-purpose flour
- 4 large eggs
- 2 cups whole milk
- 1/2 cup granulated sugar
- 1/4 cup cornstarch
- 4 oz semi-sweet chocolate, chopped
- 1/2 tsp vanilla extract
- 1/2 cup raspberry jam
- Red food coloring
- 1/4 cup sliced almonds
Instructions:
- Prepare the Choux Pastry: Preheat your oven to 400°F (200°C) and line a baking sheet with parchment paper. In a medium saucepan, bring the water and butter to a boil over medium heat. Remove from heat and immediately stir in the flour until a dough forms. Return to low heat, stirring constantly until the dough pulls away from the sides of the pan and forms a smooth ball.
- Pipe the Fingers: Transfer the dough to a mixing bowl and let it cool for a few minutes. Beat in the eggs one at a time, guaranteeing each is fully incorporated before adding the next. Spoon the dough into a piping bag fitted with a large round tip. Pipe the dough into long, slender finger shapes onto the prepared baking sheet.
- Bake the Eclairs: Bake in the preheated oven for 20-25 minutes, or until the eclairs are puffed and golden brown. Remove from oven and let them cool completely on a wire rack.
- Make the Chocolate Filling: In a saucepan, heat the milk until it starts to simmer. In a separate bowl, whisk together the sugar and cornstarch. Gradually add this mixture to the hot milk, whisking constantly until it thickens. Remove from heat, add the chopped chocolate and vanilla extract, and stir until smooth. Refrigerate until cool.
- Fill the Eclairs: Once the eclairs and filling are cooled, use a small knife to make a slit in the side of each eclair. Fill a piping bag with the chocolate pastry cream and pipe the filling into each eclair.
- Prepare the Bloody Glaze: In a small saucepan, warm the raspberry jam until it becomes liquid. Stir in a few drops of red food coloring until you achieve a blood-red hue.
- Decorate the Eclairs: Dip the top of each eclair into the raspberry glaze, allowing excess to drip off. Attach a sliced almond to the tip of each eclair to resemble a fingernail.
Extra Tips:
For the best results, verify that your choux pastry is firm enough to hold its shape when piped. If it seems too runny, you may need to add a bit more flour.
When making the chocolate filling, be sure to whisk constantly to prevent lumps from forming. If the glaze becomes too thick, you can add a tablespoon of water to thin it out.
Finally, for a more dramatic effect, you can use a toothpick to create “wrinkles” on the eclair fingers before baking. Enjoy your eerie yet delicious Bloody Finger Eclairs!
